

 Sep 21, 2015, 03:49 PM
Last edit by: IB Advertising
See related guides and technical advice from our community experts:
Browse all: General Overview
- Jeep Grand Cherokee WJ 1999 to 2004 Crash Test and Safety Ratings
Important Information to help you understand your Jeep Grand Cherokee.
Browse all: General Overview

XJ Ask the Question Thread

Junior Member
Joined: Jan 2012
Posts: 96
Likes: 0
Model: Cherokee
Well I'm back and this time I've found a few random wires and hoses that arent connected to anything. I'm not sure if they need to be connected or what they go to anyone have any ideas as to what they are?
First up is this guy. A 4 prong connector it runs in the main wire loom where the IAC wires run.


I looked around and didnt see any other 4 prong connectors anywhere.
Next up is this wierd looking guy


Its sitting right below the coolant overflow bottle. Used MS paint to show where it runs through the wire loom.
Next are these two. They are near the overflow bottle also. The bigger hose looks like it might connect to the thing in the picture above? It plugs in fine but not sure if they go together. Tried following them through the wire loom but it runs by the passenger inner fender down by the battery and out twards the radiator
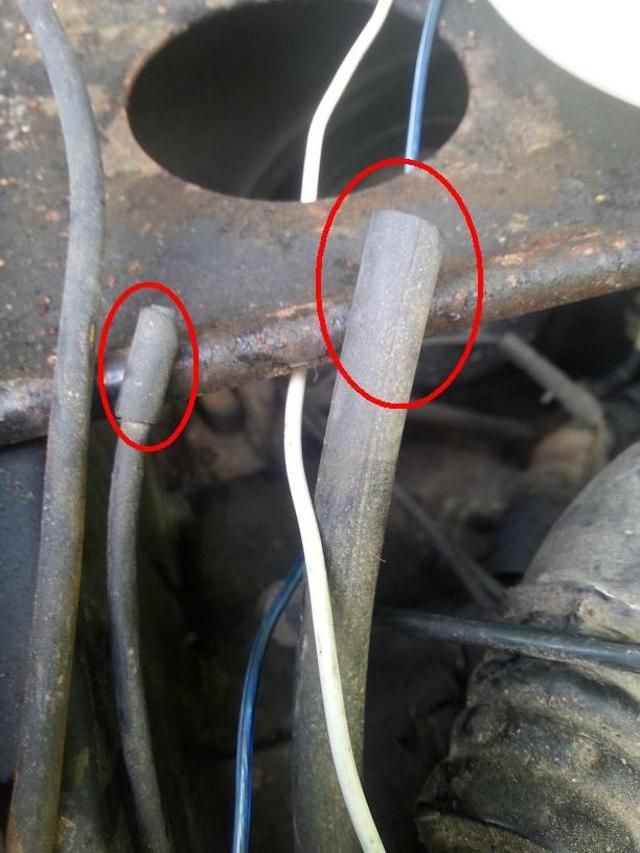
The smaller wire/hose looks like the end of it was broken off.
The last one is in a wire loom on the firewall and it runs to the fuse box by the battery. I didnt see any other connectors that could go with it so I am stumped.

If these are all supposed to be connected to something I'm surprised the jeep runs at all. Sorry for the long post but I didnt want to make a random thread for wires.
Edit: The 4 prong connector actually doesnt go to the IAC I was mistaken. It does run through the big wire loom that the IAC wires go through though.
Last edited by Brennidon; May 19, 2015 at 02:38 PM.
CF Veteran
Joined: Oct 2013
Posts: 1,589
Likes: 2
From: Denver
Year: 99
Model: Cherokee
Engine: 4.0
Well my passenger side power window finally ate ****. And it fell down when that happened.
How hard is it to replace the entire door? Do you just take out those few Torx bits, and unhook all the power leads? Lock will be different but who cares.
How hard is it to replace the entire door? Do you just take out those few Torx bits, and unhook all the power leads? Lock will be different but who cares.
Member
Joined: May 2013
Posts: 117
Likes: 0
From: New Harmony UT
Year: 1998
Model: Cherokee
Engine: 4.0L I6 Power Tech
It is a Rough Country 3" lift with AAL. Does the brand make a difference?
Herp Derp Jerp

Joined: Nov 2011
Posts: 18,251
Likes: 17
From: Parham, ON
Year: 1999
Model: Cherokee
Engine: 4.0L OBD-II
Sorry dude.
A standard shackle relocation bracket will give you additional lift as well as let you move your shackle mounting point forward to correct that vertical angle.
Now. All this said, your spring will continue to sag. This I can guarantee. You also stand a small chance of the factory leaves actually snapping due to the amount of tension on them (they were already fatigued when the AAL was added, then you added a heavy bumper, and presumably you want to beat on this thing a bit, maybe even put stuff in the cargo area).
This would be a good time to buy new leaf springs if you can find the dough. If not, relocation brackets are a solid investment.
Member
Joined: May 2013
Posts: 117
Likes: 0
From: New Harmony UT
Year: 1998
Model: Cherokee
Engine: 4.0L I6 Power Tech
And thanks salad. Your logic and discussion is good as always.
Moderator of Jeeps
Joined: Jul 2011
Posts: 21,029
Likes: 3
From: Frederick, MD from Cleveland, OH
Year: 1993 YJ Wrangler
Engine: 4.0 I6
I'm shying away from relocation brackets simply because I think the leafs will remain flat or worse over time. I'm not adverse to spending some money on the right leaf springs. The question now is, which are the right leaf springs? Since I'm planning to keep the bumper/carrier and put stuff in the rear AND beat it a bit I was thinking of erring on the side of caution and getting 3.5" or 4.5" leaf packs. Any thoughts on this?
And thanks salad. Your logic and discussion is good as always.
And thanks salad. Your logic and discussion is good as always.
Member
Joined: May 2013
Posts: 117
Likes: 0
From: New Harmony UT
Year: 1998
Model: Cherokee
Engine: 4.0L I6 Power Tech
Thanks for the recommendation. I guess I just needed someone else to confirm what I already suspected. I just ordered 3.5" leaf springs and new U-bolts.
CF Veteran
Joined: Jan 2013
Posts: 19,219
Likes: 45
From: west chester, pa
Year: 1999
Engine: 4.0
No, I don't lick fish.


Joined: Mar 2011
Posts: 11,169
Likes: 26
From: Northern Kentucky
Year: 1999
Model: Cherokee (XJ)
Engine: 4.0
Yes, but were you planning on replacing the door to begin with or are you replacing the whole door to fix your window?
CF Veteran
Joined: Oct 2013
Posts: 1,589
Likes: 2
From: Denver
Year: 99
Model: Cherokee
Engine: 4.0
No, I don't lick fish.
Joined: Mar 2011
Posts: 11,169
Likes: 26
From: Northern Kentucky
Year: 1999
Model: Cherokee (XJ)
Engine: 4.0
JP Magazine did a writeup on them a while back... basically the only difference will be the location of the door striker, but that's a pretty simple fix.
http://www.fourwheeler.com/how-to/bo...j-door-upgade/
Member
Joined: May 2013
Posts: 117
Likes: 0
From: New Harmony UT
Year: 1998
Model: Cherokee
Engine: 4.0L I6 Power Tech
Brought the leafs home last night. Soaked all attachment bolts with Liquid Wrench over night but these bolts are not budging. I'm searching the forums and YouTube but so far nothing that's really helpful. Anyone have a link to a good DIY for removing the leaf springs?
Member
Joined: Apr 2009
Posts: 105
Likes: 41
From: Texas
Year: 1988
Model: Cherokee
Engine: 4.0 -300000+ Mi.
Brought the leafs home last night. Soaked all attachment bolts with Liquid Wrench over night but these bolts are not budging. I'm searching the forums and YouTube but so far nothing that's really helpful. Anyone have a link to a good DIY for removing the leaf springs?

Seasoned Member
Joined: Mar 2015
Posts: 280
Likes: 0
From: Portland, OR
Year: 1998
Model: Cherokee
Engine: 4.0L
Here is an interesting finding on Penetrating Oils
Recently “Machinist Workshop Magazine” did a test on penetrating oils. Using nuts and
bolts that they ‘scientifically rusted’ to a uniform degree by soaking in salt water, they then
tested the break-out torque required to loosen the nuts. They treated the nuts with a variety
of penetrants and measured the torque required to loosen them.
This is what they came up with:
Nothing: 516 lbs
WD-40: 238 lbs;
PB Blaster: 214 lbs;
Liquid Wrench: 127 lbs,
Kano Kroil: 106 lbs
(ATF)/Acetone mix (50/50): 50 lbs.
This last “shop brew” of 50% automatic transmission fluid and 50% acetone appears to beat
out the commercially prepared products costing far more.
I feel like the acetone just ate up the salt water corrosion best. However I don't think one oil vs another will be night and day difference. I used a breaker bar and deep well socket (3" extension on the front frame leaf bolts). A lot of people end up breaking the welded nut inside the uni-frame. Just give everything it time extra to soak. You can reach some of the welded nuts inside the frame rail by some access holes to get some penetrating oil on it. You might need to apply some heat (use common sense since it's soaked with oil). Break it free as you would like you're tapping new threading. Ease it out, and tightening it back in, and so fourth to keep the threads clean.
Last edited by indeepwithajeep; May 21, 2015 at 01:49 PM.
Member
Joined: Apr 2009
Posts: 105
Likes: 41
From: Texas
Year: 1988
Model: Cherokee
Engine: 4.0 -300000+ Mi.
This info has been floating around for while...
I feel like the acetone just ate up the salt water corrosion best. However I don't think one oil vs another will be night and day difference. I used a breaker bar and deep well socket (3" extension on the front frame leaf bolts). A lot of people end up breaking the welded nut inside the uni-frame. Just give everything it time extra to soak. You can reach some of the welded nuts inside the frame rail by some access holes to get some penetrating oil on it. You might need to apply some heat (use common sense since it's soaked with oil). Break it free as you would like you're tapping new threading. Ease it out, and tightening it back in, and so fourth to keep the threads clean.
I feel like the acetone just ate up the salt water corrosion best. However I don't think one oil vs another will be night and day difference. I used a breaker bar and deep well socket (3" extension on the front frame leaf bolts). A lot of people end up breaking the welded nut inside the uni-frame. Just give everything it time extra to soak. You can reach some of the welded nuts inside the frame rail by some access holes to get some penetrating oil on it. You might need to apply some heat (use common sense since it's soaked with oil). Break it free as you would like you're tapping new threading. Ease it out, and tightening it back in, and so fourth to keep the threads clean.