Jeep Cherokee Forum
  • LOG IN
  • REGISTER
  • Forums
    • Technical Discussion
      • Stock XJ Cherokee Tech. All XJ Non-modified/stock questions go here
      • Modified XJ Cherokee Tech
      • MJ Comanche Tech. Stock & Modified.
      • KL Cherokee Tech
      • Modified Grand Cherokee Tech. All ZJ,WJ & WK aftermarket tech goes here
      • Stock Grand Cherokee Tech. All ZJ/WJ/WK Non-modified/stock questions go here!
      • Fabrication & builders section.
      • Jeep Builds
      • Aftermarket electrical systems
      • Jeep JK Model Discussion
      • Other Vehicles. Other Jeep models & cars and trucks of other makes
      • Technical Write-Up/How To Section
    • General
      • Introductions
      • Cherokee Chat
      • Cherokee of the Month
    • Wheeling Neighborhoods
      • Pacific Northwest
      • Pacific Southwest
      • Northern Rockies
      • Four Corners
      • Midwest
      • South Central
      • Great Lakes
      • Southeast
      • North Atlantic
      • Mid Atlantic
      • International
    • Wheeling Discussion
      • Trail Reports
      • Land Use Forum
    • Buy, Sell, Trade
      • Non-Cherokee Parts
      • Vendor Showcase
      • Vehicles
      • Axles/Tires/Wheels
      • Engines/Tranny/T-Case
      • Suspension/Steering
      • Accessories
      • Part Outs
      • Miscellaneous
      • Wanted
    • CF Announcements & Suggestions
      • Announcements
      • CF Suggestions & Questions
      • Test Section
  • Marketplace
    • Vendor Directory
    • Become a Vendor
    • Member Marketplace
    • Vendor Marketplace
  • New Posts
  • Tools
    • Car Payment Calculator
    • Tire Rim Calculator
    • Vin Decoder
    • Recalls
    • Technical Service Bulletins (TSBs)
    • Members List
    • Live Feed
  • How-Tos
  • Gallery
  • View Dark Mode
    • Please register or login to enable Dark Mode.
  • Log In
  • Register
Jeep Cherokee Forum
    • Threads
      • Advanced
Dark Mode

Please register or login to enable Dark Mode.

Log In

Forgot your Password?

By logging into your account, you agree to our Terms of Use and Privacy Policy, and to the use of cookies as described therein.
or
 
  • Recent
  • Commented
  • Albums
  • My Pictures

Travis Mudrich's Photos

View Profile
Sort:
Commented
  • Most Recent
  • Most Comments
  • Albums
  • Photos
This is the adapter I got. I believe it's M10x1.0 internal and M14x1.5 external (I'll double check later) the interior diameter was not large enough for the sensor so it had to be drilled out.
0 2022/09/16 13:43:41 Travis Mud
I zeroed the buckle as short as possible so both sides had no excess threads showing. Then I attached one side. From there, I spun the middlebto push the other side out. When I was is the general right spot, I put it in and bolted it up loosely. I make sure both arms were in the most forward position possible. Then I checked to make sure the second attachment point was seated square and proper onto the other arm. Then I tightened everything down.
0 2022/09/14 19:14:57 Travis Mud
Even with flipping the second blue bracket backwards, you can see it is misaglined by a few small degrees. Because these are fully articulated, it is perfectly fine and i have no worries. I am just a perfectionist. #Bulletproof
0 2022/09/14 19:14:50 Travis Mud
I threw both arms forward to set it up in place for the adjustable turn-buckle.
0 2022/09/14 19:14:42 Travis Mud
Boom. Now that it's on the back, you can see both linkage arms back onto the same plane again. Not sure if anyone else has donw it this way before, but this make me feel warm and fuzzy inside.
0 2022/09/14 19:14:35 Travis Mud
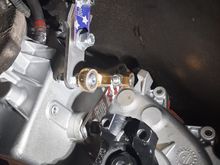
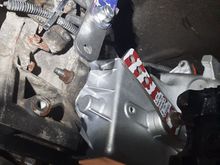
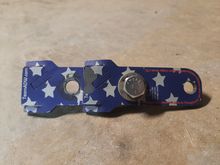
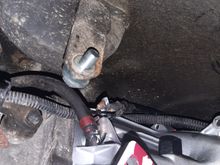
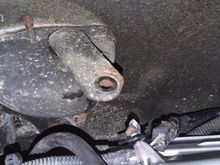
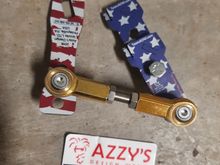
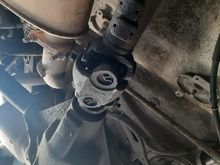
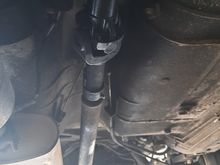
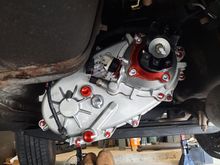
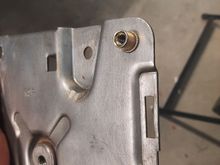
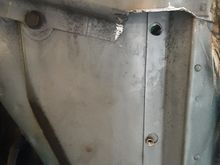
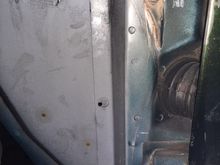
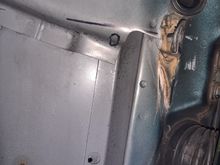
I put the bolt in from the back so it lower profile. I wouldnt have hit anything anyways, but I would rather not have to deal woth any of this again later. Here you can see that both of the linkages are not on the same plane, and the second blue plate is advertised as bolting onto the right side. The turn-buckle is articulated so its nothing to worry about, but like I said, I do not want to deal with this again. So to correct this, I flipped it around.
0 2022/09/14 19:14:29 Travis Mud
The second one was too large and made contact with the factory bracket. I simply shaved a little bit off.
0 2022/09/14 19:14:22 Travis Mud
0 2022/09/14 19:14:16 Travis Mud
I found the perfect size lock washer to fit right in there. This would help create better surface area and more for the linkage to grab onto. Like i said, probably not a real problem but I dont want this to be a failure point since its part of a whole assembly and i can just buy ans swap that part out, plus all is needed is a washer. Azzy should really include this in their kit.
0 2022/09/14 19:14:09 Travis Mud
The way that Chrystler did this was real strange. There is barely any metal left inside the hole. This probably isnt too much to worry about but I knew I could do better.
0 2022/09/14 19:14:01 Travis Mud
So first off the old bushing had to come out. The bolt would not fit and i dont think I would want 25 year old rubber on there anyways. I used a razor knife.
0 2022/09/14 19:13:52 Travis Mud
I bought this a year and a half ago when the OEM case originally broke. Unfortunately, I had removed the factory shift linkage at that time and did not take any pictures. Either way, you get the point. When I bought this kit, i did have to go back and order the second blue part to adapt it for the 242 (this was done pre-swap)
0 2022/09/14 19:13:44 Travis Mud
Also, I know you cannot see it well, but the rear leaf springs are sagging quite a bit.
0 2022/09/13 12:14:43 Travis Mud
I am still using the double cardan joint.
0 2022/09/13 12:14:35 Travis Mud
Theres around 1/2 left of adjustability until it is fully collapsed.
0 2022/09/13 12:14:26 Travis Mud
It does fit! From mounting surface to mounting surface, its 31 1/4 inches.
0 2022/09/13 12:14:18 Travis Mud
She got some (expected) battle scars fighting with the cement floor and jack. A transmission jack would have been nice!
0 2022/09/02 14:05:34 Travis Mud
An hour later I got her bolted up.
0 2022/09/02 14:05:27 Travis Mud
0 2022/08/31 16:49:22 Travis Mud
Then I applied the sticker. Its actually kind of iritating that the second row was stamped slightly off center.
0 2022/08/31 16:49:14 Travis Mud
0 2022/08/31 16:49:08 Travis Mud
I removed all the paint and cleaned the metal.
0 2022/08/31 16:49:02 Travis Mud
0 2022/08/31 16:48:55 Travis Mud
0 2022/08/31 16:48:02 Travis Mud
0 2022/08/31 16:47:53 Travis Mud
0 2022/08/31 16:38:55 Travis Mud
I filled the stamped details with sharpie and wiped off the excess.
0 2022/08/31 16:33:12 Travis Mud
First thing I did was remove all the paint with brake cleaner.
0 2022/08/31 16:33:05 Travis Mud
The original identification tage
0 2022/08/31 16:32:58 Travis Mud
It's a silicone like gel used to mark if a bolt has come loose.
0 2022/08/31 16:11:27 Travis Mud
0 2022/08/31 16:11:18 Travis Mud
Its like a silicone based gel that sticks good, but breaks easy.
0 2022/08/31 16:08:26 Travis Mud
A closer view of it sotting in there.
0 2022/08/25 16:06:44 Travis Mud
Because I cannot put it on the jeep this will have to do for now.
0 2022/08/25 16:06:36 Travis Mud
To temporarily remedy my problem, I put one in the main bracket as an achor point.
0 2022/08/25 16:06:28 Travis Mud
So this is where I jacked it up. I drilled the top hole for the largest blind rivet I had knowing damn well the set I had was an assortment set from amazon, and I did not have to attachment for. The bottom blind rivet is the largest one that I actually have the attachment for.
0 2022/08/25 15:59:28 Travis Mud
With the inner fender notched, you can see it better. Immediately I wondered if these prepunched holes are specifically for what I am doing. I seriously considered drilling out these holes instead. But that means ai would have to trim my hood release, something I seriously did not want to do.
0 2022/08/25 15:59:21 Travis Mud
I marked out the holes on the inside and drilled a pilot hole. You can see I drew about where the top hole will land and the part that will need cut off to make it easier.
0 2022/08/25 15:59:11 Travis Mud
This is roughly how it sits. 

The top is not parallel with the ground; it angles down towards the rear axle. Is this how the police packages and MJ's sit? I am sure it wont cause a probl3m woth the release cable, just wondering if this proper.
This is roughly how it sits. The top is not parallel with the ground; it angles down towards the rear axle. Is this how the police packages and MJ's sit? I am sure it wont cause a probl3m woth the release cable, just wondering if this proper.
0 2022/08/25 11:11:58 Travis Mud
Trimmed!
Trimmed!
0 2022/08/25 11:11:50 Travis Mud
First
Page
10 of 21
Last
Go To
Page
  • 1
  • ...
  • 8
  • 9
  • 10
  • 11
  • 12
  • ...
  • 21
10 of 21
Go To GO
Go to page of 21 pages
  • 1
  • ...
  • 8
  • 9
  • 10
  • 11
  • 12
  • ...
  • 21

Top
Jeep Cherokee Forum
  • Contact Us
  • FAQ
  • Archive
  • Advertising
  • Cookie Policy
  • Privacy Statement
  • Terms of Service
  • Your Privacy Choices
  • Manage Preferences

© 2026 MH Sub I, LLC dba Internet Brands


When you click on links to various merchants on this site and make a purchase, this can result in this site earning a commission. Affiliate programs and affiliations include, but are not limited to, the eBay Partner Network.