Jeep Cherokee Forum
  • LOG IN
  • REGISTER
  • Forums
    • Technical Discussion
      • Stock XJ Cherokee Tech. All XJ Non-modified/stock questions go here
      • Modified XJ Cherokee Tech
      • MJ Comanche Tech. Stock & Modified.
      • KL Cherokee Tech
      • Modified Grand Cherokee Tech. All ZJ,WJ & WK aftermarket tech goes here
      • Stock Grand Cherokee Tech. All ZJ/WJ/WK Non-modified/stock questions go here!
      • Fabrication & builders section.
      • Jeep Builds
      • Aftermarket electrical systems
      • Jeep JK Model Discussion
      • Other Vehicles. Other Jeep models & cars and trucks of other makes
      • Technical Write-Up/How To Section
    • General
      • Introductions
      • Cherokee Chat
      • Cherokee of the Month
    • Wheeling Neighborhoods
      • Pacific Northwest
      • Pacific Southwest
      • Northern Rockies
      • Four Corners
      • Midwest
      • South Central
      • Great Lakes
      • Southeast
      • North Atlantic
      • Mid Atlantic
      • International
    • Wheeling Discussion
      • Trail Reports
      • Land Use Forum
    • Buy, Sell, Trade
      • Non-Cherokee Parts
      • Vendor Showcase
      • Vehicles
      • Axles/Tires/Wheels
      • Engines/Tranny/T-Case
      • Suspension/Steering
      • Accessories
      • Part Outs
      • Miscellaneous
      • Wanted
    • CF Announcements & Suggestions
      • Announcements
      • CF Suggestions & Questions
      • Test Section
  • Marketplace
    • Vendor Directory
    • Become a Vendor
    • Member Marketplace
    • Vendor Marketplace
  • New Posts
  • Tools
    • Car Payment Calculator
    • Tire Rim Calculator
    • Vin Decoder
    • Recalls
    • Technical Service Bulletins (TSBs)
    • Members List
    • Live Feed
  • How-Tos
  • Gallery
  • View Dark Mode
    • Please register or login to enable Dark Mode.
  • Log In
  • Register
Jeep Cherokee Forum
    • Threads
      • Advanced
Dark Mode

Please register or login to enable Dark Mode.

Log In

Forgot your Password?

By logging into your account, you agree to our Terms of Use and Privacy Policy, and to the use of cookies as described therein.
or
 
  • Recent
  • Commented
  • Albums
  • My Pictures

My Post Pictures

GRAYMAN SPOTTER
February 4, 2015
 220
 0
Sort:
Default
  • Default
  • Most Recent
Mocked the front bumper back up for a minute to get a little before and after shot.  

Gotta go unwrap the package that just arrived today......
Mocked the front bumper back up for a minute to get a little before and after shot. Gotta go unwrap the package that just arrived today......
0 2015/03/14 12:41:37 GRAYMAN SP
I like it
I like it
0 2015/03/14 13:44:09 GRAYMAN SP
Got it now so I can fab it in properly, while boxing in the front of the Jeep.
0 2015/03/14 13:44:38 GRAYMAN SP
0 2015/03/14 13:59:04 GRAYMAN SP
0 2015/03/14 14:08:54 GRAYMAN SP
Template - Transfer
Template - Transfer
0 2015/03/26 10:52:04 GRAYMAN SP
Lay out for rosette weld openings
0 2015/03/26 10:52:46 GRAYMAN SP
0 2015/03/26 10:53:16 GRAYMAN SP
2nd layer is .095 bent on a Brake and then fabbed to fit over the first plate,,leaving room to access the factory weld nuts in case I decide to use them on motor mounts or other brackets.
0 2015/03/26 10:53:48 GRAYMAN SP
A 3rd layer is planned to box in the underside of the uni-body "frame" from the front bumper through the engine compartment area to the Ruff Stuff stiffeners. The stiffeners stop in the area of the lower control arm mount.
0 2015/03/26 10:59:43 GRAYMAN SP
Front bracing begins
0 2015/03/26 11:05:08 GRAYMAN SP
3/16's on the inside of the box and then supporting both sides of the unibody frame. On the outside, it gets a 1/8 inch plate that is part of the Smittybilt bumper.
0 2015/03/26 11:05:29 GRAYMAN SP
The front of the engine compartment gets tied from pass to drive side with .120 wall 2X5 rectangular tubing. Better to over build it a bit.
0 2015/03/26 11:10:01 GRAYMAN SP
angle brace tacked in to keep everything from moving during fabrication
0 2015/03/26 11:14:11 GRAYMAN SP
Boxing in the area around the steering box, the inside gets 3/16's and the outside of the uni-body "frame" gets 1/8 inch plate that is part of the Smittybilt bumper.
0 2015/03/26 11:14:34 GRAYMAN SP
Angle brace to keep everything from moving during the fabrication.
0 2015/03/26 11:17:49 GRAYMAN SP
3/16's plate is going on the inside of the uni-body "frame"  between the box and the frame,, and the outside gets 1/8th inch plate that is part of the Smittybilt bumper
3/16's plate is going on the inside of the uni-body "frame" between the box and the frame,, and the outside gets 1/8th inch plate that is part of the Smittybilt bumper
0 2015/03/26 11:19:10 GRAYMAN SP
0 2015/03/26 11:22:45 GRAYMAN SP
0 2015/03/26 11:24:03 GRAYMAN SP
Driver side, first i plated the flat vertical surface with 11 gauge flat stock to give a solid surface to weld to. Then 1/8 plate was bent in a brake with about a 1 inch return. shape fit and cut to a custom fit so that it wrapped down to lay over the 11 gauge material.  plasma cut holes to expose original mounting holes in case I want to use them later for ??
Driver side, first i plated the flat vertical surface with 11 gauge flat stock to give a solid surface to weld to. Then 1/8 plate was bent in a brake with about a 1 inch return. shape fit and cut to a custom fit so that it wrapped down to lay over the 11 gauge material. plasma cut holes to expose original mounting holes in case I want to use them later for ??
0 2015/04/27 20:45:42 GRAYMAN SP
This shows how behind the steering box I have multiple layers, first the flat plate(11 gauge material) extends to the new "front bracing/rectangular tubing".  then I plated over that by welding in a 1/4 plate for the steering box to bolt through (both drive and passenger side were plated, the  1/8 material wraps over the top of the steering box plating to tie it all together. 
In the shadowed area you can see the opening in the rectangular tubing so the front of the steering box would clear.
This shows how behind the steering box I have multiple layers, first the flat plate(11 gauge material) extends to the new "front bracing/rectangular tubing". then I plated over that by welding in a 1/4 plate for the steering box to bolt through (both drive and passenger side were plated, the 1/8 material wraps over the top of the steering box plating to tie it all together. In the shadowed area you can see the opening in the rectangular tubing so the front of the steering box would clear.
0 2015/04/27 20:47:28 GRAYMAN SP
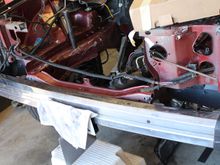
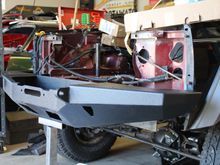
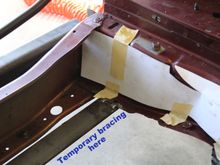
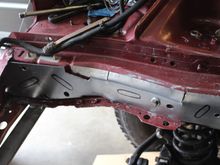
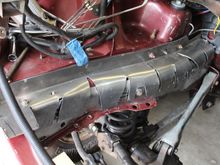
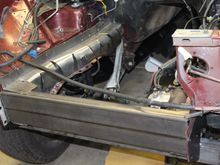
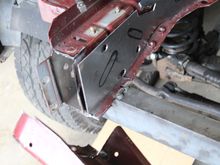
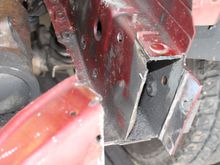
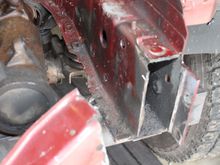
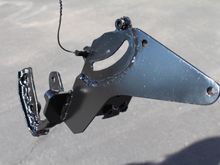
This shows several layers, first 11 gauge flat plate, Then layered in the steering box area 1/4 plate, then 1/8 plate was bent on a brake and then shaped to fit over everthing, The retangular tubing in front was tied in the same way on the passenger side.
0 2015/04/27 21:06:07 GRAYMAN SP
Plasma cutter used to shape and cut holes to allow access to the original threaded bungs and original studs in case I want to use them for anything later.
Bottom left shows how a layered "L" bracket was fabricated to tie into the Rustys stiffeners that were used along the full length of the lower "frame rails"
Plasma cutter used to shape and cut holes to allow access to the original threaded bungs and original studs in case I want to use them for anything later. Bottom left shows how a layered "L" bracket was fabricated to tie into the Rustys stiffeners that were used along the full length of the lower "frame rails"
0 2015/04/27 21:13:12 GRAYMAN SP
Bottom left you can see the "L" shaped tie in to the Rustys stiffeners that strengthen the "frame rails"
0 2015/04/27 21:22:44 GRAYMAN SP
0 2015/04/27 21:25:17 GRAYMAN SP
Had to lay down some paint to protect everything
0 2015/04/30 21:42:32 GRAYMAN SP
Had to lay down some paint to protect things
0 2015/04/30 21:44:35 GRAYMAN SP
This shows the beginnings of the roll cage., Just before paint I bent and welded in the beginnings of a roll cage, started with a  tube from the newly supported frame rail. connected it up along the spring perch.  Turned it at the upper edge of the inner fender and ran it back toward the firewall.
This shows the beginnings of the roll cage., Just before paint I bent and welded in the beginnings of a roll cage, started with a tube from the newly supported frame rail. connected it up along the spring perch. Turned it at the upper edge of the inner fender and ran it back toward the firewall.
0 2015/04/30 21:49:58 GRAYMAN SP
0 2015/04/30 21:57:35 GRAYMAN SP
Motor is ready, New clutch pressure plate and throw out bearing. Tranny and transfer case is bolted up,  Everything is on the trailer enroute to a friend business that has a lift.  Additionally he owns a few larger fabrication tools than I have at my home "shop" .
Motor is ready, New clutch pressure plate and throw out bearing. Tranny and transfer case is bolted up, Everything is on the trailer enroute to a friend business that has a lift. Additionally he owns a few larger fabrication tools than I have at my home "shop" .
0 2015/04/30 21:58:44 GRAYMAN SP
Engine is ready to go.  The tranny is bolted up with a new clutch, pressure plate and throw out bearing.  Enroute to a friends shop that has a lift.  additionally he has a few larger fabrication tools than I have at my home "shop".
Engine is ready to go. The tranny is bolted up with a new clutch, pressure plate and throw out bearing. Enroute to a friends shop that has a lift. additionally he has a few larger fabrication tools than I have at my home "shop".
0 2015/04/30 22:07:53 GRAYMAN SP
Engine is on the trailer.  Prepped with trans bolted on with a new clutch, pressure plate and throw out bearing.  Enroute to a friends shop that has a lift.  Additionally he has a few larger fabrication tools than I have at my home "shop"
Engine is on the trailer. Prepped with trans bolted on with a new clutch, pressure plate and throw out bearing. Enroute to a friends shop that has a lift. Additionally he has a few larger fabrication tools than I have at my home "shop"
0 2015/04/30 22:12:19 GRAYMAN SP
0 2015/04/30 22:16:10 GRAYMAN SP
Trans is a 2006 Jeep Wrangler 6 SPD.  Has an aluminum adaptor that mates the Cummins diesel to the Jeep.
Trans is a 2006 Jeep Wrangler 6 SPD. Has an aluminum adaptor that mates the Cummins diesel to the Jeep.
0 2015/04/30 22:24:30 GRAYMAN SP
motor is in, Power steering pump from a jeep came on the motor but the mounting was not up to standards and it was in the way of the steering stuff on the drive side, gotta move it to the other side.  Make a new mount etc.
motor is in, Power steering pump from a jeep came on the motor but the mounting was not up to standards and it was in the way of the steering stuff on the drive side, gotta move it to the other side. Make a new mount etc.
0 2015/06/02 22:42:19 GRAYMAN SP
Motor without the power steering pump bracket
0 2015/06/02 22:46:04 GRAYMAN SP
24 hours of labor later, here is the power steering bracket that I came up with.
It was a brain teaser for sure!!
24 hours of labor later, here is the power steering bracket that I came up with. It was a brain teaser for sure!!
0 2015/06/02 22:46:59 GRAYMAN SP
The slotted area is clearance for the back of the idler pulley.  I found a idler pulley out of a NAPA book that looked like it would work and just started fabbing.
The slotted area is clearance for the back of the idler pulley. I found a idler pulley out of a NAPA book that looked like it would work and just started fabbing.
0 2015/06/02 22:48:17 GRAYMAN SP
Motor in place, gotta make a power steering bracket, needs to hang on the passenger side
0 2015/06/02 22:55:42 GRAYMAN SP
24 hours (yes 3 days of work)of labor later, here is the steering bracket that I fabbed up.
It was a mind teaser for sure!!
24 hours (yes 3 days of work)of labor later, here is the steering bracket that I fabbed up. It was a mind teaser for sure!!
0 2015/06/02 22:57:34 GRAYMAN SP
First
Page
2 of 6
Last
Go To
Page
  • 1
  • 2
  • 3
  • 4
  • 5
  • 6
2 of 6
Go To GO
Go to page of 6 pages
  • 1
  • 2
  • 3
  • 4
  • 5
  • 6

Top
Jeep Cherokee Forum
  • Contact Us
  • FAQ
  • Archive
  • Advertising
  • Cookie Policy
  • Privacy Statement
  • Terms of Service
  • Your Privacy Choices
  • Manage Preferences

© 2026 MH Sub I, LLC dba Internet Brands


When you click on links to various merchants on this site and make a purchase, this can result in this site earning a commission. Affiliate programs and affiliations include, but are not limited to, the eBay Partner Network.