
Black Phoenix

Thread Starter
CF Veteran

Joined: Jan 2013
Posts: 19,219
Likes: 45
From: west chester, pa
Year: 1999
Engine: 4.0
Speaking of the OBA, that meant doing some plumbing and wiring, which would pass thru the firewall. I had a 5/16 hole that had many wires going into it (from the younger days) I didn't like how dangerous it was especially with no grommet on the edges. I wanted to put in a couple of bigger holes while I was at it. So I pretty much disconnected and pulled everything out. Some of the wiring will be re-done properly.
I also had bunch of mis-matching switches and all.
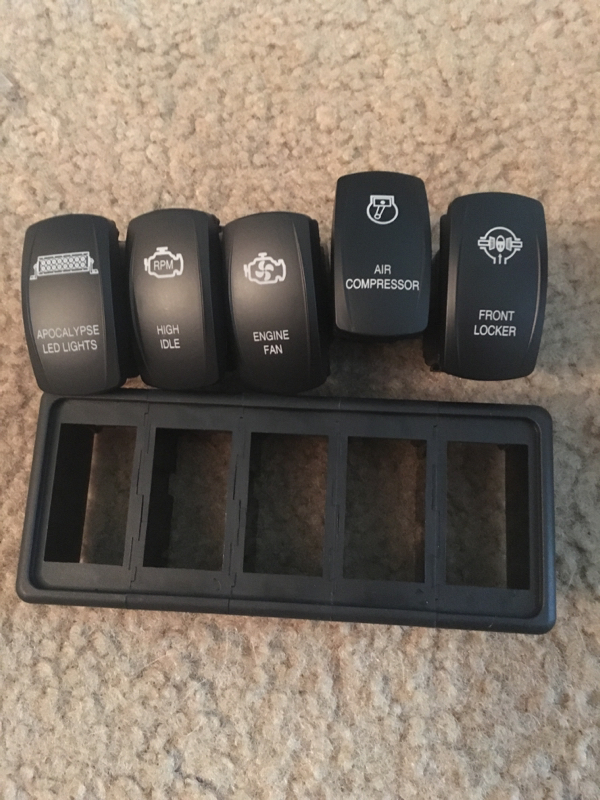
I bought 5 brand new switches along with a lighted Viair air pressure gauge. I also had to fab up new blank panel because the old one was 1/4" thick aluminum. Some of the switches barely could fit through the thick wall. This time I m using 1/16 thick steel. I ll have to move the trans temp gauge somewhere else and put the Viair gauge in its place.
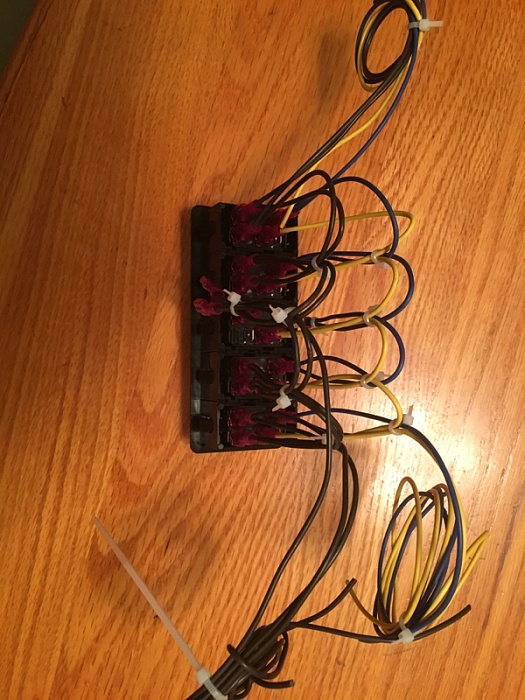
I got the switches and the mounting bezel today from Otrattw. I also wired them up too.
I also had bunch of mis-matching switches and all.
I bought 5 brand new switches along with a lighted Viair air pressure gauge. I also had to fab up new blank panel because the old one was 1/4" thick aluminum. Some of the switches barely could fit through the thick wall. This time I m using 1/16 thick steel. I ll have to move the trans temp gauge somewhere else and put the Viair gauge in its place.
I got the switches and the mounting bezel today from Otrattw. I also wired them up too.
Thread Starter
CF Veteran
Joined: Jan 2013
Posts: 19,219
Likes: 45
From: west chester, pa
Year: 1999
Engine: 4.0
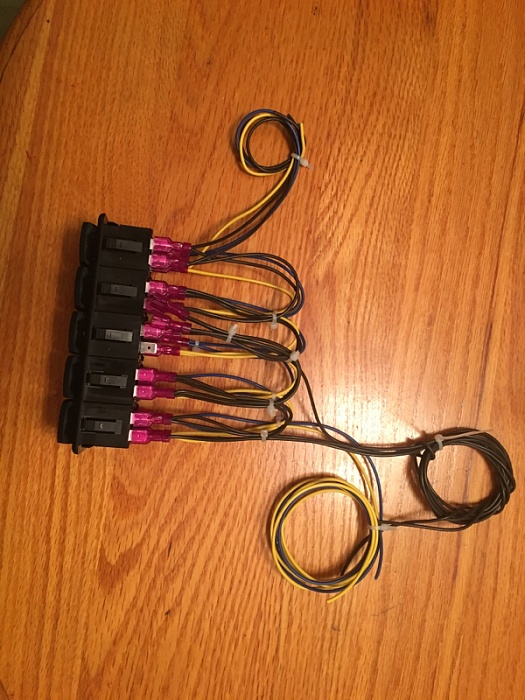
The switches and the bezel.
Four are single pole and the fifth one is single pole, double throw. Meaning it have on-off-on feature.

The yellow wires are from ignition source. They will energize the relays when the switches are flipped. The blue are illumination wires. The very dark brown are all grounds I would have liked to use black but I didn't have any handy. You notice the smaller pigtails on the end, that will go to the air pressure gauge to light it up.
I put the SPDT switch in the middle, but I still went ahead and made up power/ground connectors in case I change my mind and put a regular switch in its place, the wiring would be already in place and make it an easy swap. I will have to re run all the accessories wiring back into the cab and to the switches.
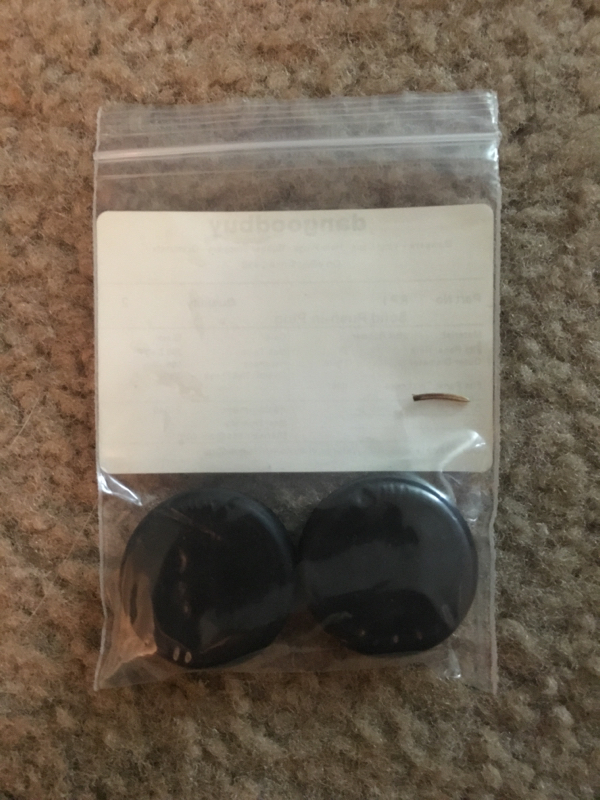
The new rubber grommets that I ll be using. Both are solid type. I ll just make my own holes in it.
One of them probably would have the wiring through it and the other one will have the air lines (one to the air tank in the back and another one to the gauge on the dash).

Four are single pole and the fifth one is single pole, double throw. Meaning it have on-off-on feature.
The yellow wires are from ignition source. They will energize the relays when the switches are flipped. The blue are illumination wires. The very dark brown are all grounds I would have liked to use black but I didn't have any handy. You notice the smaller pigtails on the end, that will go to the air pressure gauge to light it up.
I put the SPDT switch in the middle, but I still went ahead and made up power/ground connectors in case I change my mind and put a regular switch in its place, the wiring would be already in place and make it an easy swap. I will have to re run all the accessories wiring back into the cab and to the switches.


The new rubber grommets that I ll be using. Both are solid type. I ll just make my own holes in it.
One of them probably would have the wiring through it and the other one will have the air lines (one to the air tank in the back and another one to the gauge on the dash).
Last edited by XJwonders; Jun 3, 2016 at 10:14 PM.
No, I don't lick fish.


Joined: Mar 2011
Posts: 11,169
Likes: 26
From: Northern Kentucky
Year: 1999
Model: Cherokee (XJ)
Engine: 4.0
The switches and the bezel.
Four are single pole and the fifth one is single pole, double throw. Meaning it have on-off-on feature.
Attachment 289342
The yellow wires are from ignition source. They will energize the relays when the switches are flipped. The blue are illumination wires. The very dark brown are all grounds I would have liked to use black but I didn't have any handy. You notice the smaller pigtails on the end, that will go to the air pressure gauge to light it up.
I put the SPDT switch in the middle, but I still went ahead and made up power/ground connectors in case I change my mind and put a regular switch in its place, the wiring would be already in place and make it an easy swap. I will have to re run all the accessories wiring back into the cab and to the switches.
Attachment 289343
Attachment 289344
The new rubber grommets that I ll be using. Both are solid type. I ll just make my own holes in it.
One of them probably would have the wiring through it and the other one will have the air lines (one to the air tank in the back and another one to the gauge on the dash).
Attachment 289345
Thread Starter
CF Veteran
Joined: Jan 2013
Posts: 19,219
Likes: 45
From: west chester, pa
Year: 1999
Engine: 4.0
No, I don't lick fish.
Joined: Mar 2011
Posts: 11,169
Likes: 26
From: Northern Kentucky
Year: 1999
Model: Cherokee (XJ)
Engine: 4.0
CF Veteran
Joined: Oct 2013
Posts: 5,924
Likes: 203
From: Greenville, SC
Year: 1999
Model: Cherokee(XJ)
Engine: 4.0
that's how I had my light bars. Front one was on with high beams- off- on with switch and rear was on with reverse- off- on with switch. Love the convince of wiring switches like that for ease of use yet being able to also override if desired.
No, I don't lick fish.
Joined: Mar 2011
Posts: 11,169
Likes: 26
From: Northern Kentucky
Year: 1999
Model: Cherokee (XJ)
Engine: 4.0
Ahh, yeah that's a good way to do it.
CF Veteran
Joined: Aug 2015
Posts: 1,226
Likes: 11
From: Laurium, MI
Year: 1999
Model: Cherokee(XJ)
Engine: 4.0L
sorry for not replying sooner. If JCR still make the unibody tie in brackets then yes this will interfere with the steering brace.
When I built my bumper, I mostly based it on JCR Offroad's bumper (I forgot which model). In doing so, I also copied their unibody bracing brackets which utilizes the front sway bar mounting points.
Since the steering brace ALSO use the sway bar mounting points, it started to overlap. I had to grind away & elogonate the holes on the steering brace to make up for the thickness of the unibody bracing. Then I had to add washers on the front mounting points of the steering brace since the unibody bracing is 1/4" thick. Overall I was able to make everything work. I can't say about other people and their rigs.
I've been thinking about this. My only other thought is: would you really need the forced off mode? You could technically force it on to cool before a water crossing and then switch it back to auto for the crossing. Once in the water the water should cool everything very fast so it would prob ably not kick on. Is it really that bad of an e-fan to kick on temporarily in the water? Also I'd probably forget and leave it off...lol
No, I don't lick fish.
Joined: Mar 2011
Posts: 11,169
Likes: 26
From: Northern Kentucky
Year: 1999
Model: Cherokee (XJ)
Engine: 4.0
I've been thinking about this. My only other thought is: would you really need the forced off mode? You could technically force it on to cool before a water crossing and then switch it back to auto for the crossing. Once in the water the water should cool everything very fast so it would prob ably not kick on. Is it really that bad of an e-fan to kick on temporarily in the water? Also I'd probably forget and leave it off...lol
CF Veteran
Joined: Aug 2015
Posts: 1,226
Likes: 11
From: Laurium, MI
Year: 1999
Model: Cherokee(XJ)
Engine: 4.0L
Theoretically, it's supposed to kick off. I've seen videos though where it doesn't... sometimes not right away, sometimes not at all. It's supposed to kick off on its own though... and the mechanical fan is SUPPOSED to be hindered by the water, but I've seen those keep going once they hit the water too.
No, I don't lick fish.
Joined: Mar 2011
Posts: 11,169
Likes: 26
From: Northern Kentucky
Year: 1999
Model: Cherokee (XJ)
Engine: 4.0
Mechanical fans definitely keep going. Although probably a bit slower. Wasn't it you who posted the "drowning for science" vid? That one's a good one. Seriously as an Electrical Engineer water really doesn't affect electronics that much. Just don't put corrosive substances in it...hee hee

Senior Member
Joined: Apr 2016
Posts: 536
Likes: 1
From: Maple Heights, Ohio
Year: 1999
Model: Cherokee
Engine: 4.0
Well, yesterday, I did the intake swap along with new gasket...
It always rev up to 1,500-ish at start up. After the swap, it rev up to 750 at start up. People have always said I had an intake leak. Due to a cracked manifold they said.
It turns out that the intake manifold was just fine, no cracks or anything on it. The culprit was the smashed gasket. Probably due to the accident that the PO was in. (That's how I got it in the first place).
Advance auto gave me wrong gasket twice. Causing 3 hour delay on the job. They gave me those for the 0331 heads.
I gave up so I decided to enlarge the holes on gasket to match the 0630 head. Since the proper gasket won't be available for a couple days and I had already took the intake manifold and stuff out of the jeep.
I think it look pretty good and shifts much better in addition to running better too. Next is valve cover gasket. Gotta clean that oil mess up.
The "before" shot
Attachment 235436
The painted parts
Attachment 235437
The assembled parts
Attachment 235438
Attachment 235439
Attachment 235440
The difference between the old and new gasket
Attachment 235441
The old gasket
Attachment 235442
Attachment 235443
Attachment 235444
Looks like someone jb welded the crack on pipe too lol
Attachment 235445
I used this picture to help with torquing down the manifolds
Attachment 235446
The completed installation.
Attachment 235447
Attachment 235448
Attachment 235449
Thread Starter
CF Veteran
Joined: Jan 2013
Posts: 19,219
Likes: 45
From: west chester, pa
Year: 1999
Engine: 4.0
There's so much that happened. I just don't feel like updating or add pictures. But don't you worry, it's back on DD duty. Not gonna get rid of it anytime soon......