Jeep Cherokee Forum
  • LOG IN
  • REGISTER
  • Forums
    • Technical Discussion
      • Stock XJ Cherokee Tech. All XJ Non-modified/stock questions go here
      • Modified XJ Cherokee Tech
      • MJ Comanche Tech. Stock & Modified.
      • KL Cherokee Tech
      • Modified Grand Cherokee Tech. All ZJ,WJ & WK aftermarket tech goes here
      • Stock Grand Cherokee Tech. All ZJ/WJ/WK Non-modified/stock questions go here!
      • Fabrication & builders section.
      • Jeep Builds
      • Aftermarket electrical systems
      • Jeep JK Model Discussion
      • Other Vehicles. Other Jeep models & cars and trucks of other makes
      • Technical Write-Up/How To Section
    • General
      • Introductions
      • Cherokee Chat
      • Cherokee of the Month
    • Wheeling Neighborhoods
      • Pacific Northwest
      • Pacific Southwest
      • Northern Rockies
      • Four Corners
      • Midwest
      • South Central
      • Great Lakes
      • Southeast
      • North Atlantic
      • Mid Atlantic
      • International
    • Wheeling Discussion
      • Trail Reports
      • Land Use Forum
    • Buy, Sell, Trade
      • Non-Cherokee Parts
      • Vendor Showcase
      • Vehicles
      • Axles/Tires/Wheels
      • Engines/Tranny/T-Case
      • Suspension/Steering
      • Accessories
      • Part Outs
      • Miscellaneous
      • Wanted
    • CF Announcements & Suggestions
      • Announcements
      • CF Suggestions & Questions
      • Test Section
  • Marketplace
    • Vendor Directory
    • Become a Vendor
    • Member Marketplace
    • Vendor Marketplace
  • New Posts
  • Tools
    • Car Payment Calculator
    • Tire Rim Calculator
    • Vin Decoder
    • Recalls
    • Technical Service Bulletins (TSBs)
    • Members List
    • Live Feed
  • How-Tos
  • Gallery
  • View Dark Mode
    • Please register or login to enable Dark Mode.
  • Log In
  • Register
Jeep Cherokee Forum
    • Threads
      • Advanced
Dark Mode

Please register or login to enable Dark Mode.

Log In

Forgot your Password?

By logging into your account, you agree to our Terms of Use and Privacy Policy, and to the use of cookies as described therein.
or
 
  • Recent
  • Commented
  • Albums
  • My Pictures

Baddad's Photos

View Profile
Sort:
Most Recent
  • Most Recent
  • Most Comments
  • Albums
  • Photos
Joel built a custom tube bumper for his.
0 2019/06/11 23:22:31 Baddad
Reilly used Ares Fabs modular bumper ends on his installation. These will bolt right onto the stock bumper mounts and there are several styles available.
https://aresfabrication.com/model/xj/bumpers-xj/
Reilly used Ares Fabs modular bumper ends on his installation. These will bolt right onto the stock bumper mounts and there are several styles available. https://aresfabrication.com/model/xj/bumpers-xj/
0 2019/06/11 23:16:48 Baddad
0 2019/06/11 23:11:40 Baddad
Now for sale
Now for sale
0 2019/06/11 22:46:14 Baddad
Turned out pretty darn cool 😎
0 2019/05/30 01:21:40 Baddad
SReillyH added Ares Fab stubby bumper ends and a hoop to his BadDadFab Winch Mount.
0 2019/05/30 01:21:30 Baddad
0 2019/05/26 15:35:05 Baddad
Here’s some better pics of the finished project. I painted the roof white to help keep the heat out.
0 2019/05/26 15:34:57 Baddad
The wires from the cb antenna and light bar go in at the cut out.
0 2019/05/25 21:56:47 Baddad
I notched the fender for the firewall mounts then lined the cut out with door edge trim. Used the heat gun to help the trim bend around the tight bends.
0 2019/05/25 21:56:39 Baddad
The factory fender mounts near the doors require you to unbolt the fender then pull it outboard to clear the brackets. I moved the nutclips from the brackets to the fenders. Then I bent the original brackets rearward a bit.
0 2019/05/25 21:56:31 Baddad
Now I can slide the fender in from the front, behind the “A” pillar bar. Then install the bolts just like normal.
0 2019/05/25 21:56:24 Baddad
Same thing on the drivers side for the light bar wiring.
0 2019/05/25 21:56:16 Baddad
I ran the CB antenna wire down the “A” pillar and drilled a hole with a grommet into the kick panel area.
0 2019/05/25 21:56:09 Baddad
I didn’t want zip ties around the outer bars where they would catch and break off against trees and such. These little brackets are made buy making a couple of built up spot welds, then spanning them with some 1/8” steel rod welded on top. Makes an easy bracket to zip tie wires to.
0 2019/05/25 21:56:01 Baddad
Was dark by the time I finished. I did take it for a quick drive and omg what a difference! I thought my Jeep was pretty tight and solid before but now it’s like a bank vault, the doors even close with a thud!
0 2019/05/25 21:45:24 Baddad
Got it bolted on today! Was actually kind of a pita! If I were to do another one I would weld as much as possible while still bolted to the Jeep. Then brace it 6 ways to Sunday when I took it off to finish weld. Things shifted quite a bit from the welding.
0 2019/05/25 21:45:17 Baddad
Finally got it all welded up and painted. Hoping to get it finally installed this weekend 🤞
0 2019/05/23 00:40:17 Baddad
The cage is also tied into the factory roof rack mounts. I believe spreading the load is very important on our unibody structures.
0 2019/05/23 00:35:41 Baddad
This is how I triangulated the roof cross bars.
0 2019/05/23 00:35:34 Baddad
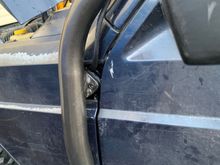
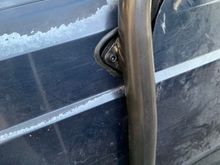
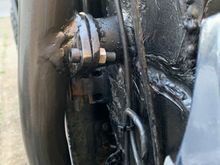
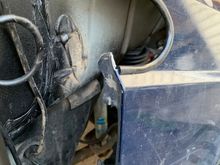
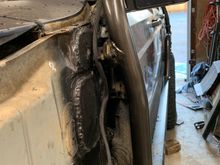
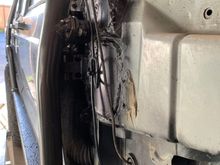
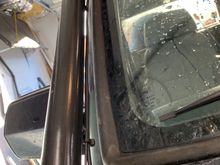
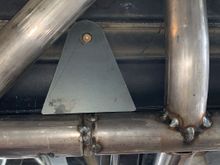
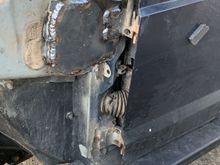
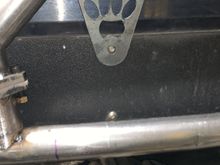
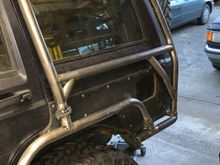
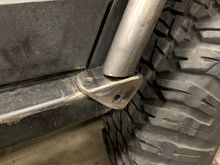
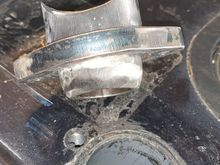
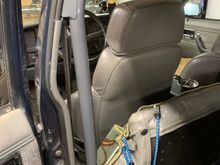
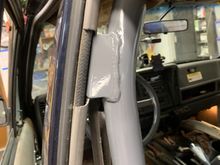
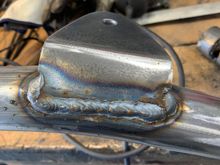
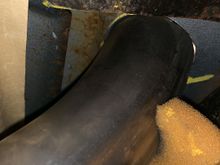
This is the mount for the “A” pillar support. I didn’t want a cross bar blocking my view, restricting access to the windshield and wipers, and the air intake for the heater intake. This is fully welded to the strongest part of the firewall/“A” pillar.
0 2019/05/23 00:29:23 Baddad
The bolts just serve to clamp the joint together. The double flange provides the strength.
0 2019/05/23 00:24:26 Baddad
This is how it goes together.
0 2019/05/23 00:24:17 Baddad
So here is the detail on the mounting points. They are all double flanged with 1.5” DOM sleeve.
0 2019/05/23 00:24:08 Baddad
I think Daisy approves!
0 2019/05/23 00:14:35 Baddad
I decided they looked to plain so fired up the cnc plasma and cut these out. The center pad is a bottle opener so I’ll never be without one 😋
0 2019/05/23 00:14:22 Baddad
I wanted to tie in the cage to the body as much as possible. Made these tabs to the body armor attach points.
0 2019/05/23 00:14:13 Baddad
Here’s how I did the sides. The braces provide triangulation without interfering with the window or gas cap.
0 2019/05/23 00:14:04 Baddad
This is the mount for the front of the rear wheel well hoops. It’s 3 pierces of 1/4” plate. The slider is drilled and taped for attachment bolts. The triangle shape “hugs” the slider providing a ton of strength.
0 2019/05/23 00:06:34 Baddad
Here’s how the tube will be welded to it.
0 2019/05/23 00:06:24 Baddad
This is how it looks apart. The top of the “B” pillar bar has a 3/8” thick plate that is tapped for the grade 8, 5/16” Allen bolts. The bolts serve to clamp the joint together, the flange provides the strength.
0 2019/05/22 23:54:42 Baddad
The mount is flanged with 3/8” wall x 1.5” diameter dom tube.
0 2019/05/22 23:54:34 Baddad
This is how it’ll attach thru the roof.
0 2019/05/22 23:54:26 Baddad
And/or fold up the back seat.
0 2019/05/22 23:45:18 Baddad
The position allows me to recline my seat fully.
0 2019/05/22 23:44:52 Baddad
This bracket bolts to the upper seatbelt mount. Had to trim the plastic trim a bit.
0 2019/05/22 23:44:38 Baddad
The bottom mounts to a 1/4” plate on the floor board that is welded to 2 of the rock slider supports.
0 2019/05/22 23:44:29 Baddad
Here’s the completed “B” pillar bar.
0 2019/05/22 23:44:16 Baddad
0 2019/05/22 23:44:00 Baddad
Mine was a bit more of a challenge as I have the factory moon roof. The mounts for the moon roof caused me some issues, but I eventually found a good spot.
0 2019/05/22 23:34:44 Baddad
First
Page
2 of 10
Last
Go To
Page
  • 1
  • 2
  • 3
  • 4
  • 5
  • 6
  • 7
  • ...
  • 10
2 of 10
Go To GO
Go to page of 10 pages
  • 1
  • 2
  • 3
  • 4
  • 5
  • 6
  • 7
  • ...
  • 10

Top
Jeep Cherokee Forum
  • Contact Us
  • FAQ
  • Archive
  • Advertising
  • Cookie Policy
  • Privacy Statement
  • Terms of Service
  • Your Privacy Choices
  • Manage Preferences

© 2026 MH Sub I, LLC dba Internet Brands


When you click on links to various merchants on this site and make a purchase, this can result in this site earning a commission. Affiliate programs and affiliations include, but are not limited to, the eBay Partner Network.