Jeep Cherokee Forum
  • LOG IN
  • REGISTER
  • Forums
    • Technical Discussion
      • Stock XJ Cherokee Tech. All XJ Non-modified/stock questions go here
      • Modified XJ Cherokee Tech
      • MJ Comanche Tech. Stock & Modified.
      • KL Cherokee Tech
      • Modified Grand Cherokee Tech. All ZJ,WJ & WK aftermarket tech goes here
      • Stock Grand Cherokee Tech. All ZJ/WJ/WK Non-modified/stock questions go here!
      • Fabrication & builders section.
      • Jeep Builds
      • Aftermarket electrical systems
      • Jeep JK Model Discussion
      • Other Vehicles. Other Jeep models & cars and trucks of other makes
      • Technical Write-Up/How To Section
    • General
      • Introductions
      • Cherokee Chat
      • Cherokee of the Month
    • Wheeling Neighborhoods
      • Pacific Northwest
      • Pacific Southwest
      • Northern Rockies
      • Four Corners
      • Midwest
      • South Central
      • Great Lakes
      • Southeast
      • North Atlantic
      • Mid Atlantic
      • International
    • Wheeling Discussion
      • Trail Reports
      • Land Use Forum
    • Buy, Sell, Trade
      • Non-Cherokee Parts
      • Vendor Showcase
      • Vehicles
      • Axles/Tires/Wheels
      • Engines/Tranny/T-Case
      • Suspension/Steering
      • Accessories
      • Part Outs
      • Miscellaneous
      • Wanted
    • CF Announcements & Suggestions
      • Announcements
      • CF Suggestions & Questions
      • Test Section
  • Marketplace
    • Vendor Directory
    • Become a Vendor
    • Member Marketplace
    • Vendor Marketplace
  • New Posts
  • Tools
    • Car Payment Calculator
    • Tire Rim Calculator
    • Vin Decoder
    • Recalls
    • Technical Service Bulletins (TSBs)
    • Members List
    • Live Feed
  • How-Tos
  • Gallery
  • View Dark Mode
    • Please register or login to enable Dark Mode.
  • Log In
  • Register
Jeep Cherokee Forum
    • Threads
      • Advanced
Dark Mode

Please register or login to enable Dark Mode.

Log In

Forgot your Password?

By logging into your account, you agree to our Terms of Use and Privacy Policy, and to the use of cookies as described therein.
or
 
  • Recent
  • Commented
  • Albums
  • My Pictures

Baddad's Photos

View Profile
Sort:
Most Recent
  • Most Recent
  • Most Comments
  • Albums
  • Photos
0 2018/05/15 01:23:10 Baddad
0 2018/05/15 01:23:06 Baddad
And the front. Next time I’d probably put the tie in flush with the end of the plate but this’ll work. Now to get the doors done 😋
0 2018/05/09 17:27:12 Baddad
How the rear turned out.
0 2018/05/09 17:27:10 Baddad
A couple coats of bed liner and it’s looking pretty good! I’ll probably put one more coat on while I do the doors.
0 2018/05/09 17:27:06 Baddad
I ground the welds fairly smooth so things don’t hang up on them. Then primered the bare metal.
0 2018/05/09 17:27:02 Baddad
Then shot it with bed liner.
0 2018/05/09 17:24:09 Baddad
0 2018/05/09 17:21:06 Baddad
Second coat drying.
Second coat drying.
0 2018/05/09 17:21:01 Baddad
0 2018/05/09 17:20:57 Baddad
So after a bit of grinding on the welds I wanted to smooth out, I primered the bare metal surfaces.
0 2018/05/09 17:20:52 Baddad
Then welded in. I used seam sealer to fill in the gaps and prep for paint.
0 2018/05/09 17:13:26 Baddad
Pieces tacked in.
Pieces tacked in.
0 2018/05/09 17:13:20 Baddad
Made a template
Made a template
0 2018/05/09 17:13:18 Baddad
Then folded it over.
0 2018/05/09 17:13:15 Baddad
Up front I cut just a little lower than this line
0 2018/05/09 17:13:12 Baddad
Got it tacked in then final welded. That spring perch is fully reinforced now 👍
0 2018/05/09 17:13:09 Baddad
More hi tech cad work 😋
0 2018/05/09 17:13:06 Baddad
I cut this out and folded the inner fender back.
0 2018/05/09 17:13:03 Baddad
Now to fill the end gaps. Here’s the rear one.
0 2018/05/09 17:12:59 Baddad
When welding this you’ll want to keep the spring bushing cool. I used a spray bottle before and after welding.
0 2018/05/08 21:44:13 Baddad
Plasma cut a 3/16” piece and tacked it in. Grab a deep 13/16”  socket and make sure you can access the bolt before ya weld it in.
Plasma cut a 3/16” piece and tacked it in. Grab a deep 13/16” socket and make sure you can access the bolt before ya weld it in.
0 2018/05/08 21:44:10 Baddad
Used the latest CAD design software 😋
0 2018/05/08 21:44:07 Baddad
Next I didn’t like this area all open and exposed. Plus I wanted to reinforce the spring mount to.
0 2018/05/08 21:44:04 Baddad
And all welded in 👍
And all welded in 👍
0 2018/05/08 21:41:15 Baddad
Here’s that 3/16-1/4” overlap on the frame. You can see how the frame has a beveled contour in this area. The overlap should add a tremendous amount of strength here.
0 2018/05/08 21:41:11 Baddad
Then plug welded it. Do these first to get your plate to contour correctly.
0 2018/05/08 21:37:11 Baddad
This is the 1” hole I drilled to plug weld to the tie ins.
0 2018/05/08 21:37:08 Baddad
I used a jack to push the plate against the tie in
0 2018/05/08 21:37:04 Baddad
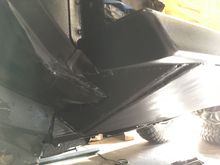
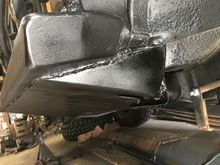
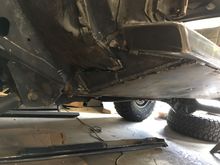
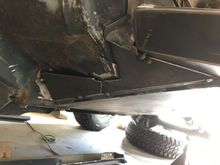
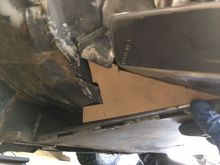
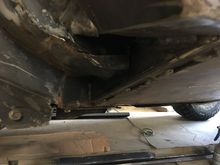
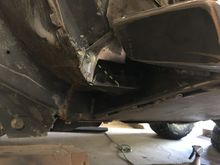
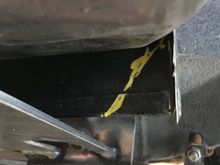
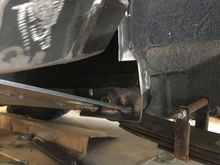
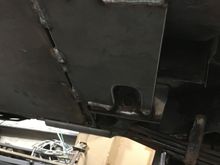
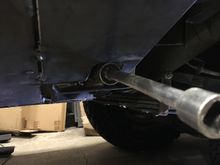
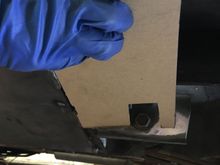
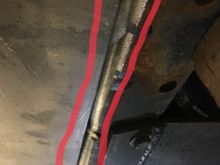
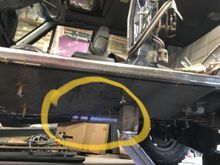
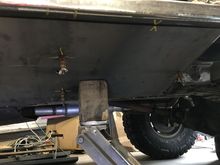
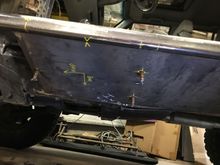
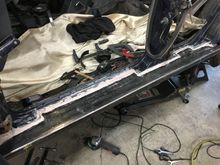
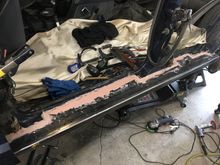
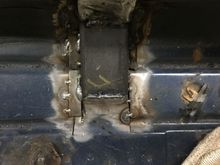
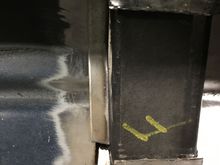
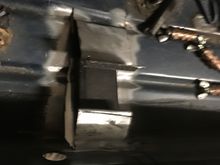
Here you can see where the plate flexes and why the tie ins are different front and rear. Make sure to grind smooth the welds at the bottom of where the tie ins and frame meet. I also had to smooth up a couple of welds from my frame stiffeners. I wouldn’t suggest doing this whole mod until after ya put in frame stiffeners, would be a major pita to weld to the thin “frame”.
0 2018/05/08 18:19:21 Baddad
Used a jack to flex the plate into position.
0 2018/05/08 18:19:20 Baddad
Painted the lower body area that’s getting covered & the back side of the boat side plate.
0 2018/05/08 18:19:17 Baddad
I’m not a body man so I literally used a 60grit flappy to “smooth” it out 😂. Its Gonna get bedlined and hopefully the sill plates will fit up when I’m done 🤞
0 2018/05/08 18:13:11 Baddad
Then flattened out the welds and used a little bondo to smooth it out.
0 2018/05/08 18:13:07 Baddad
Got the top welded.
Got the top welded.
0 2018/05/08 18:13:03 Baddad
Finished welding up the floor, then used seam sealer to fill in the gaps and smooth it out.
0 2018/05/08 18:12:59 Baddad
Then weld it together. I struggle with sheet metal welding so it kinda looks like crap 💩. Gonna use seam sealer to fill the gaps.
0 2018/05/06 19:06:53 Baddad
I cut and bent some heavy gauge sheet metal to fill the gap.
0 2018/05/06 19:06:49 Baddad
Cut the tabs to a comfortable length, then hammer them down to the 2x2 tie in. See the gap on the left...
0 2018/05/06 19:06:46 Baddad
This is what the floor board area looks like.
0 2018/05/06 19:06:43 Baddad
First
Page
6 of 10
Last
Go To
Page
  • 1
  • ...
  • 4
  • 5
  • 6
  • 7
  • 8
  • 9
  • 10
6 of 10
Go To GO
Go to page of 10 pages
  • 1
  • ...
  • 4
  • 5
  • 6
  • 7
  • 8
  • 9
  • 10

Top
Jeep Cherokee Forum
  • Contact Us
  • FAQ
  • Archive
  • Advertising
  • Cookie Policy
  • Privacy Statement
  • Terms of Service
  • Your Privacy Choices
  • Manage Preferences

© 2026 MH Sub I, LLC dba Internet Brands


When you click on links to various merchants on this site and make a purchase, this can result in this site earning a commission. Affiliate programs and affiliations include, but are not limited to, the eBay Partner Network.