
My 2000 xj.

Thread Starter
CF Veteran
Joined: Sep 2010
Posts: 4,968
Likes: 0
From: Salt Lake City, UT
Year: 2000
Model: Cherokee
Engine: 4.0L
thanks!
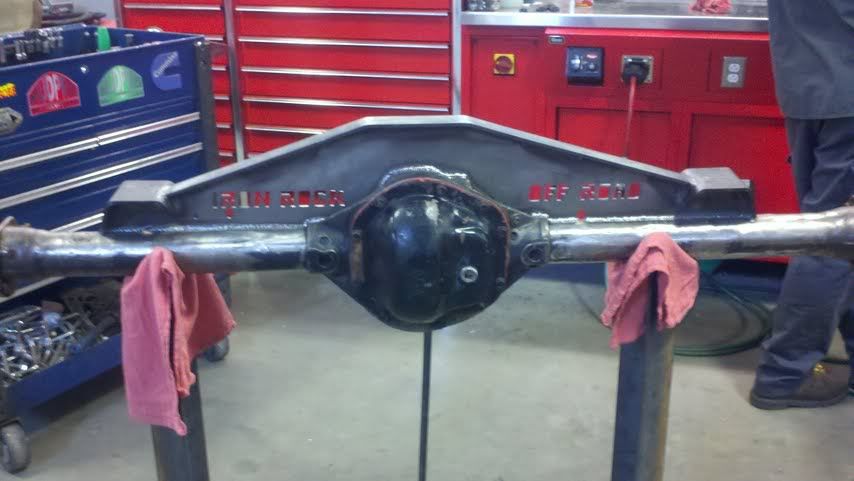
I got my rear D44 gears and locker setup. it has USA standard gears with a spartan locker. I set up the diff with all new bearings and a U-bolt yoke for the rear as well. welded my truss on today. looks beefy. I am happy with the money spent. just wish my rear wheel bearings will arrive soon. (Back-ordered) some pics of the truss.... was hard to find any online....


once my wheel bearings arrive i can make brake lines and install it. then move onto wheels ect...

I got my rear D44 gears and locker setup. it has USA standard gears with a spartan locker. I set up the diff with all new bearings and a U-bolt yoke for the rear as well. welded my truss on today. looks beefy. I am happy with the money spent. just wish my rear wheel bearings will arrive soon. (Back-ordered) some pics of the truss.... was hard to find any online....
once my wheel bearings arrive i can make brake lines and install it. then move onto wheels ect...
Thread Starter
CF Veteran
Joined: Sep 2010
Posts: 4,968
Likes: 0
From: Salt Lake City, UT
Year: 2000
Model: Cherokee
Engine: 4.0L
Senior Member
Joined: Mar 2011
Posts: 636
Likes: 0
From: Conowingo, MD
Year: 1999
Model: Cherokee
Engine: 4.0
Thread Starter
CF Veteran
Joined: Sep 2010
Posts: 4,968
Likes: 0
From: Salt Lake City, UT
Year: 2000
Model: Cherokee
Engine: 4.0L
thanks! I am enjoying it, glad some people are enjoying reading it. I just want to get the rear end finished and test it all out. I am VERY lucky to be able to work on all my own stuff at my own will at work, and use all the equipment for free. Helps make these projects more affordable and enjoyable.
Thread Starter
CF Veteran
Joined: Sep 2010
Posts: 4,968
Likes: 0
From: Salt Lake City, UT
Year: 2000
Model: Cherokee
Engine: 4.0L
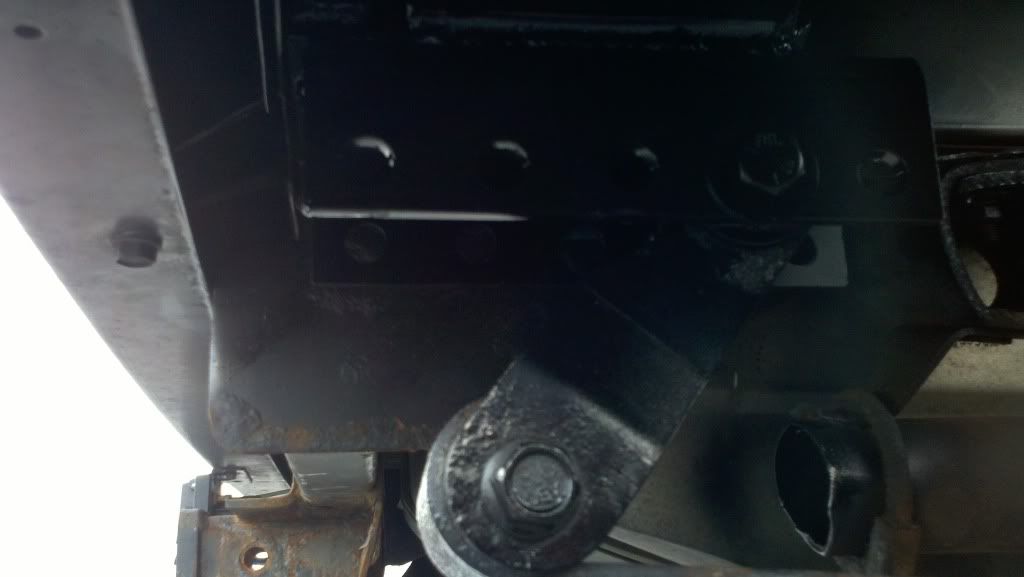
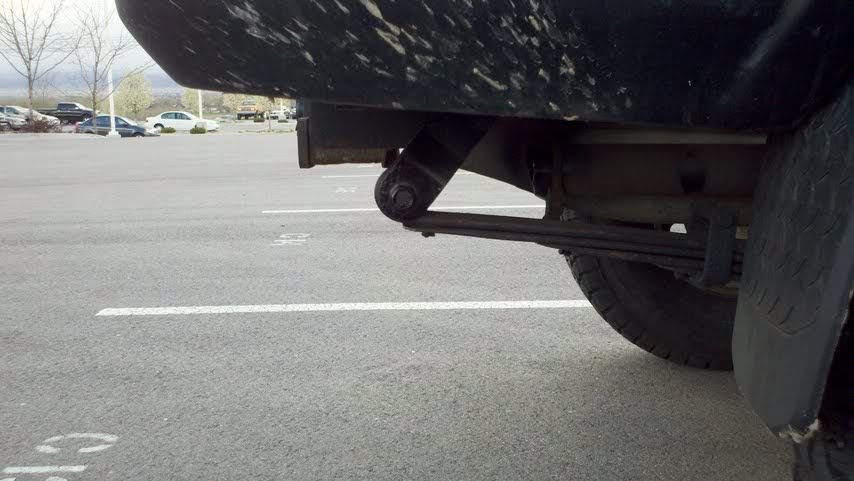
I got the rear shackle relocation brackets on last night. the ride is a TON better. its a lot less harsh and bumpy. some pics of the install and new shackle angle. before the brackets my shackles where a few degrees from vertical at ride height..
new shackle angle.

shackles while flexing (limited by shocks at the moment will be fixed with new axle and brackets
droop side

compression side
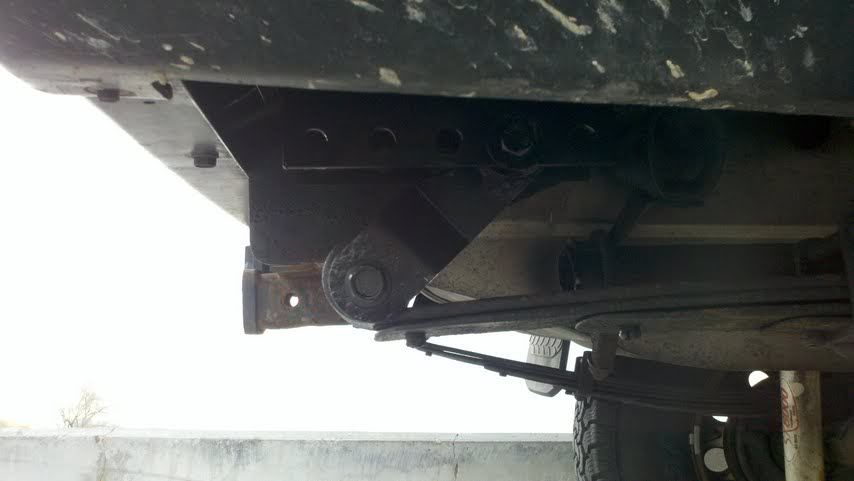
Overall these are awesome! clean install, had to modify the factory shackle box, had to remove about 3/4" of the bottom of it and then slit it at the corner and folded it in slightly. then removed hitch. installed upped bracket. welded to uni-body, installed hitch and lower brackets. adjusted shackle angle made sure it all worked well. then welded in the lower brackets. welding is optional but recommended. for me if i am going to be far distances from my tools and off road i don't want to find out later i should have gone the one step further. they are fully welded on. some other flexing pics just to test the shackle relocation. once the rear axle is in and shocks set up i plan on fully flexing it out.


new shackle angle.
shackles while flexing (limited by shocks at the moment will be fixed with new axle and brackets
droop side
compression side
Overall these are awesome! clean install, had to modify the factory shackle box, had to remove about 3/4" of the bottom of it and then slit it at the corner and folded it in slightly. then removed hitch. installed upped bracket. welded to uni-body, installed hitch and lower brackets. adjusted shackle angle made sure it all worked well. then welded in the lower brackets. welding is optional but recommended. for me if i am going to be far distances from my tools and off road i don't want to find out later i should have gone the one step further. they are fully welded on. some other flexing pics just to test the shackle relocation. once the rear axle is in and shocks set up i plan on fully flexing it out.
Last edited by Gorillaxj; Apr 21, 2011 at 11:07 PM.
Thread Starter
CF Veteran
Joined: Sep 2010
Posts: 4,968
Likes: 0
From: Salt Lake City, UT
Year: 2000
Model: Cherokee
Engine: 4.0L
I believe your wondering about the rear flex? the more "flex" (travel up and down) your suspension has the better the chances are your wheels will not leave the ground and will make for better stability and traction. less chances of getting stuck or having to winch up an obstacle.
the "better" flex in the rear is caused by the shackle angle. the shackle is the pivot point in a leaf spring suspension. as the spring compresses is actually gets longer as it flattens out, if your shackle angle is vertical like mine was the spring is fighting its self and has to overcome the full vehicle weight to get longer (compress) and creates a rough/harsh ride. when the shackle is at a 45* angle at ride height it allows it to easily compress and extend.
there is also the other direction a shackle moves. when the tire drops the shackle will move in (towards the axle) as the spring contracts (gets shorter by arcing in) and the shackle allows it to move freely. when it is already vertical at ride height and the tire drops the shackle is almost maxed out already. not allowing the spring to arch and limiting down travel as well as making a harsh ride.
from the factory they come with a close to 45* shackle angle. however after market springs and lift kits cause the angle to get worse and more vertical if not completely vertical. so installing these help to make the spring be fully usable and ride better by restoring the 45* shackle angle. the shackle is the lever in the system and the angle changes the amount of leverage the spring has to overcome in order to move up and down.
hopefully that all made sense...
Last edited by Gorillaxj; Apr 22, 2011 at 12:21 AM.
Senior Member
Joined: Mar 2011
Posts: 636
Likes: 0
From: Conowingo, MD
Year: 1999
Model: Cherokee
Engine: 4.0
Yes it did seems like I good idea that I will have to doing on the next few weeks I've seen it done just didn't fully understand the point but now I have a lot idea of how it works so where dud you get yours from
Thread Starter
CF Veteran
Joined: Sep 2010
Posts: 4,968
Likes: 0
From: Salt Lake City, UT
Year: 2000
Model: Cherokee
Engine: 4.0L
So today i got the rear D44 installed. I had to make some custom brake lines as the old ones had seen there last day. i got all new drum hardware and new shoes, wheel cylinders and resurfaced the drums. I got the old C8.25 removed, mocked up he rear axle and started welding the spring perches on and the shock tabs after setting pinion angle. here are some pics before final painting. ended up moving the rear axle back 1 inch so that the rear wheel wells could be opened up more if needed and for slightly better departure angles...


I also took some more detailed pics of the front as to how the brackets are mounted and clearances....


I also took some more detailed pics of the front as to how the brackets are mounted and clearances....
Last edited by Gorillaxj; Apr 24, 2011 at 01:51 AM.
Thread Starter
CF Veteran
Joined: Sep 2010
Posts: 4,968
Likes: 0
From: Salt Lake City, UT
Year: 2000
Model: Cherokee
Engine: 4.0L
some other pics of final ride height. need to measure the actual height, but It started with a 4.5" RE lift kit. the front brackets and coil bucket raise the front 1.5", the rear shackle relocation raised it 1"-1 1/4" and the new leaf perches raised it 1/4"-1/2", so i believe i am sitting at 5.5-6" of lift taking in account for some spring sag.


Last edited by Gorillaxj; Apr 24, 2011 at 01:51 AM.
Thread Starter
CF Veteran
Joined: Sep 2010
Posts: 4,968
Likes: 0
From: Salt Lake City, UT
Year: 2000
Model: Cherokee
Engine: 4.0L
For the custom brake lines they cost me about 14$, I got them over the counter from O'rielys auto parts. they where a British line. and i used a 51" line for the pass side, and a 24" line for the drivers. There was some slack or extra line and that was take up by some creative bending but it worked really well. it is 3/16's line with a British thread. The rear drive-line is working well with the lift and the stretch. now i need to measure for the front drive-line and get it made and then off to test it all out.