
Green Machine, 98' XJ


Thread Starter
Junior Member
Joined: Apr 2011
Posts: 48
Likes: 0
From: Logan, UT
Year: 1998
Model: Cherokee
Engine: 4.0 I6
This first post is to catch you up to speed. I don't have any pics from when I first got it, however I bought my jeep in 2007, its a 98' forest green, 4 door. It came with 101,000 miles give or take. Apart from the 2.5" lift, 31x10.5 BFGoodrich all-terrains, it was stock. Told it had never been taken off road and it looked it. I drove it like that for about a year, then one night I hit black ice and rolled it off the road. Sounds worse than it was. Apart from bending a lot of suspension parts and ripping off factory trim, there was on minor dents in the body. I popped out the dents as best I could, and figured might as well get a new lift. So I ordered Rusty's 4.5" lift and got some 32" procomp all-terrains. And from there it kept going.
As it sits now:
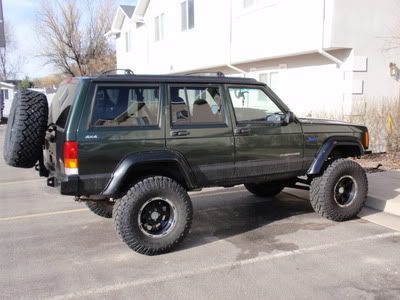
Specs List.
Rusty's 4.5" lift with 1" spacers and shackles
Ironrockoffroad long arm upgrade
Ironrockoffroad Hack n' Tap SYE
Procomp ES9000 shocks
AEM cold air intake
Rugged Ridge throttle body spacer
3 row all metal radiator
relocated washer fluid reservoir
Rugged Ridge steering brace
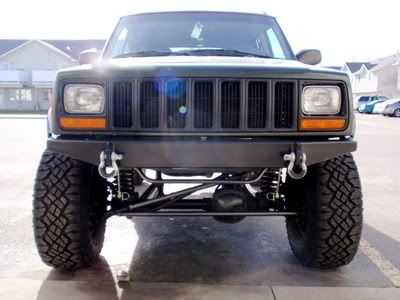
JCRoffroad stage 3 front bumper, stage 2 rear bumper (custom built swing down tire carrier w/full size spare)
JCRoffroad 1-ton steering
Chevy 1500 2wd brake lines
Flowmaster 40 muffler
33x12.5x15 Wrangler Duratracs on Procomp Alloy wheels
Geared down to 4.10's
Bedlined the lower panels and roof to remove rust.
There are probably some things that I have missed or forgotten. But if I recall something I'll add it later. My goal is to build a sleeping giant, the ultimate DD/Krawler. I'm trying to keep as much of a stock look but make it as capable as possible
As it sits now:
Specs List.
Rusty's 4.5" lift with 1" spacers and shackles
Ironrockoffroad long arm upgrade
Ironrockoffroad Hack n' Tap SYE
Procomp ES9000 shocks
AEM cold air intake
Rugged Ridge throttle body spacer
3 row all metal radiator
relocated washer fluid reservoir
Rugged Ridge steering brace
JCRoffroad stage 3 front bumper, stage 2 rear bumper (custom built swing down tire carrier w/full size spare)
JCRoffroad 1-ton steering
Chevy 1500 2wd brake lines
Flowmaster 40 muffler
33x12.5x15 Wrangler Duratracs on Procomp Alloy wheels
Geared down to 4.10's
Bedlined the lower panels and roof to remove rust.
There are probably some things that I have missed or forgotten. But if I recall something I'll add it later. My goal is to build a sleeping giant, the ultimate DD/Krawler. I'm trying to keep as much of a stock look but make it as capable as possible
Thread Starter
Junior Member
Joined: Apr 2011
Posts: 48
Likes: 0
From: Logan, UT
Year: 1998
Model: Cherokee
Engine: 4.0 I6
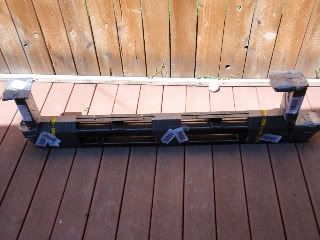
Well I should have gone and looked on the porch before I posted Some goodies were sitting there waiting for me. In last week I purchased some AJ's offroad super square sliders. I went with square to keep the lines looking nice on the jeep. Round ones are good, but the jeep is square.
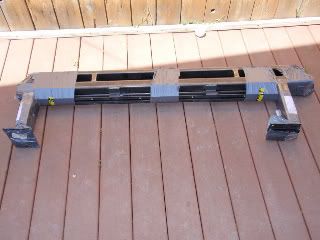
All I can say is beefy
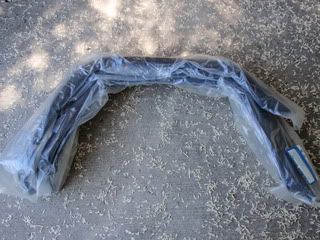
And because I am planning on trimming the fenders I ordered some of rustys flares. Apparently they are out of the fex flares so they sent me the standard. I figure the worse that can happen is they break and I am stuck getting the flex flares.
I didn't unwrap them because they are marked on the bag which fender goes where, I would some how mix them up. Better left as is IMO.
All I can say is beefy
And because I am planning on trimming the fenders I ordered some of rustys flares. Apparently they are out of the fex flares so they sent me the standard. I figure the worse that can happen is they break and I am stuck getting the flex flares.
I didn't unwrap them because they are marked on the bag which fender goes where, I would some how mix them up. Better left as is IMO.
Thread Starter
Junior Member
Joined: Apr 2011
Posts: 48
Likes: 0
From: Logan, UT
Year: 1998
Model: Cherokee
Engine: 4.0 I6
A little more update I have been buying some parts over the last week and am told that they are arriving or have arrived. My summer plans are to add on some TnT framerail stiffeners (those should be at my house), then put on my sliders from AJ's offroad.
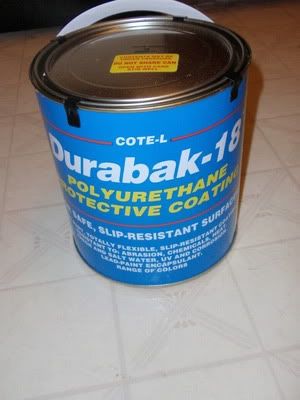
I've been having some rust problems and I like the idea of bedling the whole jeep. I dont' want to paint whats just going to get scratched, and I've played with the idea of rattlecan paint job, but have gone with the bedlined idea. I found a product called durabak, a do it yourself liner. You can get it in multiple colors with UV protection and it comes in a smooth application. I bought a couple gallons of it in Olive Drab, it was the closet green they had to what green is on my jeep right now. Before I put on the bed liner I'm going to trim my fenders, cut holes for some hood vents, and sand away all the rust spots. Then get it covered in the bedliner.
And to cap it off I'm going to get a ZJ gas tank skid from the JY and find me some diff guards.
What do you guys think?
I'll get pics posted when parts start arriving and when I get the projects going.
Thread Starter
Junior Member
Joined: Apr 2011
Posts: 48
Likes: 0
From: Logan, UT
Year: 1998
Model: Cherokee
Engine: 4.0 I6
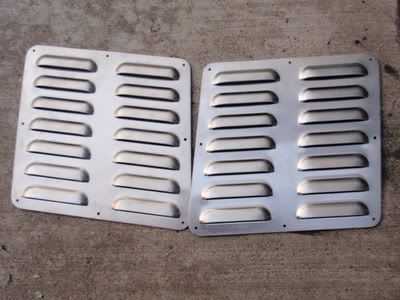
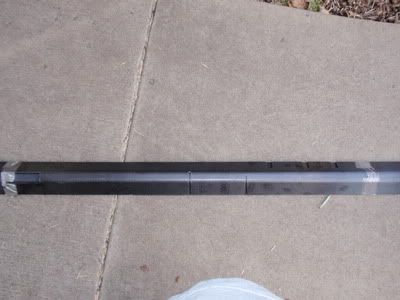
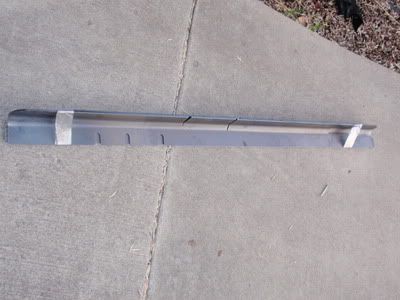
I found these genright hood vents posted on craigs list for $30, so I just had to get them at that price.
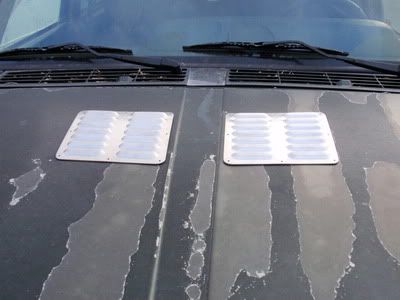
Also took the time to do couple pics of where I think I'll be putting the hood vents

And while I was out and about I came home to find the UPS man had left these by my front door, These have been one of my favorite purchases as of late
Now I'm sure that you can notice the wonderful paint job in the hood mock up pics that I have going on. That clear coat peel is going on all over the jeep and some rust spots are coming out as well. Thus I bought myself a couple cans of this protective coating in olive drab with UV protection do address the problems
At this point I am just waiting till I get back into town for more than just a day or two so I can begin to put on the parts that I have started accumulating.
Also took the time to do couple pics of where I think I'll be putting the hood vents
And while I was out and about I came home to find the UPS man had left these by my front door, These have been one of my favorite purchases as of late
Now I'm sure that you can notice the wonderful paint job in the hood mock up pics that I have going on. That clear coat peel is going on all over the jeep and some rust spots are coming out as well. Thus I bought myself a couple cans of this protective coating in olive drab with UV protection do address the problems
At this point I am just waiting till I get back into town for more than just a day or two so I can begin to put on the parts that I have started accumulating.
Trending Topics
Thread Starter
Junior Member
Joined: Apr 2011
Posts: 48
Likes: 0
From: Logan, UT
Year: 1998
Model: Cherokee
Engine: 4.0 I6
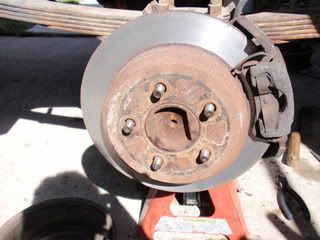
Just purchased myself a set of rear disc brakes off a 96 grand cherokee from a guy here in town. I'd have pics but camera is on vacation with the wife. The rotors need to be turned, and needs new e-brake shoes but other than that they look good. Can't wait to put them on.
Thread Starter
Junior Member
Joined: Apr 2011
Posts: 48
Likes: 0
From: Logan, UT
Year: 1998
Model: Cherokee
Engine: 4.0 I6
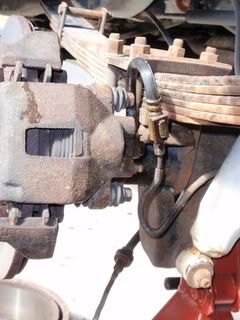
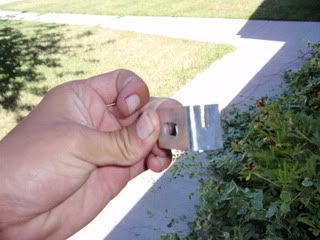
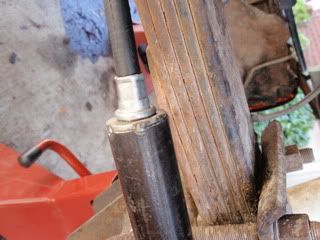
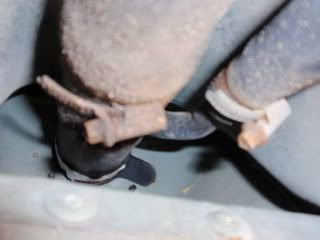
Followed a write up on the zj disc conversion and things were going smooth for awhile. I didn't snap and pics on account of all the write ups with pics. Soooo I'll jump to where my problems came in. Once I assembled the parking brake assembly I got the calipers on and flipped the soft lines to keep them from snagging on things like this
Put the caliper on go to put on the parking brake. I read that the 97 ford e-brake cables work for this mod so I previously bought some. I get them out only to find that the are a foot to long. I them moved to plan b and cut the spring back off the original cable and make a loop with a hose clamp ( sorry no Pic) but this came out making my cable way to short. So a quick brainstorming session and I came up with this.
I made it so it will slip over the brake arm on the backing plate then I can slide the xj brake cable down in the slot. Here is a shot of it on the backing plate.

I would have finished the brakes, but I cut the tension spring off my drivers side cable to make the loop. So a 45 minute trip to 5 auto parts stores only to be told xj cables are a specialty order. So I am now waiting a week to get that in. Then I moved on and decide e-brakes aren't needed to drive and finished it up
only to find that the wheel studs were to small. Its a possibilty with steel wheels that the original studs are to short and alloys for sure to short. I went to 3 different auto parts stores to collect 10 zj rear wheel studs. Using my trusty hammer I pounded the old ones out then used the tire iron and a spare lug to pull the new ones in.
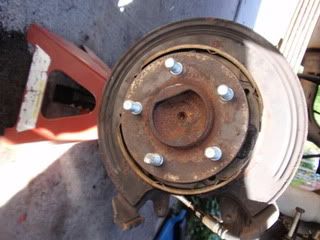
They look good right.
Well I put the wheels back on and find that they still may be to short for my rims. So now I am on the fence of whether to get some steelies or find some longer studs. And to top it off the jeep is not on wheels yet still sitting on the stands
Put the caliper on go to put on the parking brake. I read that the 97 ford e-brake cables work for this mod so I previously bought some. I get them out only to find that the are a foot to long. I them moved to plan b and cut the spring back off the original cable and make a loop with a hose clamp ( sorry no Pic) but this came out making my cable way to short. So a quick brainstorming session and I came up with this.
I made it so it will slip over the brake arm on the backing plate then I can slide the xj brake cable down in the slot. Here is a shot of it on the backing plate.
I would have finished the brakes, but I cut the tension spring off my drivers side cable to make the loop. So a 45 minute trip to 5 auto parts stores only to be told xj cables are a specialty order. So I am now waiting a week to get that in. Then I moved on and decide e-brakes aren't needed to drive and finished it up
only to find that the wheel studs were to small. Its a possibilty with steel wheels that the original studs are to short and alloys for sure to short. I went to 3 different auto parts stores to collect 10 zj rear wheel studs. Using my trusty hammer I pounded the old ones out then used the tire iron and a spare lug to pull the new ones in.
They look good right.
Well I put the wheels back on and find that they still may be to short for my rims. So now I am on the fence of whether to get some steelies or find some longer studs. And to top it off the jeep is not on wheels yet still sitting on the stands
Thread Starter
Junior Member
Joined: Apr 2011
Posts: 48
Likes: 0
From: Logan, UT
Year: 1998
Model: Cherokee
Engine: 4.0 I6
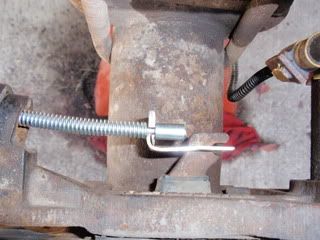
My new e-brake cable came today so I was able to finish the e-brake cable mod. With the already fabbed arm ends from the previous post I slide the cable into place to find that the cable was about 3" to long for the cable to work properly. So i came up with this to solve that porblem.
I found some old pip that I had lying around ( I don't know the diameter) and cut it to a 3" length, the opening was to wide and it would slide up over the cable so I welded a washer to the top of the pipe and reamed it out with a 1/2" drill bit until it was snuggly fit on the cable, like this
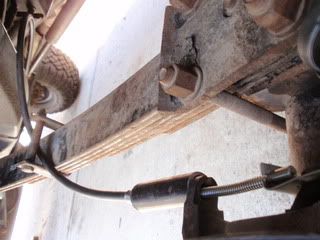
With that taken care of I slid the cable through the back blate mounting hole and into the fabbed brackets and tightened the cables to create enogh tension to hold the pipe against the e-brake mounting bracket like so
And the finished product came out looking like this.
I ran the little bit of cable through the leafs to keep it up out of the way. A couple test pulls proved that the cables worked just like before. My zj e-brake conversion is complete now all that remains is getting the calipers set up bled and tires on, and the test drive.
I found some old pip that I had lying around ( I don't know the diameter) and cut it to a 3" length, the opening was to wide and it would slide up over the cable so I welded a washer to the top of the pipe and reamed it out with a 1/2" drill bit until it was snuggly fit on the cable, like this
With that taken care of I slid the cable through the back blate mounting hole and into the fabbed brackets and tightened the cables to create enogh tension to hold the pipe against the e-brake mounting bracket like so
And the finished product came out looking like this.
I ran the little bit of cable through the leafs to keep it up out of the way. A couple test pulls proved that the cables worked just like before. My zj e-brake conversion is complete now all that remains is getting the calipers set up bled and tires on, and the test drive.
Thread Starter
Junior Member
Joined: Apr 2011
Posts: 48
Likes: 0
From: Logan, UT
Year: 1998
Model: Cherokee
Engine: 4.0 I6
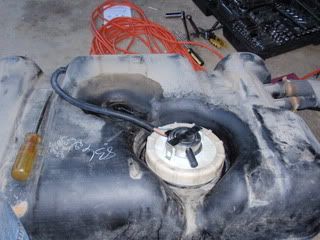
I've been having slow starts on the jeep because my fuel pump is going out. I did some shopping and found some aftermarket pumps ranging from $120-350. Then the other day while browsing e-bay I found a brand new fuel pump assembly for $100. I figured the original lasted almost 14 years and bought it. Here is a write up of my fuel pump assembly change.
First make sure the tank is empty or as close to empty as possible. This makes things alot easier.
I started by removing the metal cover that protects the gas tank hoses, just 4 self-threading bolts was all that holds it on, once it was removed about a pound of dirt fell out on top of me.

once the hose are exposed loosen the hose clamps and just give the two hoses a hard tug and the come right off.
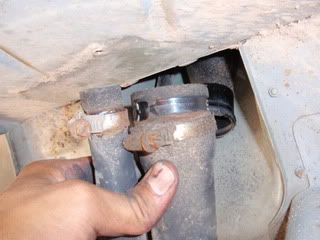
I didn't get any pics but on the 97+ cherokees there are two straps that holds the tank up. Located towards the front of the jeep are the bolts that hold the straps. I spent about 30 minutes wrenching these two nuts off. Only to discover that the heat shield between the muffler and tanks had 3 nuts holding it up. One above the nut I just removed and two on the frame holding up the muffler also. Rather than take down all these nuts I cut the heat shield on the front corner to allow the tank strap bolt be removed with out removing the whole heat shield. Once the straps are loosed you can drop the tank.
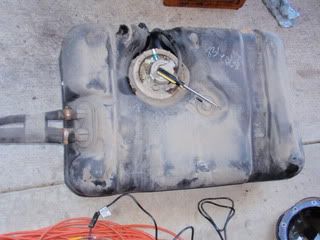
Remove the white plastic ring holding the fuel pump assembly in the tank. I had to take a dull screw driver and a rubber mallet to coax it off. Once its off just pull the whole assembly up and out.
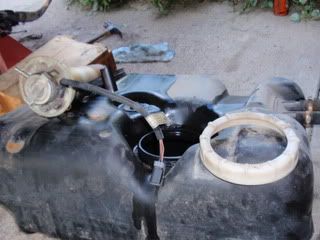
Place the new assembly in and hold the spring mechanism down while you put the ring top back on to hold it in place.
 .
.
Then follow the same steps of removal to put it back together. Its an easy fix that takes 2 hours to complete.
First make sure the tank is empty or as close to empty as possible. This makes things alot easier.
I started by removing the metal cover that protects the gas tank hoses, just 4 self-threading bolts was all that holds it on, once it was removed about a pound of dirt fell out on top of me.
once the hose are exposed loosen the hose clamps and just give the two hoses a hard tug and the come right off.
I didn't get any pics but on the 97+ cherokees there are two straps that holds the tank up. Located towards the front of the jeep are the bolts that hold the straps. I spent about 30 minutes wrenching these two nuts off. Only to discover that the heat shield between the muffler and tanks had 3 nuts holding it up. One above the nut I just removed and two on the frame holding up the muffler also. Rather than take down all these nuts I cut the heat shield on the front corner to allow the tank strap bolt be removed with out removing the whole heat shield. Once the straps are loosed you can drop the tank.
Remove the white plastic ring holding the fuel pump assembly in the tank. I had to take a dull screw driver and a rubber mallet to coax it off. Once its off just pull the whole assembly up and out.
Place the new assembly in and hold the spring mechanism down while you put the ring top back on to hold it in place.
.Then follow the same steps of removal to put it back together. Its an easy fix that takes 2 hours to complete.

Thread Starter
Junior Member
Joined: Apr 2011
Posts: 48
Likes: 0
From: Logan, UT
Year: 1998
Model: Cherokee
Engine: 4.0 I6
Thanks for the compliments and support
After the disc brake swap, I had only about 6-7 threads for the lug nuts to spin onto with the alloy rims that I had. This wasn't alot for peace of mind, so after some inner turmoil and debate I sold the alloys and bought myself some steel rims. I was sad to see the alloys go, but at the same time glad to get some crager soft 8's. The cragers just look so damn good on a jeep.
Before:
After:
The steel rims gave me more than enough thread to put my lug nuts on, with plenty of peace of mind. And I really can't help but admire the look the cragers give the jeep.