
Green Machine, 98' XJ


Thread Starter
Junior Member
Joined: Apr 2011
Posts: 48
Likes: 0
From: Logan, UT
Year: 1998
Model: Cherokee
Engine: 4.0 I6
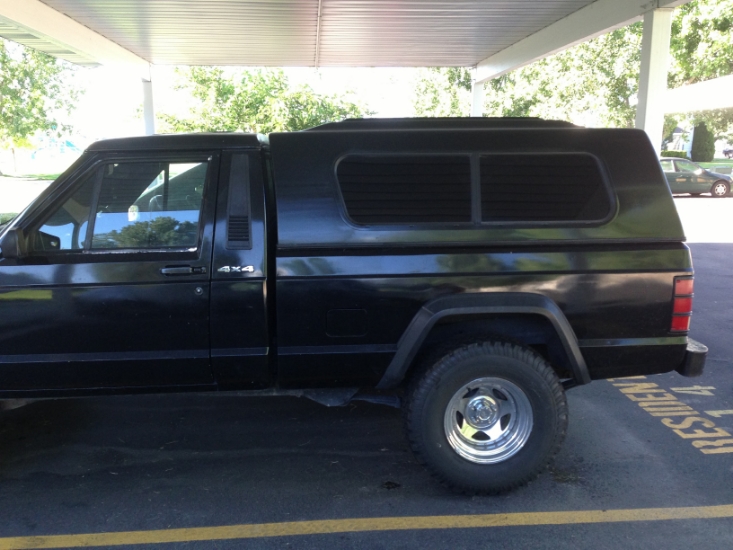
I snapped a couple new close up shots of the paint job I did. Its by no means professional but it is durable. The close ups show some of the bad but hey its a jeep not a show car, and there is a ton of dirt and mud from one of my offroad trips, still haven't cleaned it.
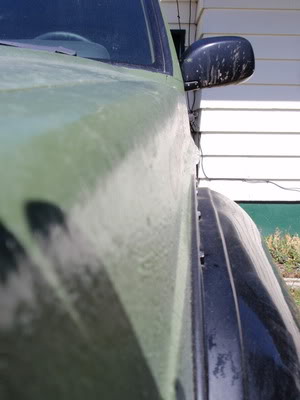
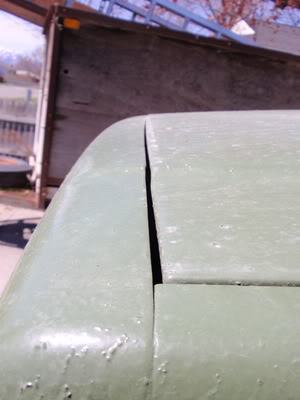

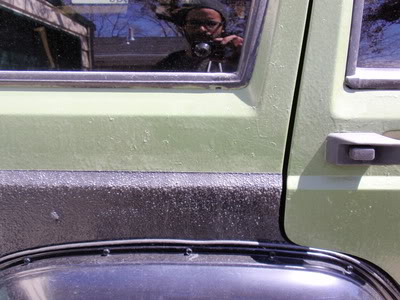
All the shots are of spots that had been run through the trees, not a single pin strip, and the few there were, are easily buffed out. For maintenance soap and a scrub brush, and I've found for a nice clean shine I apply a light coat of tire wax. Gleams like brand new every time.
All the shots are of spots that had been run through the trees, not a single pin strip, and the few there were, are easily buffed out. For maintenance soap and a scrub brush, and I've found for a nice clean shine I apply a light coat of tire wax. Gleams like brand new every time.
Thread Starter
Junior Member
Joined: Apr 2011
Posts: 48
Likes: 0
From: Logan, UT
Year: 1998
Model: Cherokee
Engine: 4.0 I6
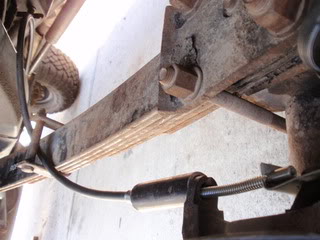
For the brake cable I reused the xj e-brake cables. I fashioned a clip from some some aluminum strip I bought at home depot I made a hole for the arm to go through and notched it at the top to slide the cable down into like so
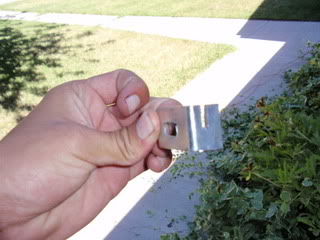
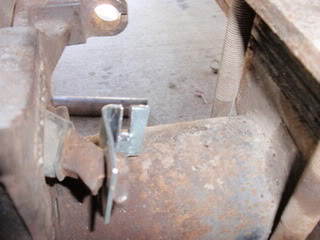
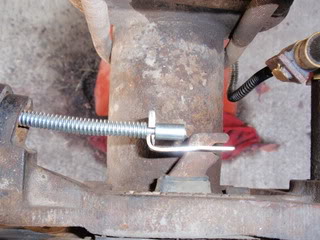
After that I measured to see how much cable needed to be taken up to remove the slack so the cable would be engaged when the e-brake lever was pulled. I used some pipe I had laying around that was large enough to sit against the bracket that hold the cable onto the backing plate as you can see in the left of the picture above. To that pipe I tac welded a washer with an opening just large enough to slide the e-brake cable in to lock it to that
Then I did a quick mock to see fitment
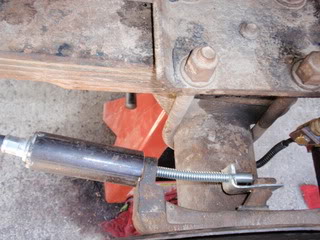
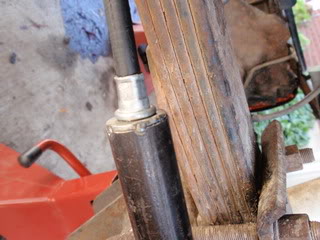
Then tightened it all up with the cable brackets on the body giving me this
I haven't had a single problem with over six months of use. I use the parking brake more now that before just use my fab work.
After that I measured to see how much cable needed to be taken up to remove the slack so the cable would be engaged when the e-brake lever was pulled. I used some pipe I had laying around that was large enough to sit against the bracket that hold the cable onto the backing plate as you can see in the left of the picture above. To that pipe I tac welded a washer with an opening just large enough to slide the e-brake cable in to lock it to that
Then I did a quick mock to see fitment
Then tightened it all up with the cable brackets on the body giving me this
I haven't had a single problem with over six months of use. I use the parking brake more now that before just use my fab work.
 .
.
Thread Starter
Junior Member
Joined: Apr 2011
Posts: 48
Likes: 0
From: Logan, UT
Year: 1998
Model: Cherokee
Engine: 4.0 I6
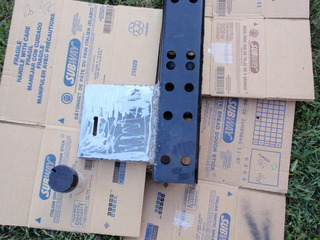
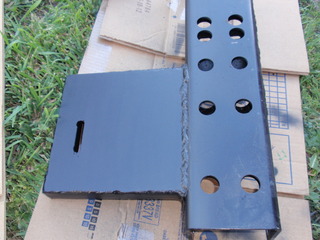
I was feeling a bit ambitious and fabbed up transfer case skid. I intergrated it into the cross member that came with my IRO longarm set up. I couldn't find my camera on the first day so I don't have any pics during the making, but I managed to get some before I painted it.

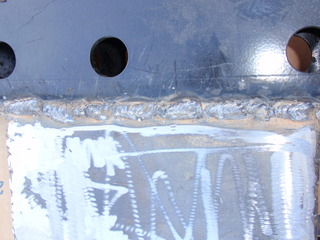
Here is a close up of some of the welds....don't judge to harshly its only the 2nd time that I have welded.
And here it is all painted up and finished
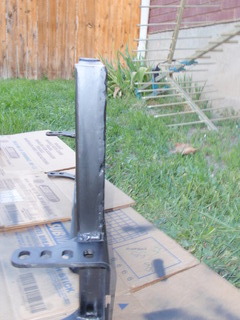
I ran out of light so tomorrow I will get it all bolted back up and on.
Here is a close up of some of the welds....don't judge to harshly its only the 2nd time that I have welded.
And here it is all painted up and finished
I ran out of light so tomorrow I will get it all bolted back up and on.
Thread Starter
Junior Member
Joined: Apr 2011
Posts: 48
Likes: 0
From: Logan, UT
Year: 1998
Model: Cherokee
Engine: 4.0 I6
Ordered some goodies today, most were needs, with 2 wants thrown in. But hey anything for the jeep is a goody. I have been having vibration problems, and have been trying to fix it, and have reached the point where I am ready to throw cash at it to fix it. So I ordered some of the parts I know were worn and could possibly contribute to the problem.
I these http://www.google.com/imgres?q=brown...r:12,s:0,i:112 and a transmission mount from autozone to go with them.
Also purchased a pair of these http://www.google.com/imgres?q=timke...,r:9,s:0,i:106
I already rebuilt both front and rear driveshafts. And next up is a new harmonic balancer when I get a few more dollars.
As for the wants I threw in, I'm trying to get the overheating problems solved. I already put in a three core radiator and added some hood louvers. Both of these work great when cruising at speed and there is sufficient air being pushed through but at low speeds when crawiling I still over heat. So I have purchased this from dirt bound offroadhttps://www.dirtboundoffroad.com/wp-content/themes/acquisto/timthumb.php?src=https://www.dirtboundoffroad.com/wp-content/uploads/2011/08/DSC_0748.jpg&h=410&w=408?1339272993799 along with the aluminum shroud. I've read good reviews on this and hear it does the job, and a perk is my MPG should go up as well because you remove the mechanical fan to fit these electric ones. So as soon as the summer ends, I will be installing these parts.
Thread Starter
Junior Member
Joined: Apr 2011
Posts: 48
Likes: 0
From: Logan, UT
Year: 1998
Model: Cherokee
Engine: 4.0 I6
I had a successful day at the jy. First thing I found was a gas tank skid from a pre 96 cherokee.
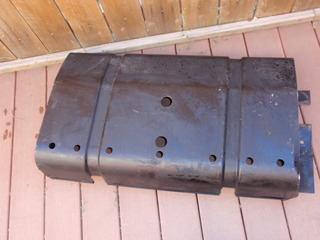
It was just sitting on the ground next to it, no need to even pull it. With the small mod required to make it fit I think it was well worth the walk over to it. I also found this on the second cherokee I walked up to. Took 3 minutes to pull it off.

It was 21 dollars for both of them, great deal eh? In the next couple of days I will be putting these on the jeep.
I also picked this up for 150 bones.
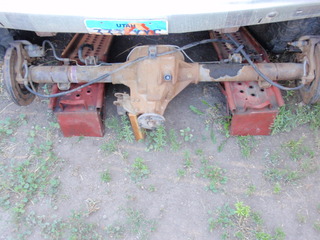
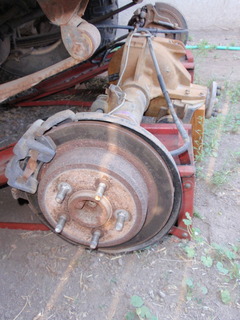
Its way to heavy to pull out for better pics. I was hoping to get lucky and it have 4.10 gears already to match my d30 up front, but I wasn't so lucky. So this one will sit for a while, until I put my big plans into motion. This ford 8.8 is going to get 4.56 gears and an e-locker, with the same up front to match. Also included in the big plan is a wj knuckle and brake up grade. I came so close at the jy to getting a set of wj knuckles, only problem was the drivers side knuckle was broken from the wreck. So I will continue to keep my eyes open for a set of those.
It was just sitting on the ground next to it, no need to even pull it. With the small mod required to make it fit I think it was well worth the walk over to it. I also found this on the second cherokee I walked up to. Took 3 minutes to pull it off.
It was 21 dollars for both of them, great deal eh? In the next couple of days I will be putting these on the jeep.
I also picked this up for 150 bones.
Its way to heavy to pull out for better pics. I was hoping to get lucky and it have 4.10 gears already to match my d30 up front, but I wasn't so lucky. So this one will sit for a while, until I put my big plans into motion. This ford 8.8 is going to get 4.56 gears and an e-locker, with the same up front to match. Also included in the big plan is a wj knuckle and brake up grade. I came so close at the jy to getting a set of wj knuckles, only problem was the drivers side knuckle was broken from the wreck. So I will continue to keep my eyes open for a set of those.
Thread Starter
Junior Member
Joined: Apr 2011
Posts: 48
Likes: 0
From: Logan, UT
Year: 1998
Model: Cherokee
Engine: 4.0 I6
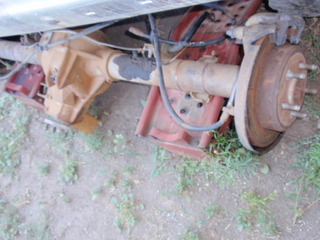
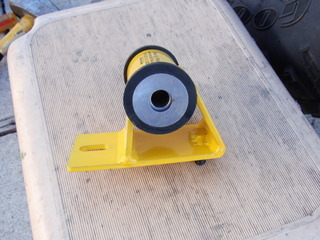
I completed my brown dog motor mount swap, I also swapped in a new transmission mount as recommended. Now I was reading and one guy posted that he was able to swap out both motor mounts in 30 minutes. Let me say that it took me about 30 minutes to remove just the driver side through bolt. I was able to get an 1/8 of a turn on the wrench with the space that was available. So don't believe everything you read. It took me about 2 hours, an hour a mount to finish the swap.
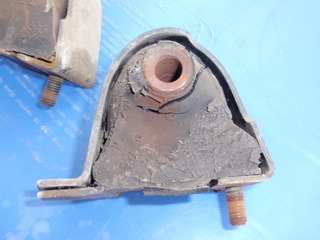
Start with the drivers side mount. Loosen all the bolts on the mount, and use a floor jack with some wood to spread the weight across the oil pan. I pulled out the drivers side and found this
My camera battery died so I didn't get any install shots of the drivers side. BUt install was a breeze. Put the new mount in and tightened them down to the bracket. For the through bolts I followed the provided instructions and placed a 1/2" washer on the bolt and tightened it until I couldn't spin the washer with my fingers. Here is the final result on the driver side
Passenger side is done exactly the same as the driver. When I pulled the passenger side mount it wasn't cracked as bad.
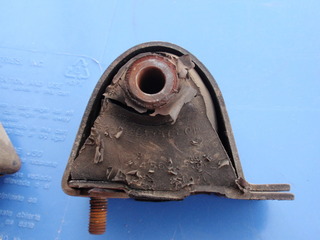
I then got ready to install the passenger side the same way. Once the old mount is out raise the engine up out of the way and slide the new mount into place, then bolt it to the bracket on the frame.
Getting ready to go in
Once bolted to the frame lower the engine until the holes line up and slide the through bolt through. Put the supplies 1/2" washer and nut on and tighten until you can no longer twist the 1/2" washer with your fingers.
Shot of the passenger side install
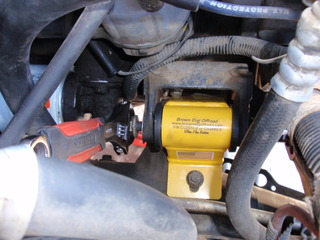
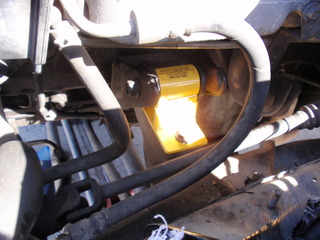
And thats the install completed.Heres a under carriage shot of the drivers side
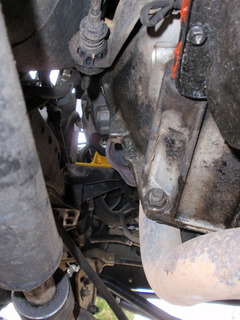
At idle the vibrations are not any different than when the full rubber mounts were in. No change, I can hear myself talk and the radio just fine. I've only taken one drive to test it out. I found that now my engine has been raised back up and not sagging the manual fan kept hitting the shroud so I had to bend that out of the way to eliminate the pinging sound that it was producing. Call it the placebo effect but it seemed that the throttle response was faster and there was more pep and get up when accelerating. Final thoughts a very worthwhile investment.
Start with the drivers side mount. Loosen all the bolts on the mount, and use a floor jack with some wood to spread the weight across the oil pan. I pulled out the drivers side and found this
My camera battery died so I didn't get any install shots of the drivers side. BUt install was a breeze. Put the new mount in and tightened them down to the bracket. For the through bolts I followed the provided instructions and placed a 1/2" washer on the bolt and tightened it until I couldn't spin the washer with my fingers. Here is the final result on the driver side
Passenger side is done exactly the same as the driver. When I pulled the passenger side mount it wasn't cracked as bad.
I then got ready to install the passenger side the same way. Once the old mount is out raise the engine up out of the way and slide the new mount into place, then bolt it to the bracket on the frame.
Getting ready to go in
Once bolted to the frame lower the engine until the holes line up and slide the through bolt through. Put the supplies 1/2" washer and nut on and tighten until you can no longer twist the 1/2" washer with your fingers.
Shot of the passenger side install
And thats the install completed.Heres a under carriage shot of the drivers side
At idle the vibrations are not any different than when the full rubber mounts were in. No change, I can hear myself talk and the radio just fine. I've only taken one drive to test it out. I found that now my engine has been raised back up and not sagging the manual fan kept hitting the shroud so I had to bend that out of the way to eliminate the pinging sound that it was producing. Call it the placebo effect but it seemed that the throttle response was faster and there was more pep and get up when accelerating. Final thoughts a very worthwhile investment.
Thread Starter
Junior Member
Joined: Apr 2011
Posts: 48
Likes: 0
From: Logan, UT
Year: 1998
Model: Cherokee
Engine: 4.0 I6
A couple weeks ago I had an excellent day in the junk yards. I was able to find a gas tanks skid and a front skid off an pre 97 cherokee.
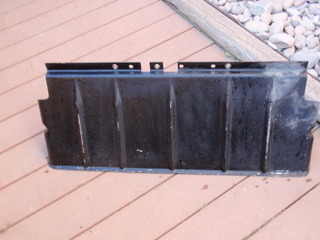 I walked away with both for 12 dollars. I had previously taken the skids to the car wash to spray off the inch of grease and grime that coated this plate. I took about an hour of my labor day to put the front skid on the jeep. It was abit more time consuming than I thought. My thoughts were that all cherokee has the bolt holes to stick skids on. I had a couple holes that could be used but they didn't quite line up. So the first thing was elongating the hole on the passenger side of the skid to allow for the skid to line up. The second obstacle that I ran into was I actually had to grind a lip off the front of the body of the jeep to allow for the skid to suck up nice and tight and allow the hole to line up. This is what took me about an hour. I forgot to take during the process pics again, but will do better.....hopefully in the future, but here is an after shot of the front skid bolt up into place, with a fresh coat of black paint.
Its super thick, but it will work great as an air-dam to push air under the body better. Also it will help protect a bit as well on those approach angles.
I walked away with both for 12 dollars. I had previously taken the skids to the car wash to spray off the inch of grease and grime that coated this plate. I took about an hour of my labor day to put the front skid on the jeep. It was abit more time consuming than I thought. My thoughts were that all cherokee has the bolt holes to stick skids on. I had a couple holes that could be used but they didn't quite line up. So the first thing was elongating the hole on the passenger side of the skid to allow for the skid to line up. The second obstacle that I ran into was I actually had to grind a lip off the front of the body of the jeep to allow for the skid to suck up nice and tight and allow the hole to line up. This is what took me about an hour. I forgot to take during the process pics again, but will do better.....hopefully in the future, but here is an after shot of the front skid bolt up into place, with a fresh coat of black paint.Its super thick, but it will work great as an air-dam to push air under the body better. Also it will help protect a bit as well on those approach angles.
Thread Starter
Junior Member
Joined: Apr 2011
Posts: 48
Likes: 0
From: Logan, UT
Year: 1998
Model: Cherokee
Engine: 4.0 I6
It has been a long time, I parted ways with the Green Machine in March of 2013. I was graduating from school, had a job lined up with a longer commute, and moving away from quick access to a pickup. I decided that I needed something with smaller tires for freeway driving and something that can haul stuff in the back, I did not get out of the jeep game, I purchased this in April of 2013
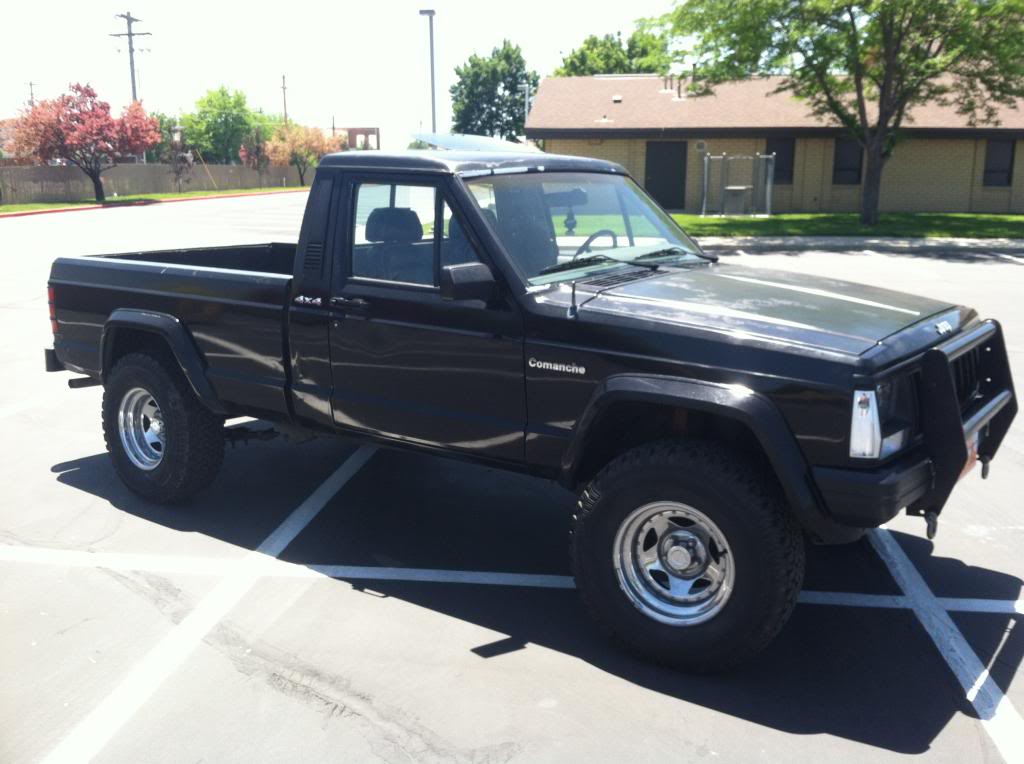

A 1989 Pioneer, 4.0L, Peugeot (P.O.S.), 4x4, 3" lift, 31" tires, 3.07 gear ratio, leather seats, custom sunroof, and the cooling system had been upgraded to an open system. I took a gamble, bought it sight unseen off the internet from a kid in Vegas. It was love at first sight, or so I thought. in all reality it was a love hate relationship from the beginning. A lot of blood, sweat, and tears have since been put into it. I kept the name that a previous owner gave it. I randomly found the build thread one day.
http://www.comancheclub.com/forums/v...361175#p361175
First person impressions were not as impressive as the internet pictures led one to believe, and it only got worse from there. First thing that was noticeable was the driver front fender was smashed in by the door, the rear bumper was crumpled like a taco shell and pushing into the bed. I peek in the cab and it got worse; no headliner, no radio or wiring, lacked a shift ****, center console, shift boot, or transmission boot, (Yeah, I was looking at the parking through the transmission hole). B-pillar lights didn't work, horn didn't work. I think easily fixed, lets drive it now. I roll the window down go for a test drive. Loud ticking from the tranny as it drives, hardest shift from 1st to 2nd I've ever felt, but the engine purred quite nice for being so tired and old. Get back from the test drive, the window doesn't crank back up. I sit and stew it over for a good 20 minutes. Here is the bind, buy it like I planned or walk away buy a plane ticket to get home, I did what any sensible jeep lover would do, I bought it.
Last edited by bomber; Mar 6, 2015 at 12:06 AM.
Thread Starter
Junior Member
Joined: Apr 2011
Posts: 48
Likes: 0
From: Logan, UT
Year: 1998
Model: Cherokee
Engine: 4.0 I6
After enjoying the weekend I began the 8 hour drive back home. Slowest, sluggish drive ever, I had it redlined in 4th sometimes 3rd just to keep up with the loaded semis on the hill climbs. At this point I'm still feeling pretty good about my purchase. As I climb in elevation its gets colder, I go to turn on my heater, nothing but the icy cold March air coming in, not a problem, fixable. Halfway home, after a few mountain pass climbs, I notice that my temp gauge is slowly climbing. I pull over and sit for an hour to let it cool off, pop the hood look really close, notice the coolant is low. I grab the given to me by the PO coolant bottle and pour out nothing but clear water. I look close at coolent in the reservoir and notice its mostly water too. I hop in drive 10 miles, watch the temp gauge peg 260 instantly, a muffled explosion sound occurs followed by lots of white smoke, and almost all engnie power goes. I am flooring it in 2nd gear to stay above 10 mph and get to the next turn off. I creep it into the gas station and it dies. No amount of cussing, coaxing, pleading with get it to turn over. I wait the 4hours for my buddy to bring his truck and trailer, and cart me , my truck, and broken ego home.
Once it was unloaded off the trailer, I began the tear down of the engine and cab, only to find the head gasket blew (which I suspected). I looked over the engine bay to find crappily spliced wires, and anything and everything that could be done wrong on a car done to this one, I began the work (no engine tear down pics) During the tear down I also find that the head was cracked, and poorly repaired, and who ever had been in the engine before had messed everything up. So already out the money of buying the truck, and needing a new head, and new internals for the motor, going stroker was not happening. Just a simple fresh start build for me. So after months of rebuilding an engine, redoing alot of jimmy rigged wireing, partly rebuilding the cabs interior, and doing some basic cosmetic work, all while trying to finish my college degree, and work full time. Scout was back on its wheels.
Once it was unloaded off the trailer, I began the tear down of the engine and cab, only to find the head gasket blew (which I suspected). I looked over the engine bay to find crappily spliced wires, and anything and everything that could be done wrong on a car done to this one, I began the work (no engine tear down pics) During the tear down I also find that the head was cracked, and poorly repaired, and who ever had been in the engine before had messed everything up. So already out the money of buying the truck, and needing a new head, and new internals for the motor, going stroker was not happening. Just a simple fresh start build for me. So after months of rebuilding an engine, redoing alot of jimmy rigged wireing, partly rebuilding the cabs interior, and doing some basic cosmetic work, all while trying to finish my college degree, and work full time. Scout was back on its wheels.
Last edited by bomber; Mar 6, 2015 at 12:16 AM.
Thread Starter
Junior Member
Joined: Apr 2011
Posts: 48
Likes: 0
From: Logan, UT
Year: 1998
Model: Cherokee
Engine: 4.0 I6
July 2013 I found myself wandering the JY and came across a short bed comanche, what's more amazing is it had a comanche short bed leer camper on it. The only problems with it were it was gray and the rear window was bent preventing it from opening correctly, both can easily be fixed. So it came home with me. I was there by my self, so I grabbed a guy in the yard and offered him 5 bucks to help me carry it to my truck and put it on.
So $62 later, $50 for the camper, $12 for a couple cans a spray paint, and 2 hours of my time and I ended up with this
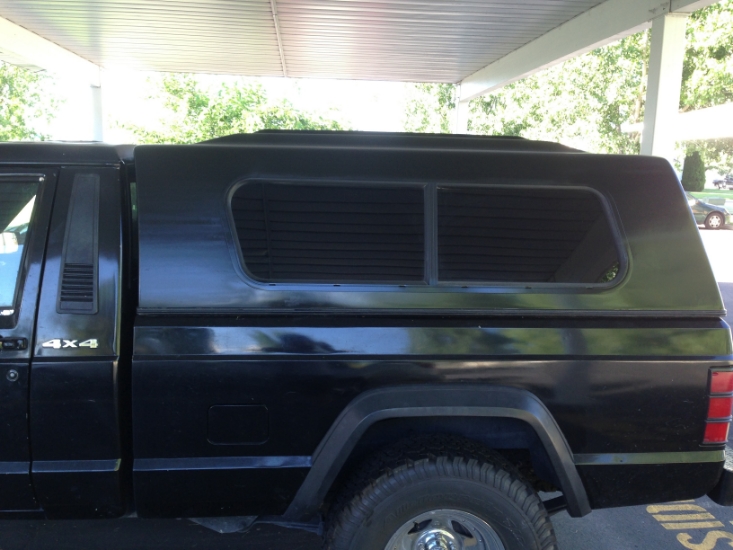
Also grabbed all four fenders to replace the poorly painted/cracked worn ones.
So $62 later, $50 for the camper, $12 for a couple cans a spray paint, and 2 hours of my time and I ended up with this


Also grabbed all four fenders to replace the poorly painted/cracked worn ones.
Thread Starter
Junior Member
Joined: Apr 2011
Posts: 48
Likes: 0
From: Logan, UT
Year: 1998
Model: Cherokee
Engine: 4.0 I6
Everything with this truck has been one step forward, two steps back.
July of 2013: I noticed the old saggy leaf on the passenger side when ever I turned or the weight shifted made a clunk or popping sound. Looked underneath and found the leaf broken in half. I ordered some hell creek 3.5" springs to replace them, some 3.5" coils, and new procomp es9000 for all for sides. I even purchased shock tower eliminator a for the front.
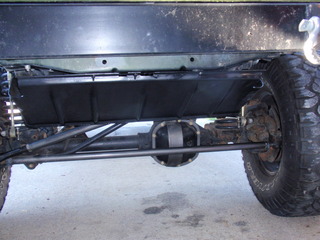
August 2013: Relocate jobs to NM, suspension upgrade on hold. In the NM monsoons notice when ever it rains it rains inside my truck. So first things first, I get a new windshield with the 97+ rubber stripping, the old chrome was peeling and looked bad. Once that's sorted out I began the suspension swap. I pulled the turdy-five out to swap rear springs. As I go to put it back in, the axle tube spins in my hand. Well I can't have that, so the ford 8.8 with LSD, 3.73 gears sitting in my yard is put to good use. I replaced all the 8.8 parts except gears and carrier. Welded on new spring perches (I stayed spring under), shock mounting tabs, and add 2" Cherokee shackles to compensate for loss in lift due to the thicker axle tubes and spring perches.
November 2013: Decided to get a working gas gauge. Pulled the fuel sending unit and it's toast, so I sent it off to be rebuilt/refurbished. While waiting to get it back figured I might as well refresh the fuel system. I replaced the fuel injectors with Bosch 4 holed, put in a new fuel filter, a new fuel delivery line (had to have it custom built, they don't make them for an 89' anymore), a new fuel pressure regulator. Wait until December for the sending unit to come back, installed it.
March 2014: The Peugeot is on its last leg, I begin sourcing parts for an external AX-15 swap.
July of 2013: I noticed the old saggy leaf on the passenger side when ever I turned or the weight shifted made a clunk or popping sound. Looked underneath and found the leaf broken in half. I ordered some hell creek 3.5" springs to replace them, some 3.5" coils, and new procomp es9000 for all for sides. I even purchased shock tower eliminator a for the front.
August 2013: Relocate jobs to NM, suspension upgrade on hold. In the NM monsoons notice when ever it rains it rains inside my truck. So first things first, I get a new windshield with the 97+ rubber stripping, the old chrome was peeling and looked bad. Once that's sorted out I began the suspension swap. I pulled the turdy-five out to swap rear springs. As I go to put it back in, the axle tube spins in my hand. Well I can't have that, so the ford 8.8 with LSD, 3.73 gears sitting in my yard is put to good use. I replaced all the 8.8 parts except gears and carrier. Welded on new spring perches (I stayed spring under), shock mounting tabs, and add 2" Cherokee shackles to compensate for loss in lift due to the thicker axle tubes and spring perches.

November 2013: Decided to get a working gas gauge. Pulled the fuel sending unit and it's toast, so I sent it off to be rebuilt/refurbished. While waiting to get it back figured I might as well refresh the fuel system. I replaced the fuel injectors with Bosch 4 holed, put in a new fuel filter, a new fuel delivery line (had to have it custom built, they don't make them for an 89' anymore), a new fuel pressure regulator. Wait until December for the sending unit to come back, installed it.
March 2014: The Peugeot is on its last leg, I begin sourcing parts for an external AX-15 swap.
Last edited by bomber; Mar 6, 2015 at 12:34 AM.
Thread Starter
Junior Member
Joined: Apr 2011
Posts: 48
Likes: 0
From: Logan, UT
Year: 1998
Model: Cherokee
Engine: 4.0 I6
AX-15 Manual Transmission – (4x4, 98’ Jeep Cherokee)
Transmission was rebuilt at 175,563 miles on the odometer. Due to the lack of proper tools, I had it professionally rebuilt (sorry no pics).
Do NOT follow the transmission fluid recommendations in the owner's manual for the AX-15, it is a misprint. The factory service manual (FSM) however does have the correct information in it. Chrysler has moved along to the newer fluids as they were introduced even though the AX-15 stayed the same. The Mopar number references a 10W-30 synthetic motor oil. However a lot of people recommend using Redline MT-90, Redline MTL fluid, (The GL-3/4 rating of this fluid means it does not have the harmful additives [sulfur compounds] that cause the brass synchronizer wear as experienced when running GL-5 rated fluids.) You can find it on-line. It is highly unlikely you will find Redline at the usual auto parts store (AutoZone, Checker, PepBoys, etc.)
Transmission fluid; I use Mobil 1 full synthetic 10W-30. I average ~5K miles per year which means I change out oil once per year.
Clutch – (External Slave, 98’ Jeep Cherokee)
Due to the differences between the Renix era and newer OBDI/OBDII computer systems, when installing the clutch system the Renix era fly wheel and CPS sensor must be used with the newer transmission.
When Chrysler changed from the internal slave setup to the external slave, the transmission input shaft diameter was changed, meaning if you are using an external slave AX-15 in a 94 or older 4.0L, a new pilot bearing may be in order.
BA10/5 and internal slave AX-15s have a pilot bearing with an ID of 0.5934 inches, OD of 1.055 inches, and depth of 0.719 inches (OE part number 53009181).
External slave AX-15s have a pilot bearing with an ID of 0.7518 inches, OD of 1.8161 inches, and depth of 0.719 inches (OE part number 33004041).
A 73’ CJ, 350 V8 pilot bearing is recommended when using an external AX-15 in an older 4.0L. It has an ID of 0.751 inches, OD of 1.056 inches, and depth of 0.88 inches (National part number PB77HD or Dorman part number 14674).
The 73’ CJ pilot had too large an OD to fit into the back of my engine, I found that the external AX-15 pilot bearing fit perfectly, so I am running that one.
Last edited by bomber; Mar 6, 2015 at 12:40 AM.
Thread Starter
Junior Member
Joined: Apr 2011
Posts: 48
Likes: 0
From: Logan, UT
Year: 1998
Model: Cherokee
Engine: 4.0 I6
NP231 J Transfer Case – (4x4, Short Input Shaft, 96’ Jeep Cherokee)
While the transmission was being rebuilt, I took the opportunity to rebuild the transfer case. The Cherokee AX-15 requires a short input shaft on the transfer case. Chrysler switched front retainer bearing depths at some point, as well as the helical cut of the gears. So take care when order parts so as to buy the right ones.
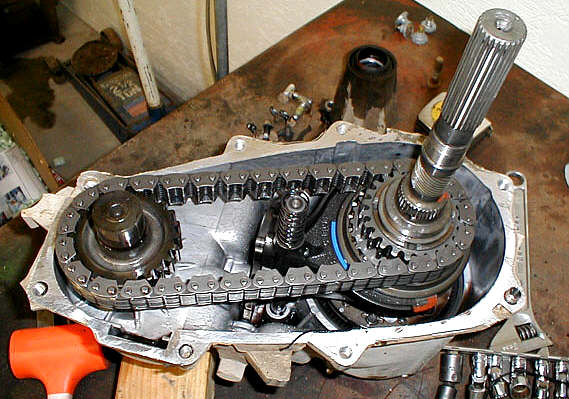
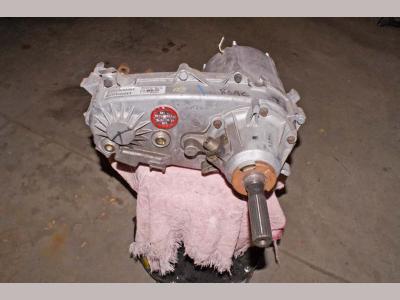
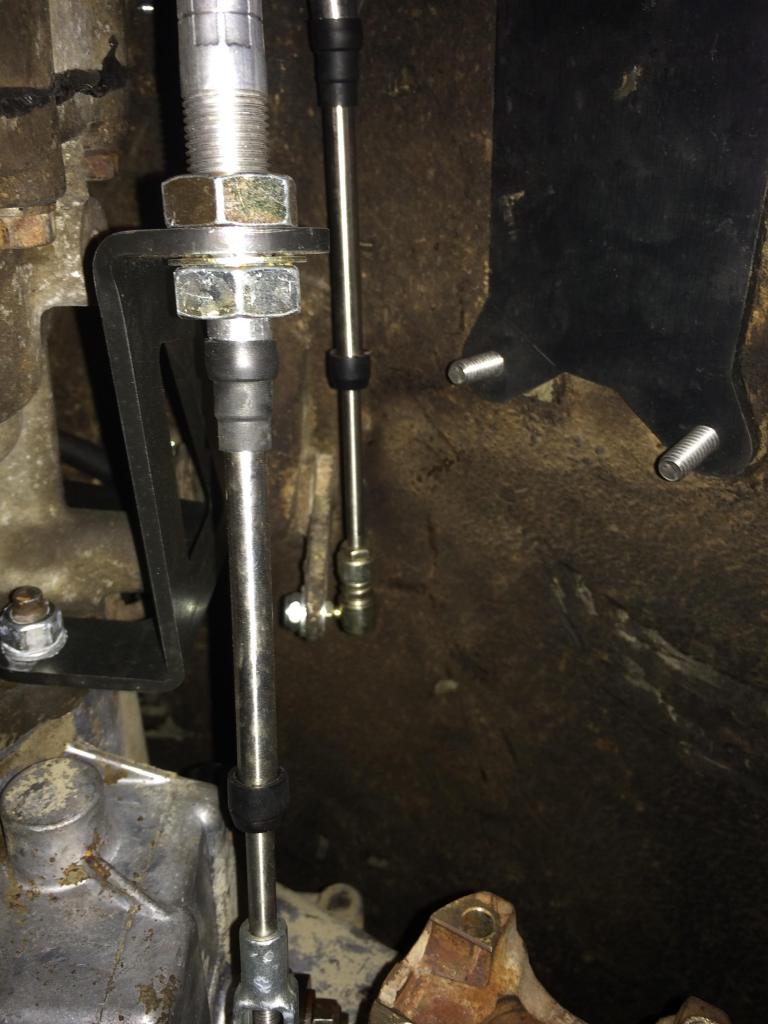
To avoid the headache of combining shift linkages together from the Peugeot and an AX-15 to gain a shift linkage that would work, a Novak 231 Cable Shifter Kit was installed. The kit comes with all the hardware and detailed instructions.
While the transmission was being rebuilt, I took the opportunity to rebuild the transfer case. The Cherokee AX-15 requires a short input shaft on the transfer case. Chrysler switched front retainer bearing depths at some point, as well as the helical cut of the gears. So take care when order parts so as to buy the right ones.


To avoid the headache of combining shift linkages together from the Peugeot and an AX-15 to gain a shift linkage that would work, a Novak 231 Cable Shifter Kit was installed. The kit comes with all the hardware and detailed instructions.

Last edited by bomber; Mar 6, 2015 at 01:06 AM.
Thread Starter
Junior Member
Joined: Apr 2011
Posts: 48
Likes: 0
From: Logan, UT
Year: 1998
Model: Cherokee
Engine: 4.0 I6
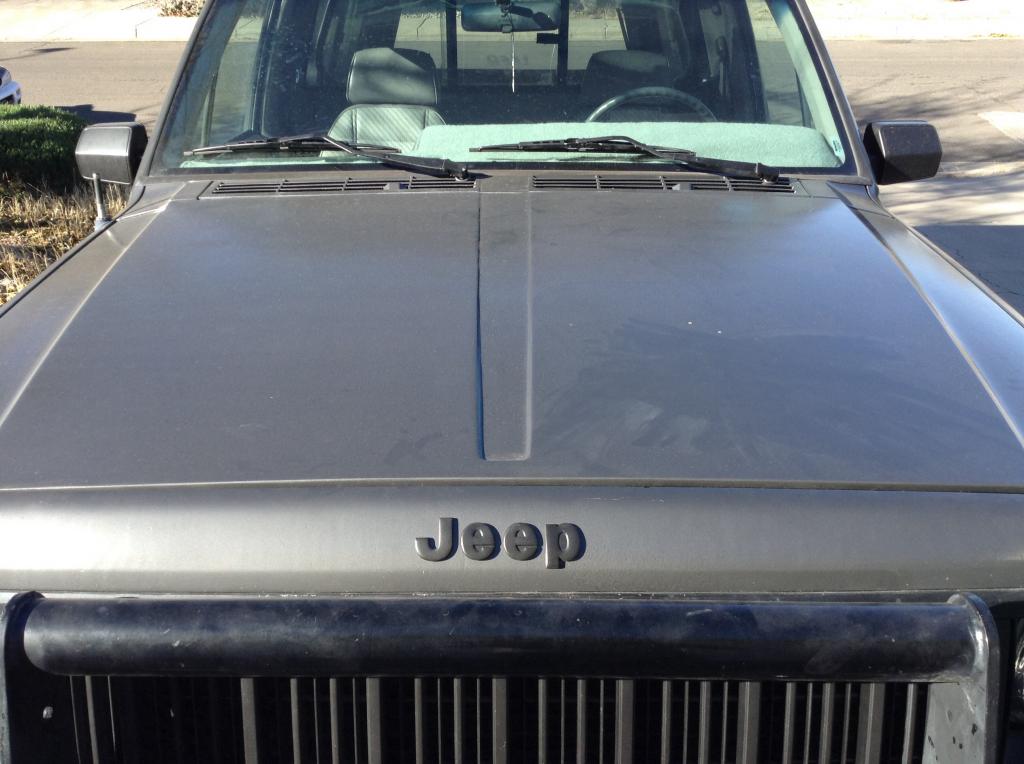
Paint and Interior - (Rattle Can)
Nov 2014, I decided to paint Scout. The roof had some rust coming through and the hoods clear coat was peeling. I felt I had nothing to loose. I followed the rattle can painting tips that I found over on pirate4x4: http://www.pirate4x4.com/forum/jeep-...e-purty-d.html
I went with rustoleum hammered metallic black, it came out more of a gun metal grey, for the body. I used plasti-dip to touch up the fender flares, cab vents, side mirrors and rims (until I buy some black rims); the plasti-dip has held up well for 5 months.
The pirate write-up was done over a weekend, mine was done over a month. It was more time consuming than difficult, I went panel by panel, working front to back. Any panel that could be removed from the truck, was removed, and any part that could be removed (i.e. door handles, cab vents, fender flares..., etc.) i removed those. I made sure to take my time. I used a 200 grit to rough up the paint, yet leave the factory base coat, then smoothed it out with 400 grit, followed by 800 grit. I put down two coats on side panels and doors and went with 4 coats on the hood and roof. After all was said and done, unless your are looking really close, you can't tell its a rattle can. I have had a couple people ask what the color is and when i say rustoleum hammered black, they look shocked that its a rattle can job.

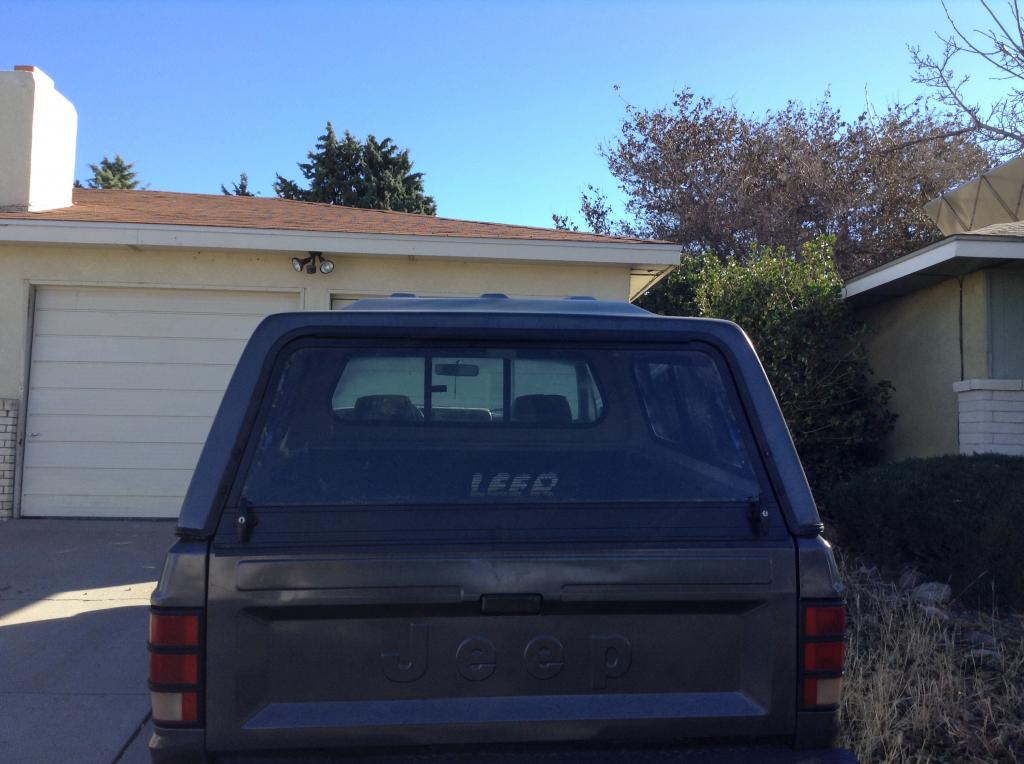
I even fixed the rear window on the camp shell.