
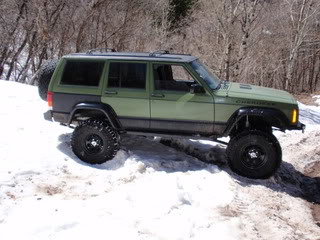
Green Machine, 98' XJ


Thread Starter
Junior Member
Joined: Apr 2011
Posts: 48
Likes: 0
From: Logan, UT
Year: 1998
Model: Cherokee
Engine: 4.0 I6
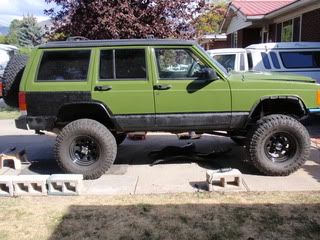
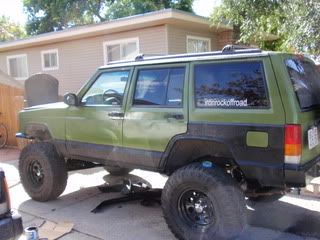
I began to prep my jeep to replace the cracked and peeling paint with the bedliner I purchased. There hasn't been a lot of time to dedicate to get it ready so for the past few weeks I have been sanding a section of it at time until it was all sanded. To continue my preparations for the new paint job I figured now was a good time to trim the front fenders and cut and fold the rear fender wells for more clearance, sand a grind away some cancer rust spots and patch some holes from fenders I put on. There are tons of write up on this so I just snapped a few pics of my work.
This pic is of the folding on one of the rear fenders,
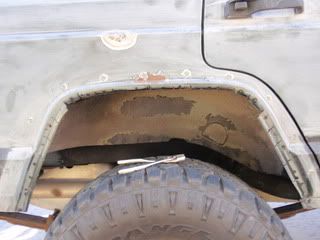
You can see the jb weld I used to patch up the holes, I took a dremel with a grinding stone to smooth out the jb weld later and remove all of the rust seen.
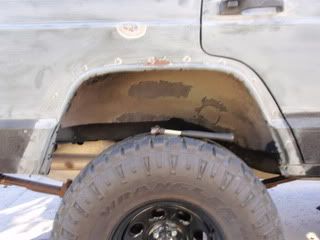
Here is a finished shot of the folding
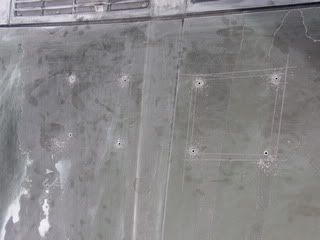
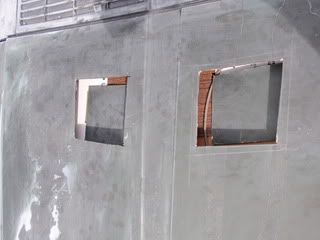
I also cut out the holes for the genright hoods vents I purchased earlier. I positioned them 6 inches from the back of the hood and 1.5 inches from the center of the hood. Install is easy position, trace the outline and measure in 1 inch from outer edge. I predrilled holes in the corner to make cleaner corners. I used a 4.5 grinder with a cut-off wheel, to cut them out
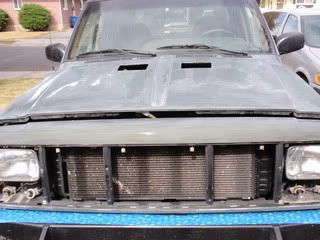
And to finish the day off I removed the grill, beazels and any other parts that were easy to remove and started to tape off.
And thats where I ended for now. The finished product will be posted when i get it done.
This pic is of the folding on one of the rear fenders,
You can see the jb weld I used to patch up the holes, I took a dremel with a grinding stone to smooth out the jb weld later and remove all of the rust seen.
Here is a finished shot of the folding
I also cut out the holes for the genright hoods vents I purchased earlier. I positioned them 6 inches from the back of the hood and 1.5 inches from the center of the hood. Install is easy position, trace the outline and measure in 1 inch from outer edge. I predrilled holes in the corner to make cleaner corners. I used a 4.5 grinder with a cut-off wheel, to cut them out
And to finish the day off I removed the grill, beazels and any other parts that were easy to remove and started to tape off.
And thats where I ended for now. The finished product will be posted when i get it done.
Thread Starter
Junior Member
Joined: Apr 2011
Posts: 48
Likes: 0
From: Logan, UT
Year: 1998
Model: Cherokee
Engine: 4.0 I6
After trimming the fenders, cutting the vent holes, patching holes made from the installation of some aftermarket flares, and sanding away lots of rust, I applied the bedliner. I bought 2 gallons of smooth olive drab and 1 quart of textured black, all from durbak. I have used the black before on the lower panels to protect against rock rash and winter salts, and on the roof to repair flaking paint and rust spots.
I'm went with a two tone, green on the body and black on the quarter panels. Application is easy, make sure all dust is gone, wipe clean with a xylol solvent and use a paint roller to apply. It took two coats or about 1 gallon to cover everything. Here is a shot midway through the second coat of the green, I didn't get to many shots because it gets messy while applying.
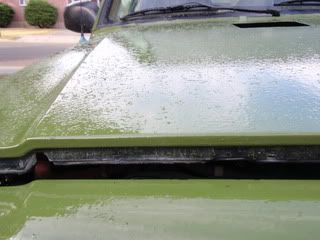
this close up shows that it has some texture in it, so it's not 100% smooth, alot of that texture was from nats landing in the bedliner and getting stuck after a day or two they came off and it looks better.
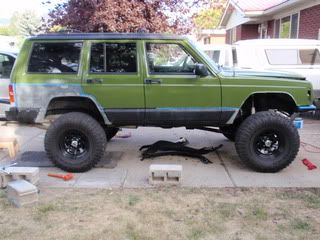
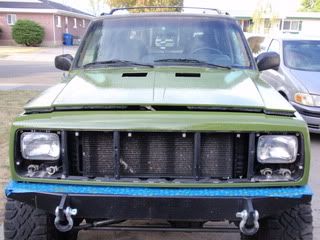
And here are some shots of it completed with the black added and all the hardware put back onto the jeep

The dirtier older black looks as good as the new once I washed it and put some turtle shine was on it. All the black looks the same now. The green came out looking like a ninja turtle at first but after a few days it has started to darken to look more olive drab.
What do you guys think?
I'm went with a two tone, green on the body and black on the quarter panels. Application is easy, make sure all dust is gone, wipe clean with a xylol solvent and use a paint roller to apply. It took two coats or about 1 gallon to cover everything. Here is a shot midway through the second coat of the green, I didn't get to many shots because it gets messy while applying.
this close up shows that it has some texture in it, so it's not 100% smooth, alot of that texture was from nats landing in the bedliner and getting stuck after a day or two they came off and it looks better.
And here are some shots of it completed with the black added and all the hardware put back onto the jeep
The dirtier older black looks as good as the new once I washed it and put some turtle shine was on it. All the black looks the same now. The green came out looking like a ninja turtle at first but after a few days it has started to darken to look more olive drab.
What do you guys think?
Junior Member
Joined: May 2011
Posts: 67
Likes: 0
Model: Cherokee
Originally Posted by bomber
Thanks for the compliments and support
After the disc brake swap, I had only about 6-7 threads for the lug nuts to spin onto with the alloy rims that I had. This wasn't alot for peace of mind, so after some inner turmoil and debate I sold the alloys and bought myself some steel rims. I was sad to see the alloys go, but at the same time glad to get some crager soft 8's. The cragers just look so damn good on a jeep.
Before:
After:
The steel rims gave me more than enough thread to put my lug nuts on, with plenty of peace of mind. And I really can't help but admire the look the cragers give the jeep.
Thread Starter
Junior Member
Joined: Apr 2011
Posts: 48
Likes: 0
From: Logan, UT
Year: 1998
Model: Cherokee
Engine: 4.0 I6
Stock wheels will work just fine for the zj disc swap. Stock wheels are steel and not as thick as alloy rims. With alloys you could go with more backspacing to make them fit, but the cragers were way cheaper than a set of alloys.
Junior Member
Joined: May 2011
Posts: 42
Likes: 0
From: Oceanside CA
Year: 1994
Model: Cherokee
Engine: 4.0
XJ looks great but I have a question why did you use rustys lift kit then IRO long arms? I'm thinking of a rustys long arm lift or an iron rock offroad long arm for my cherokee but on the fence about it
Thread Starter
Junior Member
Joined: Apr 2011
Posts: 48
Likes: 0
From: Logan, UT
Year: 1998
Model: Cherokee
Engine: 4.0 I6
I recently purchased some diff guards from bad apple fabrication. With the warm weather I decided to put them on. They came already primed so saved me a step. I went straight to painting.
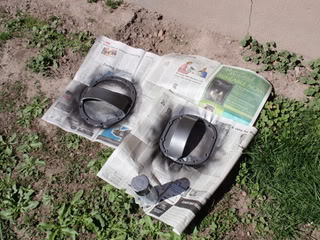
Even gave the diffs a new coat of paint. Install was straight forward every hole lined up. Take old bolts out put on the guard, install with the new hardware supplied. Shot of the rear diff
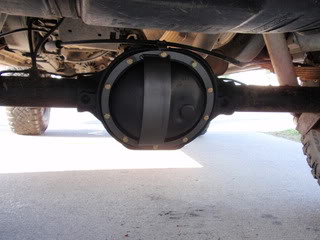
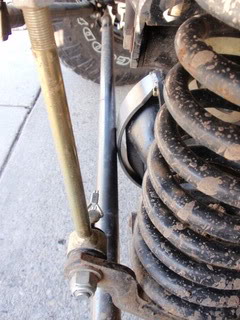
The front was a tight squeeze to get it behind the tierod but with some wiggling it slid into place
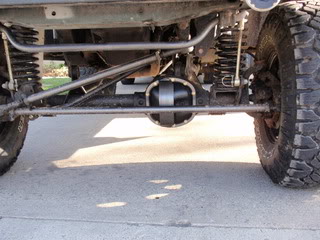
Plenty of clearance when the wheel are straight
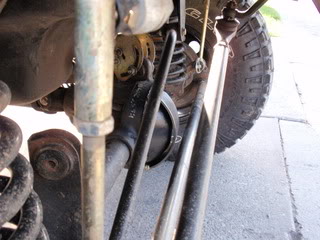
and enough room at full lock when turning right
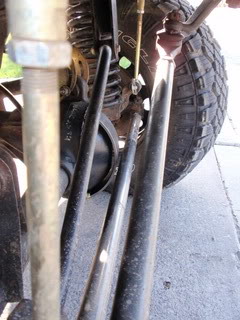
Full lock turning left there is just enough clearance, as in a milimeter at most
I think the workmanship is great, and they look great on the jeep. I would recommend to others.
Even gave the diffs a new coat of paint. Install was straight forward every hole lined up. Take old bolts out put on the guard, install with the new hardware supplied. Shot of the rear diff
The front was a tight squeeze to get it behind the tierod but with some wiggling it slid into place
Plenty of clearance when the wheel are straight
and enough room at full lock when turning right
Full lock turning left there is just enough clearance, as in a milimeter at most
I think the workmanship is great, and they look great on the jeep. I would recommend to others.
Thread Starter
Junior Member
Joined: Apr 2011
Posts: 48
Likes: 0
From: Logan, UT
Year: 1998
Model: Cherokee
Engine: 4.0 I6
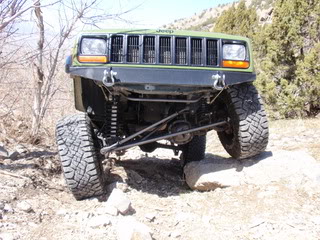
I'm loving the 1 ton steering setup. Handling is night and day difference. I don't run the steering stablizer and I don't notice any difference. very solid
Thread Starter
Junior Member
Joined: Apr 2011
Posts: 48
Likes: 0
From: Logan, UT
Year: 1998
Model: Cherokee
Engine: 4.0 I6
Made a run up one of the canyons that are close to where I live, It started off great nice dry had some fun little obstacles, I snapped a few shot because I was by myself.
As I got higher up into the mountains it got slushier and slushier. I went as far as I could. Eventually I was sinking and going nowhere, Only other thing I saw was a side by side UTV.
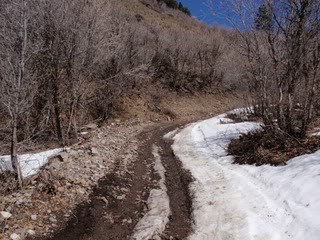
I had to go in reverse for half mile before I came to a spot wide enough to turn around.
As I got higher up into the mountains it got slushier and slushier. I went as far as I could. Eventually I was sinking and going nowhere, Only other thing I saw was a side by side UTV.
I had to go in reverse for half mile before I came to a spot wide enough to turn around.
CF Veteran
Joined: Jan 2011
Posts: 1,894
Likes: 4
From: Las Vegas
Year: 1999
Model: Cherokee
Engine: 4.0
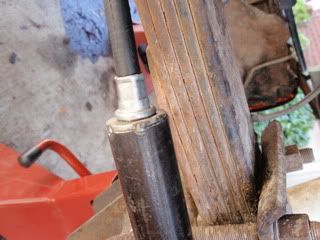
My new e-brake cable came today so I was able to finish the e-brake cable mod. With the already fabbed arm ends from the previous post I slide the cable into place to find that the cable was about 3" to long for the cable to work properly. So i came up with this to solve that porblem.
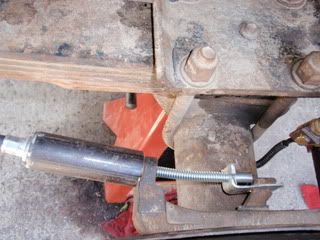
I found some old pip that I had lying around ( I don't know the diameter) and cut it to a 3" length, the opening was to wide and it would slide up over the cable so I welded a washer to the top of the pipe and reamed it out with a 1/2" drill bit until it was snuggly fit on the cable, like this
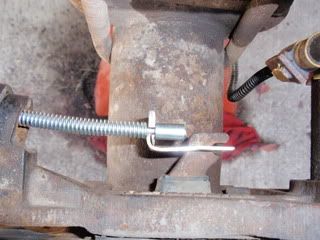
With that taken care of I slid the cable through the back blate mounting hole and into the fabbed brackets and tightened the cables to create enogh tension to hold the pipe against the e-brake mounting bracket like so
And the finished product came out looking like this.
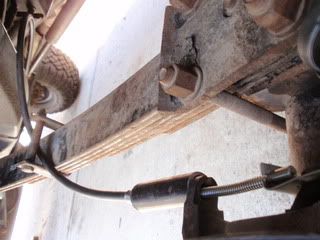
I ran the little bit of cable through the leafs to keep it up out of the way. A couple test pulls proved that the cables worked just like before. My zj e-brake conversion is complete now all that remains is getting the calipers set up bled and tires on, and the test drive.
I found some old pip that I had lying around ( I don't know the diameter) and cut it to a 3" length, the opening was to wide and it would slide up over the cable so I welded a washer to the top of the pipe and reamed it out with a 1/2" drill bit until it was snuggly fit on the cable, like this
With that taken care of I slid the cable through the back blate mounting hole and into the fabbed brackets and tightened the cables to create enogh tension to hold the pipe against the e-brake mounting bracket like so
And the finished product came out looking like this.
I ran the little bit of cable through the leafs to keep it up out of the way. A couple test pulls proved that the cables worked just like before. My zj e-brake conversion is complete now all that remains is getting the calipers set up bled and tires on, and the test drive.
Thx.