Jeep Grand Cherokee 1999-2004: Transmission Diagnostic Guide
Transmissions issues can manifest themselves in a variety of symptoms. Learn what to look for in this article.
This article applies to the Jeep Grand Cherokee WJ (1999-2004).
Transmission issues can show up in a myriad of symptoms. Something that seems really bad can end up being pretty benign and easy to fix. Other issues may seem like it's nothing, but end up needing some major work. Jeep owners should have at least a rough idea of what the problem likely is to avoid being taken at the transmission shop with a large bill for a complete rebuild when only a small part may be needed. A little bit of knowledge is your best defense and can save you a great deal of money. Use this guide to help you discern what your problem could be, and decide whether or not the job is too big for a DIY fix or one that you may be able to tackle on your own.
Materials Needed
- Ratchet with 8mm socket
- T25 Torx bit and driver
- Catch basin or pan
- Replacement filters or filter kit
- Replacement ATF +4 fluids
- Shop rags
- Hydraulic floor jack and jack stands
- ATF filter wrench
- Torque wrench capable of producing up to 105 lb/in
Step 1 – Check the level of your transmission fluid
Many transmission issues, such as missing gears, late shifting or delayed acceleration, could be a result of low ATF +4 levels.
When your transmission fluid is low, the pump may be exhausted of any fluid to continue circulating. This can manifest itself as a delayed acceleration after in initial startup. The Jeep will run normally, but then refuse to accelerate. When the fluid level is low, the pump runs out of fluid to push. When the Jeep is pulled over or sitting for a few, the fluid drains back into the pump and the cycle repeats itself.
- When the engine is completely cooled, pull the dipstick and check the fluid level.
- Add more ATF +4 fluid and let it settle for a few minutes.
- Recheck the level, add more if necessary and repeat this process.
- Take it for a test drive and see if that solved the problem.

If the fluid level is fine, it may be bad and completely broken down.
Step 2 – Check the condition of your fluid
Bad fluid that is completely broken down will lose its lubricating properties that allow the gears to shift normally.
Bad fluid will appear as very dark, nearly black and will likely smell burnt.
- Pull the ATF dipstick to check the level, coloration and smell of the fluid.
- If the fluid is very dark or smells burnt, it is time to change the fluid and likely the filters, as well.
- When you change the fluid, run a magnet through the old fluid and look for metal shavings.
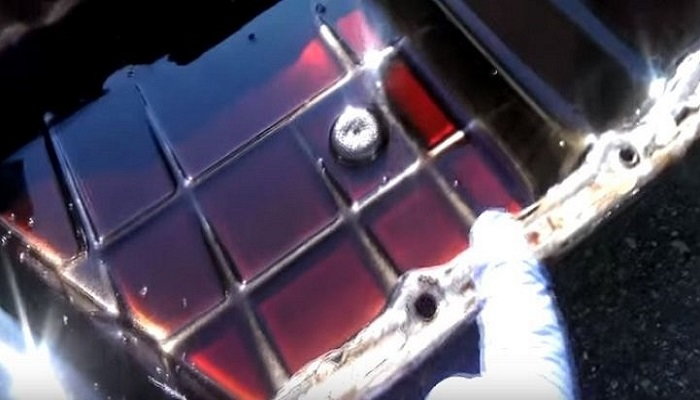
Figure 2. After draining your fluid, run a magnet through the old stuff and check for metal shavings or large chunks of debris. 
Figure 3. When you change your ATF fluid, there is a primary and a secondary (pictured) filter that you should consider changing, as well. 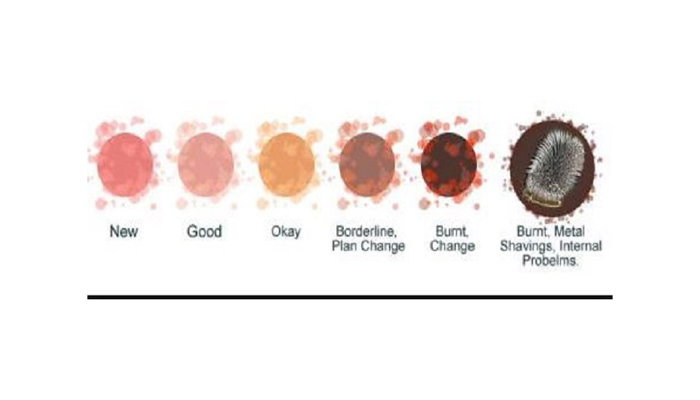
Figure 4. The look and smell, or presence of metal shavings, will indicate how severe a problem you may be experiencing.
If the fluid condition is still good, or if you changed the fluid and filters but are still experiencing problems, other components may be at fault.
Step 3 – Look for a worn transmission band
Late shifting or no shifting at all until very high RPMs are reached might indicate a worn transmission band.
If you have an external adjuster for the band, this is a pretty simple fix, but a special tool is needed. This type of issue usually does not throw any kind of CEL codes.
- When your engine is cool, look for your transmission model under the Jeep. You may need to raise the front end to locate the sticker.
- The sticker will have the type of transmission your model has installed. It will read something like 45RFE, 545RFE or 42RE.
- Find the external band adjustment procedure for your specific type of transmission.
- Follow the procedure, and adjust the band. It may be as simple as torquing it to a certain specification and then backing it down a couple of steps.
- This may not be a permanent solution, but it should get you back on the road for a while.
- If you don't have an external adjuster, the internal adjuster will require a little work to get to it, but it can be a DIY job and save you a good deal of money.

Figure 5. Check under your Jeep for the bar code sticker that indicates your specific model of transmission. 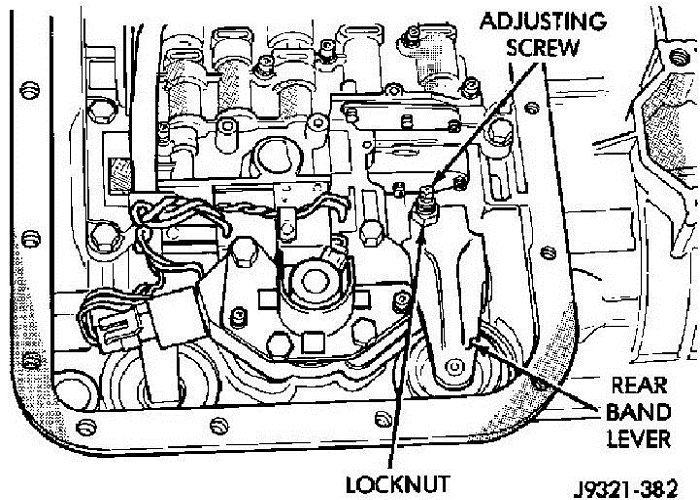
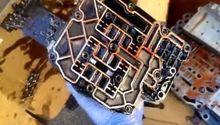
Figure 6. You may have an external adjuster, or in this example, and internal one in your valve body.
If the band is torqued correctly, or you do have a CEL code, the problem is likely to be found elsewhere.
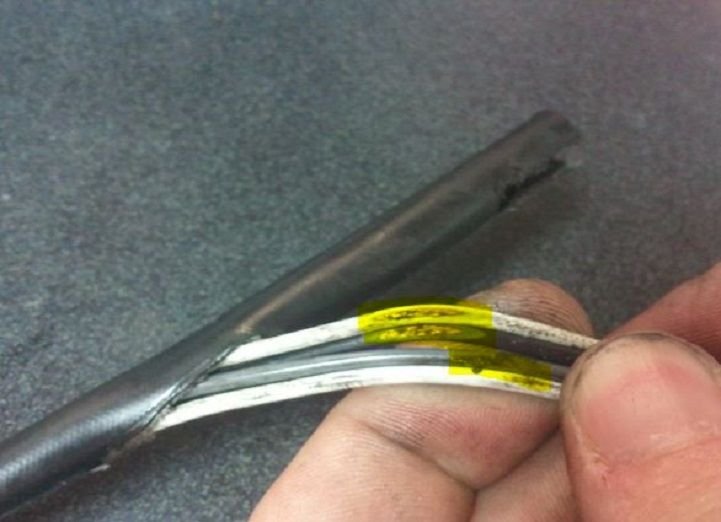
Step 4 – Check the downstream O2 sensor wiring
A short or frayed O2 sensor can cause shifting and acceleration issues, normally resulting in a CEL code.
If you have thrown a "P" code of 1763, the terminology is misleading - "Governor pressure voltage high." Luckily, this is a simple fix.
- When you are driving after a bit of time, you may find that the Jeep is searching for the next gear.
- You might find that it will skip a gear and refuse to go from first to second or second to third.
- Higher speeds may cause it to stick in third or jump to OD. It will seem fine until you stop and it cools, causing the problem to resurface.
- If your transmission fluid level is normal and in good condition, and you get that P1763 code, check the O2 sensor wiring.
- Put your Jeep on a lift or raise it up on jack stands.
- Check the condition of the O2 sensor cables. You may be able to patch and repair them with high heat tape or shrink wrap.
- At worst, replace the entire O2 sensor.
If you are experiencing different issues or CEL codes and your sensor wires are in good working order, you may just need a TCM flash.
Step 5 – Check the TSBs and have your TCM flashed
Transmission quality updates may be available for your specific transmission via a TCM flash.
From time to time, manufacturers have updates for your on-board engine computer. These are known as TCM flashes and require a trip to the dealership to have them done properly. Many owners have reported needing this procedure done two or more times to solve the problem.
- Check for any applicable TSBs for your symptoms, such as general quality updates or solutions for shifting problems.
- If everything else appears normal, such as ATF level and condition, it may be a simple TCM flash.
- Take your Jeep to the dealer, explain the symptoms and give the appropriate TSB number to help them stay honest.
- A single flash may not do the trick, so test the results and take it back for another round.

If the flash failed to solve your problems, you may have more serious work to be done.
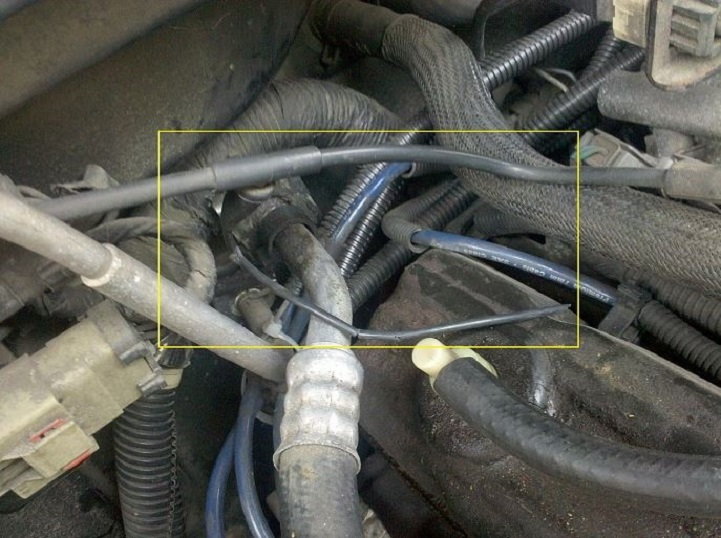
Step 6 – Check your vacuum lines
They may be leaking.
When sitting idle, if you are in drive, your Jeep starts shaking badly like if it's about to stall. Move into neutral and it stops; put it back into drive and it happens again. This can last for a few minutes and then return to normal. This seems like it should be a fuel or cold air intake, or fan issue, but more than likely you may have a vacuum leak. Check your hoses and make sure that they are all in good working order and are seated as well as sealed properly. If the problem persists, you can have a professional run it through a smoke test to be able to identify any leaks in the system.
If the vacuum lines are good or this doesn't solve your problem, your issue is more complex and you may want to seek professional help.
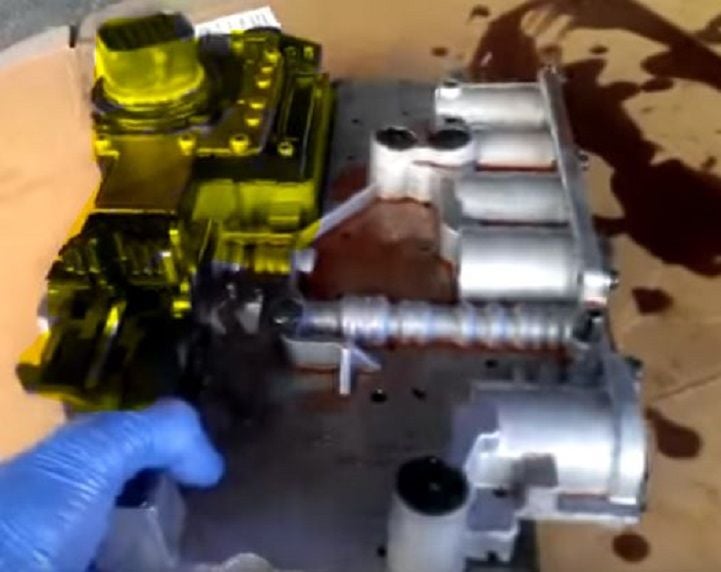
Step 7 – Replace shift solenoid
If the transmission solenoid goes bad, you will have all sorts of shifting issues and may not have a code thrown at all.
Replacing the solenoid isn't an easy job, but it doesn't mean you have to go to a professional. If you are at all unsure about this job, by all means, find a reputable pro to do this work for you. This DIY job requires a little skill with a wrench and about four hours of your time.
- Lift your Jeep and set on jack stands.
- Remove the transmission fluid pan.
- Remove at least the primary filter; the secondary does not need to come off.
- Disconnect the wiring harness for the solenoid and verify your transmission model.
- Drop the valve body.
- Inspect the solenoid for damage or shorts; at this point, you may just want to replace this part.
- If you haven't previously replaced the primary and secondary filters, now is a good time to do it.
- Reinstall the parts and refill with new ATF +4 fluid.
If the solenoid tests good or a replacement didn't help, you may have a bad throttle control cable or a broken snap ring.
Step 8 – Check for a broken snap ring or throttle transmission control cable
Both of these items may be broken, which will require considerable skill and effort for a DIY job.
If you have lost reverse, you most likely have a broken snap ring. You can easily tell this if you drop the fluid pan and remove the valve body. Pieces of the snap ring will likely be sitting right on top. Having down shift and engine braking problems or mushy upshifts are also indicative of a broken snap ring. Major disassemble is required and a spring compression tool is a must for this job. It is highly advisable to seek out a professional to do this job. The same holds true if your throttle transmission control cable goes out. You'll experience little to no downshifting at highway speeds or dropping off those speeds. At slow speeds, the Jeep otherwise runs fine and the problem may be very intermittent.

Related Discussions
- Shifting Problems with 04 Grand Cherokee Laredo - CherokeeForum.com
- WJ Tranny Slippage - CherokeeForum.com
- 2003 WJ 4.0/auto Transmission Problems. Weird Issue... CherokeeForum.com
- 2000 42RE No Reverse - CherokeeForum.com
- WJ Transmission Issues - CherokeeForum.com