
Project CHIOBA

Thread Starter
CF Veteran
Joined: Dec 2012
Posts: 4,169
Likes: 6
From: York, PA
Year: 1998
Model: Cherokee
Engine: 4.0
Im definitely interested in seeing how yours looks with the Bushwacker flares. I've only found a couple pictures of XJs that are close to stock with them and Im still on the fence on whether I want to go that route or not. What's the next step after the rust repair/prevention?
Thread Starter
CF Veteran
Joined: Dec 2012
Posts: 4,169
Likes: 6
From: York, PA
Year: 1998
Model: Cherokee
Engine: 4.0
Some updates, ya'll...
This showed up at my doorstep today

Over the weekend, my lovely girlfriend helped me rip out the interior and all of the carpet in the Jeep. With her help, it only took about 2 hours.


I found it interesting that there seemed to be a sort of bedliner "patch" there in the back, and it seems like it would be very difficult to remove. I decided that I'm going to leave it and Monstaline over it. The rear was perfect, no rust at all in the back seat / cargo areas (minus the quarter panels).
However, in the front, there are isolated areas that are covered with this foil stuff that is held on by some kind of tarry adhesive. It's pretty easy to scrape off with a putty knife, but the foil can cut you (ask me how I know)!
Drivers side:

Passenger side:
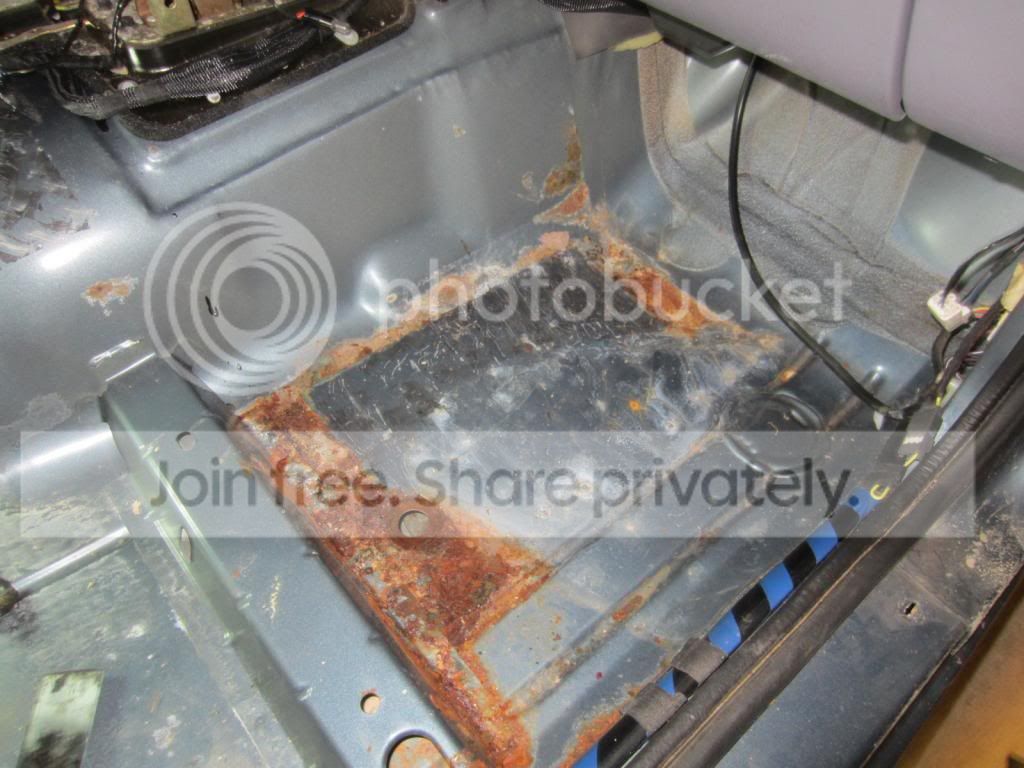
The passenger side wire-wheeled off quite nicely. Still lots of prep work to do, I've only wire-wheeled the bad sections. I need to obtain a Torx set so I can remove the seat belts and rear trim panels. It will still be a while until I'm ready to roll the Monstaliner as I also plan to remove the body trim to prepare the exterior for Monstaliner as well. Before I lay it down however, I'm going to address the rusty areas with Chassis Saver. The aluminum kind is supposed to help fill in pits and work as a better primer. Also using that stuff underneath, eventually! But that's for a later post.
This showed up at my doorstep today
Over the weekend, my lovely girlfriend helped me rip out the interior and all of the carpet in the Jeep. With her help, it only took about 2 hours.
I found it interesting that there seemed to be a sort of bedliner "patch" there in the back, and it seems like it would be very difficult to remove. I decided that I'm going to leave it and Monstaline over it. The rear was perfect, no rust at all in the back seat / cargo areas (minus the quarter panels).
However, in the front, there are isolated areas that are covered with this foil stuff that is held on by some kind of tarry adhesive. It's pretty easy to scrape off with a putty knife, but the foil can cut you (ask me how I know)!
Drivers side:
Passenger side:
The passenger side wire-wheeled off quite nicely. Still lots of prep work to do, I've only wire-wheeled the bad sections. I need to obtain a Torx set so I can remove the seat belts and rear trim panels. It will still be a while until I'm ready to roll the Monstaliner as I also plan to remove the body trim to prepare the exterior for Monstaliner as well. Before I lay it down however, I'm going to address the rusty areas with Chassis Saver. The aluminum kind is supposed to help fill in pits and work as a better primer. Also using that stuff underneath, eventually! But that's for a later post.
Thread Starter
CF Veteran
Joined: Dec 2012
Posts: 4,169
Likes: 6
From: York, PA
Year: 1998
Model: Cherokee
Engine: 4.0
Thanks, me too! A lot needs to happen before I get to roll it on though. The Monstaliner only has a pot life of 8-10 hours, once mixed. That means I need to be ready to cover everything with it within that time period.
Since I want to do the inside of my fender wells too, it makes sense to install the Bushwacker Flat Flares--well make the cuts for them anyway--so that all bare metal resulting from that will be addressed with rust preventative and durability measures. Tomorrow after work I plan to get the jeep up on the stands, remove the wheels for extra room, and removing the stock flares to prepare for that.
Since I want to do the inside of my fender wells too, it makes sense to install the Bushwacker Flat Flares--well make the cuts for them anyway--so that all bare metal resulting from that will be addressed with rust preventative and durability measures. Tomorrow after work I plan to get the jeep up on the stands, remove the wheels for extra room, and removing the stock flares to prepare for that.
Thread Starter
CF Veteran
Joined: Dec 2012
Posts: 4,169
Likes: 6
From: York, PA
Year: 1998
Model: Cherokee
Engine: 4.0
So, I've had some time to pick away at the immense amount of prepwork I need to do to the interior before I'm ready to roll on the Monstaliner...and as another thread I posted mentions...I HATE TORX BOLTS. I may replace them all with standard grade 8 bolts...I just got a new T50 socket head, and this happened when slowly wrenching out the rear seatbelt bolts. The front ones are rusty, so I'll probably just end up drilling and grinding them out. 

Same deal for these two guys, when trying to remove my rear drivers door for the door jamb rust repair.

F*** TORX!!!!
Same deal for these two guys, when trying to remove my rear drivers door for the door jamb rust repair.
F*** TORX!!!!
Thread Starter
CF Veteran
Joined: Dec 2012
Posts: 4,169
Likes: 6
From: York, PA
Year: 1998
Model: Cherokee
Engine: 4.0
Some planning updates to the CHIOBA's future...I know I change my mind on this every other day, but I'm pretty set on this idea now. I'm going to go with Rock Krawler adjustable short arms, and the Bomb-Proof Track Bar w/ Bracket. My style of wheeling/offroading really doesn't require long arms, and I'm not so anxious to drill into the frame and what not for the long arm install. Plus chopping the original control arm mounts. And, they are used, and I really want to put new stuff on. So currently, it looks like this...
Rubicon Express 4.5" Coils
Rubicon Express Twin-Tube Shocks
Rock Krawler Adj. Control Arms
Rock Krawler Bomb-Proof Adjustable Track Bar
Rock Krawler HD Tie Rod
Zone Offroad Steering Stabilizer
Rusty's 4.5 Leaf Packs (used as part of the old kit, but still seem in good shape)
Cragar Soft 8 Steelies (CHEAP)
Dick Cepek Mud Country (still torn on 33s or 35s...I think I'll decide after trying on a buddy's 35s. The price difference really isn't that much)
Quite a mixed bag! I'll probably need a SYE after all this, so I'll be getting the IRO Hack-n-Tap for that job when the time comes. I really have no interest in dropping the T-case.
Look for all that stuff to be installed 20 years from now. LOL. Sponsors welcome!
CF Veteran


Joined: Jan 2010
Posts: 1,456
Likes: 74
From: North Riding of Yorkshire, UK
Year: 1997
Model: Cherokee
Engine: 4.0
That's going to be fantastic
Looks like you got to those floors just in time, what rest preventer will you use? I've just bought a big tub of Bilt Hamber Hydrate 80, but that might not be available/good value in the US because it's made here in the UK. I've had success with POR-15 before, but it can react when painted over so I don't know how it would go with Monstaliner.
I'm pretty sure that patch is sound deadening material. It can be a real ***** to get off so I'd leave it well alone
Best of luck!
Thread Starter
CF Veteran
Joined: Dec 2012
Posts: 4,169
Likes: 6
From: York, PA
Year: 1998
Model: Cherokee
Engine: 4.0
Some visual updates for ya'll...
So, this is the mess I'm currently at, no thanks to Torx bolts and crummy tar adhesive-backed insulation.

Here you can see some of the gunmetal blue "caulk" tape that surrounds the edges of the interior and along the backseat area. What a huge pain in the *** to remove. Taking the angle grinder wire wheel to it makes a huge mess, and scraping it up by hand is way too tedious. No-win situation, but that's gonna have to come off of there. I've never seen this before on other jeeps. Go figure!

I did finally get one of the back seatbelt Torx bolts drilled out. What a difference the right bits makes! Here's where I'm at with the other one......

And, here's where I'm at with the bolts holding the rear driver's door on....

Ideally I'd have a die grinder, but I must tediously toil away with a Dremel and grinding stone on those two bastards.
Also, after getting tired and frustrated with those, I decided to switch gears and start my Bushwacker Flat Flare installation. This side is soon ready for cutting. Try to ignore those rusty original shocks...

So, all those factors combined are making this a very long and drawn-out process. I'm hoping to at least be ready to start rolling the Monsta on before it starts getting cold out since summer is basically over already. Also, I ordered a 10" LED Light Bar from White's 4x4 that's due to arrive tomorrow. Pretty excited about that one.
My mess of a garage...lol

So, this is the mess I'm currently at, no thanks to Torx bolts and crummy tar adhesive-backed insulation.
Here you can see some of the gunmetal blue "caulk" tape that surrounds the edges of the interior and along the backseat area. What a huge pain in the *** to remove. Taking the angle grinder wire wheel to it makes a huge mess, and scraping it up by hand is way too tedious. No-win situation, but that's gonna have to come off of there. I've never seen this before on other jeeps. Go figure!
I did finally get one of the back seatbelt Torx bolts drilled out. What a difference the right bits makes! Here's where I'm at with the other one......
And, here's where I'm at with the bolts holding the rear driver's door on....
Ideally I'd have a die grinder, but I must tediously toil away with a Dremel and grinding stone on those two bastards.
Also, after getting tired and frustrated with those, I decided to switch gears and start my Bushwacker Flat Flare installation. This side is soon ready for cutting. Try to ignore those rusty original shocks...
So, all those factors combined are making this a very long and drawn-out process. I'm hoping to at least be ready to start rolling the Monsta on before it starts getting cold out since summer is basically over already. Also, I ordered a 10" LED Light Bar from White's 4x4 that's due to arrive tomorrow. Pretty excited about that one.
My mess of a garage...lol
Last edited by PocketsEmpty; Aug 27, 2013 at 12:56 PM.
Thread Starter
CF Veteran
Joined: Dec 2012
Posts: 4,169
Likes: 6
From: York, PA
Year: 1998
Model: Cherokee
Engine: 4.0
Soooo this showed up a day early, today--my 10" LED light bar
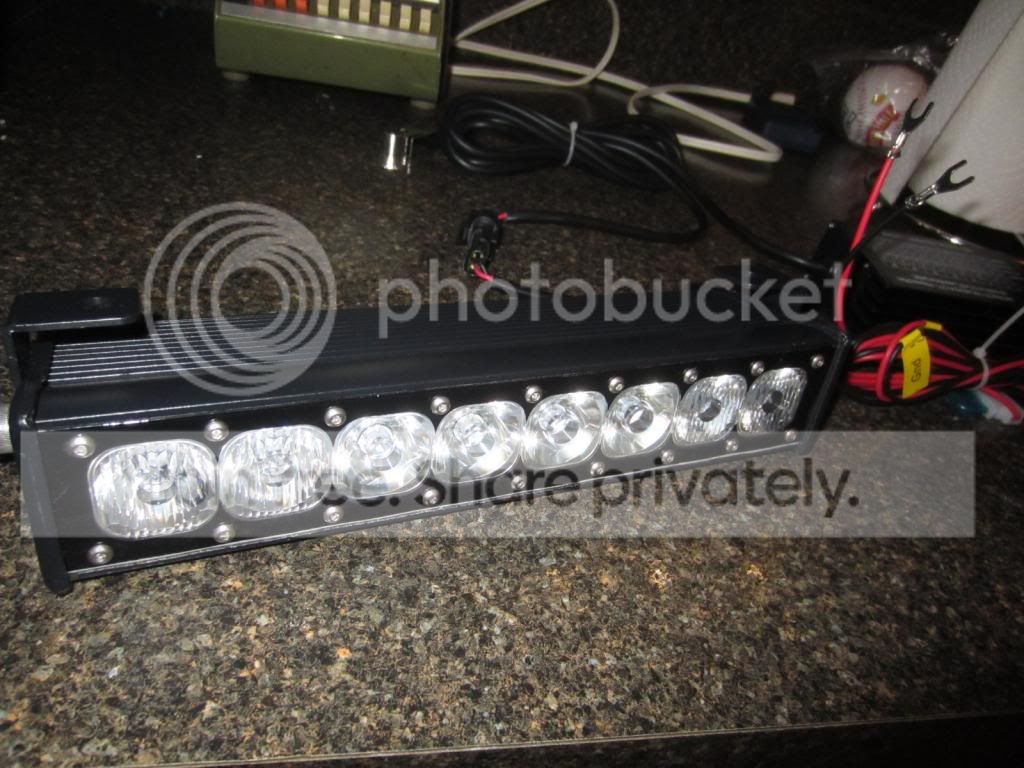
I couldn't resist installing it, so I got to work immediately. A trip to Ace and a few stainless steel nuts & bolts later...

I'm really happy with how it turned out. It's right up against the bull bar, and back in enough that it's well protected by it without blocking the beam.


I decided not to mess with the factory original switch for now, and threw in this temporary switch.

I know that's ugly, but I'll "switch" that up at a later time. Sorry, no action shots as of yet since it's still garaged for a while as I'm tackling three big projects at once...Bedliner, rust repair, and Bushwacker flares. More to come soon.
I couldn't resist installing it, so I got to work immediately. A trip to Ace and a few stainless steel nuts & bolts later...
I'm really happy with how it turned out. It's right up against the bull bar, and back in enough that it's well protected by it without blocking the beam.
I decided not to mess with the factory original switch for now, and threw in this temporary switch.
I know that's ugly, but I'll "switch" that up at a later time. Sorry, no action shots as of yet since it's still garaged for a while as I'm tackling three big projects at once...Bedliner, rust repair, and Bushwacker flares. More to come soon.
Junior Member
Joined: May 2013
Posts: 87
Likes: 0
From: Iron Range, MN
Year: 1986
Model: Cherokee
Engine: None presently
Nice thread and very nice project. Now I'm subscribed to one more thread to ensure my "cheap" project continues to eat up all of my beer money as I see more ideas. Ok... let's be serious, I'll always find a way to cover essentials.
I see you liked that seal/caulk/tape/goop/**** as much as me. Whoever came up with that is probably laughing his *** off at all of the people bedlining their interior since he knows they have to deal with it. What a sick, sick joke.
Keep up the nice work!
I see you liked that seal/caulk/tape/goop/**** as much as me. Whoever came up with that is probably laughing his *** off at all of the people bedlining their interior since he knows they have to deal with it. What a sick, sick joke.
Keep up the nice work!
Thread Starter
CF Veteran
Joined: Dec 2012
Posts: 4,169
Likes: 6
From: York, PA
Year: 1998
Model: Cherokee
Engine: 4.0
Nice thread and very nice project. Now I'm subscribed to one more thread to ensure my "cheap" project continues to eat up all of my beer money as I see more ideas. Ok... let's be serious, I'll always find a way to cover essentials.
I see you liked that seal/caulk/tape/goop/**** as much as me. Whoever came up with that is probably laughing his *** off at all of the people bedlining their interior since he knows they have to deal with it. What a sick, sick joke.
Keep up the nice work!
I see you liked that seal/caulk/tape/goop/**** as much as me. Whoever came up with that is probably laughing his *** off at all of the people bedlining their interior since he knows they have to deal with it. What a sick, sick joke.
Keep up the nice work!
Junior Member
Joined: May 2013
Posts: 87
Likes: 0
From: Iron Range, MN
Year: 1986
Model: Cherokee
Engine: None presently
Ya, mine had plenty of that crap too. I wish I had good advice for ya on it, but it was just a pain and nothing worked out too great. I used the 3" wire brushes on my drill for most of the stuff and it worked "best", but took a lot of time, made a hell of a mess, and ate up the brushes like mad. Sometimes I was able to hit it in strips and peel chunks off, but not always. Definitely not a fun time.
Thread Starter
CF Veteran
Joined: Dec 2012
Posts: 4,169
Likes: 6
From: York, PA
Year: 1998
Model: Cherokee
Engine: 4.0
I think I'm going to try to cut it some with a putty knife, and see if that makes it easier on the wire brush. Also, before working on it any more, I'm going to completely cover my dash from the mess it makes. UGH!