
"Milo" The 1989 2 Door build

Thread Starter
Senior Member
Joined: Aug 2009
Posts: 684
Likes: 1
From: St. George Utah
Year: 1989
Model: Cherokee
Engine: 4.0L Rebuilt Renix "Low Output" haha
Originally Posted by just_jeepin
Haha honestly the first time I heard it was 2 years ago and I've heard it maybe 3 times since. I get it but I guess it just hasn't caught on yet.
In any case it's real buttery and saucy.
In any case it's real buttery and saucy.
Originally Posted by Atmos
dont forget steezy. it's dipped in butter sauce and steezed out haha
Originally Posted by just_jeepin
Hahahaha! Very steezy
Originally Posted by Atmos
Originally Posted by just_jeepin
Haha If he's got beef jerky on his legs then this man has some serious bacon all slathered on his xj
Thread Starter
Senior Member
Joined: Aug 2009
Posts: 684
Likes: 1
From: St. George Utah
Year: 1989
Model: Cherokee
Engine: 4.0L Rebuilt Renix "Low Output" haha
Originally Posted by cherokee_ftw_5
Awesome. It'll only be a few trails I'm assuming, but it'd be sweet to see some people from cherokeeforum on there. =D
Last edited by goneboating06; Mar 30, 2012 at 04:32 PM.
Thread Starter
Senior Member
Joined: Aug 2009
Posts: 684
Likes: 1
From: St. George Utah
Year: 1989
Model: Cherokee
Engine: 4.0L Rebuilt Renix "Low Output" haha
Upgrade: Extended rear bump stops
My rear tires rub really bad on my fender flares at full flex... Yeah, I'm not okay with it haha.
So I found these extended rear bump stops at quadratec so I ordered a pair. I might need even need longer bump stops, who knows... I guess I'll find out next wheeling trip, which will hopefully be soon, this spring weather is too amazing not to be out enjoying it!
Last edited by goneboating06; Mar 30, 2012 at 04:29 PM.
Seasoned Member
Joined: Mar 2012
Posts: 362
Likes: 0
From: twin falls, idaho
Year: 1994
Model: Cherokee
Engine: 4.0L i6 high output
Upgrade: Extended rear bump stops
My rear tires rub really bad on my fender flares at full flex... Yeah, I'm not okay with it haha.
So I found these extended rear bump stops at quadratec so I ordered a pair. I might need even need longer bump stops, who knows... I guess I'll find out next wheeling trip, which will hopefully be soon, this spring weather is too amazing not to be out enjoying it!
My rear tires rub really bad on my fender flares at full flex... Yeah, I'm not okay with it haha.
So I found these extended rear bump stops at quadratec so I ordered a pair. I might need even need longer bump stops, who knows... I guess I'll find out next wheeling trip, which will hopefully be soon, this spring weather is too amazing not to be out enjoying it!

Thread Starter
Senior Member
Joined: Aug 2009
Posts: 684
Likes: 1
From: St. George Utah
Year: 1989
Model: Cherokee
Engine: 4.0L Rebuilt Renix "Low Output" haha
Thread Starter
Senior Member
Joined: Aug 2009
Posts: 684
Likes: 1
From: St. George Utah
Year: 1989
Model: Cherokee
Engine: 4.0L Rebuilt Renix "Low Output" haha
So i went out and found some rocks to flex my jeep on, and my rear bumpstops don't even come close to the axle, which doesn't surprise me... but still
BUT i found this
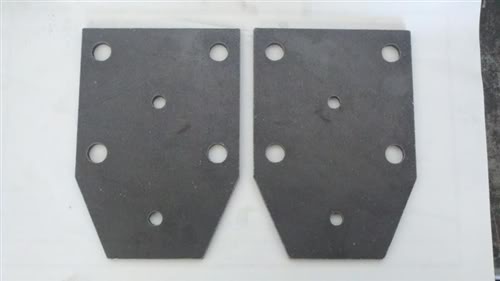
They are $20 bucks per plate from diybeadlocks.com. Plus shipping puts the total close to $60 bucks. That seems like a lot of $ to me. I could probably build them myself if i knew where to buy some metal at. What are you guy's thoughts? Any ideas are very much appreciated!
BUT i found this
They are $20 bucks per plate from diybeadlocks.com. Plus shipping puts the total close to $60 bucks. That seems like a lot of $ to me. I could probably build them myself if i knew where to buy some metal at. What are you guy's thoughts? Any ideas are very much appreciated!
CF Veteran
Joined: Jan 2012
Posts: 1,117
Likes: 1
From: New Hampshire
Year: 1999
Model: Cherokee
Engine: 4.0L
Originally Posted by goneboating06
So i went out and found some rocks to flex my jeep on, and my rear bumpstops don't even come close to the axle, which doesn't surprise me... but still
BUT i found this
They are $20 bucks per plate from diybeadlocks.com. Plus shipping puts the total close to $60 bucks. That seems like a lot of $ to me. I could probably build them myself if i knew where to buy some metal at. What are you guy's thoughts? Any ideas are very much appreciated!
BUT i found this
They are $20 bucks per plate from diybeadlocks.com. Plus shipping puts the total close to $60 bucks. That seems like a lot of $ to me. I could probably build them myself if i knew where to buy some metal at. What are you guy's thoughts? Any ideas are very much appreciated!
Seasoned Member
Joined: Mar 2012
Posts: 362
Likes: 0
From: twin falls, idaho
Year: 1994
Model: Cherokee
Engine: 4.0L i6 high output
Thread Starter
Senior Member
Joined: Aug 2009
Posts: 684
Likes: 1
From: St. George Utah
Year: 1989
Model: Cherokee
Engine: 4.0L Rebuilt Renix "Low Output" haha
Thats what i'm thinking... I have a drill, and a grinder. Looks fairly easy. But They replace the rear axle leaf spring plate, and it extends out so the bump stop hits that extended plate rather then hitting the axle.
CF Veteran
Joined: Jan 2012
Posts: 1,117
Likes: 1
From: New Hampshire
Year: 1999
Model: Cherokee
Engine: 4.0L
Originally Posted by goneboating06
Thats what i'm thinking... I have a drill, and a grinder. Looks fairly easy. But They replace the rear axle leaf spring plate, and it extends out so the bump stop hits that extended plate rather then hitting the axle.
Thread Starter
Senior Member
Joined: Aug 2009
Posts: 684
Likes: 1
From: St. George Utah
Year: 1989
Model: Cherokee
Engine: 4.0L Rebuilt Renix "Low Output" haha
Upgrade: Power Windows, Mirrors, Locks - Part 1
Having power Mirrors, locks, and windows is not only a convenience, it's a luxury! Both my Manual Mirrors didn't work, nor did both my manual window regulators. The drivers side window would gradually slide down on even the slightest bumps, and the the passenger side window wouldn't roll up once you roll it all the way down. I had to replace them all anyway, so why not replace them with power Mirrors and windows?
Now the conversion to power mirrors is pretty straight forward. You need the mirrors, obviously, the harness that goes across the floor, the door harnesses, and the switch. I got the wiring and mirrors off of a white commanche of all things haha.
Now all this would have been very easy, but since I still would like to have the ability to go doorless I had to wire in some connectors. The drivers side door has 20 wires, and the passenger side has 13. Since I have a 2 door I probably could have eliminated several wires, but I didn't want to mess with it. I work at a semi truck dealership, so I was able to buy these connectors for a huge discount. Once the doors are on the connectors go inside the door, and the rubber boot still fits over the wires so it's shielded from water. The cross over wire harness goes under the carpet. In the middle of the harness there is a wire bundle that goes under the center console and connects to the power mirror switch. Why did they out the switch there of all places?!? Beats me... But it works! 12 volts to the power mirrors is supplied by the dome light circuit via a red wire with a white tracer. I just spliced it in to the + pink floor light wire on the drivers side. The door actuator power feed is supplied through a red wire, and it connects to a 30 amp circuit breaker on the fuse panel. The Power window power feed is supplied through a purple wire, and connects to the "pwr accy" terminal on the fuse panel.
Now as for the power windows, and locks, I still need the door handles with switches, and window regulators. Next time I'm near a salvage yard I'll have to pick them up. At least all the wiring is done!
P.S. I'm really liking the look of the painted front of the mirrors vs. all black. Let me know what ya think!
Last edited by goneboating06; Apr 6, 2012 at 11:58 PM.
CF Veteran
Joined: Sep 2010
Posts: 1,024
Likes: 0
From: Coos Bay, Or
Year: 1990
Model: Cherokee
Engine: 4.0
Upgrade: Power Windows, Mirrors, Locks - Part 1
Having power Mirrors, locks, and windows is not only a convenience, it's a luxury! Both my Manual Mirrors didn't work, nor did both my manual window regulators. The drivers side window would gradually slide down on even the slightest bumps, and the the passenger side window wouldn't roll up once you roll it all the way down. I had to replace them all anyway, so why not replace them with power Mirrors and windows?
Now the conversion to power mirrors is pretty straight forward. You need the mirrors, obviously, the harness that goes across the floor, the door harnesses, and the switch. I got the wiring and mirrors off of a white commanche of all things haha.
Now all this would have been very easy, but since I still would like to have the ability to go doorless I had to wire in some connectors. The drivers side door has 20 wires, and the passenger side has 13. Since I have a 2 door I probably could have eliminated several wires, but I didn't want to mess with it. I work at a semi truck dealership, so I was able to buy these connectors for a huge discount. Once the doors are on the connectors go inside the door, and the rubber boot still fits over the wires so it's shielded from water. The cross over wire harness goes under the carpet. In the middle of the harness there is a wire bundle that goes under the center console and connects to the power mirror switch. Why did they out the switch there of all places?!? Beats me... But it works! 12 volts to the power mirrors is supplied by the dome light circuit via a red wire with a white tracer. I just spliced it in to the + pink floor light wire on the drivers side. The door actuator power feed is supplied through a red wire, and it connects to a 30 amp circuit breaker on the fuse panel. The Power window power feed is supplied through a purple wire, and connects to the "pwr accy" terminal on the fuse panel.
Now as for the power windows, and locks, I still need the door handles with switches, and window regulators. Next time I'm near a salvage yard I'll have to pick them up. At least all the wiring is done!
P.S. I'm really liking the look of the painted front of the mirrors vs. all black. Let me know what ya think!
Having power Mirrors, locks, and windows is not only a convenience, it's a luxury! Both my Manual Mirrors didn't work, nor did both my manual window regulators. The drivers side window would gradually slide down on even the slightest bumps, and the the passenger side window wouldn't roll up once you roll it all the way down. I had to replace them all anyway, so why not replace them with power Mirrors and windows?
Now the conversion to power mirrors is pretty straight forward. You need the mirrors, obviously, the harness that goes across the floor, the door harnesses, and the switch. I got the wiring and mirrors off of a white commanche of all things haha.
Now all this would have been very easy, but since I still would like to have the ability to go doorless I had to wire in some connectors. The drivers side door has 20 wires, and the passenger side has 13. Since I have a 2 door I probably could have eliminated several wires, but I didn't want to mess with it. I work at a semi truck dealership, so I was able to buy these connectors for a huge discount. Once the doors are on the connectors go inside the door, and the rubber boot still fits over the wires so it's shielded from water. The cross over wire harness goes under the carpet. In the middle of the harness there is a wire bundle that goes under the center console and connects to the power mirror switch. Why did they out the switch there of all places?!? Beats me... But it works! 12 volts to the power mirrors is supplied by the dome light circuit via a red wire with a white tracer. I just spliced it in to the + pink floor light wire on the drivers side. The door actuator power feed is supplied through a red wire, and it connects to a 30 amp circuit breaker on the fuse panel. The Power window power feed is supplied through a purple wire, and connects to the "pwr accy" terminal on the fuse panel.
Now as for the power windows, and locks, I still need the door handles with switches, and window regulators. Next time I'm near a salvage yard I'll have to pick them up. At least all the wiring is done!
P.S. I'm really liking the look of the painted front of the mirrors vs. all black. Let me know what ya think!

Senior Member
Joined: Mar 2011
Posts: 586
Likes: 0
From: Houston, TX
Year: 2000
Model: Cherokee
Engine: 4.0L
Originally Posted by goneboating06
Upgrade: Power Windows, Mirrors, Locks - Part 1
Having power Mirrors, locks, and windows is not only a convenience, it's a luxury! Both my Manual Mirrors didn't work, nor did both my manual window regulators. The drivers side window would gradually slide down on even the slightest bumps, and the the passenger side window wouldn't roll up once you roll it all the way down. I had to replace them all anyway, so why not replace them with power Mirrors and windows?
Now the conversion to power mirrors is pretty straight forward. You need the mirrors, obviously, the harness that goes across the floor, the door harnesses, and the switch. I got the wiring and mirrors off of a white commanche of all things haha.
Now all this would have been very easy, but since I still would like to have the ability to go doorless I had to wire in some connectors. The drivers side door has 20 wires, and the passenger side has 13. Since I have a 2 door I probably could have eliminated several wires, but I didn't want to mess with it. I work at a semi truck dealership, so I was able to buy these connectors for a huge discount. Once the doors are on the connectors go inside the door, and the rubber boot still fits over the wires so it's shielded from water. The cross over wire harness goes under the carpet. In the middle of the harness there is a wire bundle that goes under the center console and connects to the power mirror switch. Why did they out the switch there of all places?!? Beats me... But it works! 12 volts to the power mirrors is supplied by the dome light circuit via a red wire with a white tracer. I just spliced it in to the + pink floor light wire on the drivers side. The door actuator power feed is supplied through a red wire, and it connects to a 30 amp circuit breaker on the fuse panel. The Power window power feed is supplied through a purple wire, and connects to the "pwr accy" terminal on the fuse panel.
Now as for the power windows, and locks, I still need the door handles with switches, and window regulators. Next time I'm near a salvage yard I'll have to pick them up. At least all the wiring is done!
P.S. I'm really liking the look of the painted front of the mirrors vs. all black. Let me know what ya think!
Having power Mirrors, locks, and windows is not only a convenience, it's a luxury! Both my Manual Mirrors didn't work, nor did both my manual window regulators. The drivers side window would gradually slide down on even the slightest bumps, and the the passenger side window wouldn't roll up once you roll it all the way down. I had to replace them all anyway, so why not replace them with power Mirrors and windows?
Now the conversion to power mirrors is pretty straight forward. You need the mirrors, obviously, the harness that goes across the floor, the door harnesses, and the switch. I got the wiring and mirrors off of a white commanche of all things haha.
Now all this would have been very easy, but since I still would like to have the ability to go doorless I had to wire in some connectors. The drivers side door has 20 wires, and the passenger side has 13. Since I have a 2 door I probably could have eliminated several wires, but I didn't want to mess with it. I work at a semi truck dealership, so I was able to buy these connectors for a huge discount. Once the doors are on the connectors go inside the door, and the rubber boot still fits over the wires so it's shielded from water. The cross over wire harness goes under the carpet. In the middle of the harness there is a wire bundle that goes under the center console and connects to the power mirror switch. Why did they out the switch there of all places?!? Beats me... But it works! 12 volts to the power mirrors is supplied by the dome light circuit via a red wire with a white tracer. I just spliced it in to the + pink floor light wire on the drivers side. The door actuator power feed is supplied through a red wire, and it connects to a 30 amp circuit breaker on the fuse panel. The Power window power feed is supplied through a purple wire, and connects to the "pwr accy" terminal on the fuse panel.
Now as for the power windows, and locks, I still need the door handles with switches, and window regulators. Next time I'm near a salvage yard I'll have to pick them up. At least all the wiring is done!
P.S. I'm really liking the look of the painted front of the mirrors vs. all black. Let me know what ya think!
Thread Starter
Senior Member
Joined: Aug 2009
Posts: 684
Likes: 1
From: St. George Utah
Year: 1989
Model: Cherokee
Engine: 4.0L Rebuilt Renix "Low Output" haha
Originally Posted by alsxj
Nice work man! I understand the manual windows issues, I actually just broke my passenger window last week because it go stuck after a friend rolled it all the way down. I may do the mirror swap, especially if I find the white ones like you did, I like that. Awesome build man keep it up!
 haha. In all seriousness I highly recommend the mirror swap. It's a worthwhile upgrade.
Originally Posted by just_jeepin
Oh yeah those new white mirrors are looking fresh!
Originally Posted by bikerider
I agree
