
Florida Jeep's Mild 2WD Build - "Campin' Wag'n"

Thread Starter
Newbie
Joined: Oct 2010
Posts: 29
Likes: 0
From: Miami, Fl.
Year: 1997
Model: Cherokee
Engine: 4.0
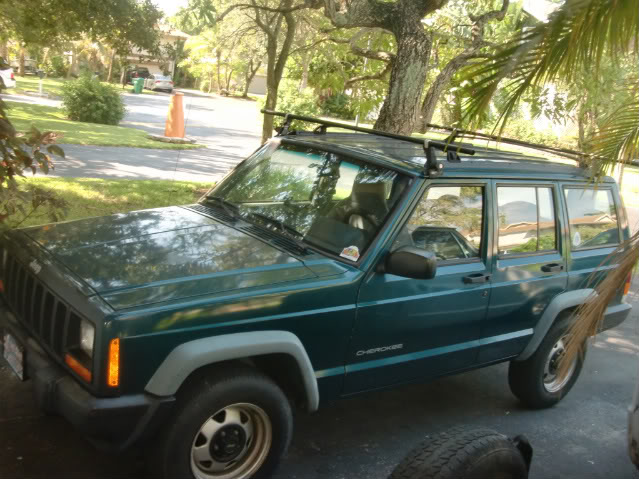
Hello all - I just got this 97 2wd Cherokee, 4.0, from my father in law a month or two ago. The thing was ridiculously maintained all of its life, and at 178k miles: no smoke, no squeaks, drives straight, no trans leaks, great shifter, light main seal seepage, and still has great power.
I do a lot of camping, hiking, and kayaking.. not a lot to do with the mud or snow, so the 2wd is fine for me.
This thing is getting a little bit of bolt on power, a little lift, 30" AT's, alloy rims, and a lot of storage. All of which have been ordered.
Here it is now: tucked in next to my project 72 C10 rat
005-7.jpg?t=1286719851
You should see some progress photos posted this afternoon.. as a few goodies have already arrived.
Thread Starter
Newbie
Joined: Oct 2010
Posts: 29
Likes: 0
From: Miami, Fl.
Year: 1997
Model: Cherokee
Engine: 4.0
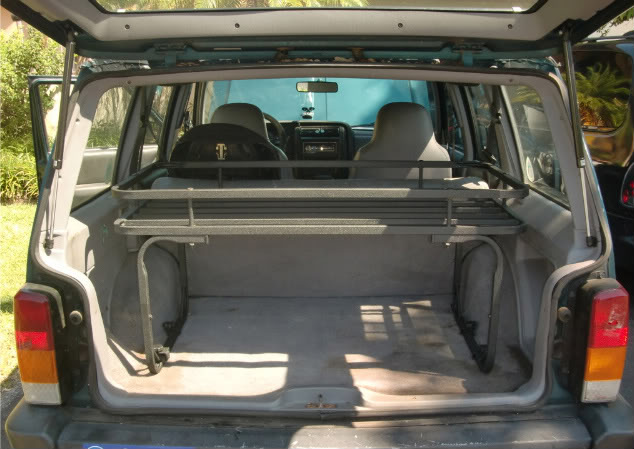
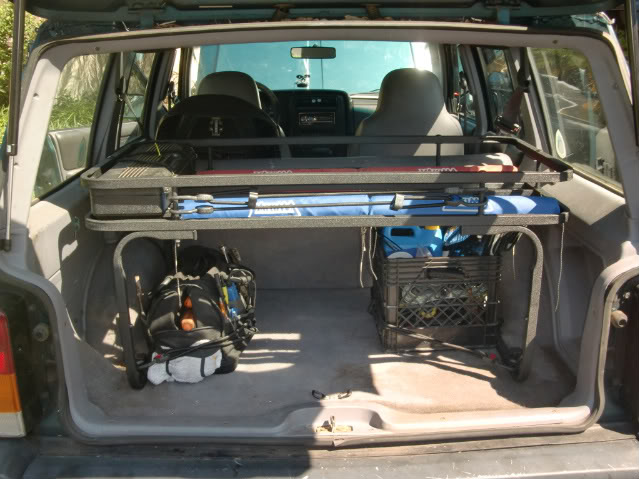
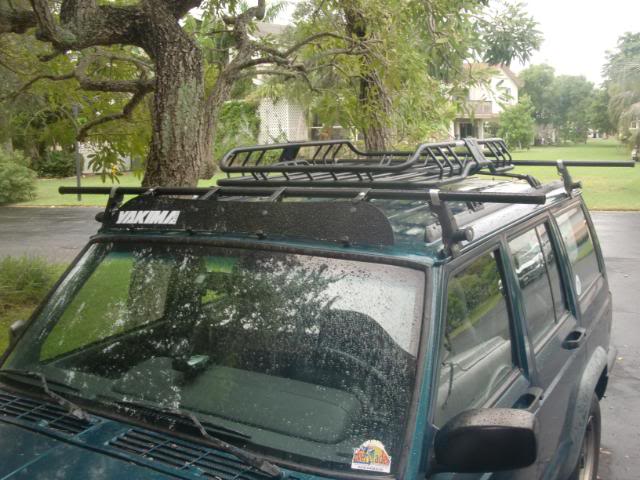
Olympic 4X4 Products Mountaineer Rack - Installed
Before:
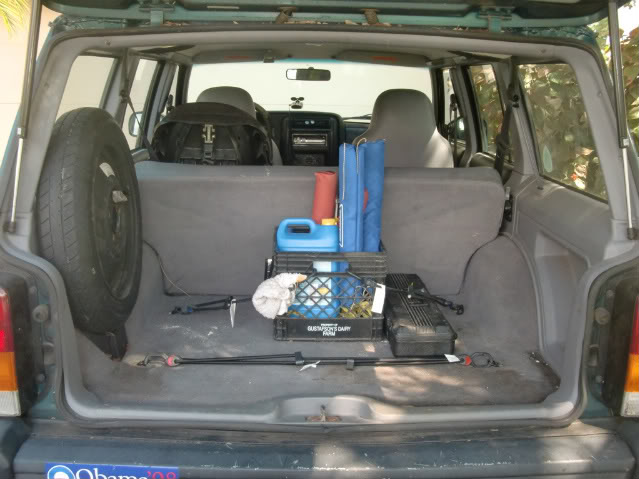
After:
Loaded (I decided to re-mount the OEM tie down points, with some 1" self tapping sheet metal screws, in the center of the rear to provide some more bungee point options):
Notes:
The instructions included with this are very detailed, as far as where to drill and mount, for various years of Cherokee. But, a couple things were not mentioned.
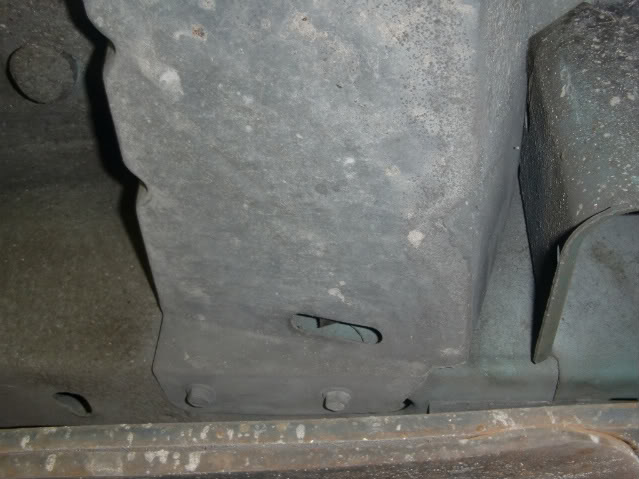
On the drivers side, after drilling out the suggested rivets that hold the OEM tie downs at the rear, when you go to put in the adapter lug, underneath the Jeep, the fuel filler lines guard plate in the way. This must be removed.
This:
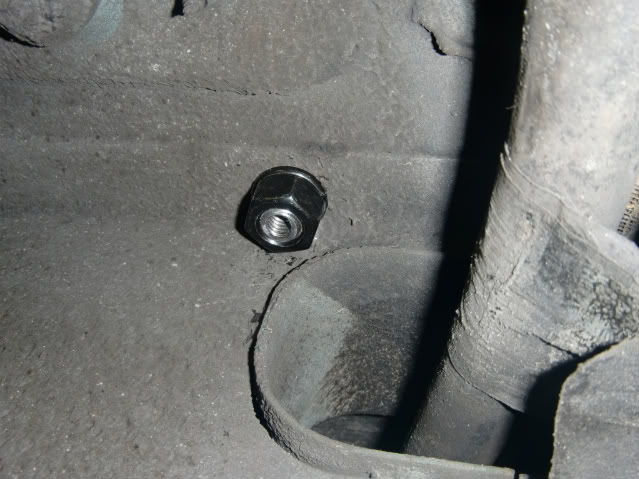
I also found that instead of drilling the 1/2" holes suggested, you can drill 7/16" holes, and the adapter lug will actually thread into the hole. So, when you go underneath to tighten the nut and lock washer, you do not need an extra hand to hold the bolt at the top. It will stick hard enough to let you install and tighten by yourself.
Also, the clearance of the rear lugs is close to the uni-body support, you will need to use an open end wrench to tighten this. It is too close to fit a socket on. You will also need to finagle the drivers rear lug around the lip of the chassis port for the filler lines.
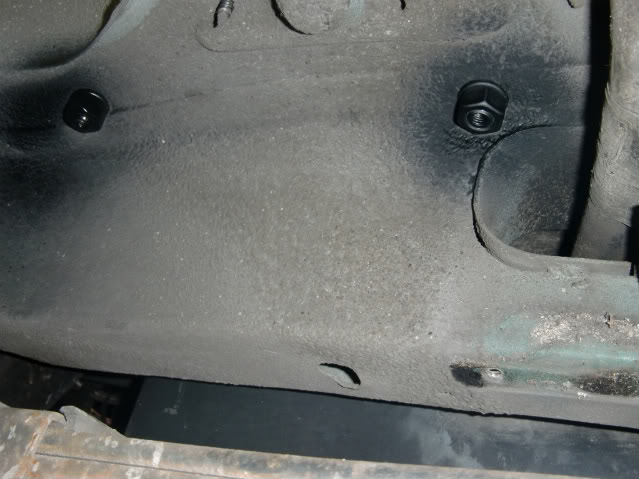
All other areas are out in the open, and easy to handle.
I also sprayed the finished mounting lugs with some rattle can black to help keep any rust from forming on the new hardware.
P.S. I am going to a full size spare.. mounted..? not sure yet
Before:
After:
Loaded (I decided to re-mount the OEM tie down points, with some 1" self tapping sheet metal screws, in the center of the rear to provide some more bungee point options):
Notes:
The instructions included with this are very detailed, as far as where to drill and mount, for various years of Cherokee. But, a couple things were not mentioned.
On the drivers side, after drilling out the suggested rivets that hold the OEM tie downs at the rear, when you go to put in the adapter lug, underneath the Jeep, the fuel filler lines guard plate in the way. This must be removed.
This:
I also found that instead of drilling the 1/2" holes suggested, you can drill 7/16" holes, and the adapter lug will actually thread into the hole. So, when you go underneath to tighten the nut and lock washer, you do not need an extra hand to hold the bolt at the top. It will stick hard enough to let you install and tighten by yourself.
Also, the clearance of the rear lugs is close to the uni-body support, you will need to use an open end wrench to tighten this. It is too close to fit a socket on. You will also need to finagle the drivers rear lug around the lip of the chassis port for the filler lines.
All other areas are out in the open, and easy to handle.
I also sprayed the finished mounting lugs with some rattle can black to help keep any rust from forming on the new hardware.
P.S. I am going to a full size spare.. mounted..? not sure yet
Thread Starter
Newbie
Joined: Oct 2010
Posts: 29
Likes: 0
From: Miami, Fl.
Year: 1997
Model: Cherokee
Engine: 4.0
AFE Intake & Jet Stage 1 Chip - Installed
Before:
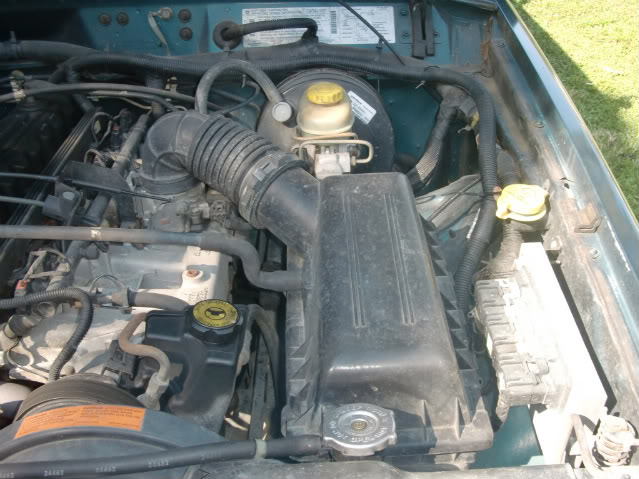
After:

Note:
After closing the hood and then opening it, I realized there was added tension on the release now. I realized it was the end of the weather stripping material on the new intake heat shield rubbing on the release rod. I angle cut the end of it, and it solved the problem.

And yes.. it is obviously faster, and runs REALLY well in the entire range.
Before:
After:
Note:
After closing the hood and then opening it, I realized there was added tension on the release now. I realized it was the end of the weather stripping material on the new intake heat shield rubbing on the release rod. I angle cut the end of it, and it solved the problem.
And yes.. it is obviously faster, and runs REALLY well in the entire range.
Thread Starter
Newbie
Joined: Oct 2010
Posts: 29
Likes: 0
From: Miami, Fl.
Year: 1997
Model: Cherokee
Engine: 4.0
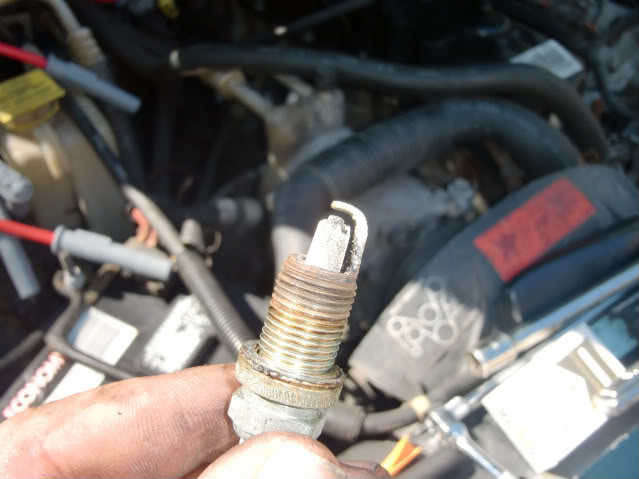
MSD Wires & Accel Cap/Rotor/Plugs - Installed
The stuff:
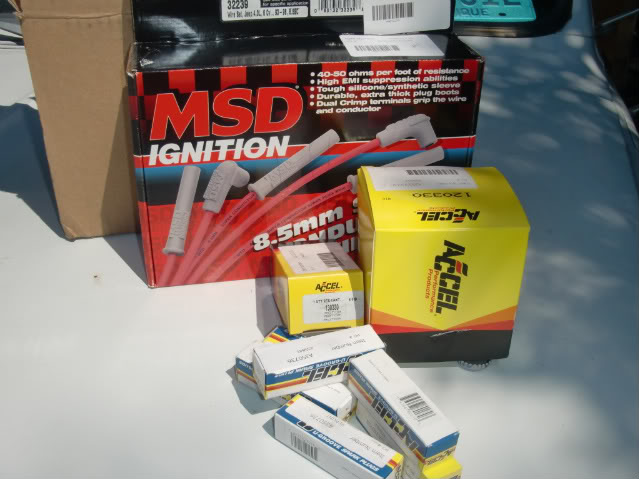
The after:
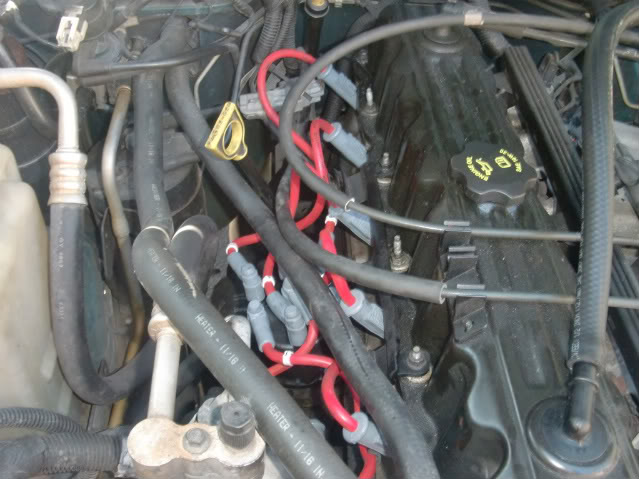
The old plugs did not show any signs of fouling or blow by. They did appear to be very old, three of them disintegrated at the mere thought of the socket coming their way.
The stuff:
The after:
The old plugs did not show any signs of fouling or blow by. They did appear to be very old, three of them disintegrated at the mere thought of the socket coming their way.

Banned
Joined: Oct 2009
Posts: 2,231
Likes: 1
From: West Springfield, MA
Year: 1999
Model: Cherokee
Engine: 4.0
i have always wondered about that AFE intake cause its cheaper than the K&N let me know how it works out and the ignition stuff too a lot of people say ignition mods to the 4.0 does nothing...nice start
Seasoned Member
Joined: Jan 2010
Posts: 412
Likes: 0
From: Former Tampa Fl. now Southern Indiana
Year: 1990
Model: Cherokee
Engine: 4.0 HO
I really dig the rack in the back, I think I might have to opt for one of those and thanks for the mount details they will come in handy..
Trending Topics
Thread Starter
Newbie
Joined: Oct 2010
Posts: 29
Likes: 0
From: Miami, Fl.
Year: 1997
Model: Cherokee
Engine: 4.0
The following response is just the opinion of me and my butt dyno:
I can say that the entire power band is improved to some degree. Not sure if it is either the Jet or AFE or the combination, but it is easily noticeable to me. I do not plan to drive this hard, but of course I had to floor it out once after I installed everything. Between the added intake growl and beefed up response, it felt great.
I will say the AFE had really tight tollerances during the install. But this is just a testament to the design/build quality leading to perfect fitment. Also, I am new to the Jeep, but not to intakes.. I have always bought K&N and Injen systems. I think AFE gets away with the cost because of the materials used, it is a composite intake tube. I think here they cut most of the cost, and it keeps it far cooler than the metal inatake pipes. And on to the heat shield, it is solid metal with a wrinkle finish that is very stout. They utilize an empty OEM hole in the fender to incorporate a fourth mounting point for the shield. It is in solid. All of the rubber seals are heavy duty, and they even throw in a piece of rubber padding to mount on your brake booster where the intake sits close. I am glad I chose this one.. my last car went through three intakes before I found one I liked.. I feel that this hit the nail on the head the first time around.
I did drive the car with the intake and chip before I did the plugs/wires/cap/rotor, and I didn't feel any power difference after.. but noticeably smoother idle (sure that has to do with the old plugs being replaced).
That rack is awesome.. a little more involved in the assembly than first pictured. But, it goes together well, looks like it can hold a good amount of weight, and last a long time. I used it today to go to the grocery store.. It was great having a second shelf for bags (versus the back seat). I also hauled a folded down kennel across the top of it, bungee'd it down, and it was solid in place while I transported it.
Any which way.. I am very happy so far, and thanks for the comments.

Thread Starter
Newbie
Joined: Oct 2010
Posts: 29
Likes: 0
From: Miami, Fl.
Year: 1997
Model: Cherokee
Engine: 4.0
I have discussed this.. I would like to, and maybe will one day, but not in the foreseeable future. I really do not travel into anything that requires it, but I am sure I would if I had the capabilities
 I used to go to the local mud pits in a 2WD Ford.. but had 4X recovery buddies who yanked me out all the time.. lol. Would be nice to be able to do that stuff again, but be able to make it on my own, so we'll see.
Last edited by Florida Jeep; Oct 12, 2010 at 06:55 AM.
Thread Starter
Newbie
Joined: Oct 2010
Posts: 29
Likes: 0
From: Miami, Fl.
Year: 1997
Model: Cherokee
Engine: 4.0
Yakima Fairing and Roof Cargo Rack - Installed
Before:
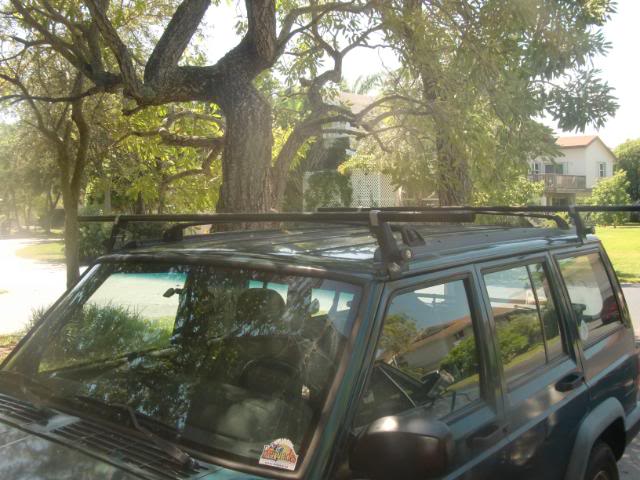
After:

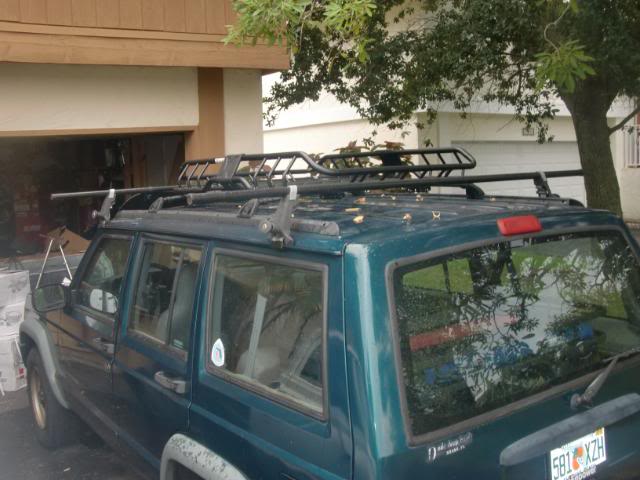
Also:
The roof bars will still be used. Going to fab fishing rod holders on the passenger side, and this should be here any day for the drivers side:

Also arrived:
1 3/4" front and 1" rear lift kit
Front tow hooks
ProComp flat black aluminum SERIES 7069, 15 x 8's:
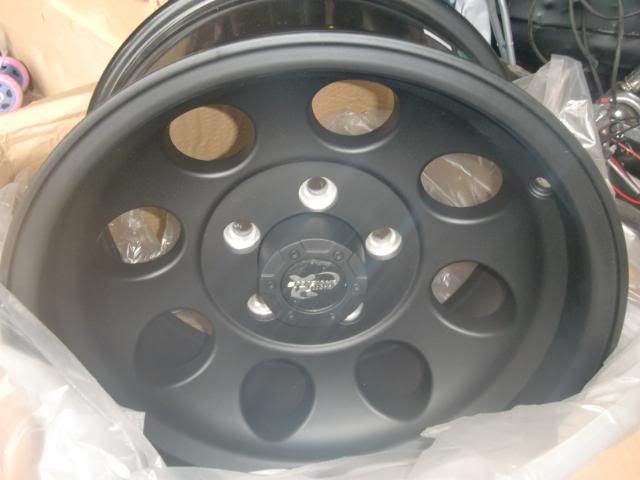
Also still waiting on the Grabber AT2's..
Just so you can get a feel for the aesthetics planned.. The fr and rr bumpers and fender flares are going flat black.. plus the rims, other black accessories, tinted windows, and window vent visors (tinted) .. should all point to a clean Green and Black XJ
Also, rear steel bumper with D rings should be in any day..
Before:
After:
Also:
The roof bars will still be used. Going to fab fishing rod holders on the passenger side, and this should be here any day for the drivers side:
Also arrived:
1 3/4" front and 1" rear lift kit
Front tow hooks
ProComp flat black aluminum SERIES 7069, 15 x 8's:
Also still waiting on the Grabber AT2's..
Just so you can get a feel for the aesthetics planned.. The fr and rr bumpers and fender flares are going flat black.. plus the rims, other black accessories, tinted windows, and window vent visors (tinted) .. should all point to a clean Green and Black XJ
Also, rear steel bumper with D rings should be in any day..
CF Veteran
Joined: Jul 2008
Posts: 1,265
Likes: 0
From: North Olmsted, OH
Year: 1998
Model: Cherokee
Engine: 4.0
Looks good! and I like the C10 
I got a 70 that had serious rust so I got a clean 72 frame I put under it, but its been up north most of it life, so the rust repair is non stop...
I got a 70 that had serious rust so I got a clean 72 frame I put under it, but its been up north most of it life, so the rust repair is non stop...
Thread Starter
Newbie
Joined: Oct 2010
Posts: 29
Likes: 0
From: Miami, Fl.
Year: 1997
Model: Cherokee
Engine: 4.0
Nice.. the C10 is next, and a much more involved project.. however, I have a bunch of fresh boxes sitting here from CCP for it
I also just received the header I ordered for the jeep.. but much more coming
The jeep also decided to spring a pretty good leak at the transmission output shaft seal.. have to look into that.
I also just received the header I ordered for the jeep.. but much more coming
The jeep also decided to spring a pretty good leak at the transmission output shaft seal.. have to look into that.