
Oil Filter Adapter o-ring


Newbie
Joined: Dec 2010
Posts: 18
Likes: 0
From: Maui
Year: 1999
Model: Cherokee
Engine: 4.0
I would think the weight of the oil filter would gradually make the whole thing unscrew. Or is there some kind of notch to hold it in position?

Newbie
Joined: Jul 2009
Posts: 14
Likes: 0
From: Portland, Oregon
Year: 1996
Model: Grand Cherokee
Engine: 4.0 Liter 6 cyl inline
Ordered the Torx L key and Loctite blue threadlocker to do mine.
I got a whole set of Torx bits and then realized it can't fit . Then to make things worse, I dropped the bit and it vanished.
I don't have the whole set of rings though. I went to NAPA and they just had the single big ring. Don't feel like waiting for delivery so I'll probably just replace the big one, and only worry about the internal rings if they look bad.
Instead of soaking the O ring in motor oil, how about soaking in silicone oil or silicone grease?? Would that make it last longer?
I got a whole set of Torx bits and then realized it can't fit
. Then to make things worse, I dropped the bit and it vanished.I don't have the whole set of rings though. I went to NAPA and they just had the single big ring. Don't feel like waiting for delivery so I'll probably just replace the big one, and only worry about the internal rings if they look bad.
Instead of soaking the O ring in motor oil, how about soaking in silicone oil or silicone grease?? Would that make it last longer?
I wrote two previous posts to this thread that listed the makers and part numbers of Torx tools. If a tool or tools in my post are not working, I would appreciate hearing: 1) the model and year Cherokee; 2) a description and part number of the tool, and is it Torx or hex; 3) a description of what is going wrong.
In response to your question on silicone grease - absolutely avoid silicone lubricants on o-rings. The solvents in silicone grease attack most rubber compounds used for o-rings, like Buna, EPDM, Neoprene. Symptoms of a silicone grease induced damaged o-ring are hardening and shrinkage. The damage is slow in manifesting itself, but is ongoing. Parker Hannifin Corp.'s O-ring division has rubber/chemical compatibility tables on their website. Doing a Google search on "rubber silicone grease incompatibility" will return about equal numbers of hits contradicting each other.
My personal experience with several silicone greased o-rings is negative. As recently as last month I was rebuilding a 5 HP electric Waterway brand spa pump with drive shaft damaged from water leaking around 10" diameter o-ring. This o-ring was installed into the pump volute with a heavy coating of silicone grease used to retain the o-ring during assembly. I checked with the factory to be sure it was, in fact, assembled with silicone grease. The old o-ring was over .015 undersize, was noticeably stiffer and less resilient than a new o-ring, and its cross-section was no longer uniformly round. This degraded o-ring had been in light service about 7 years, exposed to nothing but swimming pool water. Other o-rings in the spa (ungreased) were in good working order. Draw your own conclusions from this.
My theories as to why so many vehicles have this leakage problem with the large, outer o-ring, while the small two internal o-rings are almost always in good conditions is either: 1) the outer o-ring is one kind of rubber compound while the inner two are a different rubber compound, where the rubber for the inner o-rings is more heat and oil resistant (like Viton rubber); 2) the oil filter adapter was installed with a stiff silicone grease to hold the outer o-ring in place within the right-angle adapter to help speed assembly at the Jeep engine factory, and the silicone grease degraded the rubber; 3) the o-rings are all the same rubber compound, but atmospheric oxygen is over time attacking large outer o-ring, making it hard and destroying its resiliency. The inner two rings are not exposed to the air. I believe the most likely cause is #2.
Last edited by jpcallan; Apr 28, 2020 at 11:52 PM.
Newbie
Joined: Jul 2009
Posts: 14
Likes: 0
From: Portland, Oregon
Year: 1996
Model: Grand Cherokee
Engine: 4.0 Liter 6 cyl inline
Newbie
Joined: Dec 2010
Posts: 18
Likes: 0
From: Maui
Year: 1999
Model: Cherokee
Engine: 4.0
jpcallan, I ordered the Elkind T60 from Grainger and it fits perfectly. 1999 4.0
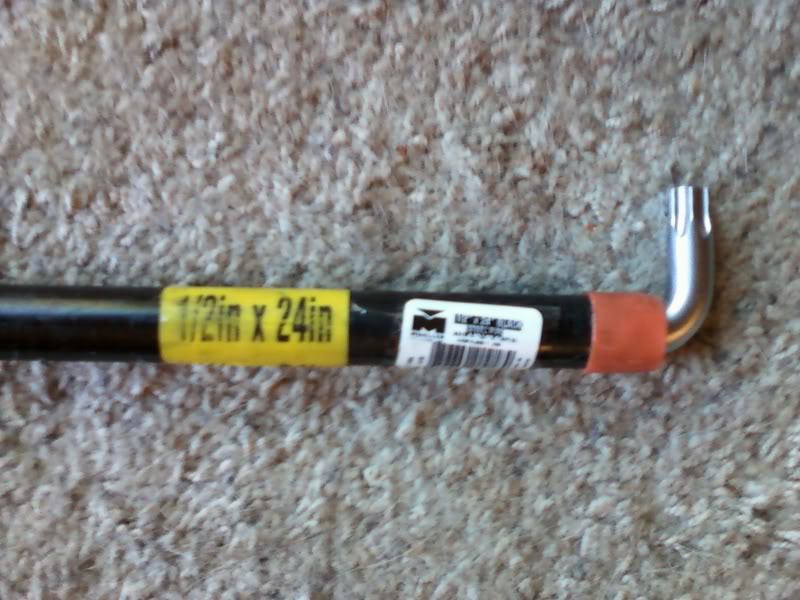
If you get a steel plumbing pipe from Ace you can wrap the key in some masking tape and it fits snugly in the pipe.
Thanks for the silicone warning
If you get a steel plumbing pipe from Ace you can wrap the key in some masking tape and it fits snugly in the pipe.
Thanks for the silicone warning

Newbie
Joined: Jan 2011
Posts: 9
Likes: 0
From: Perth Australia
Year: 1994
Model: Cherokee
I'm planning on doing mine this week, I've got the OEM o-ring set, also picked up a 1/2 t60 socket..
After reading I'm thinking the best/ easiest way is to remove the engine mount bolt and jack up the engine? Also confirm to use blue loc-tite on it?
After reading I'm thinking the best/ easiest way is to remove the engine mount bolt and jack up the engine? Also confirm to use blue loc-tite on it?

Member
Joined: Aug 2010
Posts: 123
Likes: 0
From: Bennett, CO
Year: 99
Model: Cherokee
Engine: 4L/6
I Have attempted to loosen the bolt on mine once and gave up. I think I'm gonna try the engine lift method soon.
I bought the torx set at sears where the bit can be removed from the socket. Maybe with the engine lifted on that side I can get the full socket in there with a breaker bar.
I bought the torx set at sears where the bit can be removed from the socket. Maybe with the engine lifted on that side I can get the full socket in there with a breaker bar.
Newbie
Joined: Jan 2011
Posts: 9
Likes: 0
From: Perth Australia
Year: 1994
Model: Cherokee
Just done mine today, I removed the engine mount bolt and jacked up the engine, and got the torx in from under the jeep, took a little force to crack the loc-tite, but no worries after that.
I did however spend about 30 mins cleaning the shaft and ect to ensure a clean seal. Turned out great sealing up straight away without problems..
I did however spend about 30 mins cleaning the shaft and ect to ensure a clean seal. Turned out great sealing up straight away without problems..

Former Sponsor
Joined: Feb 2010
Posts: 474
Likes: 0
From: Roanoke VA
Year: 1995
Model: Grand Cherokee
Engine: 4.0L
I think mine is leaking here as well. I have quite a bit of oil on the bottom of my oil filter and my starter is covered as well. Subscribing to this thread..
Junior Member
Joined: Jul 2010
Posts: 46
Likes: 0
From: Canton, Oh
Year: 2001
Model: Cherokee
Engine: 4.0
JUST AN FYI.. i do all my parts shopping online at rockauto.com I just bought the felpro o-ring from them for the adapter for $.70 I paid $22 for a TPS and $5.25 for fuel injector o-ring kit. Strongly reccommend checking them out if you need parts!

Junior Member
Joined: Mar 2010
Posts: 91
Likes: 0
From: Reno, NV
Year: 1996
Model: Cherokee
Engine: 4.0 6 cyl
Complete Instructions for Eliminating Oil Filter Adaptor on Jeep XJ Cherokee
This project started after reading several threads on the onerous task to dealing with Oil Filter Adaptor oil leaks. Some folks having to use 30" of leverage to break the bolt loose that attaches to Adaptor to the block, because the factory has red Locktited it on. Like many others I suspected a rear main oil leak as the wind and gravity makes it cover everything behind it such as starter and rear main area. It was seeing oil all over the top of the starter that clued me in that it was the adaptor. The best solution is to eliminate the adaptor putting a smaller oil filter directly to the block. I have done so and it works great, zero oil drip, same oil pressure as before, its easier to change the OF that before AND NO MORE OIL FILTER ADAPTOR TO LEAK AS THEY ALL DO AS the O-RING NEVER GETS REPLACED ON OIL CHANGES AND IS A TOTAL BEAR TO DO.
The genesis of this was a post by Gunner, thanks Gunner:
03-28-2010, 12:34 PM #20 Combat_Gunner
Junior Member
Join Date: Feb 2010
Location: Mount Juliet, TN
Posts: 41
My Photos
1993 Cherokee Year: 1993
Model: Cherokee
Engine: 4.0 I6
Transmission: AW-4 Automatic
Transfer Case: NP231
Front Axle: Dana 30
Rear Axle: Chrysler 8.25
Tires: 31x10.50/15 Pro Comp MTs
Lift Specifications: 2" front pucks, 2" rear blocks
Misc Accessories: Fenders cut, CB, modified bumpers, exhaust, '98 intake manifold, K&N air cleaner
This is an old thread, but I wanted to chime in here, for the many who will eventually need to fix this leak. Once you have the oil filter adapter removed from the block, you'll notice the threads to which the filter attaches have a 1" hex head around them. Using a 1" socket, you can remove this male/male thread adapter and screw it directly into the side of your engine block, to eliminate the 90* elbow adapter. After buying the O-ring kit and spending several hours getting the thing off, it seemed ridiculous to put the adapter back on there, when I could simply thread the filter directly to the engine and remove the possibility of future leaks from the adapter. There is a roll pin that locates the adapter, it must be pulled out of the block, but otherwise it's a simple matter of using the male/male adapter out of the elbow assembly, threading it into the block, and screwing on a new filter. Access to the filter is now easier, the only O-ring involved gets replaced with the filter, and you'll never have to deal with a leaky oil filter adapter again.
Yes, oil will run down the side of your engine when you change the filter. I own a Harley, so I'm accustomed to that. That is why I keep a supply of carburetor cleaner on hand. After the oil and filter change, just douse the whole oily area generously with cleaner, let the mess run off into your oil catch pan, and go on with your life.
I found that post to be true and have finished the job.
Here are two threads on the problem and various ways to break the OFA bolt loose. Both have a bunch of photos, hence why postig them. But there is a better way.http://www.lunghd.com/Tech_Articles/Engine/Oil_Filter_Mount_O-Rings.htm
https://www.cherokeeforum.com/f2/oil-filter-adapter-o-ring-9625/
Without having to remove the motor mount and jack up the engine nor weld up special tools I was able to not only get the adaptor out, but also eliminate the adaptor and not have to buy the O-Rings nor ever have to deal with this problem again. This job takes less time than replacingthe O-Rings and facing the same problem again (with these instructions).
Here are the steps, read all of them first before starting, not too long:
1. The Adaptor either has a female hex or TORX, the TORX is T60 and more common. I have 96 XJ 4.0 it was TORX.
2. Used a std TORX L Wrench set from O'Rielly's. Brand is Performance Tool # W1319 it has T40 thru T60, you only need the T60 AND the T55, more on T55 later. Only $10
3. I did not remove Battery cable at first, mistake I did arc a wrench from block to starter after the adaptor was off getting the roll pin out. Remove a Battery post cable.
4. Work from underneath, I have 32" tires and fit without jacking. Underneath is easy.
5. Suggest engine cleaner/steam clean the entire passger side of engine on top and underneath first, and if the bolt torx hole is plugged with mud and oil like mine, use coat hanger and spray with WD40 or something, scrape it out.
6. Getting that T60 L Wrench aligned was one of hardest parts, did so from below. It took me minutes to get it aligned and drop in Used screwdriver to pry the elbow part to seat as deep as possible, very close to a bolt on frame.
7. Have oil pan ready, it will leak.
7B. Leave the Oil Filter ON the adaptor, easier that way, only one drip to deal with.
8. Used a 3/8 drive deep socket about 9/16" over the long end of L wrench and connected three 3/8" extensions together about 20" total. Two and 17" were not enough. Some people have gone 30" before it broke. A 1/2" socket and extensions would be even better. Presto, think got the bolt loose easier than anyone else have heard of. Good news, did no alteration except steam clean (wish did even more) and remove starter cable hold down bolt next to adaptor. No Motor mount no nothing.
9. The t60 L Wrench requires less clearance than 1/2 drive socket others have used, thus why they welded up custom tools and removing the motor mount, this technique requires no extra work. But even with a T-60 L Wrench it might hit frame before 100% out that is where the T55 comes in below.
10. I was able after 1/2 turn with helper extensions to use just the T60 L Wrench to back it out. It will start leaking, have a pan under it. Let it leak till slows.
11. The perfect tool to back out bolt more after no longer high torque is a T55 L wrench, remembered it grabbed, much much much easier to align. If you wrench from outside under (away from block) you can do it while its dripping without getting oily.
12. After about 3-4 turns the oil filter and the adaptor (left as one unit) can rotate (the locating roll pin inside is cleared. Thus you turn the oil filter all the way up. And BTW do all this from below except rotate the entire assembly, which did from above. I was able to do all this with zero mods, just took out the bolt that holds the starter cable and moved the starter cable behind the oil filter while it was still attached.
13. Pointing the oil filter up will (hopefully) just about empty both, it will pour more oil at this point. Now point the oil filter down so when it comes loose no oil will come out.
14. Next step is to remove assembly, just keep using the t55, its fast.
It dropped free easy and with oil out and tilting up no oil drip.
15. The original OF was a tad too big to fit FYI directly to the block, width issue against the motor mount area. But a Fram Ph 3614 fits great.
16. Now for a tricky part the roll pin that prevents the adaptor from rotating needs to be removed, destroying it is fine but you do not want to leave half of it. 10" vise grips full on did not do it. Was thinking of chiseling it as where it goes is inside gasket mating surface and deeper. Those threads referenced at top of this post have pics of roll pin and everything else FYI. Then remembered my bolt cutters. Perfect crushed the pin 50% from underneath with the bolt cutter then pried it against block and bingo it came out.
17. The job is done, except for putting a new oil filter back on, The stock one is a bit wide, but a Fram PH 3614 is a perfect fit, identical gasket diameter and threads. I put on an even smaller Mobil one but will soon swap in the 3614. The Ph 3614 is used on Toy FJs, full size pickup trucks and Lexus and Ford V8s. Its smaller so it fits.
You are done no more oil leaks, mine has not leaked a drop in two days and 150 miles. No more Adaptor to leak in the future. The oil pressure is identical to what it was before 60 PSI.
Here are specs on oil filter to use:
Brand Fram
Manufacturer's Part Number PH3614
Part Type Oil Filters
Product Line Fram Extra Guard Oil Filters
Summit Racing Part Number FRM-PH3614
Oil Filter Style Canister
Height (in) 3.360 in.
Outside Diameter (in) 3.000 in.
Filter Bypass Relief Valve Yes
Relief Valve Open (psi) 9-12 psi
Anti-Drainback Valve Yes
Smallest Particle Filtered 20 microns
Thread Size 3/4-16 in.
Gasket Outside Diameter (in) 2.781 in.
Gasket Inside Diameter (in) 2.484 in.
Gasket Thickness (in) 0.203 in.
Thanks for all those who provide info on this, these forums are great time savers. I will post this alone after posting at end of this thread.
Cheers, Darp
This project started after reading several threads on the onerous task to dealing with Oil Filter Adaptor oil leaks. Some folks having to use 30" of leverage to break the bolt loose that attaches to Adaptor to the block, because the factory has red Locktited it on. Like many others I suspected a rear main oil leak as the wind and gravity makes it cover everything behind it such as starter and rear main area. It was seeing oil all over the top of the starter that clued me in that it was the adaptor. The best solution is to eliminate the adaptor putting a smaller oil filter directly to the block. I have done so and it works great, zero oil drip, same oil pressure as before, its easier to change the OF that before AND NO MORE OIL FILTER ADAPTOR TO LEAK AS THEY ALL DO AS the O-RING NEVER GETS REPLACED ON OIL CHANGES AND IS A TOTAL BEAR TO DO.
The genesis of this was a post by Gunner, thanks Gunner:
03-28-2010, 12:34 PM #20 Combat_Gunner
Junior Member
Join Date: Feb 2010
Location: Mount Juliet, TN
Posts: 41
My Photos
1993 Cherokee Year: 1993
Model: Cherokee
Engine: 4.0 I6
Transmission: AW-4 Automatic
Transfer Case: NP231
Front Axle: Dana 30
Rear Axle: Chrysler 8.25
Tires: 31x10.50/15 Pro Comp MTs
Lift Specifications: 2" front pucks, 2" rear blocks
Misc Accessories: Fenders cut, CB, modified bumpers, exhaust, '98 intake manifold, K&N air cleaner
This is an old thread, but I wanted to chime in here, for the many who will eventually need to fix this leak. Once you have the oil filter adapter removed from the block, you'll notice the threads to which the filter attaches have a 1" hex head around them. Using a 1" socket, you can remove this male/male thread adapter and screw it directly into the side of your engine block, to eliminate the 90* elbow adapter. After buying the O-ring kit and spending several hours getting the thing off, it seemed ridiculous to put the adapter back on there, when I could simply thread the filter directly to the engine and remove the possibility of future leaks from the adapter. There is a roll pin that locates the adapter, it must be pulled out of the block, but otherwise it's a simple matter of using the male/male adapter out of the elbow assembly, threading it into the block, and screwing on a new filter. Access to the filter is now easier, the only O-ring involved gets replaced with the filter, and you'll never have to deal with a leaky oil filter adapter again.
Yes, oil will run down the side of your engine when you change the filter. I own a Harley, so I'm accustomed to that. That is why I keep a supply of carburetor cleaner on hand. After the oil and filter change, just douse the whole oily area generously with cleaner, let the mess run off into your oil catch pan, and go on with your life.
I found that post to be true and have finished the job.
Here are two threads on the problem and various ways to break the OFA bolt loose. Both have a bunch of photos, hence why postig them. But there is a better way.http://www.lunghd.com/Tech_Articles/Engine/Oil_Filter_Mount_O-Rings.htm
https://www.cherokeeforum.com/f2/oil-filter-adapter-o-ring-9625/
Without having to remove the motor mount and jack up the engine nor weld up special tools I was able to not only get the adaptor out, but also eliminate the adaptor and not have to buy the O-Rings nor ever have to deal with this problem again. This job takes less time than replacingthe O-Rings and facing the same problem again (with these instructions).
Here are the steps, read all of them first before starting, not too long:
1. The Adaptor either has a female hex or TORX, the TORX is T60 and more common. I have 96 XJ 4.0 it was TORX.
2. Used a std TORX L Wrench set from O'Rielly's. Brand is Performance Tool # W1319 it has T40 thru T60, you only need the T60 AND the T55, more on T55 later. Only $10
3. I did not remove Battery cable at first, mistake I did arc a wrench from block to starter after the adaptor was off getting the roll pin out. Remove a Battery post cable.
4. Work from underneath, I have 32" tires and fit without jacking. Underneath is easy.
5. Suggest engine cleaner/steam clean the entire passger side of engine on top and underneath first, and if the bolt torx hole is plugged with mud and oil like mine, use coat hanger and spray with WD40 or something, scrape it out.
6. Getting that T60 L Wrench aligned was one of hardest parts, did so from below. It took me minutes to get it aligned and drop in
Used screwdriver to pry the elbow part to seat as deep as possible, very close to a bolt on frame. 7. Have oil pan ready, it will leak.
7B. Leave the Oil Filter ON the adaptor, easier that way, only one drip to deal with.
8. Used a 3/8 drive deep socket about 9/16" over the long end of L wrench and connected three 3/8" extensions together about 20" total. Two and 17" were not enough. Some people have gone 30" before it broke. A 1/2" socket and extensions would be even better. Presto, think got the bolt loose easier than anyone else have heard of. Good news, did no alteration except steam clean (wish did even more) and remove starter cable hold down bolt next to adaptor. No Motor mount no nothing.
9. The t60 L Wrench requires less clearance than 1/2 drive socket others have used, thus why they welded up custom tools and removing the motor mount, this technique requires no extra work. But even with a T-60 L Wrench it might hit frame before 100% out that is where the T55 comes in below.
10. I was able after 1/2 turn with helper extensions to use just the T60 L Wrench to back it out. It will start leaking, have a pan under it. Let it leak till slows.
11. The perfect tool to back out bolt more after no longer high torque is a T55 L wrench, remembered it grabbed, much much much easier to align. If you wrench from outside under (away from block) you can do it while its dripping without getting oily.
12. After about 3-4 turns the oil filter and the adaptor (left as one unit) can rotate (the locating roll pin inside is cleared. Thus you turn the oil filter all the way up. And BTW do all this from below except rotate the entire assembly, which did from above. I was able to do all this with zero mods, just took out the bolt that holds the starter cable and moved the starter cable behind the oil filter while it was still attached.
13. Pointing the oil filter up will (hopefully) just about empty both, it will pour more oil at this point. Now point the oil filter down so when it comes loose no oil will come out.
14. Next step is to remove assembly, just keep using the t55, its fast.
It dropped free easy and with oil out and tilting up no oil drip.
15. The original OF was a tad too big to fit FYI directly to the block, width issue against the motor mount area. But a Fram Ph 3614 fits great.
16. Now for a tricky part the roll pin that prevents the adaptor from rotating needs to be removed, destroying it is fine but you do not want to leave half of it. 10" vise grips full on did not do it. Was thinking of chiseling it as where it goes is inside gasket mating surface and deeper. Those threads referenced at top of this post have pics of roll pin and everything else FYI. Then remembered my bolt cutters. Perfect crushed the pin 50% from underneath with the bolt cutter then pried it against block and bingo it came out.
17. The job is done, except for putting a new oil filter back on, The stock one is a bit wide, but a Fram PH 3614 is a perfect fit, identical gasket diameter and threads. I put on an even smaller Mobil one but will soon swap in the 3614. The Ph 3614 is used on Toy FJs, full size pickup trucks and Lexus and Ford V8s. Its smaller so it fits.
You are done no more oil leaks, mine has not leaked a drop in two days and 150 miles. No more Adaptor to leak in the future. The oil pressure is identical to what it was before 60 PSI.
Here are specs on oil filter to use:
Brand Fram
Manufacturer's Part Number PH3614
Part Type Oil Filters
Product Line Fram Extra Guard Oil Filters
Summit Racing Part Number FRM-PH3614
Oil Filter Style Canister
Height (in) 3.360 in.
Outside Diameter (in) 3.000 in.
Filter Bypass Relief Valve Yes
Relief Valve Open (psi) 9-12 psi
Anti-Drainback Valve Yes
Smallest Particle Filtered 20 microns
Thread Size 3/4-16 in.
Gasket Outside Diameter (in) 2.781 in.
Gasket Inside Diameter (in) 2.484 in.
Gasket Thickness (in) 0.203 in.
Thanks for all those who provide info on this, these forums are great time savers. I will post this alone after posting at end of this thread.
Cheers, Darp
Junior Member
Joined: Feb 2011
Posts: 91
Likes: 0
From: Pomona NJ
Year: 1990
Model: Cherokee
Engine: 4.0
I have a 1990 Jeep XJ with the 4.0... but it uses a PH3985 (metric) filter... Its now leaking rather badly some days, and none the next... I put in a heavier weight oil and so far, so good... besides that, would the torx be the same size to get the adapter off? Or would it be different?

Newbie
Joined: Aug 2011
Posts: 1
Likes: 0
From: Anchorage, AK
Year: 1996
Model: Cherokee
Engine: 4.0 6 cyl
A lot of good info here. Easiest method I found was.
1. Warmed up the engine for 5 min
2. Took out engine mount bolt by the adapter
3. Used L shaped T60 torx wrench with 2' pipe on end for leverage
I did NOT use loctite on threads. Hopefully good for another 40K miles!
1. Warmed up the engine for 5 min
2. Took out engine mount bolt by the adapter
3. Used L shaped T60 torx wrench with 2' pipe on end for leverage
I did NOT use loctite on threads. Hopefully good for another 40K miles!
Seasoned Member
Joined: Oct 2010
Posts: 486
Likes: 2
From: Colorado Rocky Mountains
Year: 1999
Model: Cherokee
Engine: 4.0 I6
First of all, I read this thread before I tried replacing my o-rings on the OFA and it was a huge help! Thanks everyone! Now here's the solution I found and it was SO EASY I had to share it with everyone (pics of tools at end):
1. disconnect battery & chock your wheels.
2. remove bracket holding starter cable next to oil filter adapter.
3. disconnect wires from starter and pull cable up out of the way.
4. remove 2 bolts from starter and remove starter (might as well clean it off too!)
5. Take T-60 L-bend torx wrench and insert into end of 1/2" pipe.
6. From below, behind the front wheel, use T-60 and extension bar to remove that pesky bolt. (Mine was tight, but with this method came loose before I pulled myself up off the ground, I weigh 160lbs).
7. Soak new o-rings in engine oil.
8. Remove adapter & bolt, and then remove old o-rings (3). The big one will likely feel like plastic instead of rubber - this is the culprit, so treat accordingly!
9. Clean adapter thoroughly and paint with hi-temp paint from nearest HW store.
10. Install new o-rings on bolt and adapter housing.
11. Install adapter to engine block. Be careful as you tighten, about half-way in you will need to align the adapter with the locator pin that sticks out - aim the oil filter mating surface back like it was before and it will seat itself and hold there after a few turns as you finish tightening the bolt.
12. Torque bolt to "very tight" - I think 75 ft-lbs is the suggestion I've seen most.
13. Replace starter & bolts.
14. Reattach starter wires and bracket.
15. Reattach battery.
Tools:
This took me a total of about 3 or 4 hours, only because I waited for the paint to dry. It helps if you thoroughly clean & degrease the whole underside before you start. I used engine cleaner and a "jet" nozzle on my garden hose - got it nice and clean, but not quite as nice as a steam job. Save the steam for when there's no more leak! I have a lift so had no need to jack the vehicle. If you don't paint the adapter you could probably do this in about an hour. Taking the starter off was the key to getting the breaker and torx wrench to fit with ease! Some vehicles may have a smaller gap between the torx/hex bolt and the frame so slight modifications/improvisation may be necessary...
1. disconnect battery & chock your wheels.
2. remove bracket holding starter cable next to oil filter adapter.
3. disconnect wires from starter and pull cable up out of the way.
4. remove 2 bolts from starter and remove starter (might as well clean it off too!)
5. Take T-60 L-bend torx wrench and insert into end of 1/2" pipe.
6. From below, behind the front wheel, use T-60 and extension bar to remove that pesky bolt. (Mine was tight, but with this method came loose before I pulled myself up off the ground, I weigh 160lbs).
7. Soak new o-rings in engine oil.
8. Remove adapter & bolt, and then remove old o-rings (3). The big one will likely feel like plastic instead of rubber - this is the culprit, so treat accordingly!
9. Clean adapter thoroughly and paint with hi-temp paint from nearest HW store.
10. Install new o-rings on bolt and adapter housing.
11. Install adapter to engine block. Be careful as you tighten, about half-way in you will need to align the adapter with the locator pin that sticks out - aim the oil filter mating surface back like it was before and it will seat itself and hold there after a few turns as you finish tightening the bolt.
12. Torque bolt to "very tight" - I think 75 ft-lbs is the suggestion I've seen most.
13. Replace starter & bolts.
14. Reattach starter wires and bracket.
15. Reattach battery.
Tools:
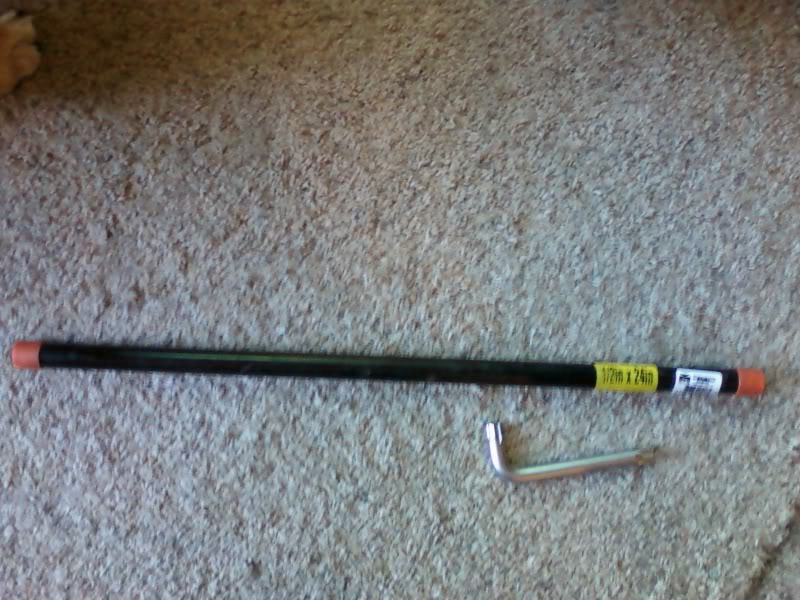
- T-60 L-bend torx wrench. I found mine on Ebay as part of a set for about $15.00 if I remember correctly.
- 24" X 1/2" steel plumbers pipe from nearest HW store, was $6.00.
- Random sockets and ratchets for removing starter & cables/wires.
- O-ring set from car parts store. Mine was about $7.00 from Car Quest. He looked up my model and had it in stock, it fit perfectly!
This took me a total of about 3 or 4 hours, only because I waited for the paint to dry. It helps if you thoroughly clean & degrease the whole underside before you start. I used engine cleaner and a "jet" nozzle on my garden hose - got it nice and clean, but not quite as nice as a steam job. Save the steam for when there's no more leak! I have a lift so had no need to jack the vehicle. If you don't paint the adapter you could probably do this in about an hour. Taking the starter off was the key to getting the breaker and torx wrench to fit with ease! Some vehicles may have a smaller gap between the torx/hex bolt and the frame so slight modifications/improvisation may be necessary...
Seasoned Member
Joined: Oct 2010
Posts: 486
Likes: 2
From: Colorado Rocky Mountains
Year: 1999
Model: Cherokee
Engine: 4.0 I6
My guess at why this happens, FWIW: The inner 2 orings seem to always be fine, mine were like new. The outer, large o-ring always seems to be brittle and hardened like plastic. The inner 2 are constantly bathed in engine oil, while the outer one has very limited contact with engine oil, if any - notice the 2 metal lips around that one. The lack of oil and constant engine heat are my guess at why the big o-ring seems to fail!