
headliner swap

Thread Starter
CF Veteran
Joined: May 2009
Posts: 1,844
Likes: 4
From: Glen Burnie, MD
Year: 1994
Model: Cherokee
Engine: 4.0 H.O. K&N, Borla headers, custom down pipe, magnaflow hi-flo cat, flowmaster to turn down tip
i am in the middle of a body swap on my 88 cherokee soon to be a 94 cherokee. i have a good almost immaculate headliner in my 88, is there a way to swap it in to the 94? cause i don't feel like paying 300 bucks for a new one. the one in the 94 is trashed!
Honorary Moderator
Joined: Mar 2010
Posts: 8,135
Likes: 16
From: Gilbert AZ/Las Cruces NM
Year: 1996
Model: Cherokee
Engine: 4.0 upgraded
As far as i know they should be interchange able.
To get it our, just start taking off the trim pieces and and it will come down.
Also, you can do a headliner at home in your living room if you wanted to. It will be about $50 in supplies (material and glue). joann's carries the foam head liner material and headliner high heat glue
To get it our, just start taking off the trim pieces and and it will come down.
Also, you can do a headliner at home in your living room if you wanted to. It will be about $50 in supplies (material and glue). joann's carries the foam head liner material and headliner high heat glue
Seasoned Member
Joined: May 2010
Posts: 360
Likes: 0
From: Bloomfield, MI
Year: 1992
Model: Cherokee
Engine: 4.0 HO
Yea I would go pick out some material and do it up yourself if there's no serious damage to the solid part of the headliner. It cost me about $60 total to do a black suede in my Jetta and I plan on doin somethin else as well in my cherokee. It'll probably be even cheaper. If not, there's always those U Pull and Pay junkyards.
Thread Starter
CF Veteran
Joined: May 2009
Posts: 1,844
Likes: 4
From: Glen Burnie, MD
Year: 1994
Model: Cherokee
Engine: 4.0 H.O. K&N, Borla headers, custom down pipe, magnaflow hi-flo cat, flowmaster to turn down tip
yea the foam is pretty messed up, torn and even burnt in some place (looks like some kid got hold of a lighter) so i am gonna try and do it the free way, and take the one out of my 88 cherokee and put it in the 94. they are the same color, so if i can get it out then i am home free.
Thread Starter
CF Veteran
Joined: May 2009
Posts: 1,844
Likes: 4
From: Glen Burnie, MD
Year: 1994
Model: Cherokee
Engine: 4.0 H.O. K&N, Borla headers, custom down pipe, magnaflow hi-flo cat, flowmaster to turn down tip
i have a factory sound bar in my 94, and my headliner is trashed. i got one from an 88 with nothing up there but a hole near the driver and pasanger for a light. how would i mount the factory sound bar on the headliner from the 88?
Honorary Moderator
Joined: Mar 2010
Posts: 8,135
Likes: 16
From: Gilbert AZ/Las Cruces NM
Year: 1996
Model: Cherokee
Engine: 4.0 upgraded
Alright so what I did was (btw I didn't have a sound bar from the factory) take some shelving upright:

then I took some tee-nuts:
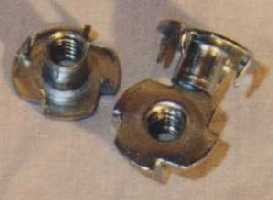
I placed those where they would allign with the light. And cut a hole in the headliner just smaller the. The light where I wanted the sound bar to be. I took weather stripping:

and placed it in between the channel so when it rested against the roof it would not rattle. I placed across the top side of the headliner to distibute the weight, then screwed everything together. I run washboards and have had zero issues for over a year now. It is slot simpler than you think lol. I will get pictures to make msor sense
alright a simple explanation:
go to your hardware store with the plastic light.
Get some longer bolts (like 1"-1.5")mind you these are some pretty tiny bolts in diameter...
get tee nuts that match thread pattern
get some washers
get a stick of shelving upright
and some thick weather stripping.
-cut the upright to where it is about 1 foot long or so
-Place the tee nuts in the shelving upright-using the plastic light as a guide to know where to put them (the tee nuts are used because when wedged into the upright they squeeze in really tight and dont move) Mind you the flat part goes down, the open part goes up.
-place the weather stripping in the open part of the Uprights. (so when against the roof it does not rattle)
-mark your holes in the headliner and cut where need be.
-install the sound bar
You use the light and the upright to "clamp" the sound bar in place. Since you used a 1 foot section of upright it distributes the load that is placed in the center.
I have run this for about a year now with no issues, even over washboards. I know its a bit of a "different"(homebrew) solution but it works rather well. I am not worried about it at all. If you look at it once it is all installed you would never be able to tell either.
then I took some tee-nuts:
I placed those where they would allign with the light. And cut a hole in the headliner just smaller the. The light where I wanted the sound bar to be. I took weather stripping:
and placed it in between the channel so when it rested against the roof it would not rattle. I placed across the top side of the headliner to distibute the weight, then screwed everything together. I run washboards and have had zero issues for over a year now. It is slot simpler than you think lol. I will get pictures to make msor sense
alright a simple explanation:
go to your hardware store with the plastic light.
Get some longer bolts (like 1"-1.5")mind you these are some pretty tiny bolts in diameter...
get tee nuts that match thread pattern
get some washers
get a stick of shelving upright
and some thick weather stripping.
-cut the upright to where it is about 1 foot long or so
-Place the tee nuts in the shelving upright-using the plastic light as a guide to know where to put them (the tee nuts are used because when wedged into the upright they squeeze in really tight and dont move) Mind you the flat part goes down, the open part goes up.
-place the weather stripping in the open part of the Uprights. (so when against the roof it does not rattle)
-mark your holes in the headliner and cut where need be.
-install the sound bar
You use the light and the upright to "clamp" the sound bar in place. Since you used a 1 foot section of upright it distributes the load that is placed in the center.
I have run this for about a year now with no issues, even over washboards. I know its a bit of a "different"(homebrew) solution but it works rather well. I am not worried about it at all. If you look at it once it is all installed you would never be able to tell either.
Last edited by 96_xj; Jun 23, 2010 at 03:01 AM.
CF Veteran
Joined: May 2008
Posts: 3,018
Likes: 23
Year: 1988
Model: Cherokee
Engine: AMC242
Same-Same, 1984-1996. Have at it!
Trending Topics
Seasoned Member
Joined: May 2010
Posts: 360
Likes: 0
From: Bloomfield, MI
Year: 1992
Model: Cherokee
Engine: 4.0 HO
Alright so what I did was (btw I didn't have a sound bar from the factory) take some shelving upright:
then I took some tee-nuts:
I placed those where they would allign with the light. And cut a hole in the headliner just smaller the. The light where I wanted the sound bar to be. I took weather stripping:
and placed it in between the channel so when it rested against the roof it would not rattle. I placed across the top side of the headliner to distibute the weight, then screwed everything together. I run washboards and have had zero issues for over a year now. It is slot simpler than you think lol. I will get pictures to make msor sense
alright a simple explanation:
go to your hardware store with the plastic light.
Get some longer bolts (like 1"-1.5")mind you these are some pretty tiny bolts in diameter...
get tee nuts that match thread pattern
get some washers
get a stick of shelving upright
and some thick weather stripping.
-cut the upright to where it is about 1 foot long or so
-Place the tee nuts in the shelving upright-using the plastic light as a guide to know where to put them (the tee nuts are used because when wedged into the upright they squeeze in really tight and dont move) Mind you the flat part goes down, the open part goes up.
-place the weather stripping in the open part of the Uprights. (so when against the roof it does not rattle)
-mark your holes in the headliner and cut where need be.
-install the sound bar
You use the light and the upright to "clamp" the sound bar in place. Since you used a 1 foot section of upright it distributes the load that is placed in the center.
I have run this for about a year now with no issues, even over washboards. I know its a bit of a "different"(homebrew) solution but it works rather well. I am not worried about it at all. If you look at it once it is all installed you would never be able to tell either.

Thread
Thread Starter
Forum
Replies
Last Post
TNXJsleeper
Stock XJ Cherokee Tech. All XJ Non-modified/stock questions go here
1
Oct 2, 2015 08:04 PM
sjm79902
Stock XJ Cherokee Tech. All XJ Non-modified/stock questions go here
2
Sep 30, 2015 11:14 PM
Currently Active Users Viewing This Thread: 1 (0 members and 1 guests)