Jeep Cherokee Forum
  • LOG IN
  • REGISTER
  • Forums
    • Technical Discussion
      • Stock XJ Cherokee Tech. All XJ Non-modified/stock questions go here
      • Modified XJ Cherokee Tech
      • MJ Comanche Tech. Stock & Modified.
      • KL Cherokee Tech
      • Modified Grand Cherokee Tech. All ZJ,WJ & WK aftermarket tech goes here
      • Stock Grand Cherokee Tech. All ZJ/WJ/WK Non-modified/stock questions go here!
      • Fabrication & builders section.
      • Jeep Builds
      • Aftermarket electrical systems
      • Jeep JK Model Discussion
      • Other Vehicles. Other Jeep models & cars and trucks of other makes
      • Technical Write-Up/How To Section
    • General
      • Introductions
      • Cherokee Chat
      • Cherokee of the Month
    • Wheeling Neighborhoods
      • Pacific Northwest
      • Pacific Southwest
      • Northern Rockies
      • Four Corners
      • Midwest
      • South Central
      • Great Lakes
      • Southeast
      • North Atlantic
      • Mid Atlantic
      • International
    • Wheeling Discussion
      • Trail Reports
      • Land Use Forum
    • Buy, Sell, Trade
      • Non-Cherokee Parts
      • Vendor Showcase
      • Vehicles
      • Axles/Tires/Wheels
      • Engines/Tranny/T-Case
      • Suspension/Steering
      • Accessories
      • Part Outs
      • Miscellaneous
      • Wanted
    • CF Announcements & Suggestions
      • Announcements
      • CF Suggestions & Questions
      • Test Section
  • Marketplace
    • Vendor Directory
    • Become a Vendor
    • Member Marketplace
    • Vendor Marketplace
  • New Posts
  • Tools
    • Car Payment Calculator
    • Tire Rim Calculator
    • Vin Decoder
    • Recalls
    • Technical Service Bulletins (TSBs)
    • Members List
    • Live Feed
  • How-Tos
  • Gallery
  • View Dark Mode
    • Please register or login to enable Dark Mode.
  • Log In
  • Register
Jeep Cherokee Forum
    • Threads
      • Advanced
Dark Mode

Please register or login to enable Dark Mode.

Log In

Forgot your Password?

By logging into your account, you agree to our Terms of Use and Privacy Policy, and to the use of cookies as described therein.
or
 
  • Recent
  • Commented
  • Albums
  • My Pictures

Travis Mudrich's Photos

View Profile
Sort:
Commented
  • Most Recent
  • Most Comments
  • Albums
  • Photos
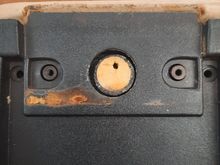
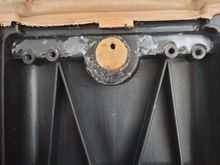
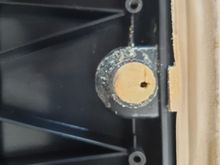
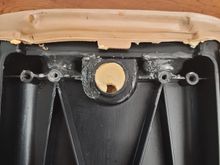
Th reason why these normally break, is because of three reasons: first, they are not supported well on the inside. Scondly, the plate allows for movement when the armrest is being both rested on, and when it's opening and closing. Finally, the hinge has stopping points to control the maximum opening position but it still pulls away from the center console when fully opened.
0 2021/08/25 13:06:20 Travis Mud
I filled the entire crevice with JB Quik to make it the posts solid and secure. I contemplated throwing some up on the otherside but figured this should do fine.
0 2021/08/25 13:03:40 Travis Mud
The excess foam was removed and the entire area was cleaned.
0 2021/08/25 13:02:13 Travis Mud
Here is the new unmolested armrest.
0 2021/08/25 13:02:05 Travis Mud
0 2021/08/25 13:00:24 Travis Mud
0 2021/08/25 12:59:06 Travis Mud
This is the one that was in the Jeep when i bought it. Besides the internal broken tabs for the hinge mounting points, there is also a large gouge in it. It has to go.
0 2021/08/25 12:45:57 Travis Mud
Hfh
Hfh
0 2021/08/17 09:38:33 Travis Mud
Hhh
Hhh
0 2021/07/31 20:48:59 Travis Mud
The split console came out of an XJ that had a sunroof installed
0 2021/07/31 20:44:23 Travis Mud
I was able to find 2 -96 overhead consoles! I was lucky to find one, let alone 2!
0 2021/07/31 20:42:30 Travis Mud
A coat of primer just to see what it looks like. You can see the hole I drilled for the gauge as it looks slightly different from the rest.
0 2021/07/22 19:17:59 Travis Mud
0 2021/07/22 19:17:36 Travis Mud
All seams, holes, and low spots were filled in with glazing putty. I know this is overkill for something that will never get seen. But I tend to be a perfectionist. I also want to produce a good quality product and content incase if I get a different idea for the Jeep, and would sell this one day.
0 2021/07/22 19:14:37 Travis Mud
After I got the inside sealed up, I started working on the outside.
0 2021/07/22 19:13:29 Travis Mud
I've added the last wall to complete the housing. Just like with the faceplate, I used JB Kwik. I also used it to fill all holes not needed, and went over everything with more glazing putty to make it smooth.
0 2021/07/22 19:10:32 Travis Mud
I'm fourtunate that the audio and lights dont share the same pigtail connector, so this will be easy. I will just remove the light wires from the speaker ones, and intrrgrate the audio loom into the overhead console harness.
0 2021/07/22 18:45:35 Travis Mud
The overhead lights will be deleted for the overhead console lights, and repurposed to the rear as the new cargo lights.
0 2021/07/22 18:43:42 Travis Mud
The tail of the overhead console will be trimmed off as it will be supported by the soundbar. I am probably going to fuse both pieces together using fiberglass matting on the inside, and a coathanger for support. You wont be able to see it, but it will be as proper as possible. I'll also recover this with a single piece of fabric.
0 2021/07/22 18:40:10 Travis Mud
Right here is about where im going to make them intersect. I'm shooting to have the light cluster dead in the middle of the soundbar as i think that would be the most pleasing aesthetic. The end will be trimmed short and flush with the back of the soundbar.
0 2021/07/22 18:37:36 Travis Mud
0 2021/07/21 07:26:19 Travis Mud
0 2021/07/21 07:26:13 Travis Mud
Final product. What you just read, was a complete instruction on how to install a 97+ windshield washer reservoir into a -96 jeep xj.
0 2021/05/30 18:16:06 Travis Mud
Here's the final product. After everything was electrically proper and working, I treated it the same as the reat of the harness, like before. I also put labels on as much of it as I could. I also drew a schmeatic of how it was wired (which is no different that stock) simply for record keeping purposes if i ever need to dive back into it, or if I end up selling my jeep. Please dont ask for my schematic, it's the same as the one in the field service manual, with notes of what I did.
0 2021/05/30 18:11:29 Travis Mud
Here is the wiring. Because the pumps are in the fender, a lot of times the 97+ pumps will get rusty and prematurely fail. I made sure to protect these electrical connections as best as possible. I soldered and crimped on female spade connectors, and heatshrunk tubing over it. Pulling the wires from the passenger side actually gave me too much wire and I had to cut it back like six inches or so, apart from the blue and white stripe wire that i had to double back and extend because it was pigtail
0 2021/05/30 18:01:27 Travis Mud
Around the radiator cap, and then finally out the same hole as the front sprayer hose and electrical connections. I bought a total of ten feet of hose, and used like nine and a half.
0 2021/05/30 17:59:43 Travis Mud
Under the battery tray back up parallel to the coolant overflow line,
0 2021/05/30 17:58:39 Travis Mud
I ran it straight by the passenger side fender,
0 2021/05/30 17:57:54 Travis Mud
0 2021/05/30 17:56:43 Travis Mud
The rear washer line was extended the same way.
0 2021/05/30 17:56:01 Travis Mud
Rerouting it from the passenger side over to rhe driver side means I only had to extend it like less than a foot
0 2021/05/30 17:54:39 Travis Mud
0 2021/05/30 17:52:12 Travis Mud
Firat thing is did was pull the whole header panel and fender off.
0 2021/05/30 17:51:06 Travis Mud
The washer hose was added back ontop of the harness (I may relocate this) and it was routed the same as the harness
0 2021/05/29 14:06:54 Travis Mud
The washer tube was added back overtop the harness (may rethink this one) and routed through the front same as the wires.
0 2021/05/29 14:04:46 Travis Mud
I added friction tape at the joints, juat like the factory. The factory wiring harness had something more stocky and thicker, almost like a waterproof sealant. This is what I had available locally.
0 2021/05/29 14:00:05 Travis Mud
After I taped the wires together, the corrugated tubing went back on, the electrical tape was applied the whole length to make it resistant to the elements.
0 2021/05/29 13:58:33 Travis Mud
At the header panel plug is where I detached this system from the rest of the harness.
0 2021/05/29 13:57:16 Travis Mud
Slowly getting there!
0 2021/05/29 13:55:48 Travis Mud
For when I have to work on this later, or if I sell my jeep and the next owner has to figure out what I did to it, I bundled the wires together and labeled them. This small loom was then incorporated back into the main harness.
0 2021/05/29 13:53:28 Travis Mud
First
Page
20 of 21
Last
Go To
Page
  • 1
  • ...
  • 15
  • 16
  • 17
  • 18
  • 19
  • 20
  • 21
20 of 21
Go To GO
Go to page of 21 pages
  • 1
  • ...
  • 15
  • 16
  • 17
  • 18
  • 19
  • 20
  • 21

Top
Jeep Cherokee Forum
  • Contact Us
  • FAQ
  • Archive
  • Advertising
  • Cookie Policy
  • Privacy Statement
  • Terms of Service
  • Your Privacy Choices
  • Manage Preferences

© 2026 MH Sub I, LLC dba Internet Brands


When you click on links to various merchants on this site and make a purchase, this can result in this site earning a commission. Affiliate programs and affiliations include, but are not limited to, the eBay Partner Network.