When you click on links to various merchants on this site and make a purchase, this can result in this site earning a commission. Affiliate programs and affiliations include, but are not limited to, the eBay Partner Network.
I spent quite a bit of looking for something like this but either I was using the wrong search terms (almost everything is about the rear hatch being stuck shut) or it doesn't exist. I would love to see methods other people use. This is something I'd been thinking about for quite a while and there are several reasons for doing this:
- When the badly designed keeper finally breaks or slips loose on the connecting rod to your latch you won't have to cut a huge hole in your interior trim or remove the bumper to get at the bolts on the latch or any of the other methods people come up with.
- This allows you to be in the back of the XJ, for whatever reason, and simply hop out without having to go through one of the side doors. This can end up being really useful if you have a lot of stuff packed inside and just enough room for you to sleep.
- If you're ever in an emergency situation the side doors are much more likely to be damaged in a roll over and possibly stuck shut since they sit inside of the body, the rear hatch is completely on the exterior of the body and once it's released it goes straight up and out.
I pondered this for a while and my first thought was to simply attach some sort of cable to the rod and run it through a trim panel to a loop or handle. Hell, you could skip this entire thread and go steal the handle off of that broken weedeater out back and have this done in about two minutes not counting the time to take the trim panel off. But that's not why we're here, are we? We want it to look like it's meant to be there, won't get in the way, and is neat. This also works whether the hatch is locked or not and the hatch will remain locked when you close it.
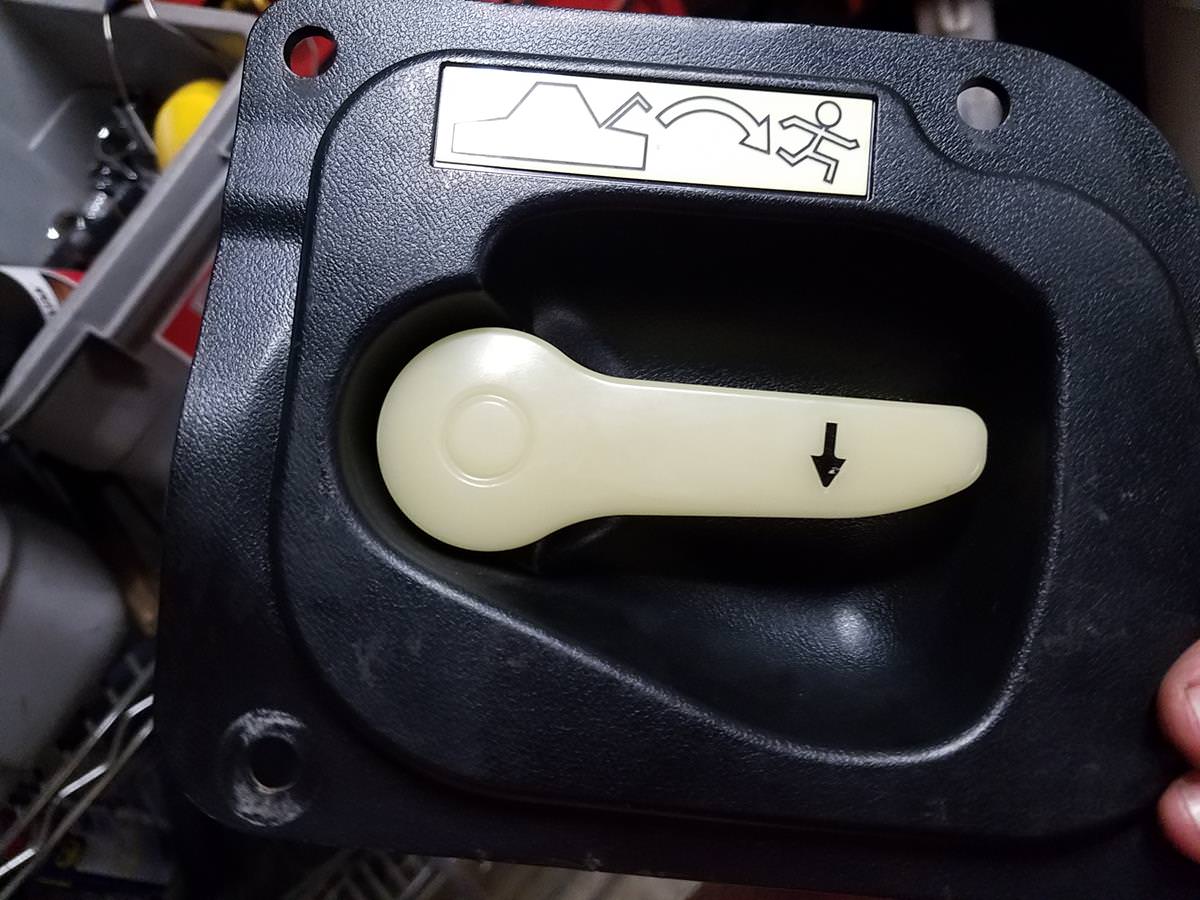
What I came up with was removing the emergency trunk release from a Subaru Legacy. Once you pop the trunk at the junkyard these are very easy to spot or you could find one on eBay but I can't make any guarantees they would work. I actually can't guarantee any of this will work for you specifically: You'll have to make your own measurements and fitting for the most part but it's pretty straight forward as long as you make sure a couple of connections are in the right place.
The parts you'll nee for this specific install are:
2 x 10-24 nuts, preferably locknuts.
2 x 1/8 fender washers or similar as long as they fit over the rod, I used stainless.
2 x 1/2" sheet metal screws but this is highly dependent on how you make and mount your bracket.
Some sort of car trunk emergency release handle, the cable, and in this case also the latching mechanism which on Subaru Legacies is all easily removed with four plastic body rivets and two 12mm nuts.
I've never see anyone else attach this type of cable end to a threaded rod this way but it was the most secure method I could come up with that was the least amount of machining work.
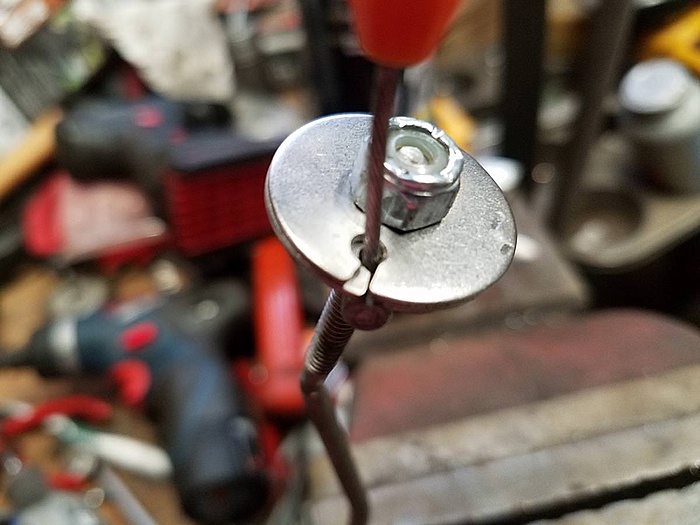
First make sure your nuts and washers fit on the threaded rod. I had to clean the thread on the end up mine up on a sanding belt since these were never actually meant to thread anything onto them. After that it all went on perfectly. Nut, two washers, and the other nut. Crank it down pretty hard at this point so the two washers can't slide against one another.
Drill a hole that's about three times the diameter of your release cable. Then, very carefully use a Dremel cut off wheel or similar to cut a slot down into one side of this hole. The slot should be able to barely fit your cable through at its most narrow point. I took the washers off and beveled the edges on both washers on both sides so this wouldn't steadily cut into the cable over time. Unlikely to be a real issue but why take chances.
The way this lock works is that you loosen the top nut and slide the cable into place and then rotate one of the washers so that the gate is now closed but not pinching the the wire. It should move freely up and down in the lock. Tighten the nut down again and make sure this all stays in place, unlock and remove the cable for now.
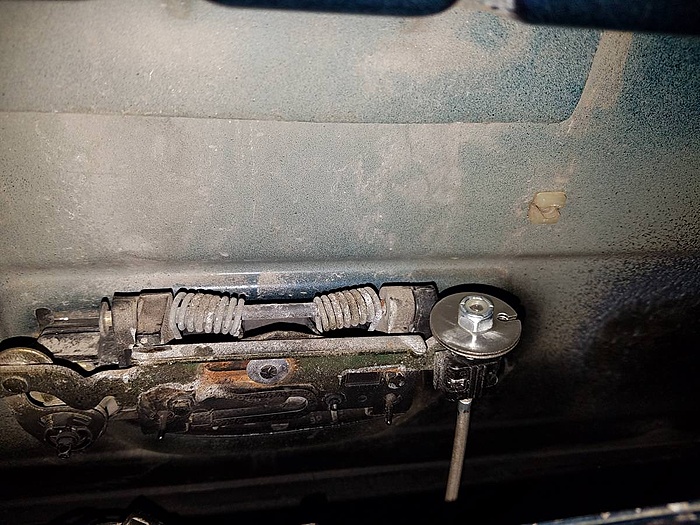
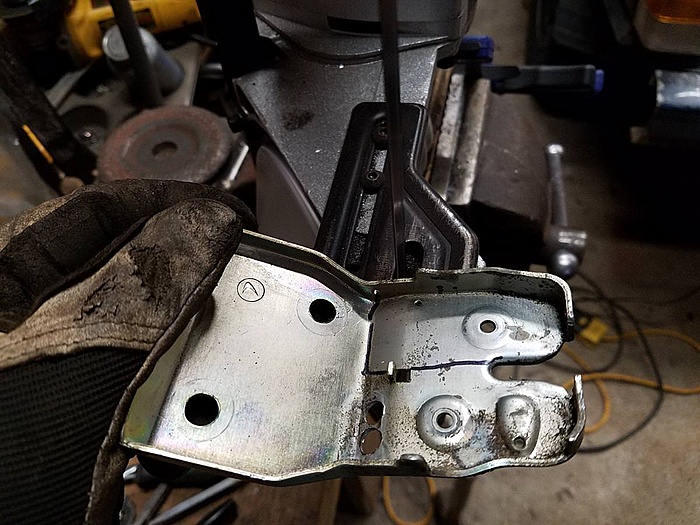
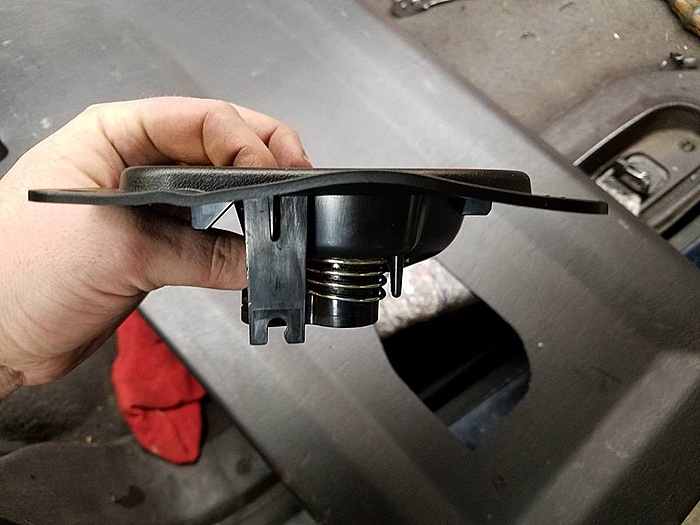
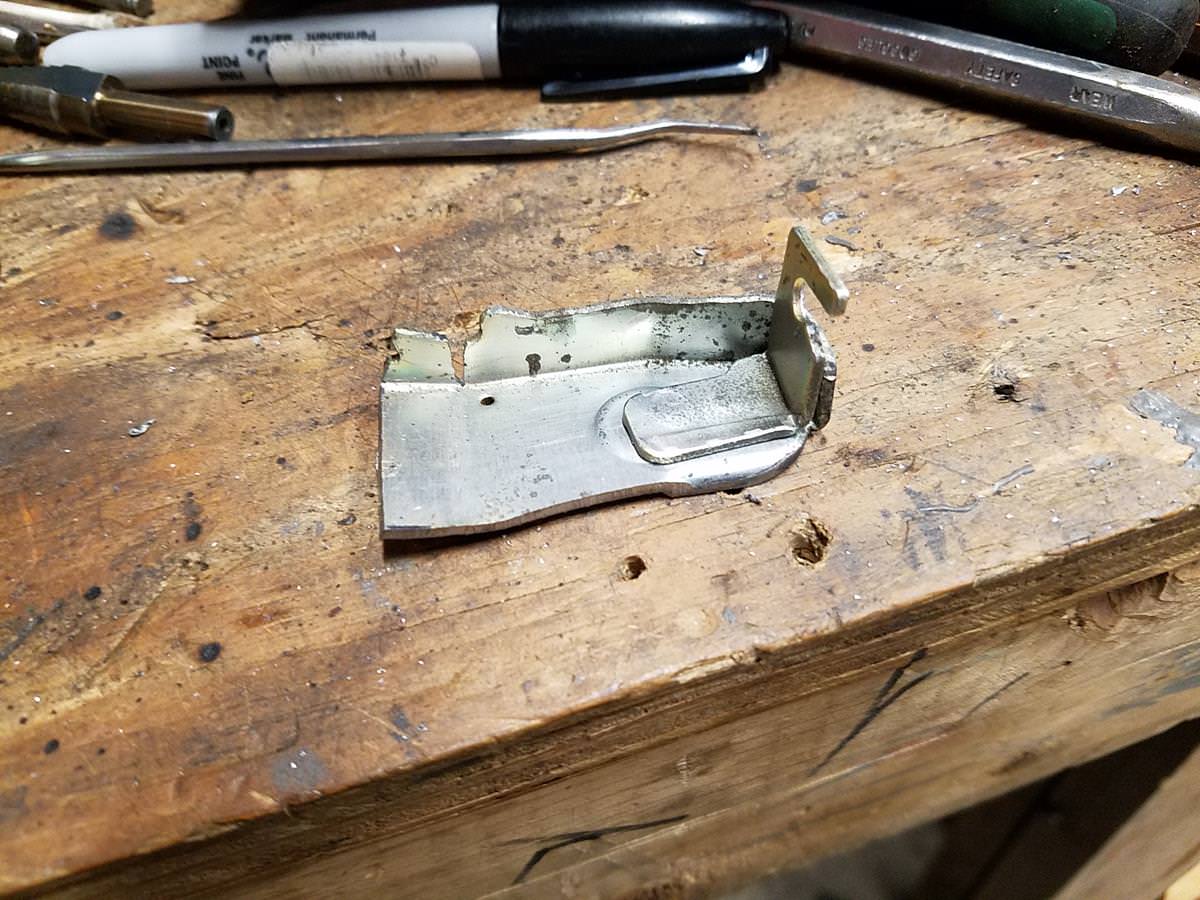
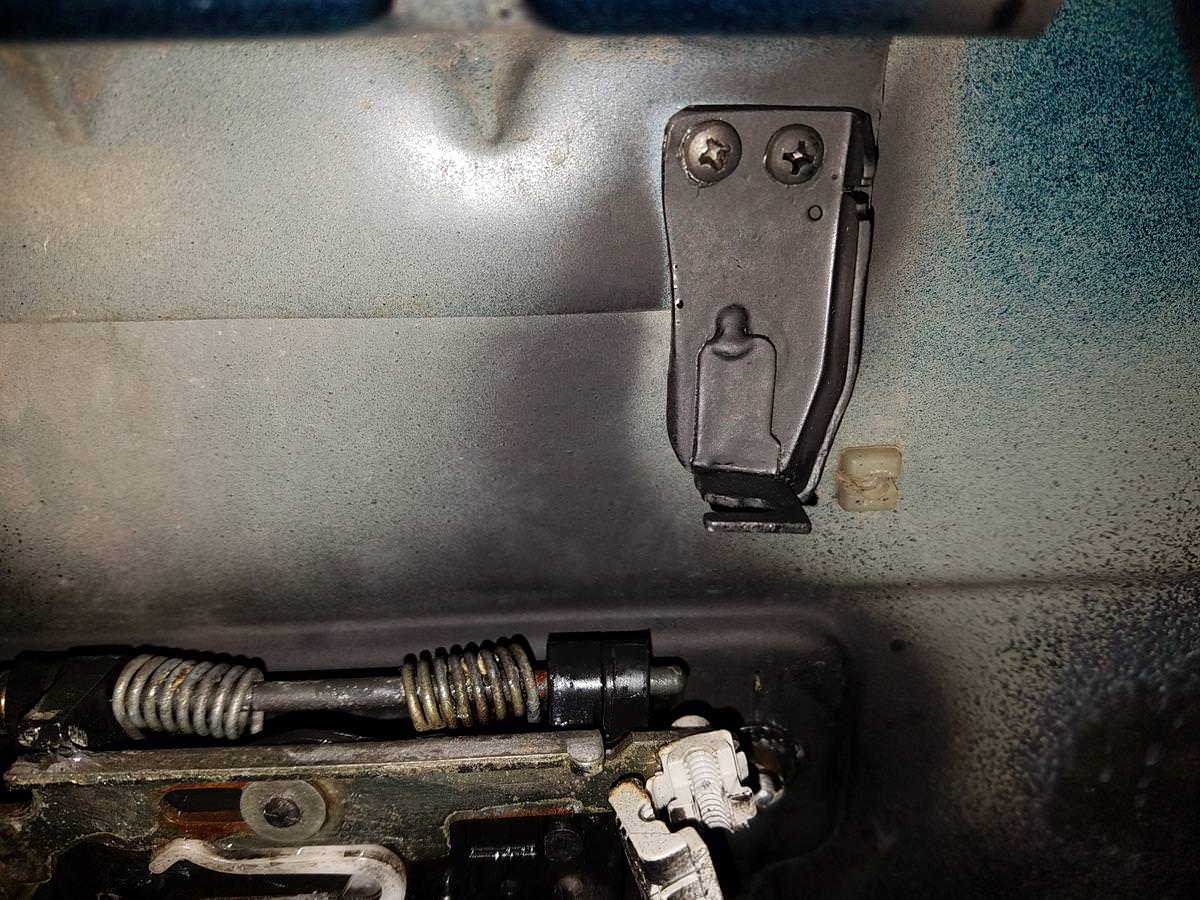
Go ahead and install the rod back in your Jeep and makes sure it's working properly. There have been many writeups covering this but essentially you want the rod to be as high in the holder as it will go without releasing the latch. If you have one of the older sheet metal keepers rip it out and get one from a later XJ, as far as I know they're interchangeable. In this picture the lock is oriented to the right but I later rotated this to the rear for a reason I'll get to later.
Now we're on to making the small bracket to hold the cable guide sleeve in place above the release. I ended up using a piece of the Subaru trunk latch since I already had it and I didn't have to make the little cutout to hold the plastic ferule. If you make your own it has to be a pretty exact fit since if it's too tight you'll crimp the ferrule and if it's too loose it will have play and eventually slip out. I've already knocked all of the other little bits out of the latch and it's about to go through the bandsaw.
This is showing the section I cut out with the small bracket for the ferrule sitting in position. I ended up bending the piece to the left slightly so that the bottom (the right) would stick out directly above the rod. This is important, you don't want off center forces being applied to the latch rod, release, or cable, if you can help it. I ended up tack welding this together but you could easily drill a whole and use a small bolt to hold it in place. At this point I also rounded off all of the rough edges and painted it black to protect the welded areas.
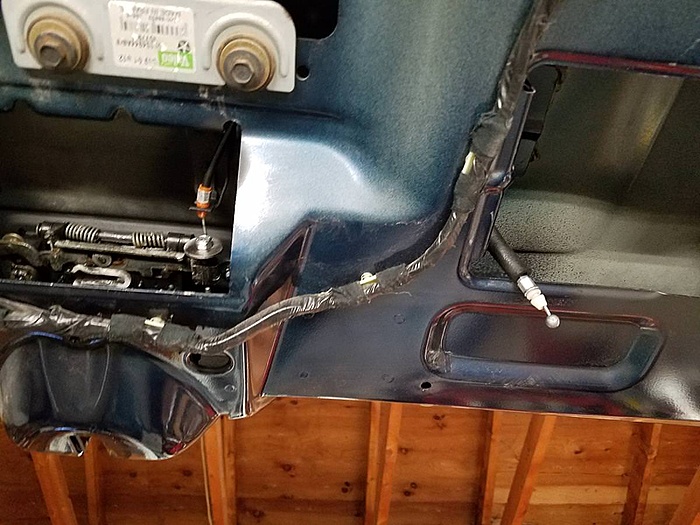
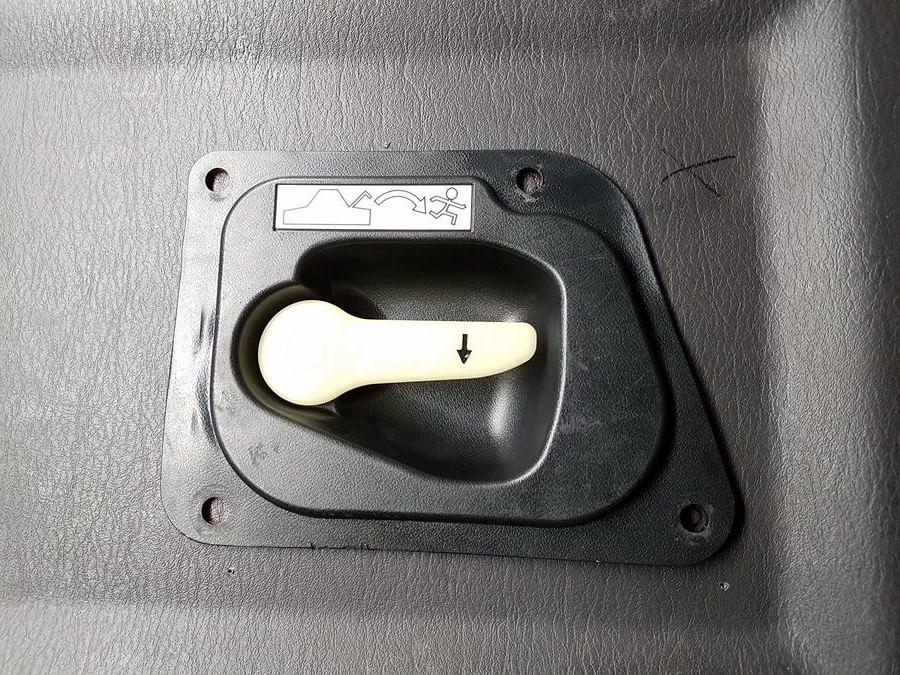
This is it installed in place. I used two very short stainless sheet metal screws to go through pilot holes in that support piece above the release. This is part of the the inner hatch stamping and behind that is the foam glue they used to attach the inner and outer hatch panels. If you use screws that are too long you will absolutely go right through the hatch under the license plate. To find this position I placed the cable in the bracket, slipped it through the lock on the rod and pulled it up so that it was tight but not straining. MAKE SURE YOU DO THIS WITH THE OTHER END ATTACHED TO THE RELEASE HANDLE. If you don't you'll absolutely end up with too much cable and the bracket will be in the wrong place. Thankfully this mounting method allows you to move the bracket around quite a bit and keep poking holes in that unseen piece until you get it right but I was good on the first go since I took my time. Don't rush this, your XJ is becoming a family heirloom.
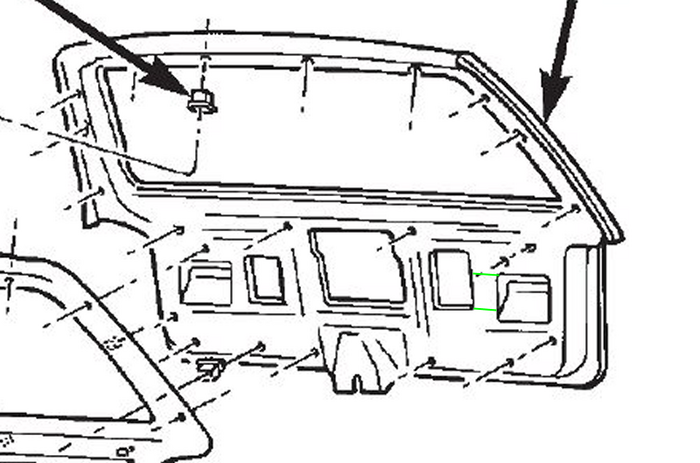
I have to apologize here but I was tired and completely forgot to take an image of the modification that was required to the hatch metal itself. This is where most of you will cringe and not want to go on and I understand but I will tell you that after removing this small piece of sheet metal the two halves barely moved and I haven't noticed any loss of stiffness in the hatch. This is required to fit the back of the release handle in place as the trim piece simply doesn't have enough depth. I made the two cuts where I've drawn green lines in this diagram and it should be obvious once you start looking at all of the pieces where this has to be done and why. If you move it to the left to try to fit it in that hole the cable will be too long and want to bind and it will take up space on your hatch for anything else you might want to install and if you try to fit it in the hole on the right it will be too close to the edge of the trim panel and will ride up out of the flat area.
I sketched it out with a Sharpie and cut with a jigsaw and metal blade. You can use an angle grinder but it will throw sparks everywhere and those sparks can damage things like your windows. Smooth the edges out with a file.
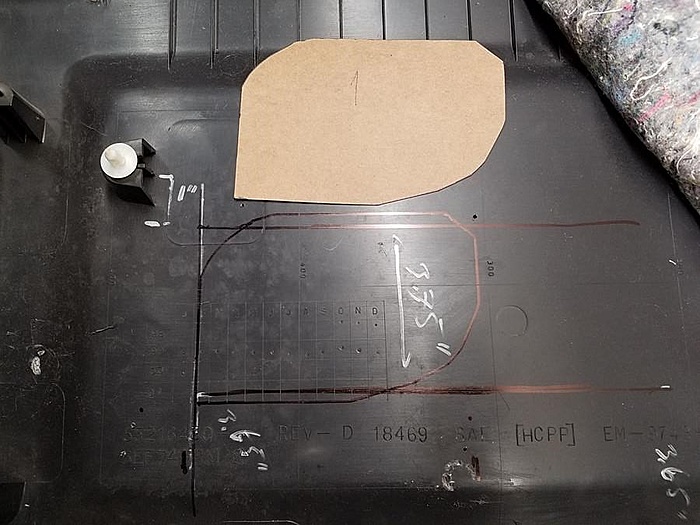
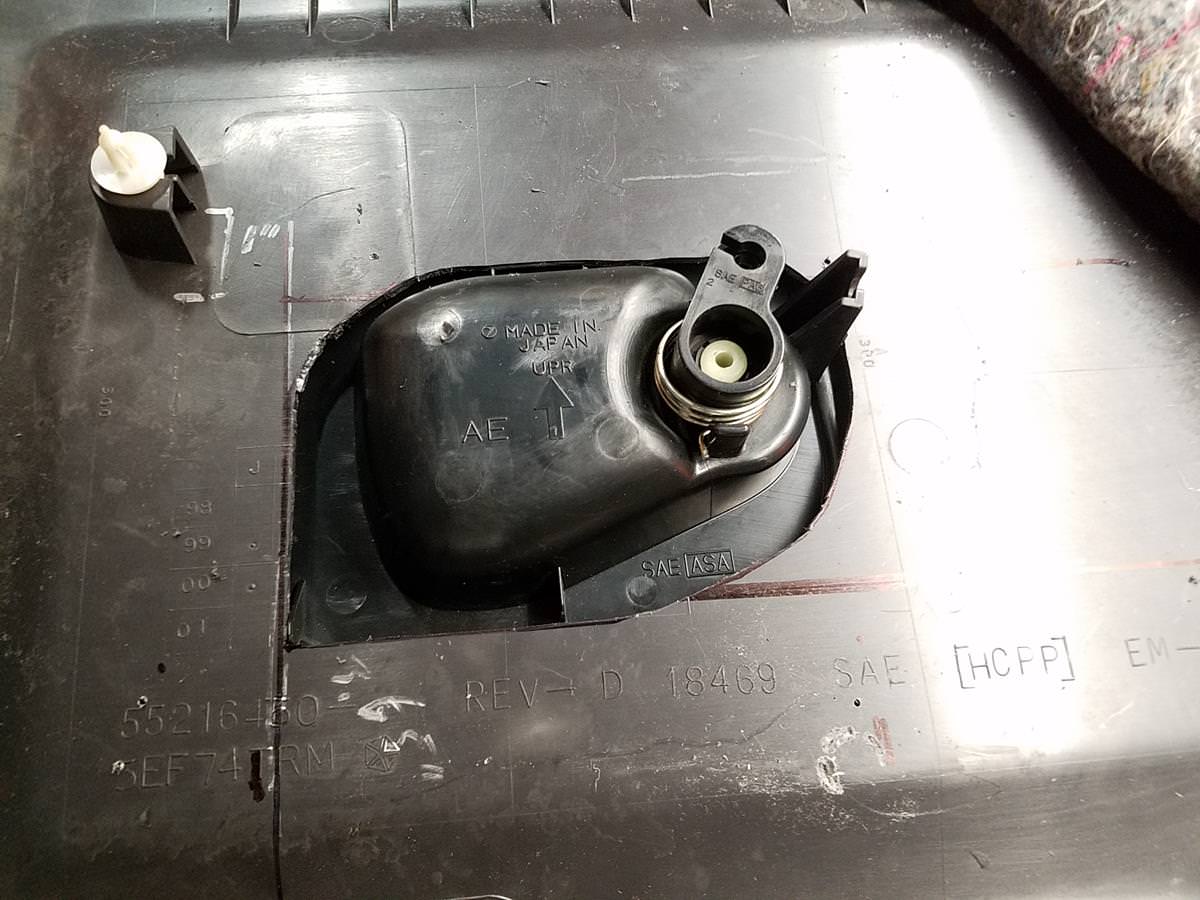
Next you'll need to figure out exactly where you're going to cut through the trim panel to install the release mechanism. Take your time here to make sure things are square to the rest of the piece but any rough edge will be covered up by the flange around the release. The main reason for neatness is so that the little plastic tabs on the back of the unit will keep it from moving around and take stress off of the four plastic rivets. I did most of my measurements using the centers of the plastic push rivets on the trim and their corresponding holes in the hatch panel.
I made some square lines in comparison to the edges of the hatch and used this to orient the rest of the lines showing me where that cutout through the metal panel now exists. I moved the release unit as far to the right as possible and created a template using thin cardboard taking measurements off of those tabs on the back of the unit. Please be careful hear and make certain you're orienting things correctly since I had two terrified moments when I thought I had flipped the cutout and then that I had cut it in the right side of the trim panel. I didn't but better safe than sorry.
I drilled some holes and slipped a medium TPI jigsaw blade through and began cutting. The only edges here that are significant at all are the bottom left in this image and the top right ones where the tabs sit. Make it tight, it's better to shave off some than have it be all loose. I had to shave a bit off to get it to fit through and be square to the rest of the trim panel.
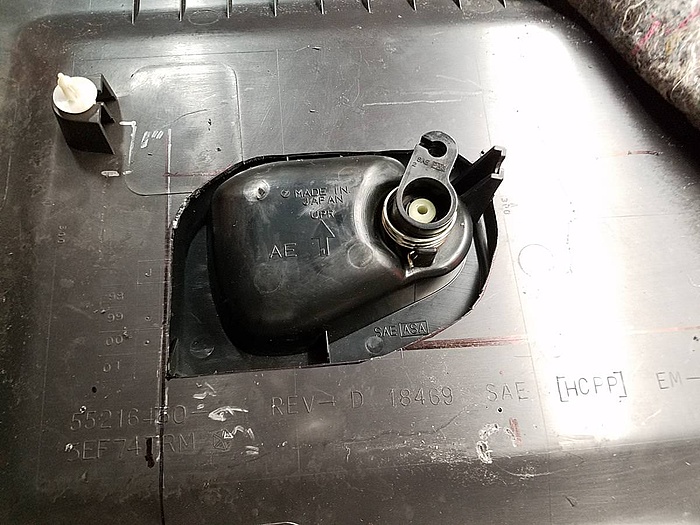
One thing I did that is completely unnecessary is heat up the molded edges of the release unit and flatten them carefully in a vise with a bit of backward bowing so all of the rivet holes met the panel on the same plane. This is really unnecessary but I knew that gap would bug me.
Here it is in place and I'm marking the the holes. My suggestion is to orient this correctly and drill one pilot hole through one rivet location with the unit in place, pick it up, widen the hole with a step drill bit to the right tight size (.30 for these rivets) and drop it back down and insert a rivet before drilling pilot holes for the other three rivets.
Next you'll route your cable and lock it onto the rod. Mine goes up beside the wiper module and back down in front of that metal support leg you can see on the right in the hole. However you route this you want the least amount of angle on the cable as it enters the two brackets. This causes less binding and less force is applied to the brackets. I lubed mine up liberally with silicone spray before installing.
This was the final orientation of my cable. This is very important. The way that the lock on the hatch release works is that it slides that bar over to the right in this picture so that the handle itself can't press down on it and rotate it up. If you have binding from the cable going either way it will either remain locked or prevent it from locking. Most likely prevent it from locking. This is why placement of your bracket is very important since there is very little slack or travel in that cable. If you use a simple cable attached to some sort of pull handle coming out of the trim right above the latching mechanism this would be a moot point but that's up to you.
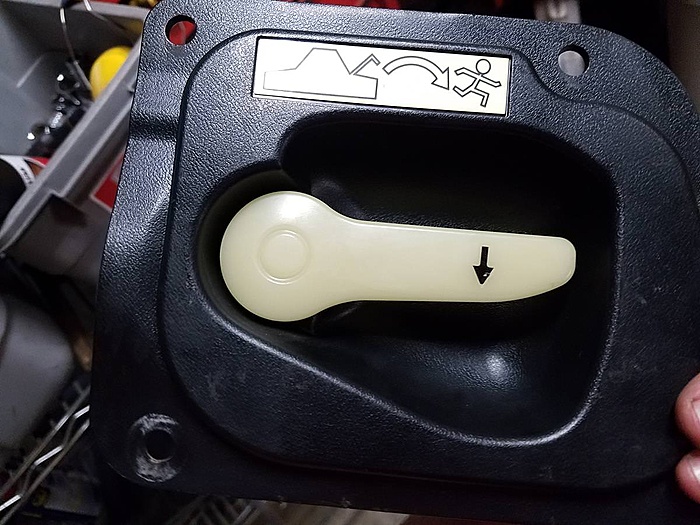
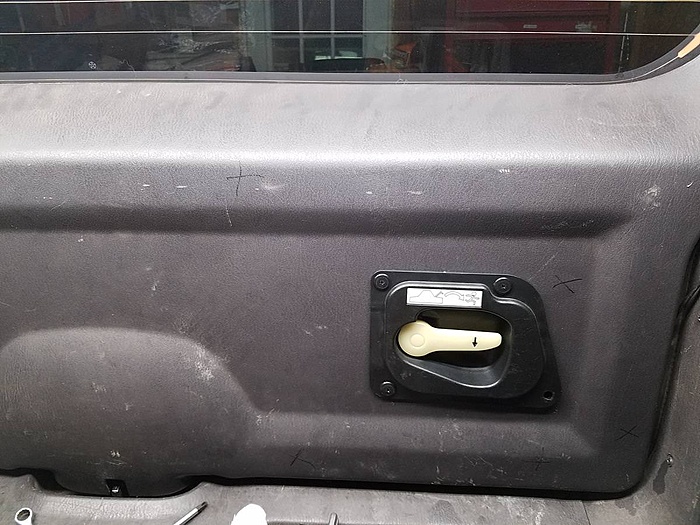
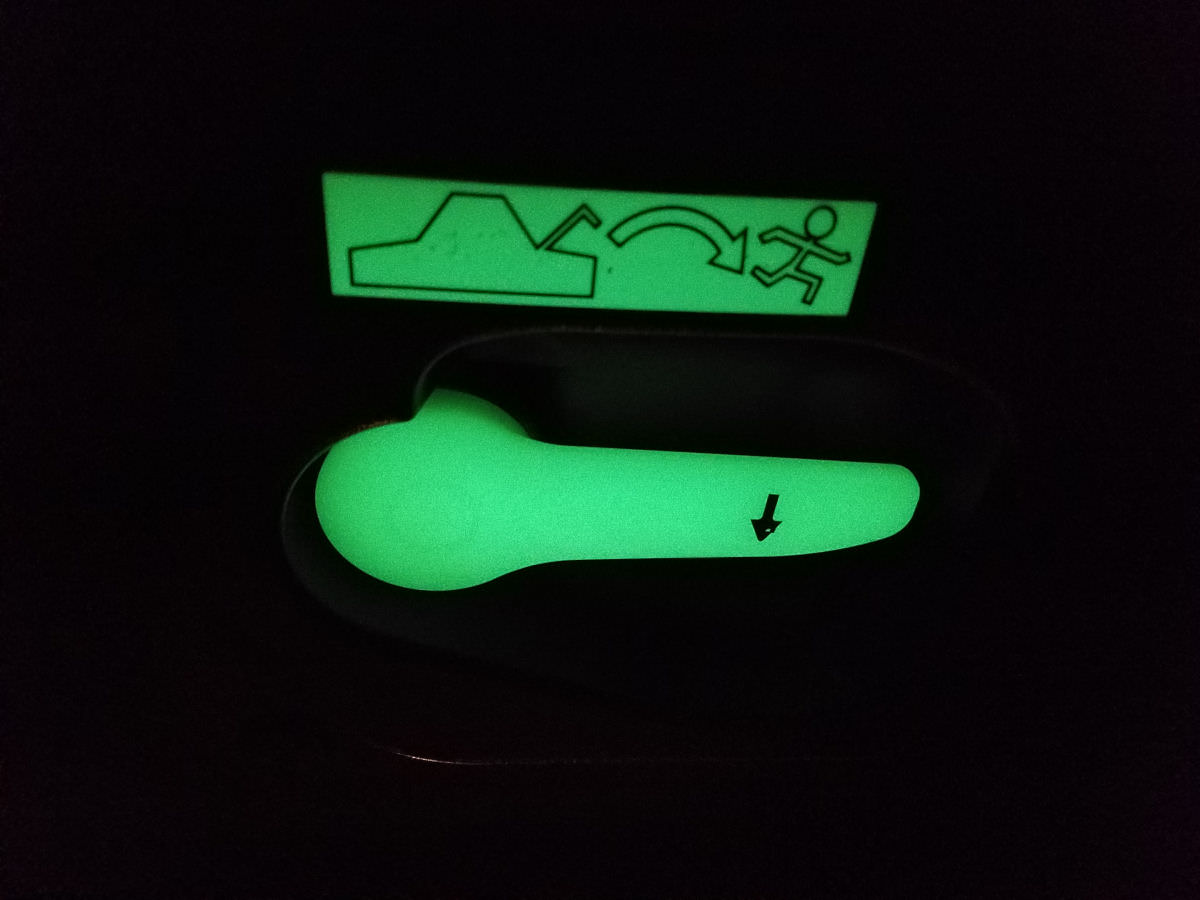
Lift the panel up close to the hatch and install the other end of your cable in the release and it's finally installed. I'm missing one plastic rivet but I'll be replacing that. This specific unit has a slightly angled bottom edge which is why it looks canted in the image. Eventually I'll color match it but when it's not under really bright light like this you barely notice. Speaking of light, these handles glow really well even with little light exposure. They were meant to be used in dark car trunks afterall.
I could sit down and sketch out at least five other specific methods of doing an interior release along with this one and most of them would probably be faster and easier but that's your decision. Oh, and since other people have asked before: Those X marks drawn on the trim panel are so I know where to punch it when reinstalling so that I make sure all of the clips go into place from the center out before cranking the screws into place. If you have any questions feel free to ask them here but I won't be able to give specific measurements for the most part.
Last edited by ColonelColt; Nov 22, 2017 at 06:40 PM.
That's very slick! But ... I just wrapped a wire around the latch bar and drilled a little hole through the plastic latch cover for it to come out. Pull the wire and it opens.
Very good write up and design of a feature very much needed on these that should have been installed at the factory OEM as an absolute safety necessity. Thank you for your time and work to share this!
That's very slick! But ... I just wrapped a wire around the latch bar and drilled a little hole through the plastic latch cover for it to come out. Pull the wire and it opens.
Absolutely faster and easier. Like I said, you could get an old pull cord from a piece of lawn equipment and have this done in a few minutes and I might eventually make a writeup on doing something like that on my donor XJ but I figured people might want something nicer looking. Now, the real question is: What's the color the interior plastic trim called? Dark bluish grey?
I did not realize that newer XJ's had better trunk release clips, my 98 has the crappy sheet-metal ears that clip onto the threaded rod.
How does the clip in your picture attach? I need to get my hands on the more sturdy one, every year my zip tie will break but I can easily get my hand back there to unlatch it but still, that handle is a great idea
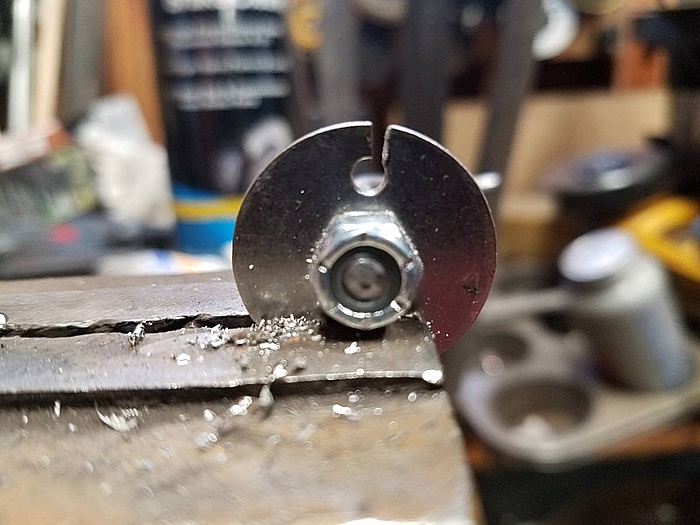
As far as I can tell, I didn't pull mine out, it just has some split fingers that pop through the hole and snap into place. It shouldn't be too hard to take one off a junkyard Jeep. Personally if I had this issue I wouldn't even bother with the plastic one. I would use some hardware parts to make one out of metal that will never break. How you would make it would depend heavily on the tools you have available. The easiest way would probably be to find a machine thread eyelet that fits snugly through the hole in the handle mechanism and somewhat loosely over the rod and sandwich it with two washers that *do* fit the rod somewhat tightly and then crank a nylock down on top of this . The lift bar, with the rod holder, has to be able to rotate slightly as its lifted so as long as you either have rotation where the new clip goes through the lift bar or at the rod you should be fine. This is the biggest reason the ziptie method is prone to breaking and puts extra strain on the whole latching mechanism every time you open it: It's having to force that plastic to flex as it tries to rotate. Example below though you'd want one with threading that went further down the shaft and you'd have to figure out the right eyelet size but you get the idea.
Engine: 4.0 63mm throttle body, mean green starter, airraid intake, Flowmaster 2.5" exhaust, Mean Green alt.
Originally Posted by investinwaffles
I did not realize that newer XJ's had better trunk release clips, my 98 has the crappy sheet-metal ears that clip onto the threaded rod.
How does the clip in your picture attach? I need to get my hands on the more sturdy one, every year my zip tie will break but I can easily get my hand back there to unlatch it but still, that handle is a great idea
Here's a pic of how my '01 clip attaches & the best way to open stuck hatch on 97-01 XJ video My Build
As far as I can tell, I didn't pull mine out, it just has some split fingers that pop through the hole and snap into place. It shouldn't be too hard to take one off a junkyard Jeep. Personally if I had this issue I wouldn't even bother with the plastic one. I would use some hardware parts to make one out of metal that will never break. How you would make it would depend heavily on the tools you have available. The easiest way would probably be to find a machine thread eyelet that fits snugly through the hole in the handle mechanism and somewhat loosely over the rod and sandwich it with two washers that *do* fit the rod somewhat tightly and then crank a nylock down on top of this . The lift bar, with the rod holder, has to be able to rotate slightly as its lifted so as long as you either have rotation where the new clip goes through the lift bar or at the rod you should be fine. This is the biggest reason the ziptie method is prone to breaking and puts extra strain on the whole latching mechanism every time you open it: It's having to force that plastic to flex as it tries to rotate. Example below though you'd want one with threading that went further down the shaft and you'd have to figure out the right eyelet size but you get the idea.
I like that eyelet idea, but I remember reading that the rod is not actually threaded, but instead just grooved. Initially I wanted to find a nylock nut to thread down on the rod to keep a bit more tension and prevent it from slipping out, coupled with some bailing wire, but others have tried different thread combos and had not found one that actually threaded down onto it. Not sure if that is true or not though
I wonder if I could pull one off a junkyard XJ, cut off the "grooved" portion and have someone weld on some allthread or a bolt or something.
I might just use bailing wire when the current zipties eventually fail, would allow a bit of play for the handle to rotate, but should be stronger long-term compared to zipties