
Liberty lights on XJ

Thread Starter
Seasoned Member
Joined: Jan 2010
Posts: 339
Likes: 0
From: Near Fayetteville NC
Year: 1993
Model: Cherokee
Engine: 4.0
just found this today not my rig but thought it was a cool pic
Here's the write up that was with it:
"The light bar comes in two pieces. It is made to mount and wire down the
drive pillar. The base of the light bar has two sided tape so you can
position the bar and mark the holes to drill. I did just take the molding
off the left door trim to allow the liner to drop a couple of inches on the
left side so I could see the clearance, etc. There is about a 1" 1/2 gap.
To get a good fit, as the bar is slightly curved along the front, I had to
shorten my roof rack about 5". I just removed the end, took out about three
or four rack/rail screws, wedged it up a little and cut it with a hacksaw.
You will loose the first hole on the rail. I just put the screw back in,
painted it the color of my top, as it will be hidden once you put the end
back on. The rail is held fine, I used trim cement on the end, then put a
very small screw through the side to hold it, black silicone the cracks and
you can't tell.
The kit comes with 7 threaded studs or whatever you want to call them. (Like
what you would put into a wall to hold the screw.) You drill the holes with
a piece of wood on the bit so it only goes into the metal about 1/4 inch.
The threaded studs are grooved and you push them in the hole, then use a
tool they give you which consists of a large nut with a bolt through it. You
thread the bolt into the stud, hold the nut with a wrench and tighten the
bolt. As you tighten it, the stud starts to compress on the back side until
it is squashed against the under side of the roof. Unthread the bolt and the
regular bolt to hold the unit goes in. I put a little silicone on each stud
and the final bolt.
There is a bigger hole, 1" for the harness rubber grommet. My Cherokee has
ridges the length of the roof, so I had to cut the plastic in the light bar
base about a 1/2' wider so the hole would not be on part of the raised
groove. You will need a 1" metal hole saw for this. I used a vacuum to clean
the drill shavings out of my windshield molding.
I positioned the rack, places the bolts, started them all to make sure they
lined up, then tightened. Fished the harness through and pushed the grommet
in and also sealed it.Ran wire down the left side. I cut off the connector
end on the harness.It was made to wire into a Liberty harness, so you don't
need it.Bar is all pre wired to all lights.
The rest of the wiring is all wrapped etc. There is a ground round connector
to run by your battery anywhere, a hot round connector to connect to the end
of your fuse box under the hood. A fuse, and the light regulator.
For under the dash they give you a switch which has a separate bulb and two
wires with 2amp fuses and fuse box plug in ends. This was the only thing
needing modified.There is not enough wire, so I connected two wires from the
ground and hot wire coming off the regulator under the hood. Wrapped it and
ran it into the car going along the passenger fender, across the firewall
and in under the steering wheel. column. Attached two roof wires to switch
wires along with power wires. Two smaller wires off switch, I cut and ran
together then put the fuse/plug-in on the end of it and ran to an empty slot
in my fuse panel on the passenger kick panel. by the way, TRY this temporary
wire and make sure everything works before you run it all and final hook it
up.
You have to put your switch in before you wire under the dash. I took my
wiring panel where your rear wiper/fog lights/and defroster are out.cut a
whole to fit the switch. The switch has a slightly larger front switch
covers your cut. I don't have a rear defroster so I used that spot.Switch is
slightly curved top to bottom.They also give to a panel you could mount some
place, both gray and black.
When top housing put on, you can still adjust the light angle as there is a
whole in the rear of each. Boy are they bright Hella lens. Lights also come
with covers. Kit retails for $450, I got mine for $360, but if you figure
wiring harness, individual lights and a light bar, cost is not too bad,
especially that they are all pre-wired."
CF Veteran
Joined: Dec 2009
Posts: 1,400
Likes: 0
From: National Park , South jersey
Year: 1993
Model: Cherokee
Engine: 4.0 IL6
yeah i was lookig at them , didn't know if they would work or look rite. NOT BAD. have to get some now
Last edited by EUGENE the JEEP; Jan 14, 2011 at 02:54 PM. Reason: spelling
Trending Topics

Senior Member
Joined: Jan 2011
Posts: 948
Likes: 1
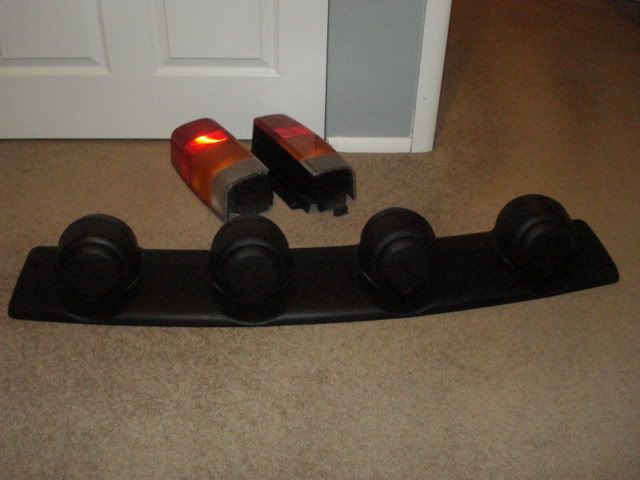
Goodluck with your search man. I searched all over the country for these things and are extremely rare. I've made calls, visited junkyards, tried aftermarket companies, salvage yards....and I came up with only 1. I found a guy on Craigslist that wanted $300 plus $50 to ship. He had one picture, would only take a money order and was a real a-hole. So I said forget it. I however did find someone on ebay selling just the outter shell. I purchased it and I'm going to fab up my own mounting plate and install different lights for it. Do all the wiring myself as well. Go to ebay and in the search type in Liberty Roof. DON"T look at those cheap after market ones. They're garbage and are blown up in the picture to make them look bigger.
Here's the one I got. It's the OEM 2 piece cover
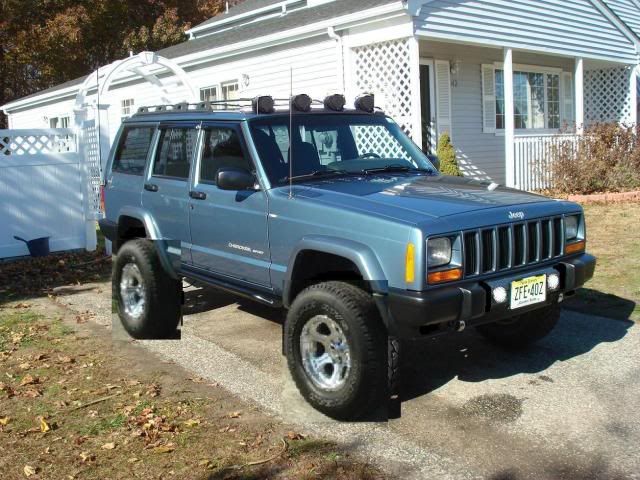
Here's what I call my "Concept XJ" It's photocrapped but you get the point. This is how I want it to look when I'm done. It'll have 32's on it as well.
Thread Starter
Seasoned Member
Joined: Jan 2010
Posts: 339
Likes: 0
From: Near Fayetteville NC
Year: 1993
Model: Cherokee
Engine: 4.0
Goodluck with your search man. I searched all over the country for these things and are extremely rare. I've made calls, visited junkyards, tried aftermarket companies, salvage yards....and I came up with only 1. I found a guy on Craigslist that wanted $300 plus $50 to ship. He had one picture, would only take a money order and was a real a-hole. So I said forget it. I however did find someone on ebay selling just the outter shell. I purchased it and I'm going to fab up my own mounting plate and install different lights for it. Do all the wiring myself as well. Go to ebay and in the search type in Liberty Roof. DON"T look at those cheap after market ones. They're garbage and are blown up in the picture to make them look bigger.
Here's the one I got. It's the OEM 2 piece cover
Here's what I call my "Concept XJ" It's photocrapped but you get the point. This is how I want it to look when I'm done. It'll have 32's on it as well.
Here's the one I got. It's the OEM 2 piece cover
Here's what I call my "Concept XJ" It's photocrapped but you get the point. This is how I want it to look when I'm done. It'll have 32's on it as well.


Thread
Thread Starter
Forum
Replies
Last Post
Coffinshaker
Stock Grand Cherokee Tech. All ZJ/WJ/WK Non-modified/stock questions go here!
10
Feb 25, 2025 03:30 PM
BluJay
Stock XJ Cherokee Tech. All XJ Non-modified/stock questions go here
19
Sep 25, 2015 02:37 PM
Tsunami
Stock XJ Cherokee Tech. All XJ Non-modified/stock questions go here
0
Sep 10, 2015 09:56 AM
RyanHardin1
Stock XJ Cherokee Tech. All XJ Non-modified/stock questions go here
9
Sep 10, 2015 08:21 AM
nrwphoto
Stock XJ Cherokee Tech. All XJ Non-modified/stock questions go here
0
Sep 9, 2015 10:41 PM
Currently Active Users Viewing This Thread: 1 (0 members and 1 guests)