
[completed] DIY roof rack rails (the bars that a roof rack would sit on)

Thread Starter
Seasoned Member
Joined: Dec 2016
Posts: 391
Likes: 10
From: Lawrence ****ing Kansas
Year: 1997
Model: Cherokee
Engine: 4.0
I just bought my first welder. It's an inexpensive DC inverter stick welder from Amazon, and at $170 I think it's a really really good value. Before I move on to building my own custom bumpers, I wanted a smaller project to practice on first. So I chose to replace the stock roof rack bars with a custom one. The one I build will have removable crossbars, and the crossbars create a high amount of drag on the road, so it will also be more aerodynamic as well as stronger and better looking.
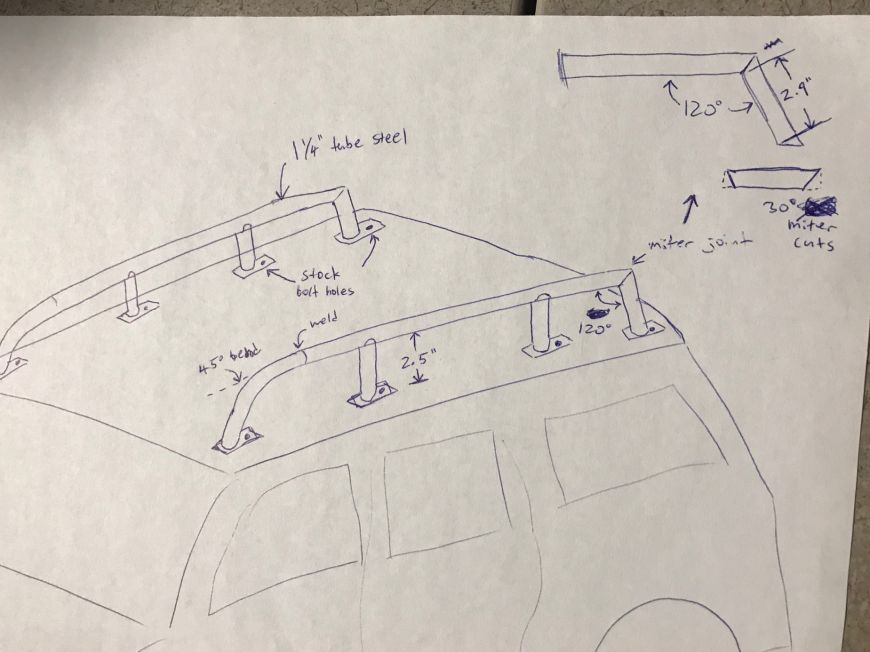
Here's the plans with some dimensions. (If you're going to use these plans, please know that they're not totally perfect as there is a slight curve to the roof that I forgot to account for. Not only is there a very slight curve from front to back, but there is also about a 7 degree slope at the mounting locations of the stock roof rails that these use to bolt to. If those 7 degrees aren't factored into the mounting pads then the rails will not sit nice a verticle and they will look stupid. I had to make up for this later in the build, but it would have saved me a lot of time a grief if I had figured this out sooner.)
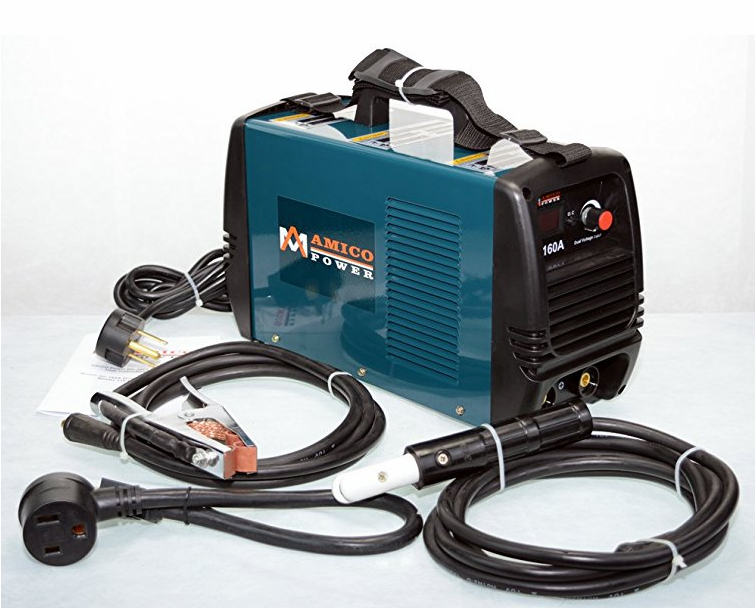
Here's the welder I bought:
I chose to use 1.25" galvanized electrical conduit pipe, because it's cheap, available at all hardware stores in long lengths, and it's lighter than black pipe. However, if you choose to do the same, please be aware that the zinc coating will burn off when the pipe is welded, making zinc-oxide fumes, and the fumes can make you very sick for a few days if you inhale them. Keep your head out of the smoke above the pipe when welding, and use lots of ventilation. Also, as much galvanized coating as possible needs to be sanded/grinded off the pipe before welding.
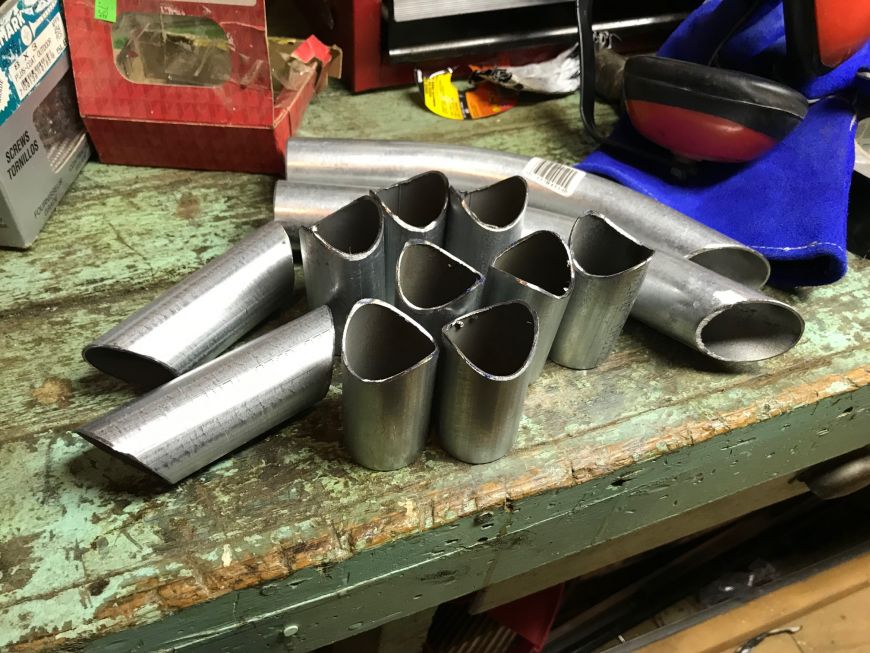
Another reason why I chose electrical conduit pipe is because they have sections that were altready bent at 45 and 90 degree angles.

While I was waiting for the welder to arrive in the mail, I started the task of notching the tubes.
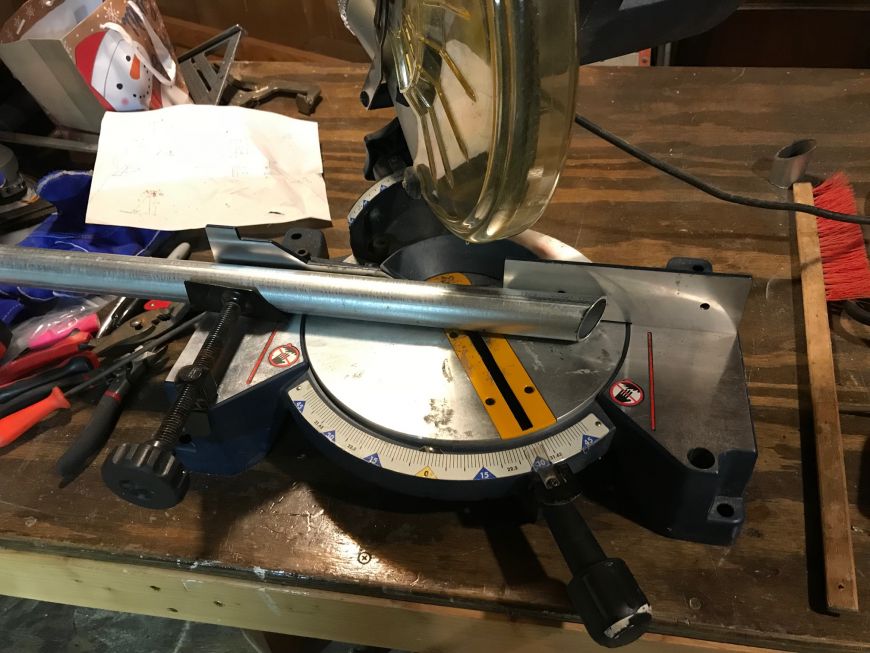
I used my cheap Ryobi miter saw/chop saw but I put an abrasive metal cutting blade on it. Very affordable way to cut presice angles, but it's taking a tole on the saw that's ment to cut wood and not metal.
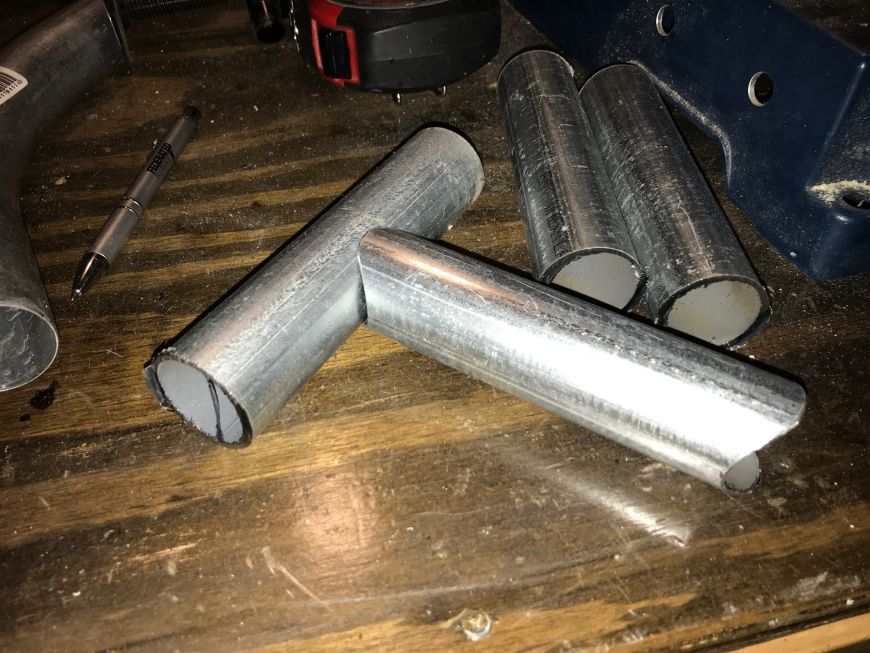
My meathod of notching the tubes was pretty easy: make two 45� angle cuts, cutting of 1/3 of the diameter of the pipe at each cut. Since 1.25" pipe is actually 1.5" in outer diamter (go figure) that means I needed to cut off 0.5".
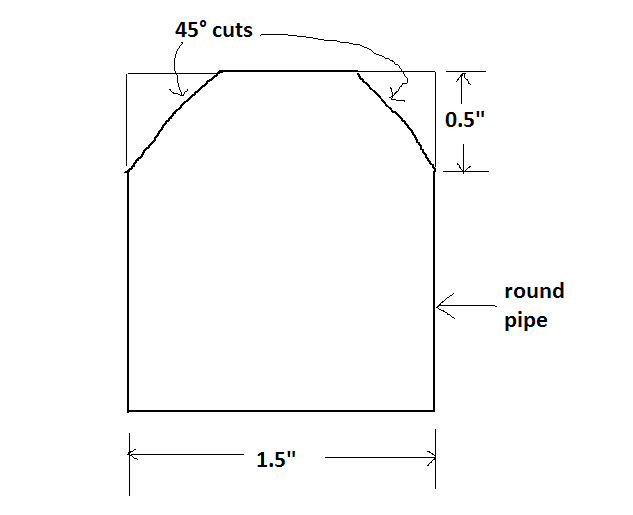
Then I just needed to round over the top with my bench grinder. They're not perfect but it's an easy way to notch tube without a tube notcher machine. Oh, and I forgot to account for the slight curve in the roof from front to back and, more importantly, the 7 degree slop from side to side. Now would have been a great time for me to correct this, but I had to make up for this later in the build.
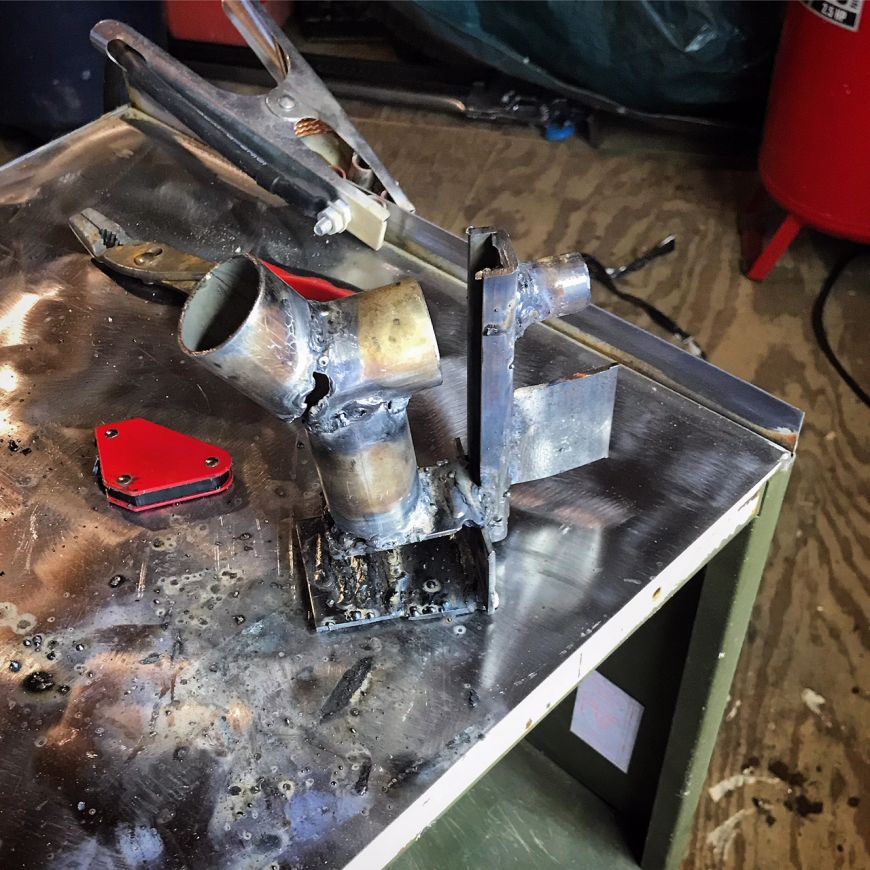
My welder finally came in the mail, so I started practicing. I think everybody makes one of these "tower of horrors" with their first welder to practice on. It turns out that 1/8" 7014 rod was absolutely the wrong choice for thin-wall galvanized pipe. I picked up some 3/32" 6013 rod and it was much better.
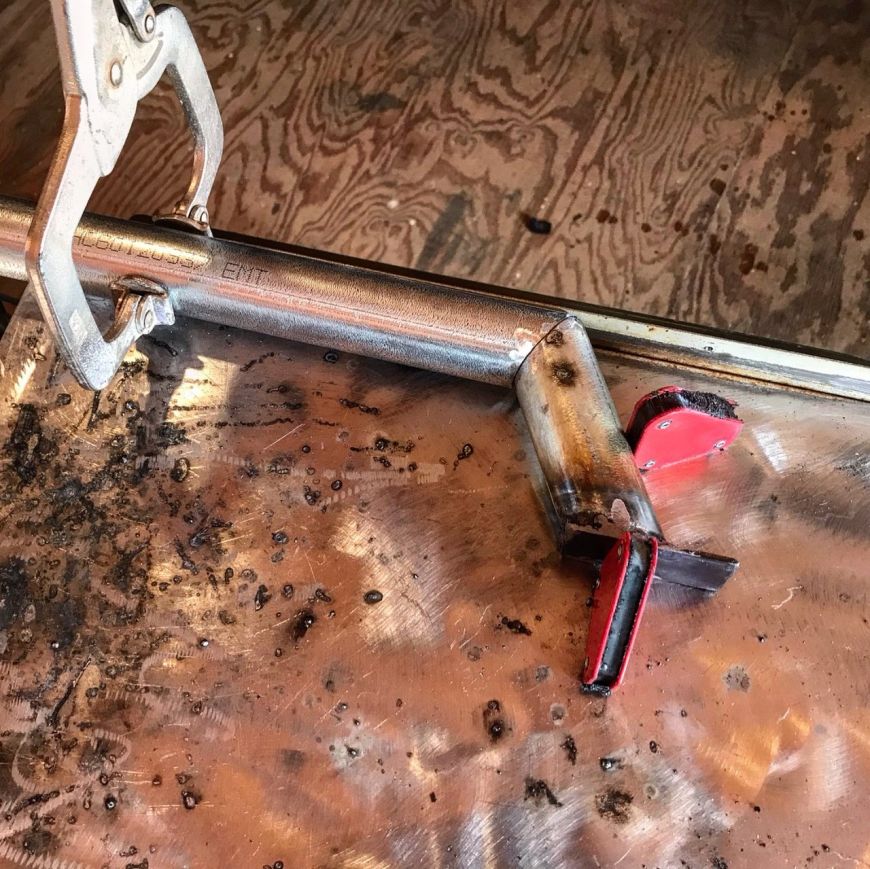
First thing I did was I welded some 1/8" flat stock onto the pipes I had notched.
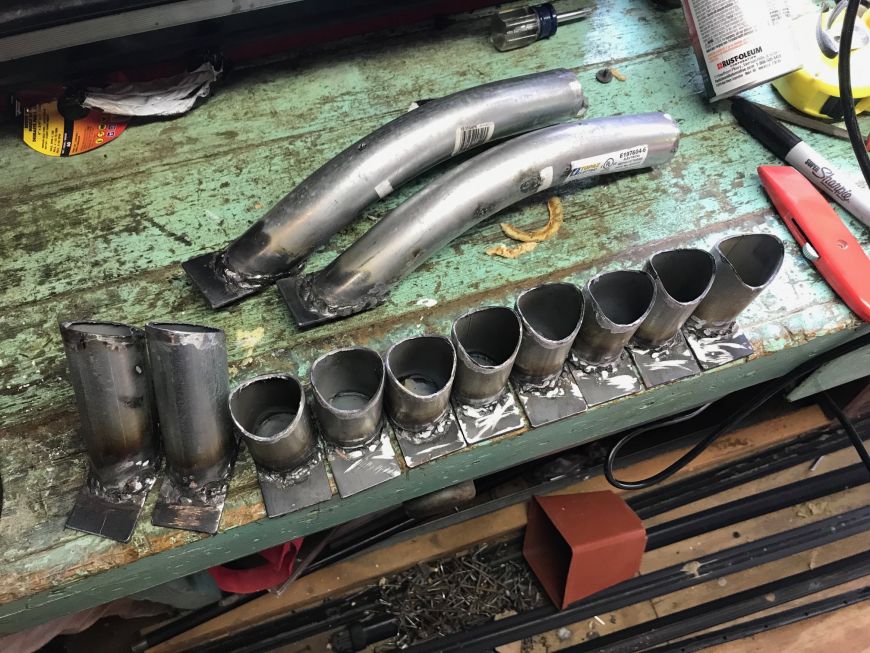
Then I began welding them onto the main length of pipe.

The key to not blowing holes through the metal was perfect fitment. No gaps!
Almost done...

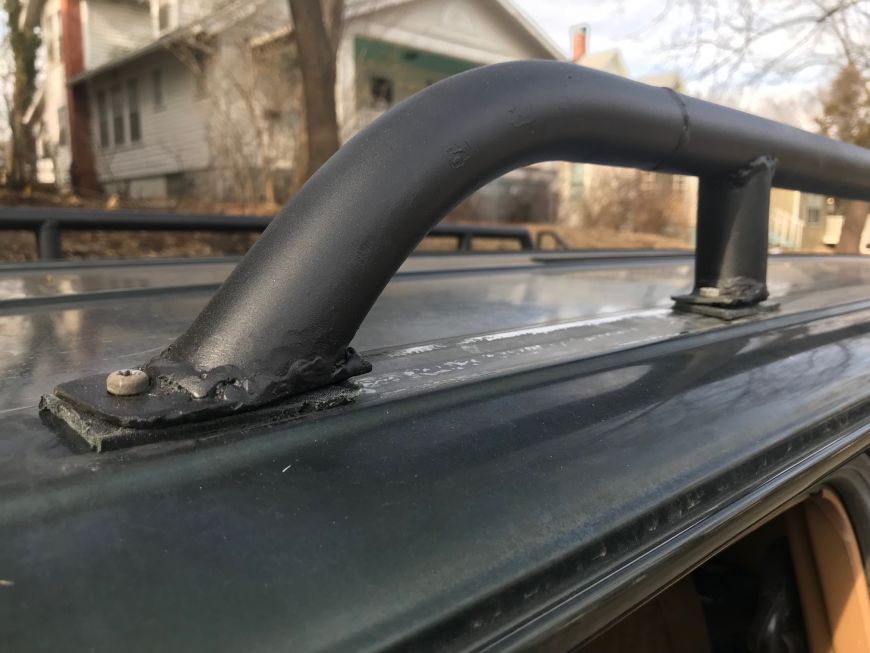
I used the old roof rack bars to know where to drill the holes in the new ones. Then I test fitted it onto the roof to see which holes needed hogged out in which direction. There were multiple ones. Also, they weren't sitting nice and verticle. This is because I forgot to account for the 7 degrees slope in roof where they were bolting to. I made up for this by "padding" one side of the bottom of the mounting plates with several passes of stringer welds right on top of each other to build up about 1/4" of metal. It worked but it's ugly.
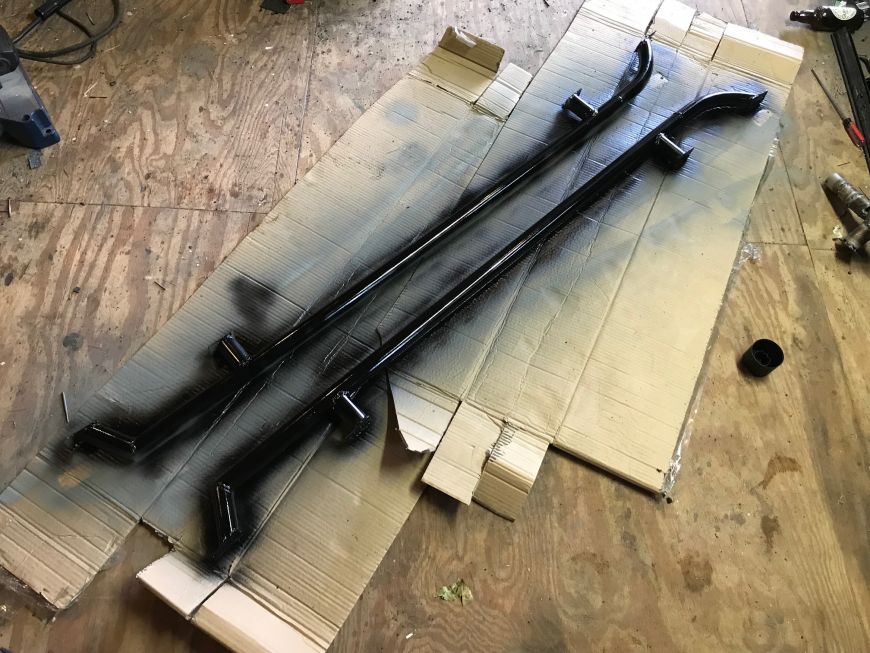
I cleaned them up, shot them with self-etching primer, then spray painted them with rustoleum textured enamel black.
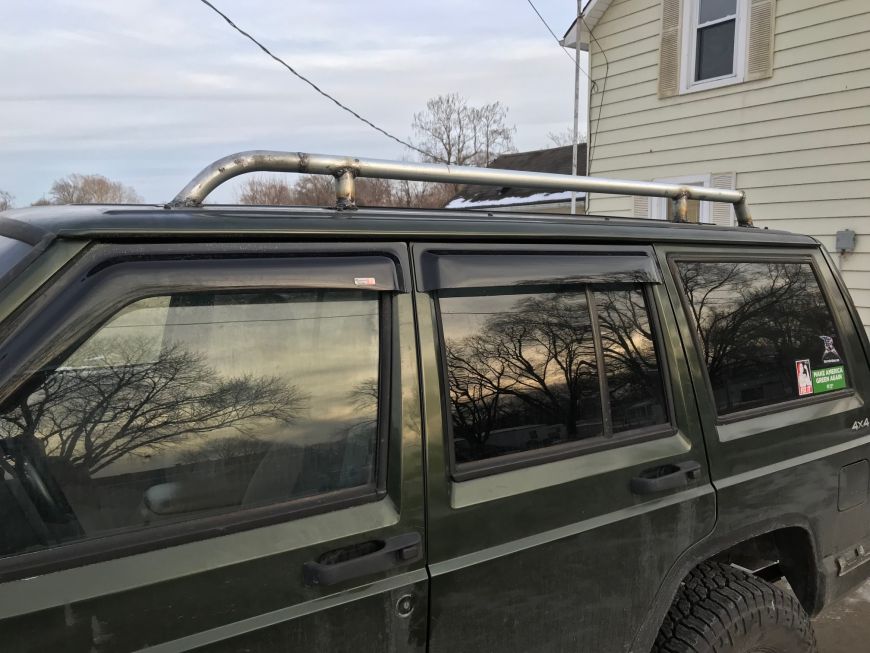
They look great!
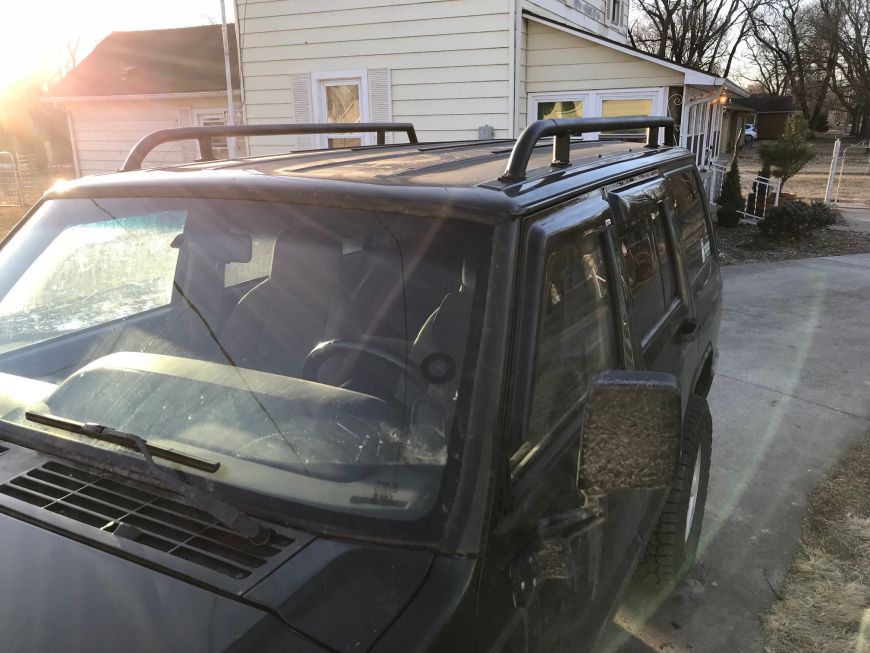
They bolt onto the roof using the nutserts that the stock bars used. Some say the gutter mount is stronger, others say it's just as weak. Both are not super strong though.
However, to get a good snug fit over the stock nutserts that stick up about 1/8" and 1/2" wide, I needed to make some plastic gaskets. I used a strip of plastic from the rear bumper cap that I saved, it was the perfect thickness. I just drilled a 1/2" hole into the 1" x 2" peiced I made. It worked flawlessly. This way, the rails would seat all the way against the sheet metal instead of only the 1/2" nutserts which would have made it very weak and floppy. I can grab the rails and shake the whole vehicle and the roof doesn't seem to flex at all (but it does a tiny amount).
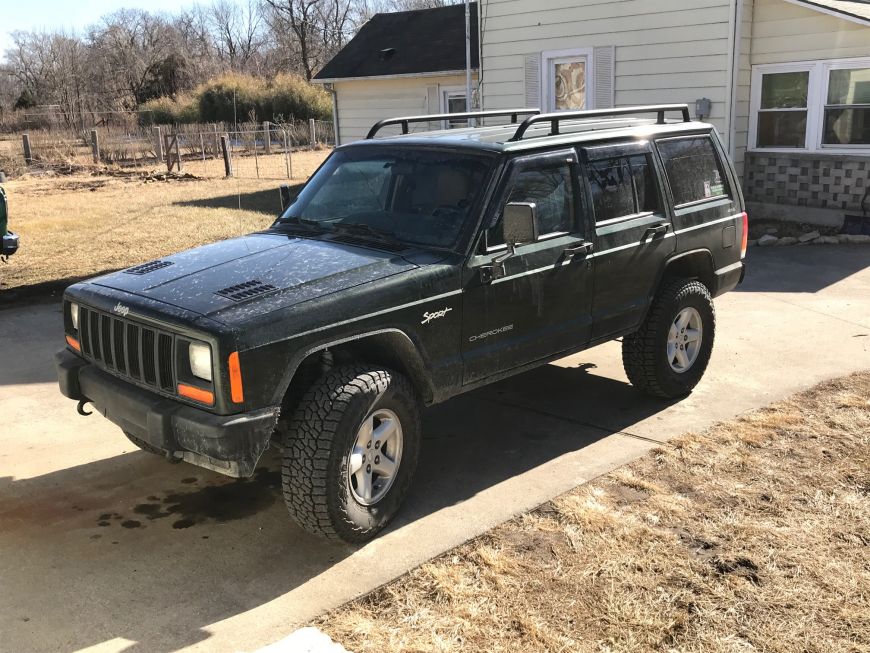
What do you think? They're designed to look a little like the ones found on a FJ Cruiser or Nissan Xterra.
Here's the plans with some dimensions. (If you're going to use these plans, please know that they're not totally perfect as there is a slight curve to the roof that I forgot to account for. Not only is there a very slight curve from front to back, but there is also about a 7 degree slope at the mounting locations of the stock roof rails that these use to bolt to. If those 7 degrees aren't factored into the mounting pads then the rails will not sit nice a verticle and they will look stupid. I had to make up for this later in the build, but it would have saved me a lot of time a grief if I had figured this out sooner.)

Here's the welder I bought:
I chose to use 1.25" galvanized electrical conduit pipe, because it's cheap, available at all hardware stores in long lengths, and it's lighter than black pipe. However, if you choose to do the same, please be aware that the zinc coating will burn off when the pipe is welded, making zinc-oxide fumes, and the fumes can make you very sick for a few days if you inhale them. Keep your head out of the smoke above the pipe when welding, and use lots of ventilation. Also, as much galvanized coating as possible needs to be sanded/grinded off the pipe before welding.
Another reason why I chose electrical conduit pipe is because they have sections that were altready bent at 45 and 90 degree angles.
While I was waiting for the welder to arrive in the mail, I started the task of notching the tubes.
I used my cheap Ryobi miter saw/chop saw but I put an abrasive metal cutting blade on it. Very affordable way to cut presice angles, but it's taking a tole on the saw that's ment to cut wood and not metal.
My meathod of notching the tubes was pretty easy: make two 45� angle cuts, cutting of 1/3 of the diameter of the pipe at each cut. Since 1.25" pipe is actually 1.5" in outer diamter (go figure) that means I needed to cut off 0.5".
Then I just needed to round over the top with my bench grinder. They're not perfect but it's an easy way to notch tube without a tube notcher machine. Oh, and I forgot to account for the slight curve in the roof from front to back and, more importantly, the 7 degree slop from side to side. Now would have been a great time for me to correct this, but I had to make up for this later in the build.
My welder finally came in the mail, so I started practicing. I think everybody makes one of these "tower of horrors" with their first welder to practice on. It turns out that 1/8" 7014 rod was absolutely the wrong choice for thin-wall galvanized pipe. I picked up some 3/32" 6013 rod and it was much better.
First thing I did was I welded some 1/8" flat stock onto the pipes I had notched.
Then I began welding them onto the main length of pipe.
The key to not blowing holes through the metal was perfect fitment. No gaps!
Almost done...
I used the old roof rack bars to know where to drill the holes in the new ones. Then I test fitted it onto the roof to see which holes needed hogged out in which direction. There were multiple ones. Also, they weren't sitting nice and verticle. This is because I forgot to account for the 7 degrees slope in roof where they were bolting to. I made up for this by "padding" one side of the bottom of the mounting plates with several passes of stringer welds right on top of each other to build up about 1/4" of metal. It worked but it's ugly.
I cleaned them up, shot them with self-etching primer, then spray painted them with rustoleum textured enamel black.
They look great!
They bolt onto the roof using the nutserts that the stock bars used. Some say the gutter mount is stronger, others say it's just as weak. Both are not super strong though.
However, to get a good snug fit over the stock nutserts that stick up about 1/8" and 1/2" wide, I needed to make some plastic gaskets. I used a strip of plastic from the rear bumper cap that I saved, it was the perfect thickness. I just drilled a 1/2" hole into the 1" x 2" peiced I made. It worked flawlessly. This way, the rails would seat all the way against the sheet metal instead of only the 1/2" nutserts which would have made it very weak and floppy. I can grab the rails and shake the whole vehicle and the roof doesn't seem to flex at all (but it does a tiny amount).
What do you think? They're designed to look a little like the ones found on a FJ Cruiser or Nissan Xterra.

Senior Member
Joined: Jun 2015
Posts: 549
Likes: 13
From: Chesapeake, VA
Year: 1999
Model: Cherokee (XJ)
Engine: 4.0L
Hey there, saw this on Reddit! Looks great, definitely better than I can do! Are you going to build a rack on top of that? I have a cheap welder as well and actually tried to make a base for a roof rack this weekend as well out of EMT. I ended up gutting it, I lost motivation. I need to practice more first, it turned out okay but I went ahead and purchased a Nates 4x4 roof rack... I'm going to be using the rack alot and don't trust my welds just yet.

Thread Starter
Seasoned Member
Joined: Dec 2016
Posts: 391
Likes: 10
From: Lawrence ****ing Kansas
Year: 1997
Model: Cherokee
Engine: 4.0
Hey there, saw this on Reddit! Looks great, definitely better than I can do! Are you going to build a rack on top of that? I have a cheap welder as well and actually tried to make a base for a roof rack this weekend as well out of EMT. I ended up gutting it, I lost motivation. I need to practice more first, it turned out okay but I went ahead and purchased a Nates 4x4 roof rack... I'm going to be using the rack alot and don't trust my welds just yet.

Thread
Thread Starter
Forum
Replies
Last Post
89jeepxj
Stock XJ Cherokee Tech. All XJ Non-modified/stock questions go here
9
Apr 7, 2019 09:35 AM
G.Simpson
Modified XJ Cherokee Tech
1
Dec 14, 2012 12:03 AM
bigtam
Stock XJ Cherokee Tech. All XJ Non-modified/stock questions go here
5
Jun 17, 2012 09:03 AM
Currently Active Users Viewing This Thread: 1 (0 members and 1 guests)