
Commander headlight conversion, attempted write-up!


Thread Starter
Junior Member
Joined: Feb 2012
Posts: 86
Likes: 0
From: Pennsylvania
Year: 1995
Model: Cherokee
Engine: 4.0
Hello all!
I'm going to make an attempt at making a write-up on how to accomplish the Jeep Commander headlight conversion. As we all know, either ya hate or love it! Anyways, I figured I'd like to make a major change to my XJ! As far as I've searched, no one has made a write-up on this topic...so I'll do my best to do this! I'm doing the swap as I update.

Now...to the information!!
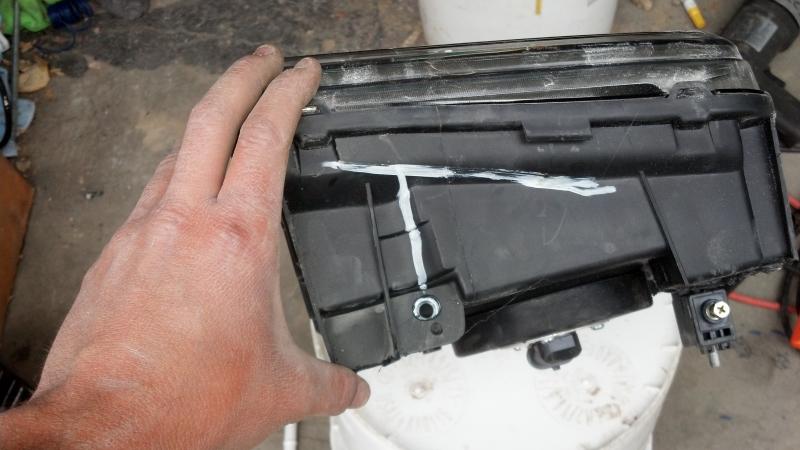
I bought 07-08 Commander headlights(NON-HID) off eBay. Received them, and they weren't damaged..packaged very well!

Tools used so far:
Dremel w/ metal cut-off wheels
Electric grinder w/ metal cut-off wheels
Various screwdrivers
Pliers(needlenose, cutters, channel-locks)
3/8" Sockets(various sizes)
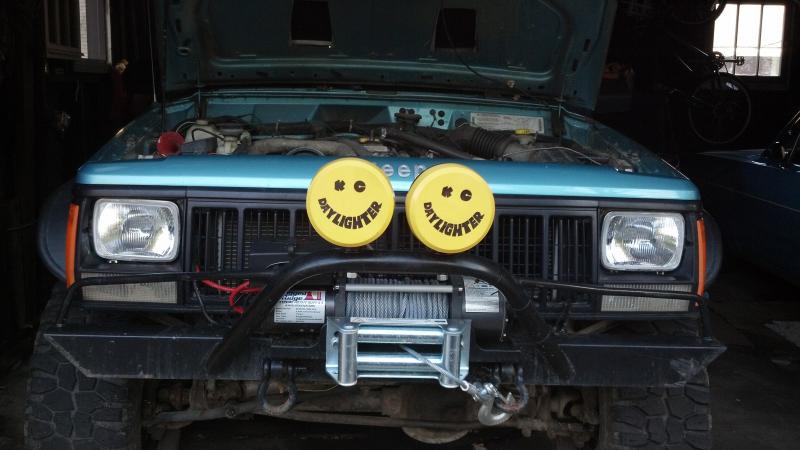
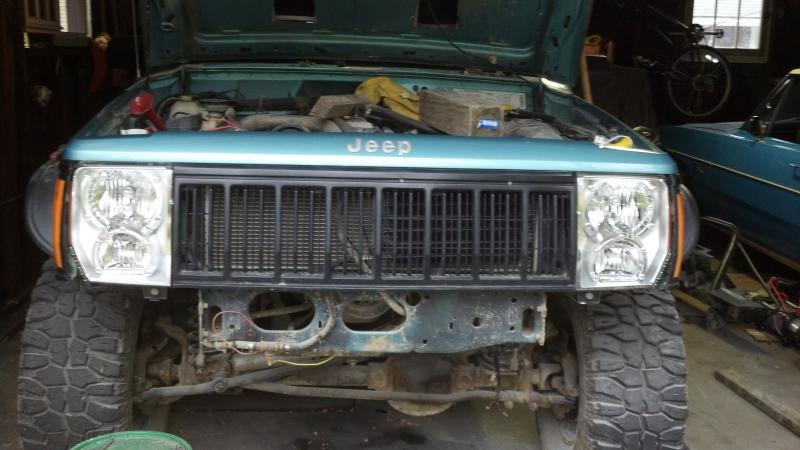
Here's my Jeep..it's a 1995. I've seen the swap done more commonly on the 97+, I figure I'll try my luck with my header panel.
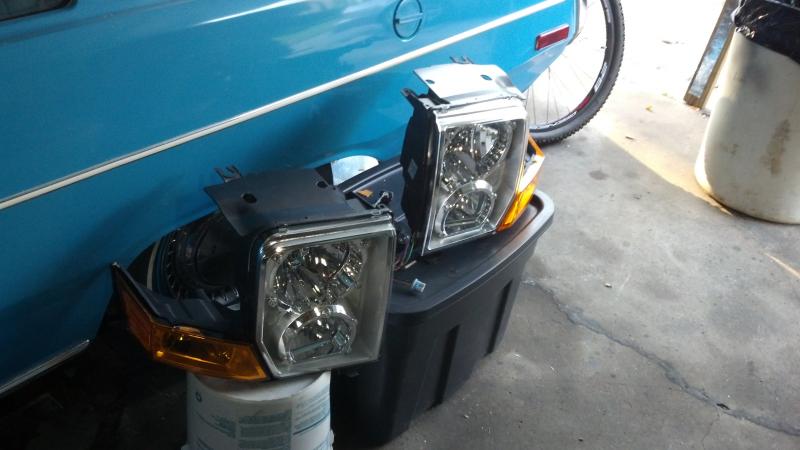
Now, on the new lights, I used a dremel tool to cut off the existing turn signal housings...you can toss them in the trash.

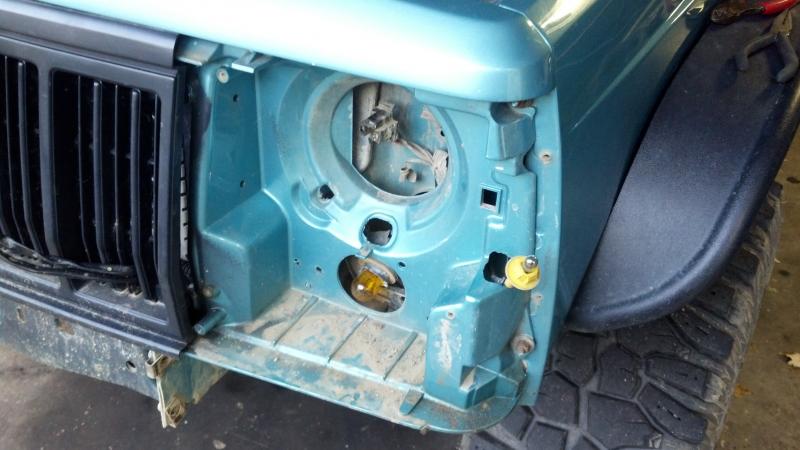
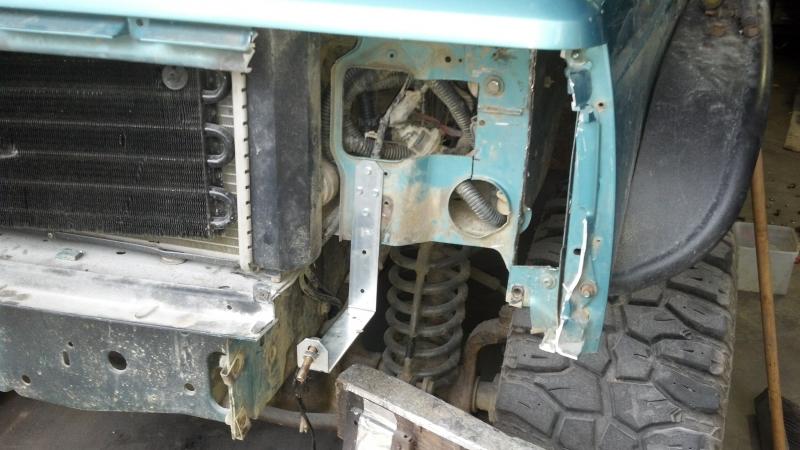
Then, begin removing all the parts from your front end(header panel,bumpers,grille,etc.)
Then, I started trimming and cutting the header panel first. I wanted to try and get the best fitment possible before cutting into the actual body of the Jeep. As you can see, you basically cut out everything on each side. Unfortunately, being so little of material on the driver side of the panel, it got broken while trying to check fitment.
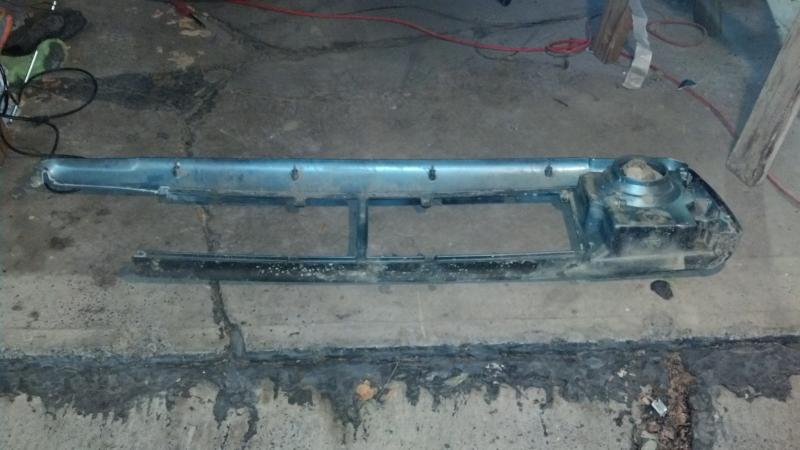
I was able to still use the broken piece, I haven't found an issue with it being broken yet!
Here's the pattern I used for the header panel, you would copy this on both sides. REMEMBER...take little bits at a time. You can keep removing material, but you can't put material back that has been cut off.
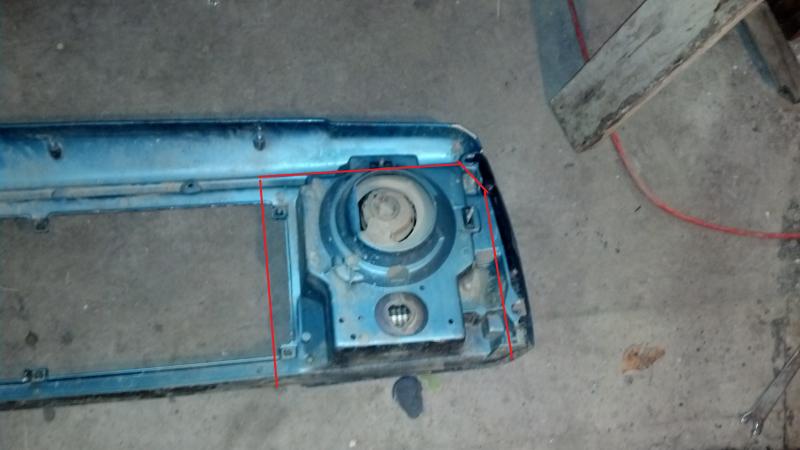
Near the top part of the header where you would see the "JEEP" emblem, I trimmed underneath it to allow the light to slide up some.
Once I got the header panel where I wanted it, now it was time to start cutting on the body. Here are the patterns that I've used and also plan to do..
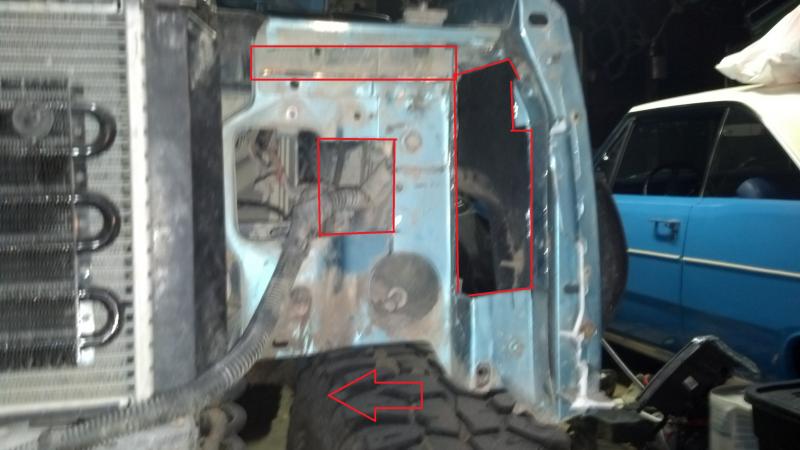
DRIVER SIDE!^^
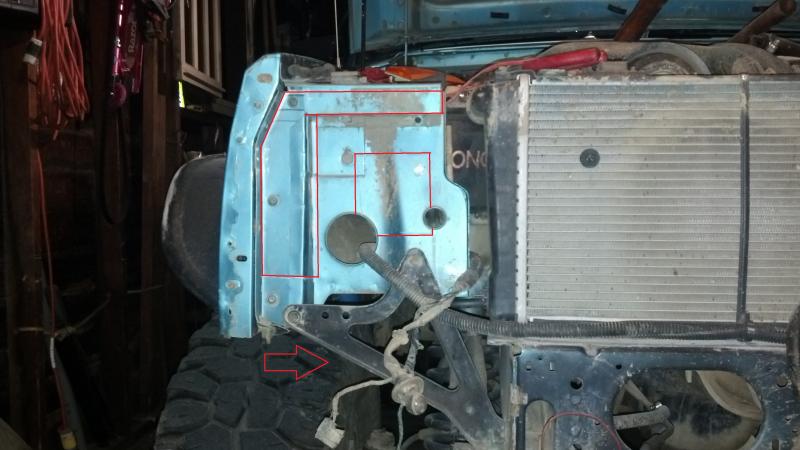
PASSENGER SIDE!^^
Here is where it stands as of right now..
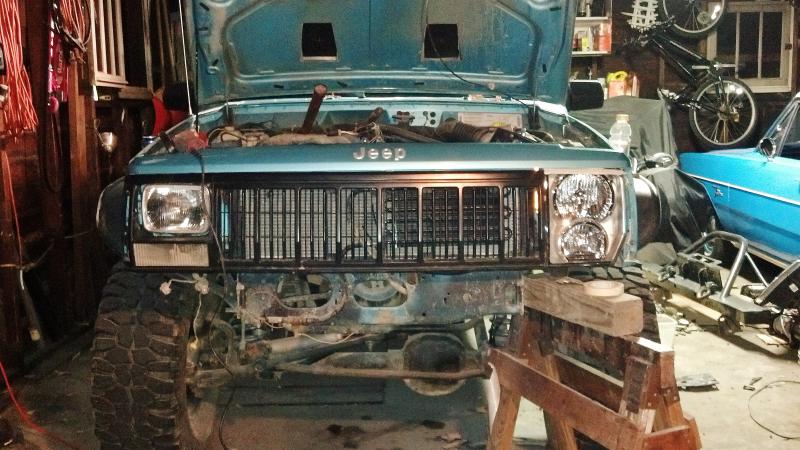
On the top of the light, I placed tape to mark where I can mount it at it's highest point. You can see the light doesn't hang lower than the grille as it does in other swaps. I did my best to try and avoid that, as well as a gap near the top of the header. Unfortunately, there will be that gap where the light has that angled edge. Another thing I've found is the original turn signal housing doesn't match up correct as assumed. So, I plan on using a heat-gun to try and change it's mold some, to reduce the gap on the side of the light.
As far as mounting, I've come up with the idea of using 1 top mounting bolt, which I will photograph tomorrow once it's fully mounted! For a mount on the bottom, I plan on using a piece of bendable flat bar or possibly "L" brackets. I will also document on how I've done this!
For wiring and lighting, you need a front turn signal light, so I'll be using the lower light for that, I'll need to wire that up to the connector! I'll show how that was done, as well as the hi/low light. The current bulbs in the light are 9005 LOW and 9006 HIGH, I'm unsure on which bulbs I'll be using, but I'll update as I go! I plan to complete this tomorrow!
I'm going to make an attempt at making a write-up on how to accomplish the Jeep Commander headlight conversion. As we all know, either ya hate or love it!
Anyways, I figured I'd like to make a major change to my XJ! As far as I've searched, no one has made a write-up on this topic...so I'll do my best to do this! I'm doing the swap as I update.Now...to the information!!
I bought 07-08 Commander headlights(NON-HID) off eBay. Received them, and they weren't damaged..packaged very well!
Tools used so far:
Dremel w/ metal cut-off wheels
Electric grinder w/ metal cut-off wheels
Various screwdrivers
Pliers(needlenose, cutters, channel-locks)
3/8" Sockets(various sizes)
Here's my Jeep..it's a 1995. I've seen the swap done more commonly on the 97+, I figure I'll try my luck with my header panel.
Now, on the new lights, I used a dremel tool to cut off the existing turn signal housings...you can toss them in the trash.
Then, begin removing all the parts from your front end(header panel,bumpers,grille,etc.)
Then, I started trimming and cutting the header panel first. I wanted to try and get the best fitment possible before cutting into the actual body of the Jeep. As you can see, you basically cut out everything on each side. Unfortunately, being so little of material on the driver side of the panel, it got broken while trying to check fitment.
I was able to still use the broken piece, I haven't found an issue with it being broken yet!
Here's the pattern I used for the header panel, you would copy this on both sides. REMEMBER...take little bits at a time. You can keep removing material, but you can't put material back that has been cut off.
Near the top part of the header where you would see the "JEEP" emblem, I trimmed underneath it to allow the light to slide up some.
Once I got the header panel where I wanted it, now it was time to start cutting on the body. Here are the patterns that I've used and also plan to do..
DRIVER SIDE!^^
PASSENGER SIDE!^^
Here is where it stands as of right now..
On the top of the light, I placed tape to mark where I can mount it at it's highest point. You can see the light doesn't hang lower than the grille as it does in other swaps. I did my best to try and avoid that, as well as a gap near the top of the header. Unfortunately, there will be that gap where the light has that angled edge. Another thing I've found is the original turn signal housing doesn't match up correct as assumed. So, I plan on using a heat-gun to try and change it's mold some, to reduce the gap on the side of the light.
As far as mounting, I've come up with the idea of using 1 top mounting bolt, which I will photograph tomorrow once it's fully mounted! For a mount on the bottom, I plan on using a piece of bendable flat bar or possibly "L" brackets. I will also document on how I've done this!
For wiring and lighting, you need a front turn signal light, so I'll be using the lower light for that, I'll need to wire that up to the connector! I'll show how that was done, as well as the hi/low light. The current bulbs in the light are 9005 LOW and 9006 HIGH, I'm unsure on which bulbs I'll be using, but I'll update as I go! I plan to complete this tomorrow!


Seasoned Member
Joined: Jun 2011
Posts: 319
Likes: 3
From: Key Peninsula, WA
Year: 1997
Model: Grand Cherokee
Engine: 4.0
Regardless of whether a person likes or dislikes the looks of the Commander headlights you are doing an awesome job of fitting them in nice and tight and the write up and pics are great.
Lookin forward to seeing it progress along and the final results.
Lookin forward to seeing it progress along and the final results.


Junior Member
Joined: Aug 2013
Posts: 75
Likes: 1
Model: Cherokee
YESSSSSSS!!!!! finally a step step install of these commander headlights!!!! I LOVE these lights am planning this MUST HAVE facelift/mod on my 2door 90! liking how you went about keeping the headlight in line with the grille.just book marked you MUCH NEEDED/APPRECIATED write-uplooking forward to the rest of the install!!!
Thread Starter
Junior Member
Joined: Feb 2012
Posts: 86
Likes: 0
From: Pennsylvania
Year: 1995
Model: Cherokee
Engine: 4.0
Thank you everyone for the kind words! I appreciate all comments regardless good or bad!
Anyways...got the project completed today!
Todays work...
Cut out all outlined patterns on body & header panel. Then began the brackets!
MOUNTING: I recommend doing the lower mount first!
On the headlights, after all of the excess plastic has been cut off, you're left with (2) possibilities for mounts, which I took advantage of! All I did was drill a hole through the top of the core support to line up to the hole in the headlight, hence the white marking paint. To make it easier, I used a hot glue gun to stick the nut to the headlight for easy of bolt it together later!

And then on the bottom of the housing, there will be a tab with a hole in it. I also utilized that tab for mounting.
I went to Lowe's and got (2) "L" brackets, they measured probably around 4"-5" in length for each end with various tiny holes in it, which I used for mounting. I used self-tapping screws to fasten the "L" bracket to the body. And then a bolt and nut for the bottom. If used correctly, it can also be used as an adjuster to tilt the headlight up/down with the correct parts.
Anyways...got the project completed today!
Todays work...
Cut out all outlined patterns on body & header panel. Then began the brackets!
MOUNTING: I recommend doing the lower mount first!
On the headlights, after all of the excess plastic has been cut off, you're left with (2) possibilities for mounts, which I took advantage of! All I did was drill a hole through the top of the core support to line up to the hole in the headlight, hence the white marking paint. To make it easier, I used a hot glue gun to stick the nut to the headlight for easy of bolt it together later!
And then on the bottom of the housing, there will be a tab with a hole in it. I also utilized that tab for mounting.
I went to Lowe's and got (2) "L" brackets, they measured probably around 4"-5" in length for each end with various tiny holes in it, which I used for mounting. I used self-tapping screws to fasten the "L" bracket to the body. And then a bolt and nut for the bottom. If used correctly, it can also be used as an adjuster to tilt the headlight up/down with the correct parts.
Thread Starter
Junior Member
Joined: Feb 2012
Posts: 86
Likes: 0
From: Pennsylvania
Year: 1995
Model: Cherokee
Engine: 4.0
WIRING UP YOUR LIGHTS:
This is how I wired my lights, and will probably revise it later on, but it does work this way! I have it wired so I can use both beams on the Commander headlight 9005/9006. I chose to go this route so I could still have a High & Low beam, others have gone other routes..to each their own!
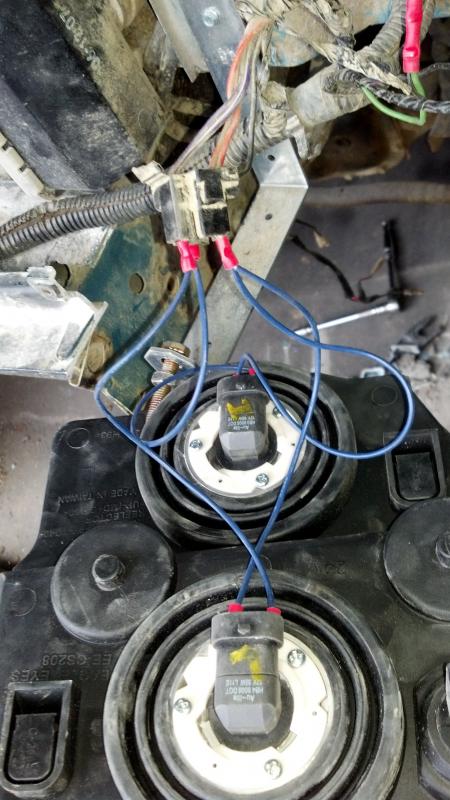
To accomplish this, I used male/female electrical connectors. (4) 4"-5" lengths of wire per headlight assembly(LEFT & RIGHT)
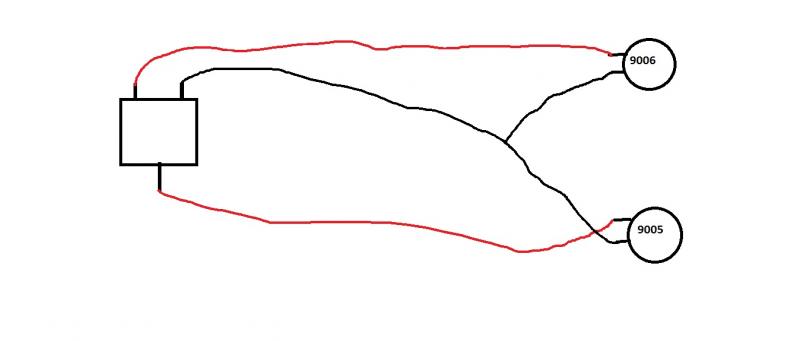
Here is an extremely vague diagram of how it's wired!^^
Basically, you need to identify on the original XJ plug, which wire does what. Mine had a red wire, black wire, & blue wire. Identify which wire is the low beam signal wire, attach a wire to the terminal using a male end then connect it to the low beam light on the Commander bulb. Then, identify which wire on the XJ plug is the high beam signal wire, then attach it to the high beam Commander bulb. Then, for the grounding. Identify the ground wire on the XJ plug, attach a male connector into it with a wire coming out, then on the end of that wire you will attach (2) wires to it. These will attach to the ground prong of each Commander bulb. Doing this, you now will have a Low beam & a High beam bulb.
Now, since you have used both bulb sockets for Low/High beams, you need a front turn signal!
I came up with the idea of using a LED strip for a turn signal. I got one at Autozone, it's the flat stick-on type with 2 wires for each LED strip about 5"-7" long. You can kind of see them in this picture! I stuck them on at the angled part of the light since it was a perfect fit
Since I did this, I unfortunately lost a front "running light", however they do function perfectly as a turn signal!
How I did it...
Find the front turn signal bulb & socket harness, strip back all the rubber & tape til you get to the actual wires. Cut off the old bulb socket, then splice together the LED lights harness to the existing turn signal harness. You will need to use a test light to identify which wire does what. When using the test light, when you turn the marker lights on, the test light will illuminate SOLID on when you touch 1 of the 3 wires. When using the test light, when you turn on the turn signals, the test light will illuminate a blinking light when you touch 1 of the 3 wires. The remaining wire is your ground. Once you wire that up, you now have front turn signals!
Once everything is all wired & mounted up..time to put everything back together! Winches,Bumpers,etc.
FINISHED PRODUCT!
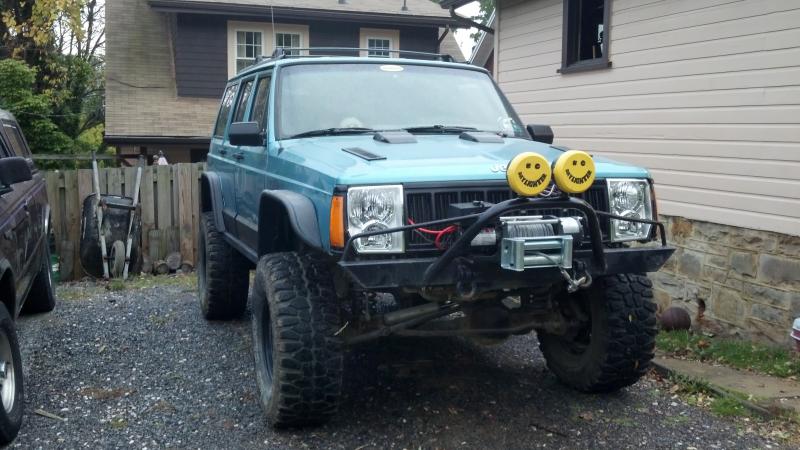
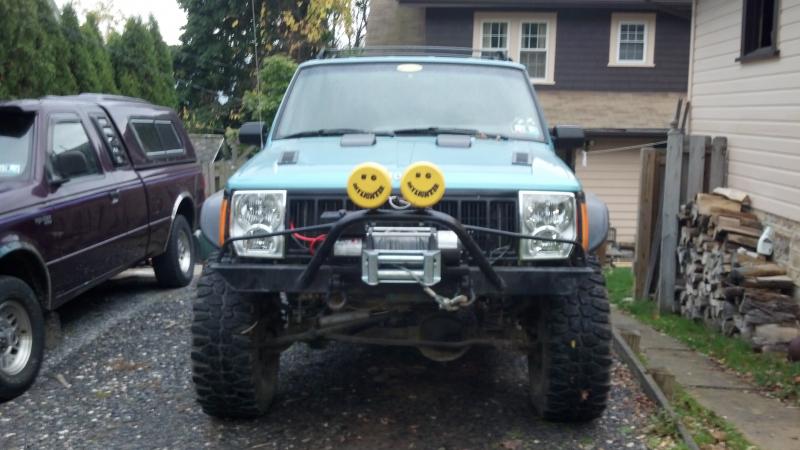

You will find on the final product, that your side marker panels do not line up PERFECTLY to fill all the gaps...be aware of this. I do have plans to reduce these gaps at a later date just using weather seals or perhaps an adhesive foam pad. That will only be for the side of the light, not at the angle part. I'm unsure what I'll do to correct that gap.
Overall, they turned out great! Took 12hrs total, including taking breaks and BSing with friends.
ENJOY!
This is how I wired my lights, and will probably revise it later on, but it does work this way! I have it wired so I can use both beams on the Commander headlight 9005/9006. I chose to go this route so I could still have a High & Low beam, others have gone other routes..to each their own!
To accomplish this, I used male/female electrical connectors. (4) 4"-5" lengths of wire per headlight assembly(LEFT & RIGHT)
Here is an extremely vague diagram of how it's wired!^^
Basically, you need to identify on the original XJ plug, which wire does what. Mine had a red wire, black wire, & blue wire. Identify which wire is the low beam signal wire, attach a wire to the terminal using a male end then connect it to the low beam light on the Commander bulb. Then, identify which wire on the XJ plug is the high beam signal wire, then attach it to the high beam Commander bulb. Then, for the grounding. Identify the ground wire on the XJ plug, attach a male connector into it with a wire coming out, then on the end of that wire you will attach (2) wires to it. These will attach to the ground prong of each Commander bulb. Doing this, you now will have a Low beam & a High beam bulb.
Now, since you have used both bulb sockets for Low/High beams, you need a front turn signal!
I came up with the idea of using a LED strip for a turn signal. I got one at Autozone, it's the flat stick-on type with 2 wires for each LED strip about 5"-7" long. You can kind of see them in this picture! I stuck them on at the angled part of the light since it was a perfect fit
Since I did this, I unfortunately lost a front "running light", however they do function perfectly as a turn signal!
How I did it...
Find the front turn signal bulb & socket harness, strip back all the rubber & tape til you get to the actual wires. Cut off the old bulb socket, then splice together the LED lights harness to the existing turn signal harness. You will need to use a test light to identify which wire does what. When using the test light, when you turn the marker lights on, the test light will illuminate SOLID on when you touch 1 of the 3 wires. When using the test light, when you turn on the turn signals, the test light will illuminate a blinking light when you touch 1 of the 3 wires. The remaining wire is your ground. Once you wire that up, you now have front turn signals!
Once everything is all wired & mounted up..time to put everything back together! Winches,Bumpers,etc.
FINISHED PRODUCT!
You will find on the final product, that your side marker panels do not line up PERFECTLY to fill all the gaps...be aware of this. I do have plans to reduce these gaps at a later date just using weather seals or perhaps an adhesive foam pad. That will only be for the side of the light, not at the angle part. I'm unsure what I'll do to correct that gap.
Overall, they turned out great! Took 12hrs total, including taking breaks and BSing with friends.
ENJOY!
Trending Topics


Thread Starter
Junior Member
Joined: Feb 2012
Posts: 86
Likes: 0
From: Pennsylvania
Year: 1995
Model: Cherokee
Engine: 4.0
Thanks again for all the comments! Much appreciated! And the blue car in the garage is a 1972 Dodge Dart Swinger, original 318 V8, auto, all stock!
Thread Starter
Junior Member
Joined: Feb 2012
Posts: 86
Likes: 0
From: Pennsylvania
Year: 1995
Model: Cherokee
Engine: 4.0
The commander lights came with the bulbs & harnesses for a commander. I bought 'em off ebay. Here's the store: http://www.ebay.com/usr/westcoastlightingusa