
Project "Hippo"...black 99 XJ

Thread Starter
CF Veteran
Joined: Jan 2011
Posts: 1,894
Likes: 4
From: Las Vegas
Year: 1999
Model: Cherokee
Engine: 4.0
Inspired by many of the cherokeeforum.com's members and some from other sites leads me to start this thread.
Members who have taken the time to advise , do write-ups and taking a lot of pics with their greasy hands……..I THANK YOU!
I'll be posting some pics, write-ups, links and discussions from this and other sites….not sure if I'm allow to without their permission. If for some reasons is against the "rules and regulations", I apologize and would remove them promptly.
"Hippo"…..that's the name given by my gf, cause it spent most of the time in the garage like this…..

Started this thread to share with you my progress on building a camping/expo rig and hoping to get some advice along the way.
Is also a little project to keep myself away from trouble…..perks of living in the Sin City.
Being a COMPLETE NEWBIE, please bear with me if I have some totally stupid questions.
Here is Hippo….
1999 Jeep Cherokee XJ Black w/148k miles
Auto/NP231
HP30 and C8.25 with 3.55 gear
Mostly stock except with some oversized tires and aftermarket wheels, not the best pic but here it is….
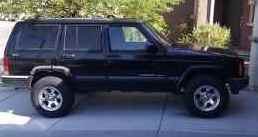
Current
Took it for a 30 min test drive….
No overheating ,
No Death Wobble
Transmission smooth except a "clunk" noise when shifting between P and D (hoping is u-joints)
Airbag light on, no horn (cockspring maybe)
Leaks everywhere…..that's when you know you drive a Jeep huh? lol.
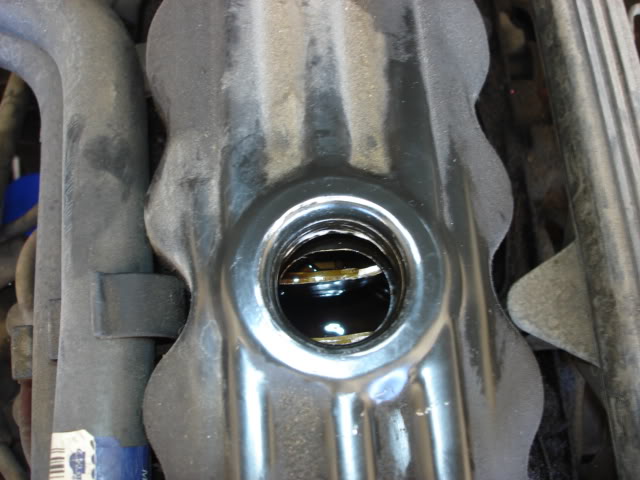
Looks scary but it wasn't milky and looking at inside the valve cover and dip stick leads me to believe (or at least hope) a good cooling system flush will do the trick.
......
Here are some of my plans,
>Cooling System
>H4 Headlamp Upgrade
>Disc Brake Conversion
>Fix leaks
>Distributor Gasket Replacement
>Oil Pressure Sending Unit Elbow Leak Fix
>D30 Pinion Seal Replacement
>RMS & Timing Chain
>Transmission Filter & Cooler
>4.5" Lift w/32"
>RC Control Arms Drop Brackets
>ZJ Tierod Upgrade
>Steering Gear Box Adjustment
>SYE + Adam's Custom Driveshaft
>Exhaust Manifold
>Cat/Muffler
>Lebaron Hood Vents
>D30 Axle U-joints Replacement
>Cowl Cold Air Intake
>Head Gasket
Members who have taken the time to advise , do write-ups and taking a lot of pics with their greasy hands……..I THANK YOU!
I'll be posting some pics, write-ups, links and discussions from this and other sites….not sure if I'm allow to without their permission. If for some reasons is against the "rules and regulations", I apologize and would remove them promptly.
"Hippo"…..that's the name given by my gf, cause it spent most of the time in the garage like this…..
Started this thread to share with you my progress on building a camping/expo rig and hoping to get some advice along the way.
Is also a little project to keep myself away from trouble…..perks of living in the Sin City.
Being a COMPLETE NEWBIE, please bear with me if I have some totally stupid questions.
Here is Hippo….
1999 Jeep Cherokee XJ Black w/148k miles
Auto/NP231
HP30 and C8.25 with 3.55 gear
Mostly stock except with some oversized tires and aftermarket wheels, not the best pic but here it is….
Current
Took it for a 30 min test drive….
No overheating ,
No Death Wobble
Transmission smooth except a "clunk" noise when shifting between P and D (hoping is u-joints)
Airbag light on, no horn (cockspring maybe)
Leaks everywhere…..that's when you know you drive a Jeep huh? lol.
Looks scary but it wasn't milky and looking at inside the valve cover and dip stick leads me to believe (or at least hope) a good cooling system flush will do the trick.
......
Here are some of my plans,
>Cooling System
>H4 Headlamp Upgrade
>Disc Brake Conversion
>Fix leaks
>Distributor Gasket Replacement
>Oil Pressure Sending Unit Elbow Leak Fix
>D30 Pinion Seal Replacement
>RMS & Timing Chain
>Transmission Filter & Cooler
>4.5" Lift w/32"
>RC Control Arms Drop Brackets
>ZJ Tierod Upgrade
>Steering Gear Box Adjustment
>SYE + Adam's Custom Driveshaft
>Exhaust Manifold
>Cat/Muffler
>Lebaron Hood Vents
>D30 Axle U-joints Replacement
>Cowl Cold Air Intake
>Head Gasket
Last edited by BotakBeng; Sep 5, 2012 at 11:33 AM.
Thread Starter
CF Veteran
Joined: Jan 2011
Posts: 1,894
Likes: 4
From: Las Vegas
Year: 1999
Model: Cherokee
Engine: 4.0
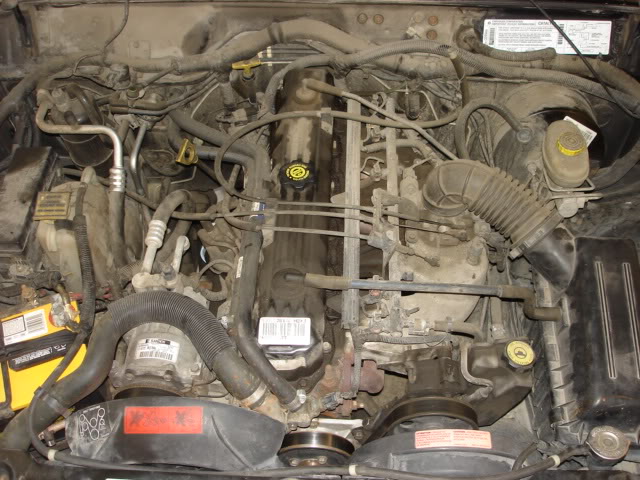
First thing i did was to work on the cooling system.
Here is the shopping list,
*Water Pump #TFW42004
*Radiator Cap #10331
*Thermostat #45359
*Thermostat Housing #85180
*Thermostat Housing Gasket #35630
*Water Pump Inlet Tube #56398
*Upper Radiator Hose #23283
*Lower Radiator Hose #21615
*Heater Inlet #19038
*Heater Outlet #19039
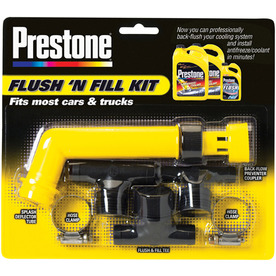
Before i replace the parts i when ahead and flush the system following this write-up, except i remove the thermostat (as i was unable to get my engine to warm up).
Sorry i didnt take any pics as i was to busy running to and from my PC looking at the instruction....but i promise there will be alot of pics to come .
.
Here is the shopping list,
*Water Pump #TFW42004
*Radiator Cap #10331
*Thermostat #45359
*Thermostat Housing #85180
*Thermostat Housing Gasket #35630
*Water Pump Inlet Tube #56398
*Upper Radiator Hose #23283
*Lower Radiator Hose #21615
*Heater Inlet #19038
*Heater Outlet #19039
Before i replace the parts i when ahead and flush the system following this write-up, except i remove the thermostat (as i was unable to get my engine to warm up).
Sorry i didnt take any pics as i was to busy running to and from my PC looking at the instruction....but i promise there will be alot of pics to come
.
Last edited by BotakBeng; Mar 18, 2012 at 01:57 PM.


Thread Starter
CF Veteran
Joined: Jan 2011
Posts: 1,894
Likes: 4
From: Las Vegas
Year: 1999
Model: Cherokee
Engine: 4.0
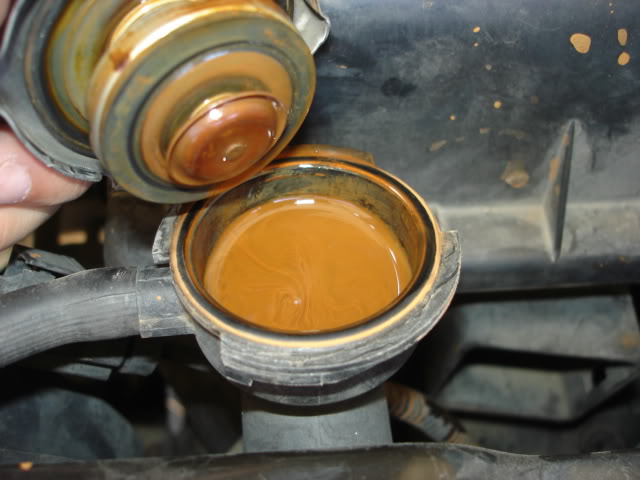
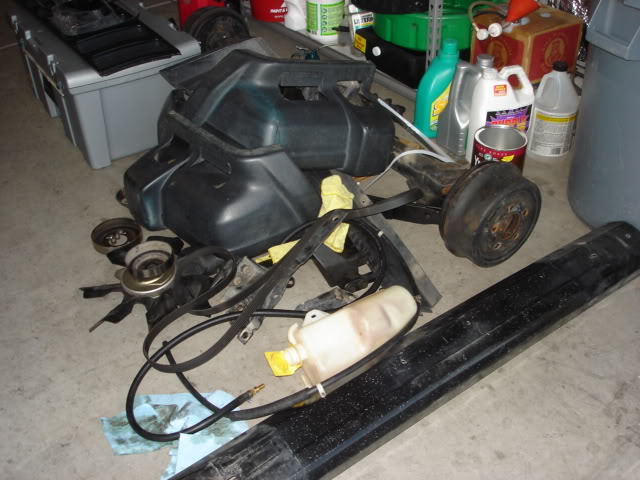
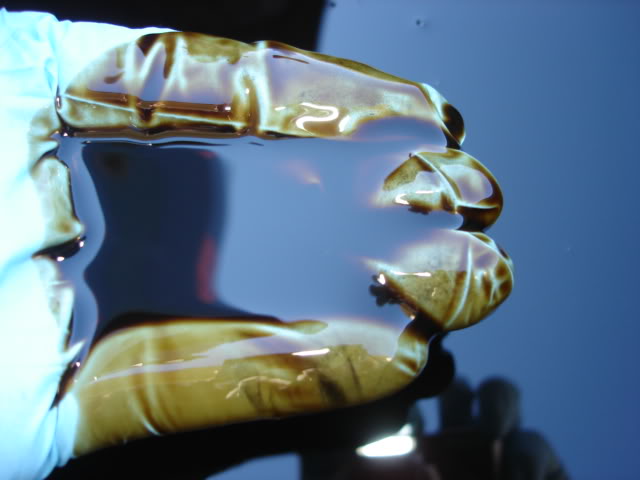
Is not as bad is it looks.
After flushing, i fill it up with water and my newly purchased parts but in a day, the water turned brown again....did a few more flushes, thinking i didn't do a good job but it didn't help.
My conclusion...
Either i have a ready corroded radiation or i could have a head gasket leak .
.
Bite the bullet and purchase a radiator from Napa, drives for a few days and coolant is all nice and green.
First repair = SUCCESS!
After flushing, i fill it up with water and my newly purchased parts but in a day, the water turned brown again....did a few more flushes, thinking i didn't do a good job but it didn't help.
My conclusion...
Either i have a ready corroded radiation or i could have a head gasket leak
.Bite the bullet and purchase a radiator from Napa, drives for a few days and coolant is all nice and green
.First repair = SUCCESS!
Thread Starter
CF Veteran
Joined: Jan 2011
Posts: 1,894
Likes: 4
From: Las Vegas
Year: 1999
Model: Cherokee
Engine: 4.0
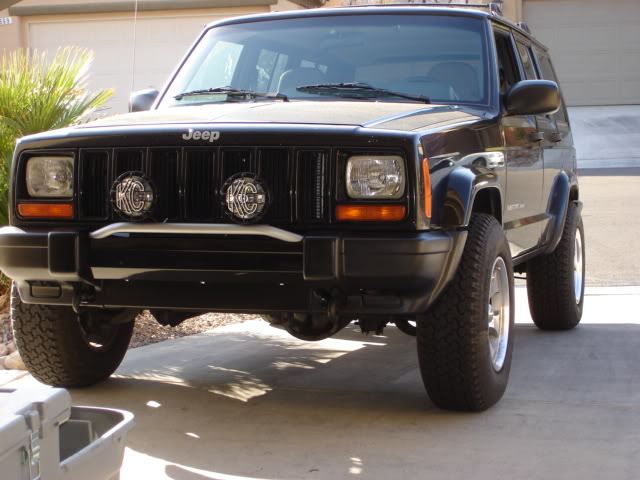
The first time i drove the Jeep after sunset was like......WTF!
There is like NO headlight at all!
After some readings, my pocket ended up a little lighter.
• Wiring Hardness
• IPF housing
• Hella 9003/H4 60/55w Bulbs
It was day and night.....highly recommend for everyone!
I also bought some almost new KC lights from CL as well as from Amazon and will be installing it as soon as i find time to install my Detour Bumper Lite Bar (inspired by Stevieboy).
That should give me enough lights.
Last edited by BotakBeng; Apr 26, 2012 at 05:26 PM.
Thread Starter
CF Veteran
Joined: Jan 2011
Posts: 1,894
Likes: 4
From: Las Vegas
Year: 1999
Model: Cherokee
Engine: 4.0
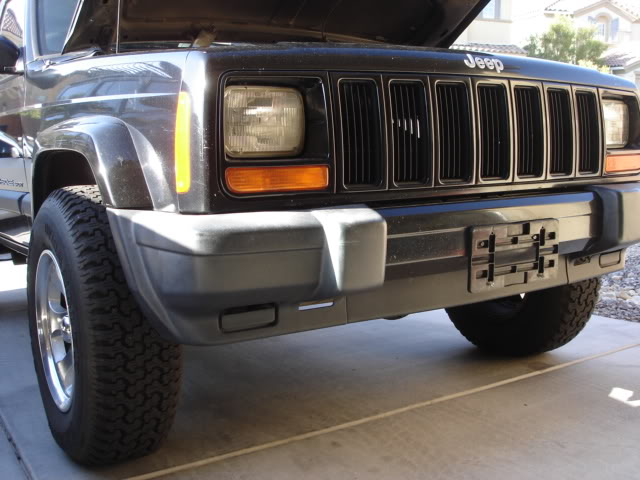
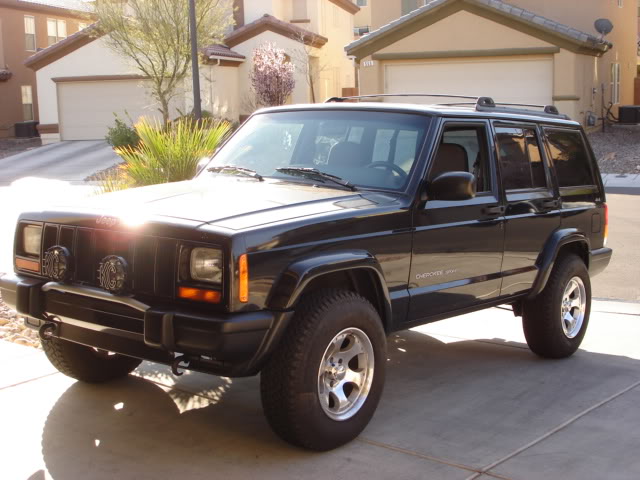
Scored a set of OEM tow hooks on CL.
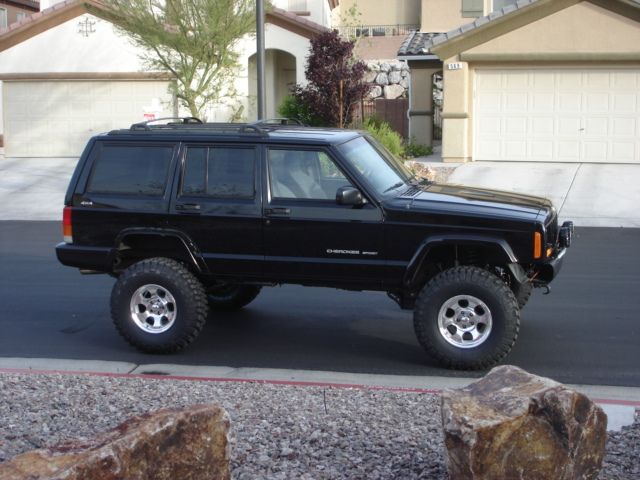
After getting new hardward to replace the torx bolts and some paint from AZ, the exterior mod begins....
Before...
After...

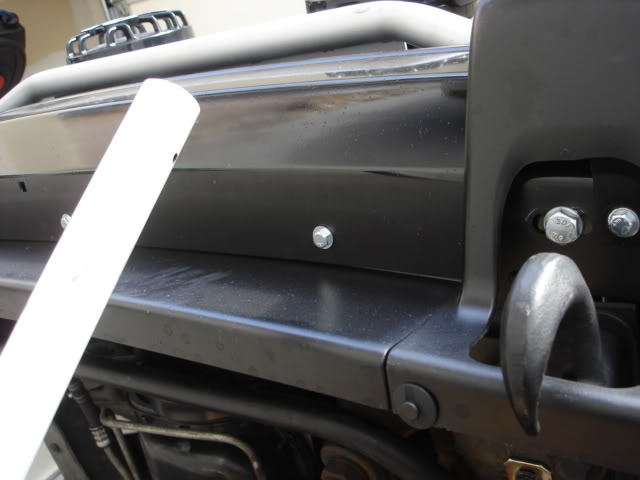
Done!
>Detour Lite Bar painted and installed.
>KC lights installed
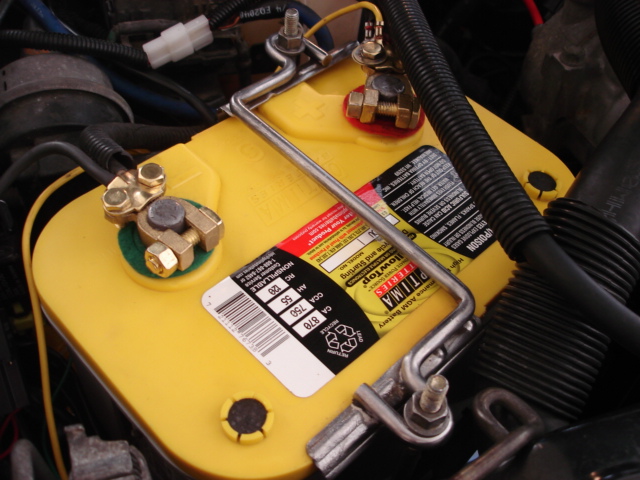
>New Optimal Yellow Top
>Bumper and Caps painted
>Side molding trims removed
>OEM Tow Hooks installed
After getting new hardward to replace the torx bolts and some paint from AZ, the exterior mod begins....
Before...
After...
Done!
>Detour Lite Bar painted and installed.
>KC lights installed
>New Optimal Yellow Top
>Bumper and Caps painted
>Side molding trims removed
>OEM Tow Hooks installed
Last edited by BotakBeng; Sep 5, 2012 at 11:37 AM.
Trending Topics
Thread Starter
CF Veteran
Joined: Jan 2011
Posts: 1,894
Likes: 4
From: Las Vegas
Year: 1999
Model: Cherokee
Engine: 4.0
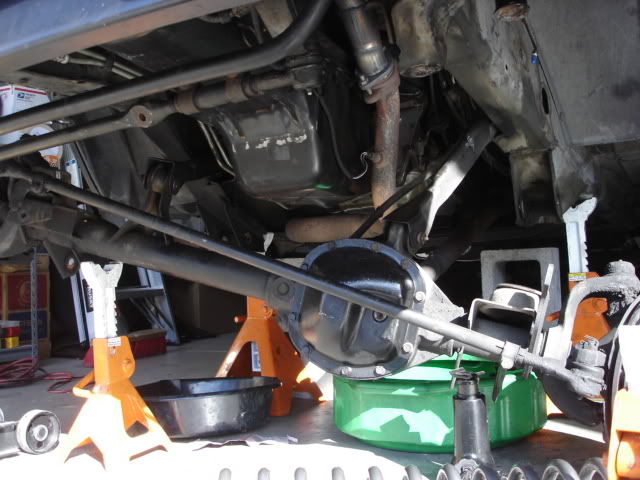
Since i didn't know much about the maintenance record on the Jeep, i thought a good engine and tranny flush should be in order.
Capacity
Engine> 6qt
Tranny> 4qt (AW-4 If fluid/filter change was performed)
I went with 5qt of 10w30 (conventional) + 1 qt of Marvel Mystery Oil and Dex/Merc for my tranny.
I went old school....change fluid every 500 miles x3.
There after, i plan on using MobilOne 10w30 and MobilOne M1-301 (oversized oil filter) and will be replacing the tranny filter as well as installing a tranny cooler.
Couldnt find a pic of the tranny fluid but engine oil looks fine (was kind of concern with the brown coolant to begin with).
Capacity
Engine> 6qt
Tranny> 4qt (AW-4 If fluid/filter change was performed)
I went with 5qt of 10w30 (conventional) + 1 qt of Marvel Mystery Oil and Dex/Merc for my tranny.
I went old school....change fluid every 500 miles x3
.There after, i plan on using MobilOne 10w30 and MobilOne M1-301 (oversized oil filter) and will be replacing the tranny filter as well as installing a tranny cooler.
Couldnt find a pic of the tranny fluid but engine oil looks fine (was kind of concern with the brown coolant to begin with).
Last edited by BotakBeng; Mar 20, 2012 at 09:26 AM.
Thread Starter
CF Veteran
Joined: Jan 2011
Posts: 1,894
Likes: 4
From: Las Vegas
Year: 1999
Model: Cherokee
Engine: 4.0
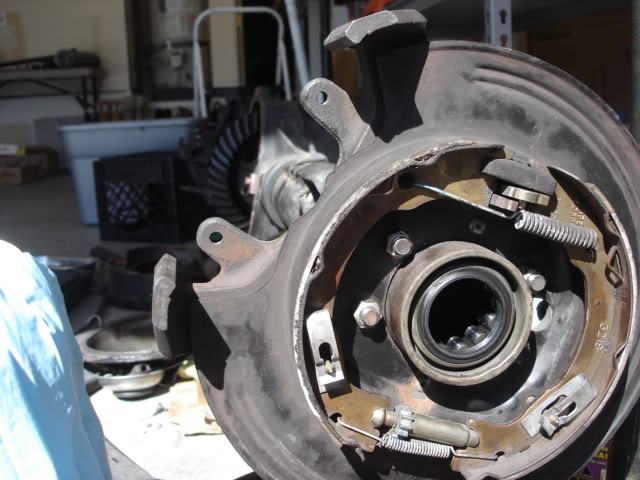
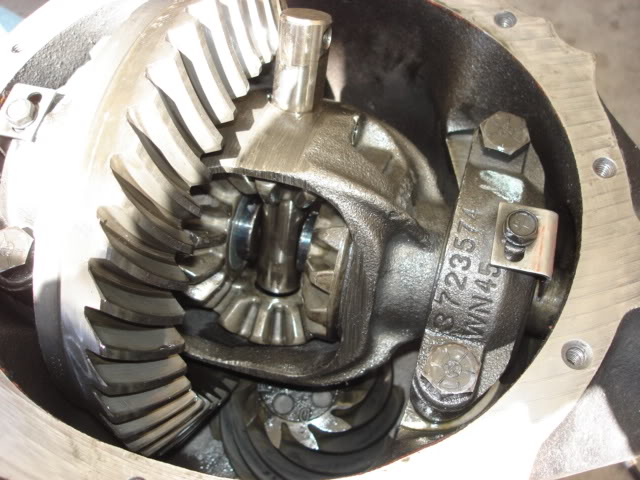
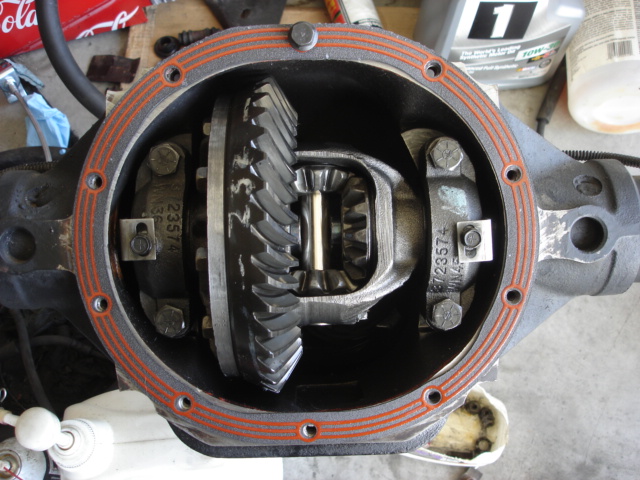
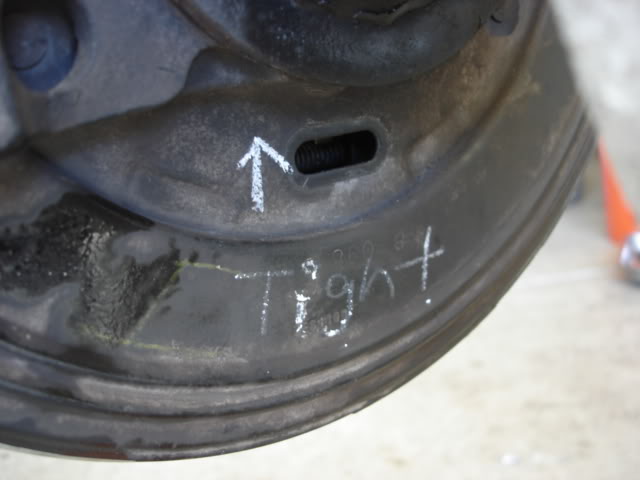
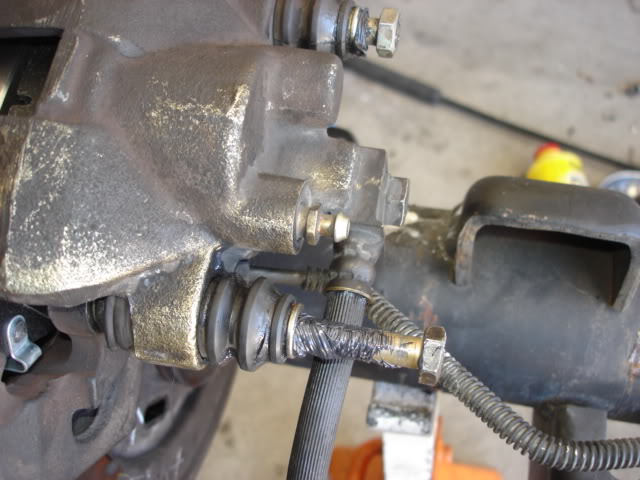
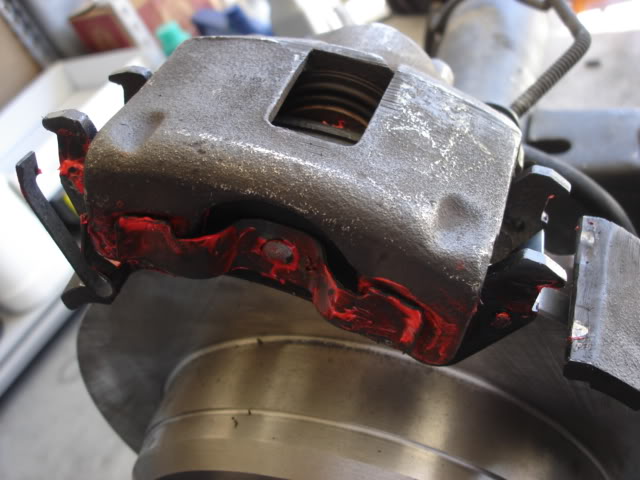
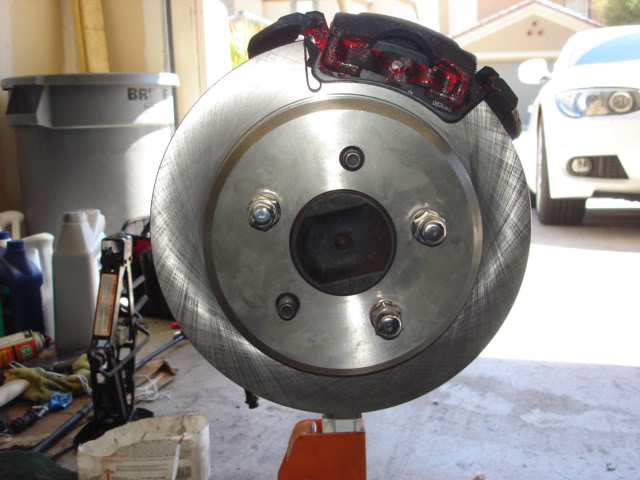
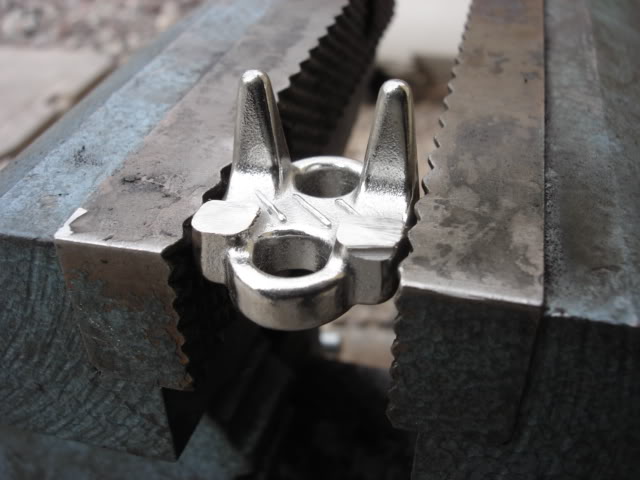
A little side job that i running now....ZJ Disc Brake Conversion on a C8.25.
Here are the parts that i acquired,
>98 ZJ Backing Plates
>Bracket w/bolts
>Calipers w/soft brake lines
>Caliper bolts
Additional parts required
>ZJ wheel lug studs(or dorman#610-234)
>ZJ proportional valve/spring A must IMHO.
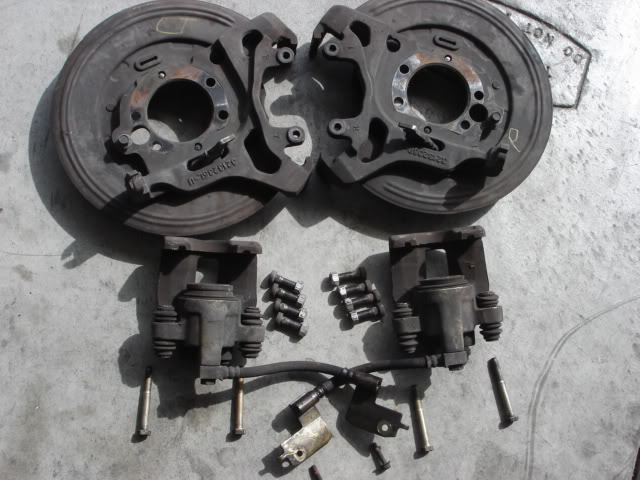
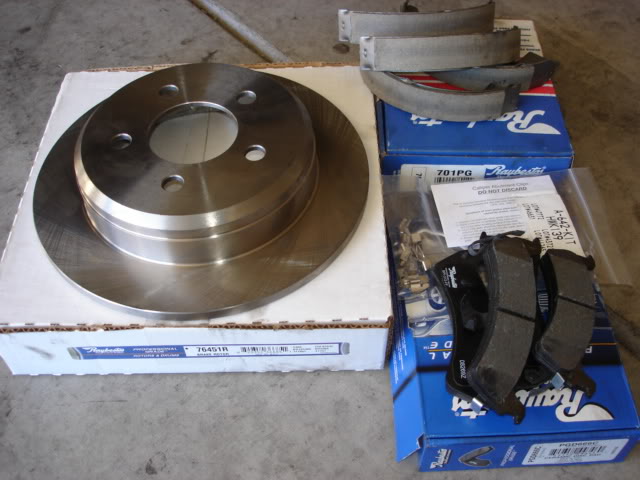
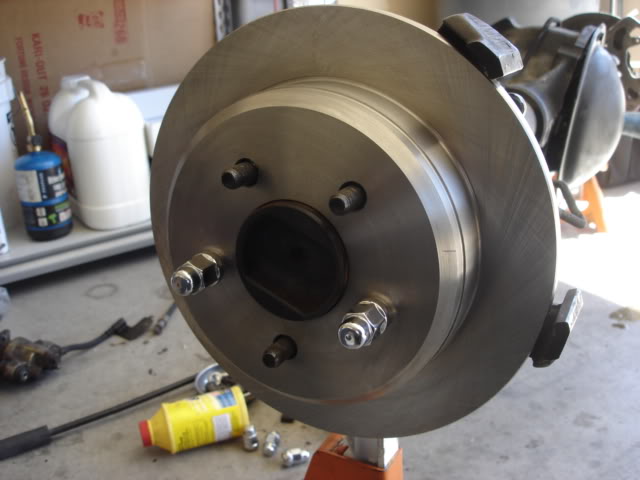
New Rotors and Pads and Parking Brake Pads.
Here we go,
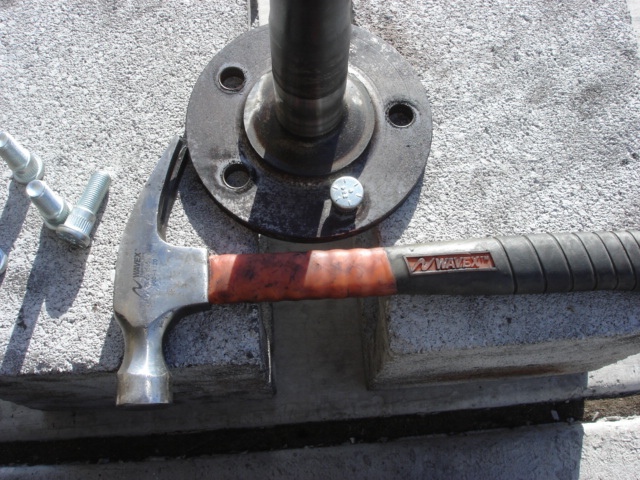
The pin (whatever is called ) should slide out easily.
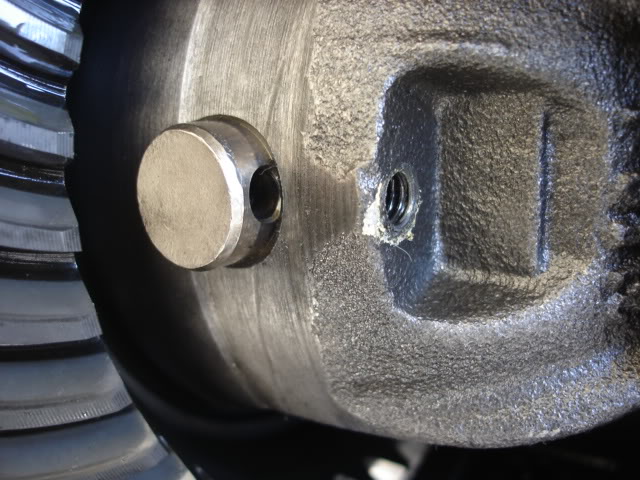
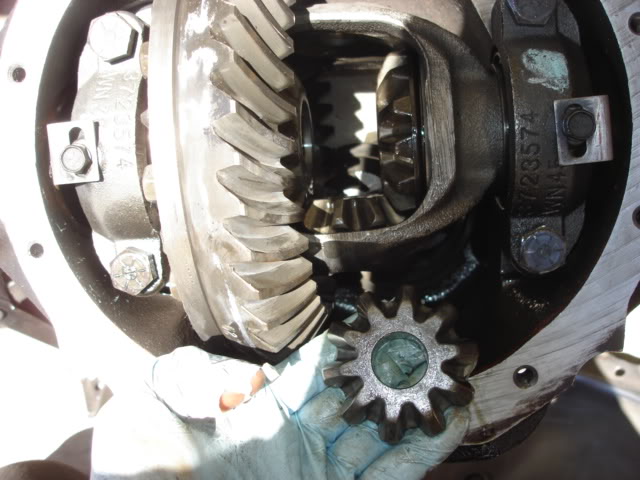
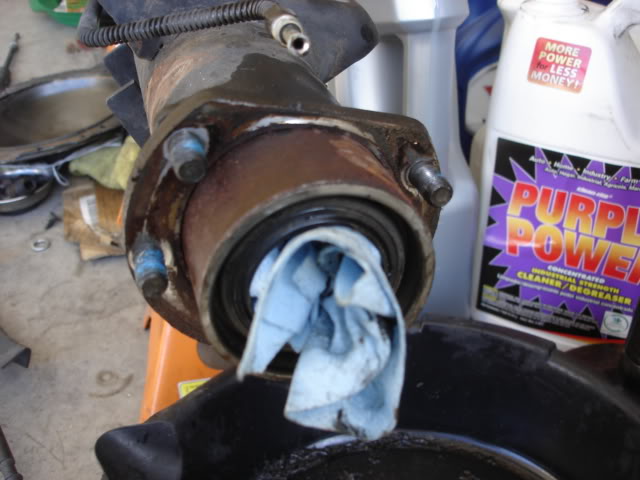
Once the pin is removed, push the axle shaft (at the end of the differential) in and the c-clips would fall off from shaft.
I re-installed the pin cos if you don't this will happen...
 or is it just me
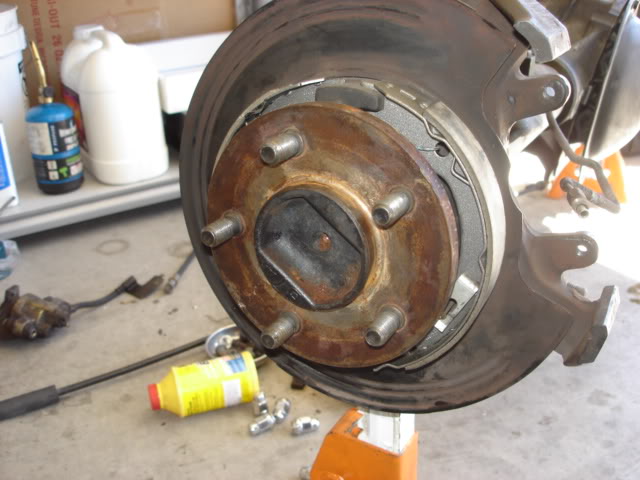
Axle shaft removed
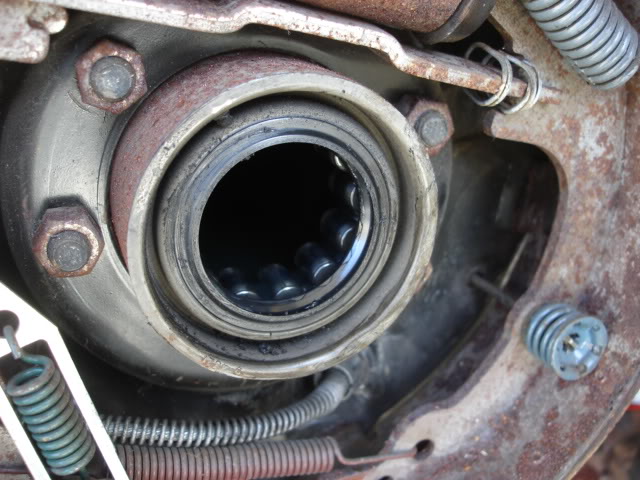
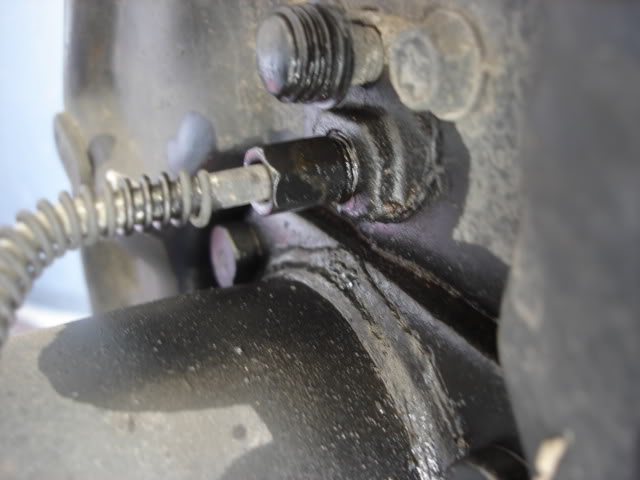
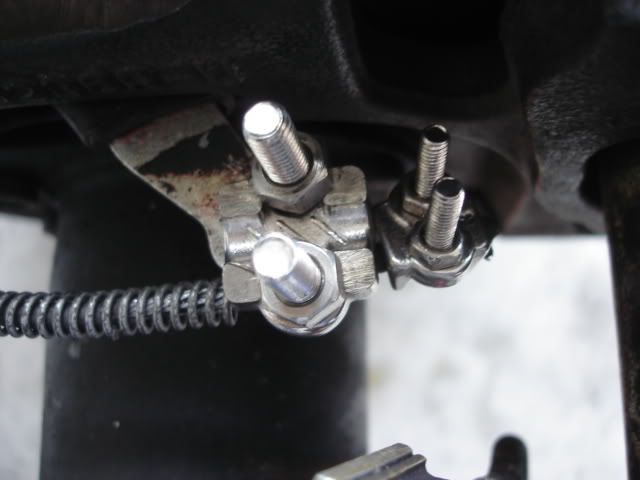
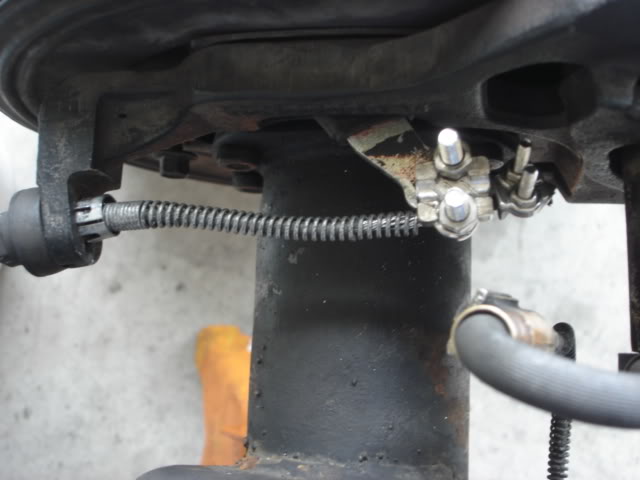
Remove brake line from the cylinder.
Next is to remove the backing plate nuts (x4) and disconnect the parking brake cable from the pads (just unhook it)
The whole brake system should come out as a unit.
(It might not be as easy as said if your parking brake cable is still attached to the equalizer....mine wasn't)
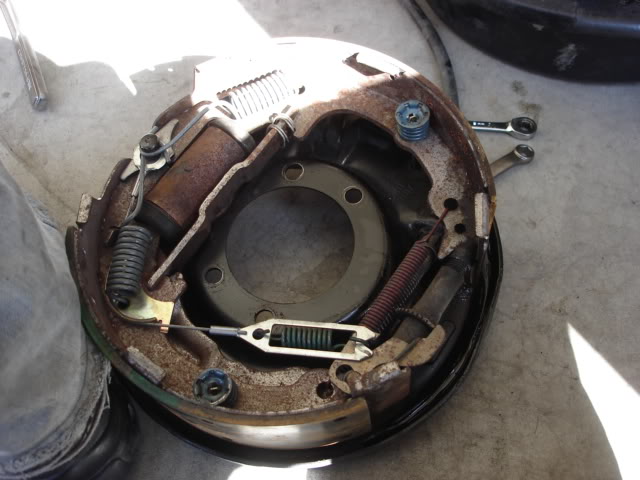
The conversion begins,
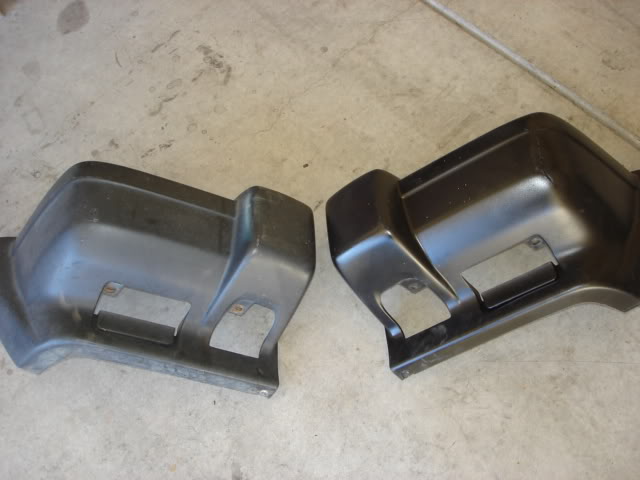
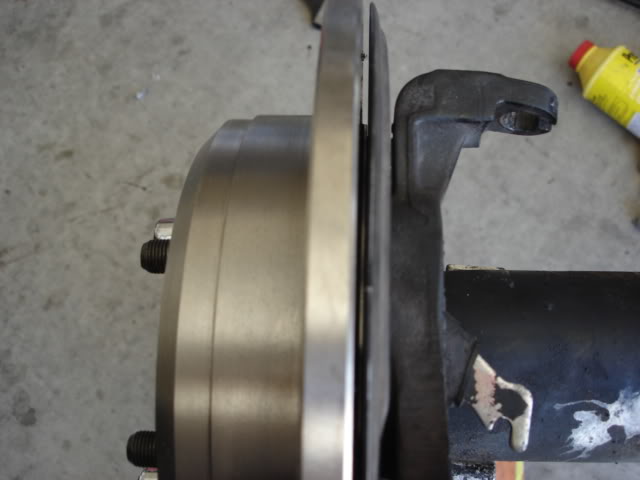
Here is a comparison between ZJ back plate bolt and the original.
Replace original with ZJ's
I use Loctite Red....don't see i'll be servicing them anytime soon.
A bfh should do the job.
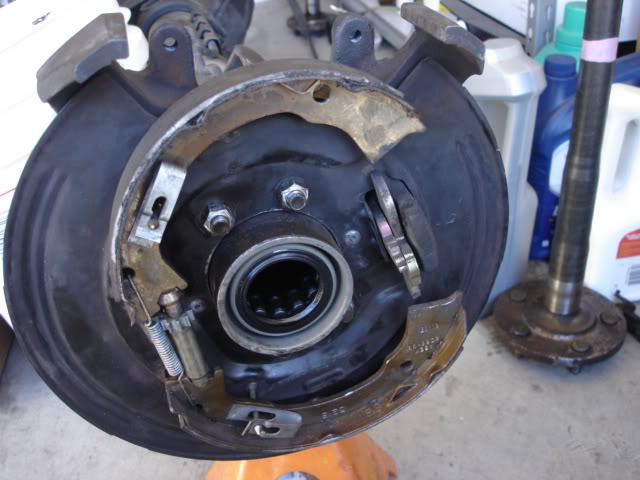
Here you have a pic of the ZJ backing plate, notice is just a slightly smaller.
A little grinding with my new tool.

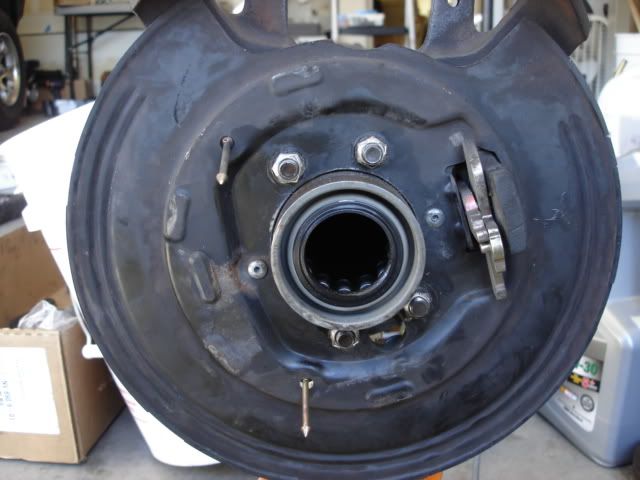
Backing plate/bracket installed
Here are the parts that i acquired,
>98 ZJ Backing Plates
>Bracket w/bolts
>Calipers w/soft brake lines
>Caliper bolts
Additional parts required
>ZJ wheel lug studs(or dorman#610-234)
>ZJ proportional valve/spring A must IMHO.
New Rotors and Pads and Parking Brake Pads.
Here we go,
The pin (whatever is called
) should slide out easily.Once the pin is removed, push the axle shaft (at the end of the differential) in and the c-clips would fall off from shaft.
I re-installed the pin cos if you don't this will happen...
or is it just me Axle shaft removed
Remove brake line from the cylinder.
Next is to remove the backing plate nuts (x4) and disconnect the parking brake cable from the pads (just unhook it)
The whole brake system should come out as a unit.
(It might not be as easy as said if your parking brake cable is still attached to the equalizer....mine wasn't)
The conversion begins,
Here is a comparison between ZJ back plate bolt and the original.
Replace original with ZJ's
I use Loctite Red....don't see i'll be servicing them anytime soon.
A bfh should do the job.
Here you have a pic of the ZJ backing plate, notice is just a slightly smaller.
A little grinding with my new tool.
Backing plate/bracket installed
Last edited by BotakBeng; Jul 7, 2012 at 12:32 PM.
Thread Starter
CF Veteran
Joined: Jan 2011
Posts: 1,894
Likes: 4
From: Las Vegas
Year: 1999
Model: Cherokee
Engine: 4.0
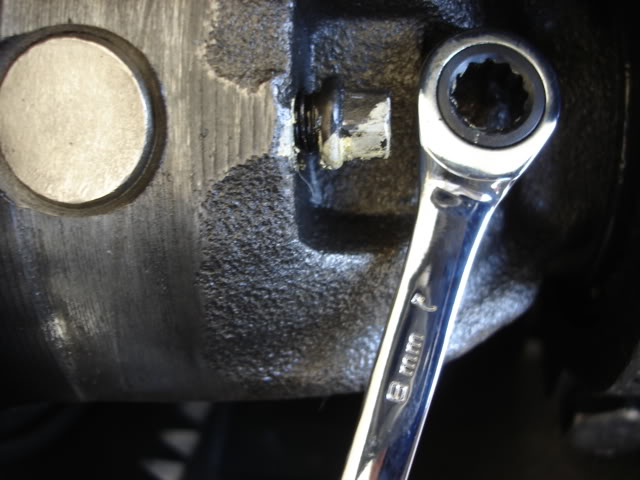
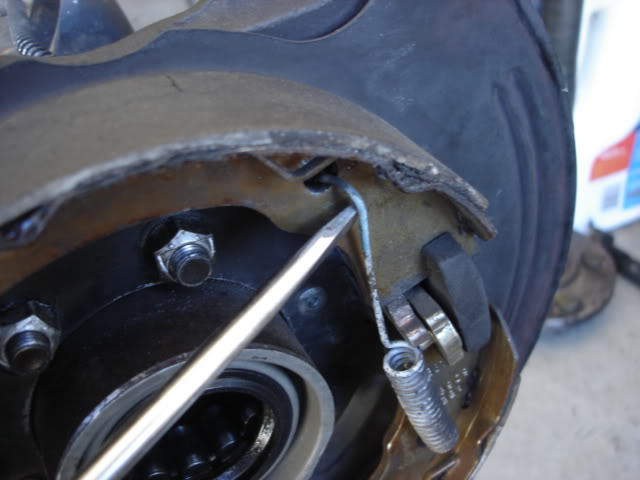
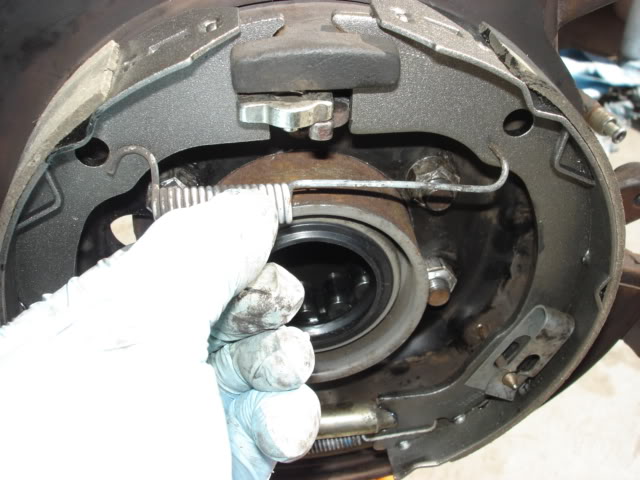
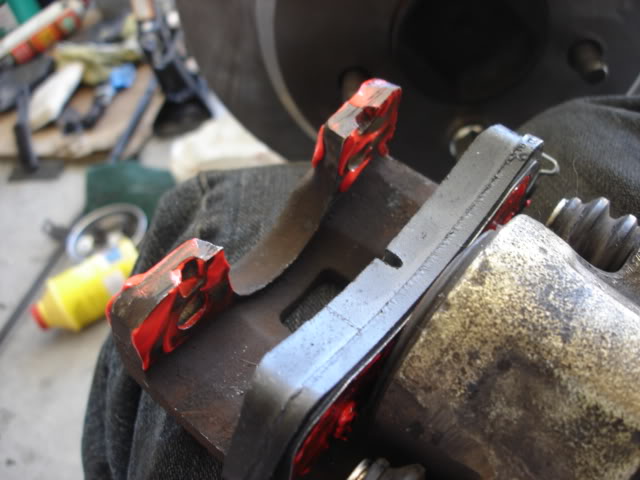
Removal is pretty straight forward.
Here are some pics of the removal on the passenger's side.
Once the spring is unhooked and the retainers (x2) removed, the adjuster and it's spring could easily remove by yanking the pads outward.
Installation
(Driver's side)
Shorten the adjuster for easier installation.
Install adjuster and spring

Install parking lever
Install pads spring (notice the left side spring does does not hook on to the pads.....is more like a lever to push out the pads).
Took me a long time to figure that out .
.
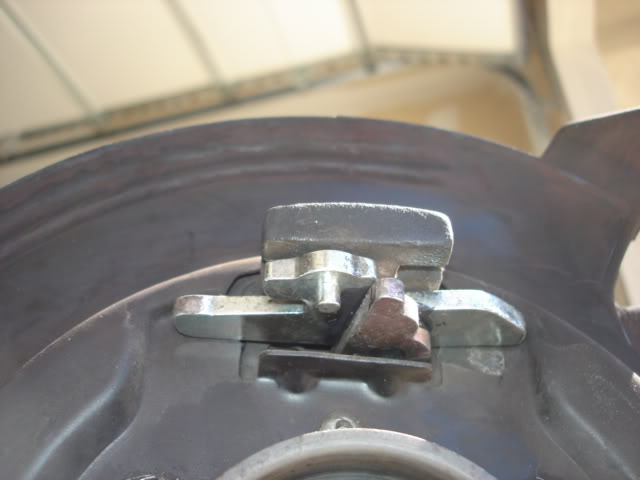
Inside view of the parking brake lever.
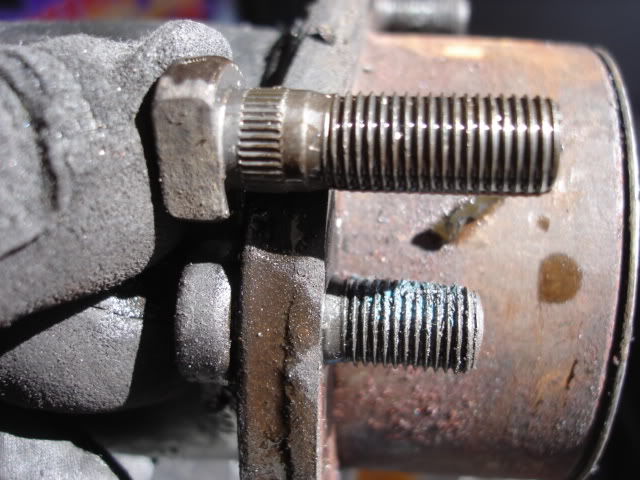
NOT QUITE DONE.........have to replace lug studs to a Grand Cherokee's.
Dorman#610.234.1
 Now i have to remove everything.....thanks to my new lubelocker, no scrapping.
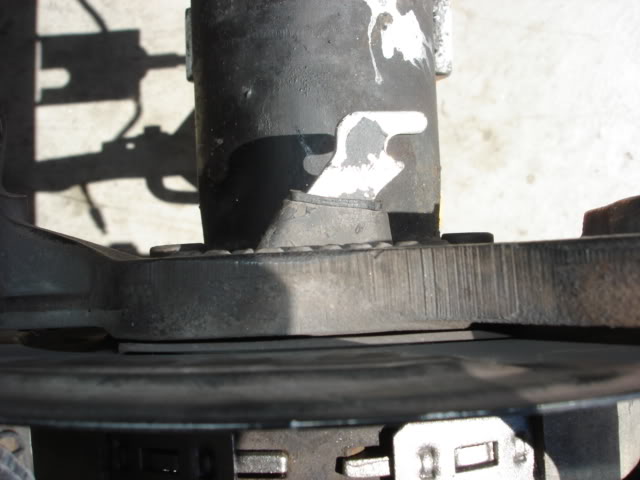
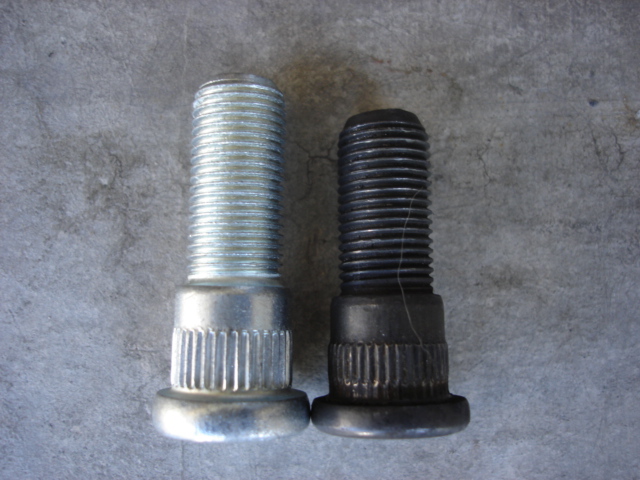
Removing factory lug studs

XJ vs ZJ stud
Install
Done!!!
Here are some pics of the removal on the passenger's side.
Once the spring is unhooked and the retainers (x2) removed, the adjuster and it's spring could easily remove by yanking the pads outward.
Installation
(Driver's side)
Shorten the adjuster for easier installation.
Install adjuster and spring
Install parking lever
Install pads spring (notice the left side spring does does not hook on to the pads.....is more like a lever to push out the pads).
Took me a long time to figure that out
.Inside view of the parking brake lever.
NOT QUITE DONE.........have to replace lug studs to a Grand Cherokee's.
Dorman#610.234.1
Now i have to remove everything.....thanks to my new lubelocker, no scrapping.Removing factory lug studs
XJ vs ZJ stud
Install
Done!!!
Last edited by BotakBeng; Apr 9, 2012 at 11:56 PM.
Thread Starter
CF Veteran
Joined: Jan 2011
Posts: 1,894
Likes: 4
From: Las Vegas
Year: 1999
Model: Cherokee
Engine: 4.0
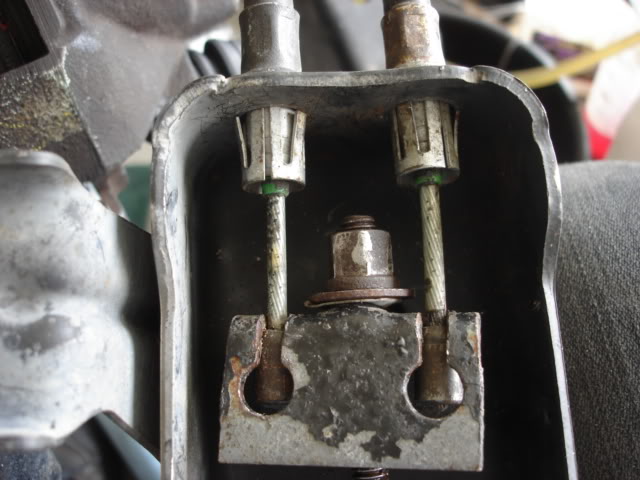
Now is to re-install the axle shaft
(Below are the pics taken before i replace my lug studs)
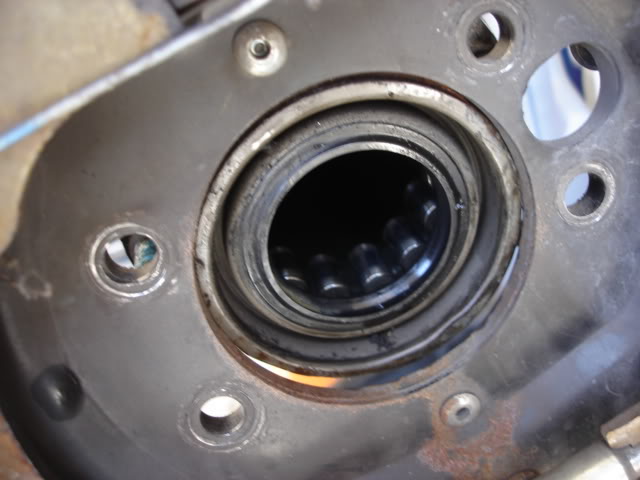
Here you see both shaft installed ready for C-clip installation

C-Clip Installed
After installation of C-Clips, push the shafts outward
Install pin
Lubelocker!
Install Rotor and check for binding
Now is time to adjust the parking brake.
This is how i did it (a small flat head will do the job),
1)Tighten until rotor can't move
2)Back off 4 clicks
Done!
.......
(Below are the pics taken before i replace my lug studs)
Here you see both shaft installed ready for C-clip installation
C-Clip Installed
After installation of C-Clips, push the shafts outward
Install pin
Lubelocker!
Install Rotor and check for binding
Now is time to adjust the parking brake.
This is how i did it (a small flat head will do the job),
1)Tighten until rotor can't move
2)Back off 4 clicks
Done!
.......
Last edited by BotakBeng; Apr 8, 2012 at 08:15 AM.
Thread Starter
CF Veteran
Joined: Jan 2011
Posts: 1,894
Likes: 4
From: Las Vegas
Year: 1999
Model: Cherokee
Engine: 4.0
First thing to do was to find out which one goes to which side 
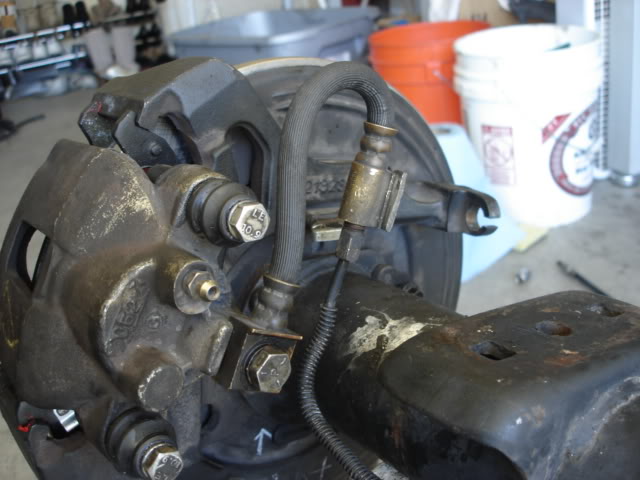
Did some searching and this is what i found....
*Bleeding screw should be at the highest on the caliper.
Here is a pic of my driver's side to give you an idea.

Above pic was taken after i installed everything but i thought i should share with you so you would not make the same mistake as i did.
The set of pads that i order did not specified if there were i right or left set so i assume they are interchangable.
Brake Quiet
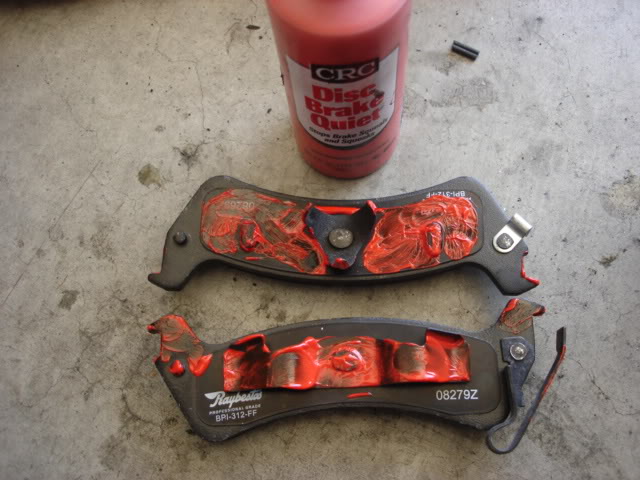
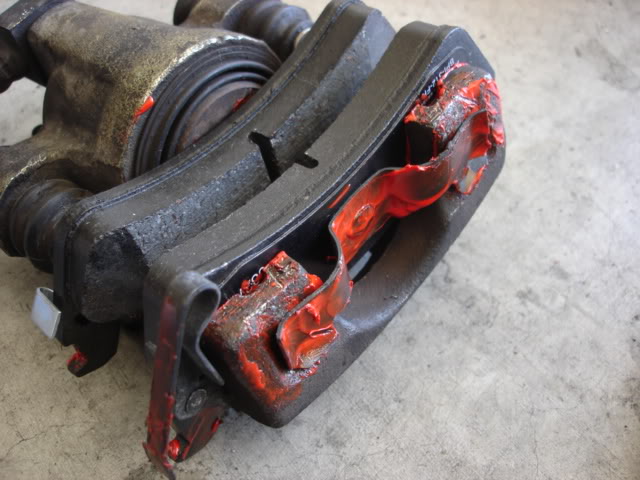
Lightly coat calipers bolts with some grease. (CRC Brake & Caliper Gease)
Before i install the caliper, i use an angle grinder and took off the bracket.
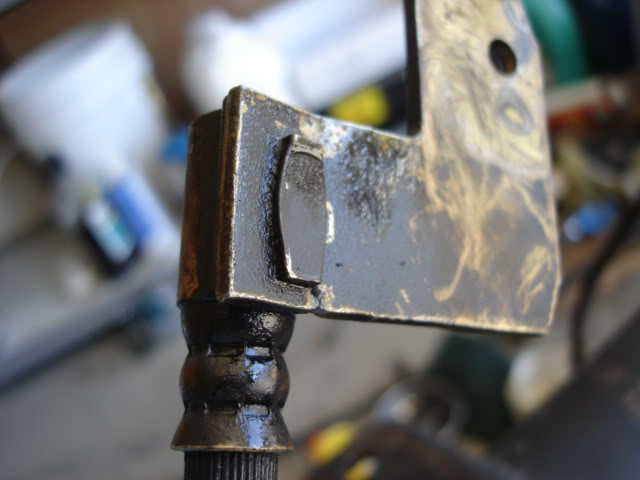
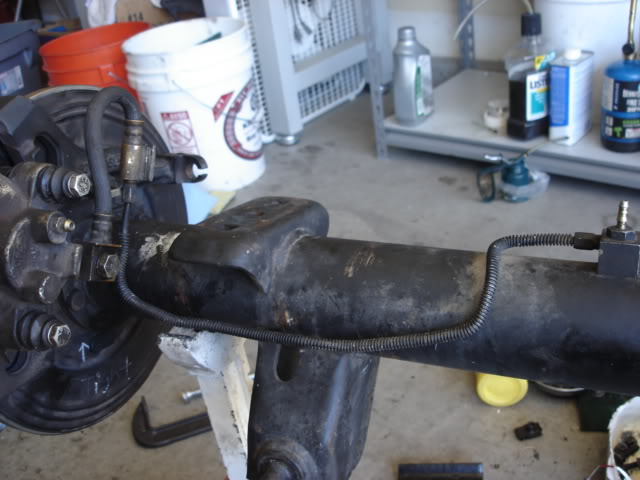
Connect soft line to XJ hard line (had to bend the hard line a little ).
That pretty much sum up ZJ Disc Brake Conversion......except for the parking brake mod.
I SUCK!
back to research......
After a few attempts, i decided to go with Mike1998XJ's mod.
Parts
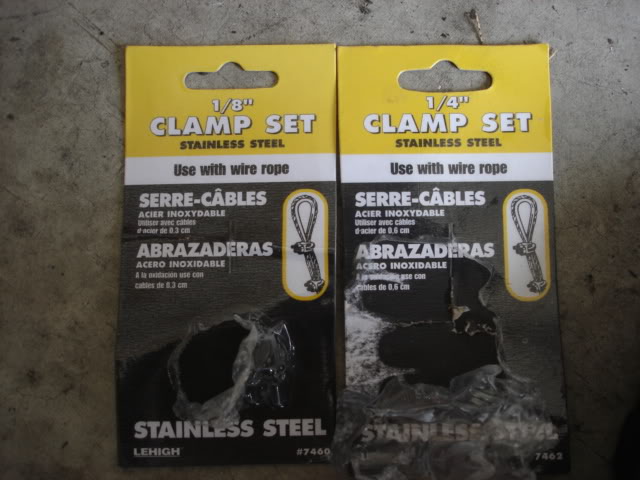
Cable clamp mod
Shorten spring

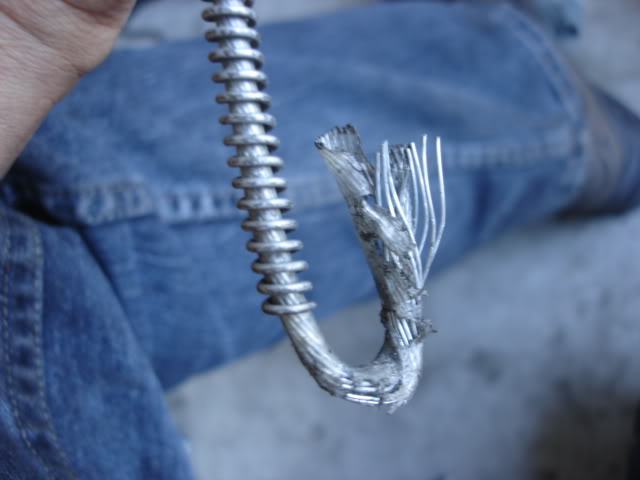
I added a cable clip on the end of the cable just to be on the safe side.
Since i have to shorten the spring, i cut off the factory cable stop to remove the spring for shortening. If i'll do it again, i'll take my time using a dremel and cut the spring without removing the factory cable stop.
Installed!
For those who are interested in reading, here are some very good references (would't have done it without them, THANK YOU!),
Rear Disc Brake conversion
• Parts, Wheel Studs #610-234 , Parking Brake Hardware carlson H7002, 8, 1.5" long 3/8"-16 Grade 8 bolts (for backing plates)
• https://www.cherokeeforum.com/f51/re...-8-25-a-57807/
• http://www.jeepforum.com/forum/f11/z...-brake-920103/ (srmitchell)
• http://www.naxja.org/forum/showthread.php?t=989827 (rear disc conversion)
• http://www.lunghd.com/Tech_Articles/..._Valve_Mod.htm (Proportioning Valve)
• https://www.cherokeeforum.com/f2/no-...version-17386/ (Parking Brake Mod)
• http://www.stu-offroad.com/suspension/d44brake/bc-1.htm (Jeep TJ)
• http://jeep.blackonyx.net/tech/disks.htm
Parking Brake
• https://www.cherokeeforum.com/f46/gr...4/#post1679986
• http://www.jeepforum.com/forum/f13/z...e-post-454677/
• http://www.jeepforum.com/forum/f13/e-brake-521054/
• http://jeepsunlimited.com/forums/sho...7&postcount=11
Did some searching and this is what i found....
*Bleeding screw should be at the highest on the caliper.
Here is a pic of my driver's side to give you an idea.
Above pic was taken after i installed everything but i thought i should share with you so you would not make the same mistake as i did.
The set of pads that i order did not specified if there were i right or left set so i assume they are interchangable.
Brake Quiet
Lightly coat calipers bolts with some grease. (CRC Brake & Caliper Gease)
Before i install the caliper, i use an angle grinder and took off the bracket.
Connect soft line to XJ hard line (had to bend the hard line a little ).
That pretty much sum up ZJ Disc Brake Conversion......except for the parking brake mod.
I SUCK!
back to research......
After a few attempts, i decided to go with Mike1998XJ's mod.
Parts
Cable clamp mod
Shorten spring
I added a cable clip on the end of the cable just to be on the safe side.
Since i have to shorten the spring, i cut off the factory cable stop to remove the spring for shortening. If i'll do it again, i'll take my time using a dremel and cut the spring without removing the factory cable stop.
Installed!
For those who are interested in reading, here are some very good references (would't have done it without them, THANK YOU!),
Rear Disc Brake conversion
• Parts, Wheel Studs #610-234 , Parking Brake Hardware carlson H7002, 8, 1.5" long 3/8"-16 Grade 8 bolts (for backing plates)
• https://www.cherokeeforum.com/f51/re...-8-25-a-57807/
• http://www.jeepforum.com/forum/f11/z...-brake-920103/ (srmitchell)
• http://www.naxja.org/forum/showthread.php?t=989827 (rear disc conversion)
• http://www.lunghd.com/Tech_Articles/..._Valve_Mod.htm (Proportioning Valve)
• https://www.cherokeeforum.com/f2/no-...version-17386/ (Parking Brake Mod)
• http://www.stu-offroad.com/suspension/d44brake/bc-1.htm (Jeep TJ)
• http://jeep.blackonyx.net/tech/disks.htm
Parking Brake
• https://www.cherokeeforum.com/f46/gr...4/#post1679986
• http://www.jeepforum.com/forum/f13/z...e-post-454677/
• http://www.jeepforum.com/forum/f13/e-brake-521054/
• http://jeepsunlimited.com/forums/sho...7&postcount=11
Last edited by BotakBeng; Apr 8, 2012 at 08:16 AM.
Thread Starter
CF Veteran
Joined: Jan 2011
Posts: 1,894
Likes: 4
From: Las Vegas
Year: 1999
Model: Cherokee
Engine: 4.0
Back to my Hippo...
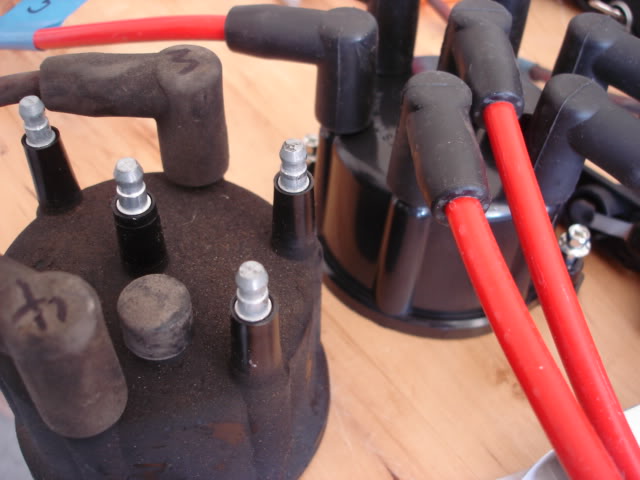
Time to replace my tired Rotor Cap, Rotor, Plug Wires and Plugs.
Accel TST16
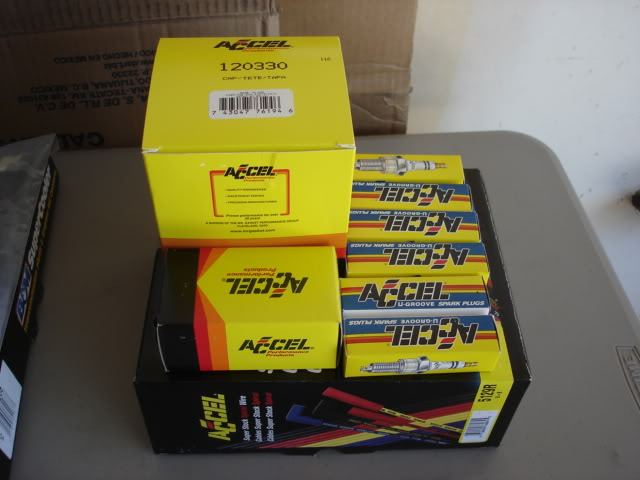
Upgrade my injectors to 784
Here are a couple of good write-ups.
https://www.cherokeeforum.com/f51/in...ap-4-0l-92149/ (Thx dukie!)
https://www.cherokeeforum.com/f67/70...rite-up-66456/ (Thx nordplz!)

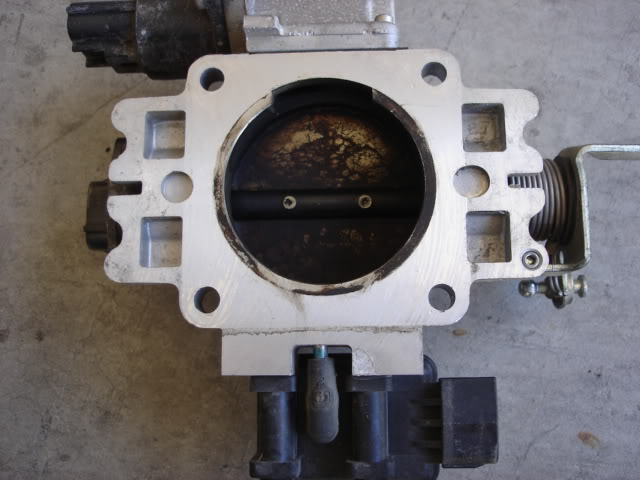
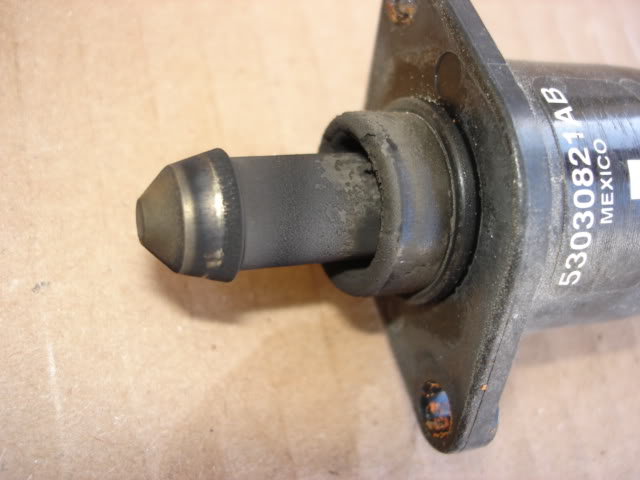
Upgrade my dirty TB to 60mm bored and cleaned up my filthy IAC.
I ordered mine from Thexjfiles (Great member to deal with, bored TB came sandblasted....like new!)
Here are some before pics,
Did not take any pics, but here is a thread about TB and IAC cleaning.
Time to replace my tired Rotor Cap, Rotor, Plug Wires and Plugs.
Accel TST16
Upgrade my injectors to 784
Here are a couple of good write-ups.
https://www.cherokeeforum.com/f51/in...ap-4-0l-92149/ (Thx dukie!)
https://www.cherokeeforum.com/f67/70...rite-up-66456/ (Thx nordplz!)
Upgrade my dirty TB to 60mm bored and cleaned up my filthy IAC.
I ordered mine from Thexjfiles (Great member to deal with, bored TB came sandblasted....like new!)
Here are some before pics,
Did not take any pics, but here is a thread about TB and IAC cleaning.
Last edited by BotakBeng; Mar 22, 2012 at 09:50 AM.
Thread Starter
CF Veteran
Joined: Jan 2011
Posts: 1,894
Likes: 4
From: Las Vegas
Year: 1999
Model: Cherokee
Engine: 4.0
When i purchased the Jeep, there was no horn and cruise control, airbag light was up as well.
Replaced clockspring......I have horn and cruise now!
Here are a couple of write-ups
• http://www.links4jeeps.com/writeups/clockspring/
• http://home.myfairpoint.net/m_levesq...ssite/id2.html
I added a hand stitched steering wheel at the same time .
.
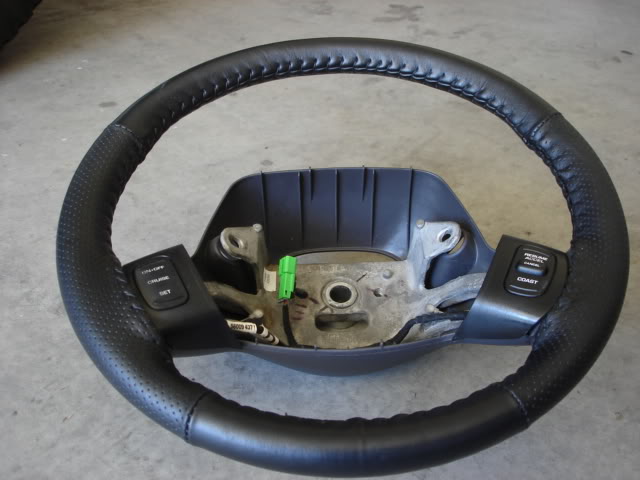
They are Wheelskins EuroPerf Perforated.
Replaced clockspring......I have horn and cruise now!
Here are a couple of write-ups
• http://www.links4jeeps.com/writeups/clockspring/
• http://home.myfairpoint.net/m_levesq...ssite/id2.html
I added a hand stitched steering wheel at the same time
.They are Wheelskins EuroPerf Perforated.
Last edited by BotakBeng; Mar 23, 2012 at 08:13 AM.


