
Project Do work - 2001 XJ Build (Pic intensive)


Thread Starter
Seasoned Member
Joined: May 2010
Posts: 415
Likes: 0
From: Columbus, OH
Year: 2001
Model: Cherokee
Engine: 4.0 I6
Thanks guys. After I get the passenger side sprayed down, I'll have to trim up the rear bumper end caps since the fenders were trimmed back a little they aren't going to line up anymore upon reinstallation.
But, I'll probably wait to reinstall the end caps as I'm also beginning the disassembly of my rear bumper for the next project which I'll be starting soon.
But, I'll probably wait to reinstall the end caps as I'm also beginning the disassembly of my rear bumper for the next project which I'll be starting soon.

Thread Starter
Seasoned Member
Joined: May 2010
Posts: 415
Likes: 0
From: Columbus, OH
Year: 2001
Model: Cherokee
Engine: 4.0 I6
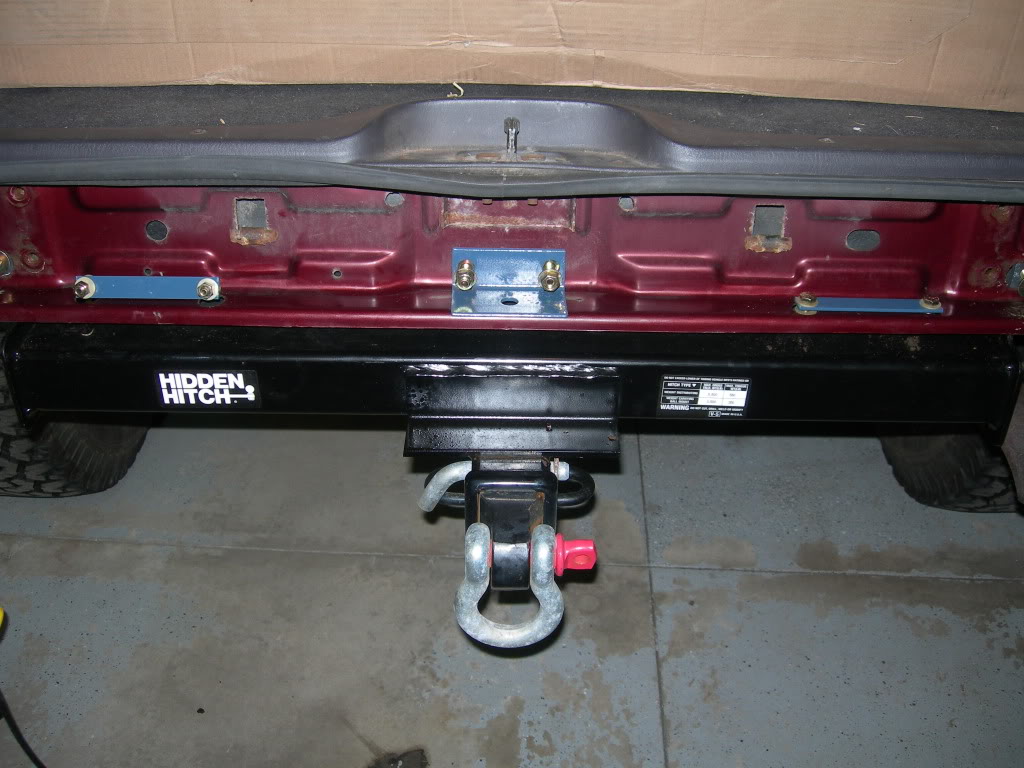
I decided to find a permanent place for my spare tire. It's been hanging out in the rear hatch/cargo area for a while now. I never really liked the idea of placing it up top, in a roof rack so I decided to opt for a rear bumper/tire carrier.
I chose the Detours Offroad Tailbone set up for it's aesthetics, design and competitive price. I really like the idea of reinforcing and preserving the factory rear bumper.
http://detoursusa.com/tailbone.php
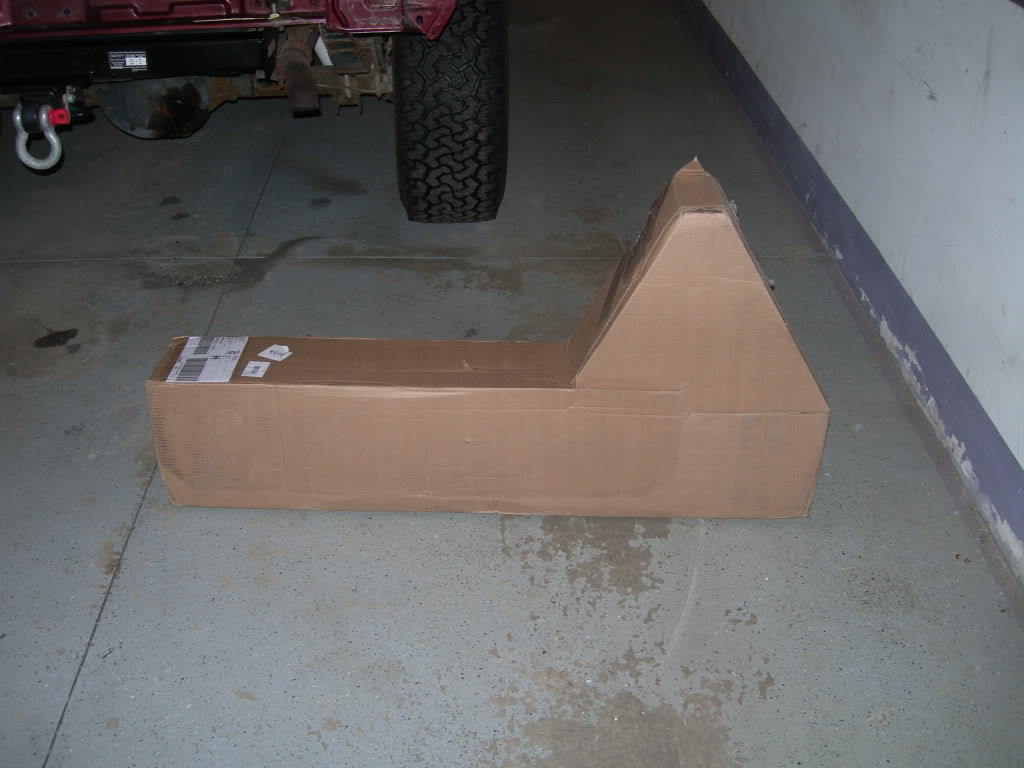
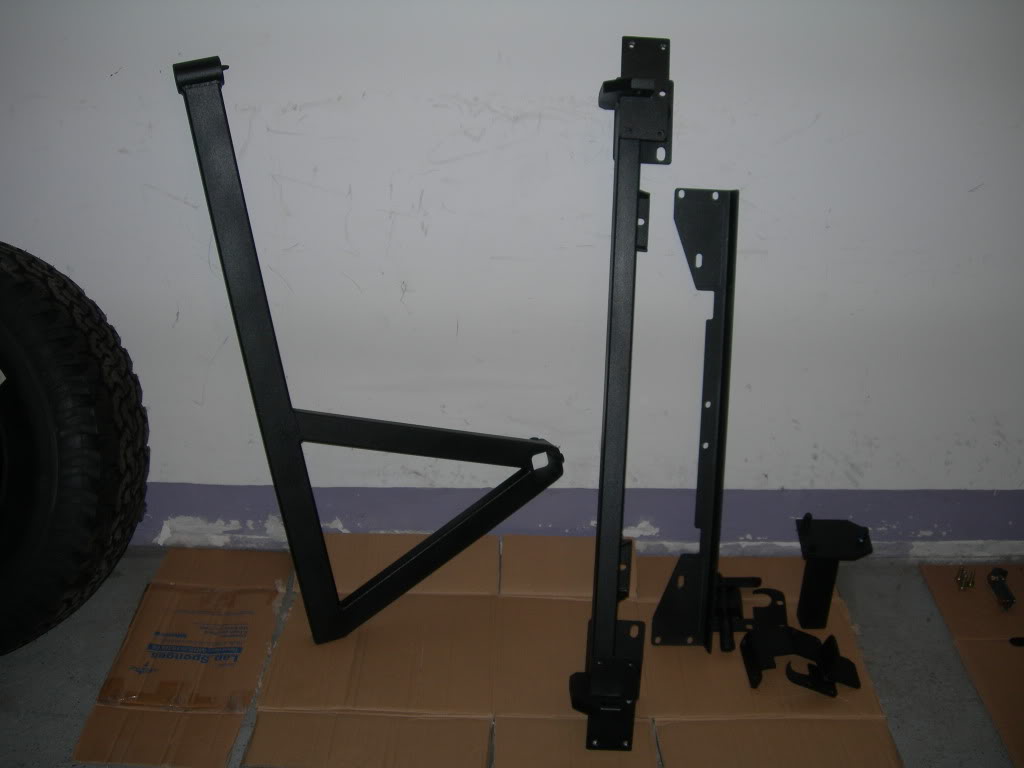
Unboxing the product:
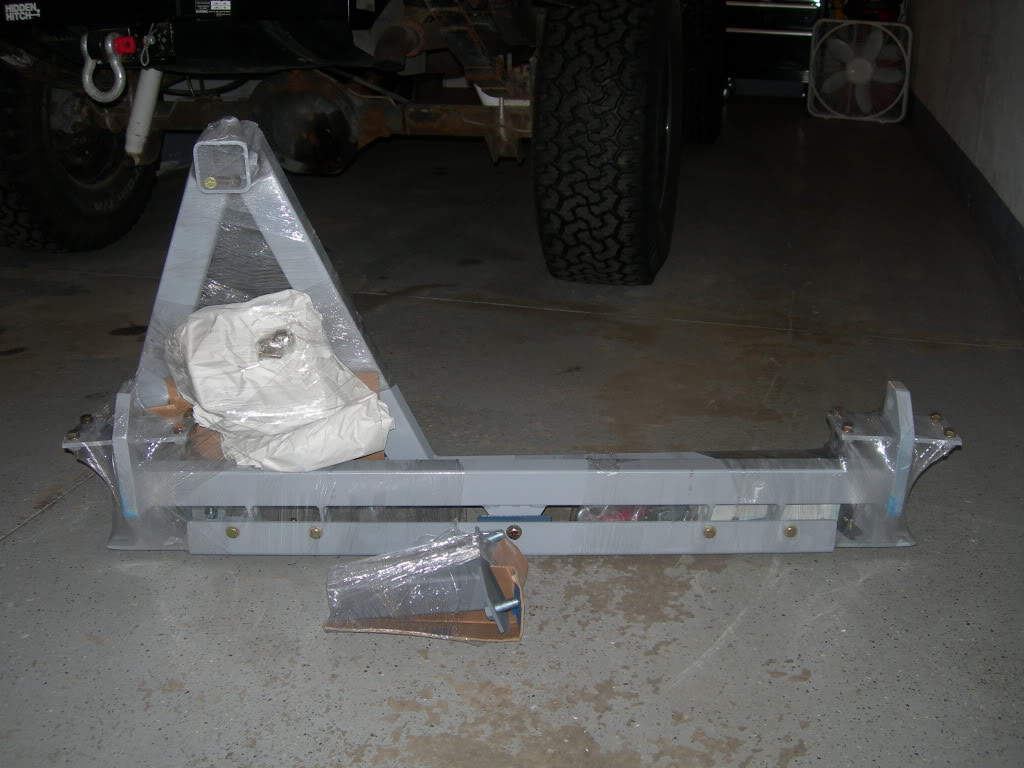
The contents, unwrapped:

The hardware comes primered, so it's ready for a topcoat right out of the box. The Detours website provides various painting tips/recommendations. I chose to go with Dupli-color's Truck Bed Coating.
So I taped up a couple bolt holes and things, then proceeded to lay everything out on a couple sawhorses for application of the truck bed liner:
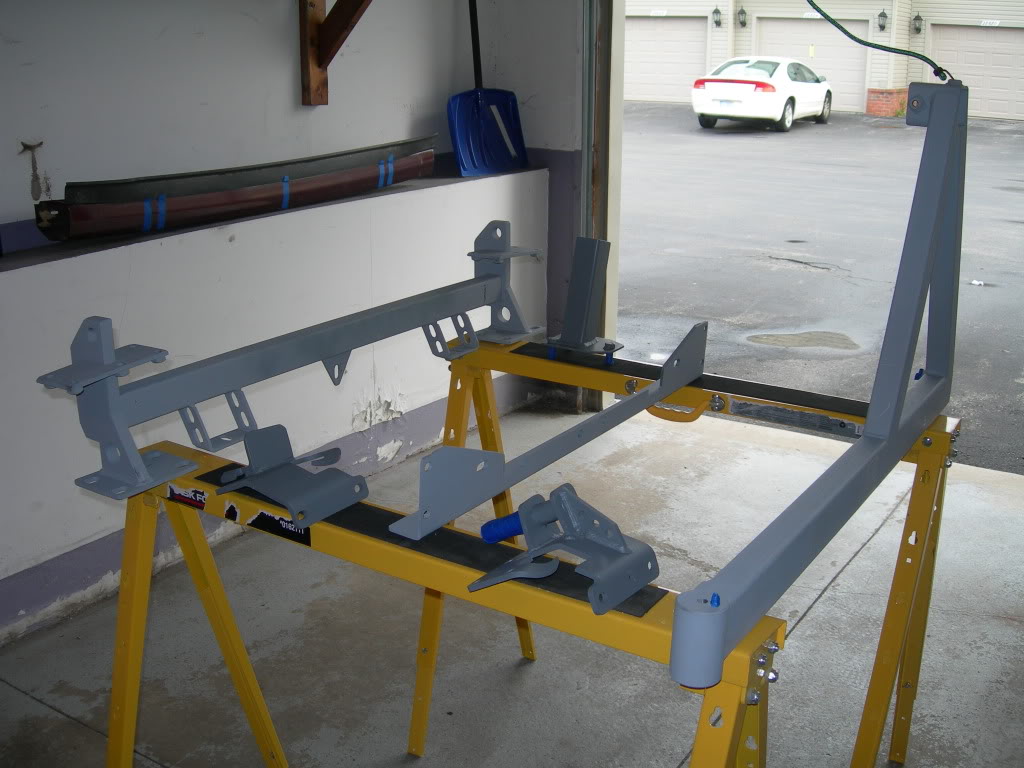
Now, I'm not a painter by trade, but I was told that it's not always a good idea to lay down a product during high humidity:

But, alas, I don't get much free time.... so I decided to go for it anyway. I applied about 3 light coats, allowing for about 20 mins to dry in between each application. The Dupli-color bed liner drys pretty quickly and lays down nicely. It has a nice texture, not real rough, but certainly not as smooth as regular black paint. It's fairly easy to apply and you get decent coverage, but the button is rather hard to depress making the application kind of labor intensive for the finger. I learned to use my thumb after a while.
After the first coat:
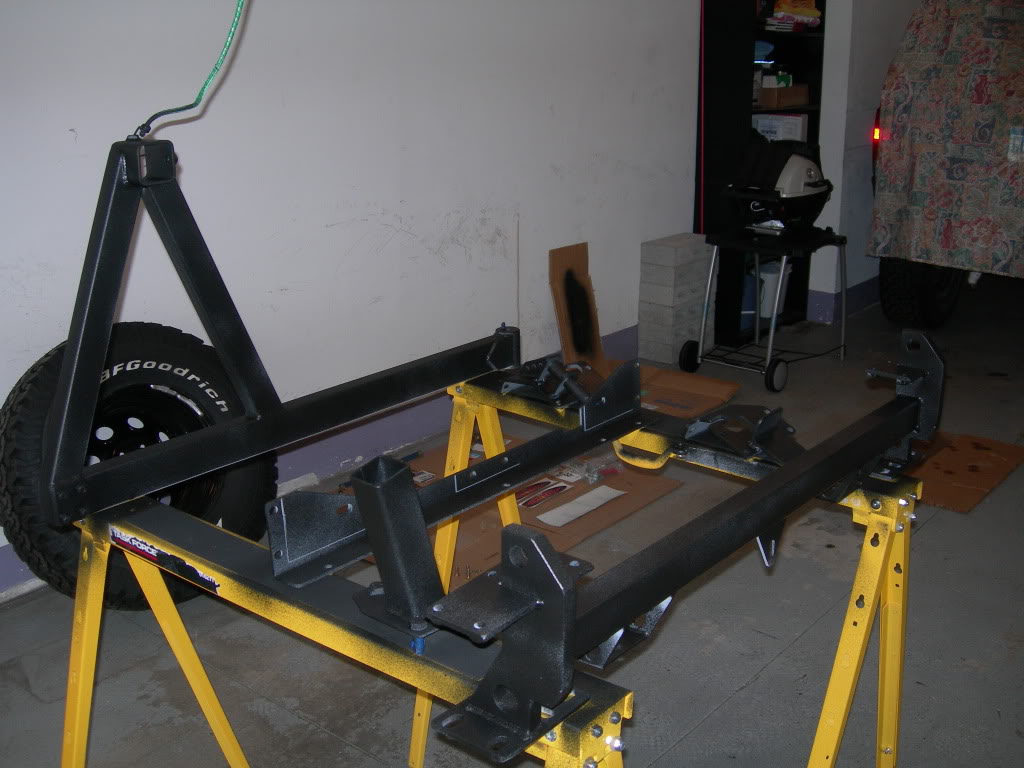
And the final product:
Up close for the texture:

I'm going to let it set up and cure overnight to make sure the pieces are ready to work with for their install tomorrow.
I chose the Detours Offroad Tailbone set up for it's aesthetics, design and competitive price. I really like the idea of reinforcing and preserving the factory rear bumper.
http://detoursusa.com/tailbone.php
Unboxing the product:
The contents, unwrapped:
The hardware comes primered, so it's ready for a topcoat right out of the box. The Detours website provides various painting tips/recommendations. I chose to go with Dupli-color's Truck Bed Coating.
So I taped up a couple bolt holes and things, then proceeded to lay everything out on a couple sawhorses for application of the truck bed liner:
Now, I'm not a painter by trade, but I was told that it's not always a good idea to lay down a product during high humidity:
But, alas, I don't get much free time.... so I decided to go for it anyway. I applied about 3 light coats, allowing for about 20 mins to dry in between each application. The Dupli-color bed liner drys pretty quickly and lays down nicely. It has a nice texture, not real rough, but certainly not as smooth as regular black paint. It's fairly easy to apply and you get decent coverage, but the button is rather hard to depress making the application kind of labor intensive for the finger. I learned to use my thumb after a while.
After the first coat:
And the final product:
Up close for the texture:
I'm going to let it set up and cure overnight to make sure the pieces are ready to work with for their install tomorrow.
Thread Starter
Seasoned Member
Joined: May 2010
Posts: 415
Likes: 0
From: Columbus, OH
Year: 2001
Model: Cherokee
Engine: 4.0 I6
Meanwhile, I'll run through how to remove the rear bumper.
The bumper is fastened to the unibody by 2 brackets. Now, there are basically two ways to remove the bumper... you can remove the bumper from the brackets first, or remove the brackets from the Jeep, taking the bumper with them.
After evaluating the location and accessibility of the bolts I decided that it would be easier to remove the bumper from the brackets first, thereby providing better exposure for the removing of the brackets.
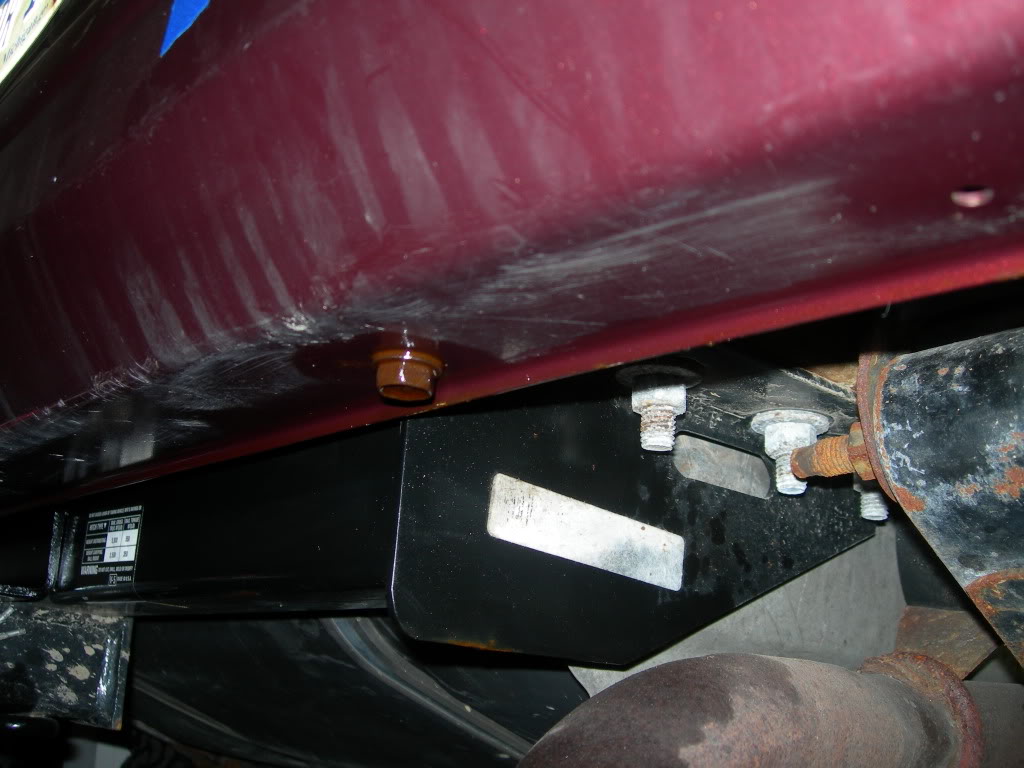
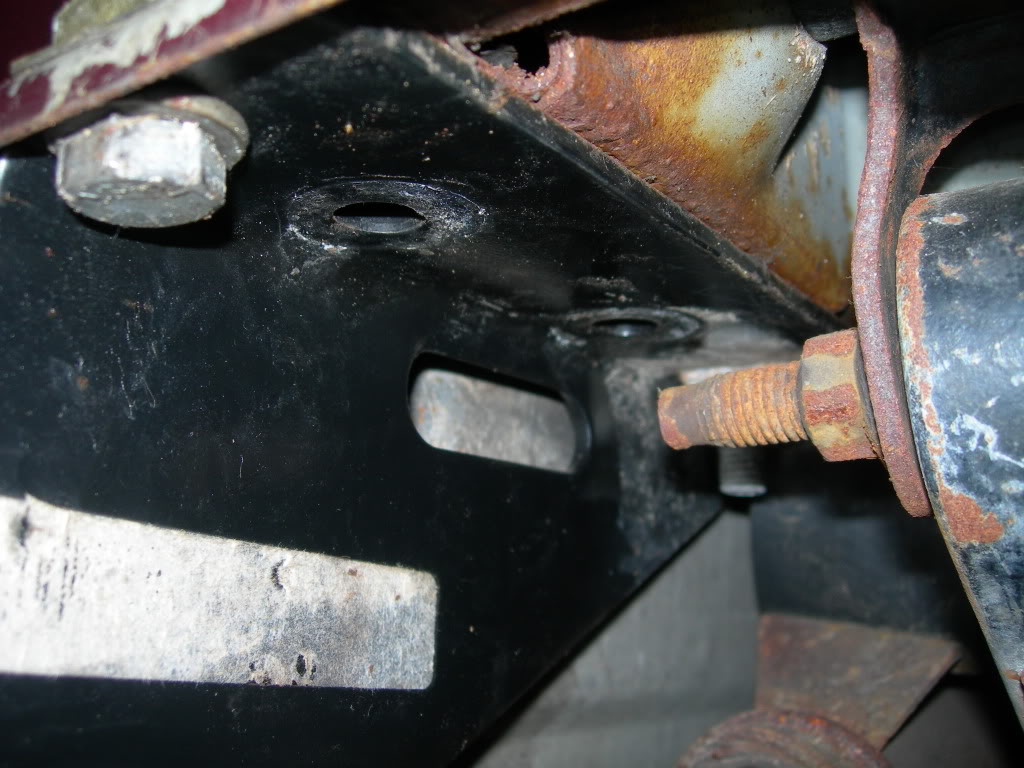
The bumper is secured to each bracket by 2 bolts. One bolt can be seen from underneath:
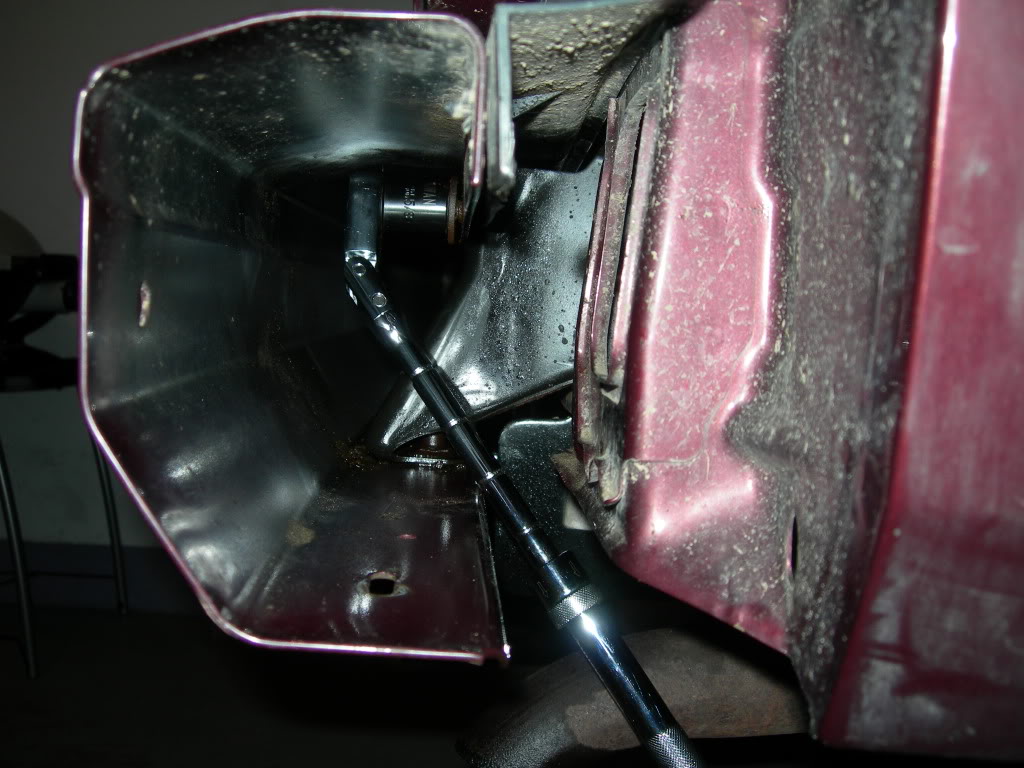
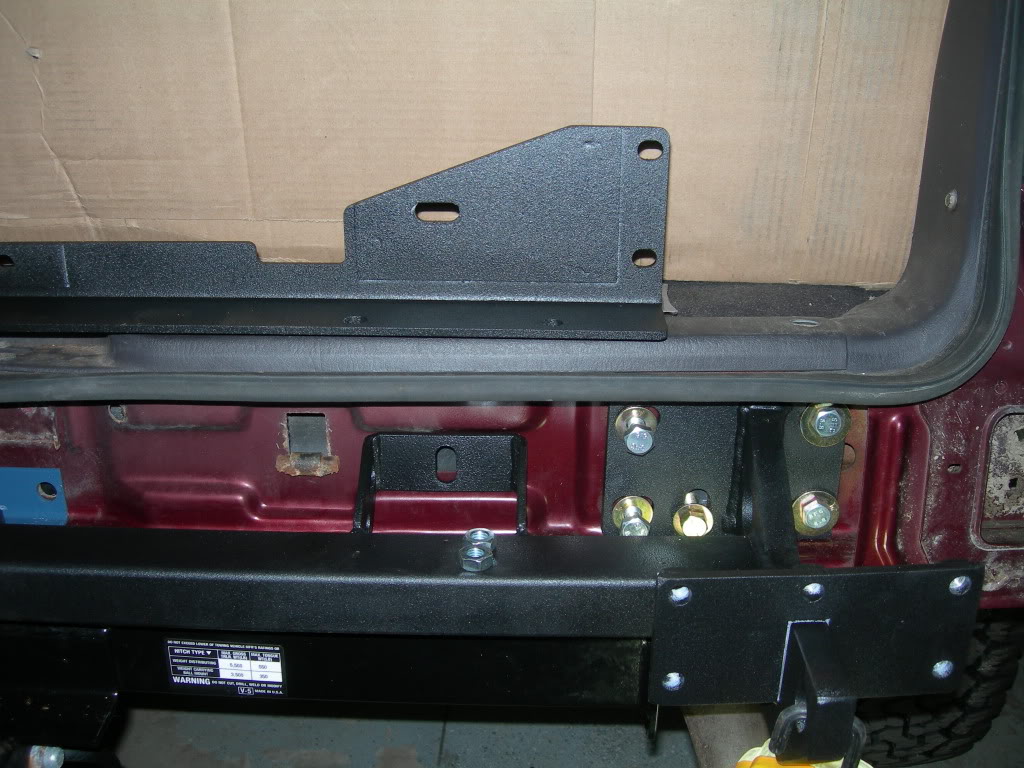
The other bolt requires you to remove the bumper end cap to expose it. Upon removal of the end cap, you'll have access to the nut which fastens the bumper to the bracket. This view is looking down into the bumper from the passenger side:

A little closer:

You can clearly see the nut/bolt. The problem is that there isn't much room to work with a socket and wrench as the bracket is located fairly deep into the bumper. I ended up having to go out and buy one of these fancy flex-head ratchets. It was worth every penney!
All the bolts came off uneventfully, I'm sure the PB Blaster soaking they underwent throughout the previous week had something to do with it.
The bumper:

The bumper is fastened to the unibody by 2 brackets. Now, there are basically two ways to remove the bumper... you can remove the bumper from the brackets first, or remove the brackets from the Jeep, taking the bumper with them.
After evaluating the location and accessibility of the bolts I decided that it would be easier to remove the bumper from the brackets first, thereby providing better exposure for the removing of the brackets.
The bumper is secured to each bracket by 2 bolts. One bolt can be seen from underneath:
The other bolt requires you to remove the bumper end cap to expose it. Upon removal of the end cap, you'll have access to the nut which fastens the bumper to the bracket. This view is looking down into the bumper from the passenger side:
A little closer:
You can clearly see the nut/bolt. The problem is that there isn't much room to work with a socket and wrench as the bracket is located fairly deep into the bumper. I ended up having to go out and buy one of these fancy flex-head ratchets. It was worth every penney!
All the bolts came off uneventfully, I'm sure the PB Blaster soaking they underwent throughout the previous week had something to do with it.
The bumper:
Thread Starter
Seasoned Member
Joined: May 2010
Posts: 415
Likes: 0
From: Columbus, OH
Year: 2001
Model: Cherokee
Engine: 4.0 I6
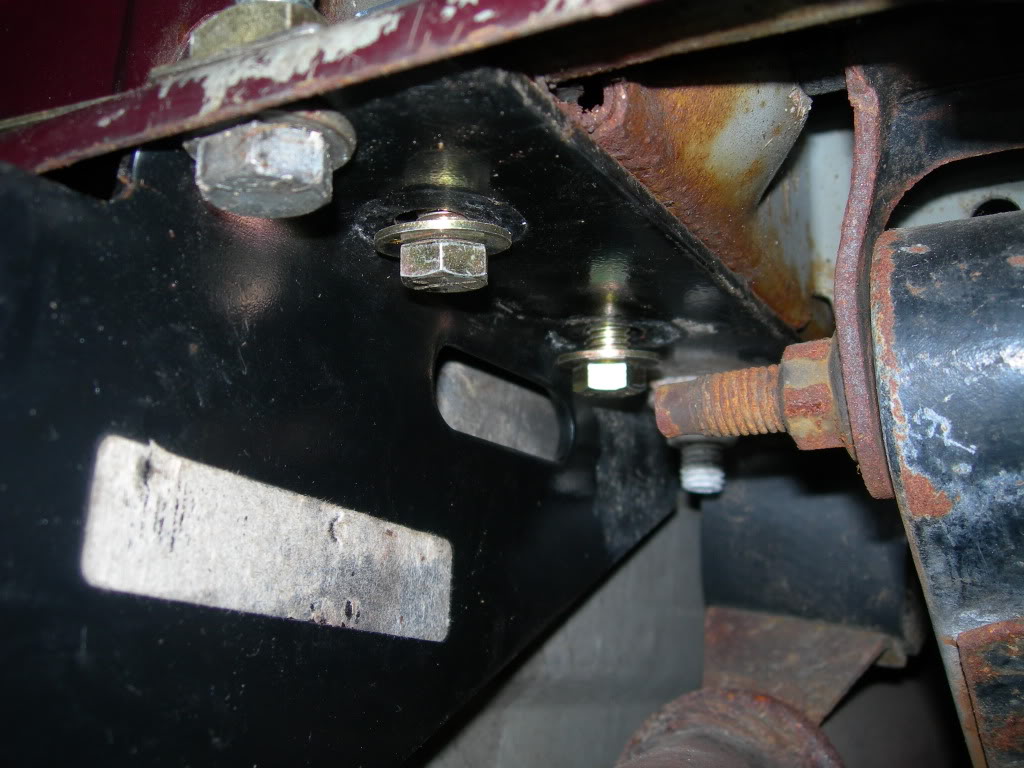
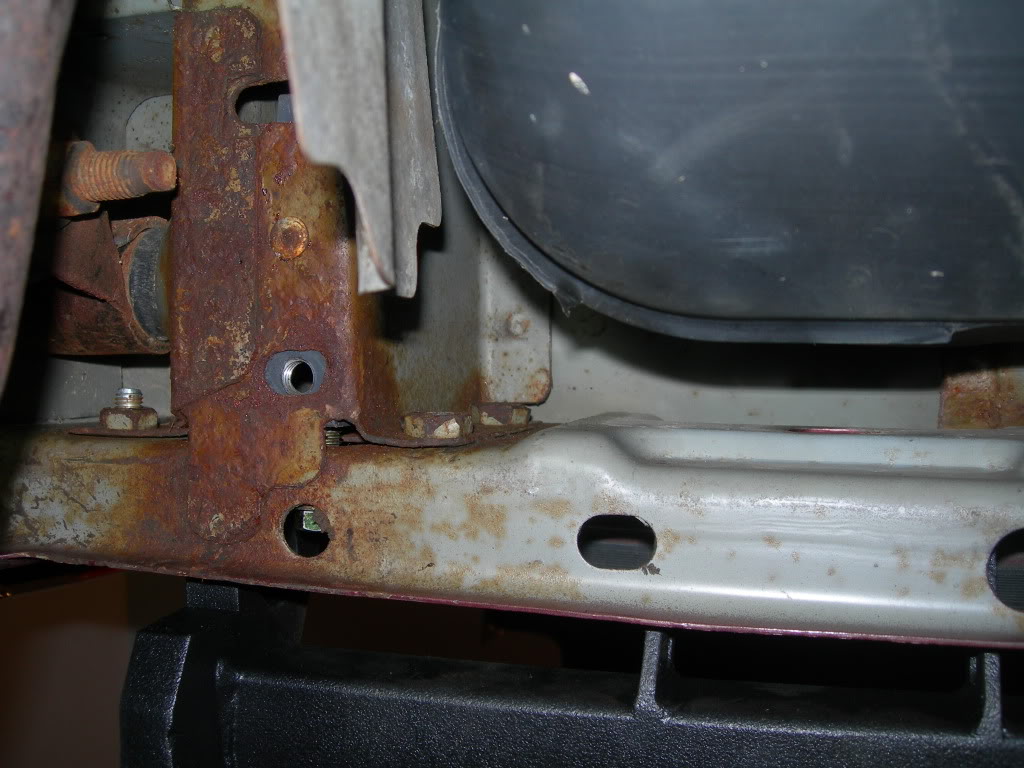
Removal of the bumper reveals the bumper brackets. They are bolted to the unibody by 4 bolts.


Pretty simple, IIRC they were 15mm bolts:

Bracket all gone:

Tomorrow, I will start installing the new hardware!
Pretty simple, IIRC they were 15mm bolts:
Bracket all gone:
Tomorrow, I will start installing the new hardware!
Senior Member
Joined: Jul 2010
Posts: 913
Likes: 6
From: Japan
Year: 2001
Model: Cherokee
Engine: 4.0 L I6
Just read through your whole thread...again. I like how meticulous you are with everything you do on your jeep- its reminds me how I really need to take the extra time to do things the right way rather than just jump into the project and get it done as quickly as possible. In the end it saves more time and headaches to be thorough and be sure you do it right the first time. Can't wait to see how the bumpers turn out.
Thread Starter
Seasoned Member
Joined: May 2010
Posts: 415
Likes: 0
From: Columbus, OH
Year: 2001
Model: Cherokee
Engine: 4.0 I6
Following the directions from the Detours website, I began the installation of the new hardware.
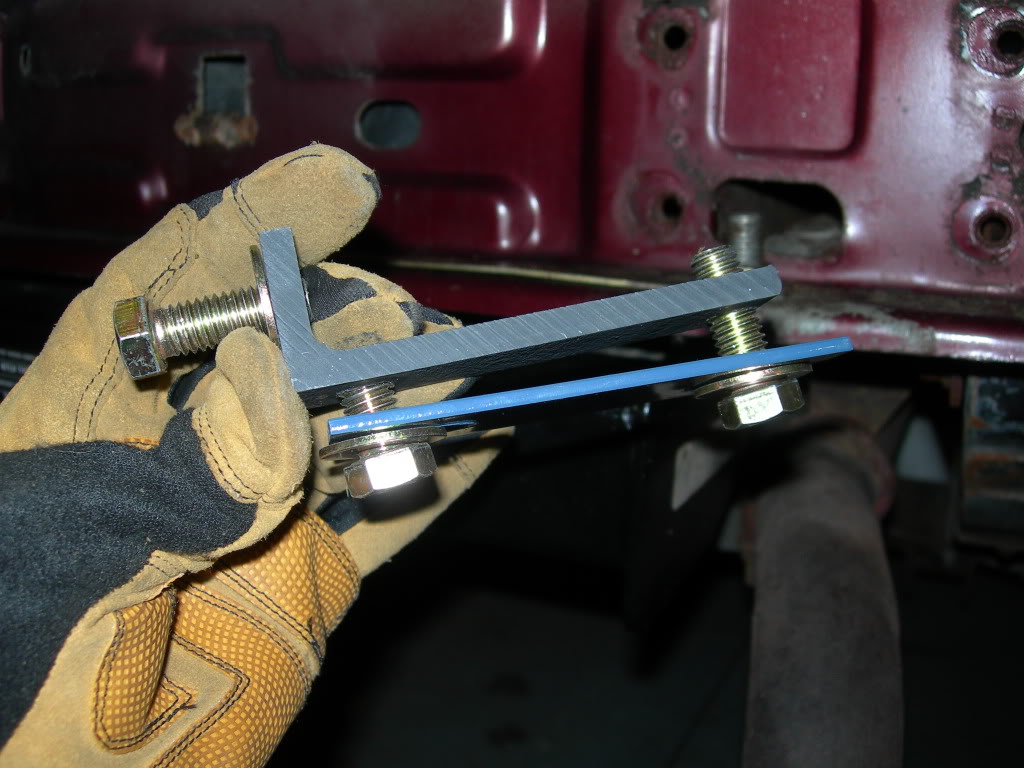
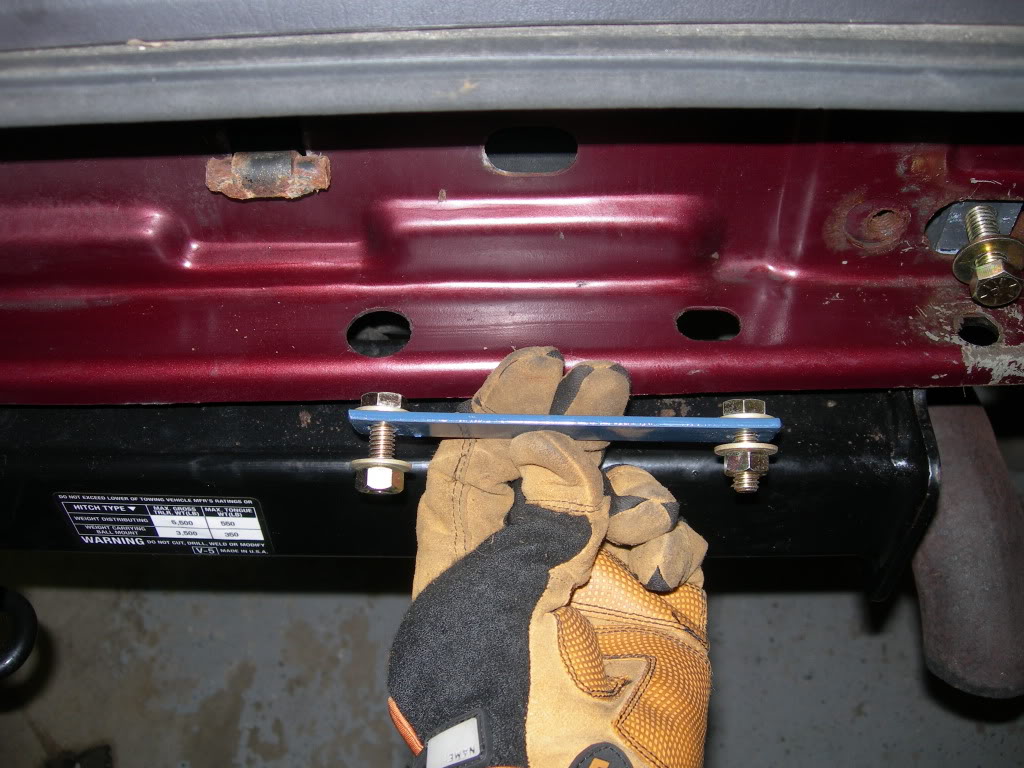
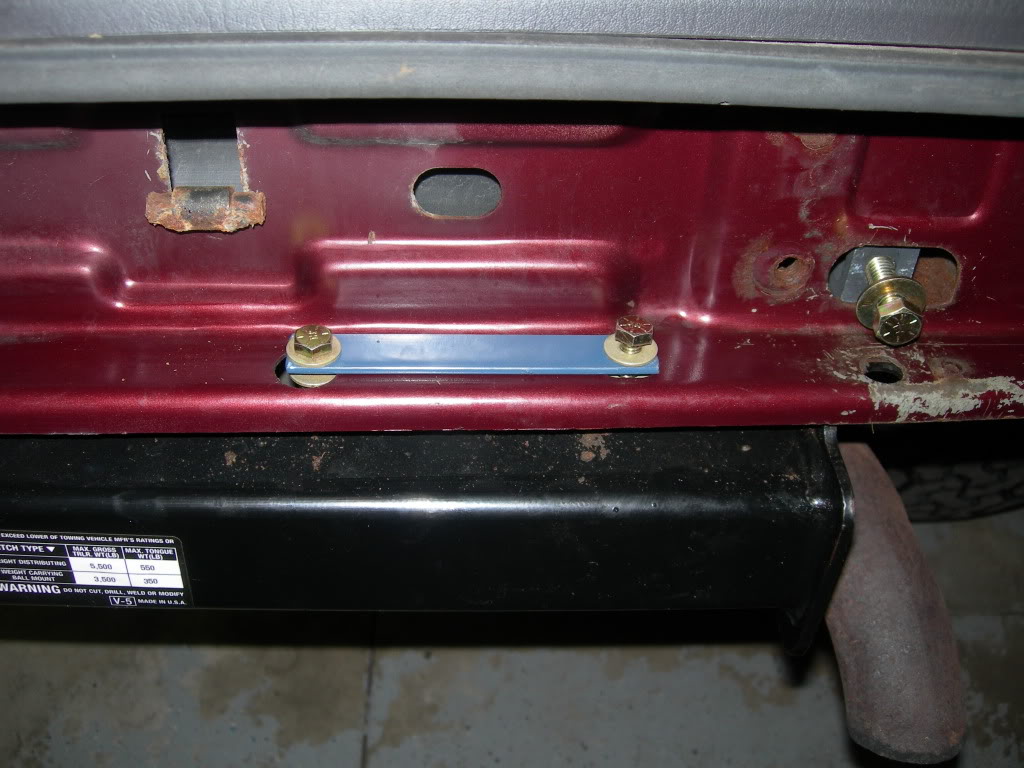
The supplied inserts install into the unibody frame rail. The insert uses the first 2 inboard factory holes. Now, I installed a Hidden Hitch a while back so I had to remove the Hidden Hitch bolts and replace them with the hardware provided.
The insert:
You can see that the insert comes with a retaining plate, which will not be used if you have a hitch in place.
The first 2 inboard bolts of the hitch must be removed:

Once the bolts are removed, I proceeded to install the insert. This insert essentially ties your rear bumper into the unibody frame rail/hitch system.

Then, I reinstalled with the supplied grade 8 hardware. Remember, the hitch is serving as a retaining plate and that is why it's not pictured.
You can see the insert here. I also temporarily removed the flag nut and bolt that belonged to the hitch so that I could pass the insert through the hole.

The supplied inserts install into the unibody frame rail. The insert uses the first 2 inboard factory holes. Now, I installed a Hidden Hitch a while back so I had to remove the Hidden Hitch bolts and replace them with the hardware provided.
The insert:
You can see that the insert comes with a retaining plate, which will not be used if you have a hitch in place.
The first 2 inboard bolts of the hitch must be removed:
Once the bolts are removed, I proceeded to install the insert. This insert essentially ties your rear bumper into the unibody frame rail/hitch system.
Then, I reinstalled with the supplied grade 8 hardware. Remember, the hitch is serving as a retaining plate and that is why it's not pictured.
You can see the insert here. I also temporarily removed the flag nut and bolt that belonged to the hitch so that I could pass the insert through the hole.
Thread Starter
Seasoned Member
Joined: May 2010
Posts: 415
Likes: 0
From: Columbus, OH
Year: 2001
Model: Cherokee
Engine: 4.0 I6
Continuing to follow the instructions, I placed the 3 pinch-lip connections in place:
1:
2:

All 3:
Now it's time to mock up the main rear cross-member:


The bolts are only loosely installed at this point:
Note that the rear cross-member is located above the main cross-member in the hatch/cargo area. I placed it there momentarily to get an idea as to where the main cross-member would tie into the rear cross-member once it was in place.
1:
2:
All 3:
Now it's time to mock up the main rear cross-member:
The bolts are only loosely installed at this point:
Note that the rear cross-member is located above the main cross-member in the hatch/cargo area. I placed it there momentarily to get an idea as to where the main cross-member would tie into the rear cross-member once it was in place.
Last edited by sanchezcruz_20; Jun 11, 2011 at 09:22 PM. Reason: accuracy


Thread Starter
Seasoned Member
Joined: May 2010
Posts: 415
Likes: 0
From: Columbus, OH
Year: 2001
Model: Cherokee
Engine: 4.0 I6
With the main cross-member in place, it was time to install the supporting rear cross-member. The rear cross-member situates between the gas tank and factory cross-member. In this way, the Detours' cross-members sandwich the factory cross-member.
This is the area in question:

This view is laying on my back, looking up.
There isn't much room to work with and I found that the hitch was obstructive in trying to place the rear cross-member. Which led to it's subsequent removal:

I read several write-ups on the Tailbone installation and it seemed like some were able to install their cross-member with the hitch in place while others were not. It probably depedns on your hitch manufacturer/design. Regardless, removal of the hitch was pretty easy since most of the bolts were already loosely installed.
With the hitch out of the way, exposure of the area was increased:
If you look closely, you can see the 2 factory weld-nuts which the bolts will pass through to connect to the rear cross-member.
This is the area in question:
This view is laying on my back, looking up.
There isn't much room to work with and I found that the hitch was obstructive in trying to place the rear cross-member. Which led to it's subsequent removal:
I read several write-ups on the Tailbone installation and it seemed like some were able to install their cross-member with the hitch in place while others were not. It probably depedns on your hitch manufacturer/design. Regardless, removal of the hitch was pretty easy since most of the bolts were already loosely installed.
With the hitch out of the way, exposure of the area was increased:
If you look closely, you can see the 2 factory weld-nuts which the bolts will pass through to connect to the rear cross-member.