
Project Do work - 2001 XJ Build (Pic intensive)

Thread Starter
Seasoned Member
Joined: May 2010
Posts: 415
Likes: 0
From: Columbus, OH
Year: 2001
Model: Cherokee
Engine: 4.0 I6
Just read through your whole thread...again. I like how meticulous you are with everything you do on your jeep- its reminds me how I really need to take the extra time to do things the right way rather than just jump into the project and get it done as quickly as possible. In the end it saves more time and headaches to be thorough and be sure you do it right the first time. Can't wait to see how the bumpers turn out.

Thanks for being a repeat visitor! I always appreciate people dropping comments, keeps me motivated.
Thread Starter
Seasoned Member
Joined: May 2010
Posts: 415
Likes: 0
From: Columbus, OH
Year: 2001
Model: Cherokee
Engine: 4.0 I6
With the hitch out of the way, I could easily slip the rear cross-member into place:

and fasten it down:

Those bolts go through the main Detours' cross-member, through the factory cross-member and finally through the rear Detours' cross-member.
Once the rear cross-member is in place, it's time to start snugging some other bolts up. I tightened down the pinch-lip connectors:

Top of the pinch-lip connection:

Bottom of the pinch-lip connection:

Fasten the remaining connections to the rear cross-member:

and fasten it down:
Those bolts go through the main Detours' cross-member, through the factory cross-member and finally through the rear Detours' cross-member.
Once the rear cross-member is in place, it's time to start snugging some other bolts up. I tightened down the pinch-lip connectors:
Top of the pinch-lip connection:
Bottom of the pinch-lip connection:
Fasten the remaining connections to the rear cross-member:
Thread Starter
Seasoned Member
Joined: May 2010
Posts: 415
Likes: 0
From: Columbus, OH
Year: 2001
Model: Cherokee
Engine: 4.0 I6
Now's a good time to reinstall the htich:

Don't forget to tighten the unibody frame-rail tie-in:

Continuing to tighten things down, I came across a slight hang up with the center pinch-lip connection. Located here:

The provided bolts appeared to be too long and were contacting the gas tank when tightened down. I spent a while scratching my head, trying to figure out if I could insert the bolt from the back which would position the nut on the outside, allowing more clearance for the gas tank but the area was just too tight to allow the bolt to flip into place.
So, I went out to Lowes and simply bought a shorter bolt:

Which resulted in a perfect fit:

Still pretty tight back there but at least I don't have to worry about the bolts wearing a hole in the tank.
Don't forget to tighten the unibody frame-rail tie-in:
Continuing to tighten things down, I came across a slight hang up with the center pinch-lip connection. Located here:
The provided bolts appeared to be too long and were contacting the gas tank when tightened down. I spent a while scratching my head, trying to figure out if I could insert the bolt from the back which would position the nut on the outside, allowing more clearance for the gas tank but the area was just too tight to allow the bolt to flip into place.
So, I went out to Lowes and simply bought a shorter bolt:
Which resulted in a perfect fit:
Still pretty tight back there but at least I don't have to worry about the bolts wearing a hole in the tank.
Thread Starter
Seasoned Member
Joined: May 2010
Posts: 415
Likes: 0
From: Columbus, OH
Year: 2001
Model: Cherokee
Engine: 4.0 I6
With the mounting hardware in place, it's time to focus on modifying the bumper skin. The instructions are pretty clear on how to do this, but basically you find the center of the bumper and make your measurements for the d-ring cut-outs from there.
Find the center line:

Measure out the indicated length and mark it off:

Do a final check before cutting by laying the bumper on top of the main cross-member:

I marked off the cross line for the top of the cut-out per the instructions, but also went one step further and measured for the bottom cross line:

Using your tool of choice, make your incsions. I used an angle grinder and cut-off wheel:
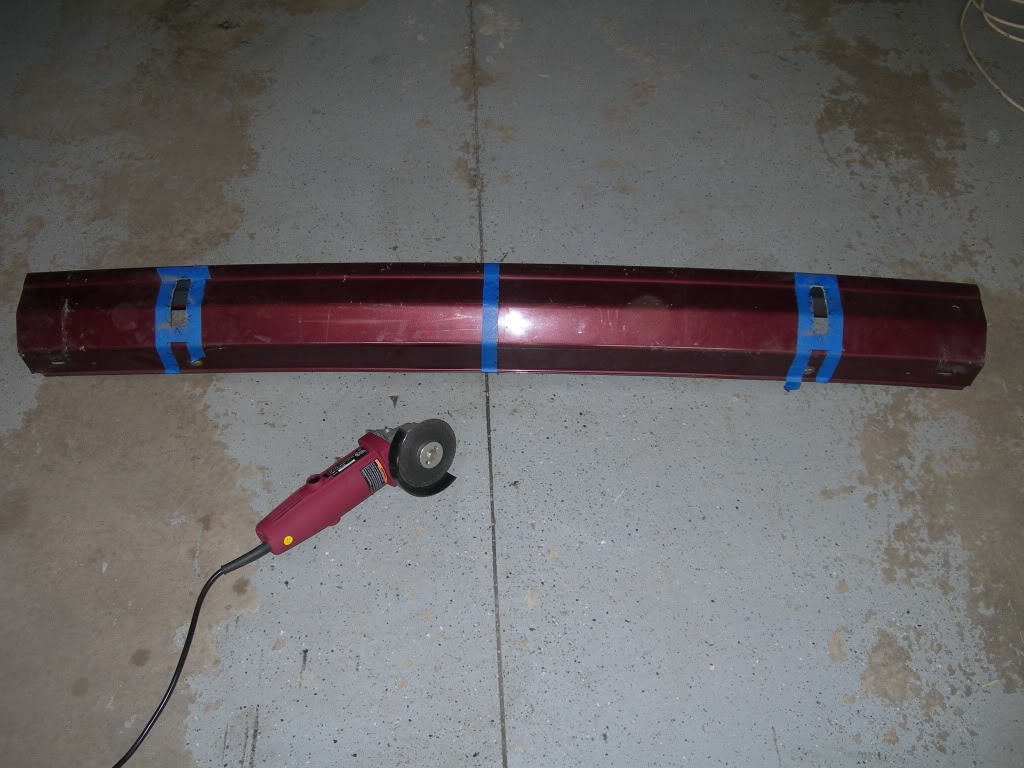
Use the provided decals to demarcate for drilling the mounting holes:

Drill out the holes per the instructions:

Test fitting:

Find the center line:
Measure out the indicated length and mark it off:
Do a final check before cutting by laying the bumper on top of the main cross-member:
I marked off the cross line for the top of the cut-out per the instructions, but also went one step further and measured for the bottom cross line:
Using your tool of choice, make your incsions. I used an angle grinder and cut-off wheel:
Use the provided decals to demarcate for drilling the mounting holes:
Drill out the holes per the instructions:
Test fitting:

Newbie
Joined: May 2011
Posts: 6
Likes: 0
Model: Cherokee
Haha, I noticed something reading through this thread. You're in the medical field somehow, aren't you? I noticed you used medical terminology a couple of times + I swear I thought I saw a "chuck" in one of your pics 
Thread Starter
Seasoned Member
Joined: May 2010
Posts: 415
Likes: 0
From: Columbus, OH
Year: 2001
Model: Cherokee
Engine: 4.0 I6
Thanks guys. I think you're gonna like the finished product once I get the pics up.
Lol, yes, I'm in the medical field... work in surgery. I guess it's possible that some of the medical jargon makes it's way into my thread.
I have the Tailbone all finished up, but I'm real busy today and attending a wedding this afternoon so I won't have any updates til later tonight probably but I'll keep everyone posted.
Thanks for checking out my thread people!
I have the Tailbone all finished up, but I'm real busy today and attending a wedding this afternoon so I won't have any updates til later tonight probably but I'll keep everyone posted.
Thanks for checking out my thread people!
Thread Starter
Seasoned Member
Joined: May 2010
Posts: 415
Likes: 0
From: Columbus, OH
Year: 2001
Model: Cherokee
Engine: 4.0 I6
Happy with the test fit, I proceeded to install the carrier mounting plates:


Greased up the swing arm hinge:

Installed the swing arm, it just slides on and bolts in place:

The latch is fastened by 4 bolts:

Finally, I secured the bottom of the carrier mounting plates to the bumper by drilling the appropriate sized hole and installing the provided hardware:


You can see the bolts coming through:

Greased up the swing arm hinge:
Installed the swing arm, it just slides on and bolts in place:
The latch is fastened by 4 bolts:
Finally, I secured the bottom of the carrier mounting plates to the bumper by drilling the appropriate sized hole and installing the provided hardware:
You can see the bolts coming through:
Thread Starter
Seasoned Member
Joined: May 2010
Posts: 415
Likes: 0
From: Columbus, OH
Year: 2001
Model: Cherokee
Engine: 4.0 I6
I still have a little work to do.....


Yeah, I still need to remove the adhesive from where I replaced the driver door when it got broken into.


- Gotta decide whether or not I want to paint/bed line the bumper. It's pretty scratched up. The only reason I'm not sure if I will is because having the bumper color matched to the XJ is a nice contrast to the black tire carrier. Hmmm...
- Have to reinstall the bumper end caps. I think that'll improve the overall look of the XJ's rear end, except before I do that, I have to trim them a little b/c they aren't going to fit as nicely since I recently trimmed the rear fender wells.
- I also have a little touching up to do here and there where I gouged some of the bed liner while installing the hardware
Yeah, I still need to remove the adhesive from where I replaced the driver door when it got broken into.


Cherokee Forum Vendor
Joined: Feb 2010
Posts: 737
Likes: 2
From: Black Diamond Foothills, KY.
Year: Multi
Model: Cherokee
You are one CrAzY man with the camera & detail, thankyou for detailing your install......(TailBone)
Everything looks 'as planned' from the shop, afterall, it's already been installed once, prior to leaving the shop.
Your lower, center, 2 bolt crossmember issue........it's intended the bolts be fed through the other direction.........a shifted fuel tank, a full fuel tank are the 2 reasons we've encountered for not being able to feed the bolts through.....typically the poly tank can be flexed back, bolts inserted......You handled it in a well manored way with different bolts, either way....as long as it dosent rub.
Excellent job!
One thing over looked unless my brain is picked.......Bedliner sprays, no matter what brand......should be applied in the shade, not in direct sunlight, you covered this in your garage...........NICE WORK!
Thankyou for taking the time to write up!
Cherokee Forum Vendor
Joined: Feb 2010
Posts: 737
Likes: 2
From: Black Diamond Foothills, KY.
Year: Multi
Model: Cherokee