
I got the carpet pretty darn close to perfect, seats installed and the center console installed. Then the dog jumped in the bed and wanted to go for a ride. So we did a 15 mile loop on the gravel roads out here. The truck ran great. Driving this 2.5 kind of reminds me of driving my old 4.2 YJ with 3.07 gears.
Then I upgraded the headlights.
IPF Housings and 55w H4 HID kit

Light pattern:

The dreaded Medium Blue keeps disappearing!


I did not like the excessive forward rake the truck had once I pulled the topper, so I installed the 1/2" isolators that came with the coil spacers.


Pulled the plastic bedliner today as well. I am pretty sure it has been in the bed since the truck was new. The paint underneath still had a metallic sheen to it, LIKE NEW! No picture of the bed floor
I found my old Unidien 520 XL CB and took the antenna/mount my father removed from his Rubi then went to Radio Shack and picked up 20' of antenna cable. Why 20' for the tiny MJ? Less tuning required to make the SWR meter happy. I hope to get it installed this week.
Then I upgraded the headlights.
IPF Housings and 55w H4 HID kit
Light pattern:
The dreaded Medium Blue keeps disappearing!
I did not like the excessive forward rake the truck had once I pulled the topper, so I installed the 1/2" isolators that came with the coil spacers.
Pulled the plastic bedliner today as well. I am pretty sure it has been in the bed since the truck was new. The paint underneath still had a metallic sheen to it, LIKE NEW! No picture of the bed floor
I found my old Unidien 520 XL CB and took the antenna/mount my father removed from his Rubi then went to Radio Shack and picked up 20' of antenna cable. Why 20' for the tiny MJ? Less tuning required to make the SWR meter happy. I hope to get it installed this week.
CF Veteran
You on comancheclub?Looking good so far. Did the 86 come with injectors or carb. I myself am trying to decide which year comanche I would like to get.
Quote:
Yep, same user name on CC.Originally Posted by NorCalJeep
You on comancheclub?Looking good so far. Did the 86 come with injectors or carb. I myself am trying to decide which year comanche I would like to get.
The 86 came with either a carbed or TBI 2.5 or a carbed 2.Hate. Mine is a TBI 2.5.
CF Veteran
Quote:
The 86 came with either a carbed or TBI 2.5 or a carbed 2.Hate. Mine is a TBI 2.5.
Should I look for an 87 up than?Originally Posted by 87Warrior
Yep, same user name on CC.The 86 came with either a carbed or TBI 2.5 or a carbed 2.Hate. Mine is a TBI 2.5.
Honestly, if you want an MJ, just look for the cleanest, rust free truck you can find. These things are easy to do a drivetrain swap in.
That said, the 4.0 is they way to go. And just as with the XJ, that was introduced in 87.
That said, the 4.0 is they way to go. And just as with the XJ, that was introduced in 87.
Moderator of Jeeps
91/92 have HO motors if you can find one. Pioneer models came with the full skid package. Metric Tonne models have D44, towing package, 1" taller stock springs, and I think 4.10s.
CF Veteran
Quote:
Thanks for the input. Just finding a comanche would be nice. They seem to be disappearing.Originally Posted by NewKindOfClown
91/92 have HO motors if you can find one. Pioneer models came with the full skid package. Metric Tonne models have D44, towing package, 1" taller stock springs, and I think 4.10s.
CB antenna is installed. Need to get the radio installed in the cab and run the coax. One step closer to communication. Then to install swaybar discos.

Really enjoying the truck. It found its way to our pasture near our ponds.
Really enjoying the truck. It found its way to our pasture near our ponds.
JKS discos installed. Here she is playing around in the back yard:

It really needs longer shocks.
I have also been driving this thing every chance I get. I have put 1000 miles on it since it was tagged and has been getting 20 mpg. I expect the mileage to improve once I install a proper thermostat (it doesn't go above 150).
My dog (the small lab) and I had to go pick up my folks' dogs. He really enjoys the MJ:

(Hey, the truck doesn't look 1/2 bad with a layer of dirt on it)
It really needs longer shocks.
I have also been driving this thing every chance I get. I have put 1000 miles on it since it was tagged and has been getting 20 mpg. I expect the mileage to improve once I install a proper thermostat (it doesn't go above 150).
My dog (the small lab) and I had to go pick up my folks' dogs. He really enjoys the MJ:
(Hey, the truck doesn't look 1/2 bad with a layer of dirt on it)
The truck finally has a matching set of Turbines, sporting all of the 80's wheel goodness. Here she is out on our property, it looks right at home:

I replaced the stock, leaking, plastic valve cover with a late model aluminium cover. The auto parts store tried to sell me a cork gasket, which I refused due to past experiences. Discovered a Dakota 2.5 has the same shape/size valve cover as Jeep and has a perma-dry gasket available. Installed the new gasket and valve cover and presto, no more engine leaks.
I also took the time to remove the CAD lines and replaced several dry rotted vacuum lines. It seems to run better, but its still rough once warmed up. I suspect the O2 sensor is the original 166k mile unit and needs replaced.

Hmmm. I did get exhaust on it:

Other than that and replacing an O2 sensor, I have just been driving it. Also took it wheeling a few times.


Other than that and replacing an O2 sensor, I have just been driving it. Also took it wheeling a few times.
The ol' 86 just keeps on a keeping on. She has turned 172,000 miles and still only burns 1/4 quart of oil every 5,000 miles. Although, I do have a random miss and loss of power I can't figure out.
Just a glamour shot of the beast:

Replaced the radiator that has been flopping around in its mounts since I bought the truck. It just seemed like an accident waiting to happen, probably when I would be a long ways from home....
- Flushed the slimy brown/green gunk from the radiator/motor
- Radiator
- Thermostat
- Upper and lower hoses
- Fresh extended life coolant

This past Sunday morning I decided to drive some of the county roads I haven't been on in quite some time. The rural roads of Kansas never cease to amaze me!

Just a glamour shot of the beast:
Replaced the radiator that has been flopping around in its mounts since I bought the truck. It just seemed like an accident waiting to happen, probably when I would be a long ways from home....
- Flushed the slimy brown/green gunk from the radiator/motor
- Radiator
- Thermostat
- Upper and lower hoses
- Fresh extended life coolant
This past Sunday morning I decided to drive some of the county roads I haven't been on in quite some time. The rural roads of Kansas never cease to amaze me!
After owning this truck for almost 3 years, I finally decided to fix three of its biggest annoyances.
1. Replaced the front output seal on the transfercase as it always left a pool of blood under the truck. I used a Timken seal that was designed much differently than the seal that was in there. Hopefully it is an improvement.
2. The shift ****. The stock **** would spin in circles and, sometimes, it would pull off of the shifter...not fun. Replaced it with a solid aluminum shifter from Rampage. Sure it was a little more expensive than a stock replacement, but it should never fail in the same way.
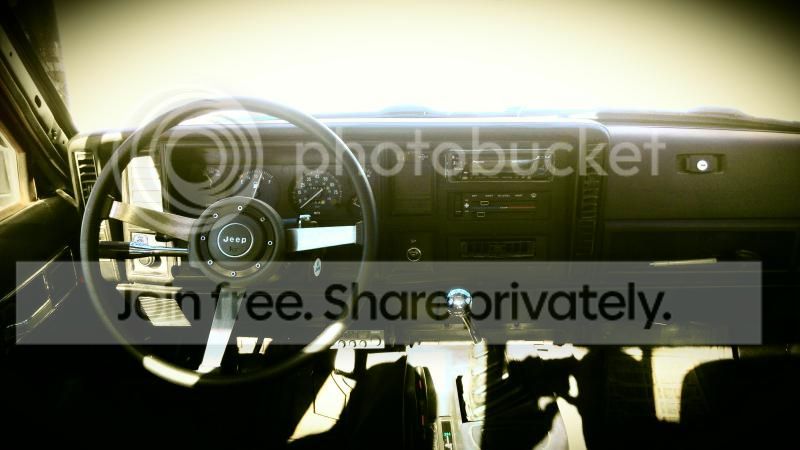
3. The Cessna yoke steering wheel had to go. Replaced it with an extra traditional 3 spoke I had laying around. This project isn't complete though as I still have to install the NAPA horn repair kit. Not a big deal since I can shout louder than the horn in this truck.
Now that the summer heat has left Kansas, I decided to start on the front axle project so I can get a new set of AT3's mounted before winter hits.
Non disco D30 gone through.
- New Spicer Ball Joints
- New Napa Unit Bearings
- New Moog UCA bushings in housing
- Replaced calipers, rotors and pads with lightly used parts from TJ
- New Dorman Chevy 1500 brake hoses (these are much nicer than the YJ hoses)
- Used 3" TJ lift springs

Now she is back on the road.

The truck drives much nicer now. The Chrysler style front brakes, albeit a poor design with the one piece knuckle, stop the truck much better than the AMC style brakes that were on it. Plus it is nice to have more parts interchange with newer Jeeps. Before the front end rebuild it felt like a squishy couch swaying down the road (according to my wife), even with the swaybar connected. Now it hugs the road like a Miata....ok maybe not, but the overall handling is much improved.
The TJ 3" coils actually lifted the front of the truck 3", not the 2" that I was anticipating. This is probably due to the springs being stiffer for a heavier 6 cylinder. I am not complaining since it eliminated the forward rake. As you can see in the picture the stock trackbar is too short now, so the axle is sitting further to the driver side. I will install a used RE1600 trackbar when the new frame side end arrives.
Rebuilt leaf springs. Added an extra leaf by cutting the eyes off of an extra MJ main leaf. I coated each leaf in POR15 and Slip Plate and replaced the worn out anti-friction pads. I had to build new spring clamps as well.

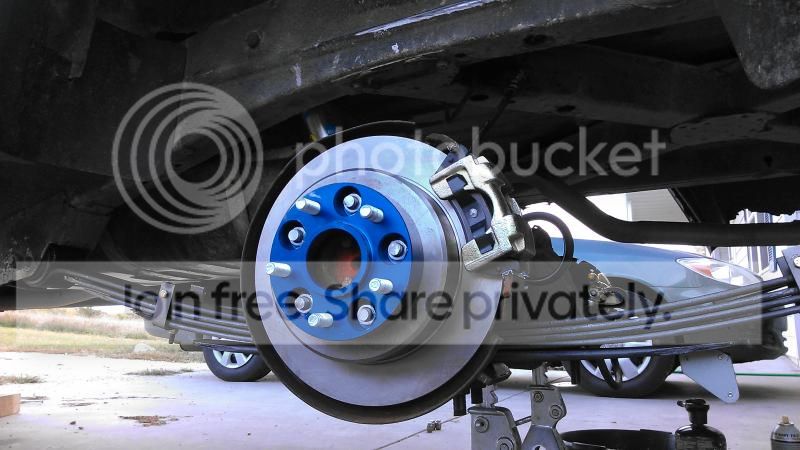
Oh hey, that sure is a funny looking Jeep axle... Got the 8.8 loosely under the truck. Still need to get the shock tabs welded to the housing. Using the Ruff Stuff kit let me position the axle 1" to the back which will allow me to use the stock driveshaft. The truck sits great with the AAL and larger 8.8 axle tube. Waiting for the spacers and brake parts to finish it up.

Parts finally started to roll in to get the rear end buttoned up. First up was the NAPA rotors and SpiderTrax spacers. Followed by loaded Centric calipers and Dorman hoses, all for a 1998 Explorer of course.
I picked up set of gently used Bilstein 5125 shocks intending to use them on my 92 build. They seemed too perfect for this truck so I elected to go ahead and use them.
I then ran into a snag with the lower shock mount. Very few folks swap in the 8.8 and keep it spring under. The small shock mounts that come with the 8.8 swap kits would effectively mount the shock 4" higher than stock. That is not acceptable to have any travel in the rear. I ended up modifying a TJ shock bracket that came with a MAD4x4 8.8 swap kit I never used.

I really need to install a new bumpstop and reconfigure the brake line mounting.
I dropped her back on the ground, installed the front driveshaft and a new V8 ZJ draglink then went for a drive. The truck rode very smooth, the 8.8 was nice and quiet, and the brakes work phenomenally.
Look ma', NEW SHOES!
265/75R15 Cooper Discoverer AT3


1. Replaced the front output seal on the transfercase as it always left a pool of blood under the truck. I used a Timken seal that was designed much differently than the seal that was in there. Hopefully it is an improvement.
2. The shift ****. The stock **** would spin in circles and, sometimes, it would pull off of the shifter...not fun. Replaced it with a solid aluminum shifter from Rampage. Sure it was a little more expensive than a stock replacement, but it should never fail in the same way.
3. The Cessna yoke steering wheel had to go. Replaced it with an extra traditional 3 spoke I had laying around. This project isn't complete though as I still have to install the NAPA horn repair kit. Not a big deal since I can shout louder than the horn in this truck.
Now that the summer heat has left Kansas, I decided to start on the front axle project so I can get a new set of AT3's mounted before winter hits.
Non disco D30 gone through.
- New Spicer Ball Joints
- New Napa Unit Bearings
- New Moog UCA bushings in housing
- Replaced calipers, rotors and pads with lightly used parts from TJ
- New Dorman Chevy 1500 brake hoses (these are much nicer than the YJ hoses)
- Used 3" TJ lift springs
Now she is back on the road.
The truck drives much nicer now. The Chrysler style front brakes, albeit a poor design with the one piece knuckle, stop the truck much better than the AMC style brakes that were on it. Plus it is nice to have more parts interchange with newer Jeeps. Before the front end rebuild it felt like a squishy couch swaying down the road (according to my wife), even with the swaybar connected. Now it hugs the road like a Miata....ok maybe not, but the overall handling is much improved.
The TJ 3" coils actually lifted the front of the truck 3", not the 2" that I was anticipating. This is probably due to the springs being stiffer for a heavier 6 cylinder. I am not complaining since it eliminated the forward rake. As you can see in the picture the stock trackbar is too short now, so the axle is sitting further to the driver side. I will install a used RE1600 trackbar when the new frame side end arrives.
Rebuilt leaf springs. Added an extra leaf by cutting the eyes off of an extra MJ main leaf. I coated each leaf in POR15 and Slip Plate and replaced the worn out anti-friction pads. I had to build new spring clamps as well.
Oh hey, that sure is a funny looking Jeep axle... Got the 8.8 loosely under the truck. Still need to get the shock tabs welded to the housing. Using the Ruff Stuff kit let me position the axle 1" to the back which will allow me to use the stock driveshaft. The truck sits great with the AAL and larger 8.8 axle tube. Waiting for the spacers and brake parts to finish it up.
Parts finally started to roll in to get the rear end buttoned up. First up was the NAPA rotors and SpiderTrax spacers. Followed by loaded Centric calipers and Dorman hoses, all for a 1998 Explorer of course.
I picked up set of gently used Bilstein 5125 shocks intending to use them on my 92 build. They seemed too perfect for this truck so I elected to go ahead and use them.
I then ran into a snag with the lower shock mount. Very few folks swap in the 8.8 and keep it spring under. The small shock mounts that come with the 8.8 swap kits would effectively mount the shock 4" higher than stock. That is not acceptable to have any travel in the rear. I ended up modifying a TJ shock bracket that came with a MAD4x4 8.8 swap kit I never used.
I really need to install a new bumpstop and reconfigure the brake line mounting.
I dropped her back on the ground, installed the front driveshaft and a new V8 ZJ draglink then went for a drive. The truck rode very smooth, the 8.8 was nice and quiet, and the brakes work phenomenally.
Look ma', NEW SHOES!
265/75R15 Cooper Discoverer AT3
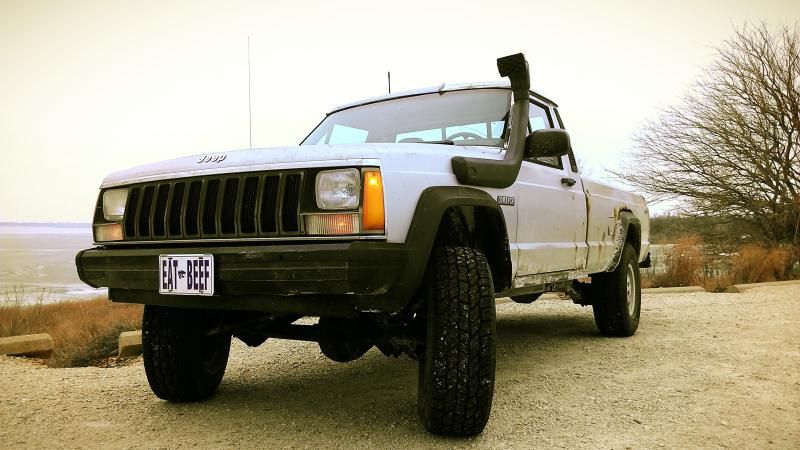
Its time for an update. My overall goal for this truck has slowly been transforming from a basic daily driver to a test mule. Test mule for what? Overland/adventure gear I will eventually incorporate into my '92 build for a cross country trip, when the time comes. This will primarily consist of solar/power equipment, bed storage, skids and recovery gear. My goal is to iron out any wrinkles in my gear prior to installing it on the '92. Since I will try and push my gear beyond my intended use on the '92, I have to get this truck up to snuff. First trip is in the Spring, Ozark National Forest in AR.
First step, snorkel.
Since I am building this truck on the cheap, I opted to give the China made Amazon snorkel a try.

My first step was to clean up a HO 4.0 air box to use in the truck. I opted to use the HO air box since the filters are easily found at the parts stores (unlike the 86 air filters) and it eliminates the vacuum doors in the air box. I fastened the snorkel adapter to the front of the air box with button head bolts with lock washers and sealer.
Measure, measure, measure. Then drill! My measurements were vastly different than the template provided. You have to elongate the the 3" hole towards the back to allow the curved snorkel tube to fit through.

Test fit the snorkel body, crossing your fingers that you measured correctly. Not pictured is the a-pillar bracket riveted to the windshield frame. I used my own stainless rivets not the provided rivets.

HO air box plumbed in to the 2.5 TBI unit. I am not crazy about the twist in the intake tube, but I highly doubt it will affect the 2.5's performance.

Installed and ready for action.
First step, snorkel.
Since I am building this truck on the cheap, I opted to give the China made Amazon snorkel a try.
My first step was to clean up a HO 4.0 air box to use in the truck. I opted to use the HO air box since the filters are easily found at the parts stores (unlike the 86 air filters) and it eliminates the vacuum doors in the air box. I fastened the snorkel adapter to the front of the air box with button head bolts with lock washers and sealer.
Measure, measure, measure. Then drill! My measurements were vastly different than the template provided. You have to elongate the the 3" hole towards the back to allow the curved snorkel tube to fit through.
Test fit the snorkel body, crossing your fingers that you measured correctly. Not pictured is the a-pillar bracket riveted to the windshield frame. I used my own stainless rivets not the provided rivets.
HO air box plumbed in to the 2.5 TBI unit. I am not crazy about the twist in the intake tube, but I highly doubt it will affect the 2.5's performance.
Installed and ready for action.