
Out with the new, in with the old...1998 XJ Build

Thread Starter
CF Veteran
Joined: Feb 2011
Posts: 1,048
Likes: 0
From: Georgia
Year: 2004
Model: Grand Cherokee (WJ)
Engine: 4.0 Inline 6

As far as know how, just jump in. You can figure it out as you go. This forum has been a wealth of knowledge for me.
Thread Starter
CF Veteran
Joined: Feb 2011
Posts: 1,048
Likes: 0
From: Georgia
Year: 2004
Model: Grand Cherokee (WJ)
Engine: 4.0 Inline 6
I figured I would throw this out here for anyone considering changing out their heater core and evaporator core. I copied some of it from another write up so I did not have to do a lot of typing but the photos are mine and my actual replacement.
You DO NOT have to remove the seats or the entire steering column and steering wheel to do this job. I think the service manual tells you that but you don't.
The job is not as bad as I thought it would be but it is time consuming and I learned that you need to check all moving parts in the heater box before reinstalling or you will be taking it back out. Fortunately I checked it before reinstalling all the dashboard.
Here goes:
1) Disconnect the negative battery terminal because you'll have your doors open and courtesy lights on for a LONG time and so your airbags don't go off when you're in the middle of removing the dash.......don't be lazy...DO THIS NOW. After that and while you're waiting for the capacitors to discharge and for your airbags to be safe, go ahead and start removing the following:
2) Both lower a-pillar trim panels (or kick panels, whatever you call them)
3) The lower steering column cover/metal knee blocker
4) Remove the center bezel that covers up your stereo/heater controls/switch panel
5) Remove your headlamp **** by reaching up and pressing the release button on the inboard side of the headlamp switch. The **** should just slide out.
6) If you have tilt steering, set it to the lowest position and disconnect the rubber steering column surround.
7) Remove the instrument cluster bezel (held in by snaps and four screws)
8) Pry the rear edge of the top cover up to disengage the seven snaps.
9) Once clear, pull the entire top cover rearward and disengage the remaining four snaps.
10) Remove your shift **** (it helps if it's in 1-2, sit in the back seat, brace yourself and give it a good pull and it should come off. Don't punch yourself in the face while doing this)
11) Remove the shifter and transfer case bezels and unplug the light bulbs.
12) At this point, you can remove the two screws holding the front of the center console down. Open the console and remove the remaining two screws and the console should be able to be removed. It might take a bit of finessing to get around the parking brake handle though so be careful.
13) Pull the carpet (if you have carpet) back far enough so you can see the two lower nuts holding the panel center support bracket to the tranny tunnel.
14) Remove the two lower nuts and the two upper nuts and remove the bracket from the vehicle.
14a) Remove the two bolts holding the steering column up and gently let it down so the steering wheel rests on the drivers seat. See pic of bolts:
Last edited by Marks2000XJ; Apr 12, 2014 at 10:15 AM.
Thread Starter
CF Veteran
Joined: Feb 2011
Posts: 1,048
Likes: 0
From: Georgia
Year: 2004
Model: Grand Cherokee (WJ)
Engine: 4.0 Inline 6
15) At this point, you can switch sides and roll down the glove box. There's two rubber stoppers and if you remove them, the glove box will rotate clear allowing you to gain access to the rear of the HVAC box.
16) On the lefthand side of the glovebox opening, you should see the white vacuum connector. Disconnect the two halves. Also, you should see a big green connector for the blower motor. Disconnect this as well.
17) Reach under the righthand side by the fuse panel and disconnect the two halves of the antenna cable.
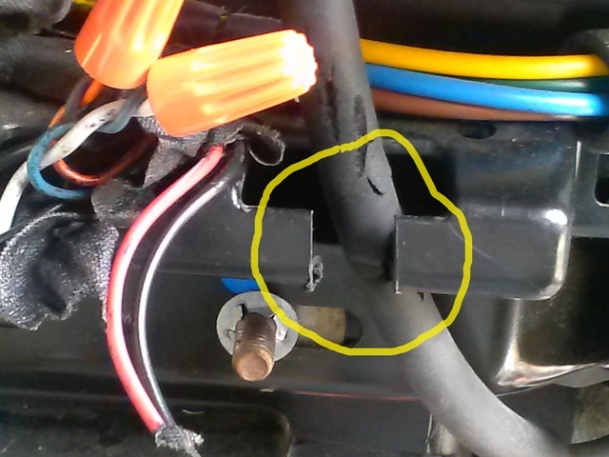
18) You can go two different ways with this next step. The book says the remove the temperature control cable from the HVAC box by unscrewing the blend-air door bellcrank from the door shaft underneath the dash. I couldn't get it unscrewed so I removed the heater control panel, separated the cable from the control head and cut a notch in the plastic to slip the cable out so it hung clear and out of the way. You can do whatever is easiest for you. See pic:

19) Loosen the left and right dash roll-down screws about 1/4" They're located right next to each courtesy lamp so they're easy to find.
20) Remove the four bolts that secure the upper-forward edge of the dash to the firewall. There are two on the left and two on the right.
21) After the bolts are out, remove the two nuts (upper forward edge) holding the center of the dash to the firewall. The dash won't fall away with these removed as the studs are still holding it in.
22) With some help (I did it alone and it was a struggle for me) lift the dash up off the two center studs and then pull it backwards to clear the roll-down bolts. Your dash area should now (hopefully) resemble this:


16) On the lefthand side of the glovebox opening, you should see the white vacuum connector. Disconnect the two halves. Also, you should see a big green connector for the blower motor. Disconnect this as well.
17) Reach under the righthand side by the fuse panel and disconnect the two halves of the antenna cable.
18) You can go two different ways with this next step. The book says the remove the temperature control cable from the HVAC box by unscrewing the blend-air door bellcrank from the door shaft underneath the dash. I couldn't get it unscrewed so I removed the heater control panel, separated the cable from the control head and cut a notch in the plastic to slip the cable out so it hung clear and out of the way. You can do whatever is easiest for you. See pic:
19) Loosen the left and right dash roll-down screws about 1/4" They're located right next to each courtesy lamp so they're easy to find.
20) Remove the four bolts that secure the upper-forward edge of the dash to the firewall. There are two on the left and two on the right.
21) After the bolts are out, remove the two nuts (upper forward edge) holding the center of the dash to the firewall. The dash won't fall away with these removed as the studs are still holding it in.
22) With some help (I did it alone and it was a struggle for me) lift the dash up off the two center studs and then pull it backwards to clear the roll-down bolts. Your dash area should now (hopefully) resemble this:


Thread Starter
CF Veteran
Joined: Feb 2011
Posts: 1,048
Likes: 0
From: Georgia
Year: 2004
Model: Grand Cherokee (WJ)
Engine: 4.0 Inline 6
23) Once I had the dash pulled back and tied off, I got under the hood and disconnected my heater core hoses and put a temporary by-pass in until I can completely finish everything.
24) My a/c had no charge so I did not have to worry about recovering any refrigerant because there was none so I went ahead and disconnected my evaporator lines going out the firewall. There is also a vacuum hose coming out that goes to a t-connection that you will have to unplug as well.
25) Once you have heater core and evaporator core disconnected you can start undoing the nuts that hold the heater box in. There are five of them on the firewall. There is one next to the blower motor, two holding the a/c receiver/dryer bracket on then two fun nuts that are behind the engine. One is located behind the valve cover which is not too bad but the other one below it is kind of hard to get to and you will need a wrench and small hands.
26) Once you get this out you can remove the heater box finally. If you have made it this far and not killed anyone yet then you have it made.

I won�t detail how to get the box open as it is pretty self explanatory but it does help if you remove the blower motor first. Replace heater core and evaporator core and put the box back together.
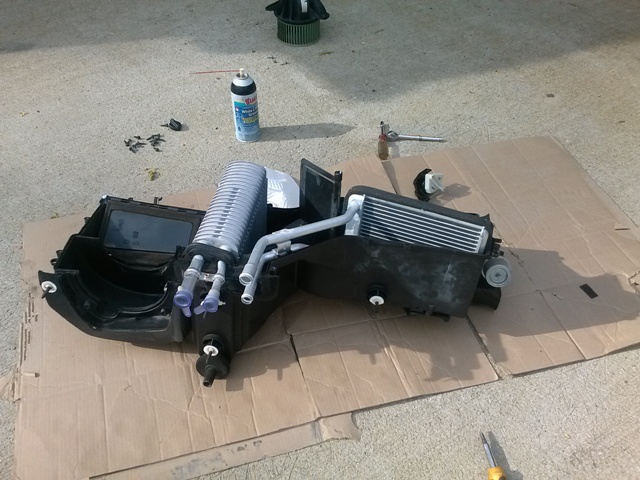
27) Make sure you have everything lined up right when putting the box back together. I advise using some sort of grease to grease all blend door hinges etc. Then make sure to check your blend door using the cable and hot/cold **** to operate it prior to reinstalling the box. I installed the box back then checked for blend door operation and had to take it back out. At least I did not have the dash put back in.
Last edited by Marks2000XJ; Apr 12, 2014 at 10:25 AM.
Thread Starter
CF Veteran
Joined: Feb 2011
Posts: 1,048
Likes: 0
From: Georgia
Year: 2004
Model: Grand Cherokee (WJ)
Engine: 4.0 Inline 6
Once you install the heater box back in, everything just goes back together like you took it out. I bagged and zip tied my evaporator core outlets in the engine compartment to keep getting junk in them while I put everything back together. I will install the new a/c compressor, receiver, and orifice tube next weekend when I have more time to finish it up. I will also flush the radiator and install new hoses and get the heater core hooked back up.
I have not included every little detail of the process but it is not hard to figure out the little things as you go. But this is the general jist of the whole deal. Anyway, if you decide to tackle this, have fun!
I have not included every little detail of the process but it is not hard to figure out the little things as you go. But this is the general jist of the whole deal. Anyway, if you decide to tackle this, have fun!
Thread Starter
CF Veteran
Joined: Feb 2011
Posts: 1,048
Likes: 0
From: Georgia
Year: 2004
Model: Grand Cherokee (WJ)
Engine: 4.0 Inline 6
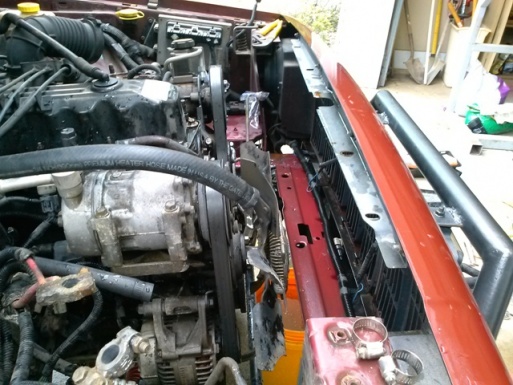
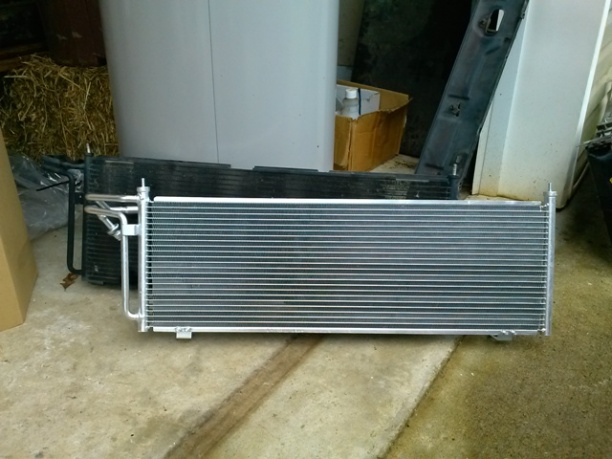
I have not updated in a while. My job keeps me busy so I have small windows of time to work on the jeep. This past weekend I was able to get the new condenser installed, cooling system flushed and installed all new heater hoses and radiator hoses, t-stat and housing.
I had to remove the drain and remove the radiator to get the old condenser out so I figured it was a good time to flush the entire cooling system and replace the two short heater hoses that went to my heater core. I had to cut them off the old core because they were stuck so they were an inch or two short when I temporarily reinstalled them.
I have a three day weekend coming up so I should be able to completely finish my a/c system overhaul. Everything will be brand new on it.
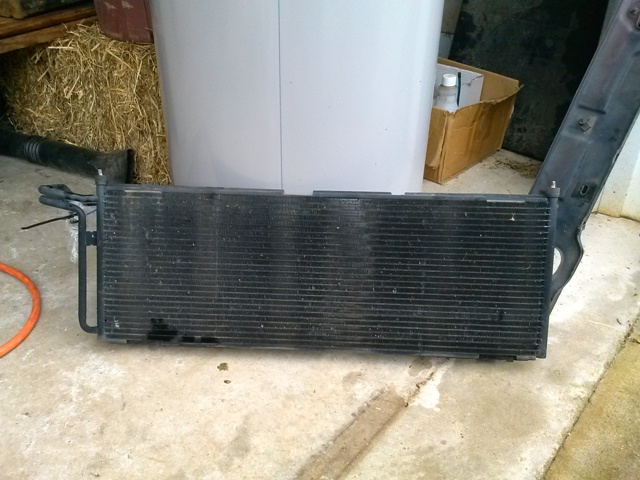
Old core removed:

I had to remove the drain and remove the radiator to get the old condenser out so I figured it was a good time to flush the entire cooling system and replace the two short heater hoses that went to my heater core. I had to cut them off the old core because they were stuck so they were an inch or two short when I temporarily reinstalled them.
I have a three day weekend coming up so I should be able to completely finish my a/c system overhaul. Everything will be brand new on it.
Old core removed:


Thread Starter
CF Veteran
Joined: Feb 2011
Posts: 1,048
Likes: 0
From: Georgia
Year: 2004
Model: Grand Cherokee (WJ)
Engine: 4.0 Inline 6
My shiny new condenser 
I did not get any shots of it installed but I will along with some other pics of the new lines and compressor, etc.

I did not get any shots of it installed but I will along with some other pics of the new lines and compressor, etc.
Thread Starter
CF Veteran
Joined: Feb 2011
Posts: 1,048
Likes: 0
From: Georgia
Year: 2004
Model: Grand Cherokee (WJ)
Engine: 4.0 Inline 6

Thread Starter
CF Veteran
Joined: Feb 2011
Posts: 1,048
Likes: 0
From: Georgia
Year: 2004
Model: Grand Cherokee (WJ)
Engine: 4.0 Inline 6
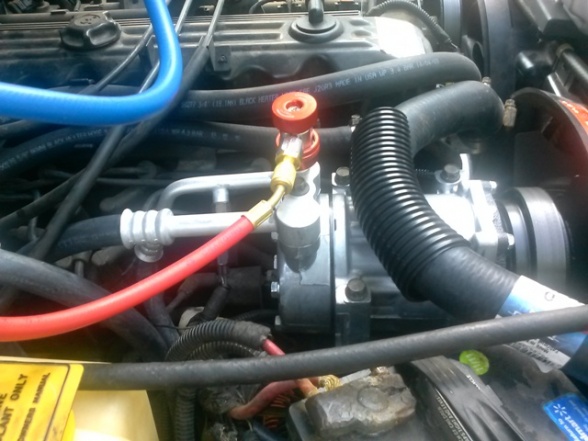
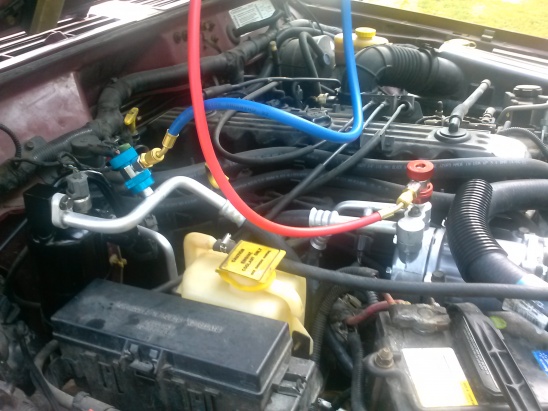
I did finally get all the new a/c components installed, vacuumed, and charged but do not like the final results. I am not sure what happened. Not sure if trash got in the system somehow or what.
I can only get 60* coming out the vents at idle and 50* when moving. I will probably have to take it back apart and flush the lines out, vacuum and recharge the system again.
Something I will do different this time is not put all the oil in the compressor. I will divide it up in the system this time. The compressor called for 8oz. of oil so I put it all in there and figured it would get distributed in the system with the freon. I used just plain freon with no oil in it.
When I initially charged it, temps coming out of the vents was like 70* degrees. I bled some of the oil out through the high side and got the idle temp down to 60* but that is the best I could get. According to the gauges, the high side psi is a little more than should be which leads me to believe there must be trash in the system.
All the new parts were sealed or capped on the ends or openings so I just assumed they did not need cleaning out or blown out. I guess there could have been some trash in them from manufacturing. This is just a wild guess though. What has me baffled though is how once I bled some of the oil out of the system the temp got cooler? Anyway, not looking forward to tearing it back apart.
Thread Starter
CF Veteran
Joined: Feb 2011
Posts: 1,048
Likes: 0
From: Georgia
Year: 2004
Model: Grand Cherokee (WJ)
Engine: 4.0 Inline 6
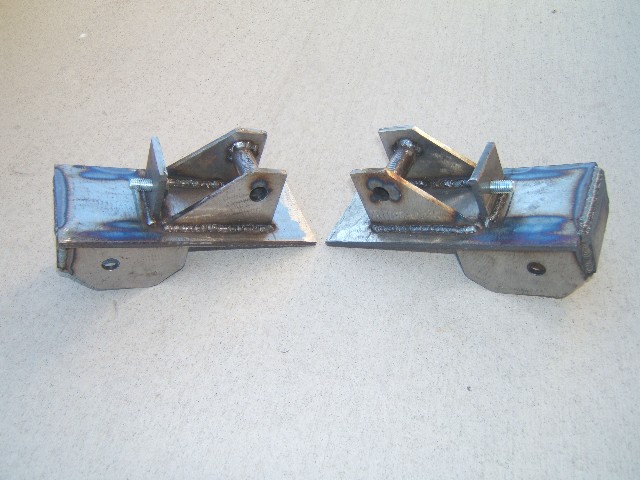
Currently working on some shackle relocation brackets similar to these only the bottom plate I am making bigger so I can bolt it on to where the tow hitch bolts on (will incorporate a hitch in new rear bumper) in addition to the other mounting bolts. I started building some other ones but scrapped that idea as I did not like the way they were turning out.
Found a local mechanic shop that will do my gears both front and rear axles for $515 so I think I am going to just let them do the install. Too much critical adjustments and tools needed to do the job. I kind of lost confidence after my a/c repair did not turn out as good as I hoped.
Found a local mechanic shop that will do my gears both front and rear axles for $515 so I think I am going to just let them do the install. Too much critical adjustments and tools needed to do the job. I kind of lost confidence after my a/c repair did not turn out as good as I hoped.