
My Forever Jeep


Thread Starter
CF Veteran
Joined: Oct 2009
Posts: 2,867
Likes: 16
From: Fauquier County, Virginia
Year: 1991
Model: Cherokee
Engine: I-6 4.0 HO
To get back to the radio, I co-op worked on it while doing my gauges. I ordered a stock radio bracket from a feller on this forum and he got it to me ASAP. I'll get his name up here later.
Remember the music-cutting issues I mentioned earlier? Yeah, I found the culprit. Look at the wiring harness below:


ALL OF THOSE CONNECTIONS, if you can call them that, were twisted once, then taped over all half-***. Absolutely pathetic. The above pic, with the wire ends exposed? It was IN THERE LIKE THAT. No tap, no crimps, NOTHING. However, I fixed it all. Luckily, this was an adapter, and not spliced directly into the harness. I pulled the adapter harness/plug and brought it inside for repair. I crimped all of my connections, one by one, and taped them properly. I took the unused wires and properly sealed them off and bundled them. Then zip-tied everything nice.

Now you might think "Kevin, if you're all for making crap the best it can be, why crimp?" Good question. I plan to replace my stereo in the near future with a touch-screen 5" LCD display unit with Bluetooth and back-up camera. When I get this, I will also get a BRAND NEW adapter and will then properly solder and heat-shrink wrap all of my connections. For now, this works fine.
And finally, install the bracket in the right holes and BAM!

Remember the music-cutting issues I mentioned earlier? Yeah, I found the culprit. Look at the wiring harness below:
ALL OF THOSE CONNECTIONS, if you can call them that, were twisted once, then taped over all half-***. Absolutely pathetic. The above pic, with the wire ends exposed? It was IN THERE LIKE THAT. No tap, no crimps, NOTHING. However, I fixed it all. Luckily, this was an adapter, and not spliced directly into the harness. I pulled the adapter harness/plug and brought it inside for repair. I crimped all of my connections, one by one, and taped them properly. I took the unused wires and properly sealed them off and bundled them. Then zip-tied everything nice.
Now you might think "Kevin, if you're all for making crap the best it can be, why crimp?" Good question. I plan to replace my stereo in the near future with a touch-screen 5" LCD display unit with Bluetooth and back-up camera. When I get this, I will also get a BRAND NEW adapter and will then properly solder and heat-shrink wrap all of my connections. For now, this works fine.
And finally, install the bracket in the right holes and BAM!
Thread Starter
CF Veteran
Joined: Oct 2009
Posts: 2,867
Likes: 16
From: Fauquier County, Virginia
Year: 1991
Model: Cherokee
Engine: I-6 4.0 HO
...the WHOLE DASH PUT BACK TOGETHER!

Trivia time: can anyone guess why the ashtray is taken out? Here's two hints; 1) I don't smoke, and 2) Power, anyone?
Trivia time: can anyone guess why the ashtray is taken out? Here's two hints; 1) I don't smoke, and 2) Power, anyone?

Thread Starter
CF Veteran
Joined: Oct 2009
Posts: 2,867
Likes: 16
From: Fauquier County, Virginia
Year: 1991
Model: Cherokee
Engine: I-6 4.0 HO
Just bought this bad boy!

$33 shipped. Thermostatically controlled transmission cooler with separate P/S cooler built in. Will be mounting behind the bumper. I'll take lots of pics.
Until then, I've got to get the pics of my other junk I've done up!
Last edited by 1991Jeep_Man; Jun 9, 2014 at 04:10 PM.
Thread Starter
CF Veteran
Joined: Oct 2009
Posts: 2,867
Likes: 16
From: Fauquier County, Virginia
Year: 1991
Model: Cherokee
Engine: I-6 4.0 HO
Oh my YES! An update for anyone who is following this sporadic chaos called 1991Jeep_Man's build!
First off, my e-fan conversion developed a tiny flaw. First off, I forgot to remember that the fan diameter itself is slightly greater than the rad core and opening of the supports. No big deal, as I would eventually use the extra opening for some slight extra fan cooling for a transmission cooler.
Problem: the opening was diverting air in the meantime of no cooler in front of it! Berka herka derk! Made an access cover. Second problem was the bottom of the fan was sitting about 1/8-1/4" back from the shroud. Made a lower brace. Everything sits nice and flush now!


Easy. And I got my cooler in the mail! Keep an eye out for a write-up among many to come.

I also fixed the LED bulb behind my new gauges that I had in the wrong way and wasn't lighting up.

And then I noticed this nastiness...

Can't do nasty rust/carbon build up. Must replace!
First off, my e-fan conversion developed a tiny flaw. First off, I forgot to remember that the fan diameter itself is slightly greater than the rad core and opening of the supports. No big deal, as I would eventually use the extra opening for some slight extra fan cooling for a transmission cooler.
Problem: the opening was diverting air in the meantime of no cooler in front of it! Berka herka derk! Made an access cover. Second problem was the bottom of the fan was sitting about 1/8-1/4" back from the shroud. Made a lower brace. Everything sits nice and flush now!
Easy. And I got my cooler in the mail! Keep an eye out for a write-up among many to come.
I also fixed the LED bulb behind my new gauges that I had in the wrong way and wasn't lighting up.
And then I noticed this nastiness...
Can't do nasty rust/carbon build up. Must replace!
Thread Starter
CF Veteran
Joined: Oct 2009
Posts: 2,867
Likes: 16
From: Fauquier County, Virginia
Year: 1991
Model: Cherokee
Engine: I-6 4.0 HO
And by replace, I mean cut the crap end off and put a temporary pretty and shiny unit in place! Looks a little more truck-ish in my opinion. Plus, instant 20 whp! 


I also wanted two more switches for Extended Idle and a manual override for my stock e-fan for those hot days where the single fan just can't quite keep up in traffic (85-90* ambient temps with 50-90% humidity). I had a spare panel sent to me from thexjfiles that fit the bill! Some modification, and presto! I'll be doing a more devoted write-up for this also. The cig lighter outlet stopped working for me, and I don't smoke and will be installed two 12v outlets where the ashtray is. So perfect! And I'll be getting stock switches and custom overlays to make it all shine!


Plenty of room for both switches! The left one where 'Power' remains is the current override switch location. Extended idle will go on the right. Great stock looking mod for those who have extra power outlets and need more switch locations!
More later! Gotta go grocery-get with da wife!
I also wanted two more switches for Extended Idle and a manual override for my stock e-fan for those hot days where the single fan just can't quite keep up in traffic (85-90* ambient temps with 50-90% humidity). I had a spare panel sent to me from thexjfiles that fit the bill! Some modification, and presto! I'll be doing a more devoted write-up for this also. The cig lighter outlet stopped working for me, and I don't smoke and will be installed two 12v outlets where the ashtray is. So perfect! And I'll be getting stock switches and custom overlays to make it all shine!
Plenty of room for both switches! The left one where 'Power' remains is the current override switch location. Extended idle will go on the right. Great stock looking mod for those who have extra power outlets and need more switch locations!
More later! Gotta go grocery-get with da wife!
Thread Starter
CF Veteran
Joined: Oct 2009
Posts: 2,867
Likes: 16
From: Fauquier County, Virginia
Year: 1991
Model: Cherokee
Engine: I-6 4.0 HO
I forgot! Cup holder!

This little guy actually works quite well. Not for bottles, but they have caps. No problem there. I needed something for coffee cups or fast food cups. Works great! I'll probably trim around the e-brake handle a bit more though. And it makes a great spot for some heated seat switches come winter!
Also replaced my wiper motor bushings finally. I also made a write-up. I could stand the blades hopping and junk any longer!
Thread Starter
CF Veteran
Joined: Oct 2009
Posts: 2,867
Likes: 16
From: Fauquier County, Virginia
Year: 1991
Model: Cherokee
Engine: I-6 4.0 HO
Sorry for the massive gaps in responses and updates. College has ****** my personal schedule and I never have time for anything. I promise more is coming. I'll be making a gauge pod mini-overhead console that will hold either two or three LED gauges as well as adding a miniature switch panel under the stock clock. I've also nabbed a GM rear view mirror with Temp/Compass that is going in, and hopefully the lift will be coming from the jolly fat man himself for Christmas! (Santa, not me!)
Until then, we grind on
Until then, we grind on
Senior Member
Joined: Jun 2014
Posts: 925
Likes: 6
From: Eagle River, Alaska
Year: 1999
Model: Cherokee (XJ)
Agreed! Enjoyed your thread and will be using your exhaust manifold DIY in the next few days when I replace mine. Interested in knowing if you have any tips before I get started. Also swapping 703 injectors while I'm in there.
Last edited by cbs_24; Dec 19, 2014 at 02:42 AM.
Thread Starter
CF Veteran
Joined: Oct 2009
Posts: 2,867
Likes: 16
From: Fauquier County, Virginia
Year: 1991
Model: Cherokee
Engine: I-6 4.0 HO
No tips, other than PB Blast leading to it. Sorry for the delay in response! The manifolds on the 4.0 are super straight forward!
Folks, I promise updates will come. I had a brake line blow in November and have been trying to remedy those set of issues along with work, cold, gravel, illness.... UGH!
I promise the thread will come back to life!
Thread Starter
CF Veteran
Joined: Oct 2009
Posts: 2,867
Likes: 16
From: Fauquier County, Virginia
Year: 1991
Model: Cherokee
Engine: I-6 4.0 HO
Working on making some custom parking brake cables for the rear disc conversion. I'll snap pictures of the finished product and, if it works, will have cost me something like $20-25 depending total for the both of them.
Also, the brake routing in my pictures is being scrapped. SUCK SUCK SUCK! I am replacing the ZJ soft lines with OEM front soft lines for the XJ. Offers 9" of extra length to loop the line behind the spring perch and connect the hardline there rather than have it run up and around the front of the perch. Salad was kind enough to point this out to me as being.. ahem, not exactly the best idea. Lol!
Beyond that, I am going to also swap in my ZJ prop valve internals and replace the rusted air filter. I'm also redoing the air intake paint and drilling a hole out for an IAT sensor. I am thinking about running two sensors with a switch to dedicate between one or the other; one for winter (near the manifold) and one for summer (in the intake tube).
Also making a custom air box! No more hot air intake!
All coming as soon as I can!
Thread Starter
CF Veteran
Joined: Oct 2009
Posts: 2,867
Likes: 16
From: Fauquier County, Virginia
Year: 1991
Model: Cherokee
Engine: I-6 4.0 HO
I'm thinking life needs to come back to this thread. Suffering from a months long work/college hiatus, stuff is back to being done on the Old Lady.
Built some new manual hatch struts. Paint is drying for the night. Custom brackets were made for the rear lines. Bought a headboard for the new camo headliner and some seats from BlueRidgeMark for a rear bucket conversion. Have some aftermarket electric window conversion kits in the office, a new 99+ efan, and some other odds and ends waiting to go in!


Built some new manual hatch struts. Paint is drying for the night. Custom brackets were made for the rear lines. Bought a headboard for the new camo headliner and some seats from BlueRidgeMark for a rear bucket conversion. Have some aftermarket electric window conversion kits in the office, a new 99+ efan, and some other odds and ends waiting to go in!
Thread Starter
CF Veteran
Joined: Oct 2009
Posts: 2,867
Likes: 16
From: Fauquier County, Virginia
Year: 1991
Model: Cherokee
Engine: I-6 4.0 HO
It's time for some updates. I had a solid full Saturday of help from two of best friends. More brothers than anything. While wife was at work, we began some of the most extensive work my poor XJ has seen in almost two years. There may be some tiny overlap (posting the pics of the finished manual hatch struts), but most of what is coming up is from yesterday. So without further ado, let's see some pics!
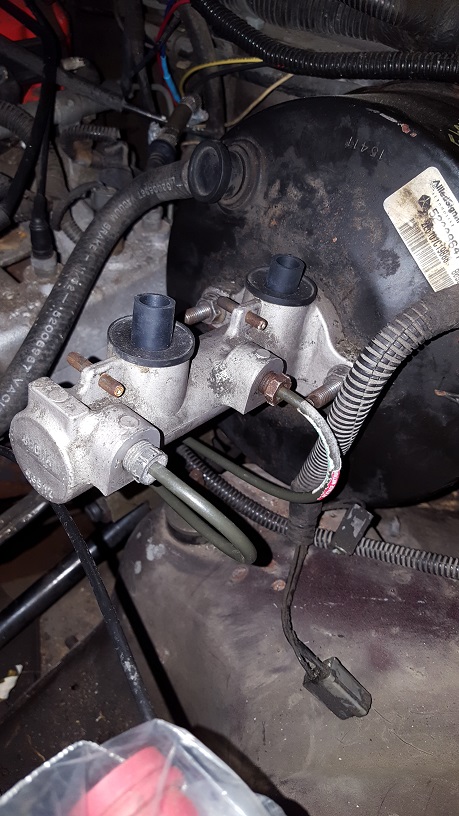
The Brake Booster Swap
This one is still being done along with the full brake overhaul. Waiting for the new metal piston rear calipers to arrive from Advance (Pro Tip: Advance price is $67 per caliper. Rock Auto is $37. Advance will pricematch FTW!) as the stockers wasted from sitting and had developed a crack in the driver's plastic piston.
My buddy Aaron started by helping me get the brake pedal detached from the booster rod and unbolting the booster from the firewall. I'm 350+ pounds and 6' 3". He's like 5' 6" and barely a feather. You do the math lol!

So we got the old booster out after I removed the old master/reservoir assembly. The thing was pitiful. It's tiny, rusted all to hell, is that moss/fungus?? Simply no bueno.

So we slapped the new '95 unit in place. Had to remove the aluminum spacer for proper distance, BUT the cool thing is we never had to grind the rod down. Apparently XJ's with cruise control use a button style switch that works opposite of the blade type switch where grinding the flat spot is required: when my button is pressed (brake pedal resting), the circuit is open and the brake lights are off. When the pedal is pressed, button opens, circuit closes, and the lights come on / cruise goes off. Sha-weet! So Aaron helped again by bolting the new booster in place and reassembling the pedal to the rod.

He verified the same amount of brake switch engagement by the pedal, and we are good to go!

... kinda. Still need to order a new reservoir and run brake lines from the master cylinder to the proportioning valve. I also went and bent the proportioning valve toward the engine slightly, properly readjusting the hard line bends so it better clears the new Big Lady booster. Plenty of room now, and that much closer to vastly improve brakes!
The Battery Cables
First and foremost, big shout out to XJwonders for his amazing battery cables. I know I ordered them months ago, but I finally found the time to install them... kinda. Had my buddy Logan working on this while Aaron and I were tackling the brake booster and a couple of other things.

So my stock ones were junk, sloppy, typical Chrysler specials that were underrated for their needs and covered with 25 years of crap. The new ones are 4AWG and nicely made, perfect length with some extra give. He got the starter+, PDC+, fender-, block-, and firewall- done... except he swapped the ends on the starter+ and we gotta remove it so it fits the new military style terminals. DOH! We'll install the alternator positive and its new fuse after I fix some wiring down on the alternator.

Otherwise that is coming along nicely!
The Headliner
So about a month ago I finally found someone relatively local parting out an XJ with the front seats I wanted for a rear bucket conversion. Bonus score because he also had and was selling the headboard, which my Jeep never had from the day I bought it! Score! BlueRidgeMark was awesome to work with and a pleasure to meet. Loaded it all up and brought it home awaiting its conversion this weekend!

The first step was getting it cleaned up. Overall is was in good condition, enough for what I needed it for. It had some tears and peeling, but that was alright. I actually found that foil HVAC tape made a good repair medium for the board, and the headliner glue does stick to it! I used that to fortify the front end and fix some minor tears.

Then we began the time consuming task of carefully scrubbing every inch with a brush to break loose all the old foam and glue. This made for some coughing. Took the shop vac to it and then laid out the new material. Shot some glue and waited for it to tack up.

ANNNND the rest you have to wait to see when it is installed! No more cold metal roof during the winter!
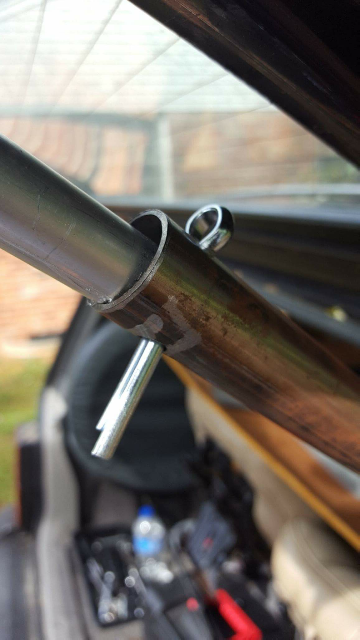
The Manual Hatch Struts
And finally, a quick finished picture of the new manual hatch struts! Below is old...

... and new!

And that's about all I have for now. Hopefully we'll get everything else wrapped up in the new couple of weeks when we devote another full Saturday to new parking brake cables, finishing the rear lines, the master lines, headliner install, and other odds and ends!
The Brake Booster Swap
This one is still being done along with the full brake overhaul. Waiting for the new metal piston rear calipers to arrive from Advance (Pro Tip: Advance price is $67 per caliper. Rock Auto is $37. Advance will pricematch FTW!) as the stockers wasted from sitting and had developed a crack in the driver's plastic piston.
My buddy Aaron started by helping me get the brake pedal detached from the booster rod and unbolting the booster from the firewall. I'm 350+ pounds and 6' 3". He's like 5' 6" and barely a feather. You do the math lol!

So we got the old booster out after I removed the old master/reservoir assembly. The thing was pitiful. It's tiny, rusted all to hell, is that moss/fungus?? Simply no bueno.

So we slapped the new '95 unit in place. Had to remove the aluminum spacer for proper distance, BUT the cool thing is we never had to grind the rod down. Apparently XJ's with cruise control use a button style switch that works opposite of the blade type switch where grinding the flat spot is required: when my button is pressed (brake pedal resting), the circuit is open and the brake lights are off. When the pedal is pressed, button opens, circuit closes, and the lights come on / cruise goes off. Sha-weet! So Aaron helped again by bolting the new booster in place and reassembling the pedal to the rod.

He verified the same amount of brake switch engagement by the pedal, and we are good to go!

... kinda. Still need to order a new reservoir and run brake lines from the master cylinder to the proportioning valve. I also went and bent the proportioning valve toward the engine slightly, properly readjusting the hard line bends so it better clears the new Big Lady booster. Plenty of room now, and that much closer to vastly improve brakes!
The Battery Cables
First and foremost, big shout out to XJwonders for his amazing battery cables. I know I ordered them months ago, but I finally found the time to install them... kinda. Had my buddy Logan working on this while Aaron and I were tackling the brake booster and a couple of other things.

So my stock ones were junk, sloppy, typical Chrysler specials that were underrated for their needs and covered with 25 years of crap. The new ones are 4AWG and nicely made, perfect length with some extra give. He got the starter+, PDC+, fender-, block-, and firewall- done... except he swapped the ends on the starter+ and we gotta remove it so it fits the new military style terminals. DOH! We'll install the alternator positive and its new fuse after I fix some wiring down on the alternator.

Otherwise that is coming along nicely!
The Headliner
So about a month ago I finally found someone relatively local parting out an XJ with the front seats I wanted for a rear bucket conversion. Bonus score because he also had and was selling the headboard, which my Jeep never had from the day I bought it! Score! BlueRidgeMark was awesome to work with and a pleasure to meet. Loaded it all up and brought it home awaiting its conversion this weekend!

The first step was getting it cleaned up. Overall is was in good condition, enough for what I needed it for. It had some tears and peeling, but that was alright. I actually found that foil HVAC tape made a good repair medium for the board, and the headliner glue does stick to it! I used that to fortify the front end and fix some minor tears.

Then we began the time consuming task of carefully scrubbing every inch with a brush to break loose all the old foam and glue. This made for some coughing. Took the shop vac to it and then laid out the new material. Shot some glue and waited for it to tack up.

ANNNND the rest you have to wait to see when it is installed! No more cold metal roof during the winter!
The Manual Hatch Struts
And finally, a quick finished picture of the new manual hatch struts! Below is old...

... and new!

And that's about all I have for now. Hopefully we'll get everything else wrapped up in the new couple of weeks when we devote another full Saturday to new parking brake cables, finishing the rear lines, the master lines, headliner install, and other odds and ends!
Thread Starter
CF Veteran
Joined: Oct 2009
Posts: 2,867
Likes: 16
From: Fauquier County, Virginia
Year: 1991
Model: Cherokee
Engine: I-6 4.0 HO
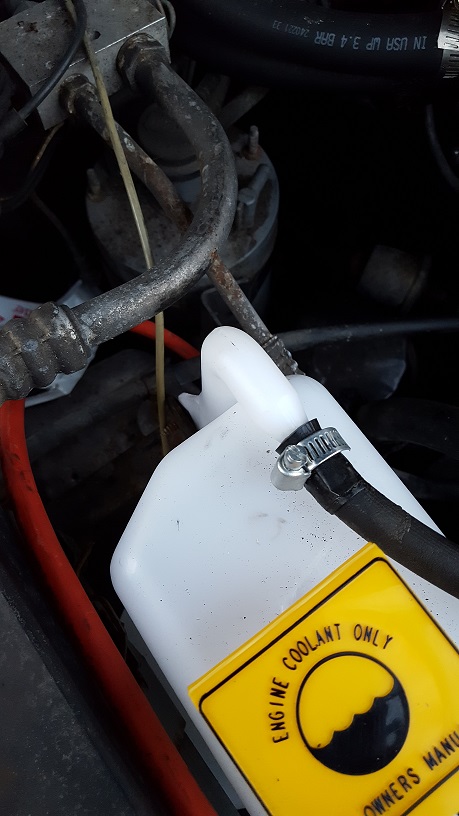
So, first a foremost something cool happened with Amazon. I ordered a new brake fluid reservoir for my rig, along with a new 4.5" touchscreen head unit and backup camera. Everything was guaranteed delivery (Prime shipping), except on the delivery date no reservoir. Suddenly it won't get to me until December. Unacceptable. I called customer service. First guy, Mike I couldn't understand, says it'll be there next day (no it won't). Second call is a lady who put me on hold then disconnected. Third guy said no to a manager, said he didn't know what happened, and told me "You go ahead and do that" when I said I'd speak to a supervisor. Finally I get a supervisor, and after he can't find another one to get to me, he orders me an entire new master cylinder assembly with reservoir and eats the cost difference. Sha-weeeet!
So, I got a 'new' PDC from BlueRidgeMark here on the forum to convert into a secondary fuse box for my efan conversions, fog lights, etc.
Strip the relays and fuses away.

Pop the bottom cover off.

Pop to the little colored guides out.

File down a piece of pop rivet to depress the little terminal clips.

These clips are a pain in the ****!

Accumulate the terminals to keep the decent gauged ones.

And tie off the MAXI fuse wires for now!

And that's where I am so far. Work and college showed up and screwed the schedule. I'm hoping to do a bit more this weekend, and my buds should be back over next weekend to finish the headliner, install the new master cylinder, wrap up the battery cables, install new parking brake cables, install new brake lines, install the new rotors/pads/calipers, and hopefully fire the old lady up!
For some amusement...
This was at the local asian buffet place. I laughed because I have the mentality of a 13 year old.

Also, this isn't laundry...

One of our Persians.")
So, I got a 'new' PDC from BlueRidgeMark here on the forum to convert into a secondary fuse box for my efan conversions, fog lights, etc.
Strip the relays and fuses away.

Pop the bottom cover off.

Pop to the little colored guides out.

File down a piece of pop rivet to depress the little terminal clips.

These clips are a pain in the ****!

Accumulate the terminals to keep the decent gauged ones.

And tie off the MAXI fuse wires for now!

And that's where I am so far. Work and college showed up and screwed the schedule. I'm hoping to do a bit more this weekend, and my buds should be back over next weekend to finish the headliner, install the new master cylinder, wrap up the battery cables, install new parking brake cables, install new brake lines, install the new rotors/pads/calipers, and hopefully fire the old lady up!
For some amusement...
This was at the local asian buffet place. I laughed because I have the mentality of a 13 year old.

Also, this isn't laundry...

One of our Persians.
Thread Starter
CF Veteran
Joined: Oct 2009
Posts: 2,867
Likes: 16
From: Fauquier County, Virginia
Year: 1991
Model: Cherokee
Engine: I-6 4.0 HO
So, a bit of an update. Mainly some pictures. Mainly some pictures of how junked my poor XJ is right now amid all these repairs!


The new headliner is in, and I am VERY pleased with how it has turned out. I somehow managed no wrinkles, and the reinforcements I made with the foil duct tape has really done well to support the weak spots of the headboard. Just some minor trim pieces to reinstall!

I also managed to get my master cylinder lines done up. I've become pretty good at getting double flares (those who follow CF on Facebook will see my.. er... earlier attempts!)


And some shots of the battery cable routing. Starter runs up behind and parallel to the PDC, alternator runs up front, around the battery box, to the fender mounted ANL fuse block (mounted with two rivnuts), and then to the positive terminal. Overall very pleased!


The game plan is I have a buddy of mine coming over tomorrow early, and we are shooting for the sky to get her going. She still needs:
[ ] Spark Plugs Installed
[ ] Spark Plug Wires Installed
[ ] Cap and Rotor Replaced
[ ] New Master Cylinder Bench Bled and Installed
[ ] Rear Passenger Hard Line Cut to Fit and Flared
[ ] Rear Driver's Hard Line Formed to Fit
[ ] Front-to-Rear Hard Line Adjusted
[ ] Ebrake lever rod either retapped or redneck engineered to accept a coupling nut to install a threaded rod
[ ] New Ebrake Cables Installed and Adjusted
[ ] Rotors and Pads Installed Up Front
[ ] Front Hard and Soft Brake Lines Replaced
[ ] Fluids Replaced
[ ] Headliner Trim Reinstalled
And I am sure I am missing a thing or two. Fingers crossed folks!


The new headliner is in, and I am VERY pleased with how it has turned out. I somehow managed no wrinkles, and the reinforcements I made with the foil duct tape has really done well to support the weak spots of the headboard. Just some minor trim pieces to reinstall!

I also managed to get my master cylinder lines done up. I've become pretty good at getting double flares (those who follow CF on Facebook will see my.. er... earlier attempts!)

And some shots of the battery cable routing. Starter runs up behind and parallel to the PDC, alternator runs up front, around the battery box, to the fender mounted ANL fuse block (mounted with two rivnuts), and then to the positive terminal. Overall very pleased!


The game plan is I have a buddy of mine coming over tomorrow early, and we are shooting for the sky to get her going. She still needs:
[ ] Spark Plugs Installed
[ ] Spark Plug Wires Installed
[ ] Cap and Rotor Replaced
[ ] New Master Cylinder Bench Bled and Installed
[ ] Rear Passenger Hard Line Cut to Fit and Flared
[ ] Rear Driver's Hard Line Formed to Fit
[ ] Front-to-Rear Hard Line Adjusted
[ ] Ebrake lever rod either retapped or redneck engineered to accept a coupling nut to install a threaded rod
[ ] New Ebrake Cables Installed and Adjusted
[ ] Rotors and Pads Installed Up Front
[ ] Front Hard and Soft Brake Lines Replaced
[ ] Fluids Replaced
[ ] Headliner Trim Reinstalled
And I am sure I am missing a thing or two. Fingers crossed folks!