
Introducing project 'Grape Ape'

Thread Starter
Senior Member
Joined: Jan 2012
Posts: 648
Likes: 1
From: Port Richey, FL
Model: Cherokee
Engine: 4.0
I actually had only done the passenger side, which was the side it was leaning to. Saturday morning, I decided to do the driver side. What was I thinking? I went to remove the shackle bolt from the unibody and snap!


What the frick am I gonna do now? After the shock had worn off, I decided what my best course of action would be. I took the back bumper off and opened up the access hole for the nutstrips.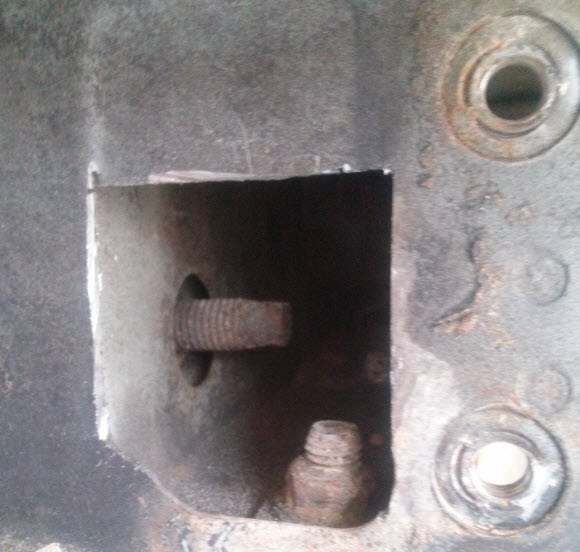
Okay, there's plenty of bolt left. We proceed to drop the tank and make another access hole. Next, we tried to weld a nut to bolt so we could extract, but there was just too much rust and PB blaster for my buddy's little welder to make that weld hold. He decided to just ball up as much weld as possible and hope for the best. It worked! Ugly as sin, but did the job. We called it a night as it was 10:30pm.
Easter Sunday, I proceeded to go out and see if I could find a tap to re-cut the threads on the welded nut in the unibody. Yeah right! M14x2.00 is nowhere to be found! So while I was at Rural King, I decided to buy a new bolt, couple washers, lock washers, and nuts. I highly recommend buying your hardware there or at Tractor Supply as not only will you find what you need, they sell it by the pound! Nuff said. It was cheap. What I ended up doing was drilling out the threads with the 9/16" drill bit I bought when I installed my Clayton Track Bar. I then just ran the bolt through and wrench in the frame and my ratchet on the bolt.
  It was a huge PITA, but I have the satisfaction of another DIY victory. Here's a couple pics of the poly bushings installed.

Off to Jeep Beach in the morning!!!!


What the frick am I gonna do now? After the shock had worn off, I decided what my best course of action would be. I took the back bumper off and opened up the access hole for the nutstrips.

Okay, there's plenty of bolt left. We proceed to drop the tank and make another access hole. Next, we tried to weld a nut to bolt so we could extract, but there was just too much rust and PB blaster for my buddy's little welder to make that weld hold. He decided to just ball up as much weld as possible and hope for the best. It worked! Ugly as sin, but did the job.
 We called it a night as it was 10:30pm.
Easter Sunday, I proceeded to go out and see if I could find a tap to re-cut the threads on the welded nut in the unibody. Yeah right! M14x2.00 is nowhere to be found! So while I was at Rural King, I decided to buy a new bolt, couple washers, lock washers, and nuts. I highly recommend buying your hardware there or at Tractor Supply as not only will you find what you need, they sell it by the pound! Nuff said. It was cheap. What I ended up doing was drilling out the threads with the 9/16" drill bit I bought when I installed my Clayton Track Bar.
 I then just ran the bolt through and wrench in the frame and my ratchet on the bolt.
  It was a huge PITA, but I have the satisfaction of another DIY victory. Here's a couple pics of the poly bushings installed.

Off to Jeep Beach in the morning!!!!
Last edited by kickice24; Oct 13, 2014 at 11:38 AM. Reason: formatting
Thread Starter
Senior Member
Joined: Jan 2012
Posts: 648
Likes: 1
From: Port Richey, FL
Model: Cherokee
Engine: 4.0
Had a busy week getting ready for Jeeptoberfest. I decided to build some shackle relocation brackets and that led to new shackles, which led to coils spring spacers, and the result is I'm sitting around 5.5" with a very nice shackle angle and improved ride. I couldn't be happier with how it turned out.


Last edited by kickice24; Oct 13, 2014 at 11:27 AM.
Thread Starter
Senior Member
Joined: Jan 2012
Posts: 648
Likes: 1
From: Port Richey, FL
Model: Cherokee
Engine: 4.0
Time for a quick update! I received a hand-me-down Mile Marker winch, so I have to create a way to mount it as the current setup bare can handle itself. I decided I want to clock the winch 90* and mount it behind where the stock bumper was as there's already bolt hoes there. Obviously, it's barely strong enough to hold a winch in place let alone pull my XJ. That being said, I decided to make some frame braces and reinforce the front with some 1/4" plate. A little cutting, grinding, welding, and some paint. Not too bad for a noob me thinks. Now I will mount the winch, and start planning a bumper to protect/reinforce it.


Thread Starter
Senior Member
Joined: Jan 2012
Posts: 648
Likes: 1
From: Port Richey, FL
Model: Cherokee
Engine: 4.0
Progress! This project sure is teaching me the time, patience, skill, and consumables it takes for this to happen. I still have a ways to go, but I am happy so far.


Thread Starter
Senior Member
Joined: Jan 2012
Posts: 648
Likes: 1
From: Port Richey, FL
Model: Cherokee
Engine: 4.0
More progress. It's "finished" but, all that's left is a bunch off odds and ends including mounting the box and wiring everything in. Really, starting to a "feel" for it now. Little bit better on judging heat and also figured out I was going too fast. I'm undecided if I want to add more to it or not.


Thread Starter
Senior Member
Joined: Jan 2012
Posts: 648
Likes: 1
From: Port Richey, FL
Model: Cherokee
Engine: 4.0
Installed the locker Saturday. Overall, it's not a very difficult job. I just came across a snag I wasn't expecting, so it took me way longer than expected. I was under the impression from several threads and friends, that this could be done with the carrier installed. Imagine my surprise when I knocked the roll pin out and went to remove the cross pin and it went dink on the ring gear. So, I went out and bought a torque wrench from Harbor Freight as I did not already have one. I highly agree with any installs that states to coat everythign with grease. It made assembly so much easier and no issues installng the springs.


Won't be needing these.

The guts.

In their new home.

First impression. It feels almost like cheating now. It makes a HUGE difference. I honestly can't tell you why it took me so long to buy one. I did notice the steering get heavier in 4 wheel now. You can hear it click on tight turns, but it's nothing obnoxious. Very happy I pulled the trigger!
Thread Starter
Senior Member
Joined: Jan 2012
Posts: 648
Likes: 1
From: Port Richey, FL
Model: Cherokee
Engine: 4.0
Figured I'd throw a couple pics up of me testing out the new locker. MUCH easier to almost everything except turn! LoL


I'm really impressed with just how much more capable GrapeApe is just by adding a locker up front. Almost feels like cheating.


I'm really impressed with just how much more capable GrapeApe is just by adding a locker up front. Almost feels like cheating.
Thread Starter
Senior Member
Joined: Jan 2012
Posts: 648
Likes: 1
From: Port Richey, FL
Model: Cherokee
Engine: 4.0
Good lord. I can't believe it's been 8 months since I last worked on this. I finally got my hands on a small drill press, so I decided to start making the clevis mounts for the bumper. I was surprised how easily the hole saw cut through the steel. I used 850rpm on the press and spray lube.


I think they came out pretty nice.


I also was able to get a brace in along the back edge.


Still have to add the passenger clevis mount and some gussets, but it's pretty close. I've just been very lazy this summer, plus it rained a LOT this year.


I think they came out pretty nice.


I also was able to get a brace in along the back edge.


Still have to add the passenger clevis mount and some gussets, but it's pretty close. I've just been very lazy this summer, plus it rained a LOT this year.
Thread Starter
Senior Member
Joined: Jan 2012
Posts: 648
Likes: 1
From: Port Richey, FL
Model: Cherokee
Engine: 4.0
Finally got around to tackling heat issues when wheeling. Others have said this method works, so I figured I'd give it a try. I made the spacers out of some .75" square tubing I have. I ended up using the factory shims as well to get up just a tad higher.

A quick coat of paint...

Installed...


A quick coat of paint...

Installed...


Thread Starter
Senior Member
Joined: Jan 2012
Posts: 648
Likes: 1
From: Port Richey, FL
Model: Cherokee
Engine: 4.0
Well, I finally got it finished yesterday. Just in time for Jeeptoberfest too! Had to pull the winch apart so I could clock it 45 degrees. The clutch switch would hit the bumper and not engage. Also had to make up some longer cables from the control box to the motor. I'm pretty happy with it for my first big project.


I ended up having to trim that top plate so I could get my wrench in to mount it. Most of it is still there.


I ended up having to trim that top plate so I could get my wrench in to mount it. Most of it is still there.


Thread Starter
Senior Member
Joined: Jan 2012
Posts: 648
Likes: 1
From: Port Richey, FL
Model: Cherokee
Engine: 4.0
So, we were out wheeling two weeks ago and it was raining and very wet. It started missing and actiing wierd. We stopped to check it out thining it might have been water, but it was not! Ended up the pre-cat O2 sensor harness had found it's way onto the header and melted through. I was able to tape up the wires to get it home. I went to the local pick-n-pull and got a replacement harness section. Didn't turn out too bad.

Not going to touch now!


This last pic is a bit deceiving as it's not actually close to touching the pulley at all.

Not going to touch now!


This last pic is a bit deceiving as it's not actually close to touching the pulley at all.
Thread Starter
Senior Member
Joined: Jan 2012
Posts: 648
Likes: 1
From: Port Richey, FL
Model: Cherokee
Engine: 4.0
Since I had a little spare time after the harness splice, I "thought" I'd pop the steering wheel off and move it due to it being off-center when driving straight. I made this nifty little steering wheel removal tool.


Worked like a charm. Only problem? Jeep steering wheels are keyed, so it was all for naught. Ohwell. I'll just have to adjust it at the drag link like I should have in the first place lol.


Worked like a charm. Only problem? Jeep steering wheels are keyed, so it was all for naught. Ohwell. I'll just have to adjust it at the drag link like I should have in the first place lol.


