


Dee Dee


Thread Starter
Member
Joined: Apr 2012
Posts: 212
Likes: 1
From: ri
Year: 1996
Model: Cherokee
Engine: 4.0 HO

The first guy to call on the S10 showed up with cash Tuesday night, which finally freed up some money for parts.
I never really fell for the 'Xtreme', but it was pretty and it served me well for 8 years, so it was kind of sad to see it go.
The kid that bought it got it at a good price and was seriously psyched, so that softened the blow.
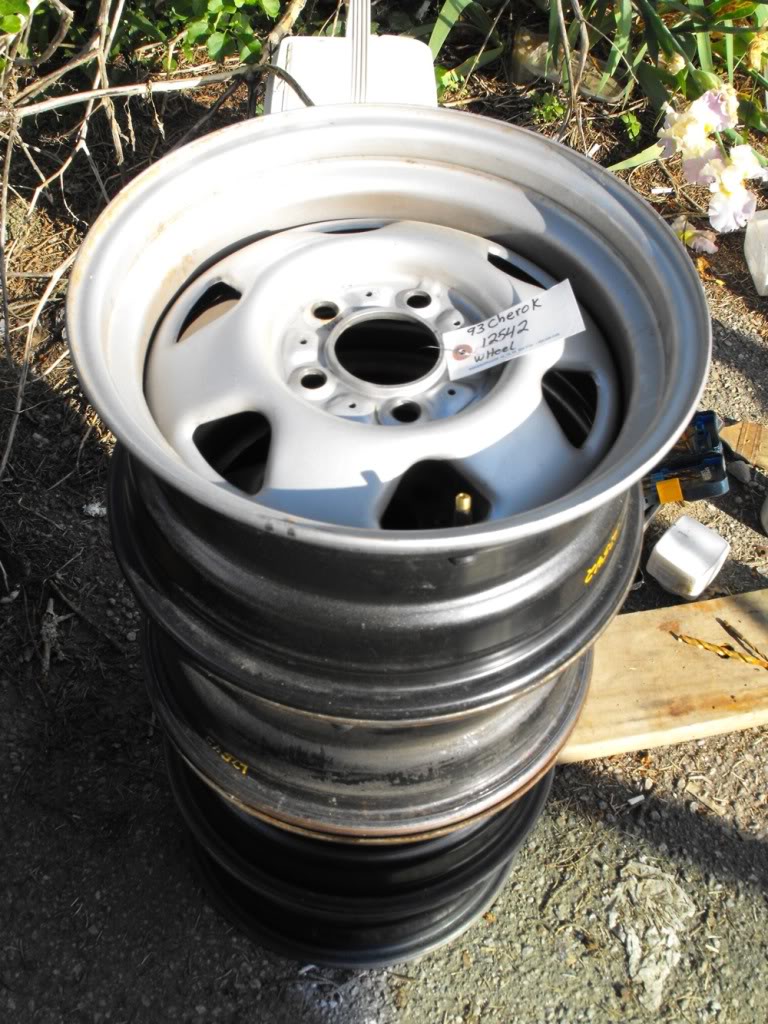
I went by the JY Wednesday and got 4 really nice original steel factory rims,
and a new instrument bezel and an ash tray with no holes drilled in it.
The bezel is from a 93 with the simulated wood grain finish, which gives me a simulated 3 extra HP, so I'm all over that!
I moved the rear wiper switch over to the other side of the steering wheel so now the rear defroster and the rear wipe/wash are "side by each", which, if nothing else, makes more sense.
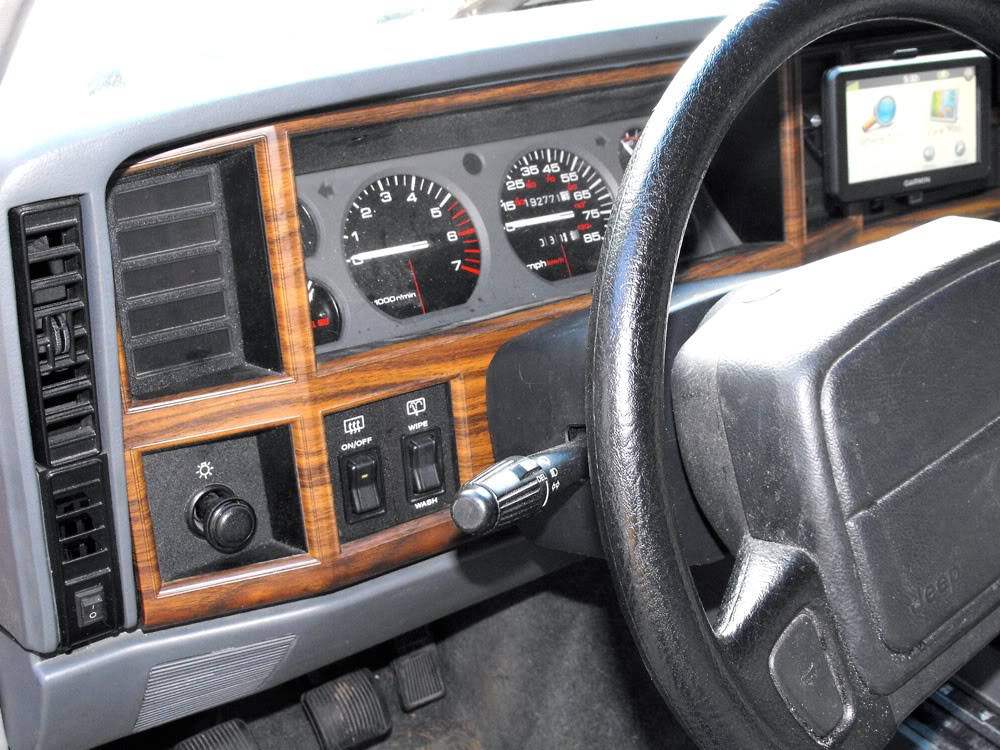
I also added a 12V to 5V DC transformer in the pocket for the clock and attached a permanent hard mount for the GPS to the cover.
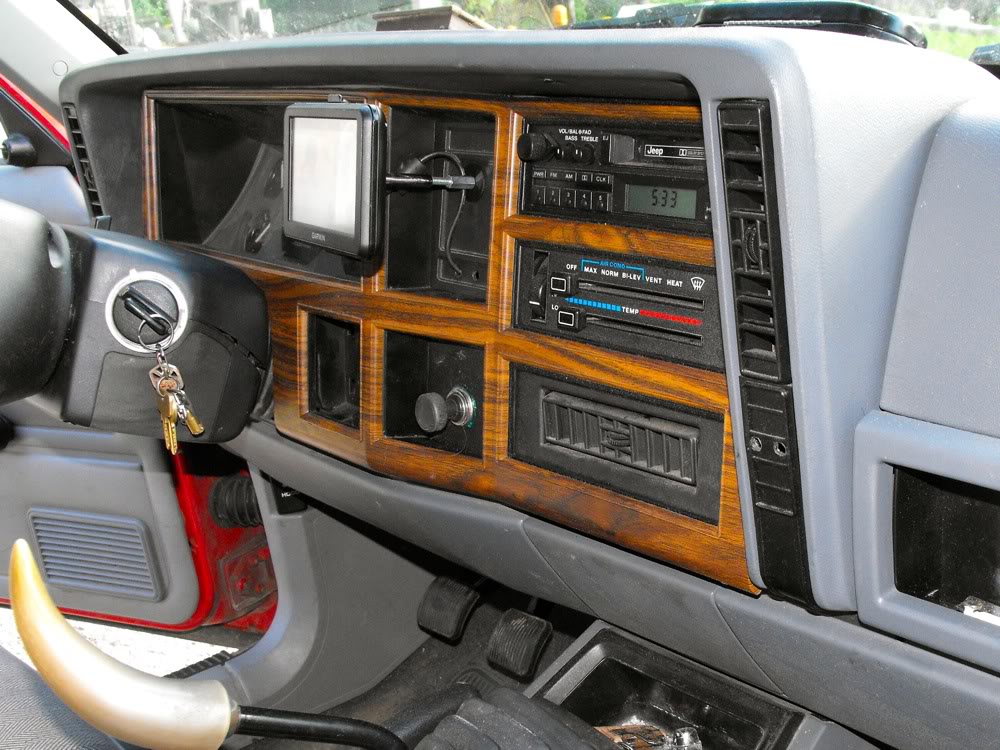
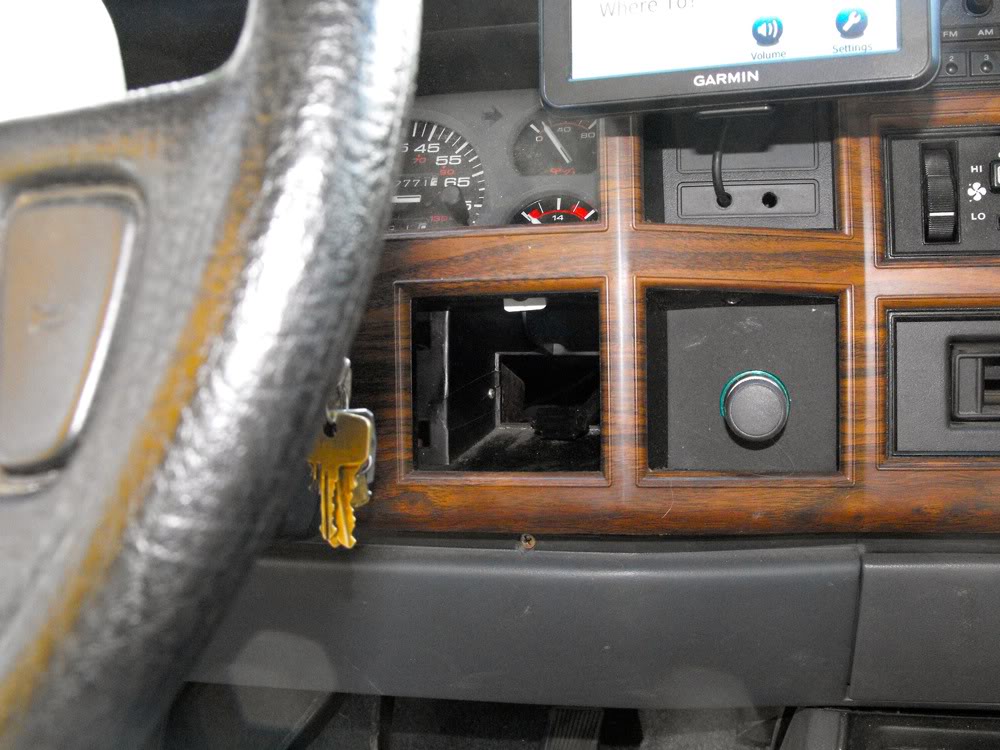
Moving the switch freed up a nice spot under the GPS. I may stick a little MP3 player (or something) in the hole since I already have a 5V supply and a hook up for a 12V instrument cluster lamp right there.
Stay tuned, there will be more up this week.
I never really fell for the 'Xtreme', but it was pretty and it served me well for 8 years, so it was kind of sad to see it go.
The kid that bought it got it at a good price and was seriously psyched, so that softened the blow.
I went by the JY Wednesday and got 4 really nice original steel factory rims,
and a new instrument bezel and an ash tray with no holes drilled in it.
The bezel is from a 93 with the simulated wood grain finish, which gives me a simulated 3 extra HP, so I'm all over that!
I moved the rear wiper switch over to the other side of the steering wheel so now the rear defroster and the rear wipe/wash are "side by each", which, if nothing else, makes more sense.
I also added a 12V to 5V DC transformer in the pocket for the clock and attached a permanent hard mount for the GPS to the cover.
Moving the switch freed up a nice spot under the GPS. I may stick a little MP3 player (or something) in the hole since I already have a 5V supply and a hook up for a 12V instrument cluster lamp right there.
Stay tuned, there will be more up this week.
Last edited by Marcucco; Jun 3, 2012 at 09:11 PM.
Thread Starter
Member
Joined: Apr 2012
Posts: 212
Likes: 1
From: ri
Year: 1996
Model: Cherokee
Engine: 4.0 HO
I ordered the leafs and all the hardware a week ago Monday, some from Quadratec and some from Morris.
Morris was a shade cheaper but they charge more for shipping so it seemed to be pretty much a wash.
I got the complete Quadratec order in less then a week.
Morris sent me a newsletter even tho I'd checked off the box that said I didn't want any, so I sent them a note.
I mentioning that I didn't care for the spam, that the stuff from Quad was on my porch while their order hadn't even shipped yet, and that my first order from them was quite probably going to be my last.
These guys called me 15 minutes after I sent the eMail, so I can't say anything bad about their customer service, but their stuff still isn't here (due tomorrow).
I think that if you're going to charge more for S&H, you really ought to be faster.
Anyway, I figured I'd pick away at a couple of other little projects.
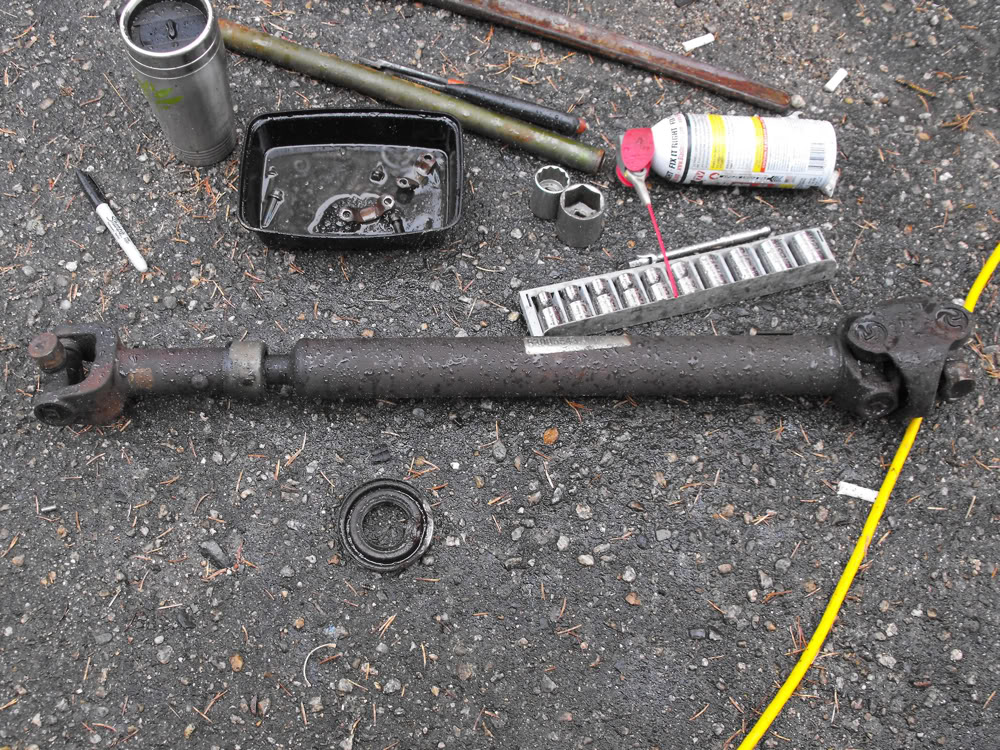
I had a small oil leak at the front pinion. The mechanic said he thought maybe the trans-axel had been over -filled but the seal was under $8 so what the heck.
Boy did I peck the wrong day, as soon as I got it apart, it started to pour.
(Look at the water in the parts tray, that was under the Jeep.)
I couldn't get the pinion off so I pulled the shaft, changed clothes, and drove it down to the mechanic where he got it off with an impact gun.
I waited an hour for the rain to stop before I got back under it, and as soon as I did it started to pour again.
So my little $8 seal ended up killing the day and 3 changes of clothes.
When I finally got it back on the ground and checked the fluid level, the axel was still overfilled and the mechanic was right all along.
oh well.
Morris was a shade cheaper but they charge more for shipping so it seemed to be pretty much a wash.
I got the complete Quadratec order in less then a week.
Morris sent me a newsletter even tho I'd checked off the box that said I didn't want any, so I sent them a note.
I mentioning that I didn't care for the spam, that the stuff from Quad was on my porch while their order hadn't even shipped yet, and that my first order from them was quite probably going to be my last.
These guys called me 15 minutes after I sent the eMail, so I can't say anything bad about their customer service, but their stuff still isn't here (due tomorrow).
I think that if you're going to charge more for S&H, you really ought to be faster.
Anyway, I figured I'd pick away at a couple of other little projects.
I had a small oil leak at the front pinion. The mechanic said he thought maybe the trans-axel had been over -filled but the seal was under $8 so what the heck.
Boy did I peck the wrong day, as soon as I got it apart, it started to pour.
(Look at the water in the parts tray, that was under the Jeep.)
I couldn't get the pinion off so I pulled the shaft, changed clothes, and drove it down to the mechanic where he got it off with an impact gun.
I waited an hour for the rain to stop before I got back under it, and as soon as I did it started to pour again.
So my little $8 seal ended up killing the day and 3 changes of clothes.
When I finally got it back on the ground and checked the fluid level, the axel was still overfilled and the mechanic was right all along.
oh well.
Last edited by Marcucco; Jun 11, 2012 at 10:56 PM.
Thread Starter
Member
Joined: Apr 2012
Posts: 212
Likes: 1
From: ri
Year: 1996
Model: Cherokee
Engine: 4.0 HO
I kept finding antifreeze on the front of the passenger side frame, even after I changed the top hose.
I had these weird slots hacked into the panel that made me a little leery of the PO's install so I finally pulled the panel over the radiator and sure enough the core was leaking at the top row.
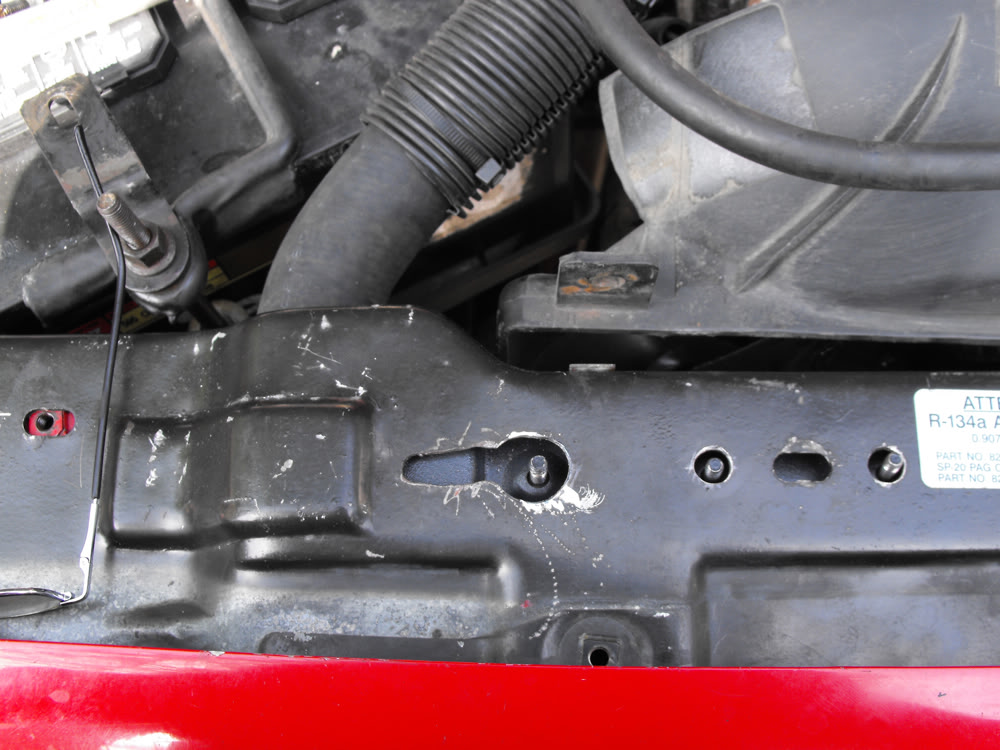
I grabbed a 2 core Spectra that didn't fit any better then the one that was in there so I had to do some drilling and grinding. I was afraid to cut the extra studs off until I got everything lined up.
The 6 nuts are certainly overkill, but I went thru the trouble of drilling the holes so there they are.
I've got to go thru the manual and see how the AC core is actually supposed to be attached, I really don't like the zip-tie array I hacked.
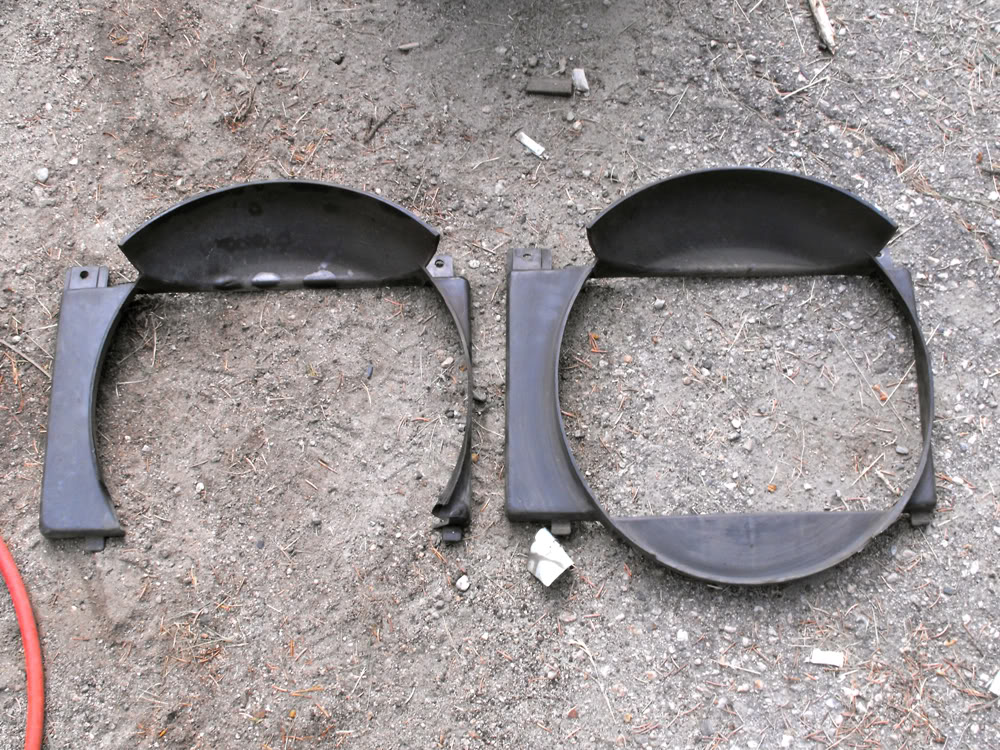
I got a shroud from the JY (took me 3 trys to find one that didn't have the bottom snapped off) and replaced the bottom hose since it was already all apart.
I had these weird slots hacked into the panel that made me a little leery of the PO's install so I finally pulled the panel over the radiator and sure enough the core was leaking at the top row.
I grabbed a 2 core Spectra that didn't fit any better then the one that was in there so I had to do some drilling and grinding. I was afraid to cut the extra studs off until I got everything lined up.
The 6 nuts are certainly overkill, but I went thru the trouble of drilling the holes so there they are.
I've got to go thru the manual and see how the AC core is actually supposed to be attached, I really don't like the zip-tie array I hacked.
I got a shroud from the JY (took me 3 trys to find one that didn't have the bottom snapped off) and replaced the bottom hose since it was already all apart.
Last edited by Marcucco; Jun 11, 2012 at 11:10 PM.
Thread Starter
Member
Joined: Apr 2012
Posts: 212
Likes: 1
From: ri
Year: 1996
Model: Cherokee
Engine: 4.0 HO
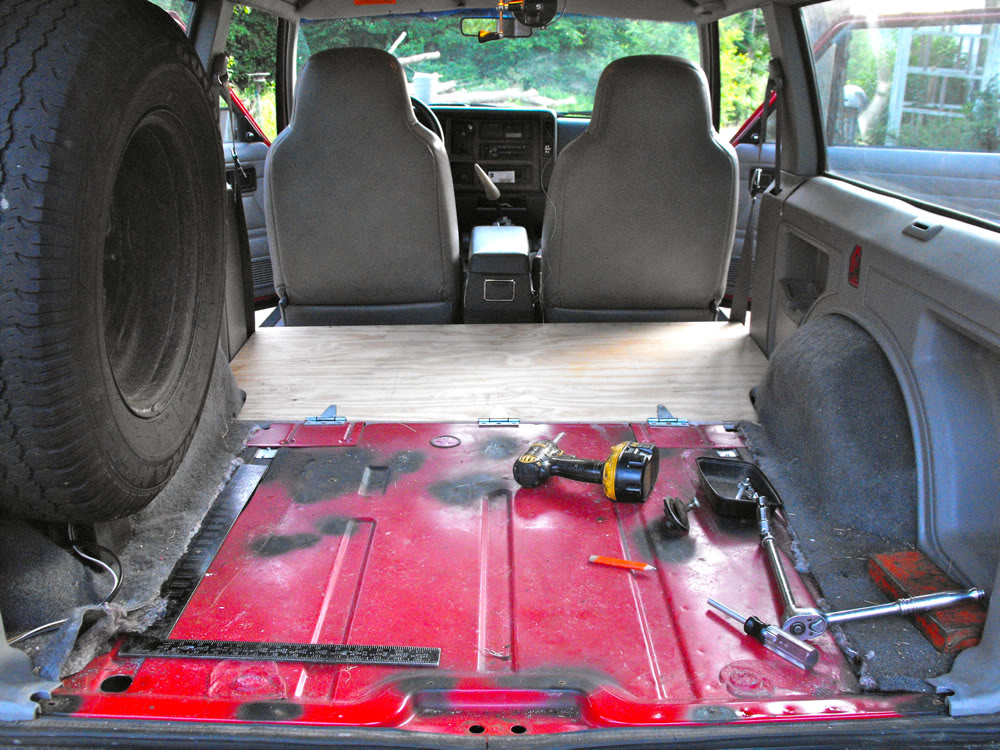
The other thing I did was make up a cover to replace the seat back.
I thought it would give me enough room to put a rack for the long guns underneath, but its still too low to be of any use. I only picked up a couple of inches of deck space front to back and the area under the seat is only marginally deeper then it was with the cushioned seat back, so it was pretty much a waste of time.
I thought it would give me enough room to put a rack for the long guns underneath, but its still too low to be of any use. I only picked up a couple of inches of deck space front to back and the area under the seat is only marginally deeper then it was with the cushioned seat back, so it was pretty much a waste of time.
Last edited by Marcucco; Jun 11, 2012 at 10:41 PM.
Thread Starter
Member
Joined: Apr 2012
Posts: 212
Likes: 1
From: ri
Year: 1996
Model: Cherokee
Engine: 4.0 HO
I replaced the rocker cover gasket and grommets and elbows a couple of weeks ago.
This cleared up the oil in the air intake so I went ahead with the final installation of the new air filter.
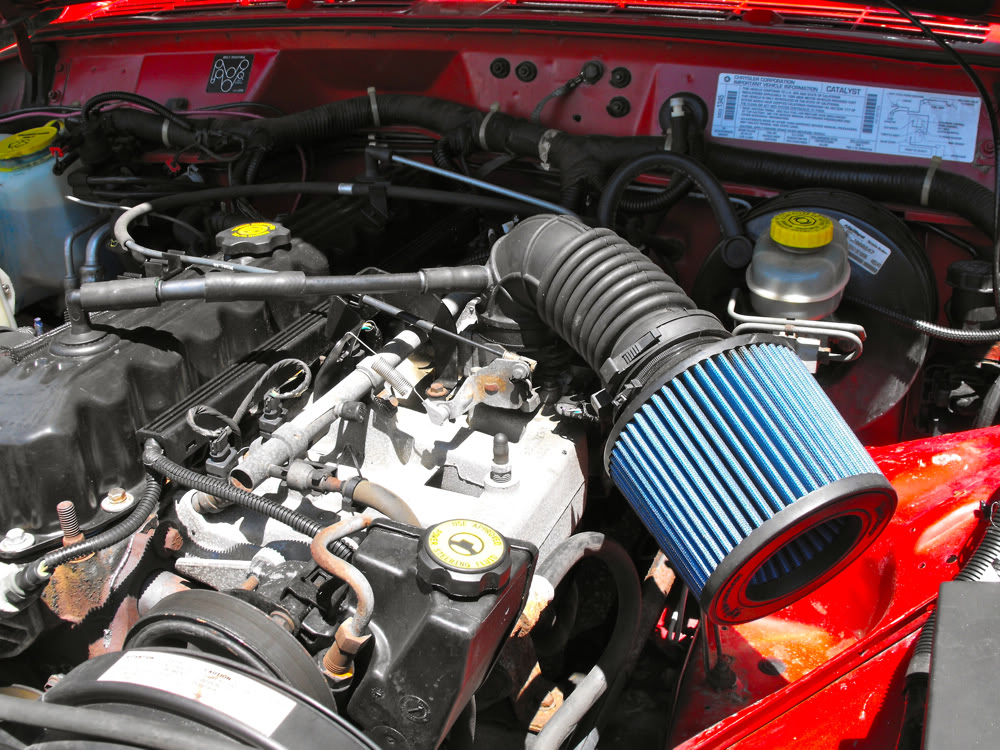
I made up a simple "Y"shaped kick-stand out of 1/4" rod and attached to one of the mounting holes for the old filter box.
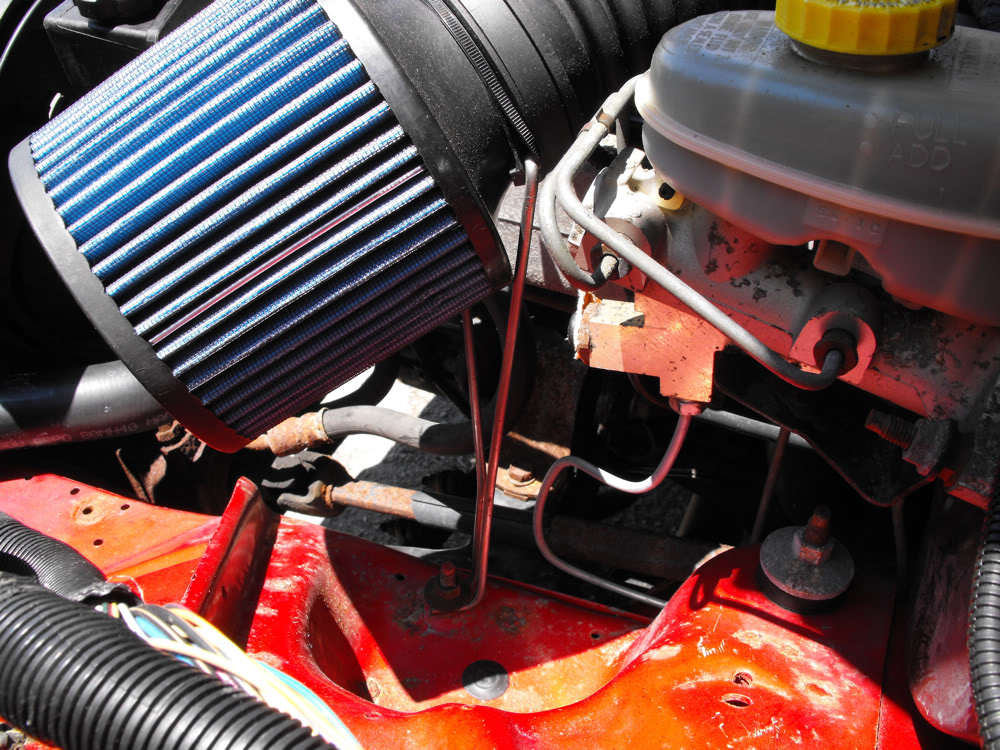
I was happy with the result but even if I move the OBC, I still don't end up with enough room for a second battery.
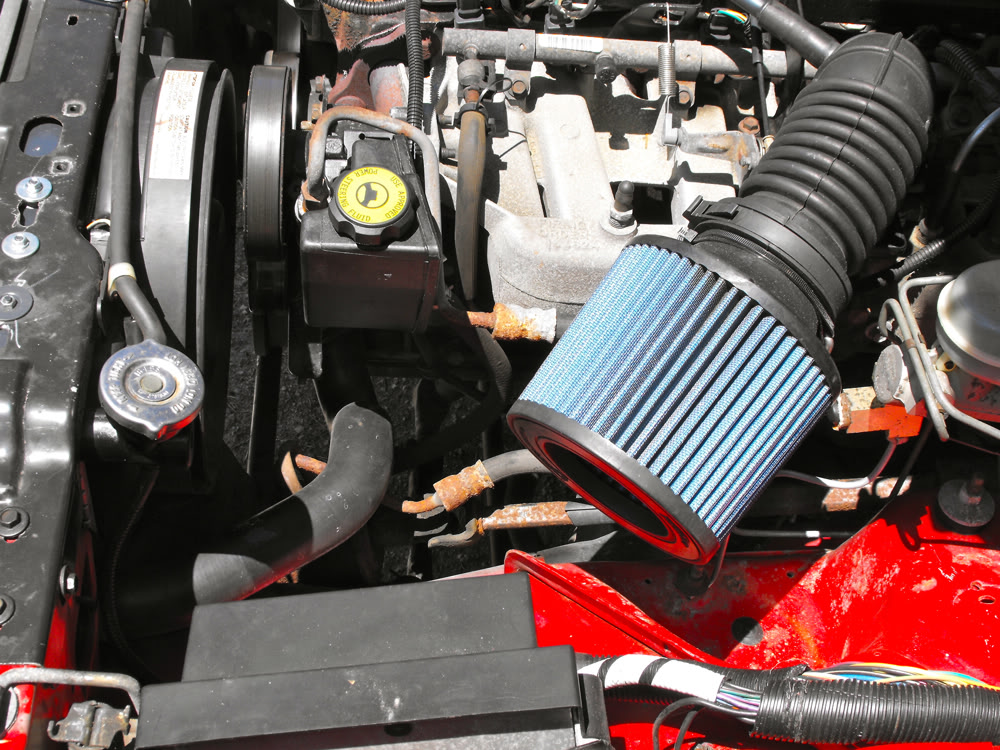
I can honestly say I didn't feel any noticeable difference in performance, or hear any increase in sound levels, but I did see a solid 1 MPG increase in country and highway driving averaged over 3 fill-ups. (no city miles lately)
It's not quite what the manufactures claim, but it will still pay for itself in short order.
This cleared up the oil in the air intake so I went ahead with the final installation of the new air filter.
I made up a simple "Y"shaped kick-stand out of 1/4" rod and attached to one of the mounting holes for the old filter box.
I was happy with the result but even if I move the OBC, I still don't end up with enough room for a second battery.
I can honestly say I didn't feel any noticeable difference in performance, or hear any increase in sound levels, but I did see a solid 1 MPG increase in country and highway driving averaged over 3 fill-ups. (no city miles lately)
It's not quite what the manufactures claim, but it will still pay for itself in short order.
Last edited by Marcucco; Jun 15, 2012 at 07:16 PM.

Thread Starter
Member
Joined: Apr 2012
Posts: 212
Likes: 1
From: ri
Year: 1996
Model: Cherokee
Engine: 4.0 HO
So I started on the "Up Country" leaf spring package this afternoon.
I got her up on 6 jack-stands and pulled all the wheels, I figured I'd check the brakes too while I was under there.
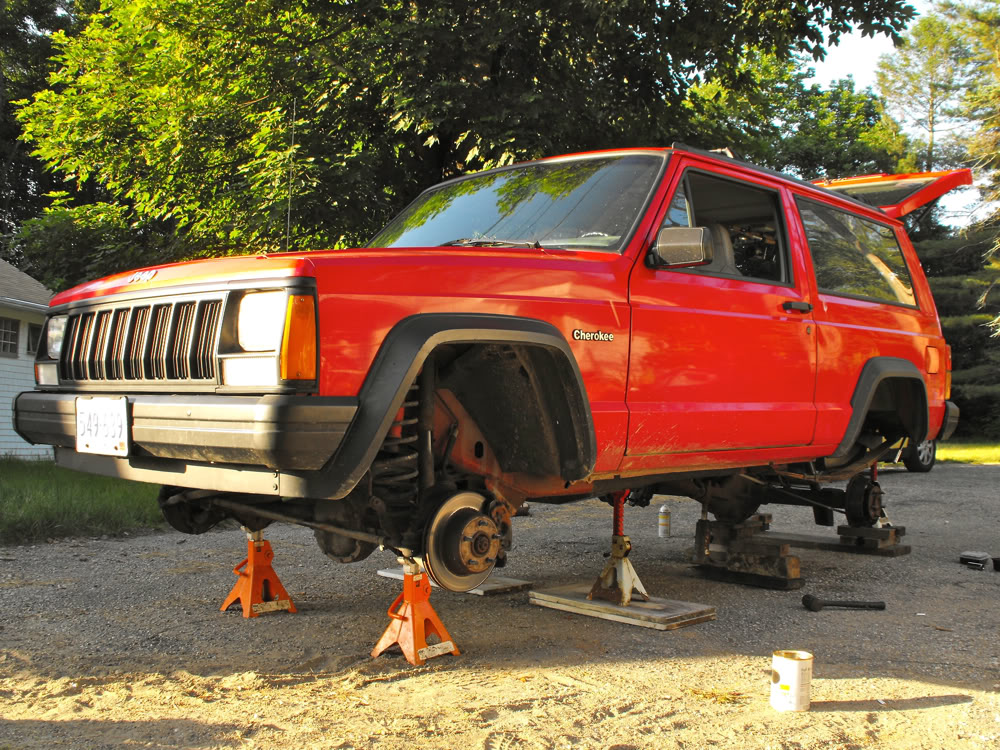
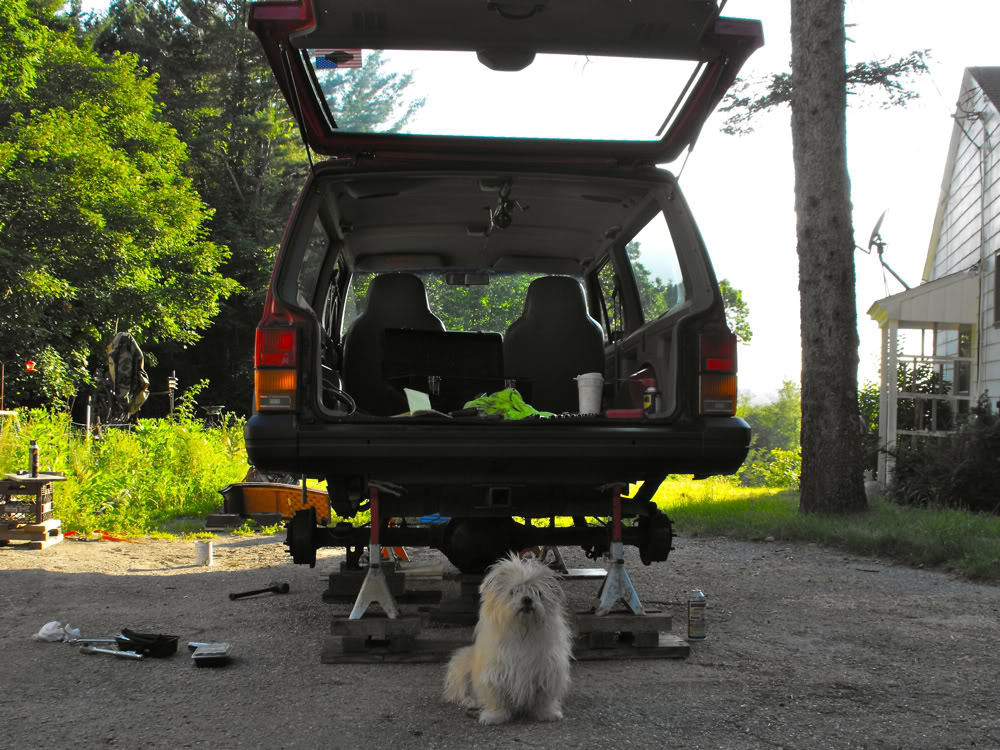
The U bolts and the sway bar came off with no problems.
The bolts for the jounce (bump stop) on the drivers side came right out too.
But both of the bolts on the passenger side jounce snapped off flush. THAT should be fun.
Even after spraying the leaf spring bolts twice a week for a month, everything's still frozen solid, so Im not going to waste a lot of time.
The grinder and sawzall are going to earn their keep tomorrow, then were gong to introduce DeeDee to the "blue wrench".
Got my fingers crossed.
You guys weren't kidding when you said those rear brakes were small, I've seen bigger drums on riding lawnmowers.
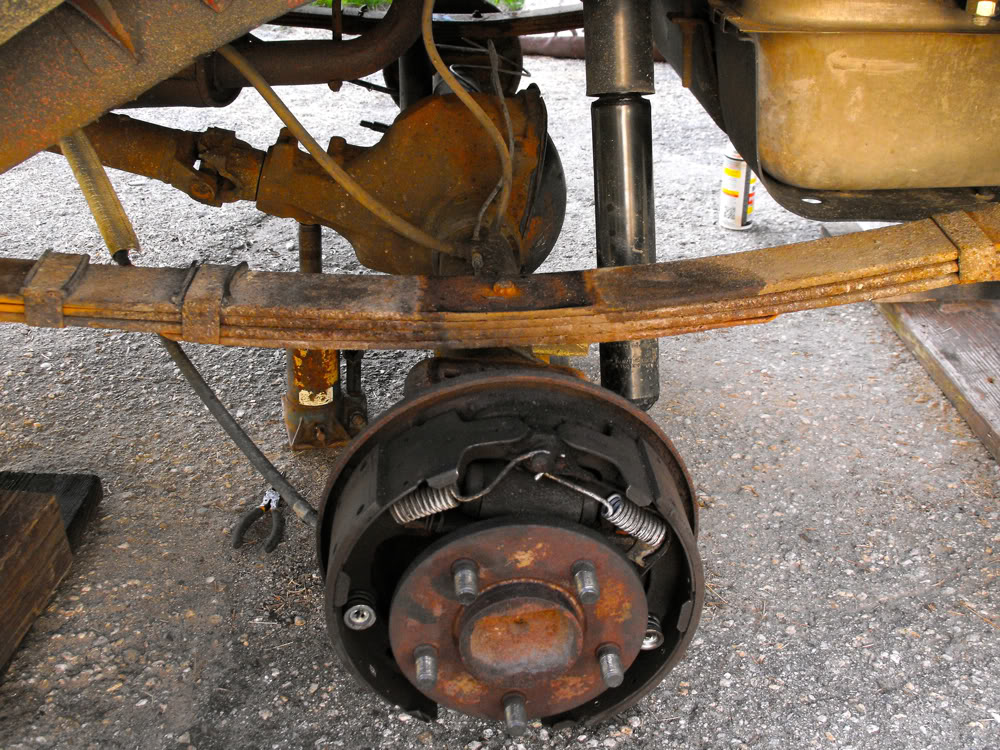
The brakes looked good, but it appears the money I saved there is going into a muffler.
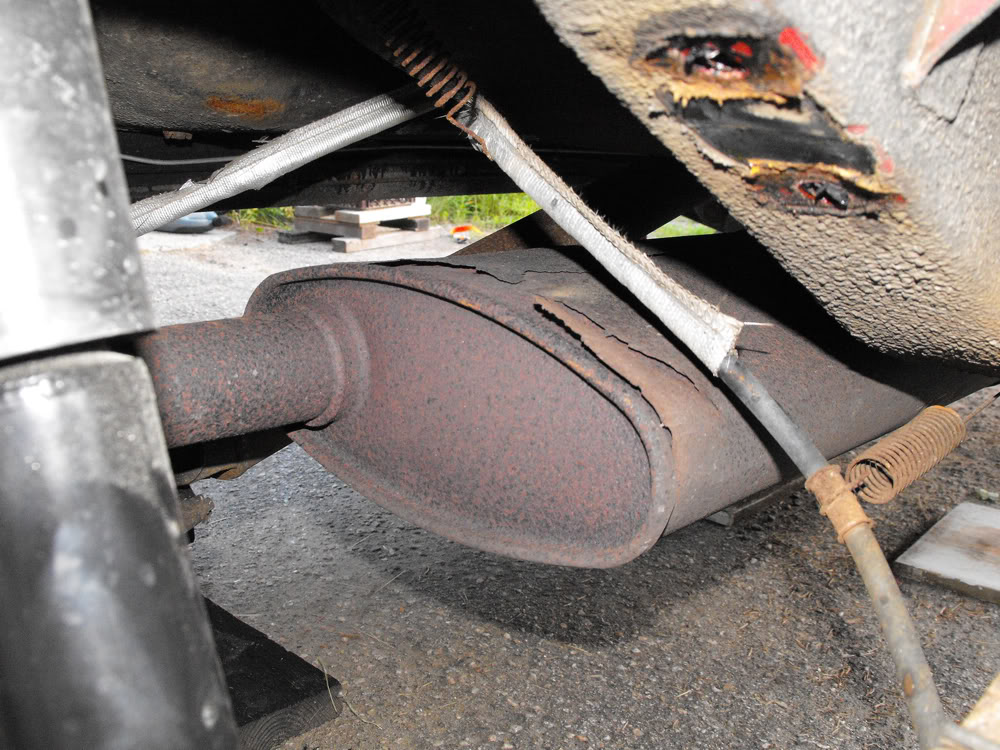
I got her up on 6 jack-stands and pulled all the wheels, I figured I'd check the brakes too while I was under there.
The U bolts and the sway bar came off with no problems.
The bolts for the jounce (bump stop) on the drivers side came right out too.
But both of the bolts on the passenger side jounce snapped off flush. THAT should be fun.
Even after spraying the leaf spring bolts twice a week for a month, everything's still frozen solid, so Im not going to waste a lot of time.
The grinder and sawzall are going to earn their keep tomorrow, then were gong to introduce DeeDee to the "blue wrench".
Got my fingers crossed.
You guys weren't kidding when you said those rear brakes were small, I've seen bigger drums on riding lawnmowers.
The brakes looked good, but it appears the money I saved there is going into a muffler.
Last edited by Marcucco; Jun 22, 2012 at 05:55 PM.
Thread Starter
Member
Joined: Apr 2012
Posts: 212
Likes: 1
From: ri
Year: 1996
Model: Cherokee
Engine: 4.0 HO
The Monday before last started well.
I went into "Take no prisoners" mode and cut away anything on the rear suspension I didn't plan on reusing.
Once I cut the leaf springs and bushings out, all the bolts came free with the 40" breaker bar and a little dose of propane.
Around 2 that afternoon, just as I was patting myself on the back for my progress, the phone rang.
It was "the hall" telling me I needed to be at URI at 6:00 Wednesday morning.
...and my only vehicle is up on jack stands with the transaxle on the ground and the new shackles out in Massachusetts someplace.
Okay, no panic, I've got plenty of time so long as nothing goes wrong.
I took a deep breath and undercoated the leaf spring mounts. (that stuff isn't ever coming out again ...in my lifetime anyway.)
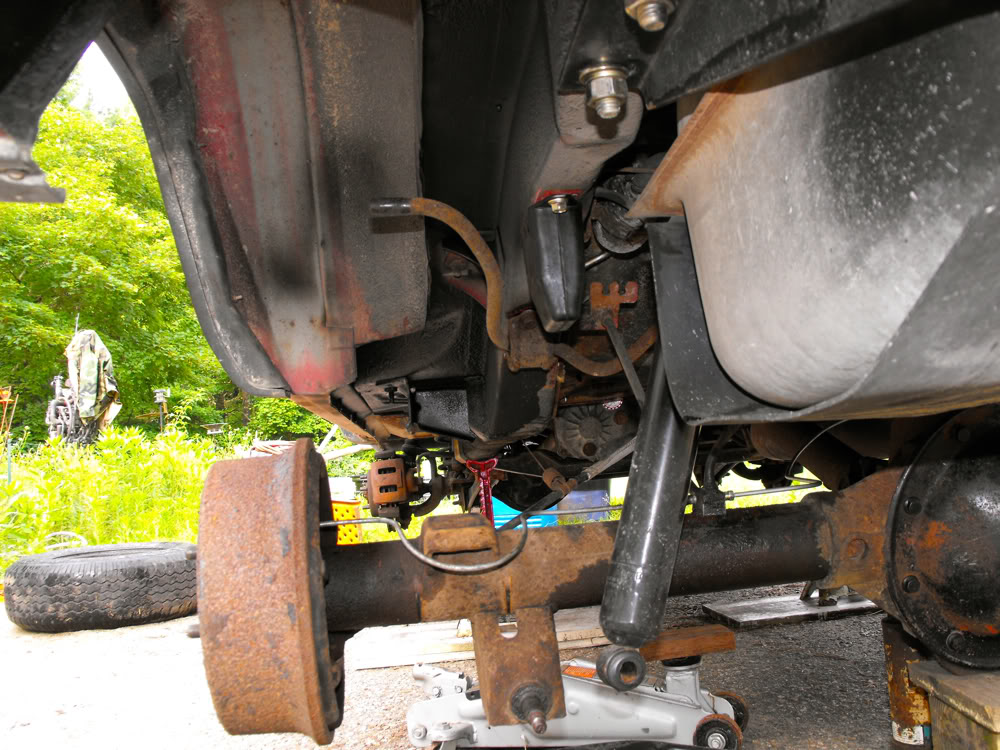
I used a heavy punch to knock the nuts for the rear bump stops free and got them installed with hew bolts dropped in from above.
The rear sway bar bushings went in no problem, same with the U bolts, mounts, and the front leaf bushings.
I put the front tires back on and got the front-end back on the ground.
I took the middle jack stands out and decided to get the *** end up a little higher so I could replace the rear brake lines.
...but I forgot to chock the front wheels and she rolled forward, tipped off the jack stands and slammed down on the differential.
Amazingly, no damage, not even a bent brake drum.
The shackles showed up around noon Tuesday and I got her back on 4 wheels with plenty of time to sort out the tools and get the jeep loaded for work, but I didn't have any time for pictures.
It's no great loss, you've seen a bazillion leaf spring swaps here and mine was no different.
All in all it isn't difficult to do, just kind of tedious.
On 225/75 R15 tires, I had 30.5" between the ground and the bottom of the fender flare with the old leaf springs (31.5" in front.)
With the new springs installed, I had 34.5"in the rear (31" in front) and it looked ridiculous.
sorry, no pic.
I knew the springs would settle in some, so for the rest of the week I left it parked overnight with the boat on the hitch and the tools in the back.
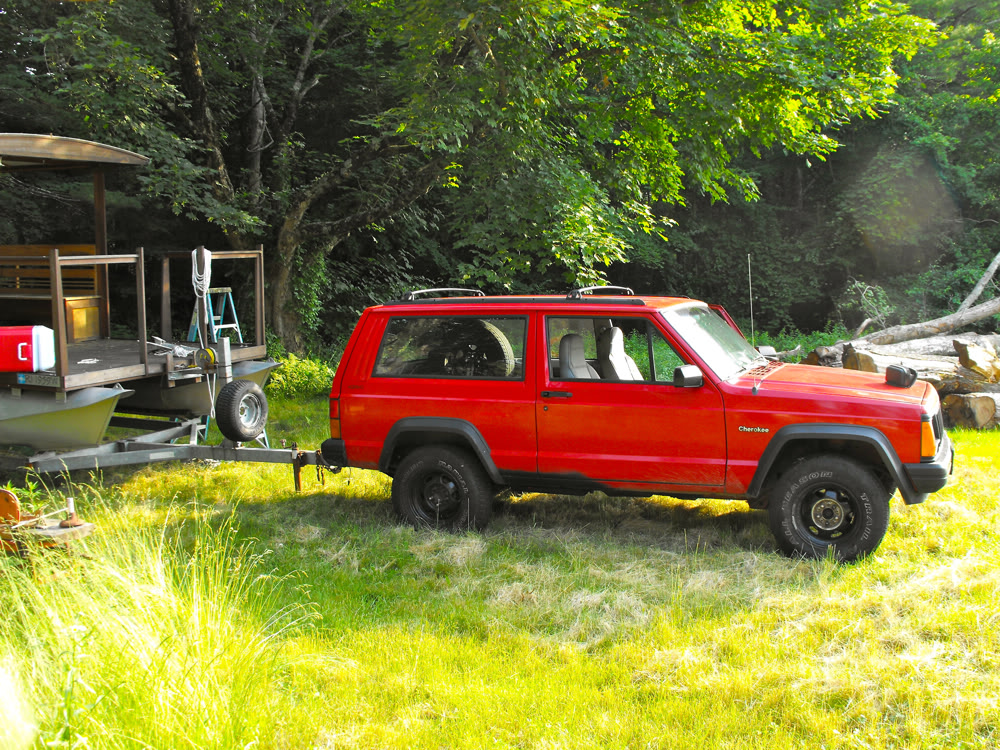
This brought it down to an acceptable 32.5" and it sits nice with the jeep and trailer fully loaded.
Once the leafs settled in the ride was great, very comfortable and not radically stiffer considering the 15% increase in capacity and the urethane bushings.
I can't wait to get the front squared away.
I went into "Take no prisoners" mode and cut away anything on the rear suspension I didn't plan on reusing.
Once I cut the leaf springs and bushings out, all the bolts came free with the 40" breaker bar and a little dose of propane.
Around 2 that afternoon, just as I was patting myself on the back for my progress, the phone rang.
It was "the hall" telling me I needed to be at URI at 6:00 Wednesday morning.
...and my only vehicle is up on jack stands with the transaxle on the ground and the new shackles out in Massachusetts someplace.
Okay, no panic, I've got plenty of time so long as nothing goes wrong.
I took a deep breath and undercoated the leaf spring mounts. (that stuff isn't ever coming out again ...in my lifetime anyway.)
I used a heavy punch to knock the nuts for the rear bump stops free and got them installed with hew bolts dropped in from above.
The rear sway bar bushings went in no problem, same with the U bolts, mounts, and the front leaf bushings.
I put the front tires back on and got the front-end back on the ground.
I took the middle jack stands out and decided to get the *** end up a little higher so I could replace the rear brake lines.
...but I forgot to chock the front wheels and she rolled forward, tipped off the jack stands and slammed down on the differential.
Amazingly, no damage, not even a bent brake drum.
The shackles showed up around noon Tuesday and I got her back on 4 wheels with plenty of time to sort out the tools and get the jeep loaded for work, but I didn't have any time for pictures.
It's no great loss, you've seen a bazillion leaf spring swaps here and mine was no different.
All in all it isn't difficult to do, just kind of tedious.
On 225/75 R15 tires, I had 30.5" between the ground and the bottom of the fender flare with the old leaf springs (31.5" in front.)
With the new springs installed, I had 34.5"in the rear (31" in front) and it looked ridiculous.
sorry, no pic.
I knew the springs would settle in some, so for the rest of the week I left it parked overnight with the boat on the hitch and the tools in the back.
This brought it down to an acceptable 32.5" and it sits nice with the jeep and trailer fully loaded.
Once the leafs settled in the ride was great, very comfortable and not radically stiffer considering the 15% increase in capacity and the urethane bushings.
I can't wait to get the front squared away.
Last edited by Marcucco; Jun 26, 2012 at 08:35 PM.

Junior Member
Joined: Jun 2012
Posts: 32
Likes: 0
From: Bayview Idaho
Model: Cherokee
I picked up a V5 Reese receiver from a local yard that specializes in Jeep stuff.
I had to do some sawzall surgery to get the bumper off, but it had seen better days so it was no great loss.
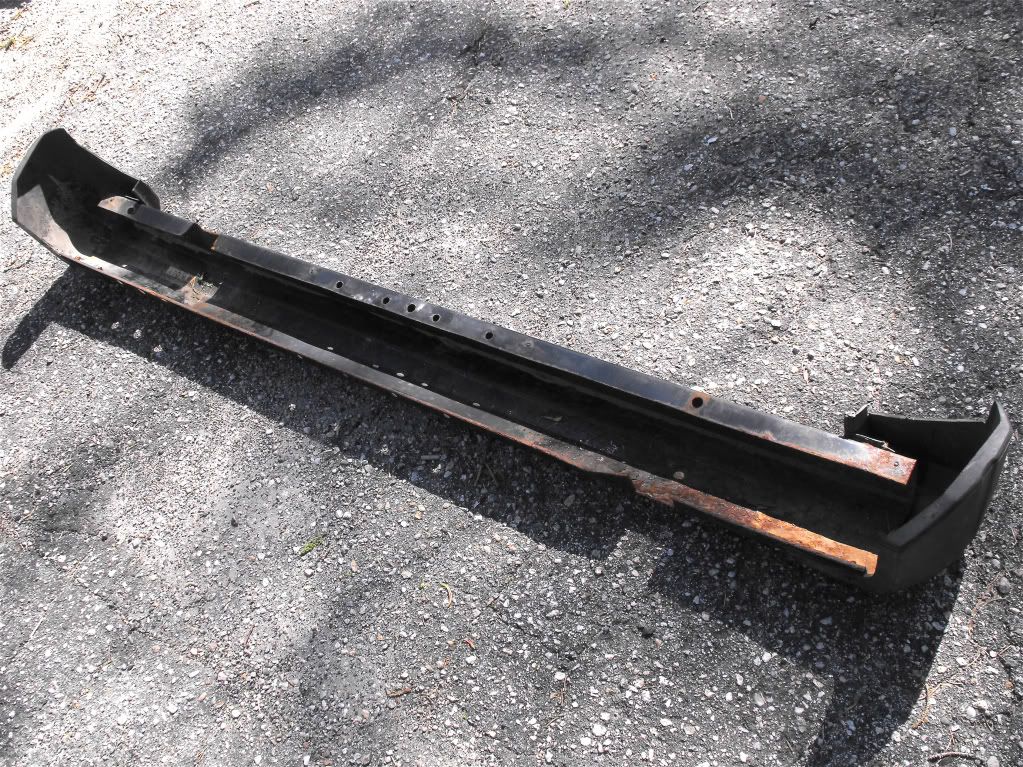
Im not sure what the Reese hitch actually came off of. It's exactly the right width and angle, but the legs are twice as long as anything I've ever seen on a Cherokee.
I liked the longer legs for the extra bolts and spreading the weight out on the unibody. Getting the forward most bolts and the one under the fuel filler neck into their holes was "interesting".

The little blond fella is Elvis.
I ordered the Hopkins T connector module from Amazon to hook up the trailer lights. It works great and the install was painless.
If you want to add a 4 pin connector to your harness, that's absolutely the way to go, a definitive plug and play mod.
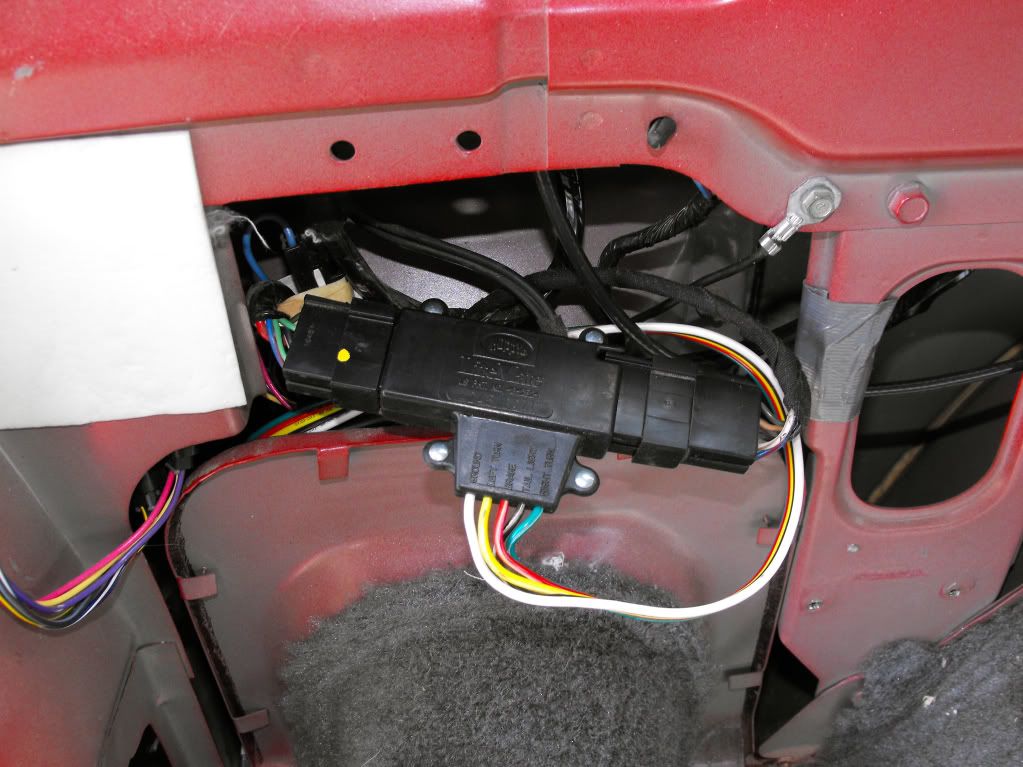
I also put in an override for the drivers door switch. The buzz got really annoying.

I had to do some sawzall surgery to get the bumper off, but it had seen better days so it was no great loss.
Im not sure what the Reese hitch actually came off of. It's exactly the right width and angle, but the legs are twice as long as anything I've ever seen on a Cherokee.
I liked the longer legs for the extra bolts and spreading the weight out on the unibody. Getting the forward most bolts and the one under the fuel filler neck into their holes was "interesting".
The little blond fella is Elvis.
I ordered the Hopkins T connector module from Amazon to hook up the trailer lights. It works great and the install was painless.
If you want to add a 4 pin connector to your harness, that's absolutely the way to go, a definitive plug and play mod.
I also put in an override for the drivers door switch. The buzz got really annoying.
Thread Starter
Member
Joined: Apr 2012
Posts: 212
Likes: 1
From: ri
Year: 1996
Model: Cherokee
Engine: 4.0 HO
Work kind of slammed a lid on my progress.
Don't get me wrong, I'm REALLY glad to be back. This means tires and an exhaust are suddenly in reach.
...but DeeDee looks ever so odd with her butt in the air like a big red cat in heat.
I re-sent the roll pin off to Moesizlac again (sorry moe) and arranged to get the air box to Mannyssj, and the very next eMail in my box was from a guy named Steve up in Woonsocket who had this on Craigslist for $20
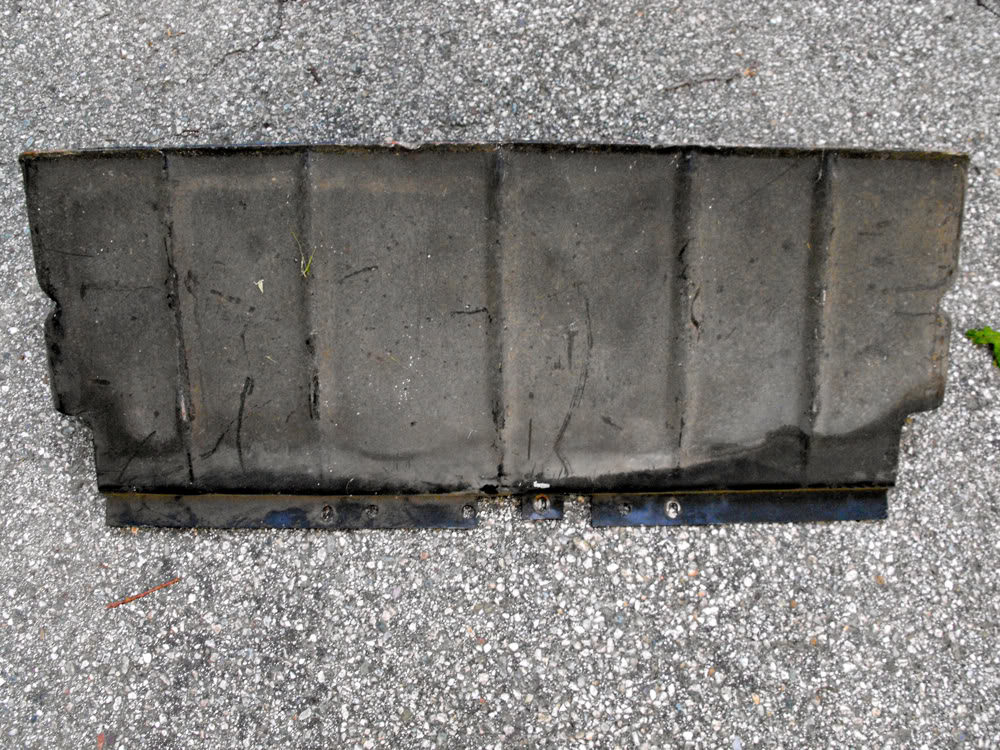
Who says there's no such thing as Karma
SCORE!!!!!
The photo makes it look a little twisted with the dirt and stains, it's actually nice and straight, and HEAVY.
I was amazed, I was expecting sheet metal, this thing is 1.5' X 3' and weighs 50#s
I'm jonesing to get some coil spaces in up front, and the sway bar bushings, but I'll have to wait until Thursday to place the order.
I contacted EnergySuspensionParts.Com asking what exactly was included in the coil spacer kit 2.6012.
(I only need between 3/4 and 1 1/2" lift up front)
They told me they didn't know and I needed to call EnergySuspension directly to find out.
I don't know about you, but this answer didn't work for me.
You expect me to call somebody else to find out what I'm gonna get after I send YOU money?
WTF. You can't call the guys down in shipping and ask them to look at a package on the shelf?
You don't think , maybe, you owe it to your customers to know at least something about your products besides the price?
I would strongly recommend you find another source for Energy Suspension products, or go with another brand if you have to.
If this is how EnergySuspensionParts is going to treat you before the sale, imagine whats going to happen if you have a problem after.
Don't get me wrong, I'm REALLY glad to be back. This means tires and an exhaust are suddenly in reach.
...but DeeDee looks ever so odd with her butt in the air like a big red cat in heat.
I re-sent the roll pin off to Moesizlac again (sorry moe) and arranged to get the air box to Mannyssj, and the very next eMail in my box was from a guy named Steve up in Woonsocket who had this on Craigslist for $20
Who says there's no such thing as Karma
SCORE!!!!!
The photo makes it look a little twisted with the dirt and stains, it's actually nice and straight, and HEAVY.
I was amazed, I was expecting sheet metal, this thing is 1.5' X 3' and weighs 50#s
I'm jonesing to get some coil spaces in up front, and the sway bar bushings, but I'll have to wait until Thursday to place the order.
I contacted EnergySuspensionParts.Com asking what exactly was included in the coil spacer kit 2.6012.
(I only need between 3/4 and 1 1/2" lift up front)
They told me they didn't know and I needed to call EnergySuspension directly to find out.
I don't know about you, but this answer didn't work for me.
You expect me to call somebody else to find out what I'm gonna get after I send YOU money?
WTF. You can't call the guys down in shipping and ask them to look at a package on the shelf?
You don't think , maybe, you owe it to your customers to know at least something about your products besides the price?
I would strongly recommend you find another source for Energy Suspension products, or go with another brand if you have to.
If this is how EnergySuspensionParts is going to treat you before the sale, imagine whats going to happen if you have a problem after.
Last edited by Marcucco; Jun 30, 2012 at 07:48 PM.
Thread Starter
Member
Joined: Apr 2012
Posts: 212
Likes: 1
From: ri
Year: 1996
Model: Cherokee
Engine: 4.0 HO
I've been back to work for a month now, somehow the money still goes out as fast as it comes in.
...but I did manage to squirrel enough away for a set of 235/75R15 Wrangler RT/S's to go with the 3/4 ton rear end.
I know the rock and mud guys are cringing, but hay, this is a road warrior, not a rock climber.
I also have everything I need to tweak the front end except the time to install it.
Going back a page, I wanted to keep the stock hight, but the 3/4 ton springs equalled a 1" lift.
I needed the payload for towing, so it was "like it or lump it" time.
Apparently that 1" is measured with the vehicle fully loaded because I ended up with around 2" of lift with the Crown LT springs.
As I mentioned before, I started parking it over night with the trailer attached and a load of tools in the bed, hoping to flex out the leafs. It seemed to settle down a bit in the morning, but it was back to 1.5" by the time I got home.
The only set of "stock" replacement shackles I could find that didn't come from the stealership were around $20 a piece, which should have set off my alarm bell, but they were listed as OEM so I went for it.
They were absolute garbage.
This is my DD and I had to get to work, so I was stuck and had to install them at least temporarily.
Tomken makes a set that were a little cheaper then the stealership item, so I ordered a set of those. I finally got the time to get them and an oil change in this week end.
The 2 on the left are the "OEM"s, they're stamped from steel that I miked out at .140".
I've seen better welds coming out of high school kids.
The one in the center is (obviously) factory issue. It mikes out to .185" without the rust.
The one on the right is the Tomken, mikeing out at .185" steel and was welded by a pro.
Excellent item if you're looking for short shackles..
I put the Prothane bushings in it, the stock Tomken bushings are shown below it.
The Tomken shackles are advertised as being 1" longer the stock and giving you a 1/2" lift, but that would mean they expect your shackles to be resting at a 45º angle, and mine are only about 5º off plumb right now so I got more lift then I was hoping out of them.
As it stands now, the 16 year old front end is, maybe, 1/4" under the stock hight after nearly 200k.
The spec's for the parts I put the rear should have made it 1 1/2" over stock, but somehow I ended up with around 2 3/4" IRL.
It's looking really stoopit right now, but I got a set of 1 1/2" Prothane spacers for the front coils.
The only issue is the new shocks I bought were for the stock hight so I'm a little worried about how that will work out.
I can live with the 2" lift, and I like that it looks a little more aggressive,
but I was digging the 23 mpg highway,
and Elvis doesn't even attempt a clean-jump in now.
...but I did manage to squirrel enough away for a set of 235/75R15 Wrangler RT/S's to go with the 3/4 ton rear end.
I know the rock and mud guys are cringing, but hay, this is a road warrior, not a rock climber.
I also have everything I need to tweak the front end except the time to install it.
Going back a page, I wanted to keep the stock hight, but the 3/4 ton springs equalled a 1" lift.
I needed the payload for towing, so it was "like it or lump it" time.
Apparently that 1" is measured with the vehicle fully loaded because I ended up with around 2" of lift with the Crown LT springs.
As I mentioned before, I started parking it over night with the trailer attached and a load of tools in the bed, hoping to flex out the leafs. It seemed to settle down a bit in the morning, but it was back to 1.5" by the time I got home.
The only set of "stock" replacement shackles I could find that didn't come from the stealership were around $20 a piece, which should have set off my alarm bell, but they were listed as OEM so I went for it.
They were absolute garbage.
This is my DD and I had to get to work, so I was stuck and had to install them at least temporarily.
Tomken makes a set that were a little cheaper then the stealership item, so I ordered a set of those. I finally got the time to get them and an oil change in this week end.
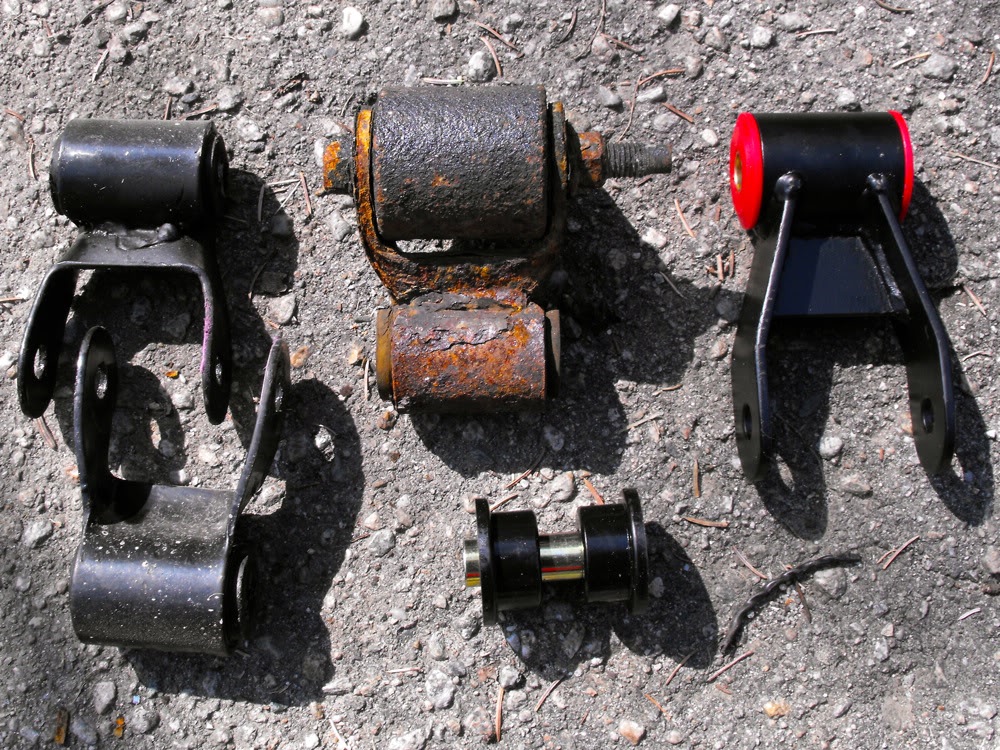
The 2 on the left are the "OEM"s, they're stamped from steel that I miked out at .140".
I've seen better welds coming out of high school kids.
The one in the center is (obviously) factory issue. It mikes out to .185" without the rust.
The one on the right is the Tomken, mikeing out at .185" steel and was welded by a pro.
Excellent item if you're looking for short shackles..
I put the Prothane bushings in it, the stock Tomken bushings are shown below it.
The Tomken shackles are advertised as being 1" longer the stock and giving you a 1/2" lift, but that would mean they expect your shackles to be resting at a 45º angle, and mine are only about 5º off plumb right now so I got more lift then I was hoping out of them.
As it stands now, the 16 year old front end is, maybe, 1/4" under the stock hight after nearly 200k.
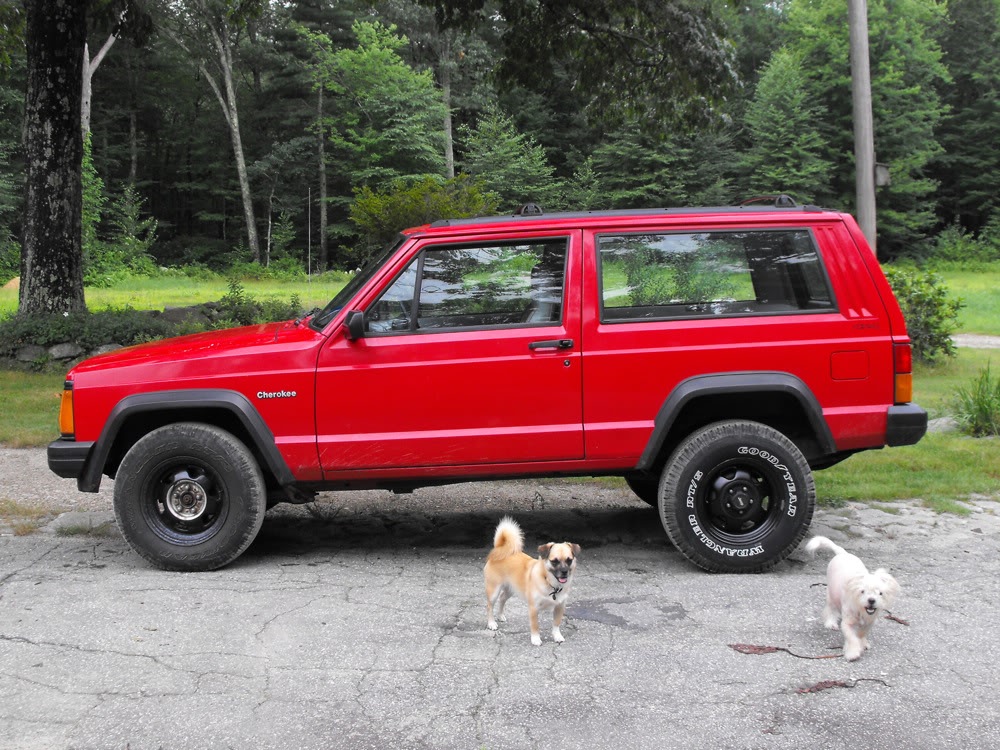
The spec's for the parts I put the rear should have made it 1 1/2" over stock, but somehow I ended up with around 2 3/4" IRL.
It's looking really stoopit right now, but I got a set of 1 1/2" Prothane spacers for the front coils.
The only issue is the new shocks I bought were for the stock hight so I'm a little worried about how that will work out.
I can live with the 2" lift, and I like that it looks a little more aggressive,
but I was digging the 23 mpg highway,
and Elvis doesn't even attempt a clean-jump in now.
Last edited by Marcucco; Jul 29, 2012 at 06:01 PM.
Thread Starter
Member
Joined: Apr 2012
Posts: 212
Likes: 1
From: ri
Year: 1996
Model: Cherokee
Engine: 4.0 HO
I finally got the time to get the parts into the front end two weeks ago.
RI still celebrates VJ Day so I had a 3 day weekend.
New sway-bar connectors with urethane bushings all around, new shocks and steering dampener and shims for the front coils.
...and a new set of tires on some rattle-can painted rims.
Everything came off okay, tho I did need the torch to get the stud for the steering dampener parted. The big crisis was getting the coils back in.
The only spring compressor I could borrow was the type that goes inside the spring and it was way too big for the XJ coils.
The drivers side went back on no problem with a couple of pry bars. The passenger side was a 3 hour + nightmare that included 4 pry bars, half a dozen wooden blocks, a pair of engineering wedges and a dead-blow hammer.
I pulled the rubber coil bushings out of the front and replaced them with two pairs of 3/4" Prothane bushings. As she stands now, she's 1 1/4" over stock in front, and looks a bit better.
The sway-bar stuff was painless, the top bolts snapped off both links. The lower bolts spun off no problem. I'd ordered a replacement stock set because one of them was bent.
(How does an old man in a mall-crawler bend a sway-bar link?)
I also got the Prothane bushing kit for the sway-bar. For those of you out there that Mic'd their sway bar out to 1.08" +/-, go ahead and order the 25mm. bushing kit, it will fit fine. The bar is so worn after 16 years and 200k miles I almost wish I'd ordered the 24mm set.
The bump-stops crumbled to dust when I pulled the coils off, I didn't think to order replacements so that's on the list with the muffler and windshield.
The Monroe SensaTrack shocks were hit and run, no problem. The matching steering damper took a little extra time.
You want to put a wrench on the mounting stud and then beat a ball joint splitting fork in. You don't have a lot of room to swing a heavy hammer with the axel and all in the way if you go crossways, and the shape of the steering arm won't let you go in parallel to the arm.
The alignment took a 1/4" adjustment. Nothing you could feel but enough to prematurely chew up a new set of tires so it was worth the $50.
I took her out and tried some evasive maneuvers at 50mph on pavement, and 6 or 7 miles of dirt road at 35mph in 3rd and 4th gear, I'm thrilled.
The suspension is stiff, but not tooth-rattling. The street handling is excellent right up into highway speeds, she rides nice at 75 mph. I'm really liking her as a road warrior.
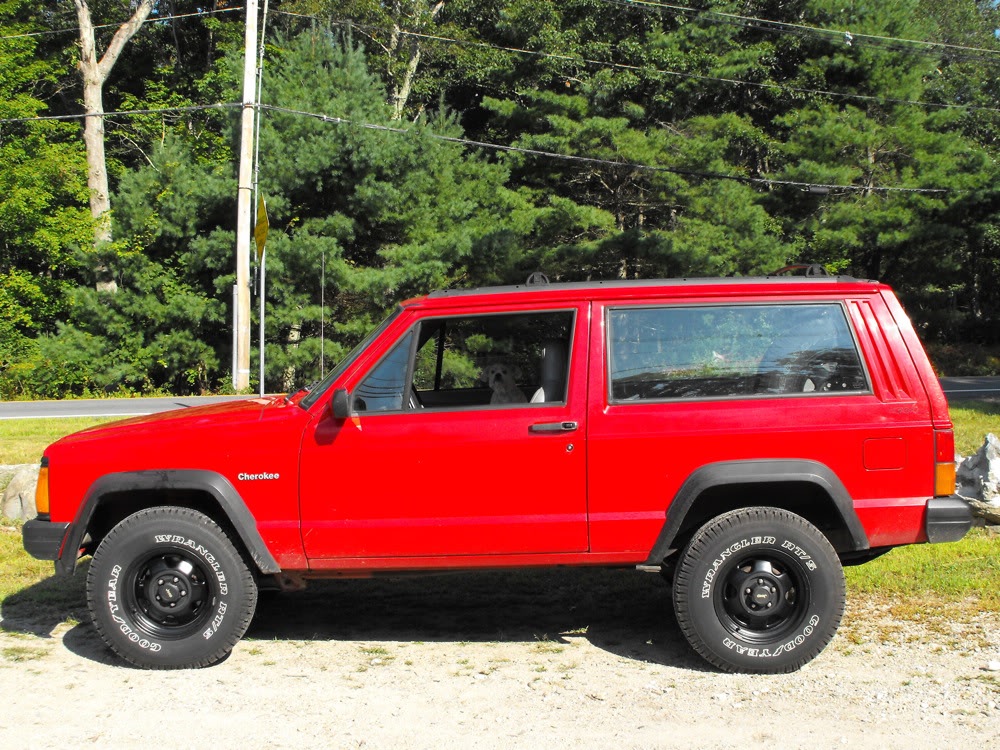
But she's still got her butt in the air.
RI still celebrates VJ Day so I had a 3 day weekend.
New sway-bar connectors with urethane bushings all around, new shocks and steering dampener and shims for the front coils.
...and a new set of tires on some rattle-can painted rims.
Everything came off okay, tho I did need the torch to get the stud for the steering dampener parted. The big crisis was getting the coils back in.
The only spring compressor I could borrow was the type that goes inside the spring and it was way too big for the XJ coils.
The drivers side went back on no problem with a couple of pry bars. The passenger side was a 3 hour + nightmare that included 4 pry bars, half a dozen wooden blocks, a pair of engineering wedges and a dead-blow hammer.
I pulled the rubber coil bushings out of the front and replaced them with two pairs of 3/4" Prothane bushings. As she stands now, she's 1 1/4" over stock in front, and looks a bit better.
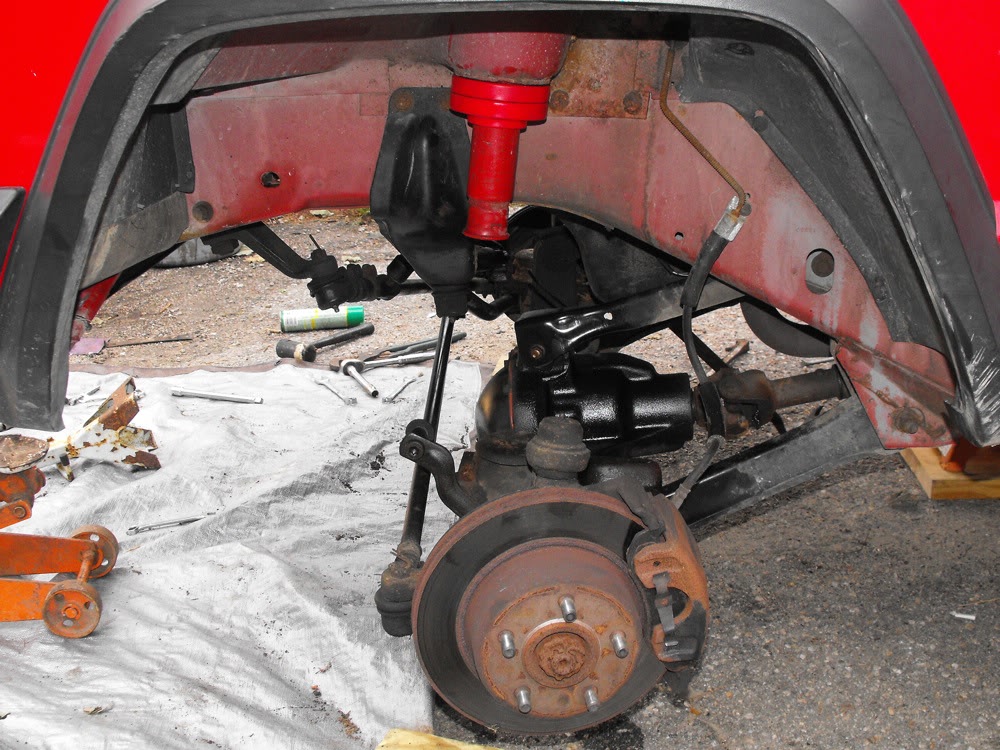
The sway-bar stuff was painless, the top bolts snapped off both links. The lower bolts spun off no problem. I'd ordered a replacement stock set because one of them was bent.
(How does an old man in a mall-crawler bend a sway-bar link?)
I also got the Prothane bushing kit for the sway-bar. For those of you out there that Mic'd their sway bar out to 1.08" +/-, go ahead and order the 25mm. bushing kit, it will fit fine. The bar is so worn after 16 years and 200k miles I almost wish I'd ordered the 24mm set.
The bump-stops crumbled to dust when I pulled the coils off, I didn't think to order replacements so that's on the list with the muffler and windshield.
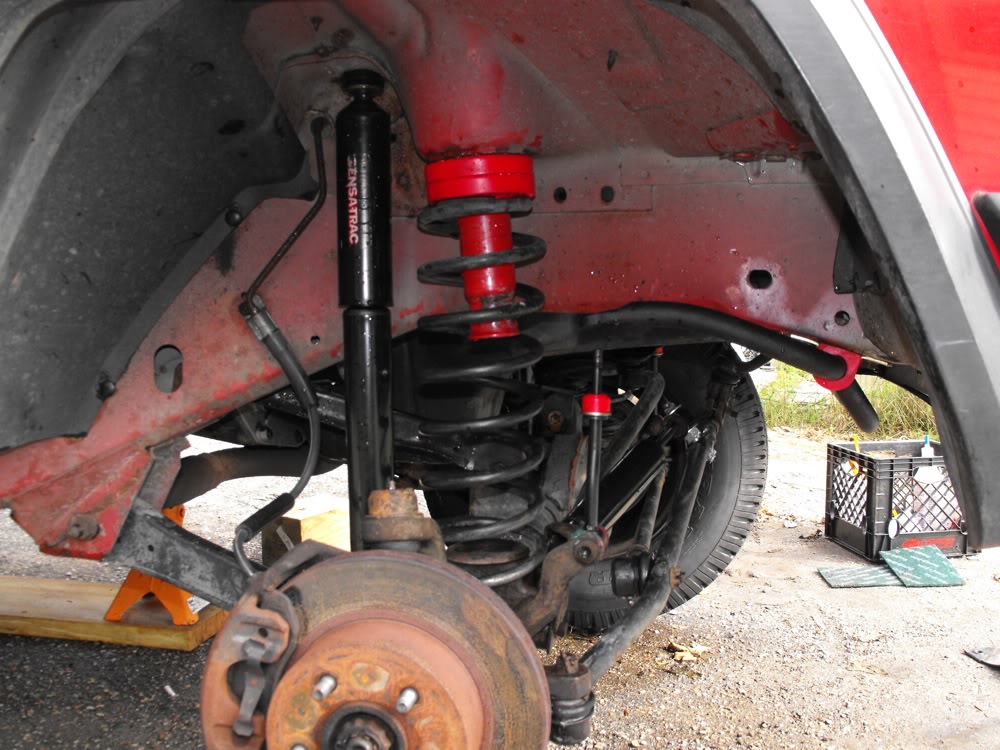
The Monroe SensaTrack shocks were hit and run, no problem. The matching steering damper took a little extra time.
You want to put a wrench on the mounting stud and then beat a ball joint splitting fork in. You don't have a lot of room to swing a heavy hammer with the axel and all in the way if you go crossways, and the shape of the steering arm won't let you go in parallel to the arm.
The alignment took a 1/4" adjustment. Nothing you could feel but enough to prematurely chew up a new set of tires so it was worth the $50.
I took her out and tried some evasive maneuvers at 50mph on pavement, and 6 or 7 miles of dirt road at 35mph in 3rd and 4th gear, I'm thrilled.
The suspension is stiff, but not tooth-rattling. The street handling is excellent right up into highway speeds, she rides nice at 75 mph. I'm really liking her as a road warrior.
But she's still got her butt in the air.
Thread Starter
Member
Joined: Apr 2012
Posts: 212
Likes: 1
From: ri
Year: 1996
Model: Cherokee
Engine: 4.0 HO
I tracked down all the stuff for the 10" drum brake conversion and was just about to grab the parts when I got hit with 2 quick lefts. The new job fell thru and the water pump "bit the shed"
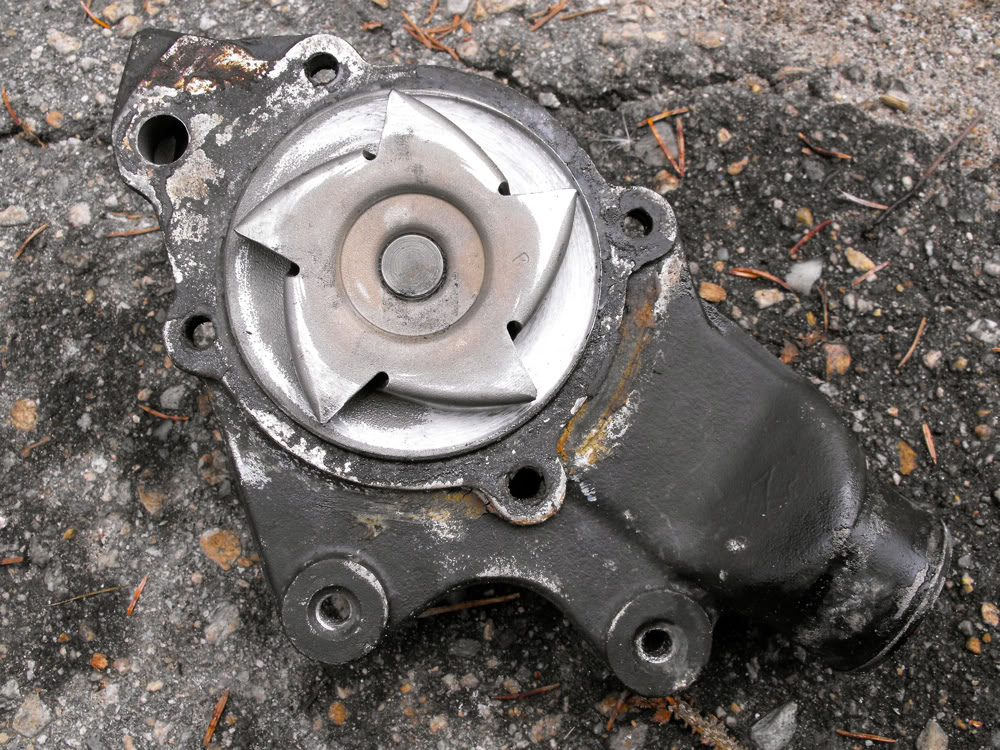
The replacement wasn't bad, you don't have to pull the radiator or the shroud, just the electric fan.
I noticed the bit of rubber hose that connects the CCV line to the manifold need to be replaced it again. (This is the second time in 5 months.) So I decided to go for a permanent fix.
I grabbed a 1/4" FPT X 1/4" flair fitting and nut and a 16" piece of 1/4" OD brake line.
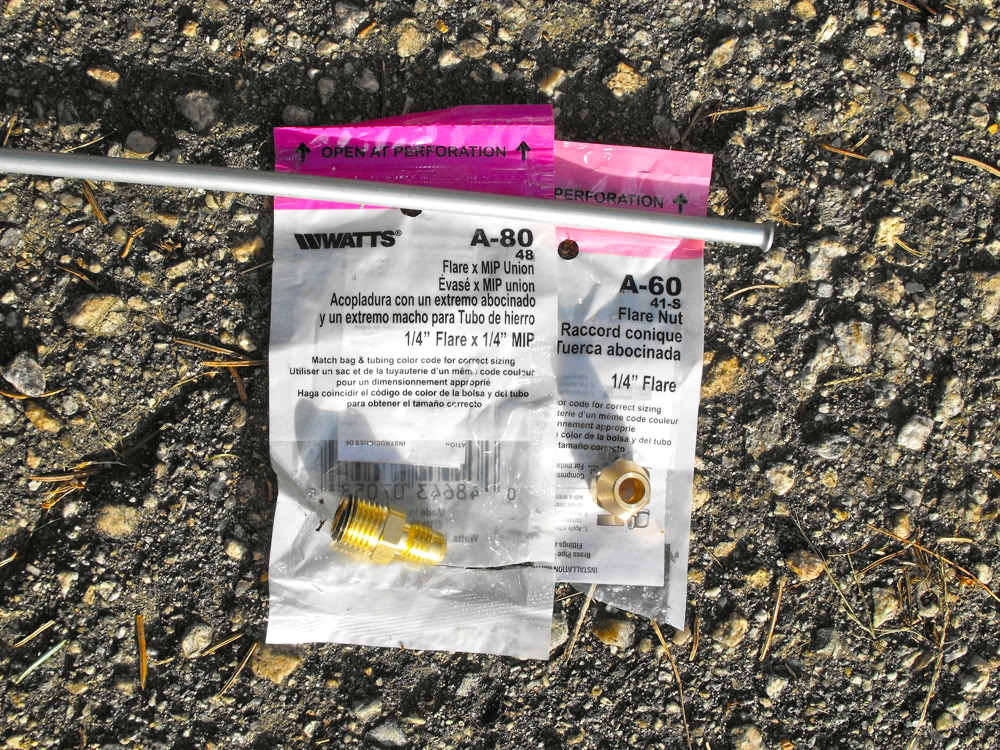
Pull the old barb fitting out of the manifold and install the flair nut fitting.
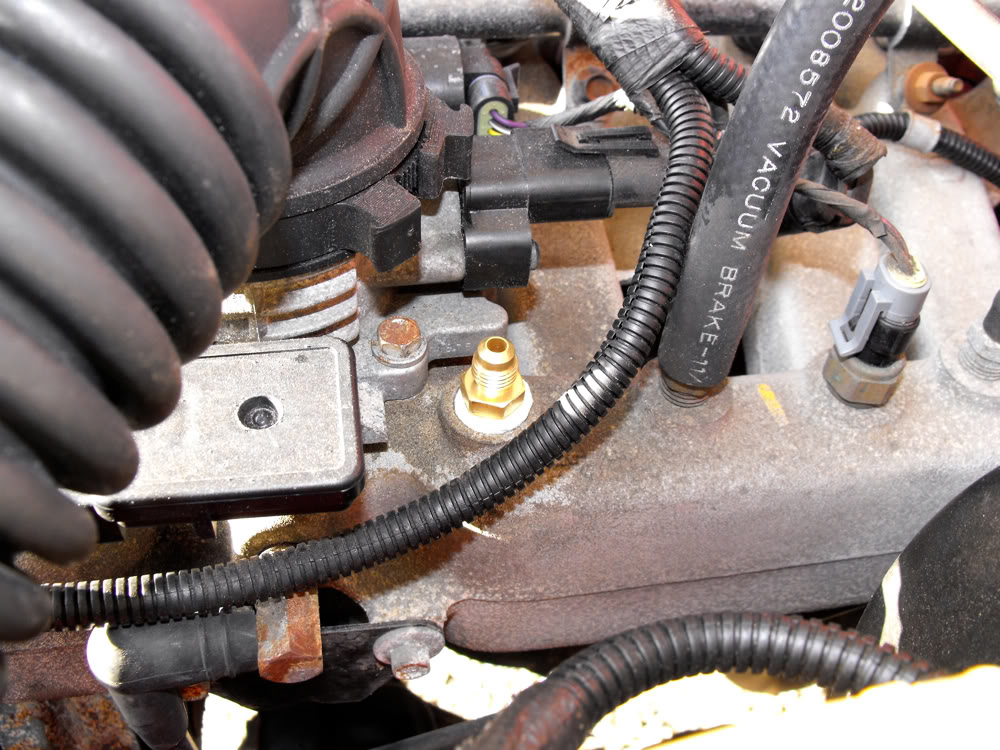
Cut the flare off one end of the brake line and slip the flare nut on (before you bend the brake line). The line needs to come up between 3 3/4" and 4" as it turns. I have a 1/4" bender, but the curve doesn't have to be as tight as that one. You could just use a coffee can.
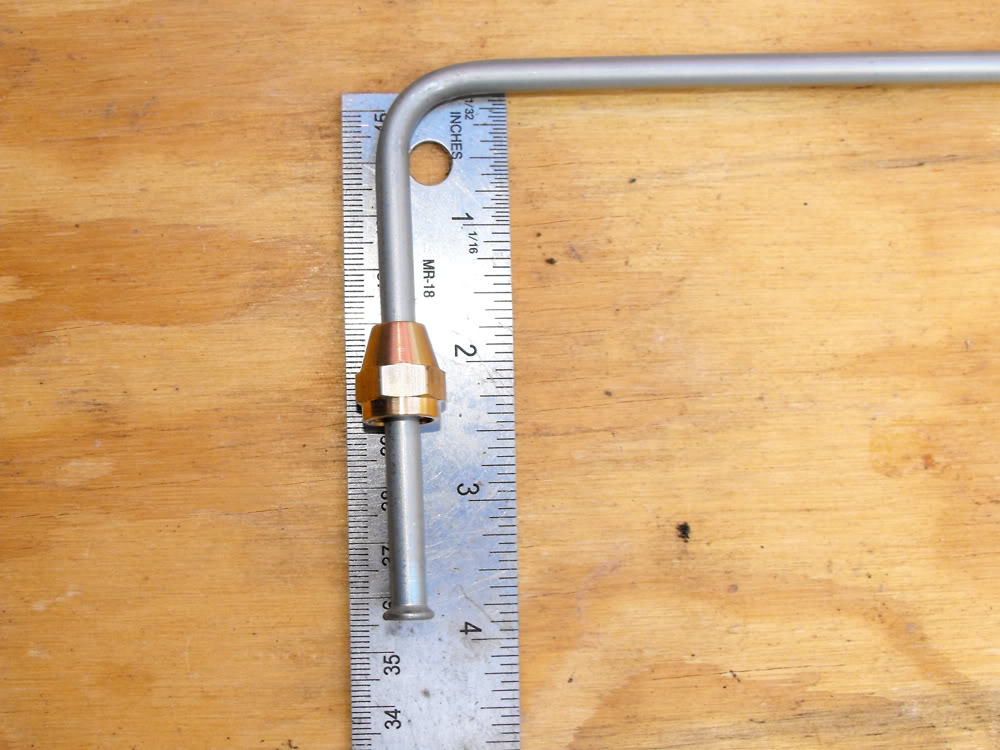
You can dry-fit the line from the fitting to the CCV elbow to determine the proper length for the long leg. You want it to fit right inside the CCV elbow to a depth of 3/4" to 1".
Once you've got the line cut to size, you can take a 1/4" vacuum fitting cap with the end punched out, (or just a piece of 1/4" vac line) and slip it onto the line.
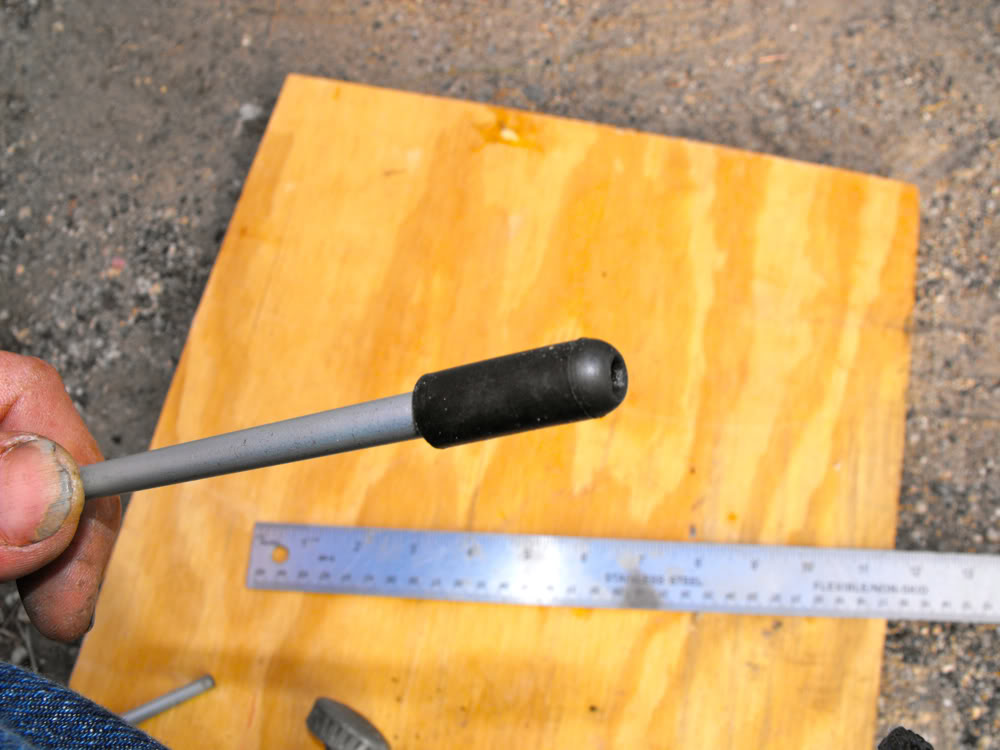
This will fit right into the CCV fitting on the rocker cover. I used a dab of RTV to make sure it sealed tight.
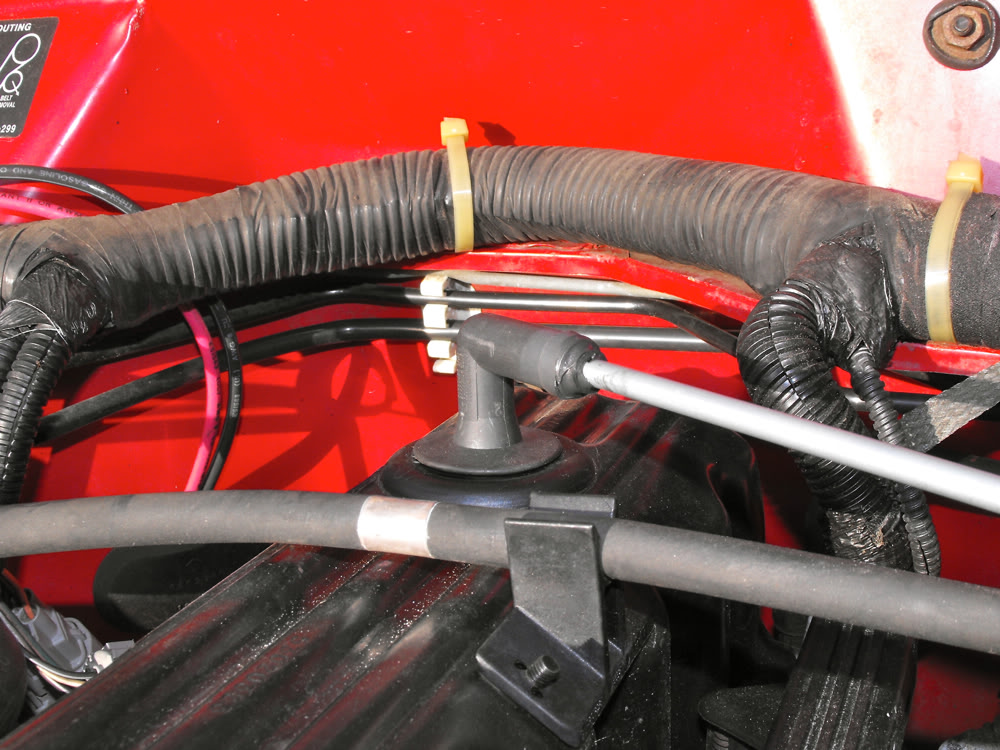
2 quick notes, you don't have to mash that flair nut down, it doesn't take much to get a good seal, and you don't need much RTV on the CCV/brake line connection, with the flair nut tightened up, there's not enough flex in the steel brake line for it to ever come loose.
So there it is, $10 worth of parts and you'll never have to mess with it again.
The replacement wasn't bad, you don't have to pull the radiator or the shroud, just the electric fan.
I noticed the bit of rubber hose that connects the CCV line to the manifold need to be replaced it again. (This is the second time in 5 months.) So I decided to go for a permanent fix.
I grabbed a 1/4" FPT X 1/4" flair fitting and nut and a 16" piece of 1/4" OD brake line.
Pull the old barb fitting out of the manifold and install the flair nut fitting.
Cut the flare off one end of the brake line and slip the flare nut on (before you bend the brake line). The line needs to come up between 3 3/4" and 4" as it turns. I have a 1/4" bender, but the curve doesn't have to be as tight as that one. You could just use a coffee can.
You can dry-fit the line from the fitting to the CCV elbow to determine the proper length for the long leg. You want it to fit right inside the CCV elbow to a depth of 3/4" to 1".
Once you've got the line cut to size, you can take a 1/4" vacuum fitting cap with the end punched out, (or just a piece of 1/4" vac line) and slip it onto the line.
This will fit right into the CCV fitting on the rocker cover. I used a dab of RTV to make sure it sealed tight.
2 quick notes, you don't have to mash that flair nut down, it doesn't take much to get a good seal, and you don't need much RTV on the CCV/brake line connection, with the flair nut tightened up, there's not enough flex in the steel brake line for it to ever come loose.
So there it is, $10 worth of parts and you'll never have to mess with it again.
Last edited by Marcucco; Sep 21, 2012 at 10:15 PM.

