
Dee Dee


Thread Starter
Member
Joined: Apr 2012
Posts: 212
Likes: 1
From: ri
Year: 1996
Model: Cherokee
Engine: 4.0 HO
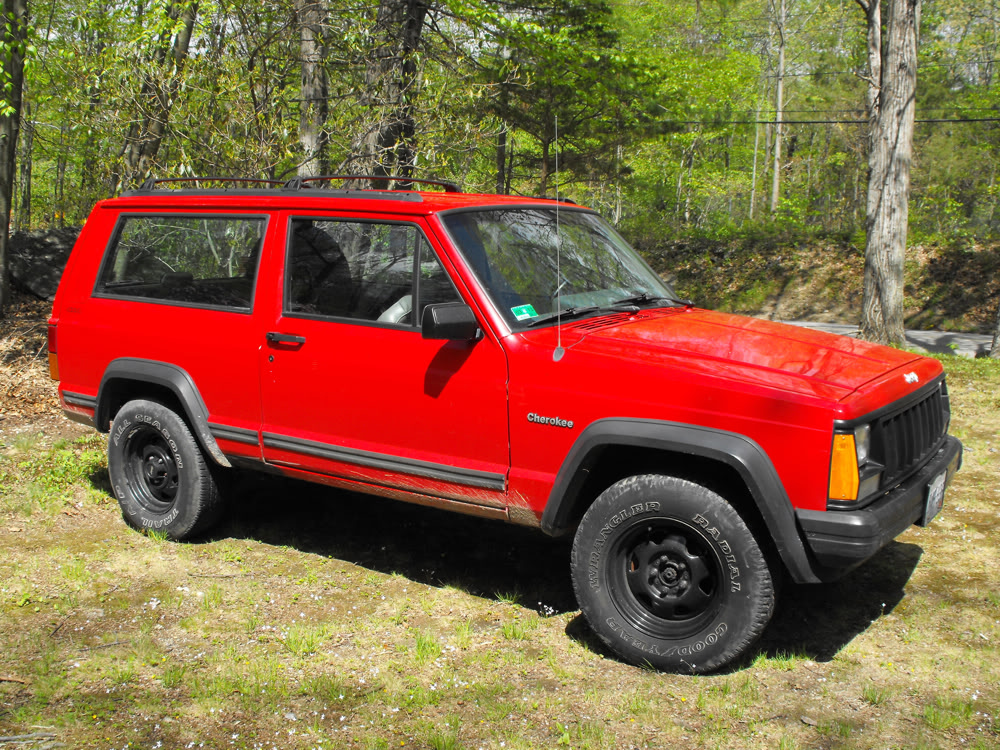
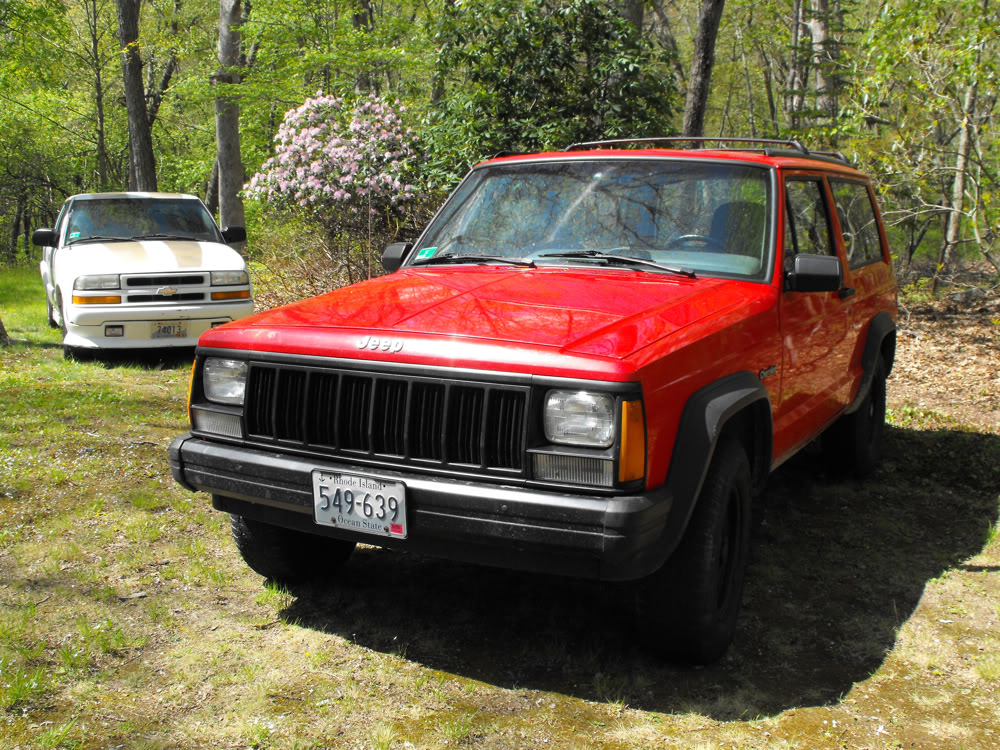
It's my daily driver and a 2 door, and since I'm not I'm not the type to spend a lot of time on a naming an inanimate object, I guess I'll just call her "Dee Dee".

She's strictly "meat and potatoes". The only option seems to be AC and the sound bar. Overall she's in really nice shape for a '96 that's spittin' distance from 200k. No major dents and just enough dings so I don't have to worry about where I park. I've busted a couple of bolts, but all the sheet metal rust has been superficial (...so far).
I had a 2WD Comanche with a 4.0 around 10 years ago. I was always a Chevy guy but that thing was the berries. I put 80k on it in 5 years and it never caused me a moments grief (until the top end went).
I managed to jump on this one at a price that made me happy.
The previous owner was the Chief of a local volunteer fire company. He sold it to Jay, his mechanic, who also happens to be my mechanic and a pal.
According to Jay, "The Chief" bought DeeDee new and Jay had been working on it since it went out of warrantee. I managed to talk him into letting me take her as a loaner while my S10 was in his shop and I fell in love. Maybe it's cause the old girl runs great, maybe it's that big square buttt. (It's an Italian thing.)
I can't find the title for the S10 so I'm kind of stuck for $ until the DMV gets around to printing me out a new one and I can sell it.
This has put a temporary hold on DeeDee's upgrades, but there's some odds and ends I can pick away at while I wait.
If you've hit this thread hoping to see a 2 door get all jacked up, you're in for a disappointment.
I got her as a tow/support vehicle for this boat camper project I've been working on.
The plan is to rebuild DeeDee's suspension with a heavier duty rating. The rear may come up an inch to offset the loading and the hitch, but the front will stay at the stock hight.
It's also getting converted to a 2 seater. I need the payload more then I need a back seat. In the past 8 years I've only used the jump seat in my S10 once.
First thing I did was pull a bushel basket full of live wires out of it. (sorry, no pics) There was an old remote alarm, a satellite radio, a CB with an amplified speaker box, a couple of co-ax's with a splitter, a second splitter on the stock antenna, wiring for lights and a siren, (but no lights or siren), some kind of hands free mic module, a hook-up for a scanner, a GPS, and a couple or three mystery switches.
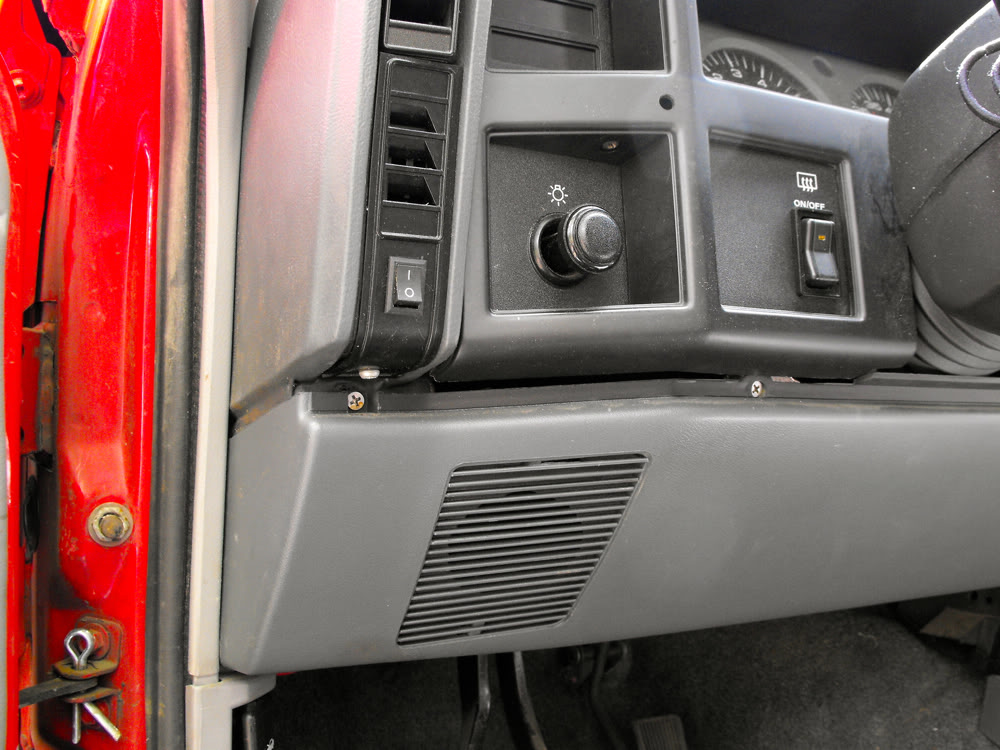
The dash and console look like Swiss Cheese.
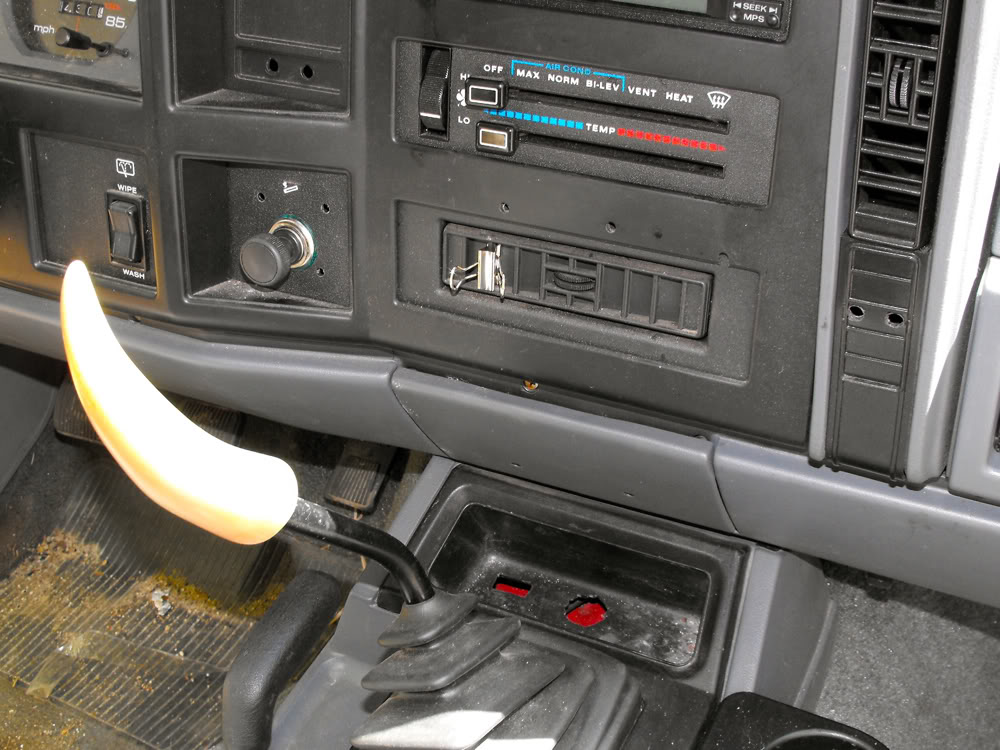
The shift **** is out of the Comanche, it's real horn and used to be white.
She's strictly "meat and potatoes". The only option seems to be AC and the sound bar. Overall she's in really nice shape for a '96 that's spittin' distance from 200k. No major dents and just enough dings so I don't have to worry about where I park. I've busted a couple of bolts, but all the sheet metal rust has been superficial (...so far).
I had a 2WD Comanche with a 4.0 around 10 years ago. I was always a Chevy guy but that thing was the berries. I put 80k on it in 5 years and it never caused me a moments grief (until the top end went).
I managed to jump on this one at a price that made me happy.
The previous owner was the Chief of a local volunteer fire company. He sold it to Jay, his mechanic, who also happens to be my mechanic and a pal.
According to Jay, "The Chief" bought DeeDee new and Jay had been working on it since it went out of warrantee. I managed to talk him into letting me take her as a loaner while my S10 was in his shop and I fell in love. Maybe it's cause the old girl runs great, maybe it's that big square buttt. (It's an Italian thing.)
I can't find the title for the S10 so I'm kind of stuck for $ until the DMV gets around to printing me out a new one and I can sell it.
This has put a temporary hold on DeeDee's upgrades, but there's some odds and ends I can pick away at while I wait.
If you've hit this thread hoping to see a 2 door get all jacked up, you're in for a disappointment.
I got her as a tow/support vehicle for this boat camper project I've been working on.
The plan is to rebuild DeeDee's suspension with a heavier duty rating. The rear may come up an inch to offset the loading and the hitch, but the front will stay at the stock hight.
It's also getting converted to a 2 seater. I need the payload more then I need a back seat. In the past 8 years I've only used the jump seat in my S10 once.
First thing I did was pull a bushel basket full of live wires out of it. (sorry, no pics) There was an old remote alarm, a satellite radio, a CB with an amplified speaker box, a couple of co-ax's with a splitter, a second splitter on the stock antenna, wiring for lights and a siren, (but no lights or siren), some kind of hands free mic module, a hook-up for a scanner, a GPS, and a couple or three mystery switches.
The dash and console look like Swiss Cheese.
The shift **** is out of the Comanche, it's real horn and used to be white.
Last edited by Marcucco; May 6, 2012 at 11:32 AM.
Thread Starter
Member
Joined: Apr 2012
Posts: 212
Likes: 1
From: ri
Year: 1996
Model: Cherokee
Engine: 4.0 HO
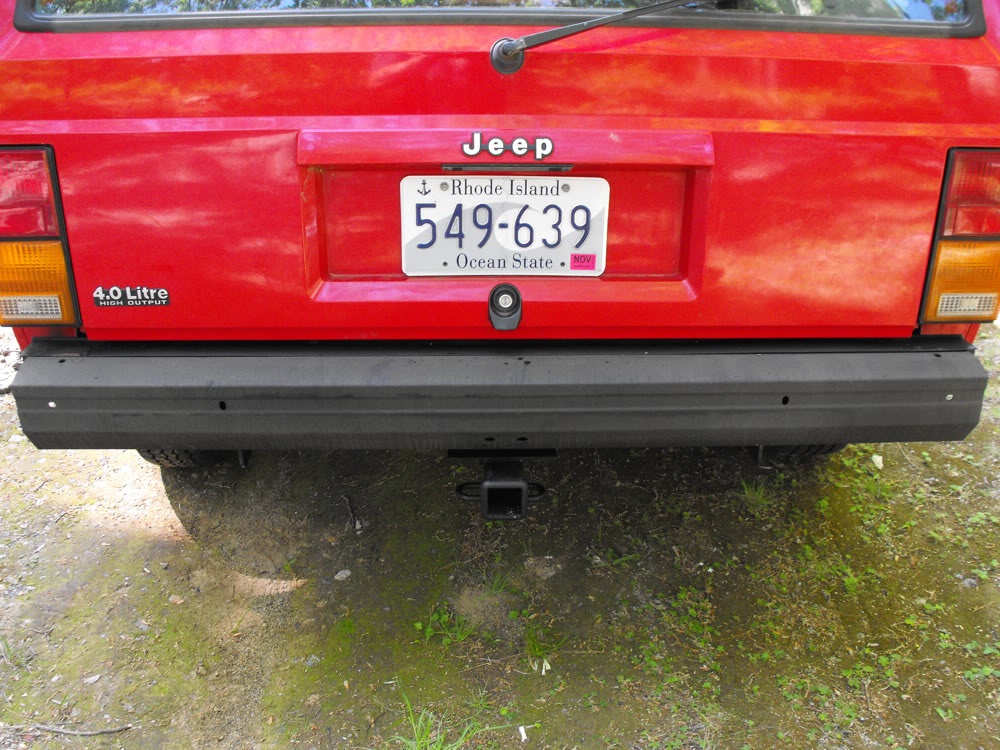
I picked up a V5 Reese receiver from a local yard that specializes in Jeep stuff.
I had to do some sawzall surgery to get the bumper off, but it had seen better days so it was no great loss.

Im not sure what the Reese hitch actually came off of. It's exactly the right width and angle, but the legs are twice as long as anything I've ever seen on a Cherokee.
I liked the longer legs for the extra bolts and spreading the weight out on the unibody. Getting the forward most bolts and the one under the fuel filler neck into their holes was "interesting".
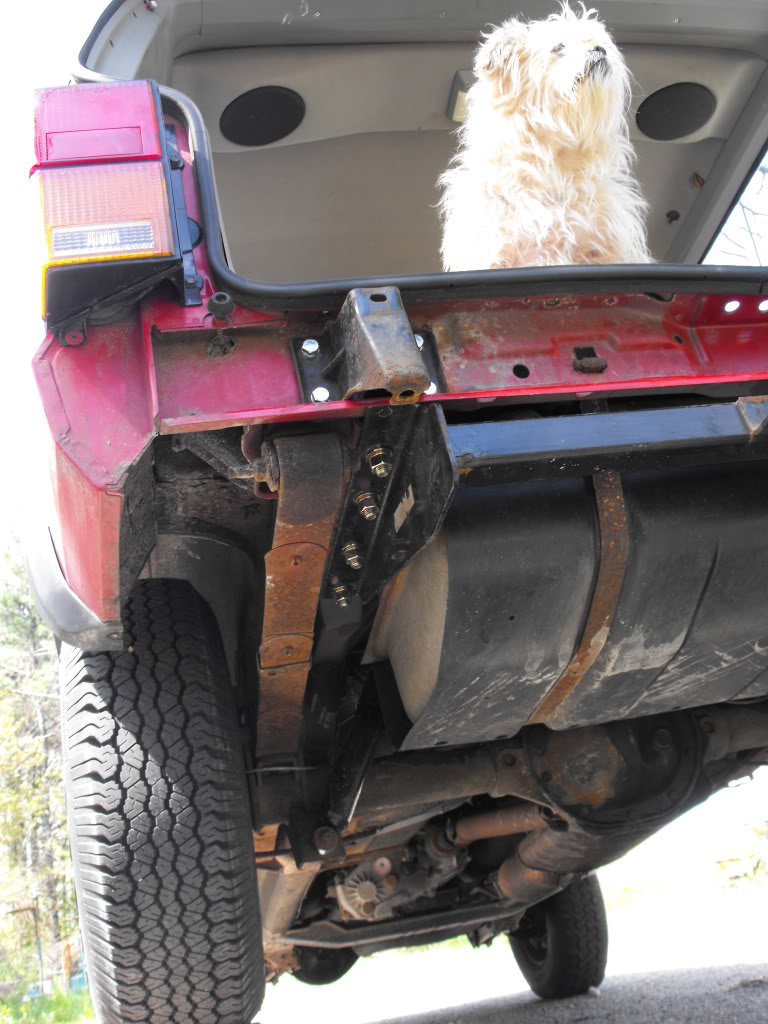
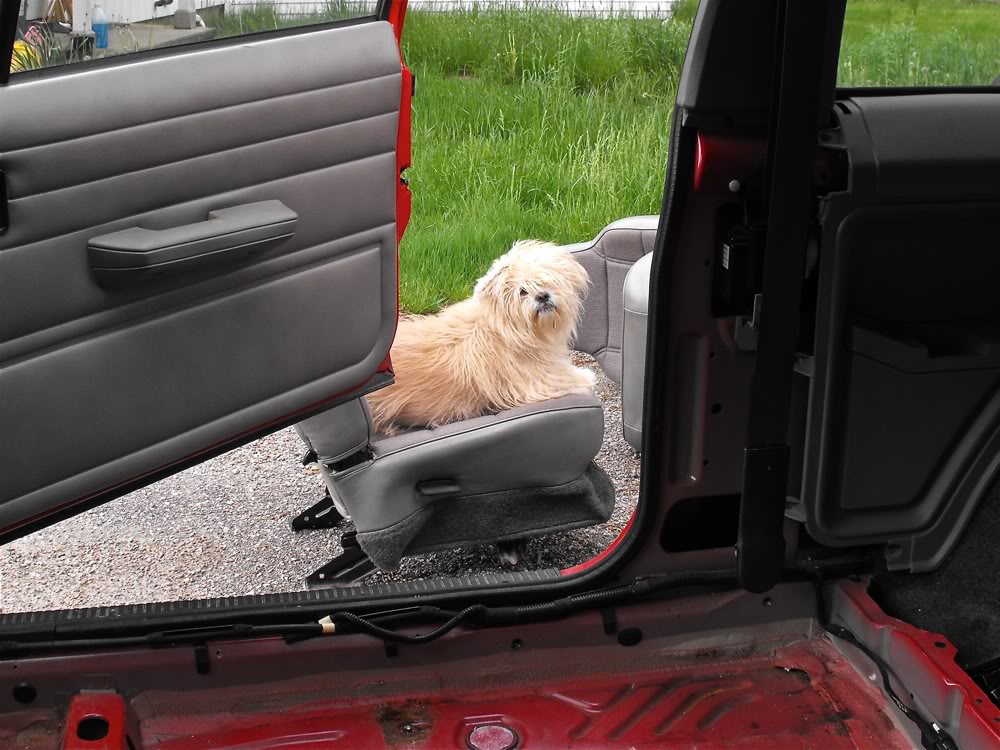
The little blond fella is Elvis.
I ordered the Hopkins T connector module from Amazon to hook up the trailer lights. It works great and the install was painless.
If you want to add a 4 pin connector to your harness, that's absolutely the way to go, a definitive plug and play mod.
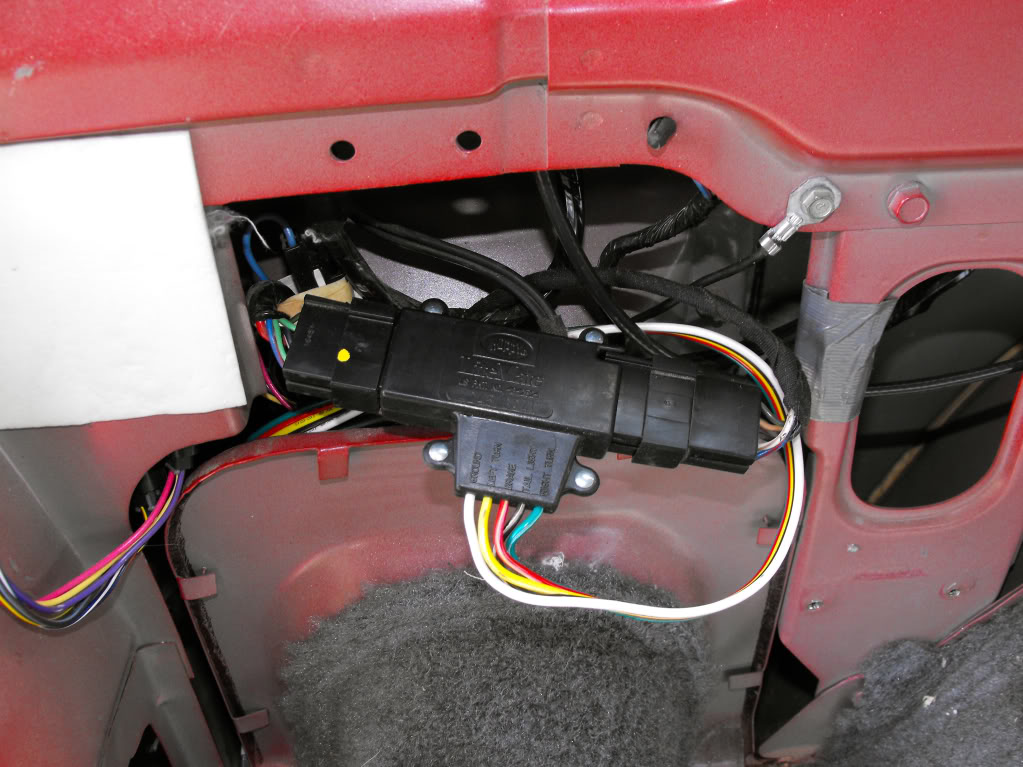
I also put in an override for the drivers door switch. The buzz got really annoying.
I had to do some sawzall surgery to get the bumper off, but it had seen better days so it was no great loss.
Im not sure what the Reese hitch actually came off of. It's exactly the right width and angle, but the legs are twice as long as anything I've ever seen on a Cherokee.
I liked the longer legs for the extra bolts and spreading the weight out on the unibody. Getting the forward most bolts and the one under the fuel filler neck into their holes was "interesting".
The little blond fella is Elvis.
I ordered the Hopkins T connector module from Amazon to hook up the trailer lights. It works great and the install was painless.
If you want to add a 4 pin connector to your harness, that's absolutely the way to go, a definitive plug and play mod.
I also put in an override for the drivers door switch. The buzz got really annoying.
Last edited by Marcucco; May 6, 2012 at 11:36 AM.
Thread Starter
Member
Joined: Apr 2012
Posts: 212
Likes: 1
From: ri
Year: 1996
Model: Cherokee
Engine: 4.0 HO
As far as plans go:
I get 20 + MPG on the highway out of the stock 4.0 HO with the 5 speed, which I think is pretty freakin' great for a full size vehicle. It seems strong enough to pull the boat as it is, but I'd like to make it as ballsy as I can without cutting down on the MPG. Engine heat will certainly be an issue while towing so there will probably be louvers or a cowl along with some cooling system upgrades. It appears the radiator's been replaced once already.
I'm comfortable with the 225/75 15's but she's got 3 different kinds of tires on her and the rims are wicked fugly.
Anybody in the northeast who's got a stock size set of stock steel wheels in decent shape they want to get rid of should drop me a PM.
I'll need to spring for better tires. She'll see some snow up here, and maybe some mud, but between the initial cost of oversize tires and rims and what they'll do to my milage, I'll probably just pick up 2 sets of chains to cover the few times I'd actually need big rubber.
She's a pleasure to drive on the highway, but I took her down a washboard dirt road last weekend and she was all over the place. Front shocks and a urethane bushing kit are the first thing on the list. The rear shocks are brand new but one of my rear bump-stops is missing and the leafs are pretty tired. Replacing them will be in the first round of upgrades as well.
The muffler is about done too. So an exhaust system upgrade is way up there on the to-do list. I'm also considering a low restriction air intake set-up and maybe swapping out the manifold for the heavier 1999+ version ...but then there will have to be a lot of experimenting with injectors and fuel pressures so I'm not looking forward to that one so much.
I'm also going for the heavier alternator and wiring early on. I'd like to get a second battery on board. (Under the hood if the air intake mods give me enough room.) The shanty boat has four 12 volt deep cycles with a solar/wind charging system, but I'd like to generate enough power to top everyone up in a pinch.
I'd also like to add an inverter for the power tools and camping, I've got a bit of background in electronics so getting this done shouldn't be be a problem.
I might go for a set of tow hooks and brackets for the front if one shows up at the junkyard.
Last edited by Marcucco; May 24, 2012 at 05:24 PM.
Thread Starter
Member
Joined: Apr 2012
Posts: 212
Likes: 1
From: ri
Year: 1996
Model: Cherokee
Engine: 4.0 HO
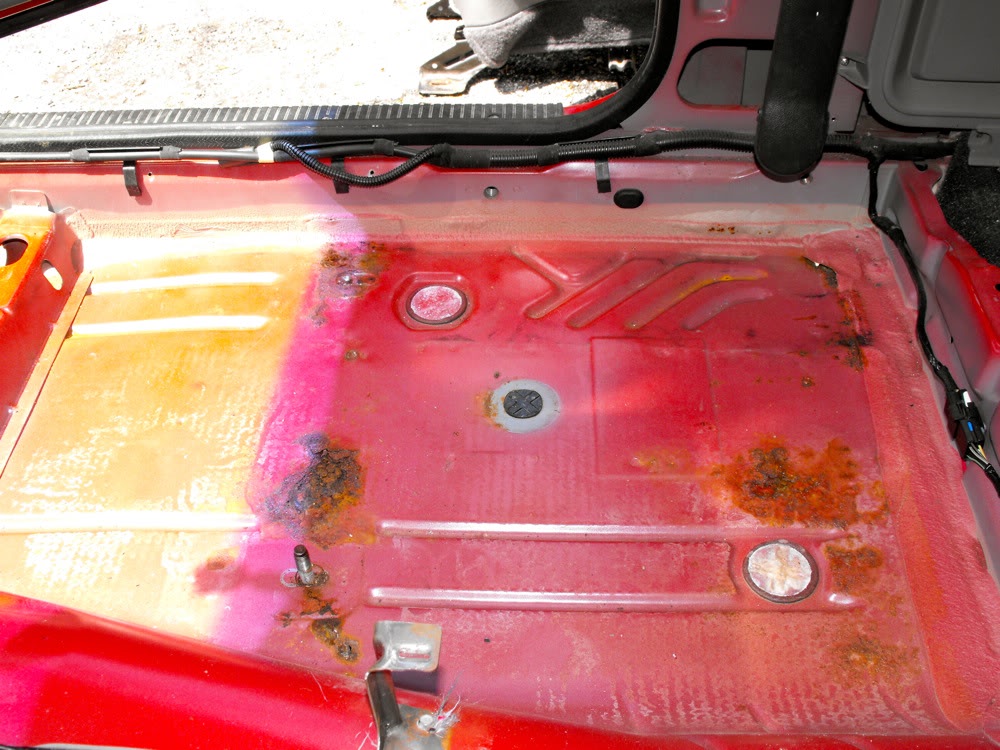
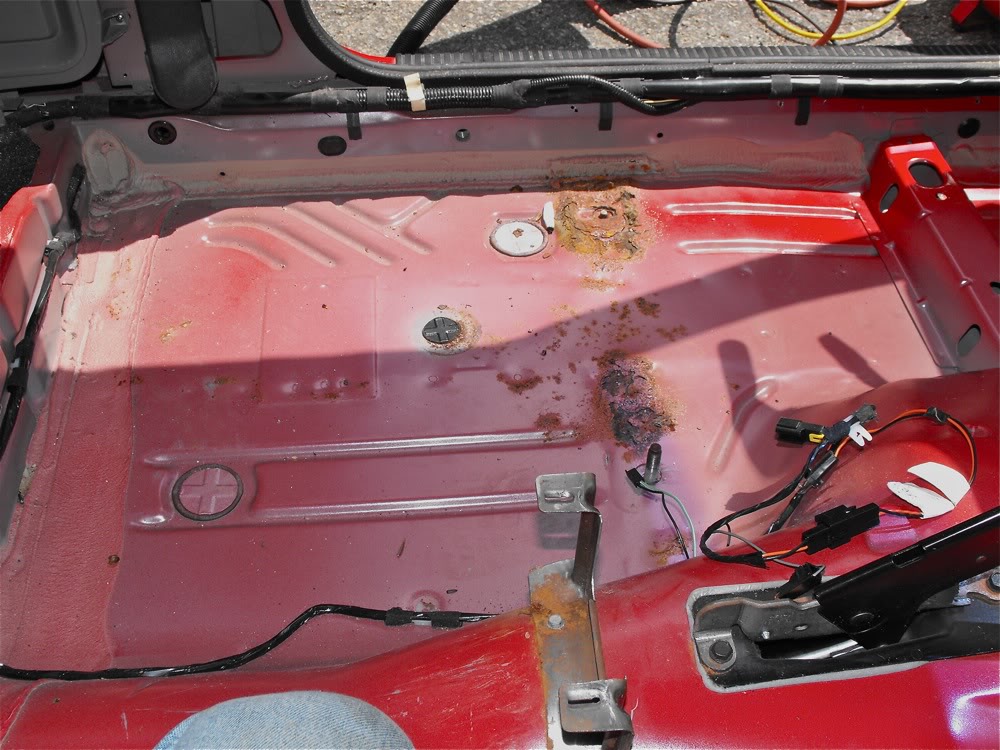
I pulled up the carpet to check the deck in the cargo area. The only bad spot I found was immediately under the spare bracket, right next to the fuel fill.
The rest looked great, barely even surface rust.
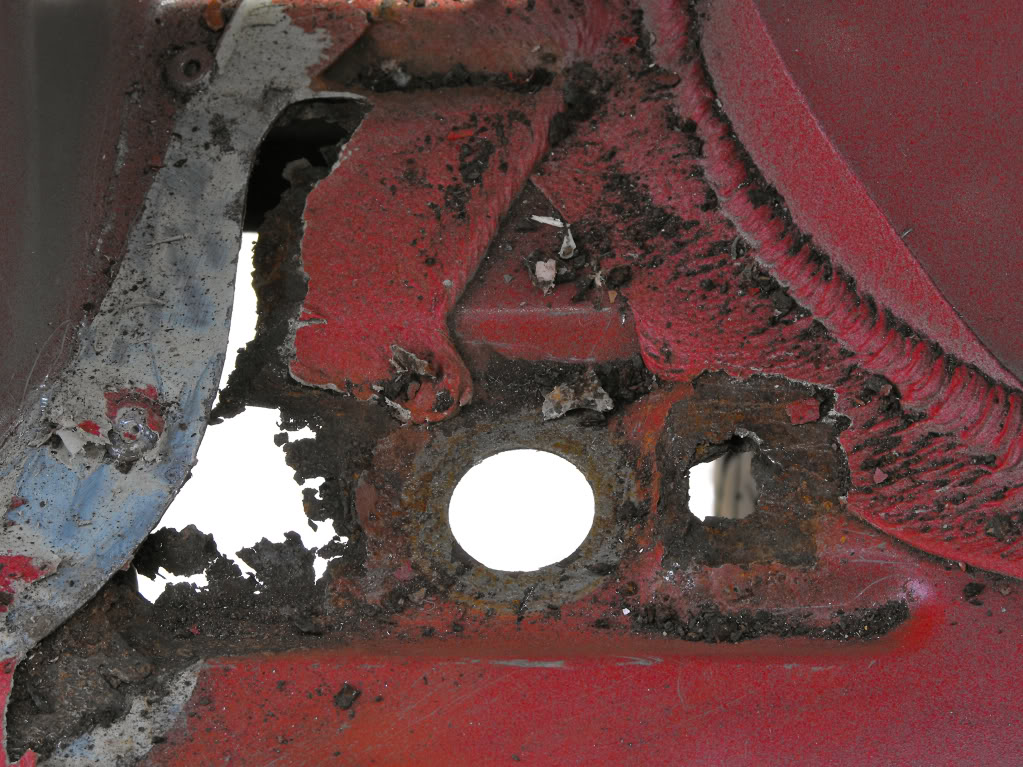
I cleared out what was left of the cover for the fuel filler lines between the rocker and the "frame" and cut out the rot in the deck.
Then patched the floor with some 12 ga. galvanized with RTV as a gasket. I'll work out a cover for the filler neck later.
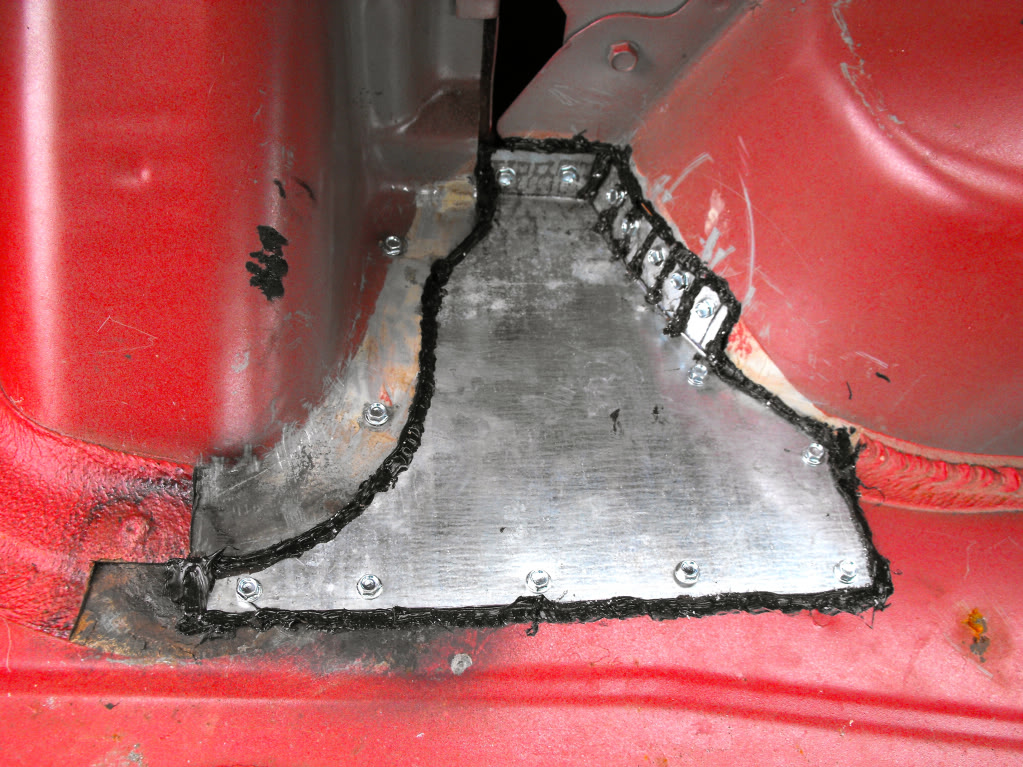
How come I knew bad things happen when you join aluminum to steel without an insulating gasket and the engineers at Chrysler didn't?
Checking the front cabin floors Monday
The rest looked great, barely even surface rust.
I cleared out what was left of the cover for the fuel filler lines between the rocker and the "frame" and cut out the rot in the deck.
Then patched the floor with some 12 ga. galvanized with RTV as a gasket. I'll work out a cover for the filler neck later.
How come I knew bad things happen when you join aluminum to steel without an insulating gasket and the engineers at Chrysler didn't?
Checking the front cabin floors Monday
Member
Joined: May 2012
Posts: 151
Likes: 3
From: Long Island NY
Model: Cherokee

How come I knew bad things happen when you join aluminum to steel without an insulating gasket and the engineers at Chrysler didn't?
Checking the front cabin floors Monday[/QUOTE]
Nice clean patch. The over-ride switch for the door buzzer shuts the dome light too? That would be a nice option for me. Hate leaving doors open because I can't manually shut the light.
Thread Starter
Member
Joined: Apr 2012
Posts: 212
Likes: 1
From: ri
Year: 1996
Model: Cherokee
Engine: 4.0 HO
Tuesday was going to be crappy so I spent Monday knocking off some odds and ends.
I pulled a screw out of the front tire and plugged it.
The tranny had been grinding a little going into reverse so I bled the clutch.
What a hideous disaster they turned that simple little slave cylinder into.
I miss AMC, if one of their engineers had come up with a system like that he'd have been ****-canned.
(Did I mention my first car was a Javelin?)
I figured out a simple way to bleed it by myself. I'll do a post on the process with pic's some time soon.
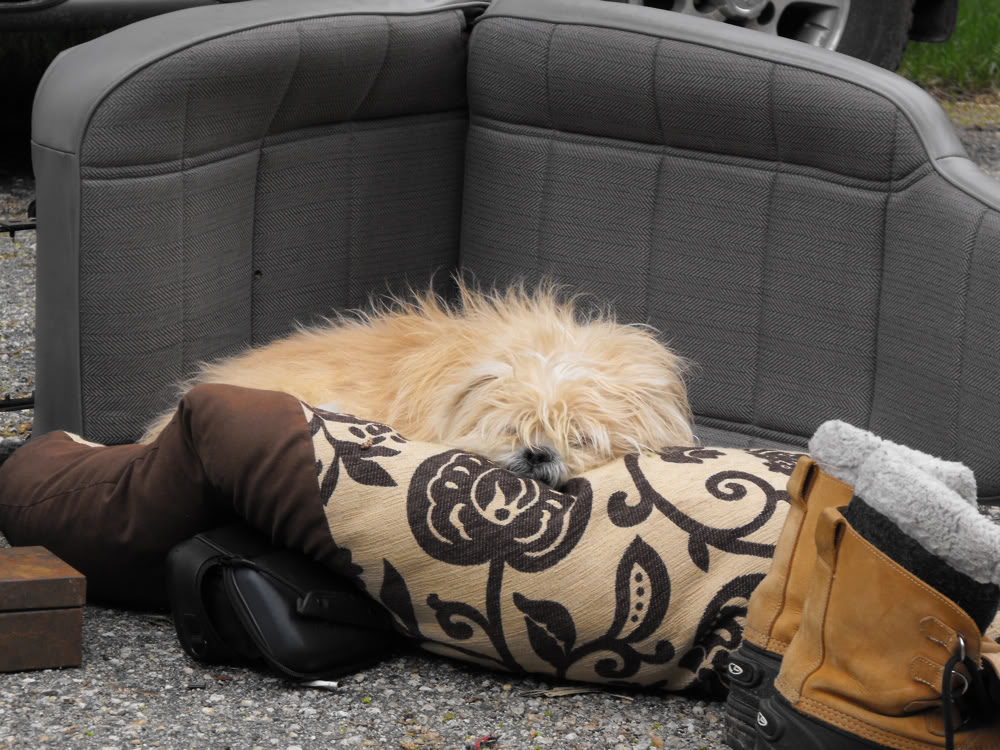
The weather finally broke Thursday and I pulled the seats, console, and carpet.
I snapped off the bolts on the outboard side of both seats, but the Torx holding the seat belts came off easy enough.
Elvis seemed to like the new configuration.
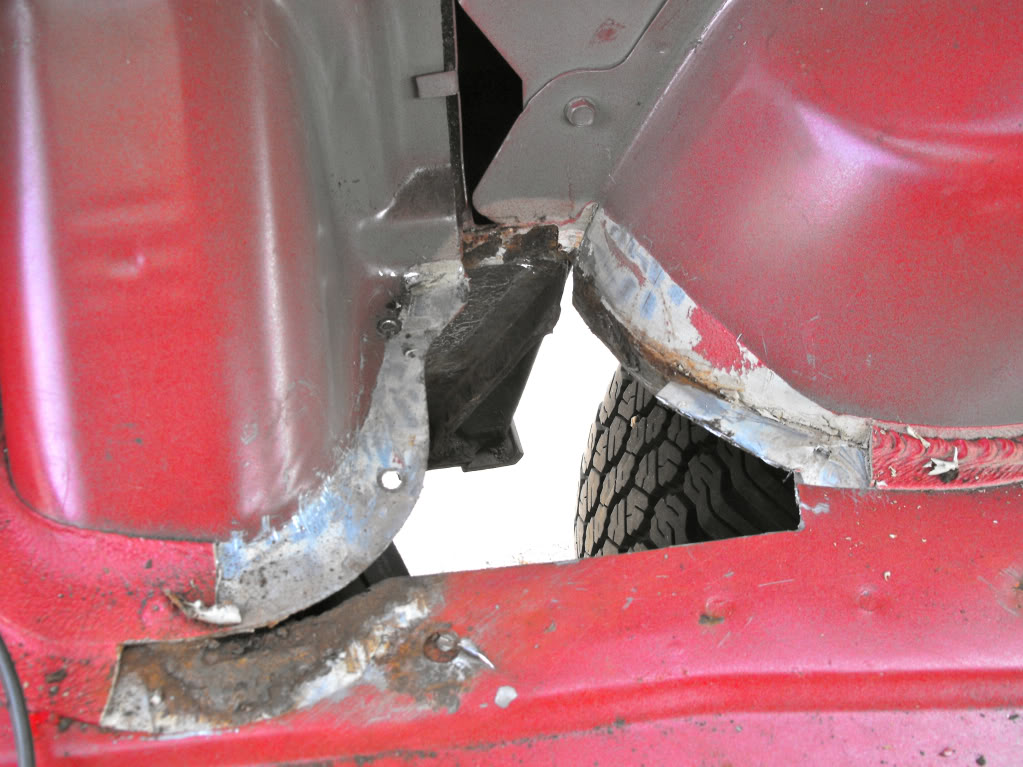
The passenger front looked the worst, but the rust turned out to be just on the surface. It looks like I may have a rain leak on that side.

The drivers front didn't look too bad, until I pulled the firewall pad.
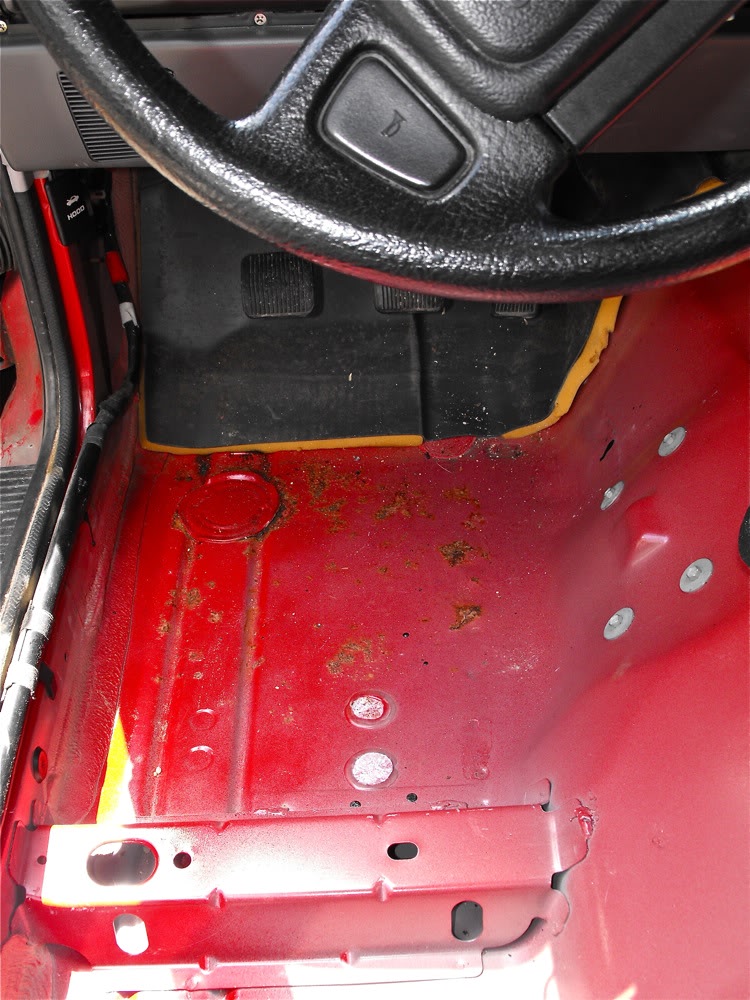
Both the rear sections had started to rust over the truss that supports the seat backs.
There were a couple of holes at the base of the fire wall behind the drivers front wheel that were a chore to patch, but the rest cleaned up well.
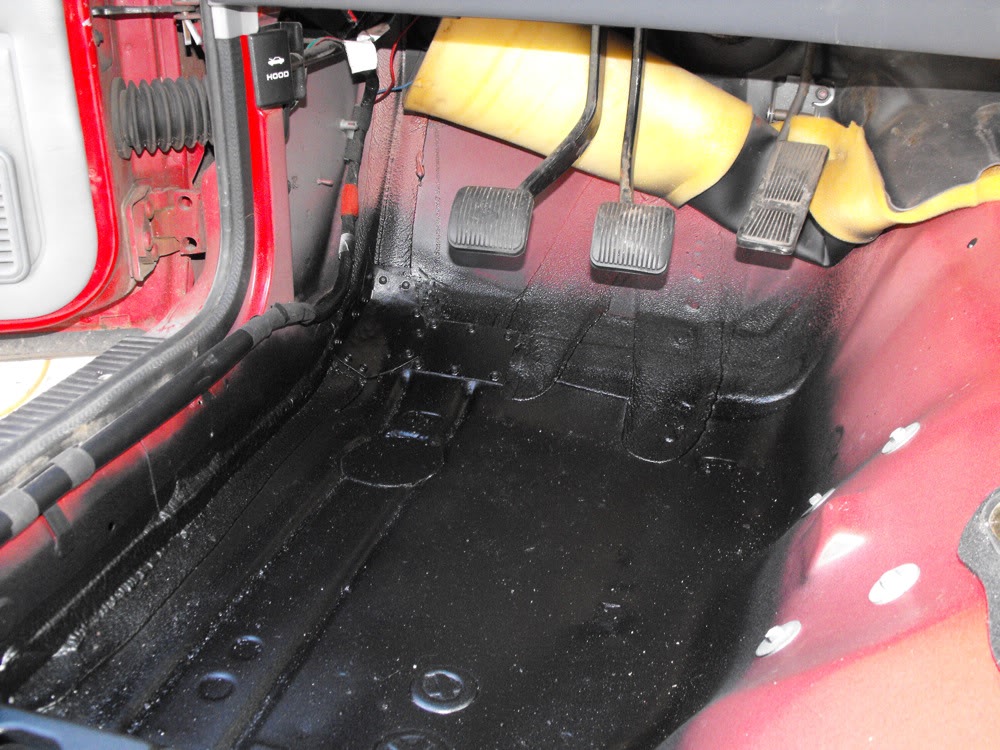

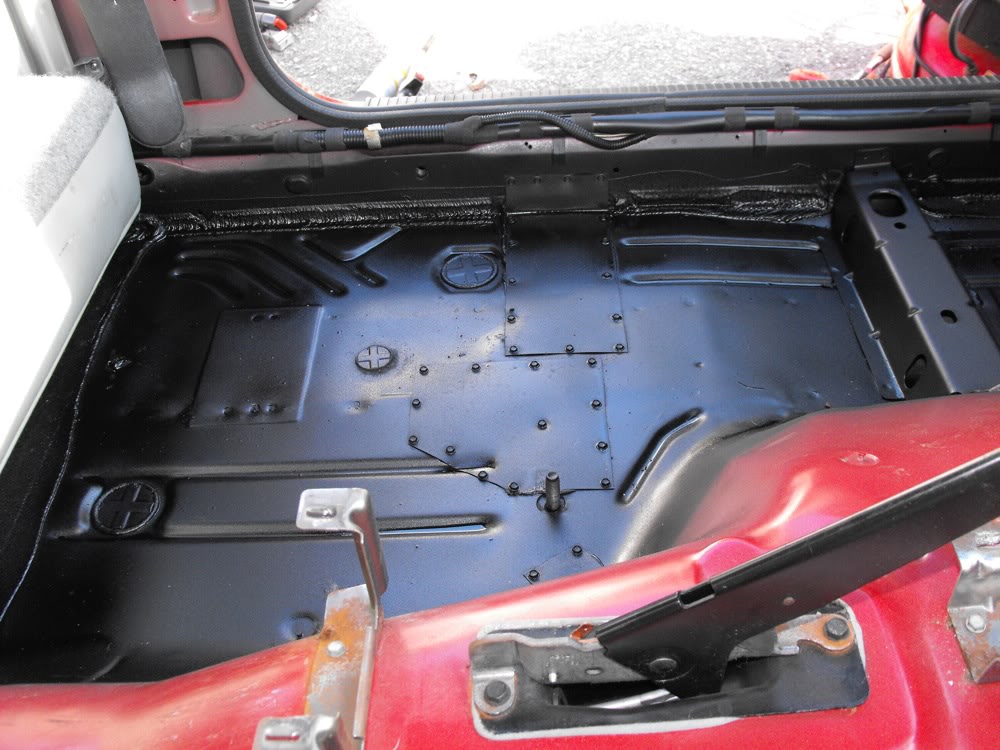
Over all I was pleased, I had really expected a lot worse.
2 cans of bed liner, a can of rust inhibiter, a sheet of metal that had been hanging around since the '90's and a free buzz off the fumes.
...what's not to like?
I pulled a screw out of the front tire and plugged it.
The tranny had been grinding a little going into reverse so I bled the clutch.
What a hideous disaster they turned that simple little slave cylinder into.
I miss AMC, if one of their engineers had come up with a system like that he'd have been ****-canned.
(Did I mention my first car was a Javelin?)
I figured out a simple way to bleed it by myself. I'll do a post on the process with pic's some time soon.
The weather finally broke Thursday and I pulled the seats, console, and carpet.
I snapped off the bolts on the outboard side of both seats, but the Torx holding the seat belts came off easy enough.
Elvis seemed to like the new configuration.
The passenger front looked the worst, but the rust turned out to be just on the surface. It looks like I may have a rain leak on that side.
The drivers front didn't look too bad, until I pulled the firewall pad.
Both the rear sections had started to rust over the truss that supports the seat backs.
There were a couple of holes at the base of the fire wall behind the drivers front wheel that were a chore to patch, but the rest cleaned up well.
Over all I was pleased, I had really expected a lot worse.
2 cans of bed liner, a can of rust inhibiter, a sheet of metal that had been hanging around since the '90's and a free buzz off the fumes.
...what's not to like?
Last edited by Marcucco; May 11, 2012 at 09:37 PM.
Thread Starter
Member
Joined: Apr 2012
Posts: 212
Likes: 1
From: ri
Year: 1996
Model: Cherokee
Engine: 4.0 HO
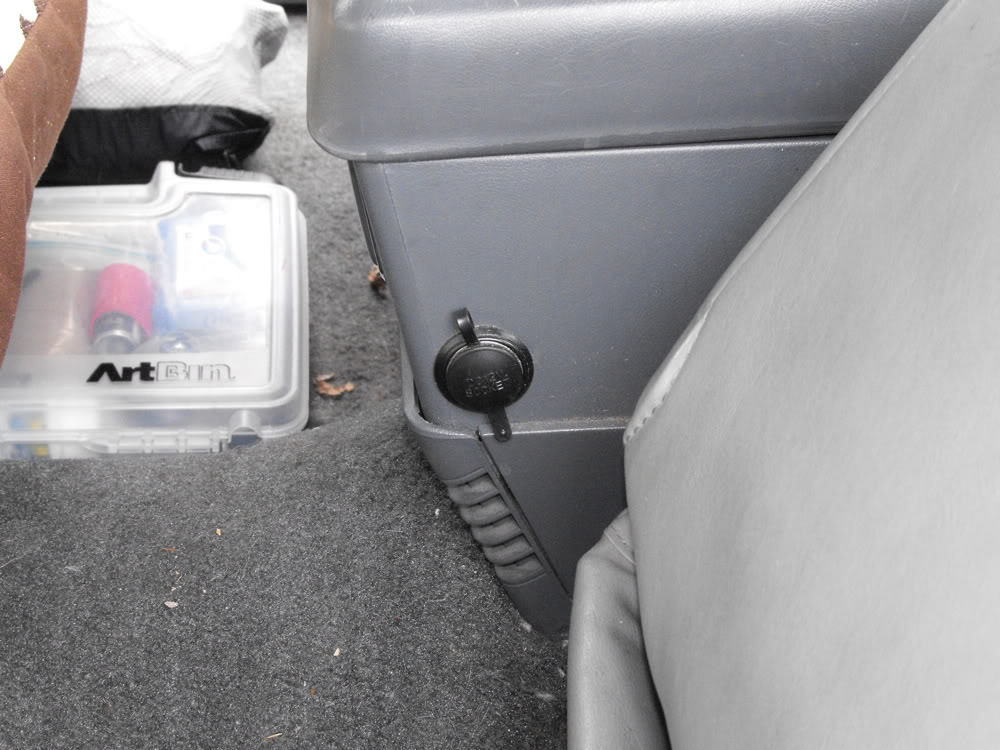
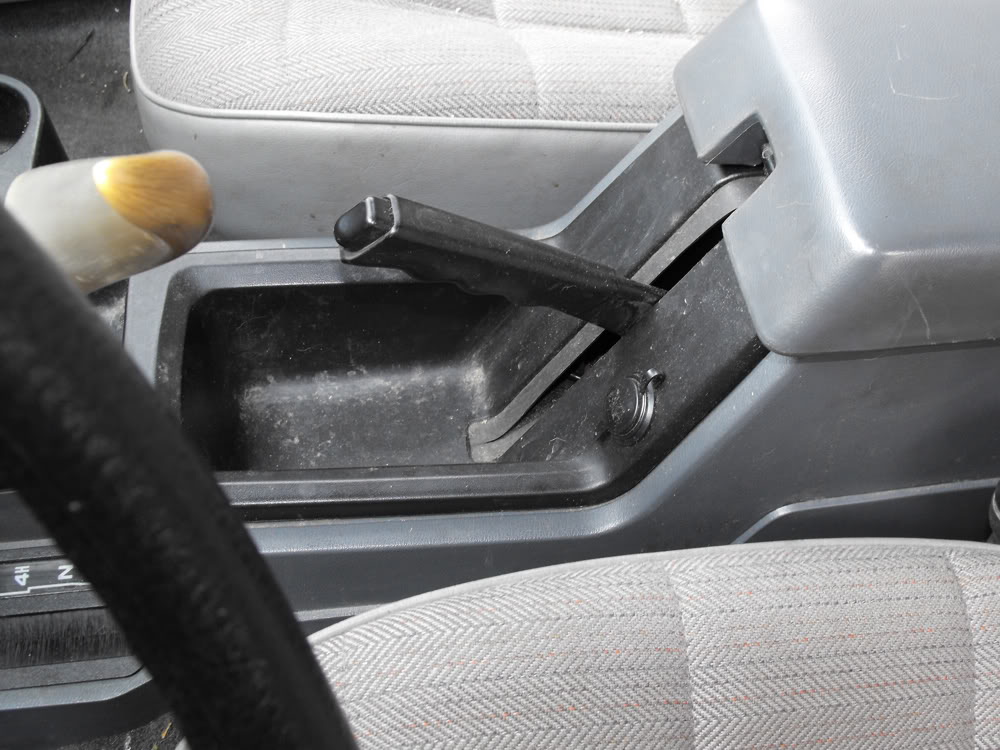
I use the cigarette lighter for it's intended purpose, so I needed to add a couple of 12v ports to the 8 ga. wire the PO had run under the console for all the toys I yanked.
I also ran a 12 ga. lead back to the trailer hitch to top up the boat batteries. (not shown)
That's the spare co-ax you see coiled up under the E brake.
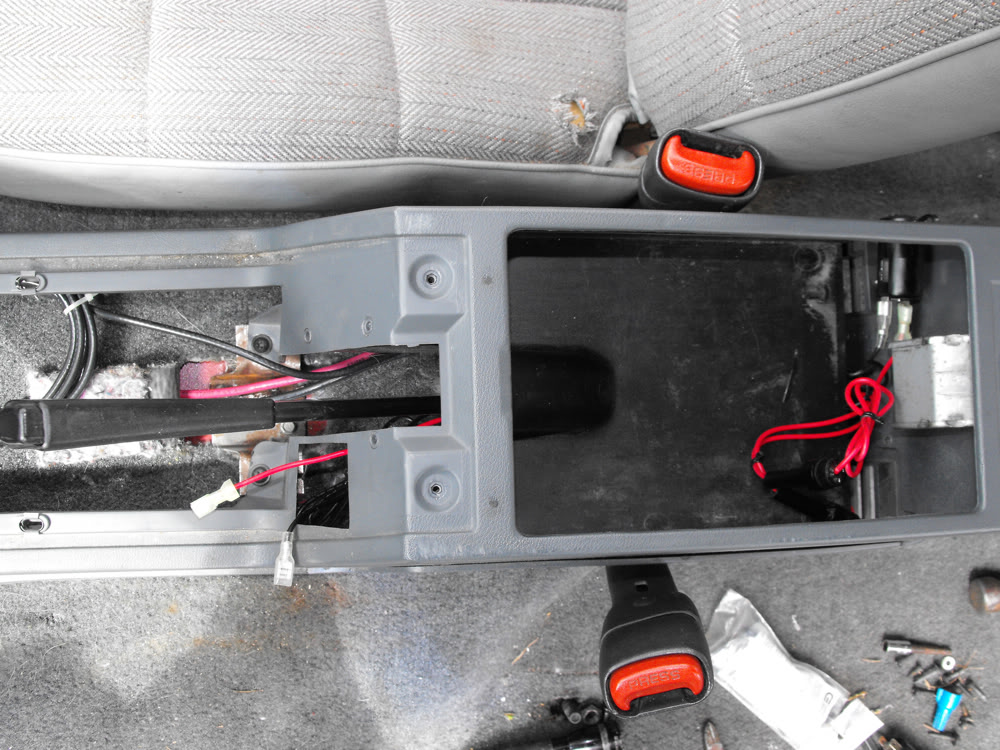
The "Art Bin" is the first aid kit off the boat.
I figure I'll repurpose the rear seat back next, unless a $50 rear bumper showed up on Craigslist.
But this came in the mail today.
I also ran a 12 ga. lead back to the trailer hitch to top up the boat batteries. (not shown)
That's the spare co-ax you see coiled up under the E brake.
The "Art Bin" is the first aid kit off the boat.
I figure I'll repurpose the rear seat back next, unless a $50 rear bumper showed up on Craigslist.
But this came in the mail today.
Last edited by Marcucco; May 24, 2012 at 05:31 PM.
Trending Topics
Thread Starter
Member
Joined: Apr 2012
Posts: 212
Likes: 1
From: ri
Year: 1996
Model: Cherokee
Engine: 4.0 HO
I picked up a back bumper at the JY last weekend.
It came off an '89 and used to have the light duty factory hitch.
The hitch was gone and the backing plate was toast, but the bumper itself and the end caps were good so I was happy.
I stripped it down, primed it and painted it with Rustoleum bed liner.
Getting the bumper on with the V5 receiver hitch in place was a project and I managed to get some "Never-Seaze" paw prints on the new coating. I used Zep degreaser to wash it.
Bad idea.
The degreaser turned my brand new bedliner the color of old chocolate.
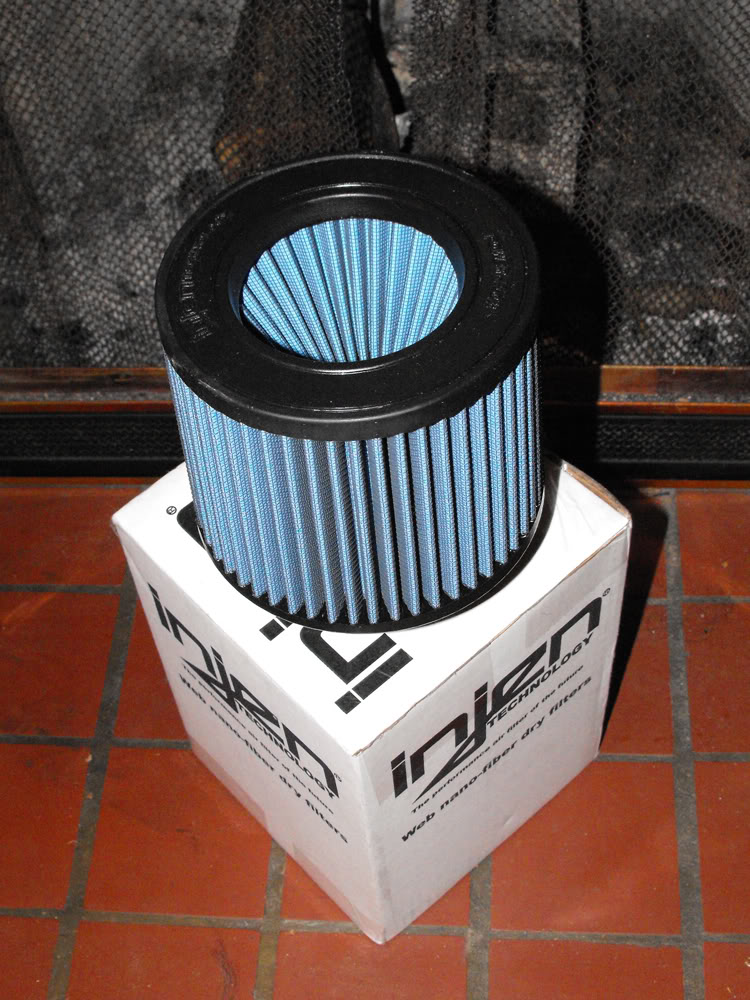
I couldn't wait to try out the new air filter, but I had some oil on the old one and I was a worried about blow-by.
After a little pokeing around under the hood and some searching here, I found the CCV was, in fact, all plugged up.
The rocker cover gasket and grommets will be going in this week end (if the title shows up and the S10 sells) but I thought I'd give the air filter a shot anyway.
I cranked out a temporary plenum and a drum trap for the CC breather.
As soon as I started the engine, the idle jumped to 1500 rpm.
I thought "OH CRAP" and started looking for vac leaks.
Turned out I put the clip for the throttle body side of the boot on upside down and the accelerator cable was hanging up on it.

I don't see any milage difference in my first thank of fuel, but I've been adding injector cleaner to my last 2 fill-ups so I haven't been tracking the mileage accuratey.
The intake is just a temporary set up. If anybody wants the 3" hook up tube, you can have it free, I'll even throw in the CCV trap.
(but you're on the hook for the postage.)
First PM takes it, I'll ping you back with the shipping.
It came off an '89 and used to have the light duty factory hitch.
The hitch was gone and the backing plate was toast, but the bumper itself and the end caps were good so I was happy.
I stripped it down, primed it and painted it with Rustoleum bed liner.
Getting the bumper on with the V5 receiver hitch in place was a project and I managed to get some "Never-Seaze" paw prints on the new coating. I used Zep degreaser to wash it.
Bad idea.
The degreaser turned my brand new bedliner the color of old chocolate.
I couldn't wait to try out the new air filter, but I had some oil on the old one and I was a worried about blow-by.
After a little pokeing around under the hood and some searching here, I found the CCV was, in fact, all plugged up.
The rocker cover gasket and grommets will be going in this week end (if the title shows up and the S10 sells) but I thought I'd give the air filter a shot anyway.
I cranked out a temporary plenum and a drum trap for the CC breather.
As soon as I started the engine, the idle jumped to 1500 rpm.
I thought "OH CRAP" and started looking for vac leaks.
Turned out I put the clip for the throttle body side of the boot on upside down and the accelerator cable was hanging up on it.
I don't see any milage difference in my first thank of fuel, but I've been adding injector cleaner to my last 2 fill-ups so I haven't been tracking the mileage accuratey.
The intake is just a temporary set up. If anybody wants the 3" hook up tube, you can have it free, I'll even throw in the CCV trap.
(but you're on the hook for the postage.)
First PM takes it, I'll ping you back with the shipping.
Last edited by Marcucco; May 24, 2012 at 05:33 PM.
Thread Starter
Member
Joined: Apr 2012
Posts: 212
Likes: 1
From: ri
Year: 1996
Model: Cherokee
Engine: 4.0 HO
I've got this pontoon boat I converted to electric drive and set up as a camper.
There's some build photo's here:
http://flic.kr/ps/239B2b
She still needs a little more work, and the photos are posted most recent to oldest.
I thought I posted this earlier in the thread, but I don't see it now.
I don't think it violates CF's TOS, if it does, and the Mods deleted the link to it, I apologize.
Last edited by Marcucco; May 24, 2012 at 05:36 PM.
Thread Starter
Member
Joined: Apr 2012
Posts: 212
Likes: 1
From: ri
Year: 1996
Model: Cherokee
Engine: 4.0 HO
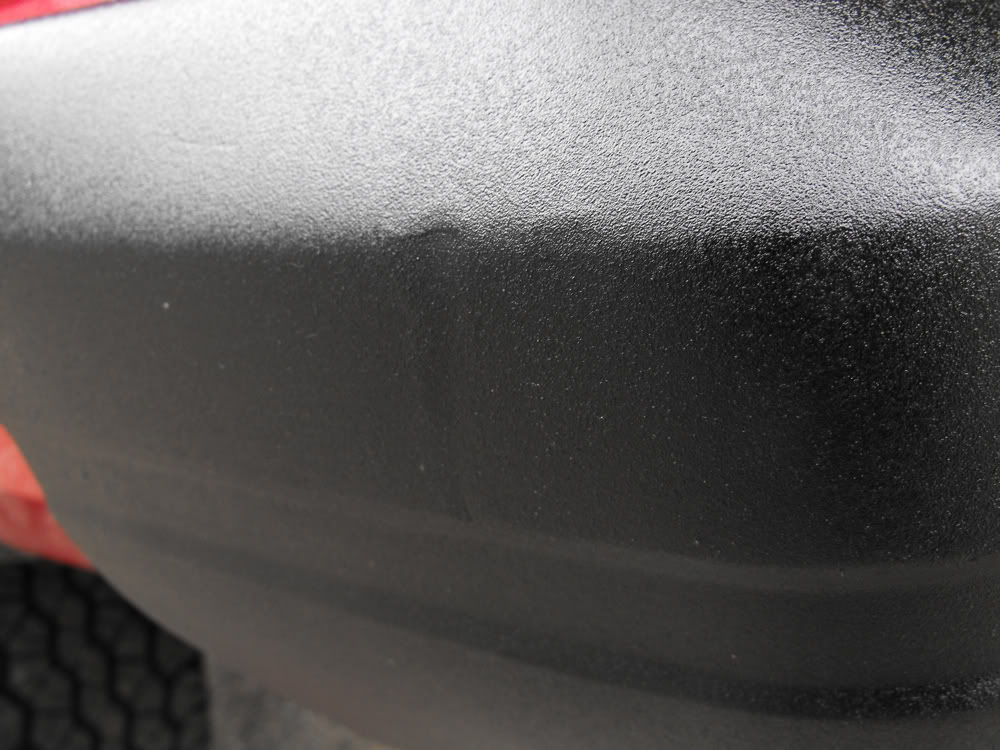
Today was a good day.
The DMV finally got around to printing out a new title for the S10 so now I can sell it and get a little cash flow going.
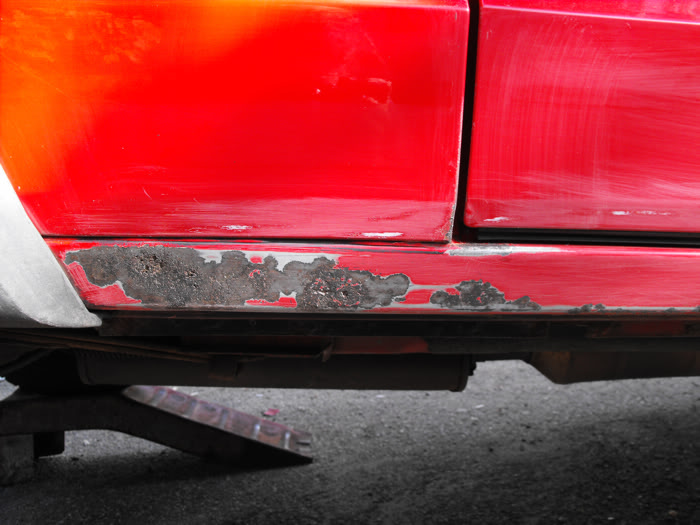
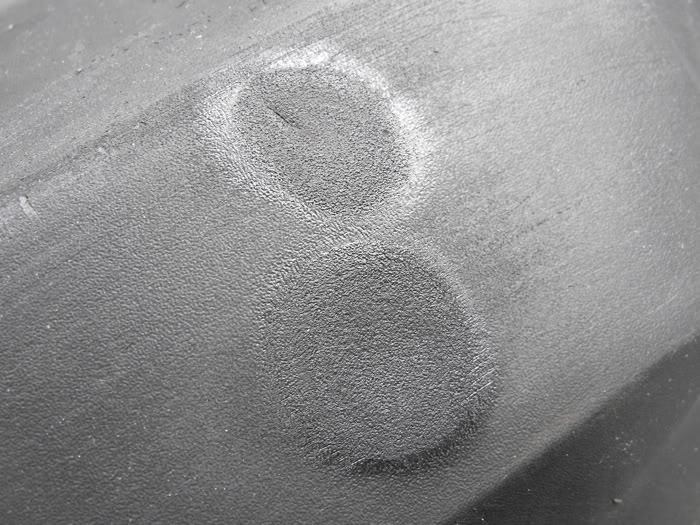
I cleaned up the area on the passenger side rocker where Dee Dee traded some paint with somebody in her past.
It turned out to be minor.
I threw another coat of bed liner on the new bumper and then went to work on the end caps.
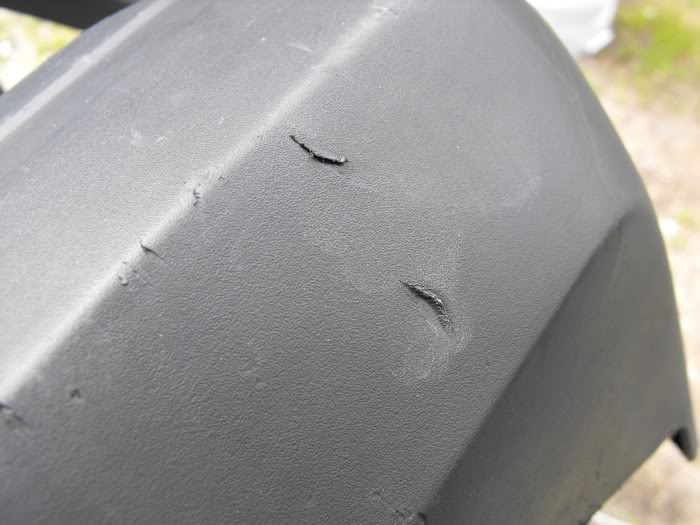
I got this portable soldering iron that looks a little like a Bic lighter on steroids. It came wih an attachment for heating up shrink tube.

I used the attachment to heat up the plastic on the end caps (which makes it soft and shiney) and then pressed some 180 grit sand paper into the soft plastic to replace the texture.
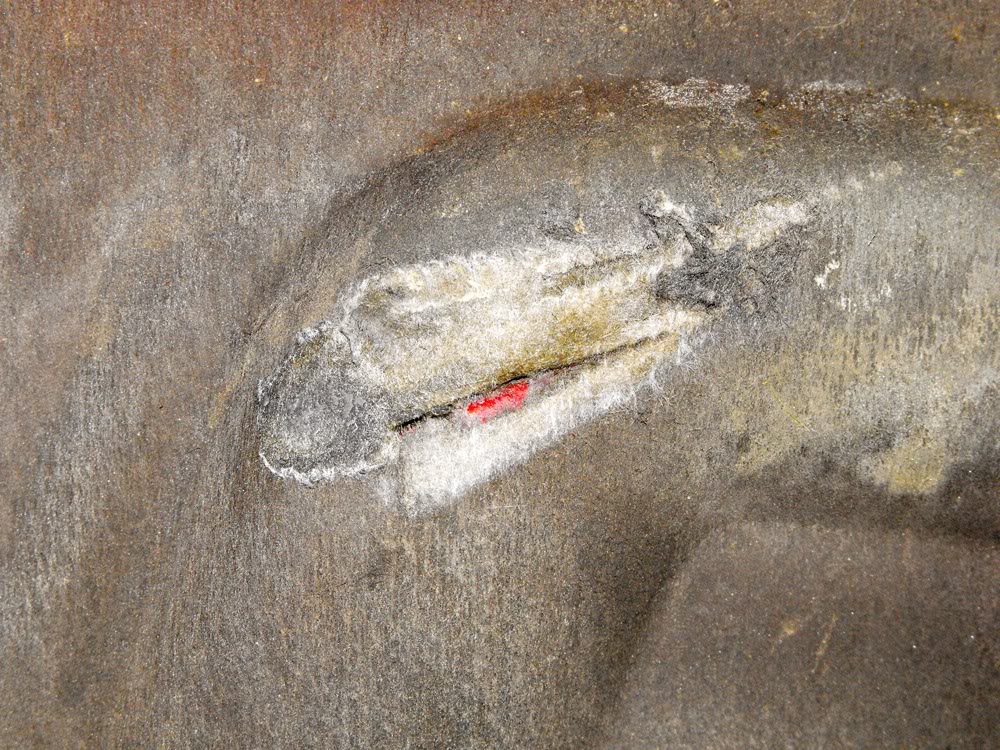
Here's one more:
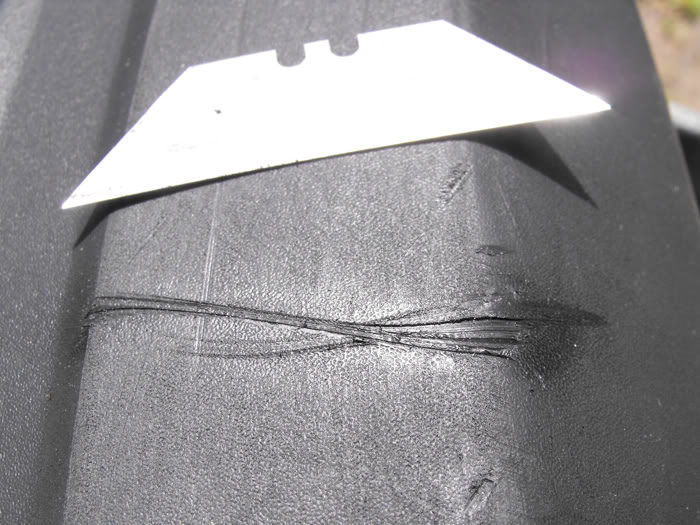
Use a blade to take off the flap around the gouge. Heat it up until the plastic just starts to get shiney and press the sand paper into it.
(150 to 180 grit paper seems to be just right to match the texture)
Go a little at a time, don't try and take the gouge out all at once, you can go back over and over until your satisfied..
You end up trading little dents for the gouges and you'll need to repaint the plastic to even up the color, but over all I think it's worth it.
Remember, go easy, a little at a time.
If you get close to a square edge it's going to moosh the edge over a bit.
You can go back with your blade and straighten out the quirk some, then add the texture to the area you cleaned up.
I used a little tiny butane torch for this, not some propane rig made to solder plumbing.
DON'T BE STUPID,
GO EASY
I'll get some pics of the finished product up as soon as the paint dries.
Do I get a star for this?
The DMV finally got around to printing out a new title for the S10 so now I can sell it and get a little cash flow going.
I cleaned up the area on the passenger side rocker where Dee Dee traded some paint with somebody in her past.
It turned out to be minor.
I threw another coat of bed liner on the new bumper and then went to work on the end caps.
I got this portable soldering iron that looks a little like a Bic lighter on steroids. It came wih an attachment for heating up shrink tube.
I used the attachment to heat up the plastic on the end caps (which makes it soft and shiney) and then pressed some 180 grit sand paper into the soft plastic to replace the texture.
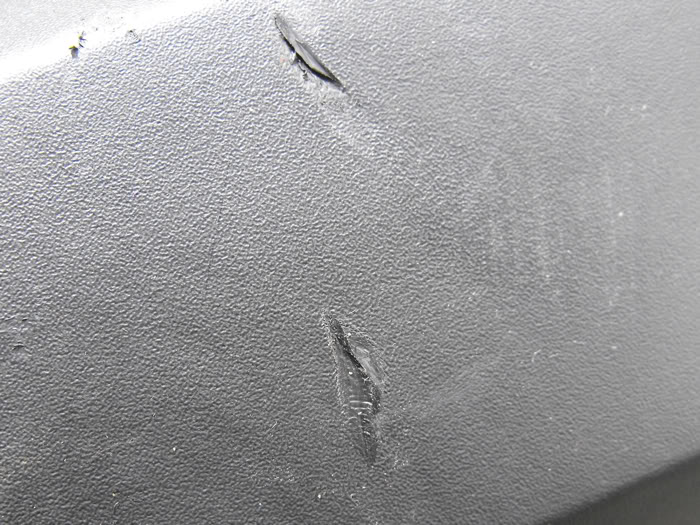
Here's one more:
Use a blade to take off the flap around the gouge. Heat it up until the plastic just starts to get shiney and press the sand paper into it.
(150 to 180 grit paper seems to be just right to match the texture)
Go a little at a time, don't try and take the gouge out all at once, you can go back over and over until your satisfied..
You end up trading little dents for the gouges and you'll need to repaint the plastic to even up the color, but over all I think it's worth it.
Remember, go easy, a little at a time.
If you get close to a square edge it's going to moosh the edge over a bit.
You can go back with your blade and straighten out the quirk some, then add the texture to the area you cleaned up.
I used a little tiny butane torch for this, not some propane rig made to solder plumbing.
DON'T BE STUPID,
GO EASY
I'll get some pics of the finished product up as soon as the paint dries.
Do I get a star for this?
Last edited by Marcucco; May 25, 2012 at 04:00 PM.
Thread Starter
Member
Joined: Apr 2012
Posts: 212
Likes: 1
From: ri
Year: 1996
Model: Cherokee
Engine: 4.0 HO
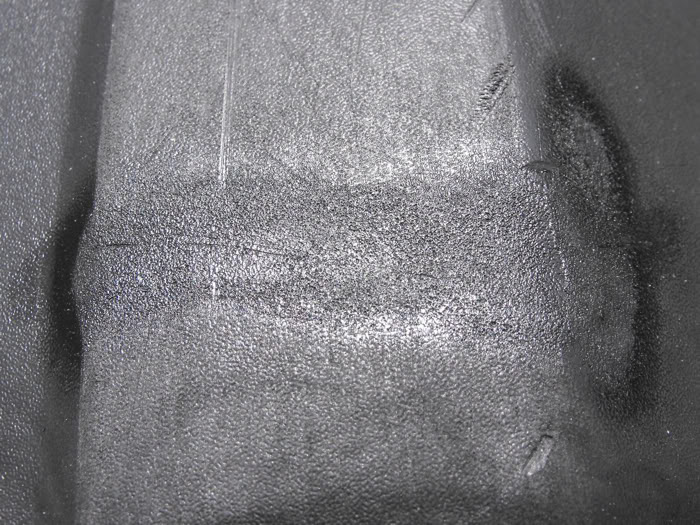
So this is it painted with bedliner.
I wont say it's perfect, but way better then it was.
And this way I won't feel that badly when I hang one of those end caps up on something and rip it off..
I wont say it's perfect, but way better then it was.
And this way I won't feel that badly when I hang one of those end caps up on something and rip it off..

Thread Starter
Member
Joined: Apr 2012
Posts: 212
Likes: 1
From: ri
Year: 1996
Model: Cherokee
Engine: 4.0 HO
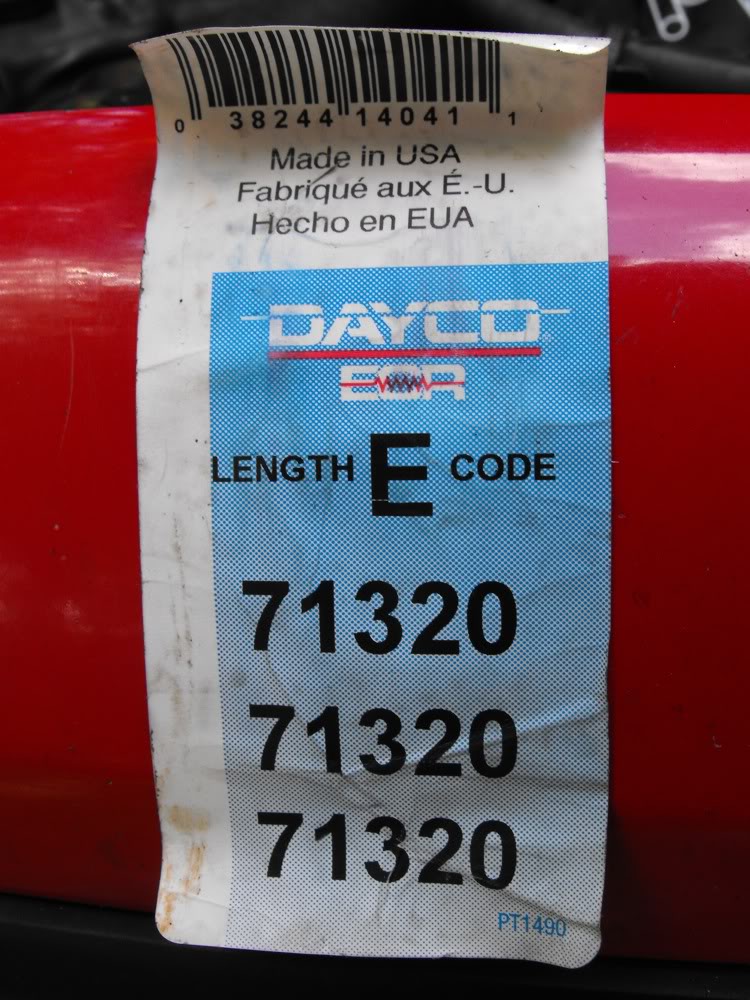
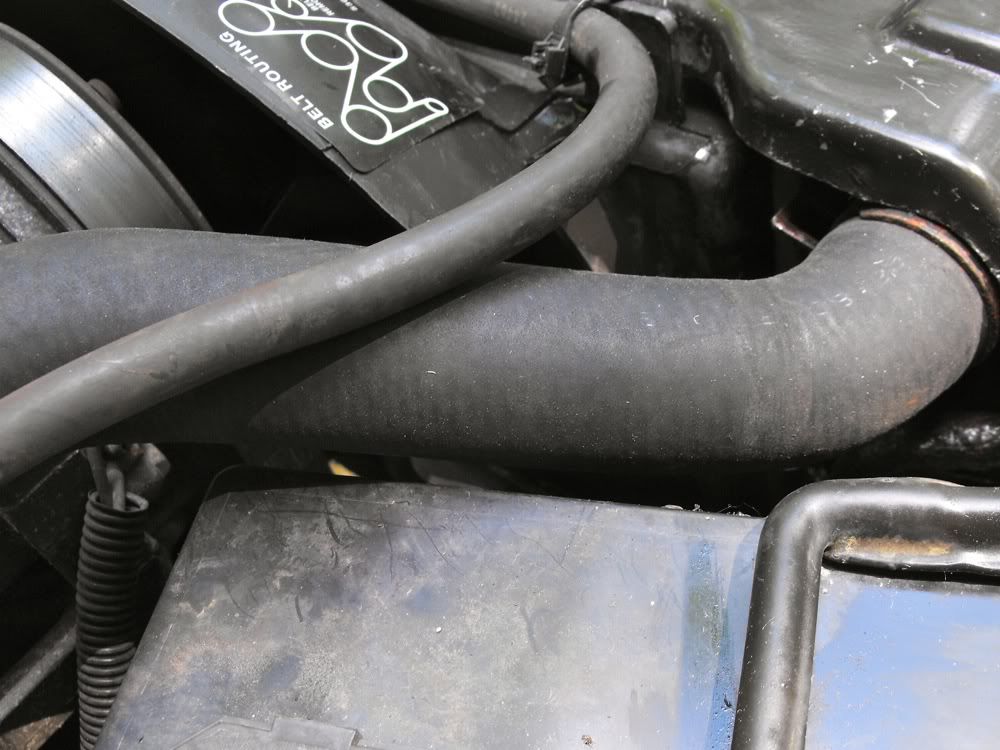
The first thing I had to do to Dee Dee was replace the top radiator hose, It was a really bad fit and it had split underneath just above the clamp.
The new hose the national chain wanted to sell me was a name brand that looked exactly like the one I took off. The counter guy was 100% sure it was the right hose and that I was a jerk for doubting him, but the new hose fit like crap too.
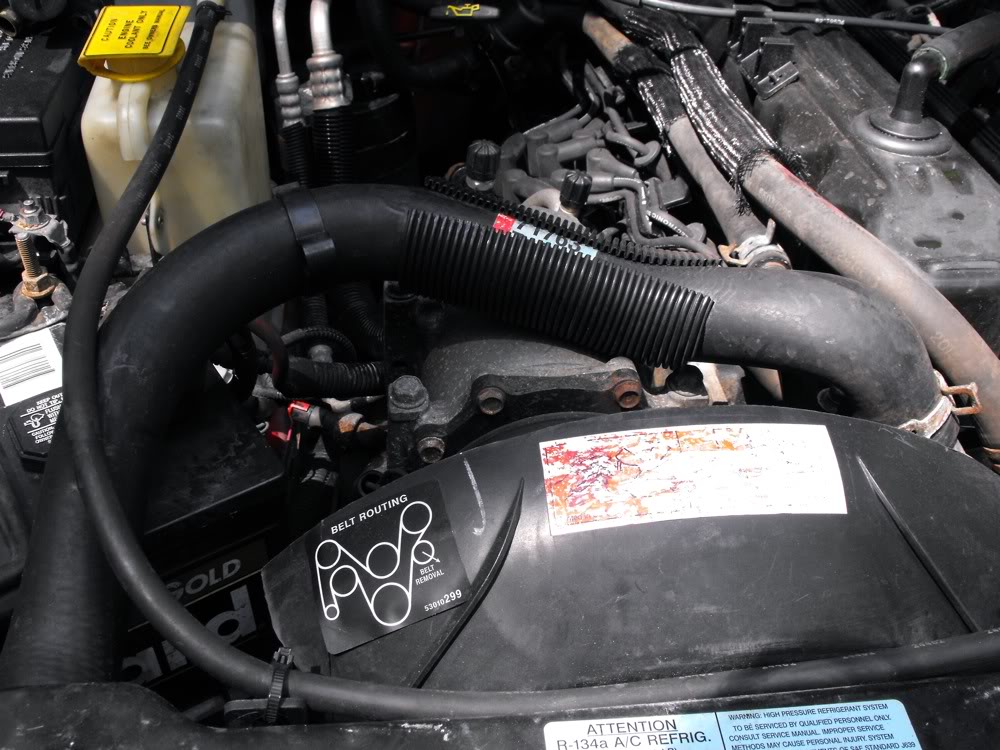
It crimped at the thermostat housing.
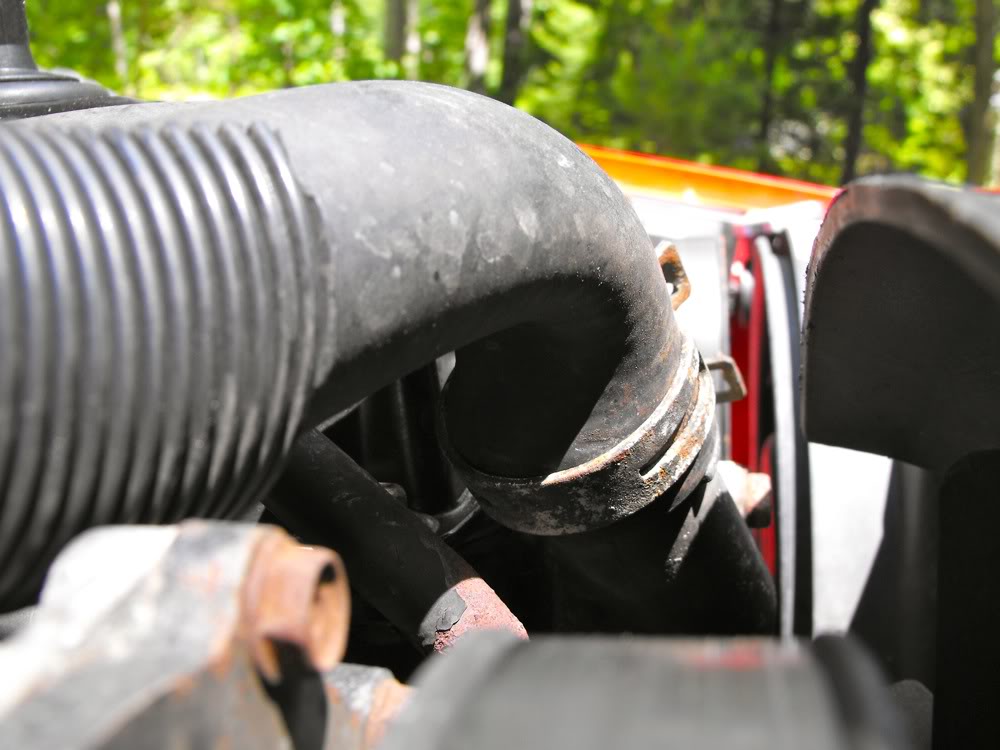

Sat on the edge of the battery.

And got crushed between the hood and the AC compressor.
I went by a smaller local shop for something else and happened to ask the parts kid about the hose. He looked it up and his listing showed the exact same hose. The kid is the kind of guy that wants to come thru for his customers, so he did a little searching and pulled up the hose for the "non-AC" model just to see.
Lo and behold, there was the proper hose.
Somehow the numbers for the AC and non AC hoses have been reversed.
Just for a goof, I started looking around on line and sure enough, everyplace I checked (RockAuto was the first pace I looked) has the hose for the AC model marked Non-AC and the Non-AC hose listed as being for the AC model.
Here's the right hose:
It hooks around the AC, doesn't get crimped at the T-stat housing, and doesn't get crushed between the AC and the hood.
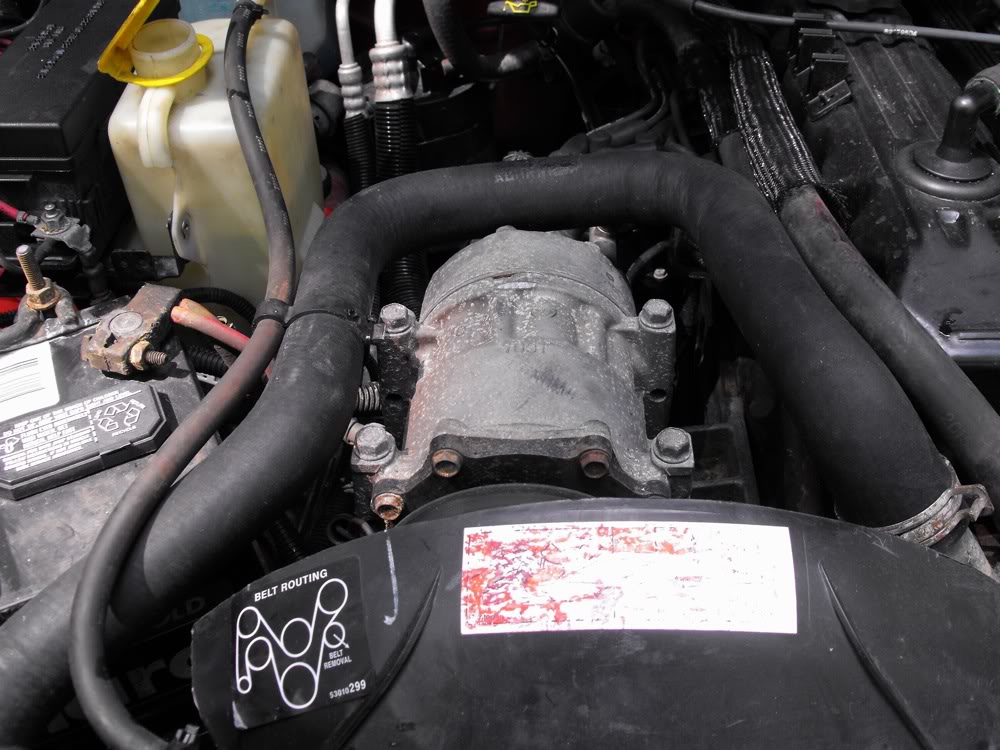
it also doesn't chafe up against the battery.
You do want to save that corrugated plastic sleeve. The hose still comes perilously close the the bolts on the AC and it couldn't hurt to split it in half and zip-tie the pieces in place.
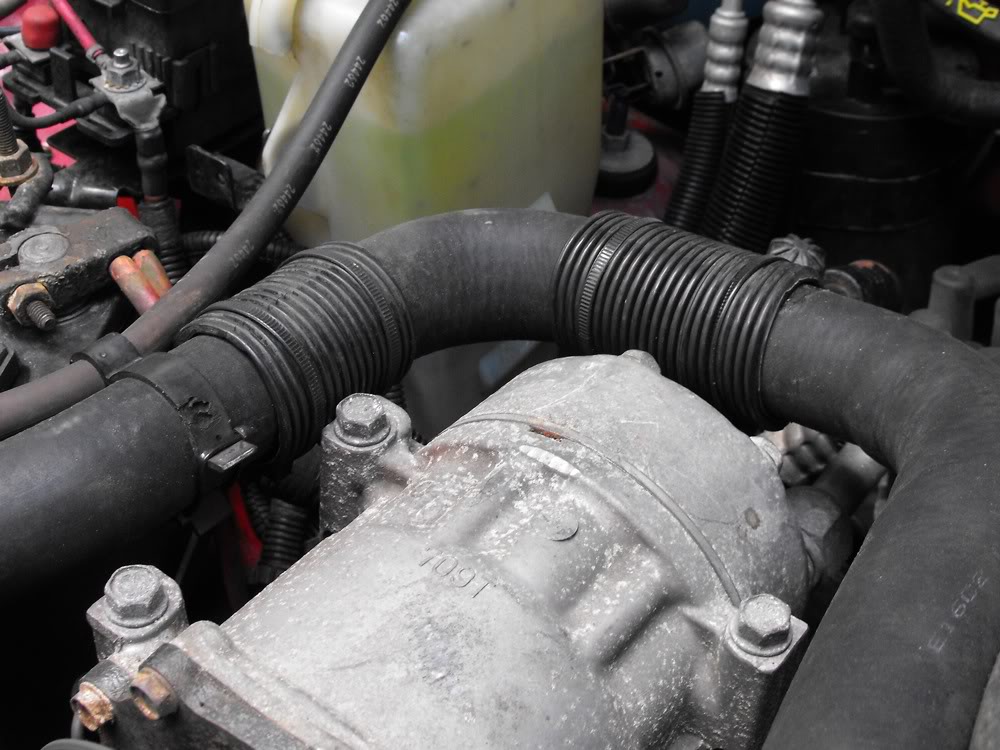
This and a quick radiator flush dropped my normal operating temp 10�
The new hose the national chain wanted to sell me was a name brand that looked exactly like the one I took off. The counter guy was 100% sure it was the right hose and that I was a jerk for doubting him, but the new hose fit like crap too.
It crimped at the thermostat housing.
Sat on the edge of the battery.
And got crushed between the hood and the AC compressor.
I went by a smaller local shop for something else and happened to ask the parts kid about the hose. He looked it up and his listing showed the exact same hose. The kid is the kind of guy that wants to come thru for his customers, so he did a little searching and pulled up the hose for the "non-AC" model just to see.
Lo and behold, there was the proper hose.
Somehow the numbers for the AC and non AC hoses have been reversed.
Just for a goof, I started looking around on line and sure enough, everyplace I checked (RockAuto was the first pace I looked) has the hose for the AC model marked Non-AC and the Non-AC hose listed as being for the AC model.
Here's the right hose:
It hooks around the AC, doesn't get crimped at the T-stat housing, and doesn't get crushed between the AC and the hood.
it also doesn't chafe up against the battery.
You do want to save that corrugated plastic sleeve. The hose still comes perilously close the the bolts on the AC and it couldn't hurt to split it in half and zip-tie the pieces in place.
This and a quick radiator flush dropped my normal operating temp 10�
Last edited by Marcucco; Jun 13, 2012 at 07:55 PM.