
Beach Build

Thread Starter
Seasoned Member
Joined: Dec 2009
Posts: 269
Likes: 1
From: Eastern NC
Year: 93
Model: Grand Cherokee
Engine: 5.2
I had an idea for my exhaust so I figured I'd post a picture of what I'm thinking to get some feed back. I don't know if it's been done before, or if it will make it sound/flow better, but this is what I'm thinking. The idea is based on an x-pipe, but the opposite. Instead of two pipes intersecting, one pipe is separating and then reconnecting. I would put this in place after the catalytic converter.
Last edited by JeepingDan; Aug 18, 2011 at 03:34 PM. Reason: Forum general rule.
Thread Starter
Seasoned Member
Joined: Dec 2009
Posts: 269
Likes: 1
From: Eastern NC
Year: 93
Model: Grand Cherokee
Engine: 5.2
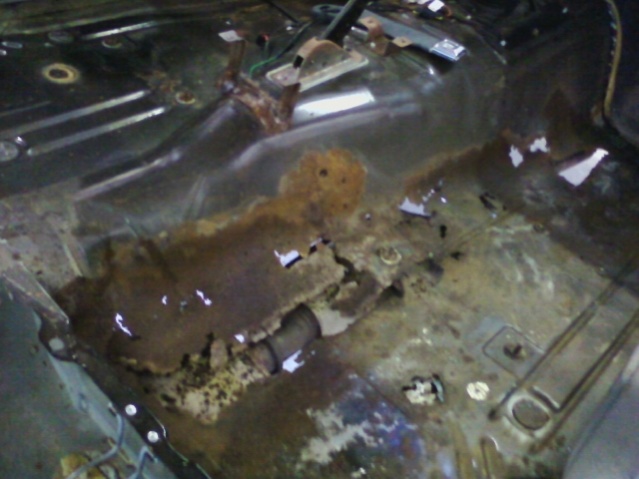
I had a few hours to spare today so I decided to take out my carpet to see just how bad off my floor board was. I new there were two holes rusted through on the passenger side, but you're never exactly sure how bad the damage is until the carpet is out.
Here's what I found.

So I cut it out.

Then I used what used to be my roof for the patch panels.

Sprayed it with rust neutralizer and undercoating.

Then I used adhesive flashing (window tape) to deaden any sounds from outside the cab, just like dynomat as far as I'm concerned.

In all, it was a well spent 6.5 hours. Afterwords, I pressure washed the carpet at a local car wash, so I was able to pressure soap it then rinse it. The carpet isn't perfect, but it's better. I also replaced the front two seat mount bolts on both sides with half inch diameter, stainless bolts that I had laying around since I had to cut the old ones out to remove the seats.
Here's what I found.
So I cut it out.

Then I used what used to be my roof for the patch panels.

Sprayed it with rust neutralizer and undercoating.

Then I used adhesive flashing (window tape) to deaden any sounds from outside the cab, just like dynomat as far as I'm concerned.

In all, it was a well spent 6.5 hours. Afterwords, I pressure washed the carpet at a local car wash, so I was able to pressure soap it then rinse it. The carpet isn't perfect, but it's better. I also replaced the front two seat mount bolts on both sides with half inch diameter, stainless bolts that I had laying around since I had to cut the old ones out to remove the seats.
Last edited by rollingstone; May 16, 2011 at 05:20 AM. Reason: wrong word used
Thread Starter
Seasoned Member
Joined: Dec 2009
Posts: 269
Likes: 1
From: Eastern NC
Year: 93
Model: Grand Cherokee
Engine: 5.2
Oh yeah, the drivers side was solid. No patching needed. I feel like my 98 had some plates that acted as exhaust shields on the bottom of the floor. It seems the exhaust had a lot to do with the holes in my floor.
Seasoned Member
Joined: Dec 2010
Posts: 402
Likes: 2
From: Charlotte/Raleigh, NC
Year: 1999
Model: Cherokee
Engine: 4.0 MPI
Does that window tape do anything for heat? I have a 99 and it has the patches over the cat but I was looking for something to go over the tranny tunnel
Thread Starter
Seasoned Member
Joined: Dec 2009
Posts: 269
Likes: 1
From: Eastern NC
Year: 93
Model: Grand Cherokee
Engine: 5.2
I don't know if it does anything for heat. Something my dad did to his old xj years ago was take some 1/2" thick rubber mat from walmart or lowes and draped it over the center hump, after cutting holes for center console brackets, shifters, etc. That would probably be the best for insulation.
CF Veteran
Joined: Jan 2011
Posts: 3,228
Likes: 1
From: BELLINGHAM W.A.
Year: 1993
Model: Cherokee
Engine: 4.0
Then I had a dream...
Attachment 44178
The idea of chopping (or as I call it-chipping) the top occupied my thoughts quite often. I probably spent 6 months planning how I was going to do it. I've never done anything like it before, and the only welding experience I had was building aluminum awnings and racks at work.
But I charged it...
Attachment 44179
I cut two parallel lines, one on the back of the c-pillar, and one on the front of the d-pillar. I cut into the roof so the ridges on it would end properly and look factory.
Then I filled the space between the bottom of the d-pillar and the rear quarter with sheet metal the best I could and folded where the d-pillar used to be to continue the body line under where the window used to be
Attachment 44184
When I decided how I was going to do this project, I searched craigslist for parts. I needed a steel liftgate and the tail lights to match. I found a jeep fanatic close by, and traded my labor (cutting/bedlining his fenders) for his liftgate and lights. I then beat the tail light-mounting surface flat and mounted the lights from a 99. Then I cut the liftgate in half, cut and folded where the bottom of the back glass was, and welded it to my fenders. I'll still be able to replace my bulbs, but I'll have to do it from inside where I'll have panels that will remove easily. Here's how it looks now.
Attachment 44192
Seasoned Member
Joined: Dec 2010
Posts: 402
Likes: 2
From: Charlotte/Raleigh, NC
Year: 1999
Model: Cherokee
Engine: 4.0 MPI
I don't know if it does anything for heat. Something my dad did to his old xj years ago was take some 1/2" thick rubber mat from walmart or lowes and draped it over the center hump, after cutting holes for center console brackets, shifters, etc. That would probably be the best for insulation.
Thread Starter
Seasoned Member
Joined: Dec 2009
Posts: 269
Likes: 1
From: Eastern NC
Year: 93
Model: Grand Cherokee
Engine: 5.2
It's been a while, Cherokee Forum. I've got some small things accomplished lately. I welded in a 25" glasspack and i love the way it sounds. Its throaty, but not obnoxious. I salvaged some seats out of my sisters neon that she wrecked. Theyre in perfect shape as the car only had 65000 miles on it. I made some brackets to adapt the seats to the jeeps frames. Just have to by some bolts and install them. I still haven't painted my jeep since the chop because there are a few more things I want to do. I'm trying not to rush and have to do something over. Just got a new camera, so I'm going to upload some quality pictures of what I've been up to soon. Oh, and I'm have two "XJ Truck" emblems made. They will be in the same font as the emblems that were on my jeep. I'll put those on the front fenders behind the tire where "Cherokee" normally is and I'm going to put the Jeep emblem back on the header panel.
Member
Joined: Mar 2011
Posts: 142
Likes: 0
From: Northeast Ohio
Year: 1998
Model: Cherokee
Engine: 4.0 L
I am amazed and inspired at how well you are doing on this project. I have never really done any modifications to my Xj. I work on it replacing parts and stuff but I don't have the equipment or know how to fab anything. You inspire me to be more creative and think outside the box more. You are doing a great job and like you said...take your time and do it right the first time! Keep up the awesome job and I am sure you have inspired others as well

Member
Joined: Jan 2011
Posts: 227
Likes: 1
From: Sacramento
Year: 1994
Model: Cherokee
Engine: 4.0
Thread Starter
Seasoned Member
Joined: Dec 2009
Posts: 269
Likes: 1
From: Eastern NC
Year: 93
Model: Grand Cherokee
Engine: 5.2
The original plan was to make what is there now a funtional tailgate, but when I tacked it to the rear quarters, I was able to easily access the floor of the bed. My jeep only has 2" of lift and 31's so it's not big. The current plan is to leave it like this for now (enjoy the feeling of accomplishment), and make it functional if I either get really in to tailgating or lift it more. Possibilities also include turning the bed of the jeep into a bathtub for trail bathing...
