
Almost There: 01’ XJ Build

Senior Member
Joined: Dec 2009
Posts: 735
Likes: 0
From: Ft. Collins, Co
Year: 1998
Model: Cherokee
Engine: 4.0L I6
AAHH you went without me...
looks like the same place though, I think Herman is getting old to be honest. I'll get my yeep bolted back together and we'll get something planned if your down. And my friend got his 35s and wants to get some 4x4 in.
looks like the same place though, I think Herman is getting old to be honest. I'll get my yeep bolted back together and we'll get something planned if your down. And my friend got his 35s and wants to get some 4x4 in.
Thread Starter
Senior Member
Joined: Jul 2010
Posts: 913
Likes: 6
From: Japan
Year: 2001
Model: Cherokee
Engine: 4.0 L I6
well today I was motivated to get my gas skid, and undercarriage skid installed so I can go wheeling on a real trail this weekend without ruining my jeep... and Yea it sucked.
I spend four hours, and all I was able to accomplish was breaking most of the bolts holding on the trailer hitch , and eventually pulling out a cutting wheel, and cutting off the last 3 bolts. Bright side I guess is that I got my trailer hitch off...now I just need to take off the rear bumper, put the dang skid and trailer hitch back on with new bolts and nuts, and then tackle the other skid plate.
I spend four hours, and all I was able to accomplish was breaking most of the bolts holding on the trailer hitch
, and eventually pulling out a cutting wheel, and cutting off the last 3 bolts. Bright side I guess is that I got my trailer hitch off...now I just need to take off the rear bumper, put the dang skid and trailer hitch back on with new bolts and nuts, and then tackle the other skid plate.
Last edited by gvns8; Feb 5, 2011 at 07:21 PM.
Thread Starter
Senior Member
Joined: Jul 2010
Posts: 913
Likes: 6
From: Japan
Year: 2001
Model: Cherokee
Engine: 4.0 L I6
Today I got my Control Arm drop brackets in the mail today from Rocky Mountain Outfitters. These things are huge. I will be installing them tomorrow, so I'll post up some install pictures and results.
I'm also finally going to a shop on Thursday to get my my rear axle pinion bearings replaced. Definitely pretty exciting for me, because it means that by the end of the week, I will have a much smoother riding, vibration free, non-axle-howling cherokee to drive for the first time ever.
Here are the parts:
Last edited by gvns8; Feb 7, 2011 at 09:52 PM.
CF Veteran
Joined: May 2010
Posts: 1,013
Likes: 1
From: New Hampshire
Year: 1997
Model: Grand Cherokee
Engine: 4.0
x2. Nice build here. Cant wait to see the drops mounted. Seen them, heard of them, never seen them installed beside on a sales ad. Very curious on performance
Thread Starter
Senior Member
Joined: Jul 2010
Posts: 913
Likes: 6
From: Japan
Year: 2001
Model: Cherokee
Engine: 4.0 L I6
Hey guys, I couldn't get my Control Arm drops on in the beginning of the week because of a huge snow storm. But I did drop off my jeep and get the rear axle bearing replaced and unfortunately had to replace the ring and pinion also due to improper wear patterns...there goes $550 . But at least the howling is gone and hopefully this is the last time I will have to deal with the differentials.
Today I got a late start, but I went to the base auto hobby shop and started work on installing my CAD brackets. Here are some crappy cell phone pics of my progress:


Unfortunately I only got to this point when the shop closed. So I will be back working on finishing it up tomorrow so stay tuned. I will also be installing a coil spacer in the front to level it out to about 6" in the front and 5.5" in the rear. Anyone think its worth cutting 0.5 inches off the spacer to make the front lift height the exact same as the rear? I guess I am just feeling like its not worth the effort.
Also any tips on how to get the UCA's off? I got the bolts out but cant push the axle far enough forward to get them out of the pockets.
I should be getting the skid plates on if I have time too. Let me know what you all think.
. But at least the howling is gone and hopefully this is the last time I will have to deal with the differentials.Today I got a late start, but I went to the base auto hobby shop and started work on installing my CAD brackets. Here are some crappy cell phone pics of my progress:
Unfortunately I only got to this point when the shop closed. So I will be back working on finishing it up tomorrow so stay tuned. I will also be installing a coil spacer in the front to level it out to about 6" in the front and 5.5" in the rear. Anyone think its worth cutting 0.5 inches off the spacer to make the front lift height the exact same as the rear? I guess I am just feeling like its not worth the effort.
Also any tips on how to get the UCA's off? I got the bolts out but cant push the axle far enough forward to get them out of the pockets.
I should be getting the skid plates on if I have time too. Let me know what you all think.
Last edited by gvns8; Feb 12, 2011 at 06:48 PM.
Thread Starter
Senior Member
Joined: Jul 2010
Posts: 913
Likes: 6
From: Japan
Year: 2001
Model: Cherokee
Engine: 4.0 L I6
Well here is the update on my fully installed Control Arm Drop brackets and coil spacer. I pretty much finished installing the actual bracket and brace parts yesterday and that took me only a few hours. Today I installed a new coil spacer to level out the front and I attached the arms to the the bracket. When put that way it doesn't sound like I did much, but wow, installing the arms was a huge pain to say the least and it took me 7 hours of work.
I guess the lesson for the future is to get some tips for your installation first so you don't have to figure everything out on your own. Here are the pictures:
First of all I took the springs out and installed the spacer since the control arms were already out this was much easier than normal.


Here is the most difficult part of the install: The lower control arms have to line up into an adjustment sleeve and then the mounting pocket. Through trial and error, I found the best way was to put the adjustment sleeve on the CA and then use a rubber mallet to hit it into the bracket. Then use a fine chissel and a hammer to line up the sleeve, arm, and bracket holes.

This is also where I made a huge mistake. You have to install the upper control arms first before the lowers. Otherwise it is pretty much impossible to install both lowers without disconnecting the steering. I had to take out the lowers after already spending an hour getting them into place so that I could get the upper into place.

The final tip I have is this: use a ratcheting strap between the axle and the sway bar in order to pull the axle far enough forward to get the last lower control arm into place.

I then torqued everything down and threw the tires back on.
Here is the before picture of the incorrect control arm angles:
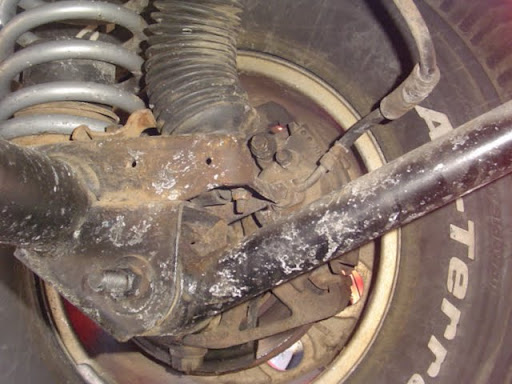
And the After pictures where the CA's are close to being horizontal to the ground like they should be to make the suspension absorb the shocks instead of the body:

(still need to replace my front drive shaft centering ball and reinstall it)


The bracket mounts conveniently with the cross-member bolts:

I think I need some swaybar drops to keep the coil from hitting the swaybar disconnects:

I also think I need a drop pitman arm because the TRE hits the swaybar link:

Here is a comparison of how my xj sat before with only 4.5" springs:

And after sitting at about 6" in the front with the spacer in along with the brackets:


I lost a little bit of ground clearance with the bracket, but its no more than I would if I had long arms.

And finally here is some poser flex shots I took tonight after finishing the install for fun... sway bar is still connected though so doesn't say much. Technically, I should have a whole not more flex because the arms are located 4" lower and a have a much larger radius to rotate on since they are horizontal to the ground. I will probably need longer shocks though and new steering before I can realize the full potential.


I know a lot of people wonder why they'd use CAD brackets instead of long arms. My biggest consideration was price: these cost $200 from Rocky Mountain Outfitters, whereas a good set of long arms will cost at least $800. Long arms may perform better offroad, but I hear that when set up properly, these can offer nearly as much flex as long arms. I also hear these are as good or better than LA's on-road. Eventually when I trailer my Rig I will probably throw on LA's but for now, these are a hundred times better than just short arms.
Here are my impressions about the performance so far: These are definitely worth every dime I spent on them. I drove my buddies stock 01' durango the other day, and I would say that my xj now feel pretty close to the same as his durango even though I have close to 6" of lift. The steering no longer tracks with the curvature of the road, and small bumps in the road no longer jolt the passenger area. To sum it up, I would say it is a huge improvement and much closer to driving a stock cherokee. Keep in mind I went straight from a 4.5" lifted front to close to a 6" lifted front with CAD brackets so if I stayed at 4.5" it would probably drive the same as at stock height since these brackets drop everything 4". I only drove for about 5 miles tonight, about 1 mile on a rough dirt road and I still need an alignment, so I will report back once I have driven some more.
I guess the lesson for the future is to get some tips for your installation first so you don't have to figure everything out on your own. Here are the pictures:
First of all I took the springs out and installed the spacer since the control arms were already out this was much easier than normal.
Here is the most difficult part of the install: The lower control arms have to line up into an adjustment sleeve and then the mounting pocket. Through trial and error, I found the best way was to put the adjustment sleeve on the CA and then use a rubber mallet to hit it into the bracket. Then use a fine chissel and a hammer to line up the sleeve, arm, and bracket holes.
This is also where I made a huge mistake. You have to install the upper control arms first before the lowers. Otherwise it is pretty much impossible to install both lowers without disconnecting the steering. I had to take out the lowers after already spending an hour getting them into place so that I could get the upper into place.
The final tip I have is this: use a ratcheting strap between the axle and the sway bar in order to pull the axle far enough forward to get the last lower control arm into place.
I then torqued everything down and threw the tires back on.
Here is the before picture of the incorrect control arm angles:
And the After pictures where the CA's are close to being horizontal to the ground like they should be to make the suspension absorb the shocks instead of the body:
(still need to replace my front drive shaft centering ball and reinstall it)
The bracket mounts conveniently with the cross-member bolts:
I think I need some swaybar drops to keep the coil from hitting the swaybar disconnects:
I also think I need a drop pitman arm because the TRE hits the swaybar link:
Here is a comparison of how my xj sat before with only 4.5" springs:
And after sitting at about 6" in the front with the spacer in along with the brackets:
I lost a little bit of ground clearance with the bracket, but its no more than I would if I had long arms.
And finally here is some poser flex shots I took tonight after finishing the install for fun... sway bar is still connected though so doesn't say much. Technically, I should have a whole not more flex because the arms are located 4" lower and a have a much larger radius to rotate on since they are horizontal to the ground. I will probably need longer shocks though and new steering before I can realize the full potential.
I know a lot of people wonder why they'd use CAD brackets instead of long arms. My biggest consideration was price: these cost $200 from Rocky Mountain Outfitters, whereas a good set of long arms will cost at least $800. Long arms may perform better offroad, but I hear that when set up properly, these can offer nearly as much flex as long arms. I also hear these are as good or better than LA's on-road. Eventually when I trailer my Rig I will probably throw on LA's but for now, these are a hundred times better than just short arms.
Here are my impressions about the performance so far: These are definitely worth every dime I spent on them. I drove my buddies stock 01' durango the other day, and I would say that my xj now feel pretty close to the same as his durango even though I have close to 6" of lift. The steering no longer tracks with the curvature of the road, and small bumps in the road no longer jolt the passenger area. To sum it up, I would say it is a huge improvement and much closer to driving a stock cherokee. Keep in mind I went straight from a 4.5" lifted front to close to a 6" lifted front with CAD brackets so if I stayed at 4.5" it would probably drive the same as at stock height since these brackets drop everything 4". I only drove for about 5 miles tonight, about 1 mile on a rough dirt road and I still need an alignment, so I will report back once I have driven some more.
Last edited by gvns8; Feb 14, 2011 at 12:16 AM.
Thread Starter
Senior Member
Joined: Jul 2010
Posts: 913
Likes: 6
From: Japan
Year: 2001
Model: Cherokee
Engine: 4.0 L I6
I rebuilt my front driveshaft with new u-joints, and centering yoke today. I was hoping this would cure my front driveline vibrations I have been having. No such luck. I am guessing the problem is that I need to aim the pinion angle higher. I was hoping the control arm drop brackets would fix this, but I guess I will need some adjustable uca's.


Thread Starter
Senior Member
Joined: Jul 2010
Posts: 913
Likes: 6
From: Japan
Year: 2001
Model: Cherokee
Engine: 4.0 L I6
I decided to troubleshoot my front driveline vibrations today. Before buying adjustable UCA's I wanted to make sure they were actually the solution to the vibes I have been having.
So first I traded my front and rear drive shafts. Unfortunately the vibes remained. This means that having the shaft balanced will not fix the vibrations. I then drove around with the front shaft bolted to the rear and no shaft in the front. There were only some noticeable vibes at highway speeds. So this means I still need to get the front shaft balanced. I also checked the yokes for the front axle and T/C and they did not have any play.
Next I found a way to extend my front sway bars to the appropriate length for a 5.5" lift as opposed to the 3.5" lift that they were made for. I was hoping that having the correct size sway bars would keep the axle from wrapping and moving the pinion downward thereby causing the vibrations to occur. Unfortunately they didn't help. I did only spend about $3 to make these though, so I would still chalk it up as a win.
Ultimately though I am going to have to get adjustable upper control arms, and get my front shaft balanced to get rid of all the front vibrations. Man this jeep is expensive .
.
Here are the extended sway bar disco's I made with some threaded rod, nuts, and a thread connector:

I also installed some champion spark plugs today. I am not very impressed with them due to the fact that the thread on one of them them got messed up while I very lightly screwed one of them in. So I could only replace 5 of the 6 for now.

Old ones:

New One Ready to be screwed in.

Engine runs pretty smooth now. A minor ticking I noticed went away but I am not sure it is related. I was originally hoping these may help with the trouble I have starting the engine when its cold, but that is probably just the starter getting old.
So first I traded my front and rear drive shafts. Unfortunately the vibes remained. This means that having the shaft balanced will not fix the vibrations. I then drove around with the front shaft bolted to the rear and no shaft in the front. There were only some noticeable vibes at highway speeds. So this means I still need to get the front shaft balanced. I also checked the yokes for the front axle and T/C and they did not have any play.
Next I found a way to extend my front sway bars to the appropriate length for a 5.5" lift as opposed to the 3.5" lift that they were made for. I was hoping that having the correct size sway bars would keep the axle from wrapping and moving the pinion downward thereby causing the vibrations to occur. Unfortunately they didn't help. I did only spend about $3 to make these though, so I would still chalk it up as a win.
Ultimately though I am going to have to get adjustable upper control arms, and get my front shaft balanced to get rid of all the front vibrations. Man this jeep is expensive
Here are the extended sway bar disco's I made with some threaded rod, nuts, and a thread connector:
I also installed some champion spark plugs today. I am not very impressed with them due to the fact that the thread on one of them them got messed up while I very lightly screwed one of them in. So I could only replace 5 of the 6 for now.
Old ones:
New One Ready to be screwed in.
Engine runs pretty smooth now. A minor ticking I noticed went away but I am not sure it is related. I was originally hoping these may help with the trouble I have starting the engine when its cold, but that is probably just the starter getting old.
Last edited by gvns8; Feb 21, 2011 at 11:01 PM.
Thread Starter
Senior Member
Joined: Jul 2010
Posts: 913
Likes: 6
From: Japan
Year: 2001
Model: Cherokee
Engine: 4.0 L I6
Here is an update on all the things I have left/ have done in the past 30 days or so:
Done- Felpro Valve Cover Gasket install ($45)
Done- Install new gears/bearing in rear axle ($575)
Done- CAD Brackets Install ($300)
Done- 6 degree shims ($20)
Done- BPE's Install
Done- Rebuild/Replace Centering ball and u joints on front driveshaft ($110)
Done- Extend Swaybar Links to fit extra lift
Done- Install Spark Plugs ($20)
*Spent So Far: $1035
Plan on doing very soon:
1. Buy/install Drop Pitman Arm ($50)
2. Buy/Install Adjustable Upper Control Arms ($180)
3. Buy/Install New Front Brake lines from a 97 chevy 1500 2wd which I hear are good for 7+ inches of lift ($25)
4. Buy Hockey pucks ~3" worth to extend bumpstops
5. Install Transmission Skid and Gas Skid Plates
6. New Shocks up front after I figure out the right size for max droop/flex ($140)
7. Figure out my steering situation/maybe upgrade due to TRE being bad
*Running total: $1430
Other less important items that I am going to do:
-Fix roof rack light wiring (had a short and disconnected them), fix broken bumper light, align lights
-OBA or CO2 system ($200) and get some tire deflators ($50)
-Get some Quadratec Rubber Mats ($100)
-Tune my CB Radio Antenna
-Install spring retainer clips
-Hood Vents ($50) http://www.genright.com/ProductInfo....ductid=LVR1001
-Rewire Headlights with 10ga wires/replace with some new silverstars ($40)
*Grand total: $1870...
Dang thats too much $$ for a broke college kid.
Last edited by gvns8; Feb 23, 2011 at 11:40 PM.

Newbie
Joined: Feb 2011
Posts: 8
Likes: 0
Model: Cherokee
dude, I'm looking at getting an 01 and I'm following this build religiously. I'm about to become a broke college kid. I just wish i had your know how and knowledge with fabricating and working on your car so i could save money there. Probably would help to have the tools to. Keep it up. Its one badass jeep
Thread Starter
Senior Member
Joined: Jul 2010
Posts: 913
Likes: 6
From: Japan
Year: 2001
Model: Cherokee
Engine: 4.0 L I6
dude, I'm looking at getting an 01 and I'm following this build religiously. I'm about to become a broke college kid. I just wish i had your know how and knowledge with fabricating and working on your car so i could save money there. Probably would help to have the tools to. Keep it up. Its one badass jeep
 . Just get yourself a hanes manual and look up tutorials/videos online and on this site to figure out how to do everything. I had no idea how to do anything other than change oil when I first got my xj- they are just easy to figure out.
 From learning all that I have the way I would build up one if I were you is get a stock low mileage cheap xj, get it into good condition mechanically, then save up and do the big ticket items first. Don't do all the aesthetic stuff like a roof rack/lights/exhaust until you have it where you want it suspension/axle/steering wise. Those other little things add up crazy fast. Guess it just depends on what you want to do with it though. Good luck man!
Last edited by gvns8; Feb 25, 2011 at 12:24 AM.
Thread Starter
Senior Member
Joined: Jul 2010
Posts: 913
Likes: 6
From: Japan
Year: 2001
Model: Cherokee
Engine: 4.0 L I6
Here's an update on some progress I made on this past weekend. First I installed my front Tomken transmission/undercarriage skid plate. It was pretty easy and looks pretty sturdy- I can't complain too much because I bought it on CL for like $50. I had some trouble with the plate hitting the after-market 2.5" exhaust piping, but I found a way to drop down the plate in the front by about an inch and now its fine.
Underview:

Front View:

I also found my cb radio mic clip and found a good place to mount it. I routed the wire behind the dash so it didn't get in the way.


I also got the hardware for the rear trailer hitch and gas tank skid. I can't get the dang rear bumper off though to put some new nuts in the unibody frame. Anyone have any pointers? I might need to get a torch.
Underview:
Front View:
I also found my cb radio mic clip and found a good place to mount it. I routed the wire behind the dash so it didn't get in the way.
I also got the hardware for the rear trailer hitch and gas tank skid. I can't get the dang rear bumper off though to put some new nuts in the unibody frame. Anyone have any pointers? I might need to get a torch.
Last edited by gvns8; Feb 28, 2011 at 03:15 PM.
Thread Starter
Senior Member
Joined: Jul 2010
Posts: 913
Likes: 6
From: Japan
Year: 2001
Model: Cherokee
Engine: 4.0 L I6
Today was pretty productive. In my quest to install my gas tank skid plate, I ended up removing the rear bumper today to get to the nut plates that all the bolts seized into. Surprisingly, it wasn't too hard to remove the bumper. I soaked the bolts in liquid wrench for the last few days and it made it way easier today than the last time I tried. Hopefully I can finish up installing the skid plate and trailer hitch before the weekend.
I also had the chance to fix my roof light wiring. The way I wired it the first time I kept getting a short, so for awhile now I have had them disconnected. I wired them following this diagram, which I am hoping is correct and won't lead to any more dead batteries. Any thoughts?

I also lowered the skid plate another half inch and it finally stopped hitting the exhaust piping and vibrating the whole jeep. And Finally, I also replaced the rear differential fluid, due to the required change after the 500 mile break in period for new gears.
I also had the chance to fix my roof light wiring. The way I wired it the first time I kept getting a short, so for awhile now I have had them disconnected. I wired them following this diagram, which I am hoping is correct and won't lead to any more dead batteries. Any thoughts?
I also lowered the skid plate another half inch and it finally stopped hitting the exhaust piping and vibrating the whole jeep. And Finally, I also replaced the rear differential fluid, due to the required change after the 500 mile break in period for new gears.
Last edited by gvns8; Mar 2, 2011 at 12:38 AM.