
'01 XJ Driver/Crawler


Thread Starter
Member
Joined: Jan 2017
Posts: 125
Likes: 2
From: Anthem, AZ
Year: 2001
Model: Cherokee
Hey everyone, so I was bitten by the XJ bug a little over a year ago. I bought a built 98 XJ and had no idea what I got myself into. The PO beat the crap out of that thing, I thought I made a huge mistake, but then I started researching and fixing little things here and there, it seemed to have every common XJ problem and generally wasn't too hard to fix, but all at once it was overwhelming! After doing a lot of work to it I finally took it out on the trails and I was less than impressed. Not in the XJ itself, but in the build quality from the PO. I tried fixing all the little things, but in the end, I knew I just wouldn't be happy with it, basically it was too abused and after learning about all the options, I wanted a different lift, different axles, rear discs, different bumpers, etc. It was just going to be easier/cheaper to start from scratch and I fell into an unmolested XJ for a killer price and decided to sell the 98 and build the 01.
Surprisingly my 98 sold pretty quick. I've been going back and forth on selling this 01 and making a profit and getting an older one to build. I just can't bring myself to cut up this XJ that is in such great shape. Of course, at the same time, that's exactly why I want this one, it's in amazing shape and clean and just more up to my standards. Then I wonder if it's too clean and I'll just be beating it up offroad and it won't matter how nice it was to begin with. I need to stop thinking and just build it!!!
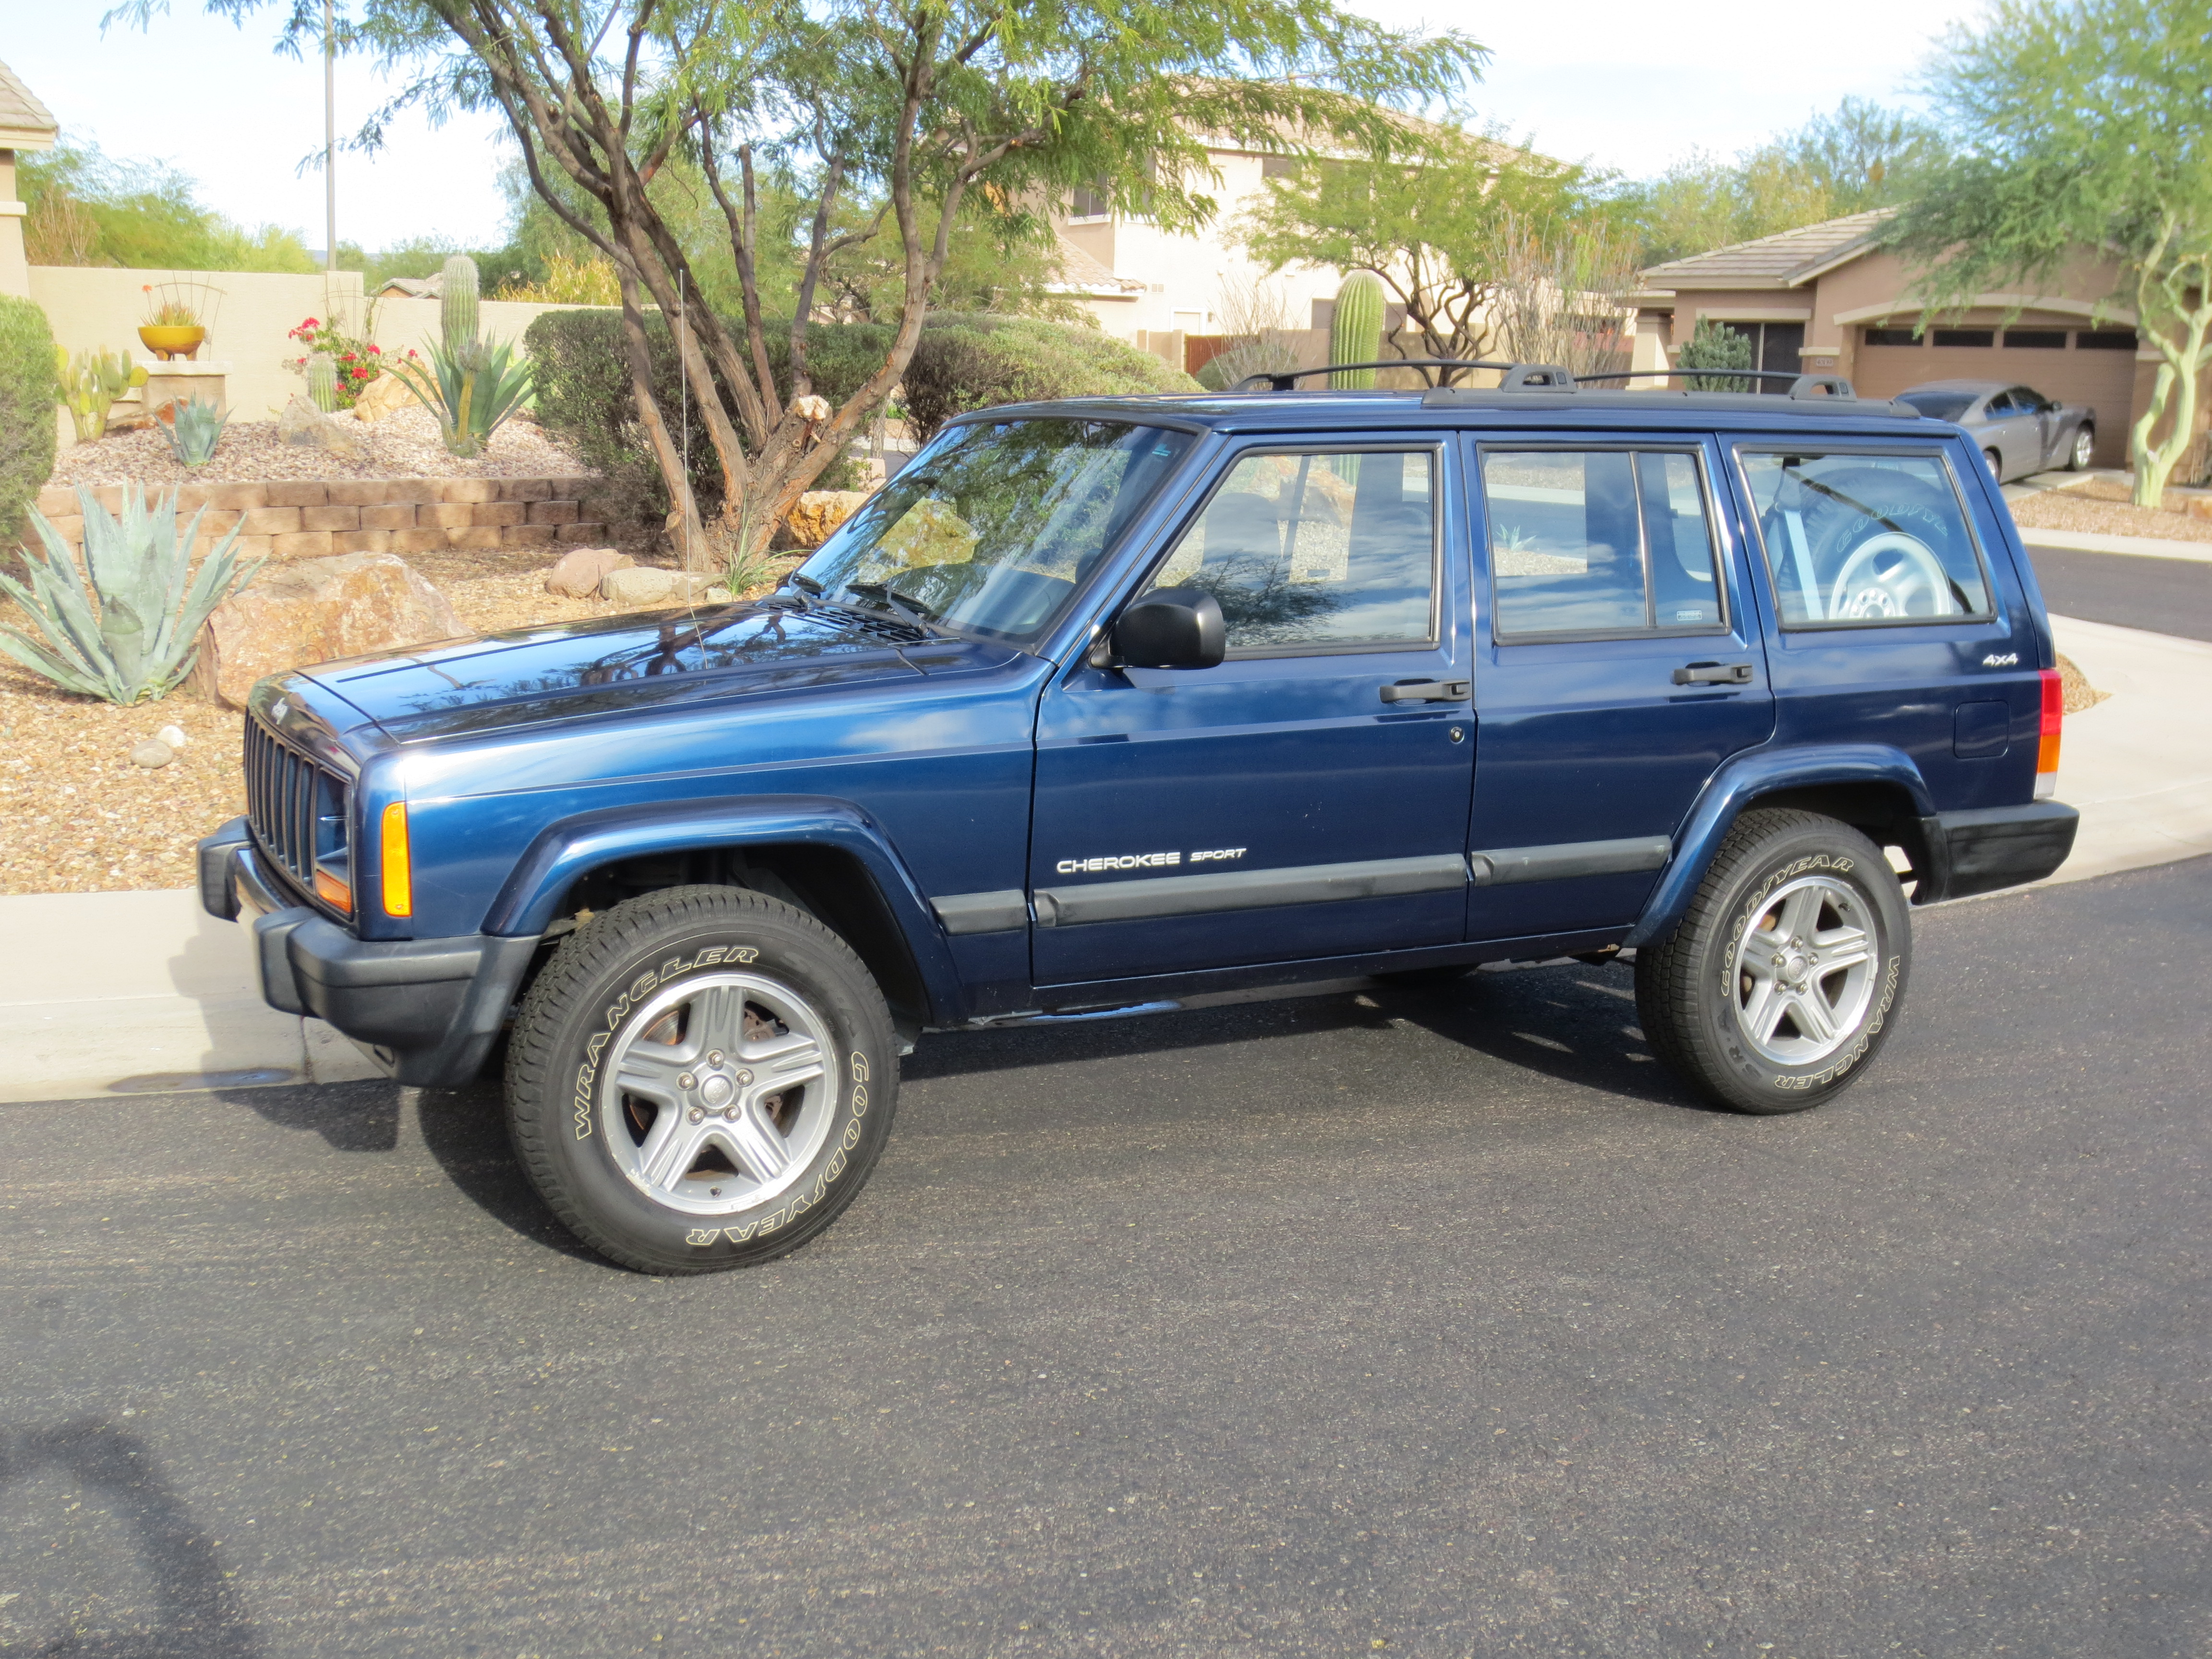
Here it is when I first got it and gave it a quick detail, it's an 01 with 87k miles...

My plan is to build it to behave well on the street, I won't daily drive it, but I want it to be capable of it. I want it to be capable offroad, but I don't want to beat the hell out of it. That's my dilemma, I'm not sure how far to go with the build, I guess I just figure it out as I go.
I've already bought a few parts...
Dirtbound DIY front and rear bumpers
Cavfab 3-link (finally got shipping confirmation today!! )
)
Rear 8.8 with disc, LS and 4.10's (planning on running 33's)
HD offroad no lift shackle relocation kit
HD offroad frame stiffeners front to rear
Dodge Stealth front seats
Advanced Adapter SYE
Rubicon Express track bar with bracket and brace
Rubicon Express 4.5" coils
Ironrock 3.5" leafs
Ironrock adjustable shackles (thinking about doing BWE comp shackles)
Various sound system components
I'm sure I'm missing a few things, I've been collecting parts for about 5 or 6 months now.
I plan to build a custom tire carrier.
Not sure about rock sliders, possibly do rocker mod with 2x6 tubing.
I want to swap in an HP30 or 44 with 4.10's, but I'm finding it next to impossible to find! Anyone know of anything available in AZ or SoCal?
Thinking about doing the 2 low kit.
I've done a few little things to it so far. It has been on hold for a while as I needed to finish a few projects around the house before I get in deep. I recently finished wiring my garage with 220 for my new welder. In the process of building a new welding cart right now as well.
Of course I'll be dealing with extreme heat in a couple months and probably won't want to work on it much, so this could be a long build!
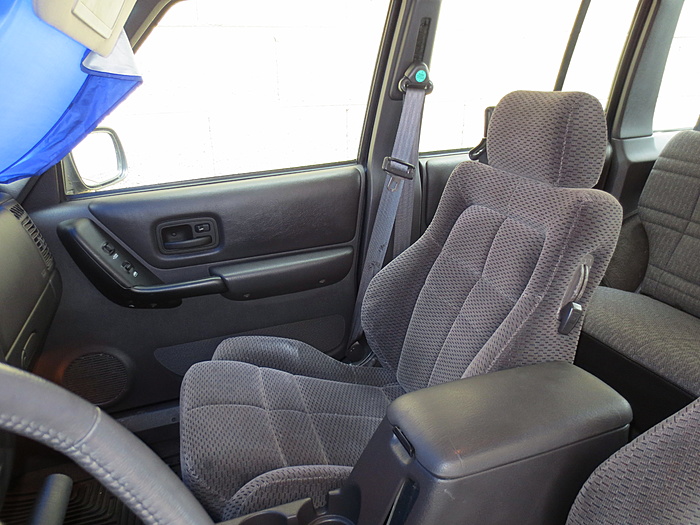
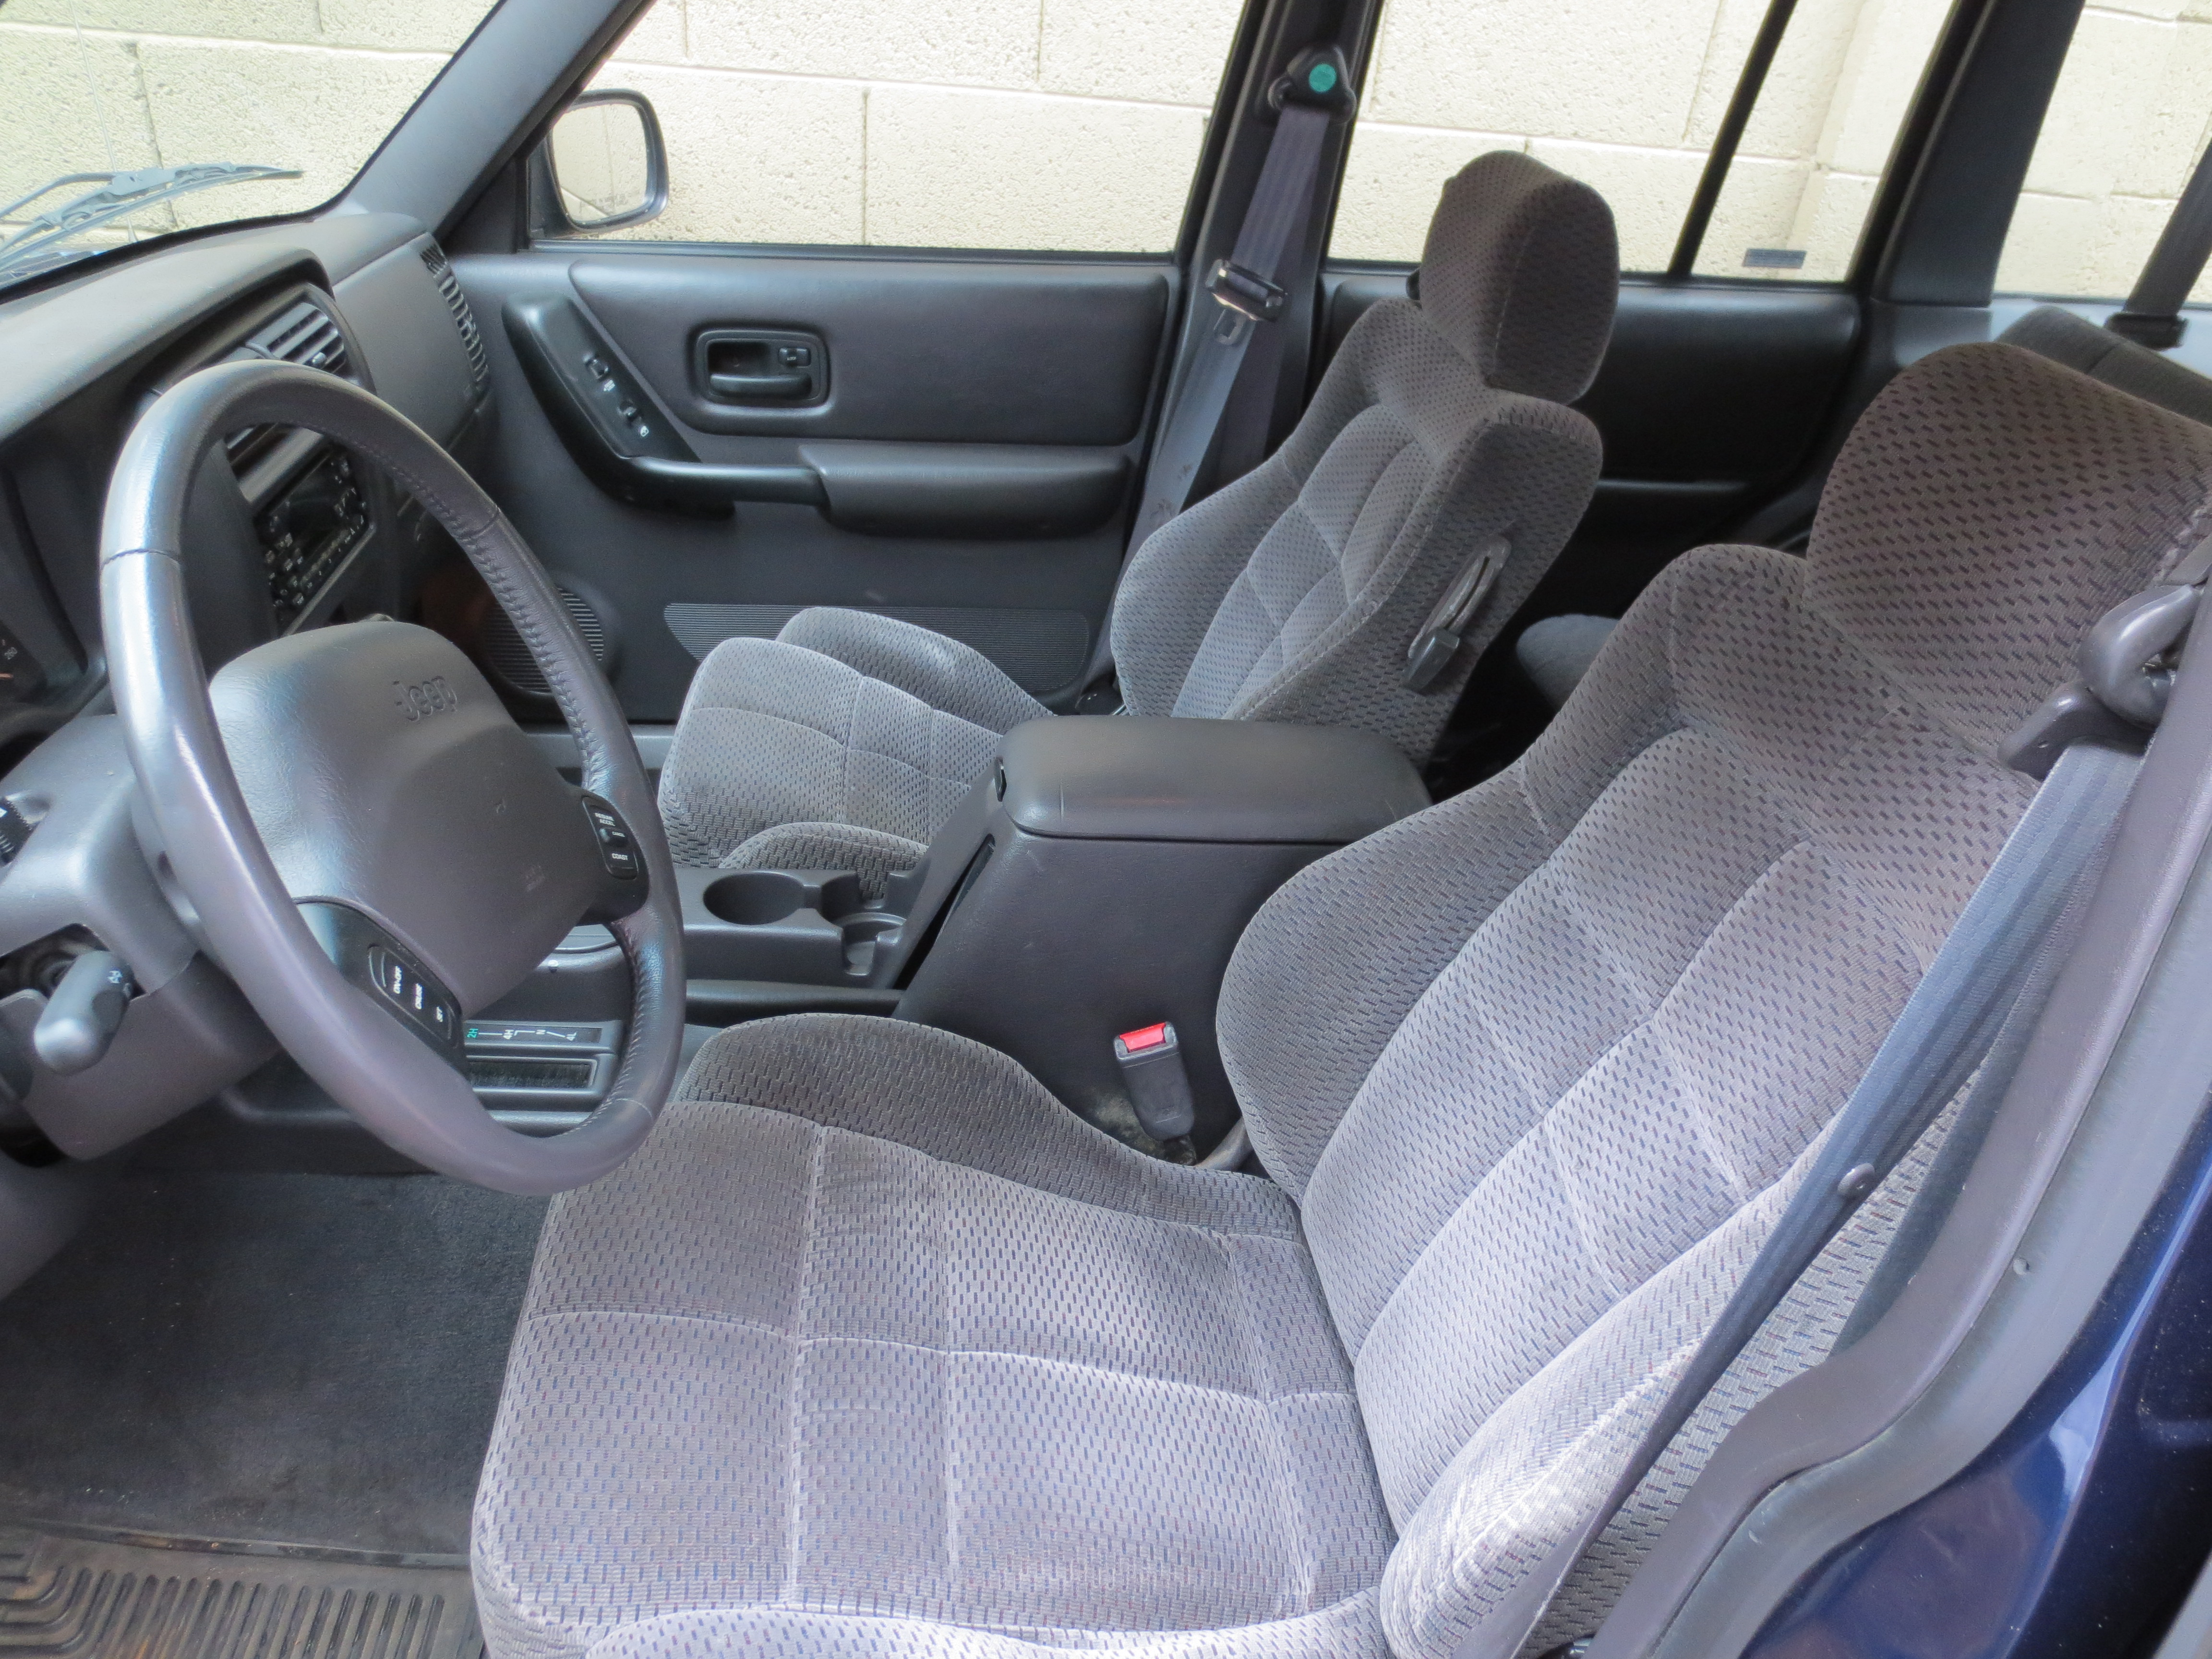
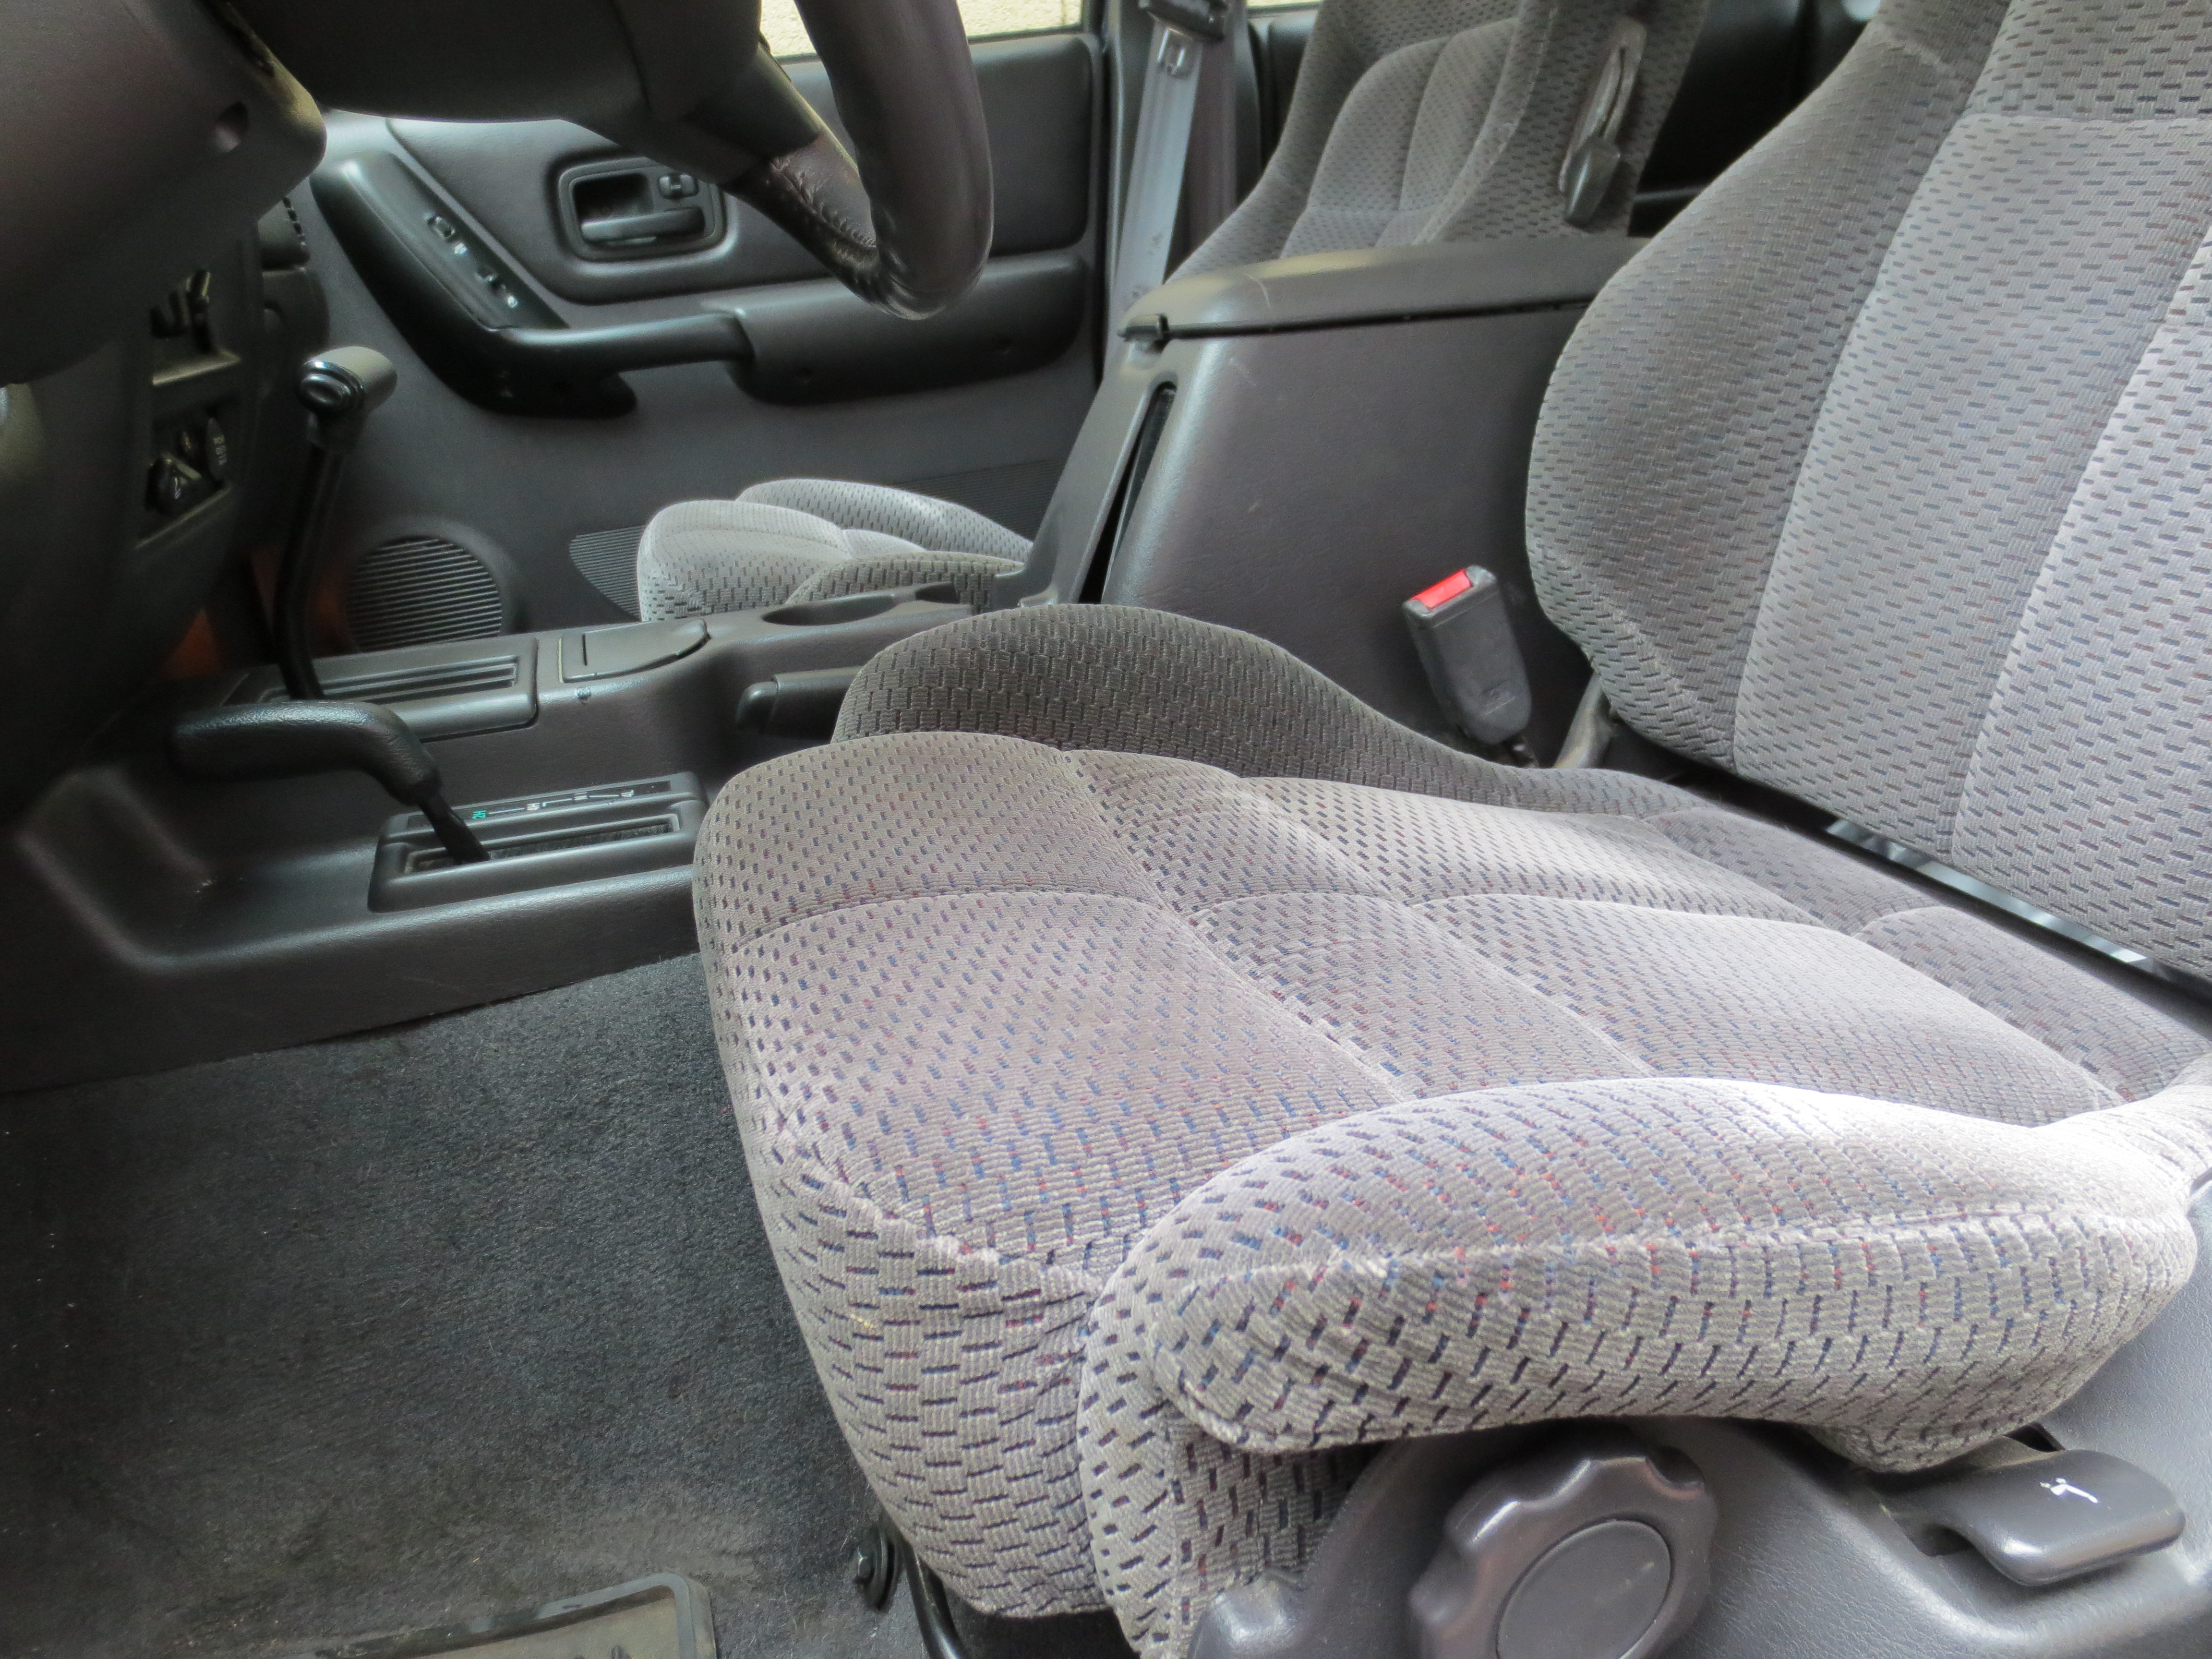
Anyways, first thing I did when I got it was swap the seats with some Dodge Stealth seats, they are so much more comfortable and I got them to sit lower than stock. It was pretty tough to modify the brackets and I had to clearance the center hump a bit, but they finally fit and I think they look awesome as well. Only thing I might do is push the drivers seat back a little more, I want a little more room to be more comfortable. We'll see if I ever get around to that though.


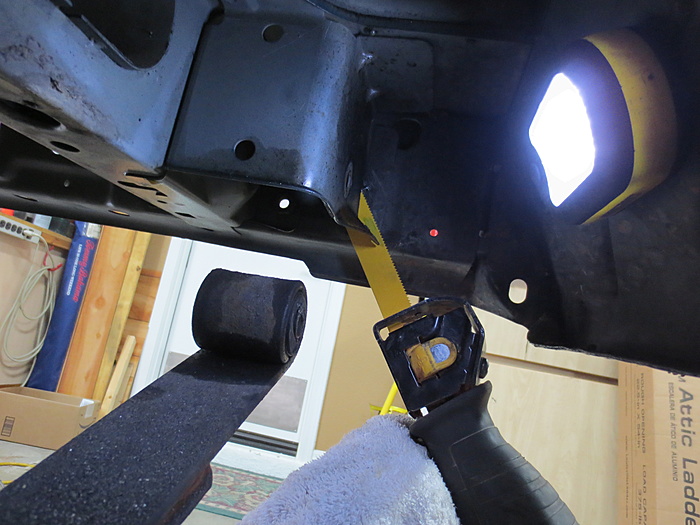
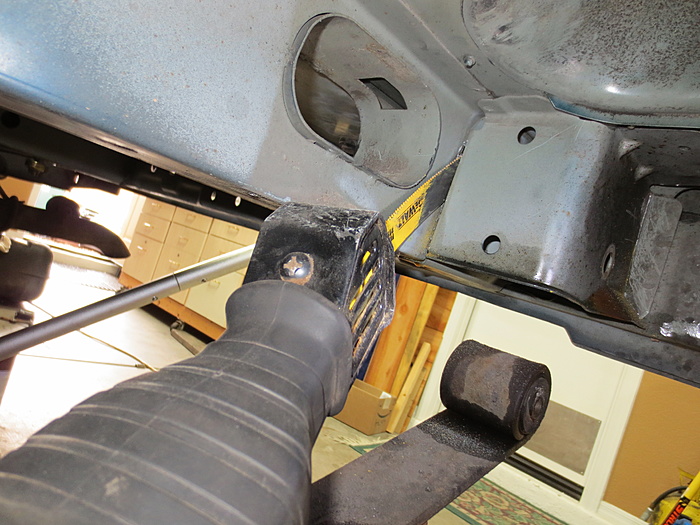
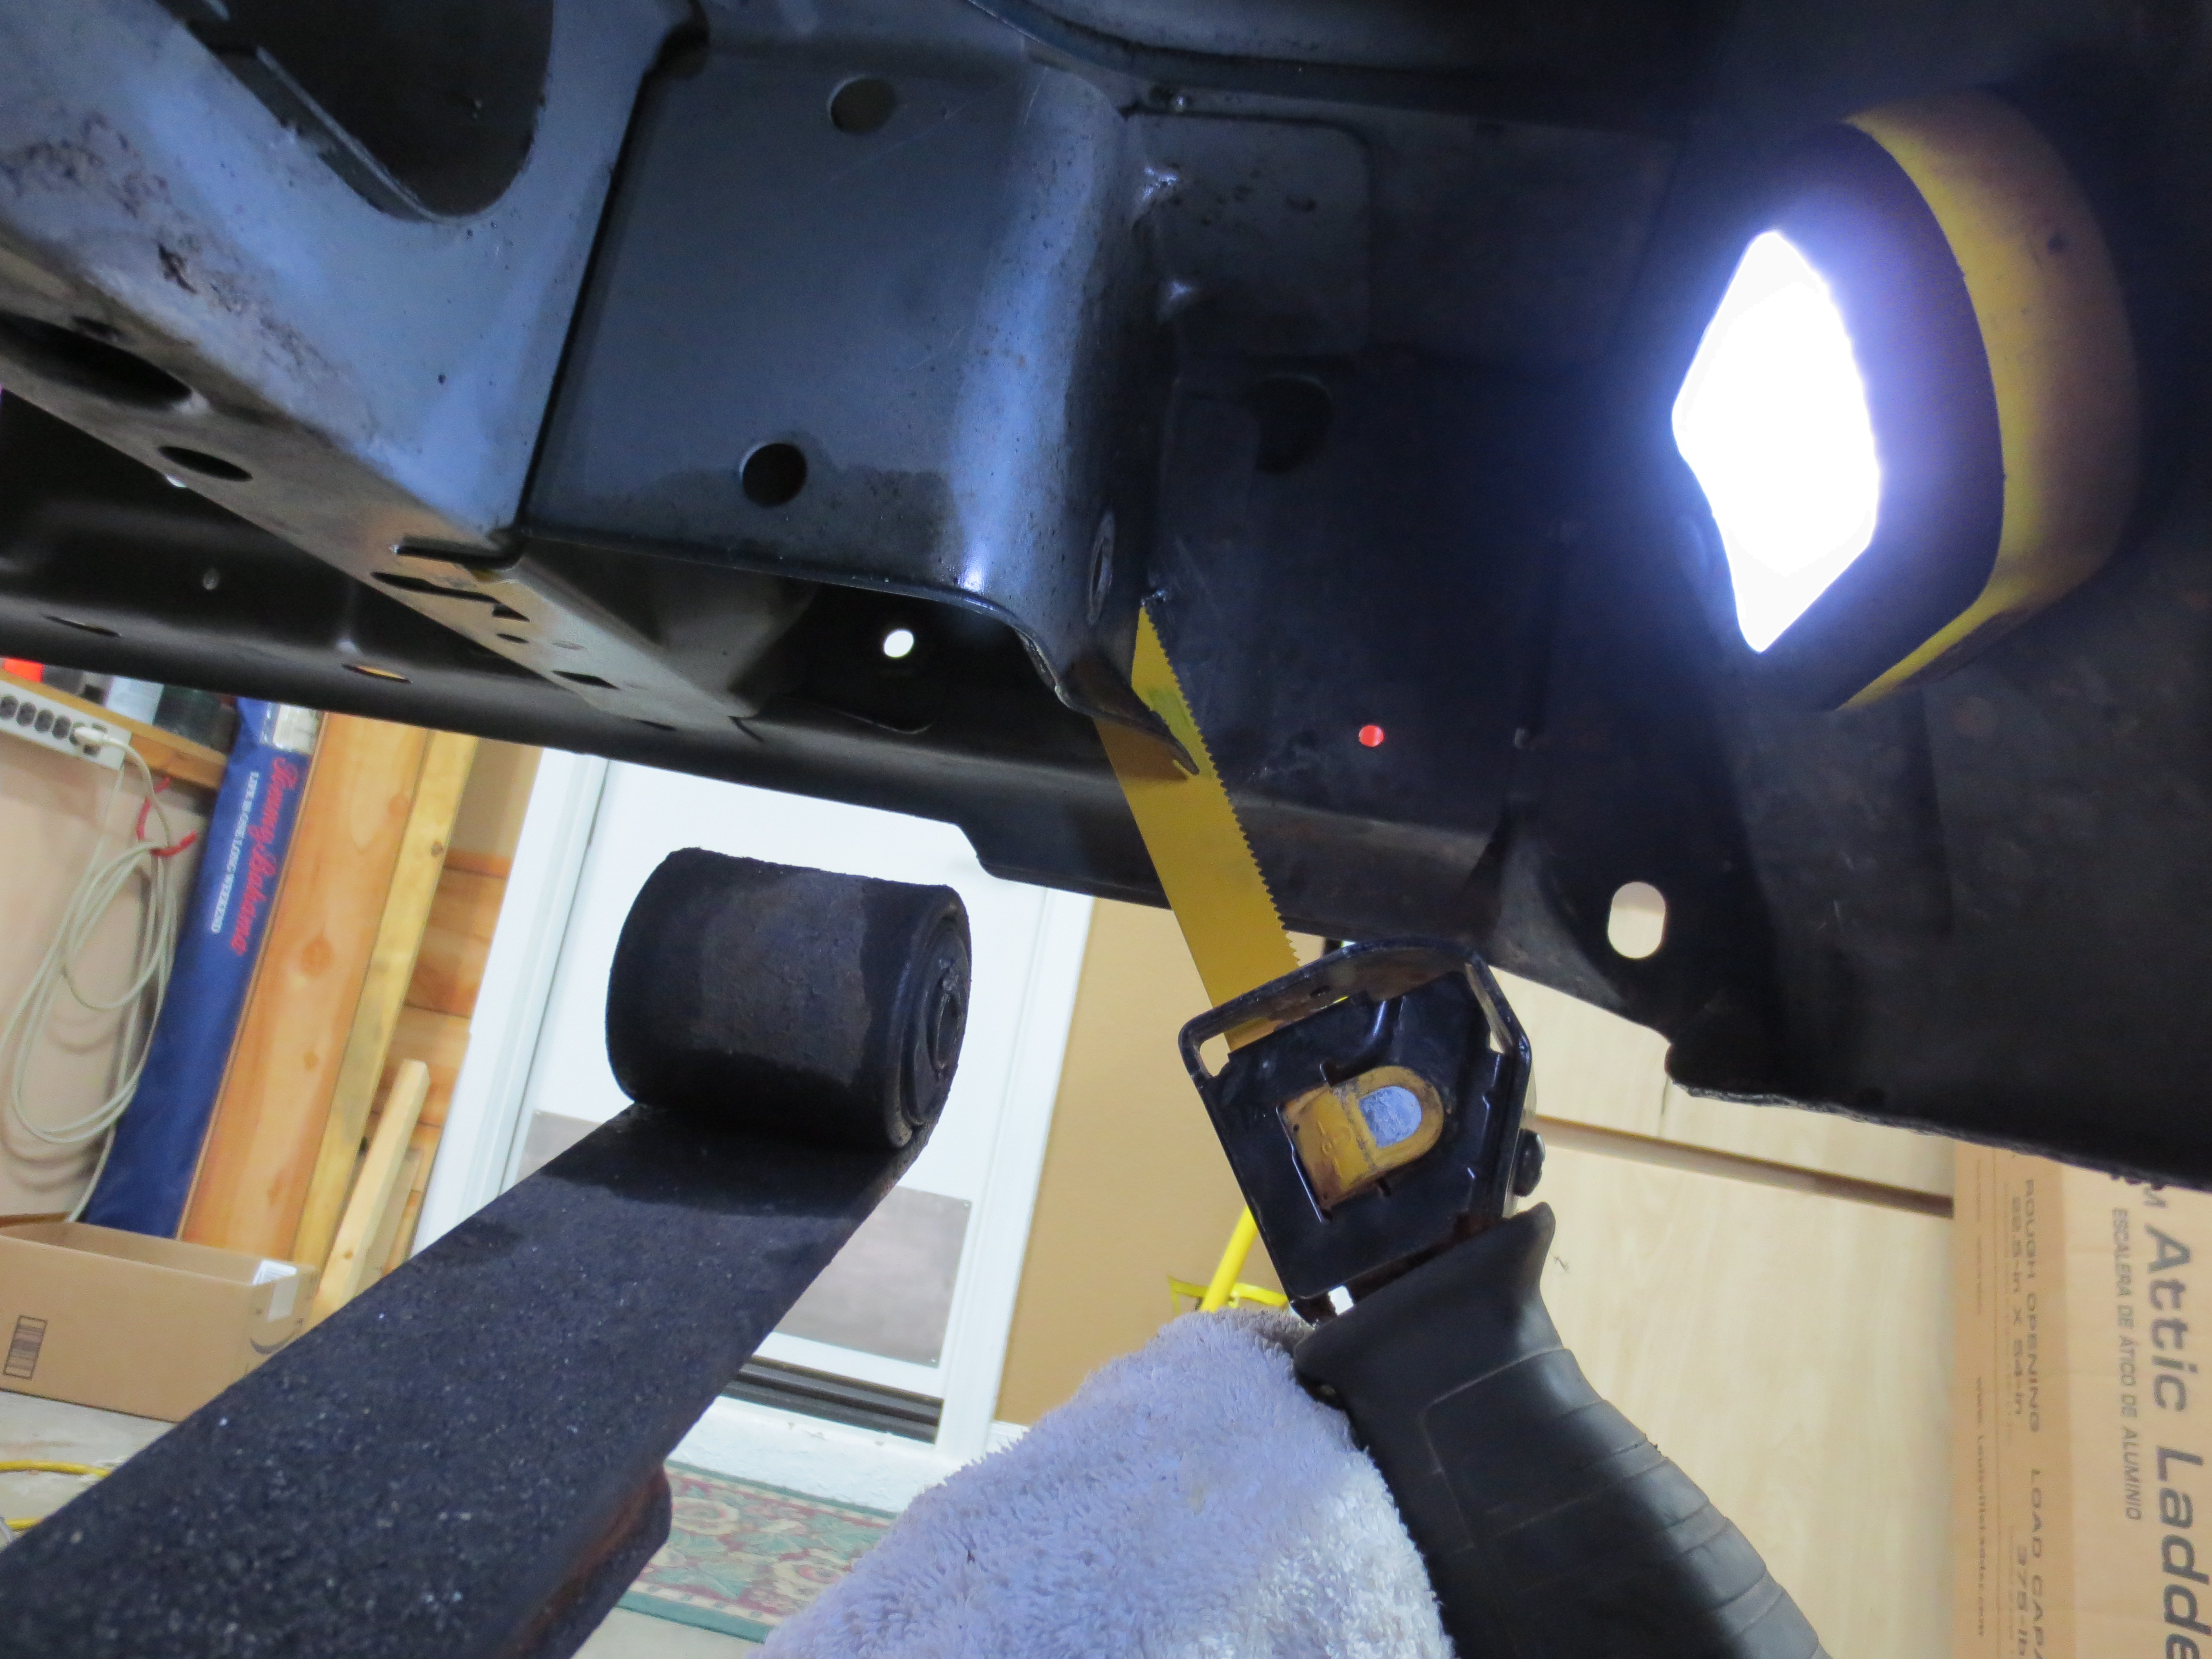
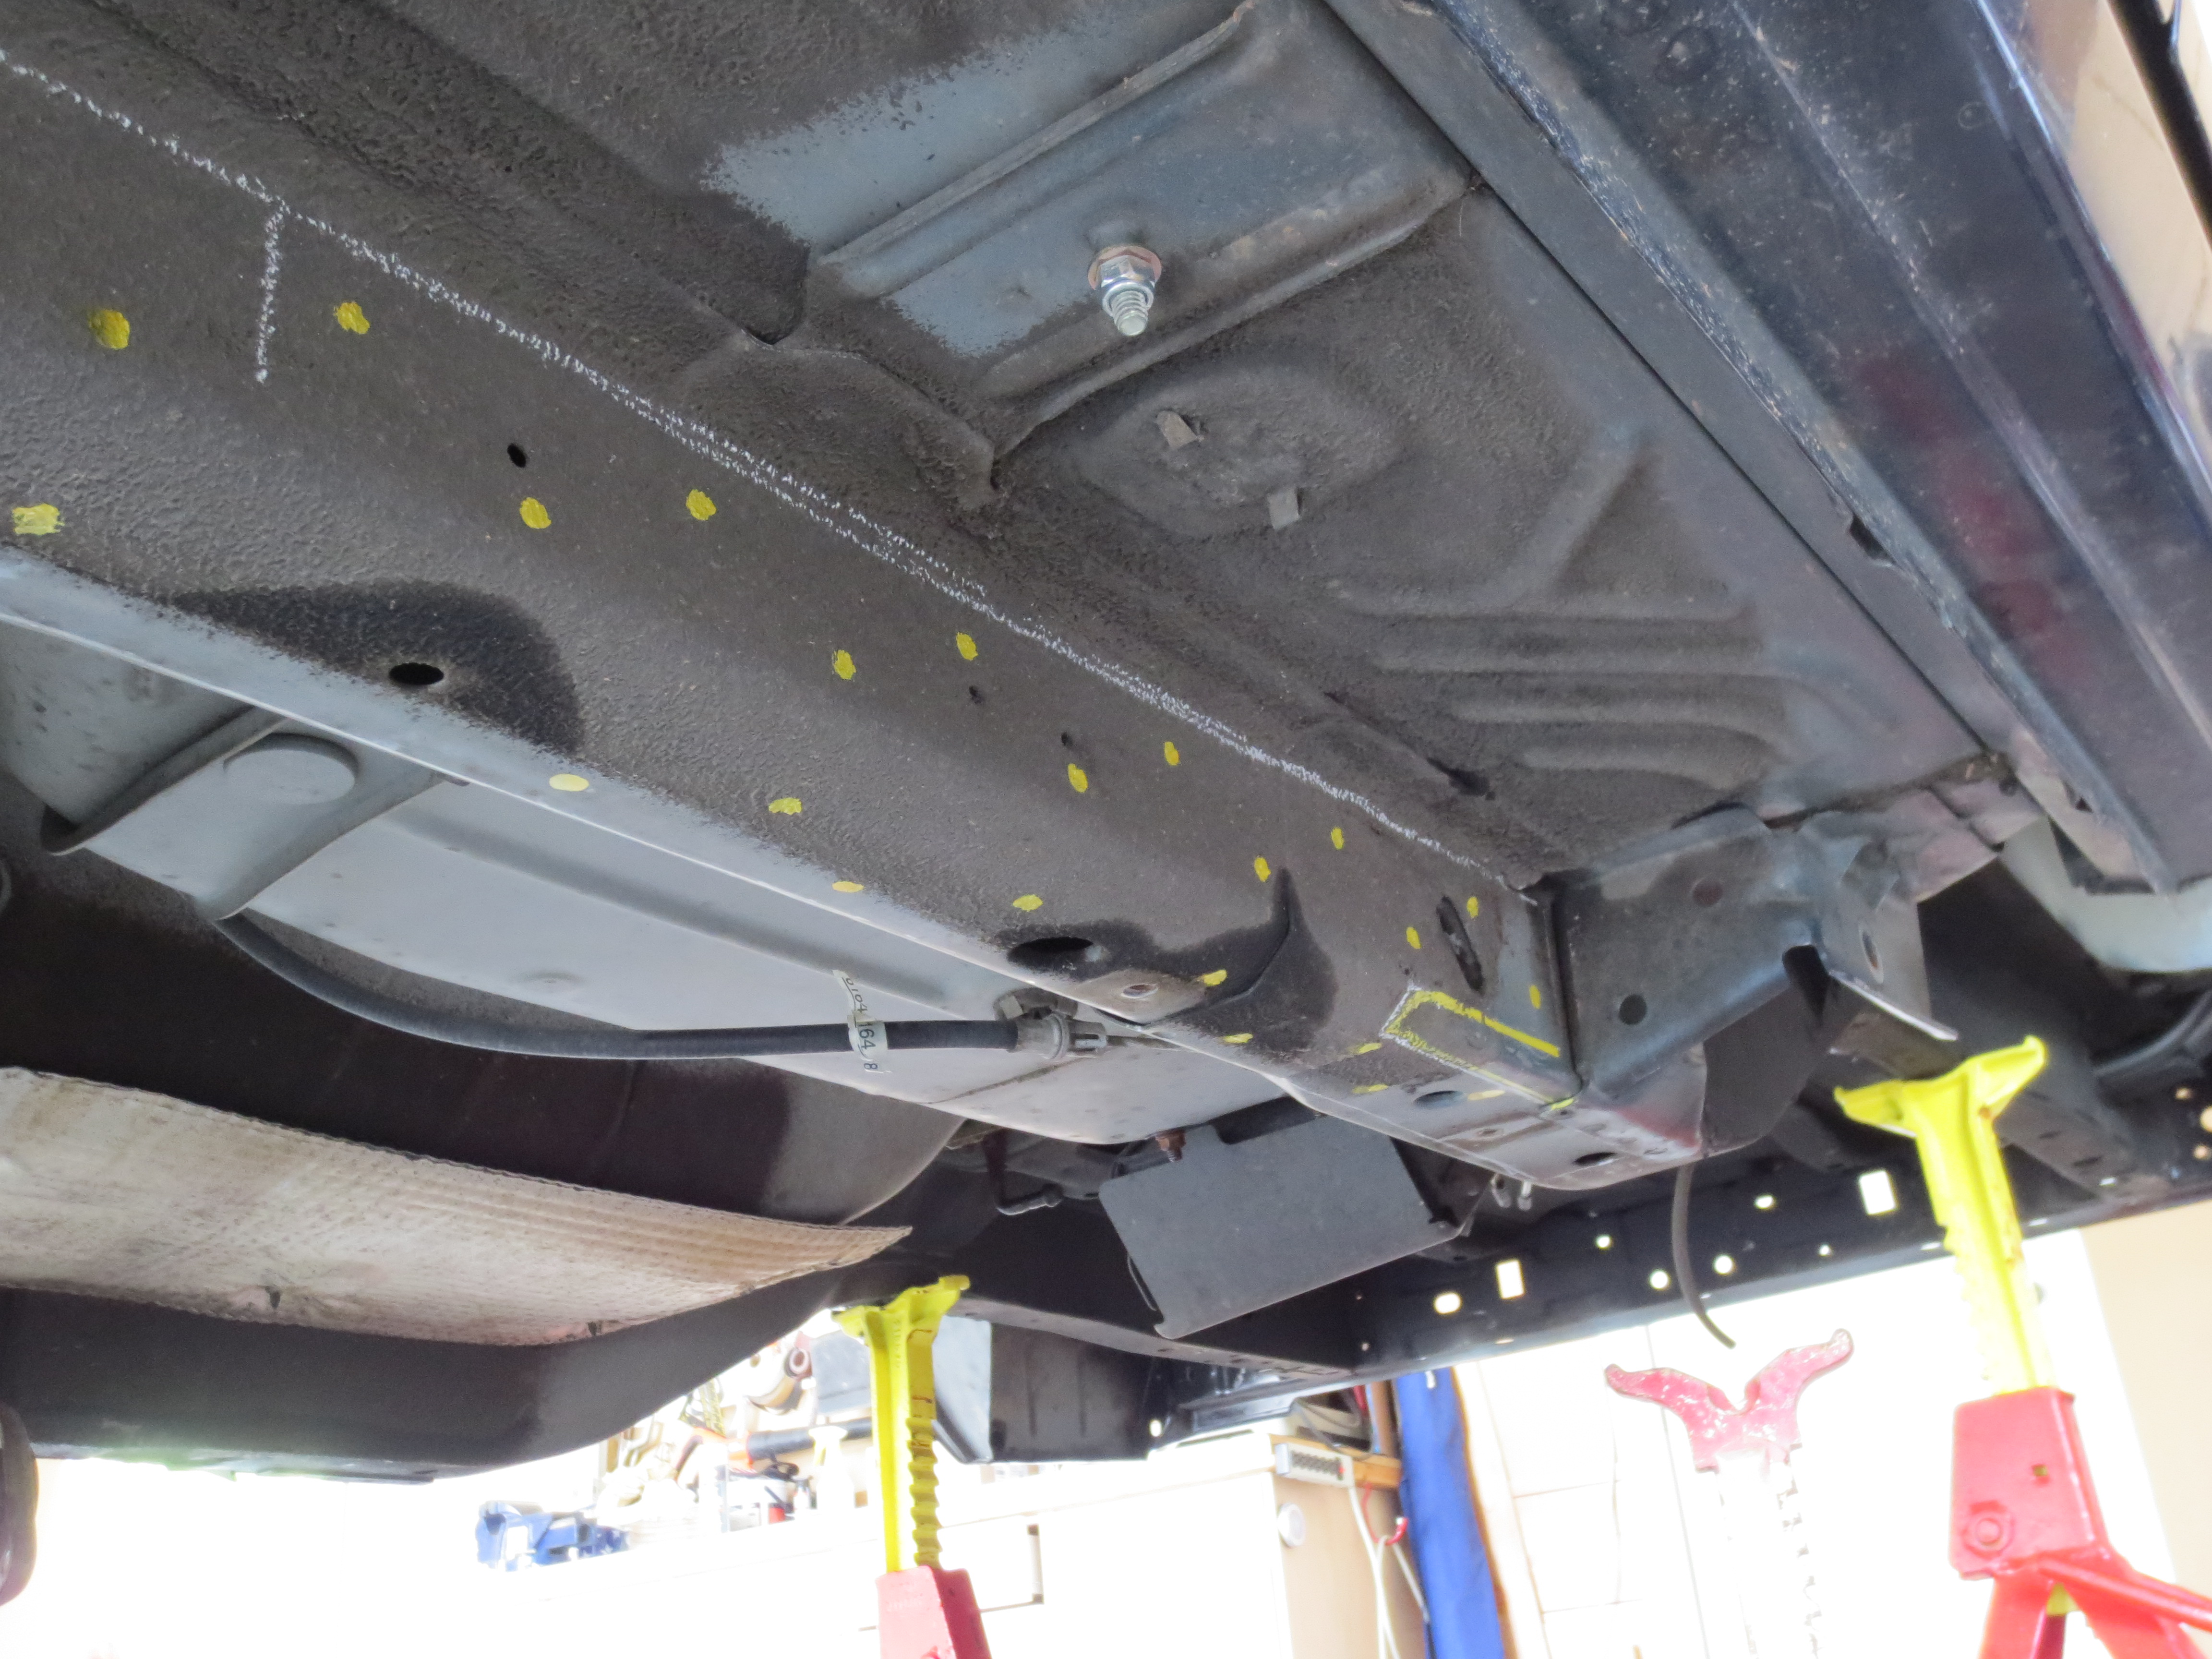
I've also installed the shackle relocation brackets. I did this on my 98, it was a little easier the second time around. I'd highly recommend these for anyone on the fence, they improved the ride on my 98 as the shackles were near vertical. I used a sawzall for all the cutting and barely had to grind any material away. It's much easier if you remove the fuel hoses, mine needed to be replaced anyways, but it makes it much easier cutting out the drivers side bracket. Here's a few pics...
Pass side just using sawzall
After sanding a little
Used a jack stand for leverage cutting upward, sorry for sideways pic
Harbor freight magnetic light works great here
Closer shot
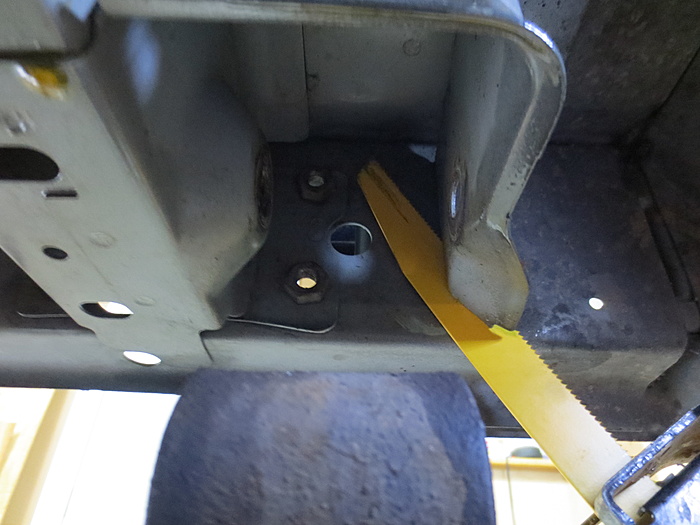
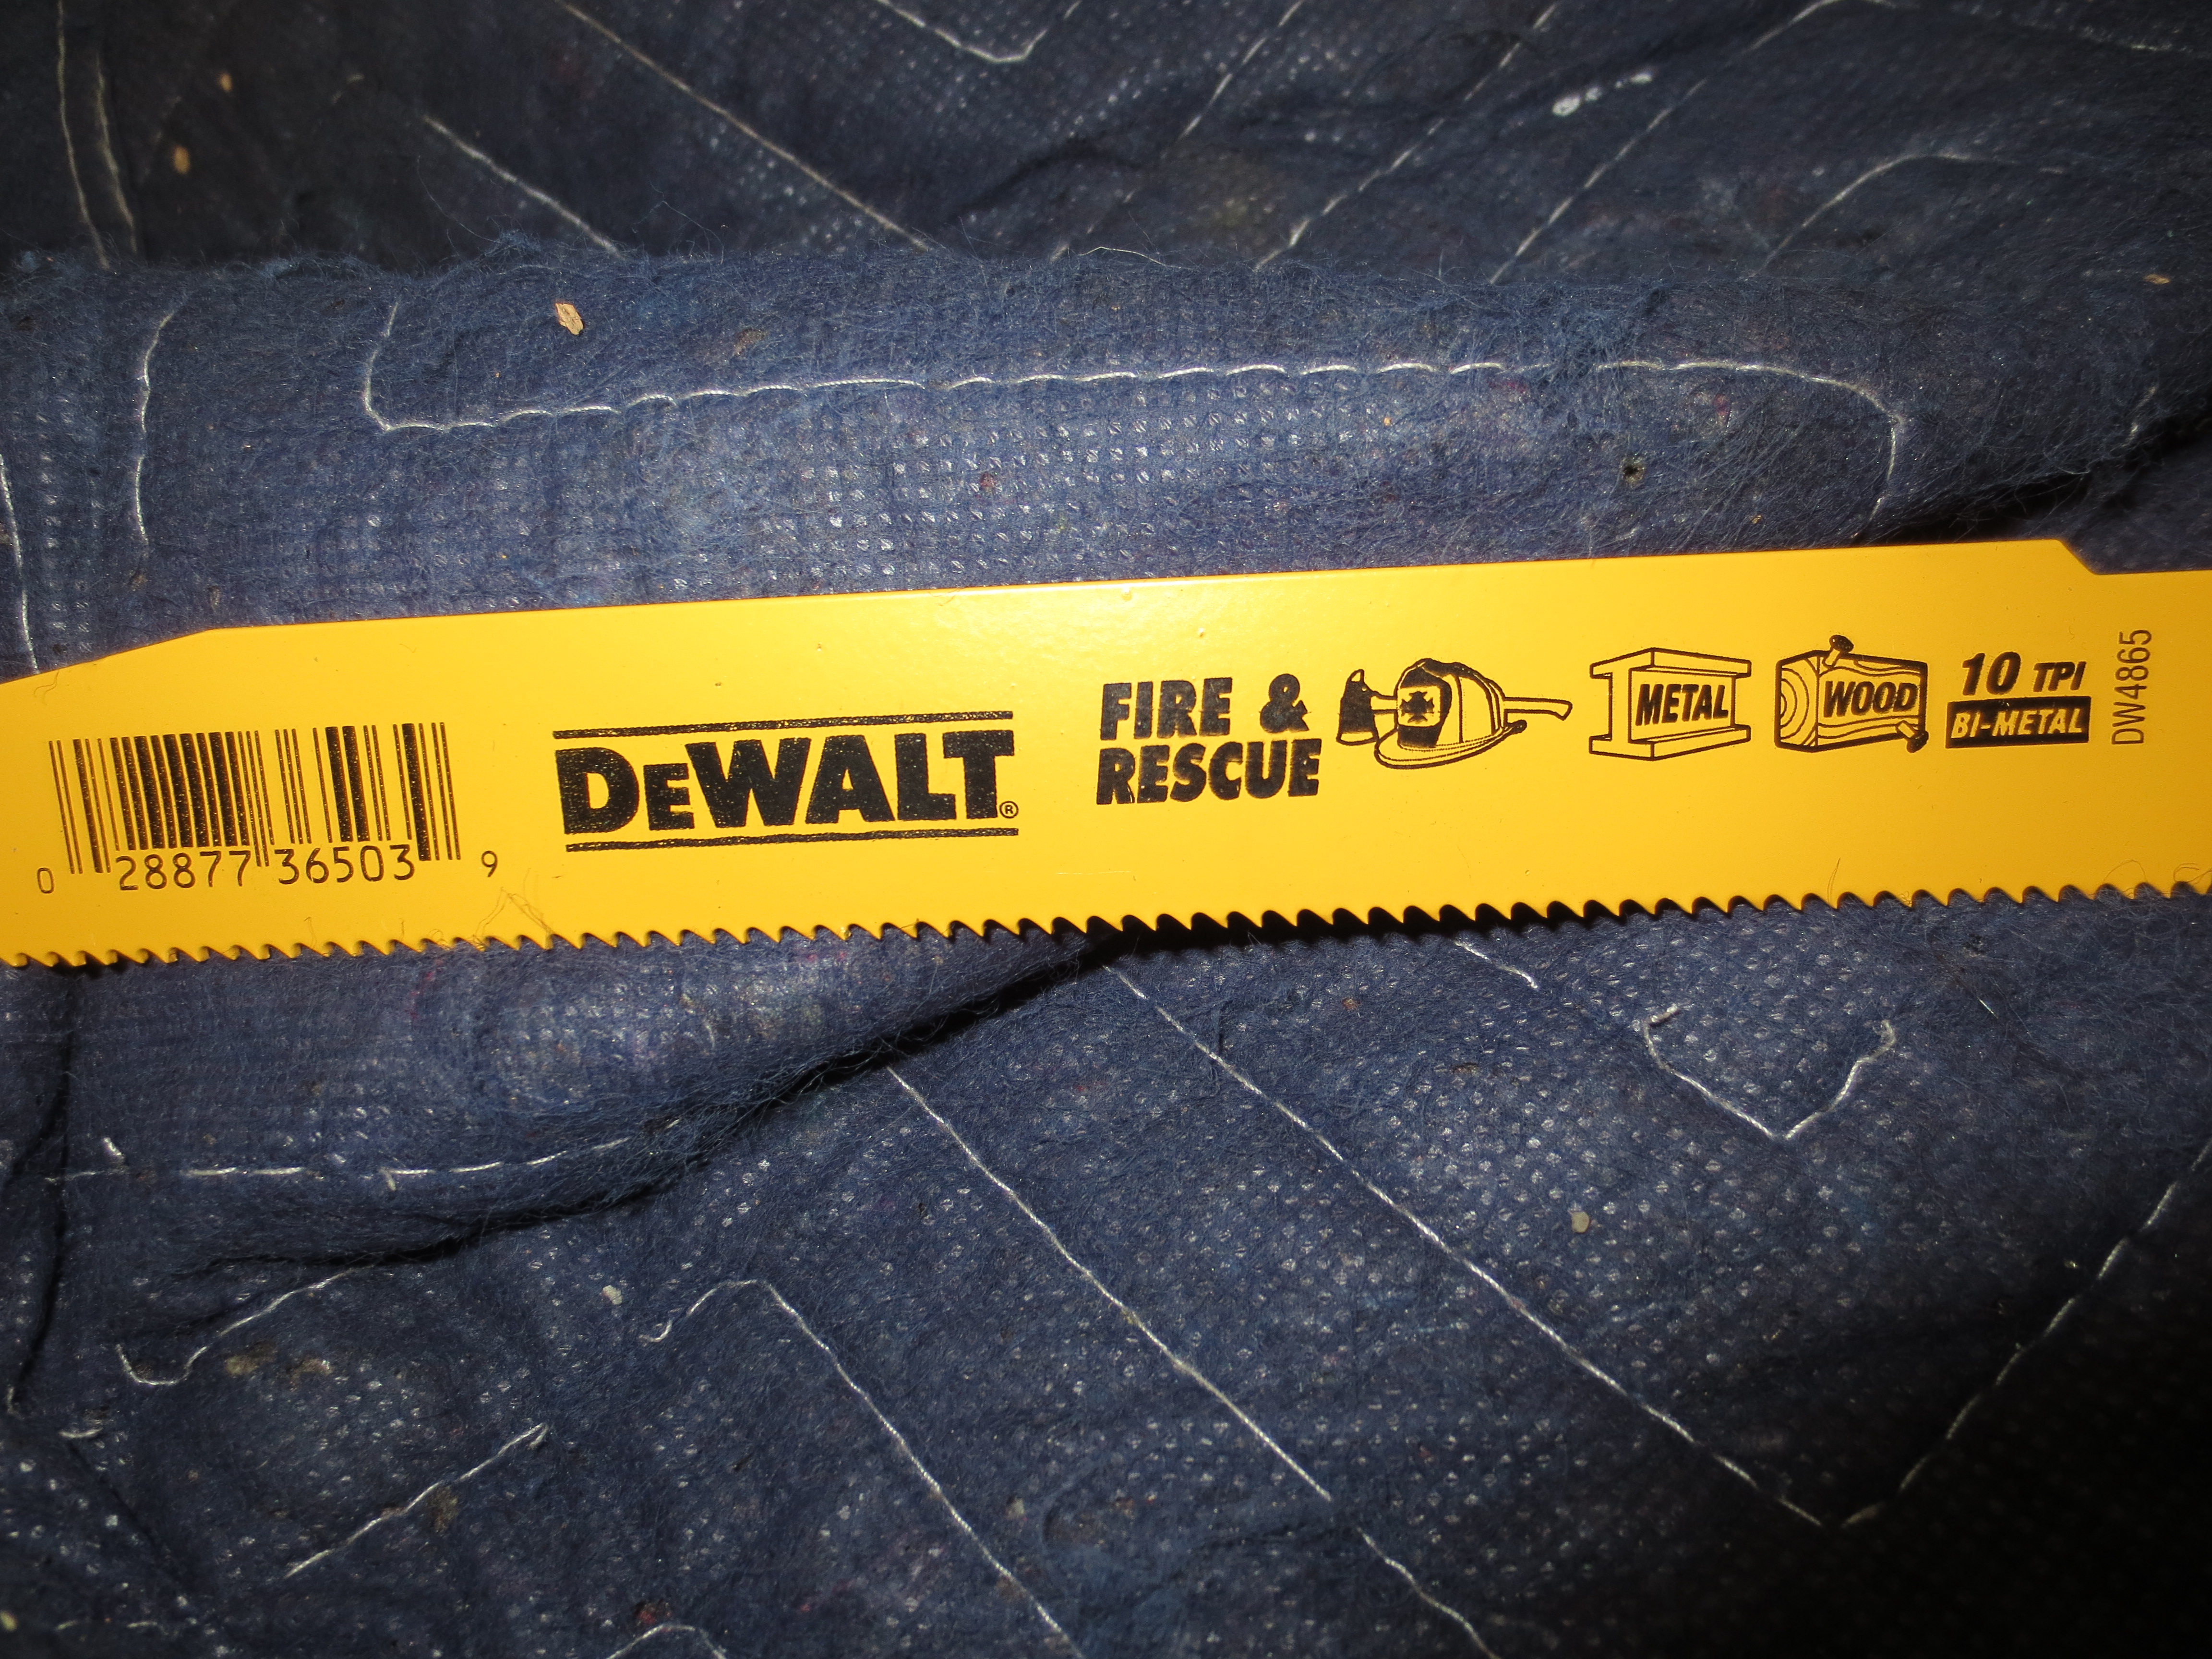
Here's the blade I used, worked great

Cutting upward couldn't get the top, had to reposition for closer cut
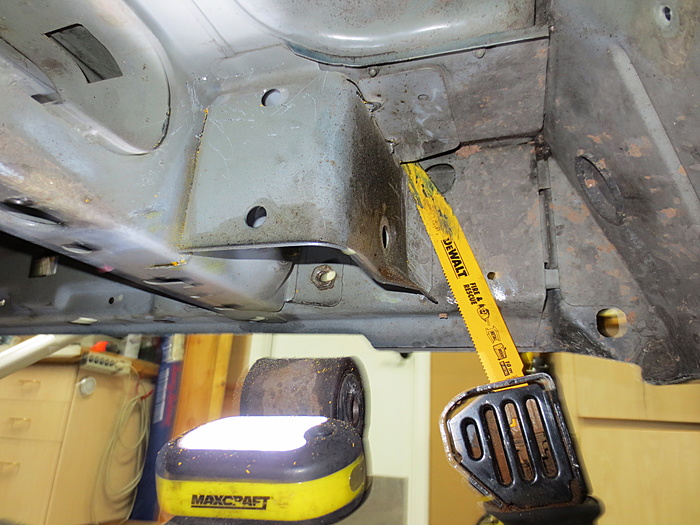
Bracket had to be clearanced

Now it fits

Both backing plates had to have corners cut
And now they fit as well
Drivers side ready for paint
That's it for now, hoping to start on frame stiffeners as soon as my welding cart is done.
Surprisingly my 98 sold pretty quick. I've been going back and forth on selling this 01 and making a profit and getting an older one to build. I just can't bring myself to cut up this XJ that is in such great shape. Of course, at the same time, that's exactly why I want this one, it's in amazing shape and clean and just more up to my standards. Then I wonder if it's too clean and I'll just be beating it up offroad and it won't matter how nice it was to begin with. I need to stop thinking and just build it!!!
Here it is when I first got it and gave it a quick detail, it's an 01 with 87k miles...
My plan is to build it to behave well on the street, I won't daily drive it, but I want it to be capable of it. I want it to be capable offroad, but I don't want to beat the hell out of it. That's my dilemma, I'm not sure how far to go with the build, I guess I just figure it out as I go.
I've already bought a few parts...
Dirtbound DIY front and rear bumpers
Cavfab 3-link (finally got shipping confirmation today!!
)Rear 8.8 with disc, LS and 4.10's (planning on running 33's)
HD offroad no lift shackle relocation kit
HD offroad frame stiffeners front to rear
Dodge Stealth front seats
Advanced Adapter SYE
Rubicon Express track bar with bracket and brace
Rubicon Express 4.5" coils
Ironrock 3.5" leafs
Ironrock adjustable shackles (thinking about doing BWE comp shackles)
Various sound system components
I'm sure I'm missing a few things, I've been collecting parts for about 5 or 6 months now.
I plan to build a custom tire carrier.
Not sure about rock sliders, possibly do rocker mod with 2x6 tubing.
I want to swap in an HP30 or 44 with 4.10's, but I'm finding it next to impossible to find! Anyone know of anything available in AZ or SoCal?
Thinking about doing the 2 low kit.
I've done a few little things to it so far. It has been on hold for a while as I needed to finish a few projects around the house before I get in deep. I recently finished wiring my garage with 220 for my new welder. In the process of building a new welding cart right now as well.
Of course I'll be dealing with extreme heat in a couple months and probably won't want to work on it much, so this could be a long build!
Anyways, first thing I did when I got it was swap the seats with some Dodge Stealth seats, they are so much more comfortable and I got them to sit lower than stock. It was pretty tough to modify the brackets and I had to clearance the center hump a bit, but they finally fit and I think they look awesome as well. Only thing I might do is push the drivers seat back a little more, I want a little more room to be more comfortable. We'll see if I ever get around to that though.

I've also installed the shackle relocation brackets. I did this on my 98, it was a little easier the second time around. I'd highly recommend these for anyone on the fence, they improved the ride on my 98 as the shackles were near vertical. I used a sawzall for all the cutting and barely had to grind any material away. It's much easier if you remove the fuel hoses, mine needed to be replaced anyways, but it makes it much easier cutting out the drivers side bracket. Here's a few pics...
Pass side just using sawzall
After sanding a little

Used a jack stand for leverage cutting upward, sorry for sideways pic

Harbor freight magnetic light works great here
Closer shot


Here's the blade I used, worked great
Cutting upward couldn't get the top, had to reposition for closer cut


Bracket had to be clearanced
Now it fits
Both backing plates had to have corners cut

And now they fit as well

Drivers side ready for paint

That's it for now, hoping to start on frame stiffeners as soon as my welding cart is done.

Thread Starter
Member
Joined: Jan 2017
Posts: 125
Likes: 2
From: Anthem, AZ
Year: 2001
Model: Cherokee
Today didn't go as planned, was hoping to get my welding cart done besides paint, but my belt sander doesn't want to cooperate, so I can't even think about finishing it. On the hunt for a good used belt sander now, hopefully I can get one tomorrow.
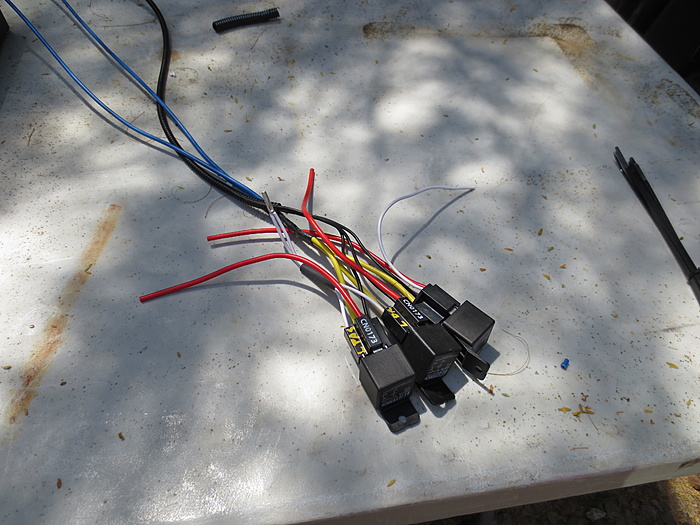
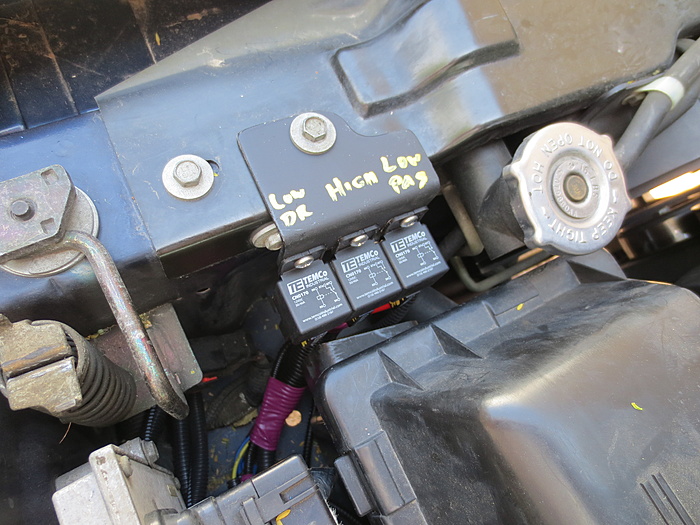
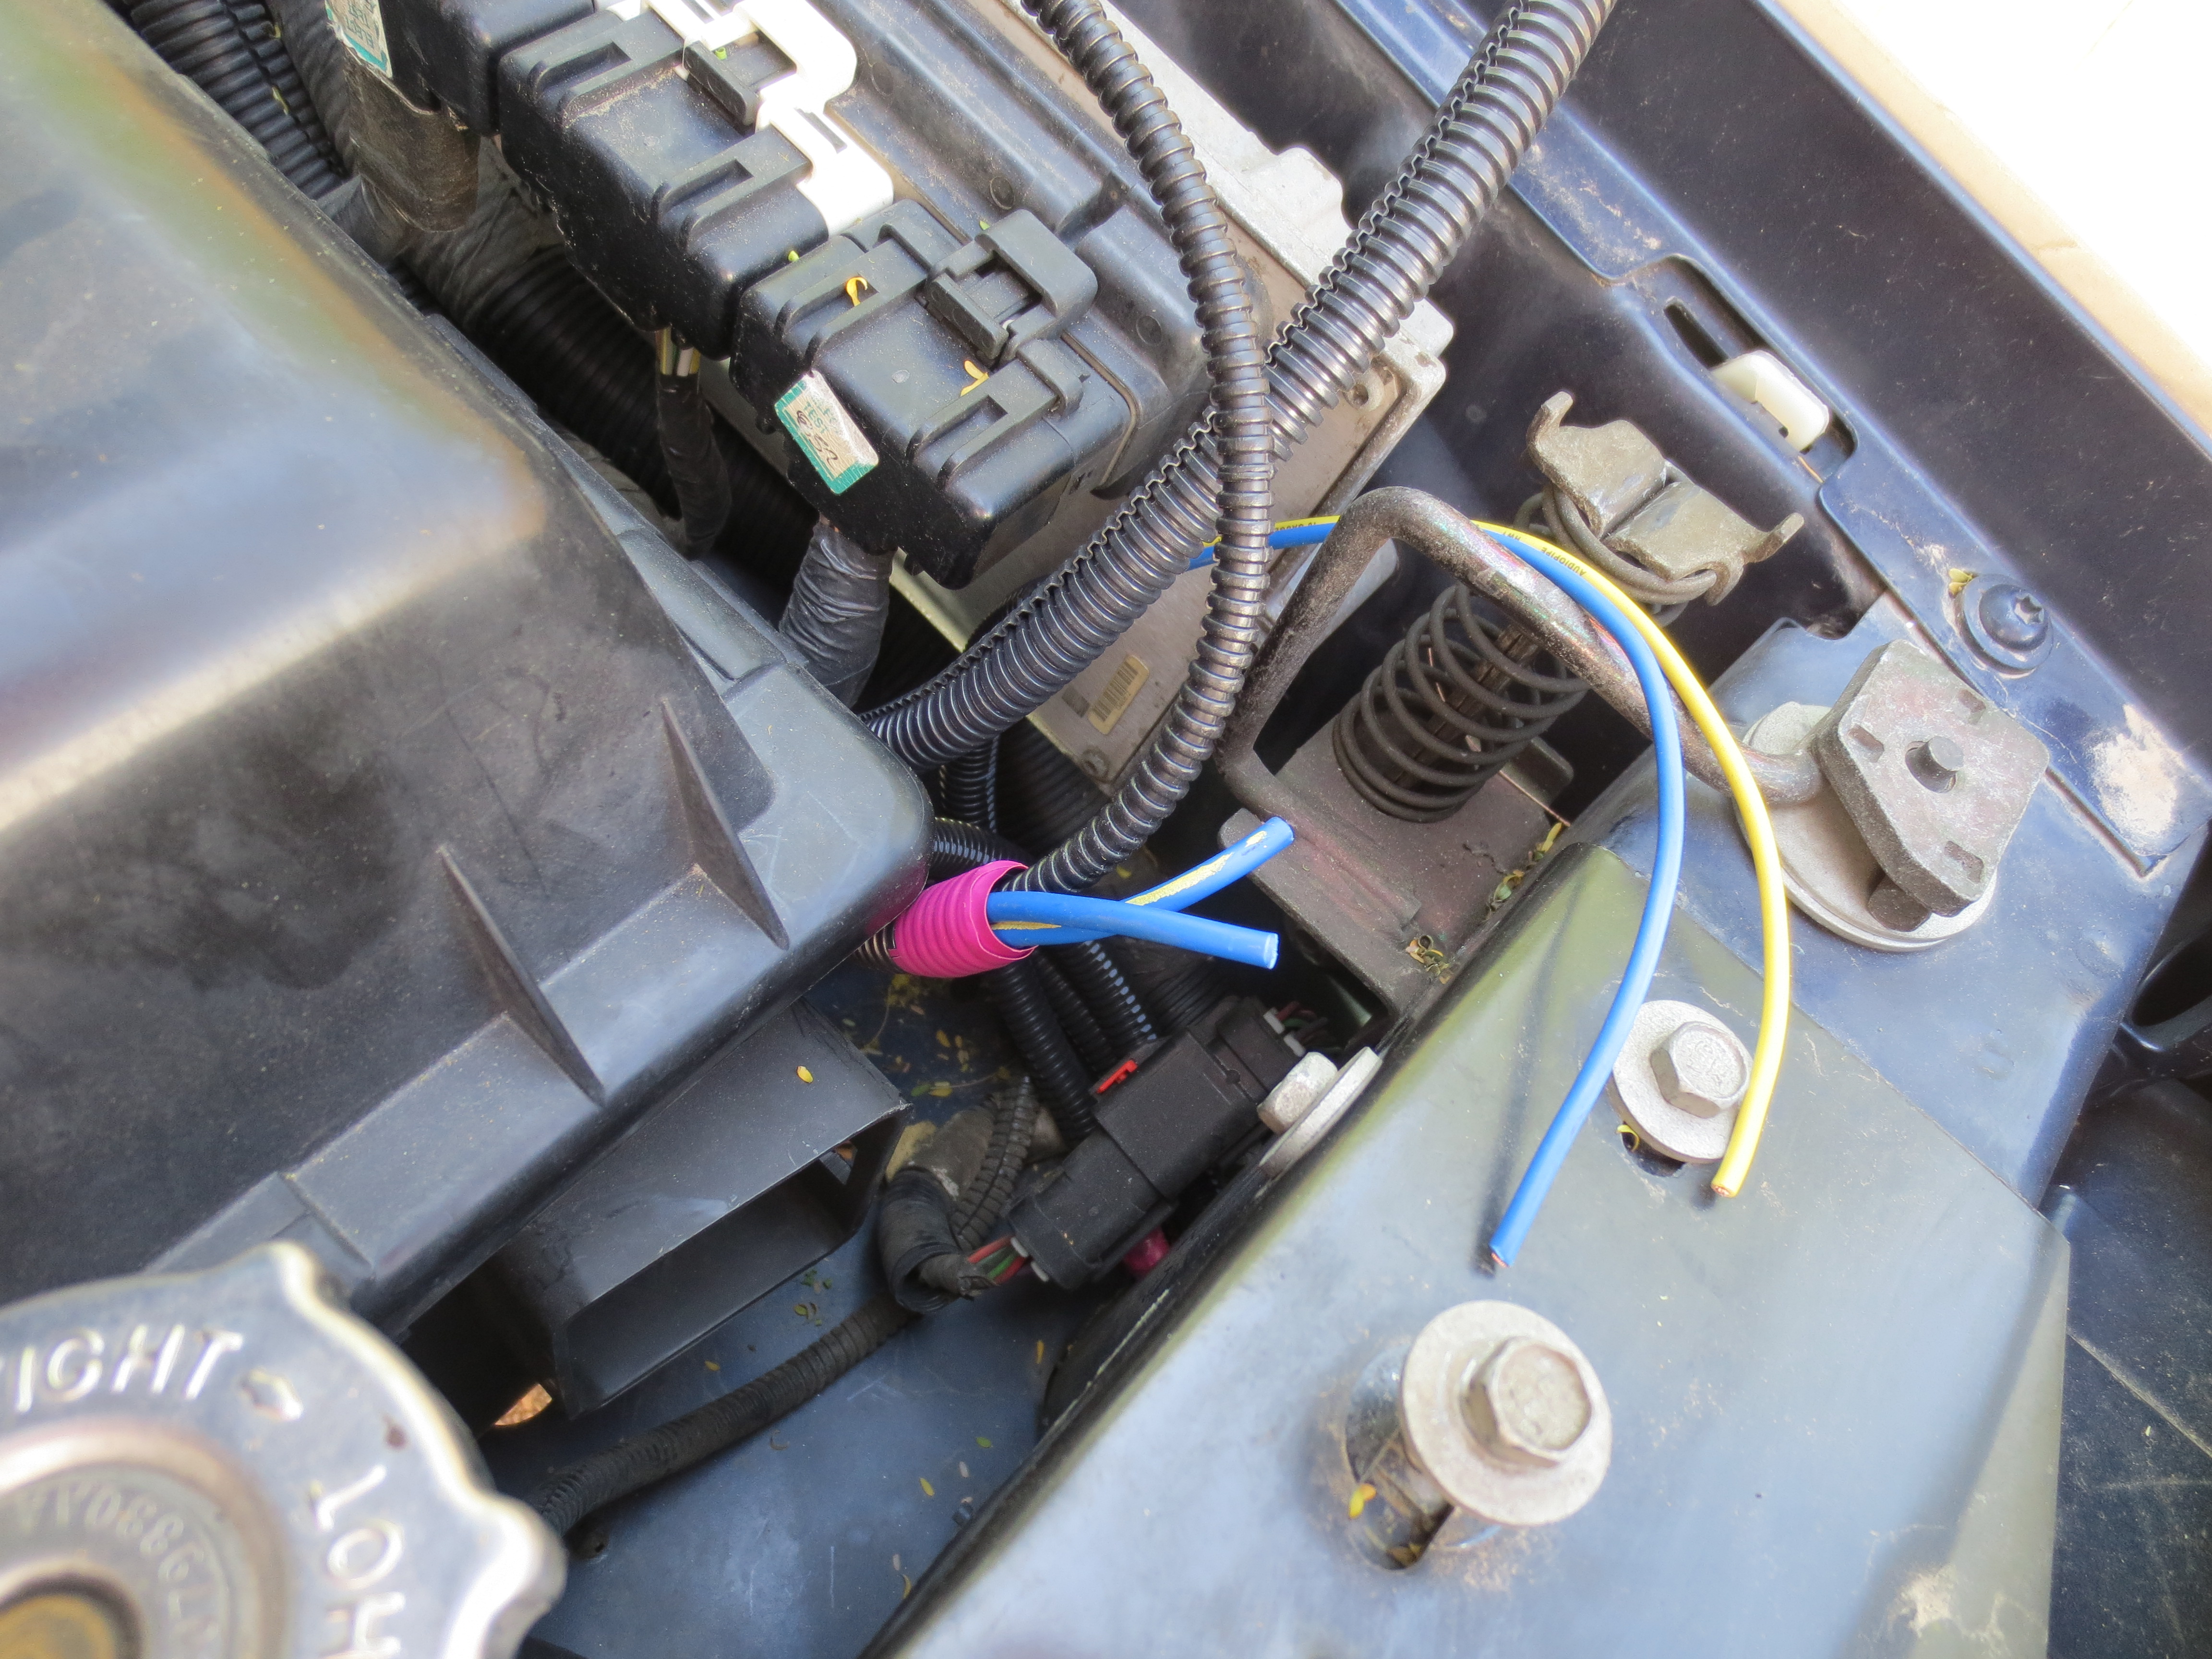
Decided to work on a headlight harness since I'm at a stand still on any welding. I was going to buy one of the upgraded ones, but decided to make my own. I wanted to have separate relays for the low beams, so if one dies, I'll still have one light at least. Also found a good place to mount the relays right behind the drivers side headlight. Almost done with the harness, but still finishing up the bracket to hold the relays and still have to mount a fuse box on the firewall.
I didn't take any pictures today, hopefully have a few when the harnesses are installed showing where I ran them and the relays.
Seasoned Member
Joined: Jul 2015
Posts: 366
Likes: 4
From: WV
Year: 97
Model: Cherokee(XJ)
Engine: 4.0
Subscribed! Very well documented and nice pics on the shackle relocaters. The one thing that I'm really not looking forward to and dred doin is the frame stiffeners, so I hope you take us thru the whole process.
Thread Starter
Member
Joined: Jan 2017
Posts: 125
Likes: 2
From: Anthem, AZ
Year: 2001
Model: Cherokee
As far as the frame stiffeners, I read through many builds seeing different ways to tackle that project, the best I found is this Unibody Welding Bible, some good info, well worth the read...
http://mallcrawlin.com/forum/showthr...-Welding-Bible
Thread Starter
Member
Joined: Jan 2017
Posts: 125
Likes: 2
From: Anthem, AZ
Year: 2001
Model: Cherokee
Not much progress today, sometimes I hate Craigslist and sometimes it works out in the end! I wasted part of yesterday and half the day today trying to deal with the seller of a belt sander, but in the end, I was able to pick it up, so it was worth it, but it shouldn't have taken so long!! It's way better than what I was using before, I was able to mount it to my shopsmith just to use for now, I'll make a base for it at some point, but for now it works great as is. Made quick work of cleaning the edges of the shelves for my cart.
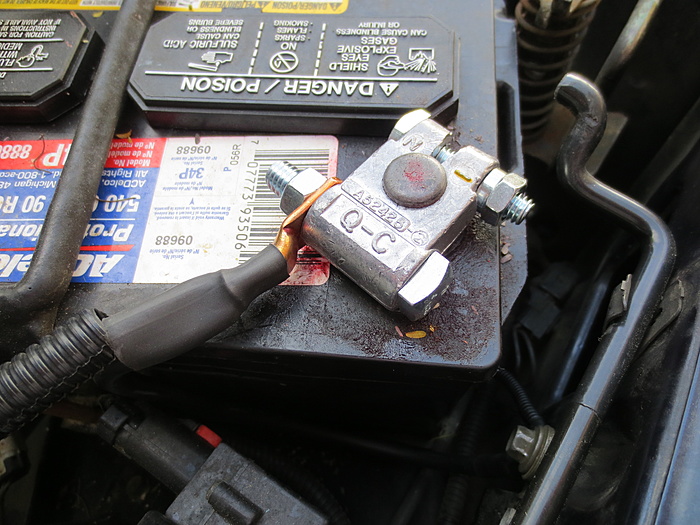
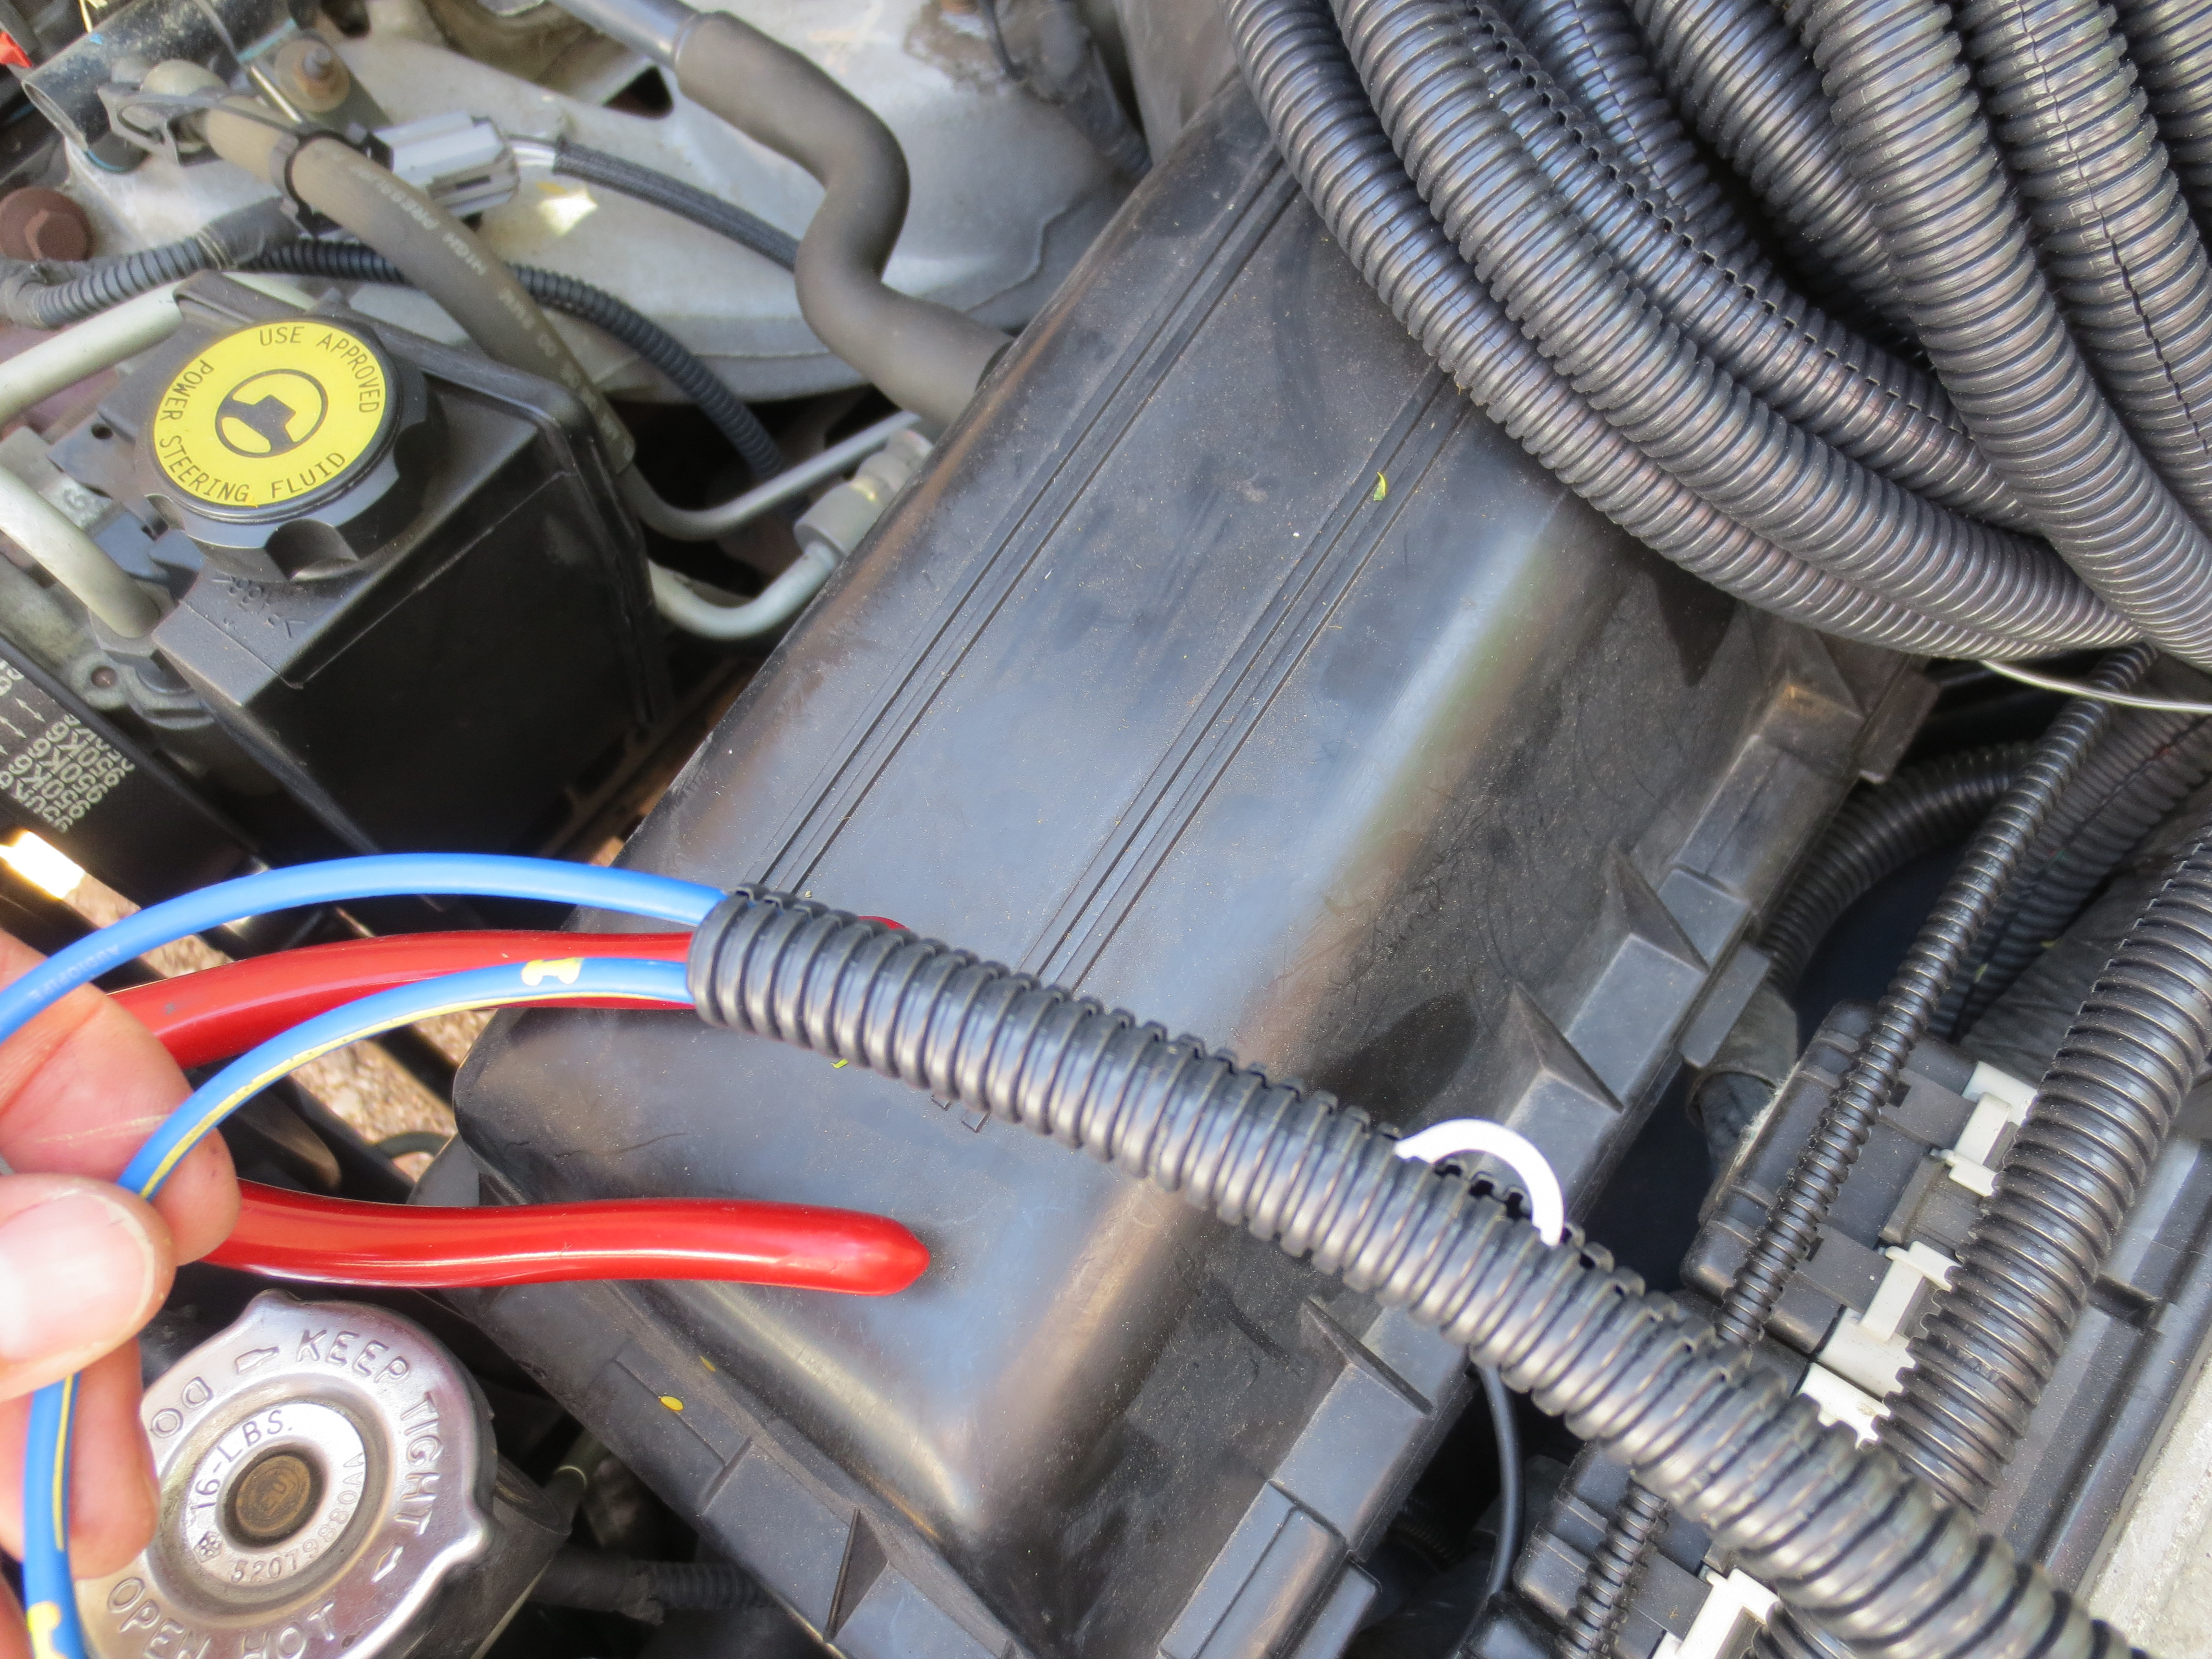
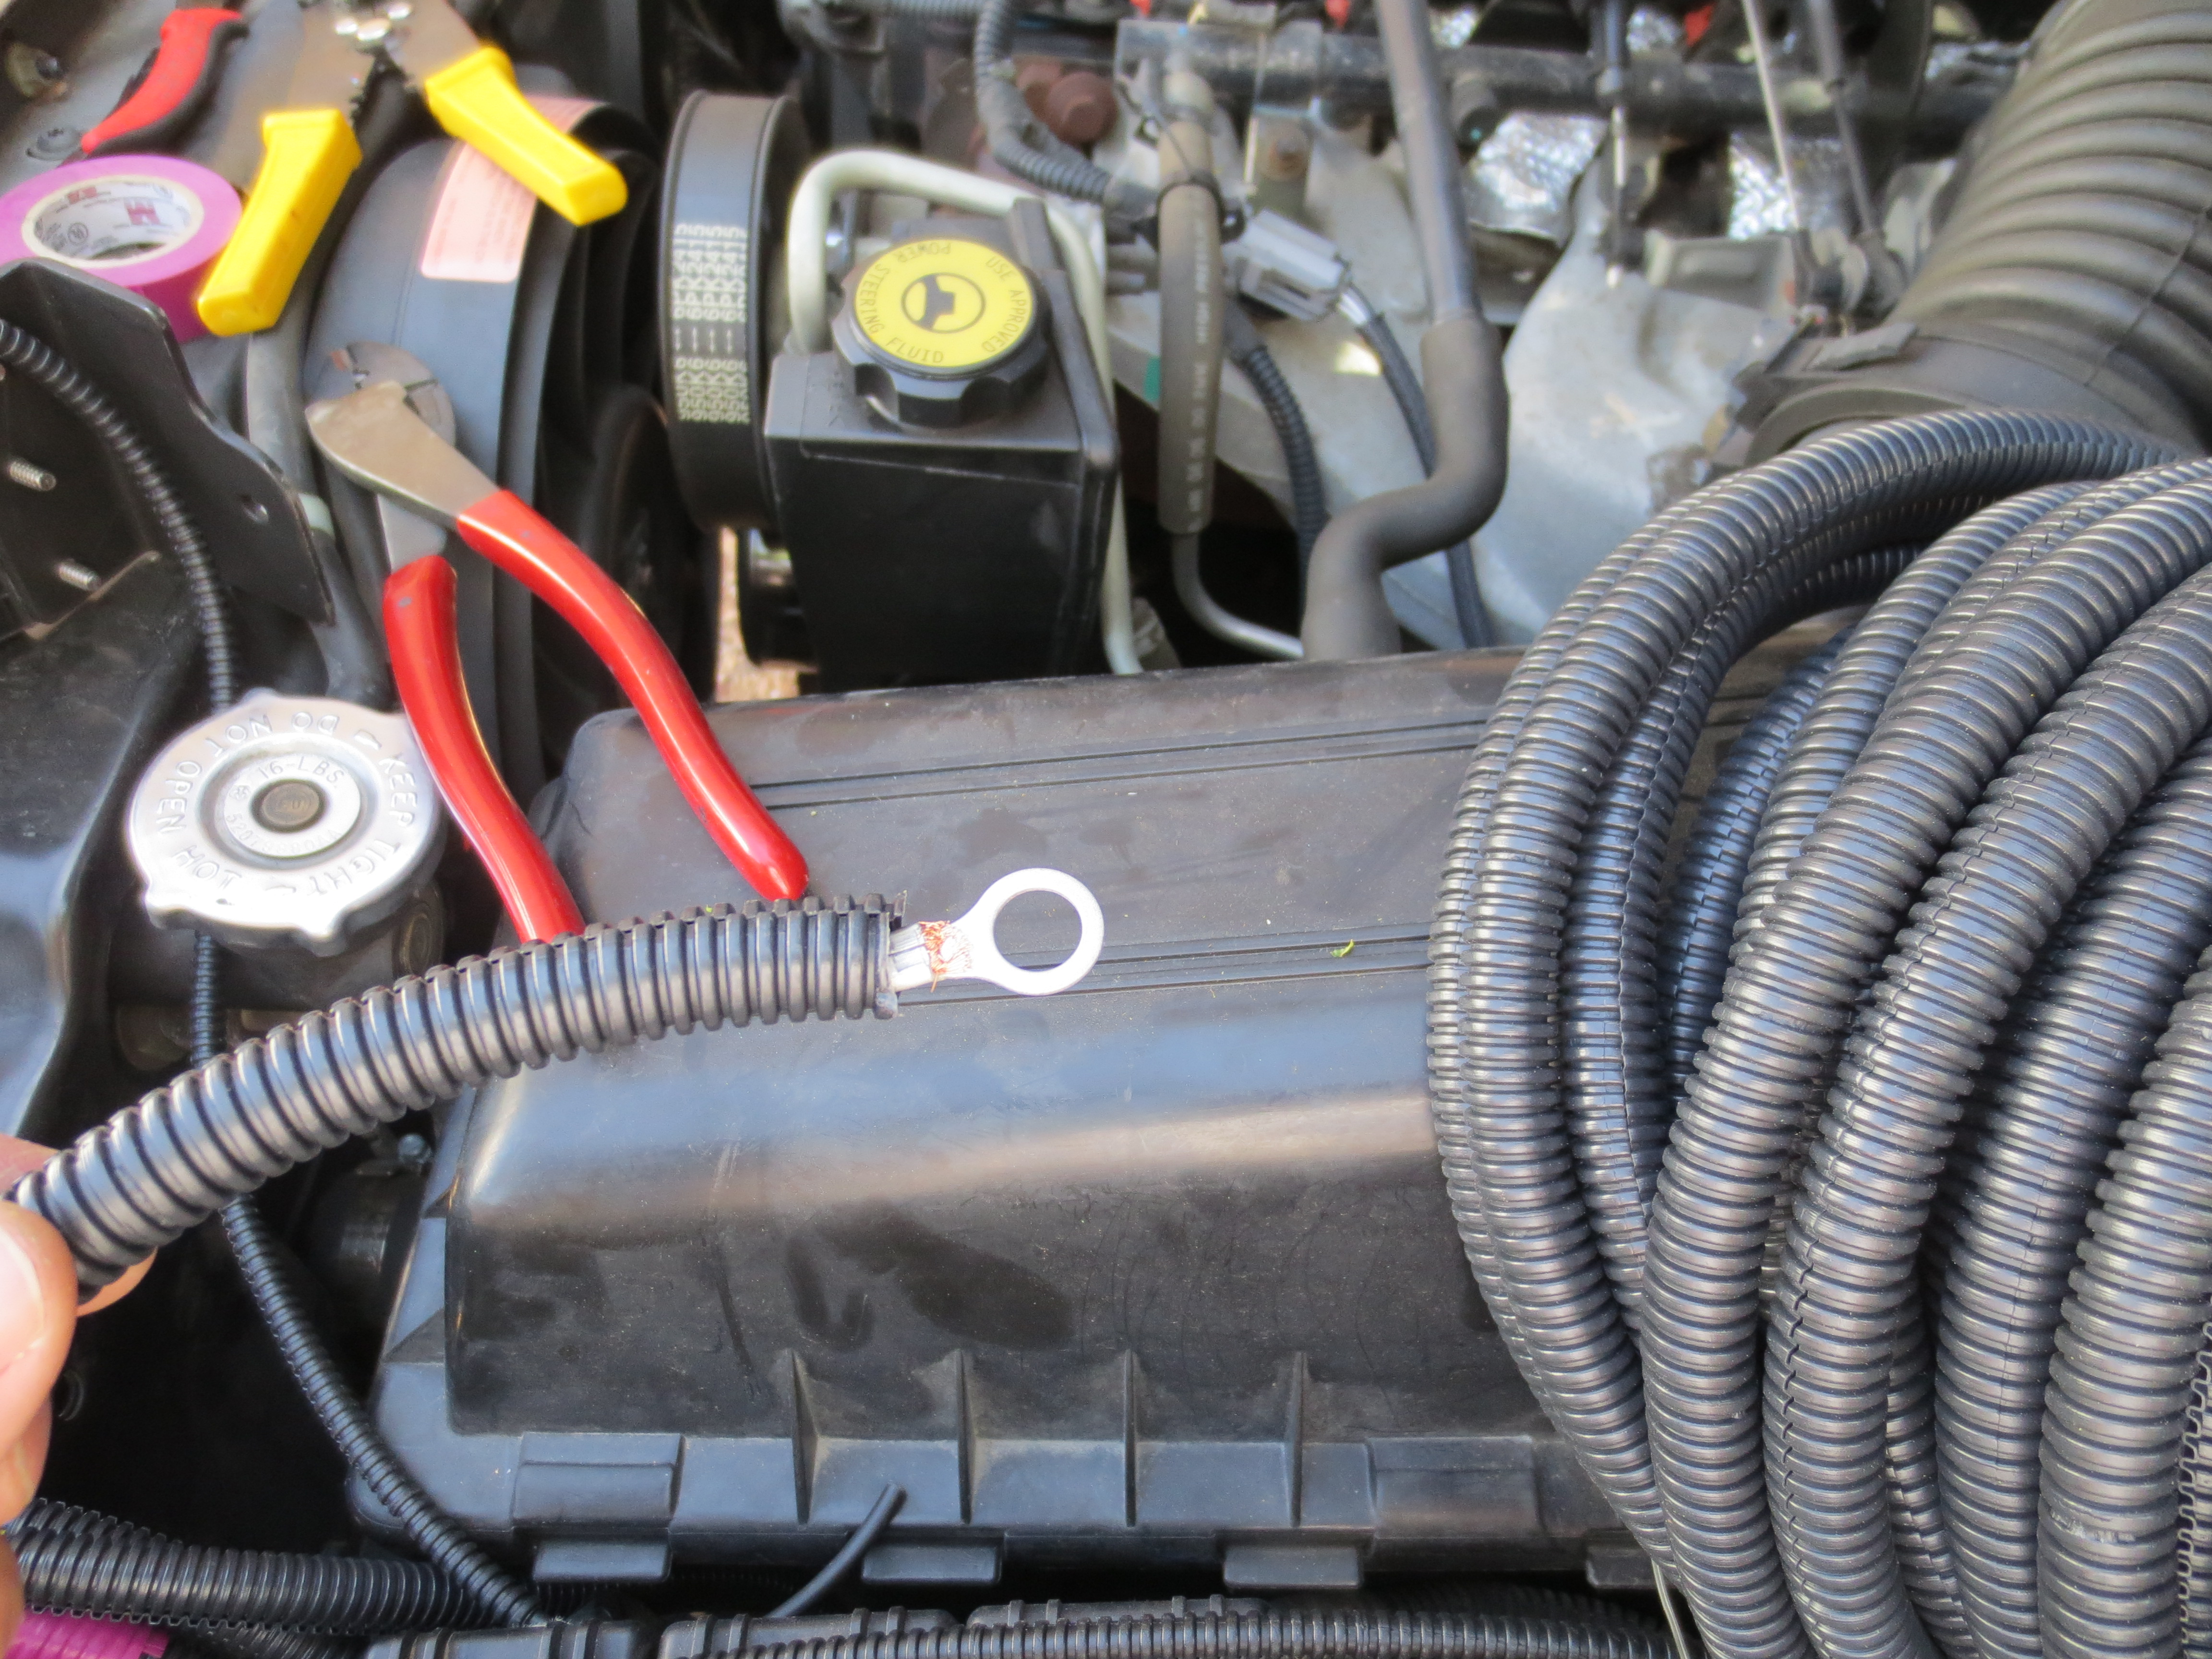
I finished the headlight harness for the most part, just need to find a fuse box and hook them up, hopefully I wired them up right! Also upgraded the ground wire from the battery to the body and changed the battery terminal. Still have to do the positive side, but I'll do that when I figure out what other power wires I need to run.
On to some pics...
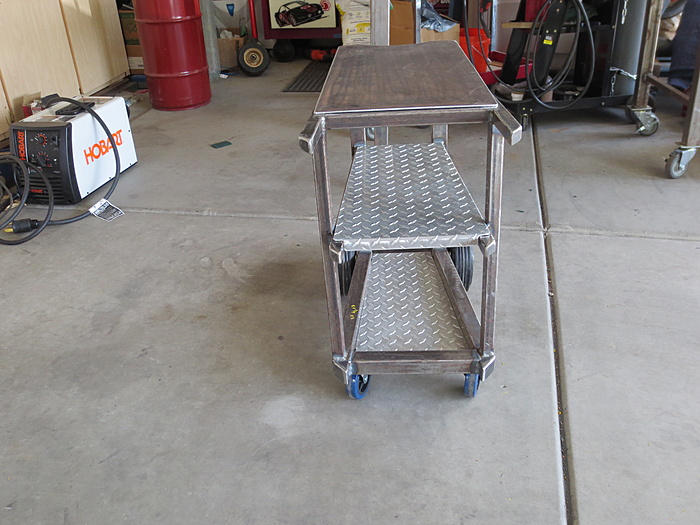
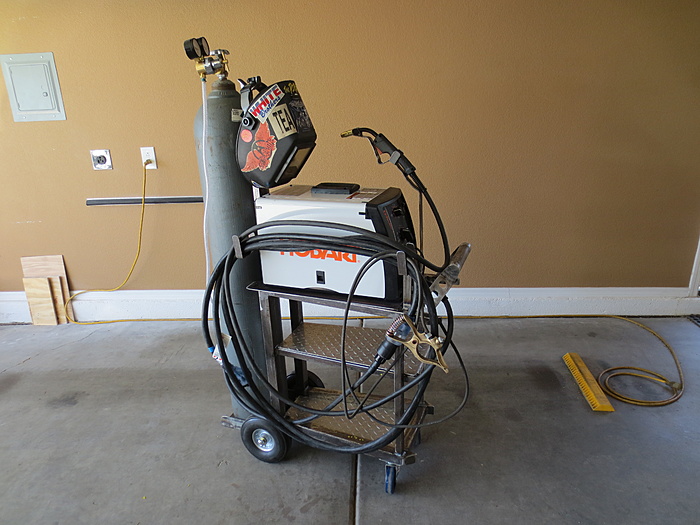
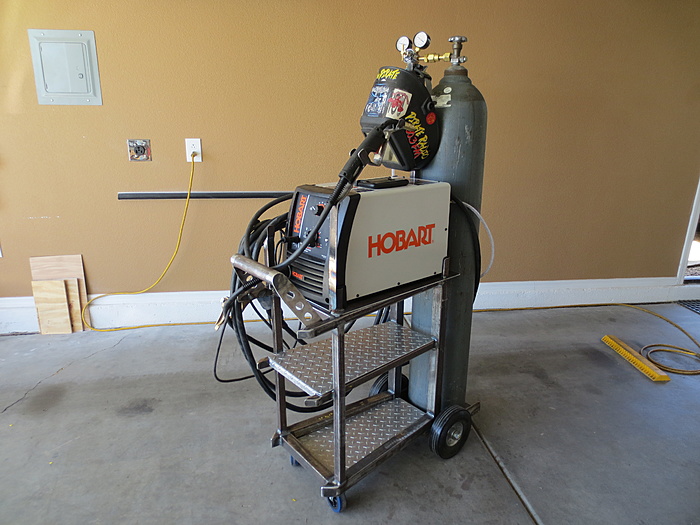
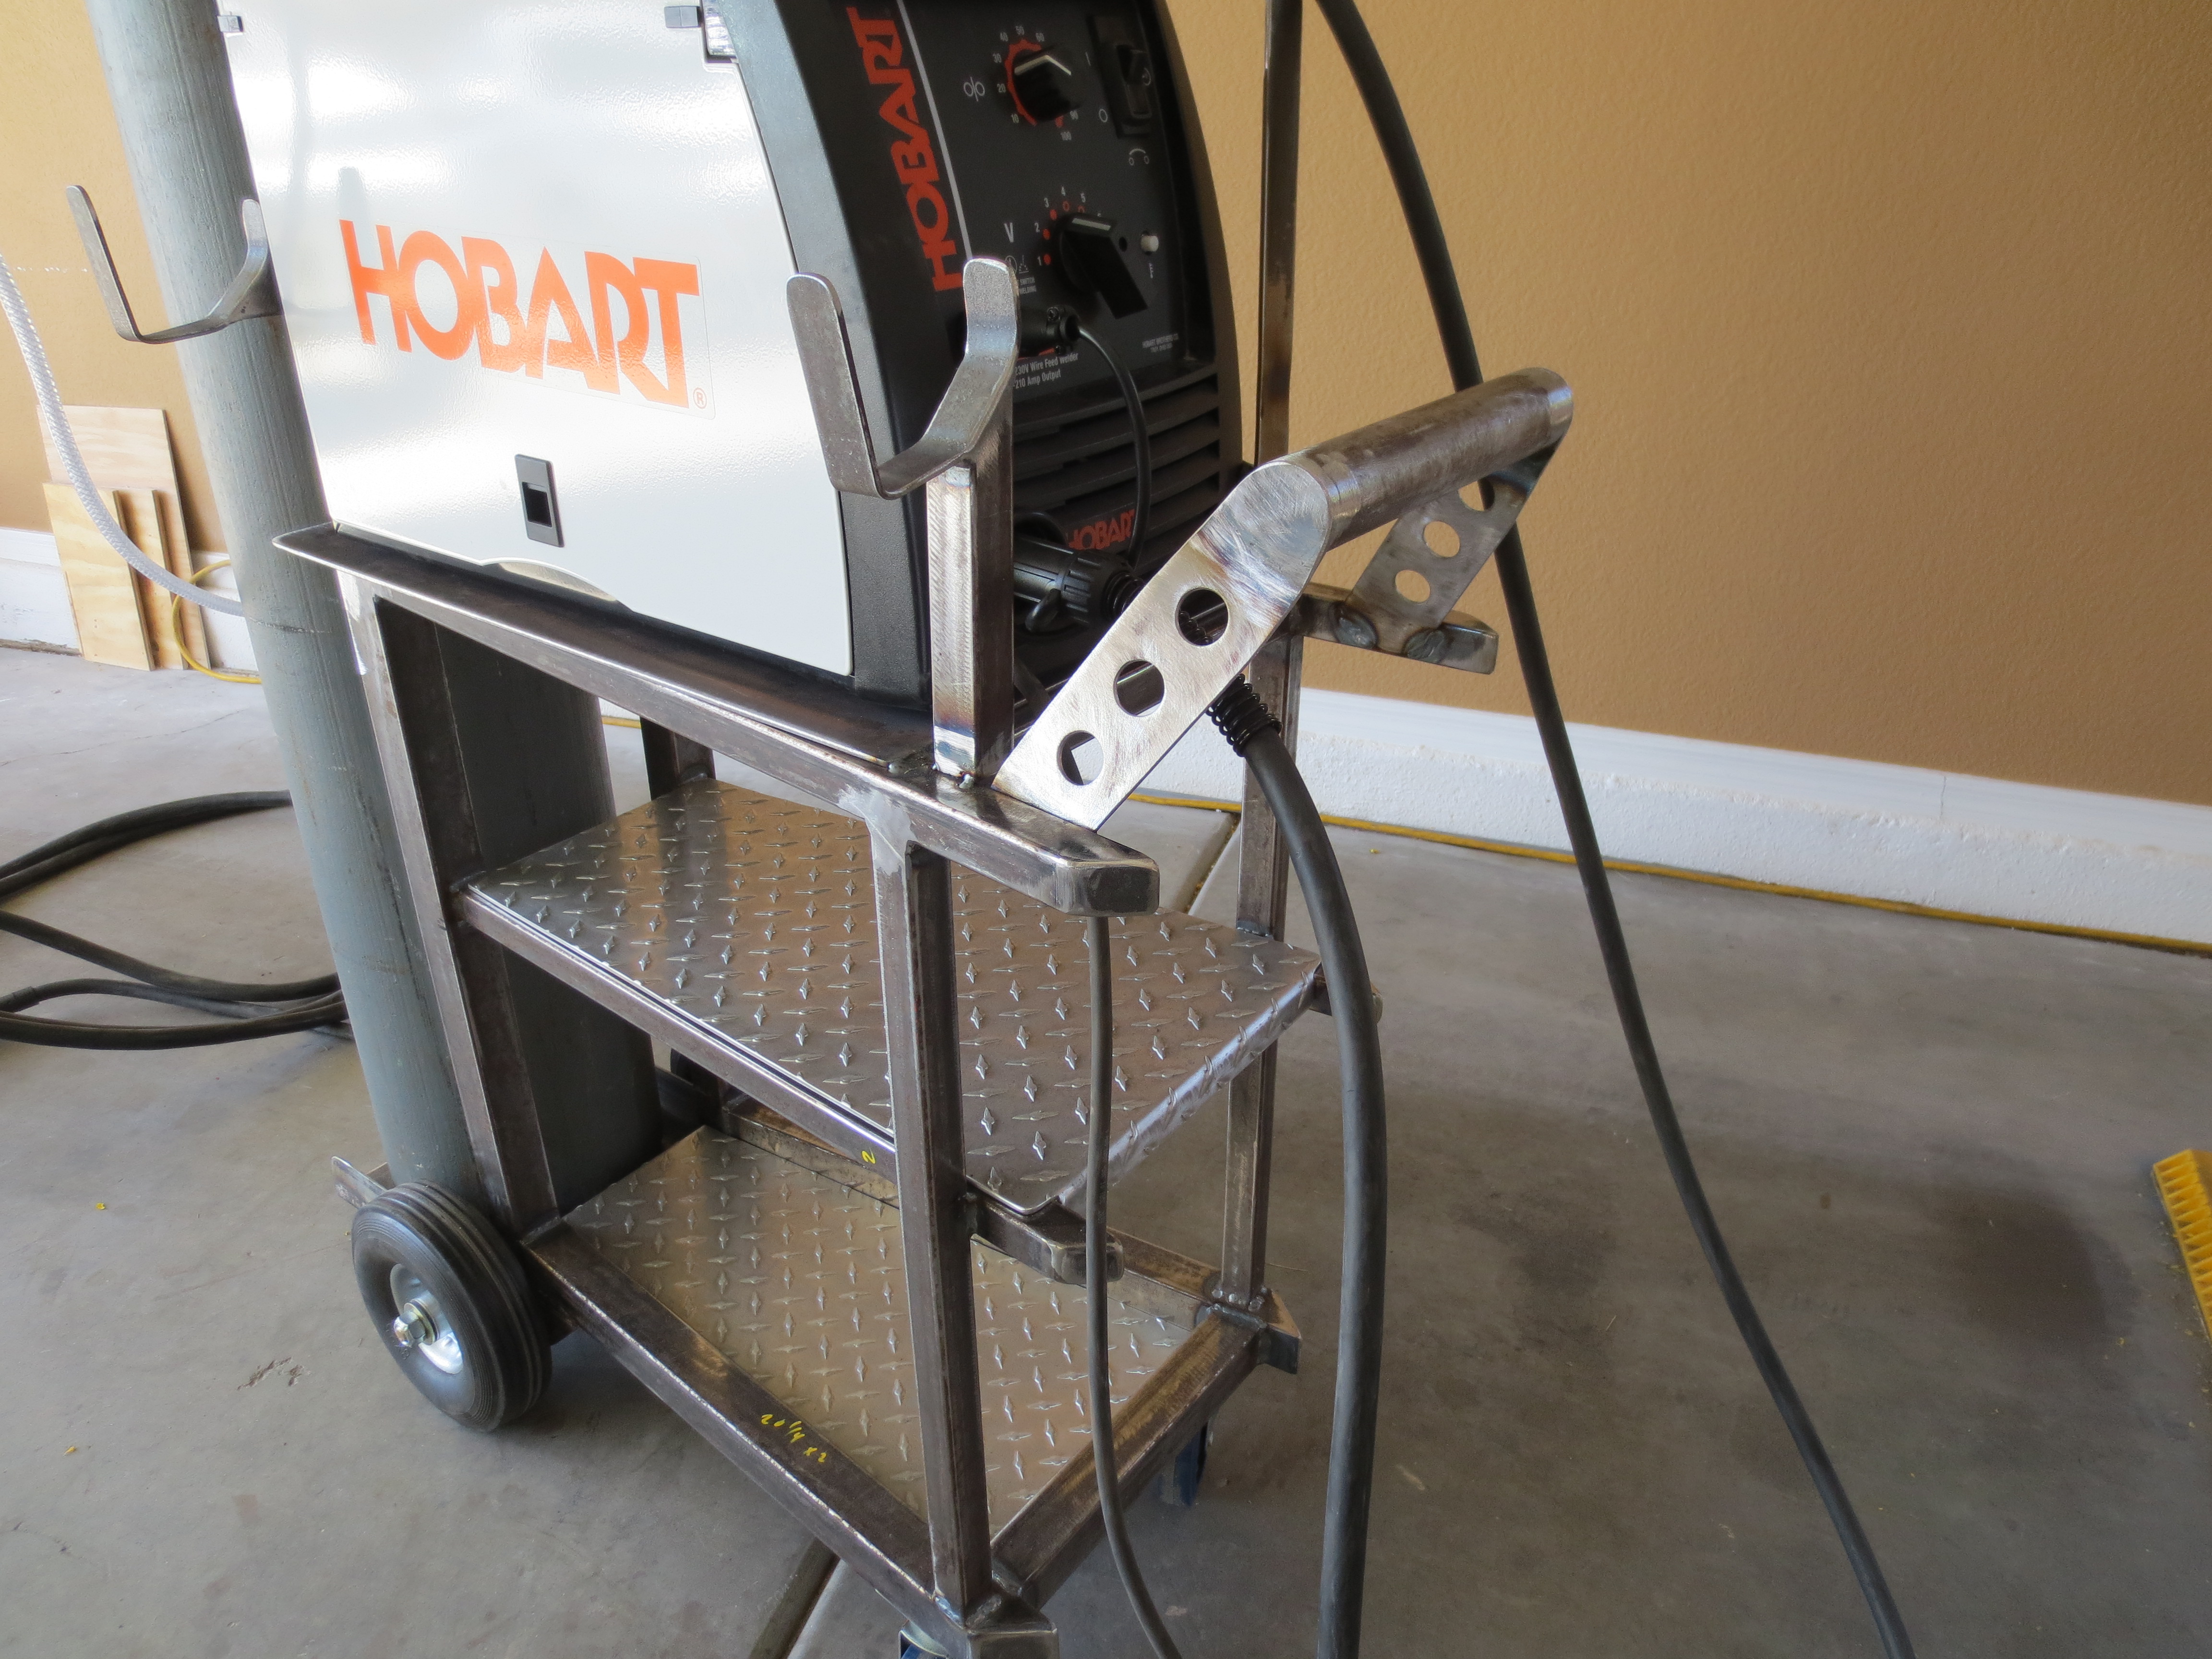
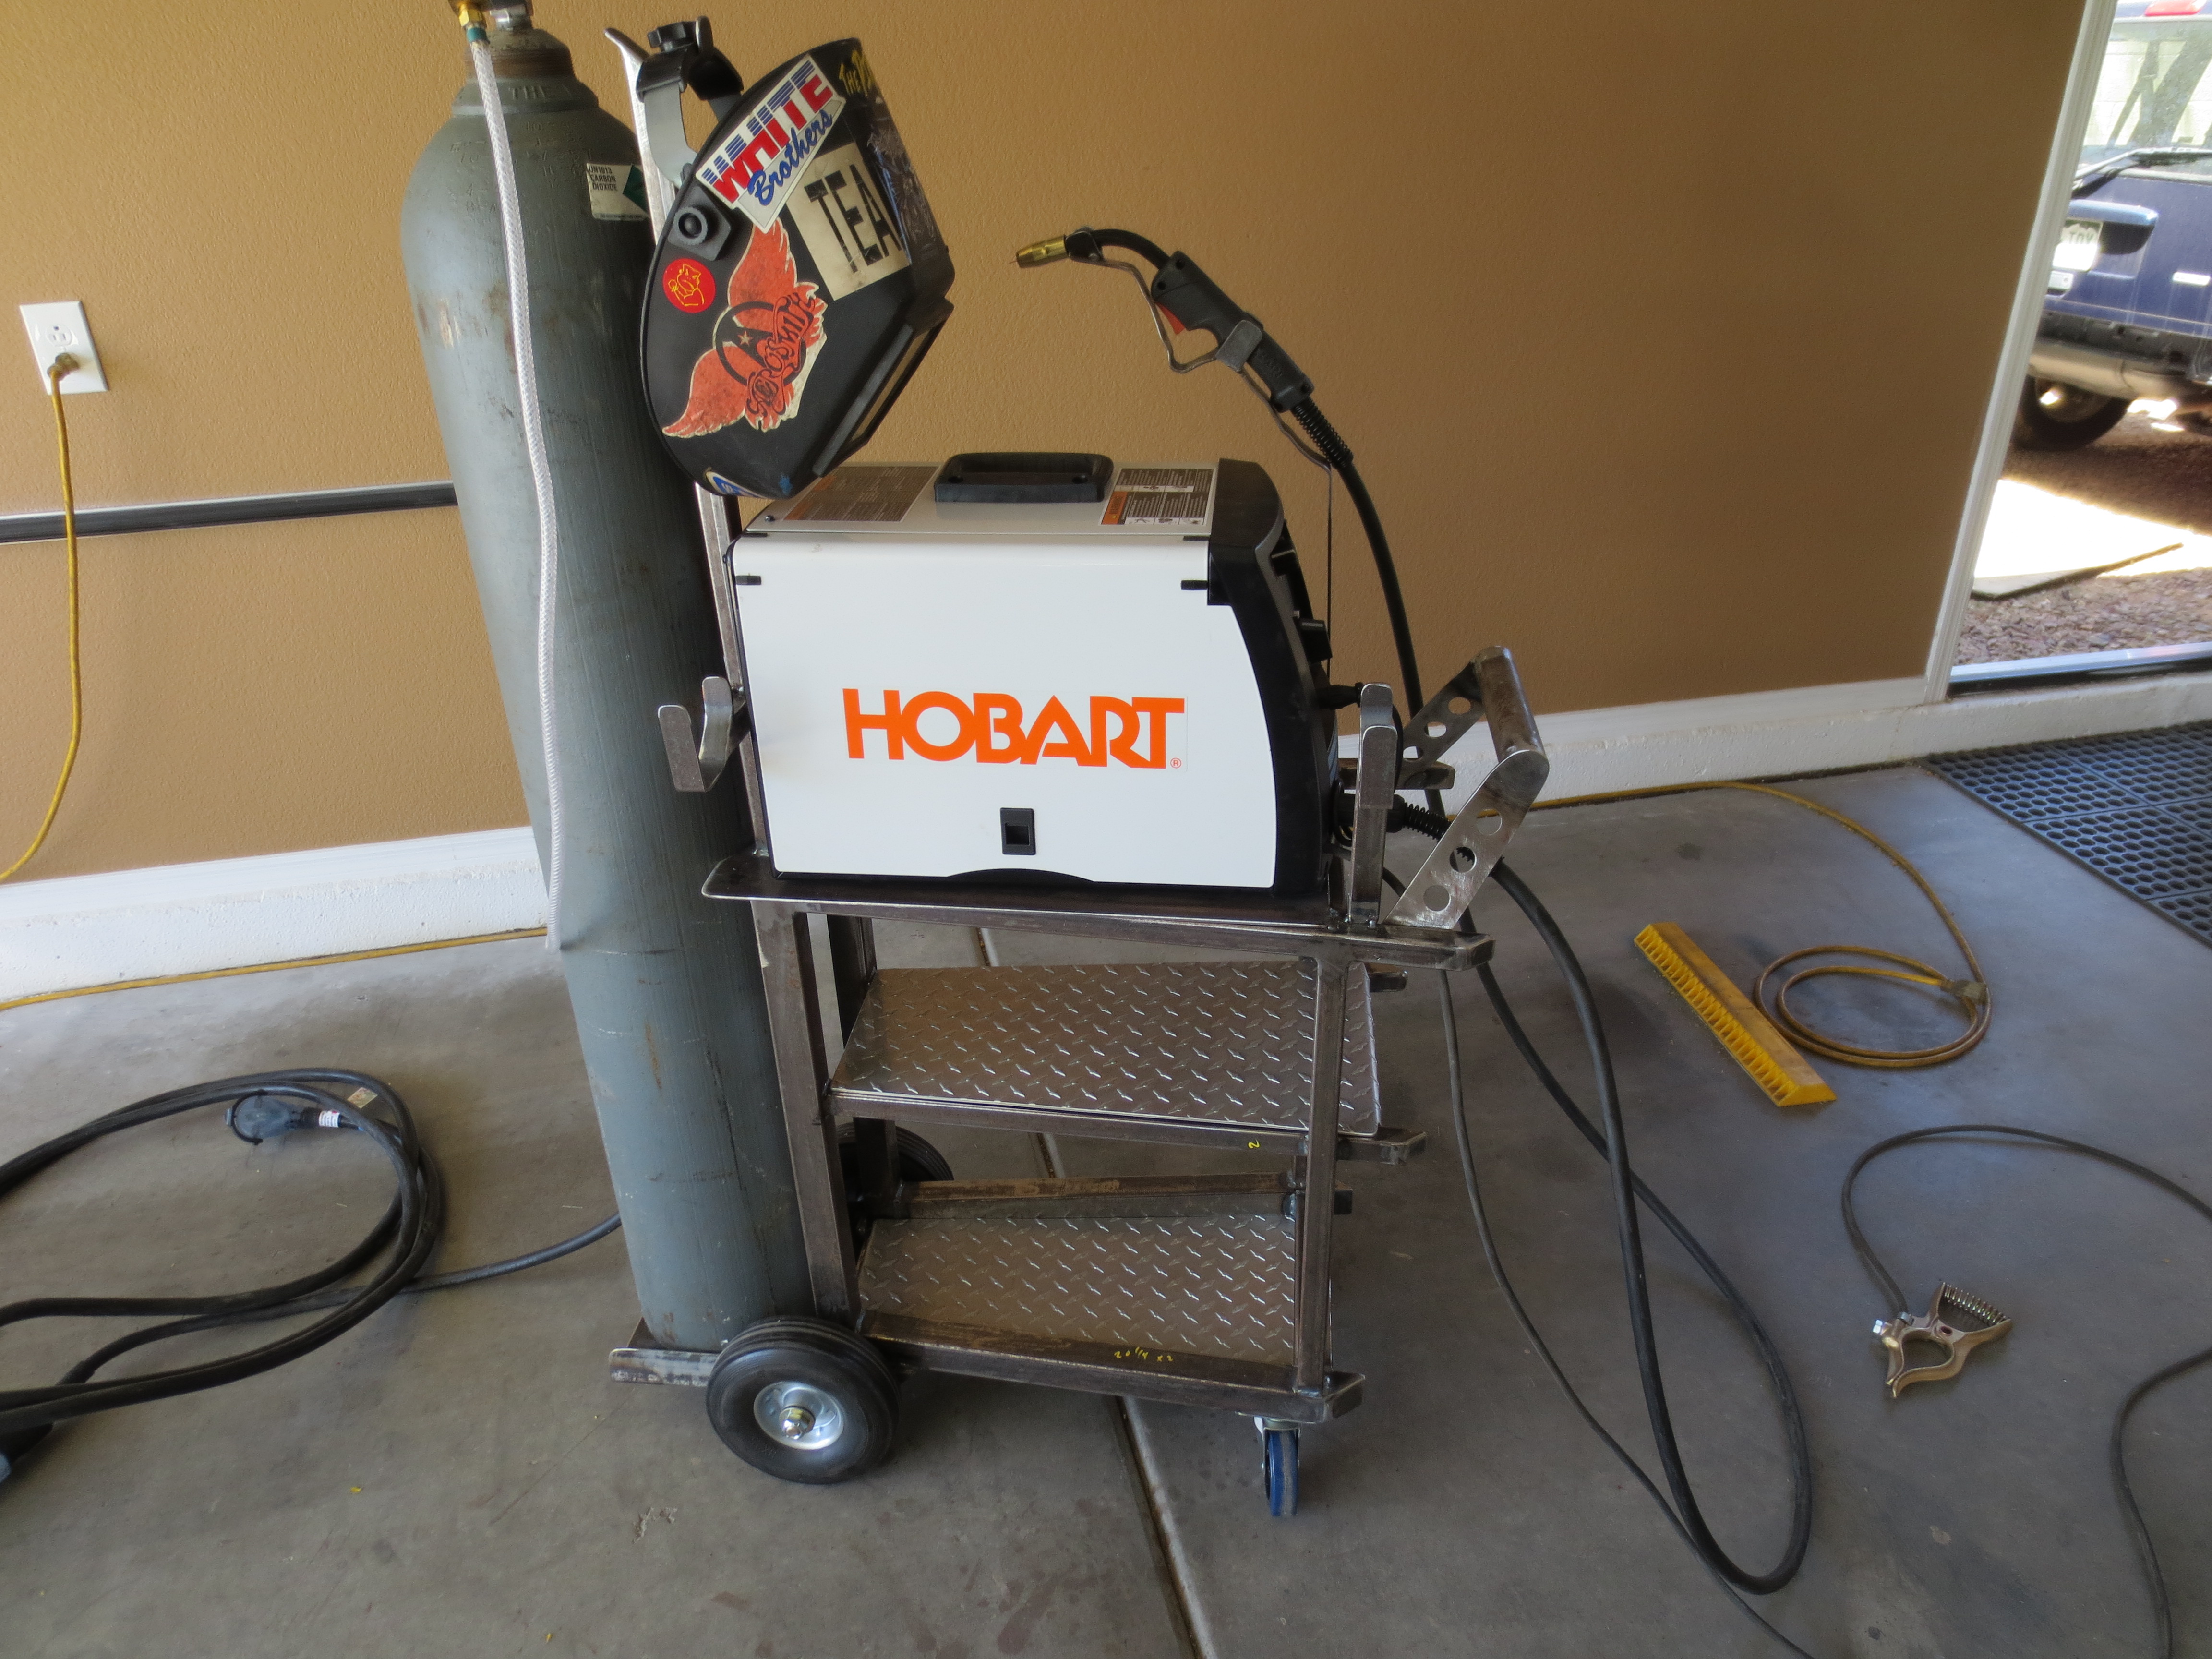
Here's the welding cart, still need to make cord holder, gun holder, some brackets for the welder, a handle and misc other items, almost ready to be able to use it at least. Made from whatever I had lying around, only bought the wheels and casters. So it's just a mix of different size tubing and only had enough aluminum diamond plate to do the lower shelves. It's not perfect, but it should be good when it's all done.

Wiring up the relays on the bench.
New ceramic plug

Ran the wires from pass headlight behind grille to drivers side
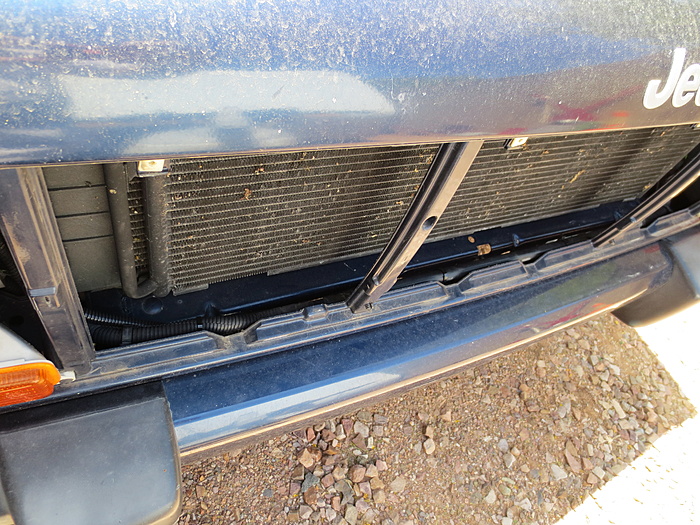
All wires will terminate behind drivers headlight area except for grounds and main power that will go across the firewall to a fusebox that will be mounted near the pass side firewall area

Relays mounted to bracket and labeled
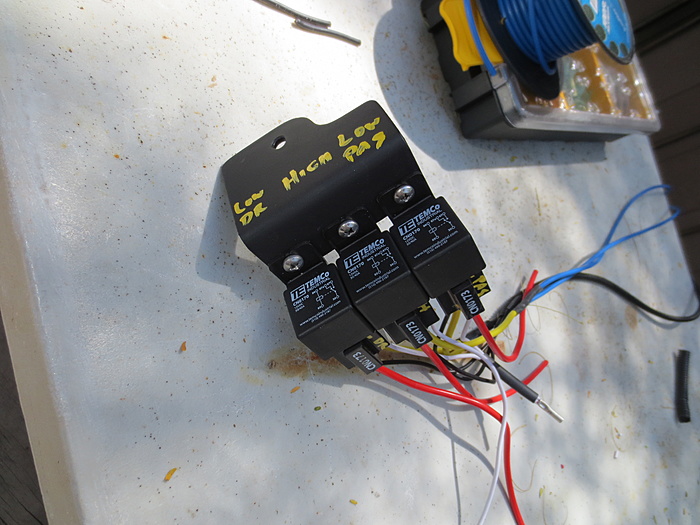
All wires connected and shrink wrapped. If doing this again, I would've made the wires shorter off the relays, no need to have this much extra
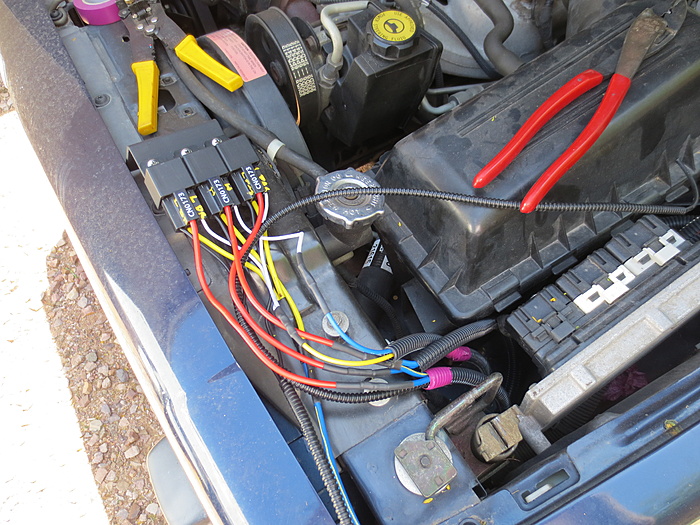
All mounted
Just a little tip, when trying to run wires through wire loom. Take a large ring style crimp connector, I like to remove the insulation, and crimp the wires to it. Then put it through one end of loom, leave the ring in the split part of the loom and you can just pull it through with your fingers or you can use a small pick hook to pull it through.

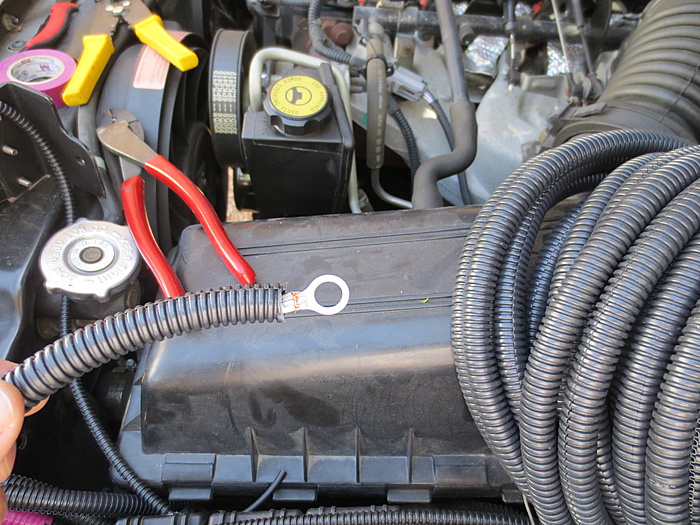
New ground terminal, crimped an soldered
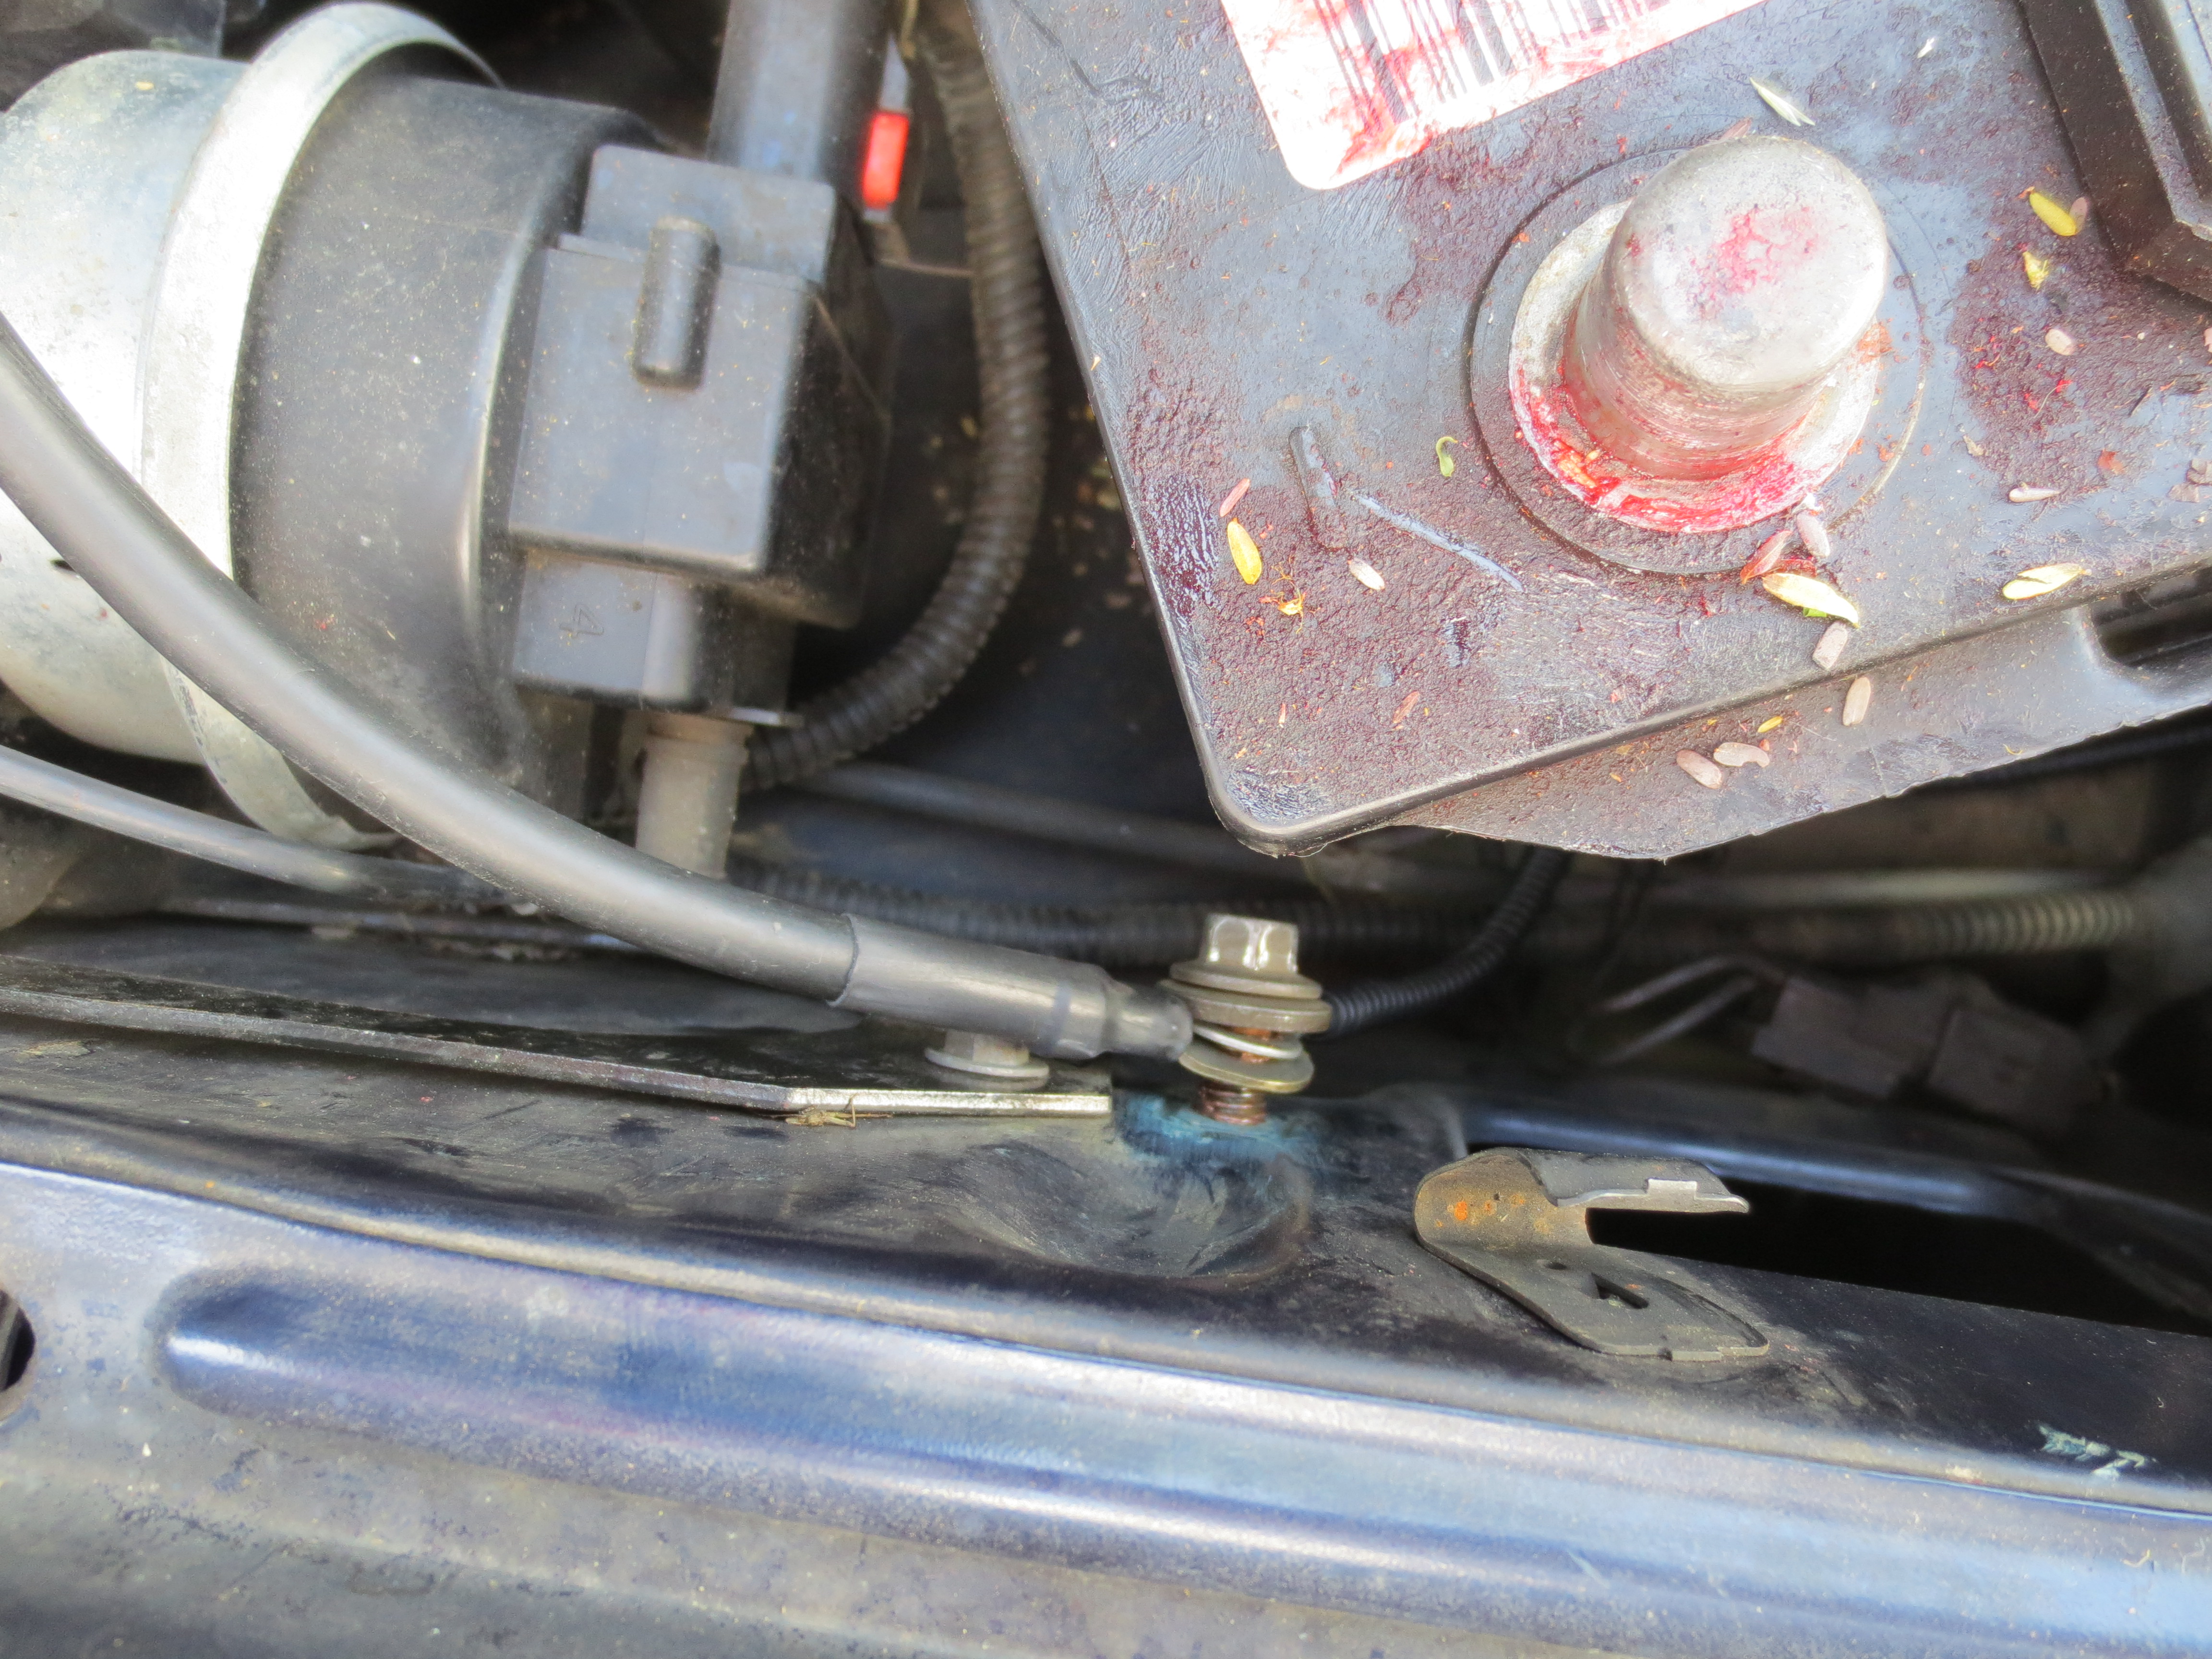
Grounded the pass headlight here where the factory ground is

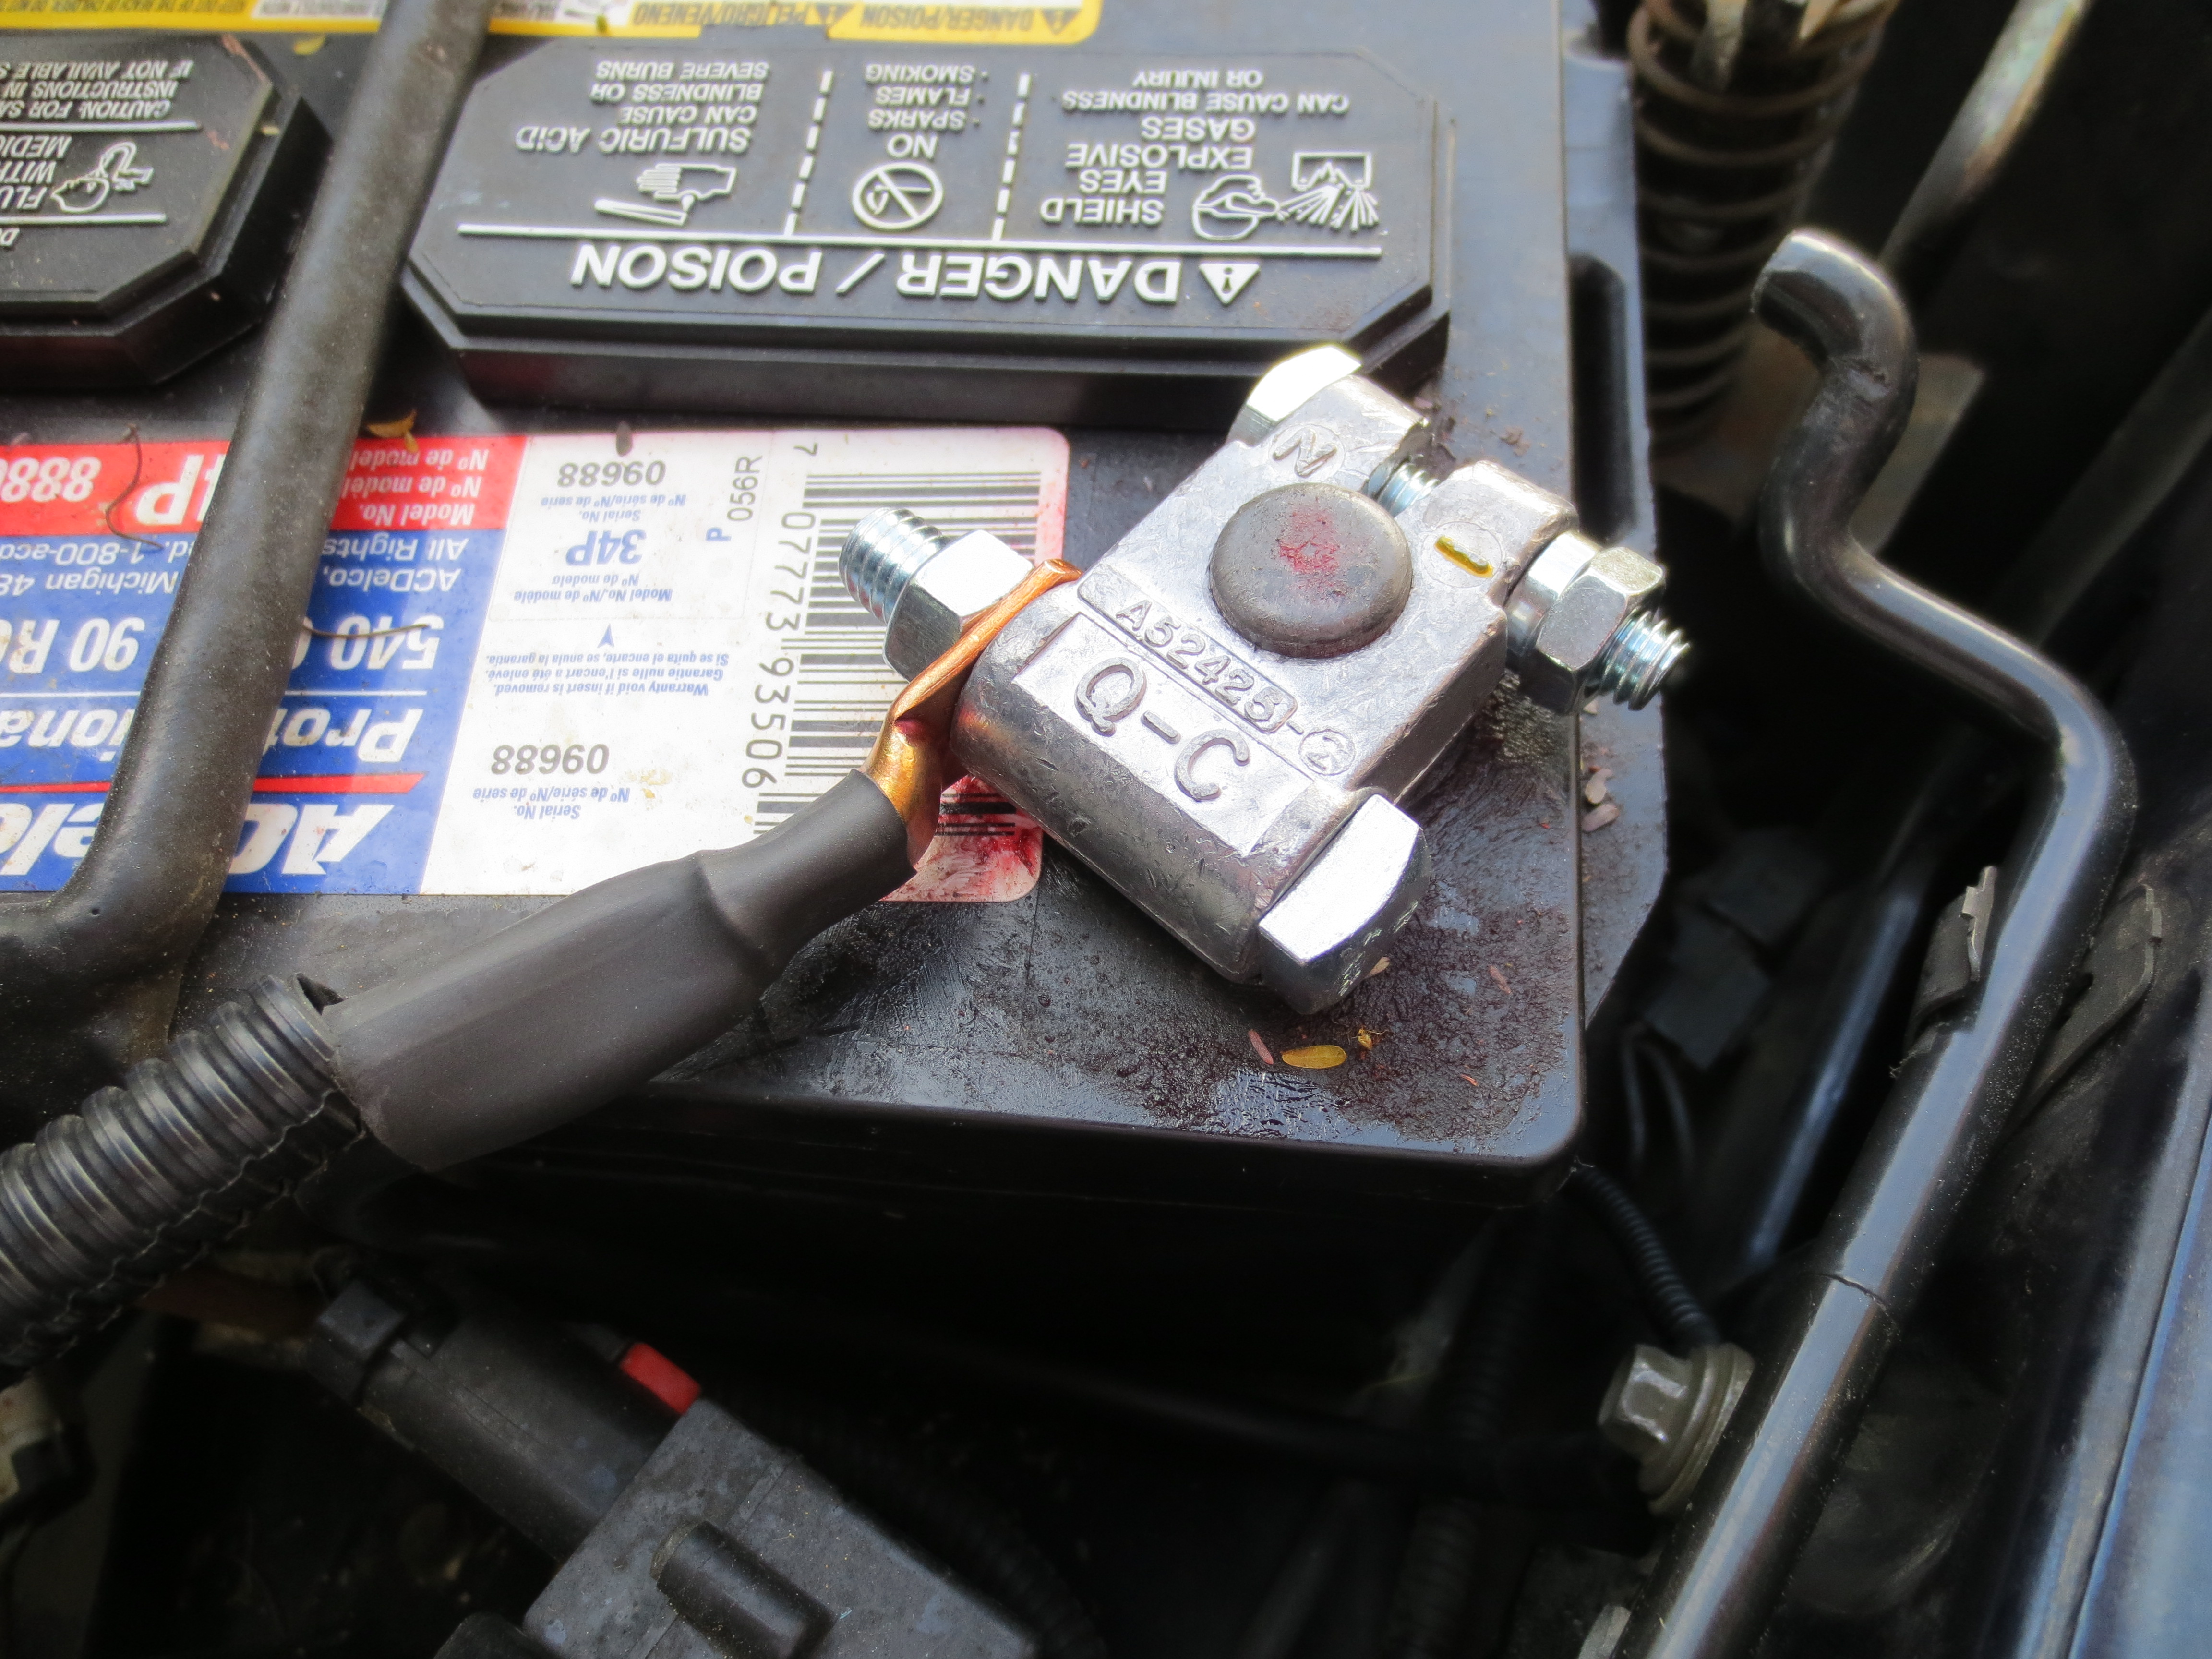
New ground terminal done, this is my first time using this style and it is great, very heavy duty and way better than stock! They are MIL Spec.
Part #'s at O'reilly's BH315P and BH315N
I finished the headlight harness for the most part, just need to find a fuse box and hook them up, hopefully I wired them up right! Also upgraded the ground wire from the battery to the body and changed the battery terminal. Still have to do the positive side, but I'll do that when I figure out what other power wires I need to run.
On to some pics...
Here's the welding cart, still need to make cord holder, gun holder, some brackets for the welder, a handle and misc other items, almost ready to be able to use it at least. Made from whatever I had lying around, only bought the wheels and casters. So it's just a mix of different size tubing and only had enough aluminum diamond plate to do the lower shelves. It's not perfect, but it should be good when it's all done.


Wiring up the relays on the bench.

New ceramic plug
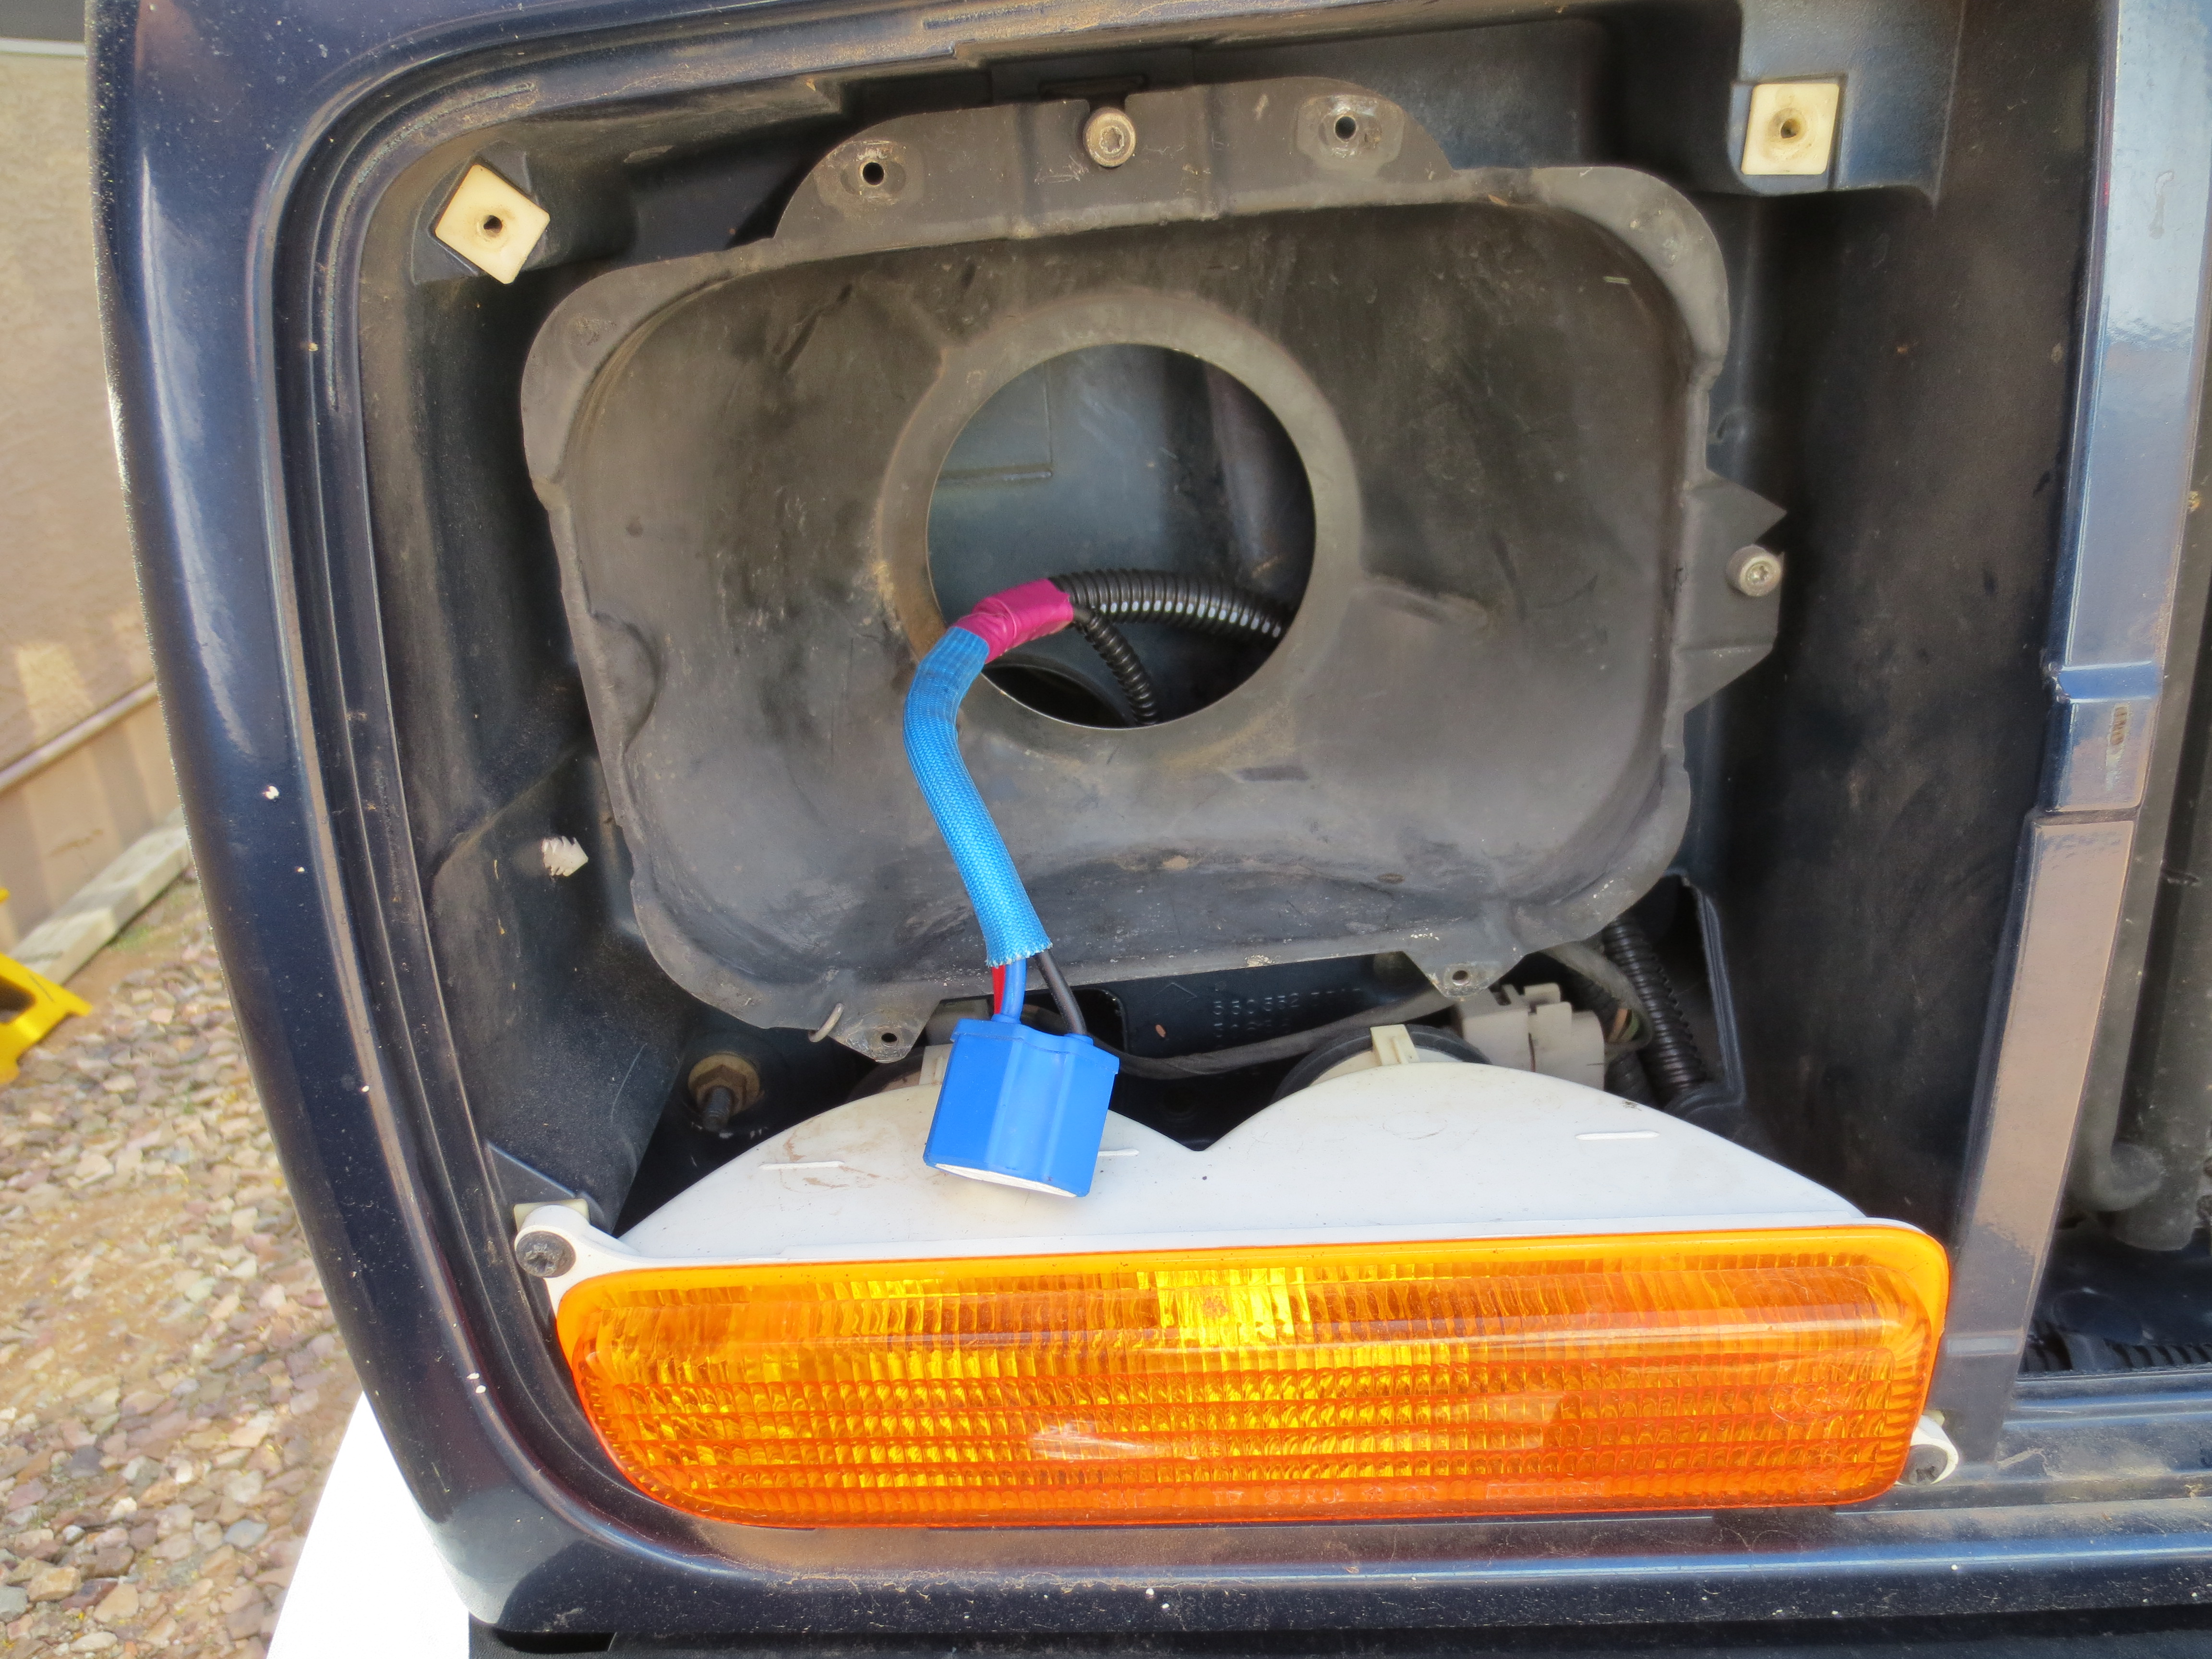
Ran the wires from pass headlight behind grille to drivers side

All wires will terminate behind drivers headlight area except for grounds and main power that will go across the firewall to a fusebox that will be mounted near the pass side firewall area
Relays mounted to bracket and labeled

All wires connected and shrink wrapped. If doing this again, I would've made the wires shorter off the relays, no need to have this much extra

All mounted

Just a little tip, when trying to run wires through wire loom. Take a large ring style crimp connector, I like to remove the insulation, and crimp the wires to it. Then put it through one end of loom, leave the ring in the split part of the loom and you can just pull it through with your fingers or you can use a small pick hook to pull it through.
New ground terminal, crimped an soldered

Grounded the pass headlight here where the factory ground is
New ground terminal done, this is my first time using this style and it is great, very heavy duty and way better than stock! They are MIL Spec.
Part #'s at O'reilly's BH315P and BH315N
Thread Starter
Member
Joined: Jan 2017
Posts: 125
Likes: 2
From: Anthem, AZ
Year: 2001
Model: Cherokee
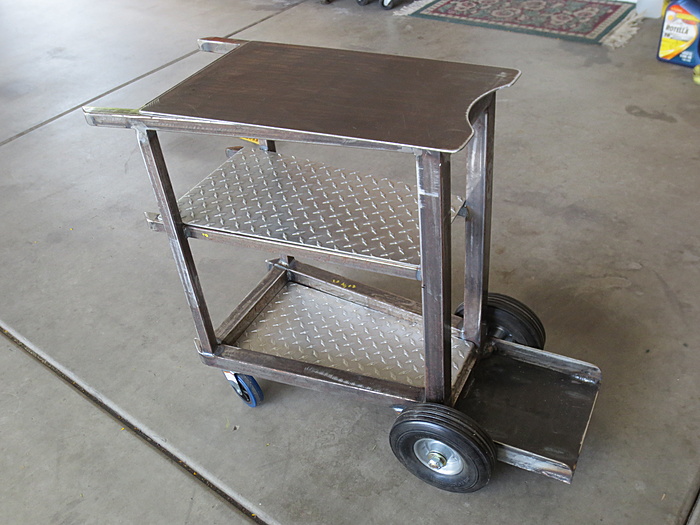
I made a little progress over the weekend, I kind of finished my welding cart. I didn't paint it as there are a few things I will probably change on it, but I need to use it! I have to get this build going!
First welding project, rear frame stiffeners. I have to say, I really like this Hobart 210, huge upgrade from my old Lincoln 135, glad I finally upgraded!
On to some pics of the welding cart...


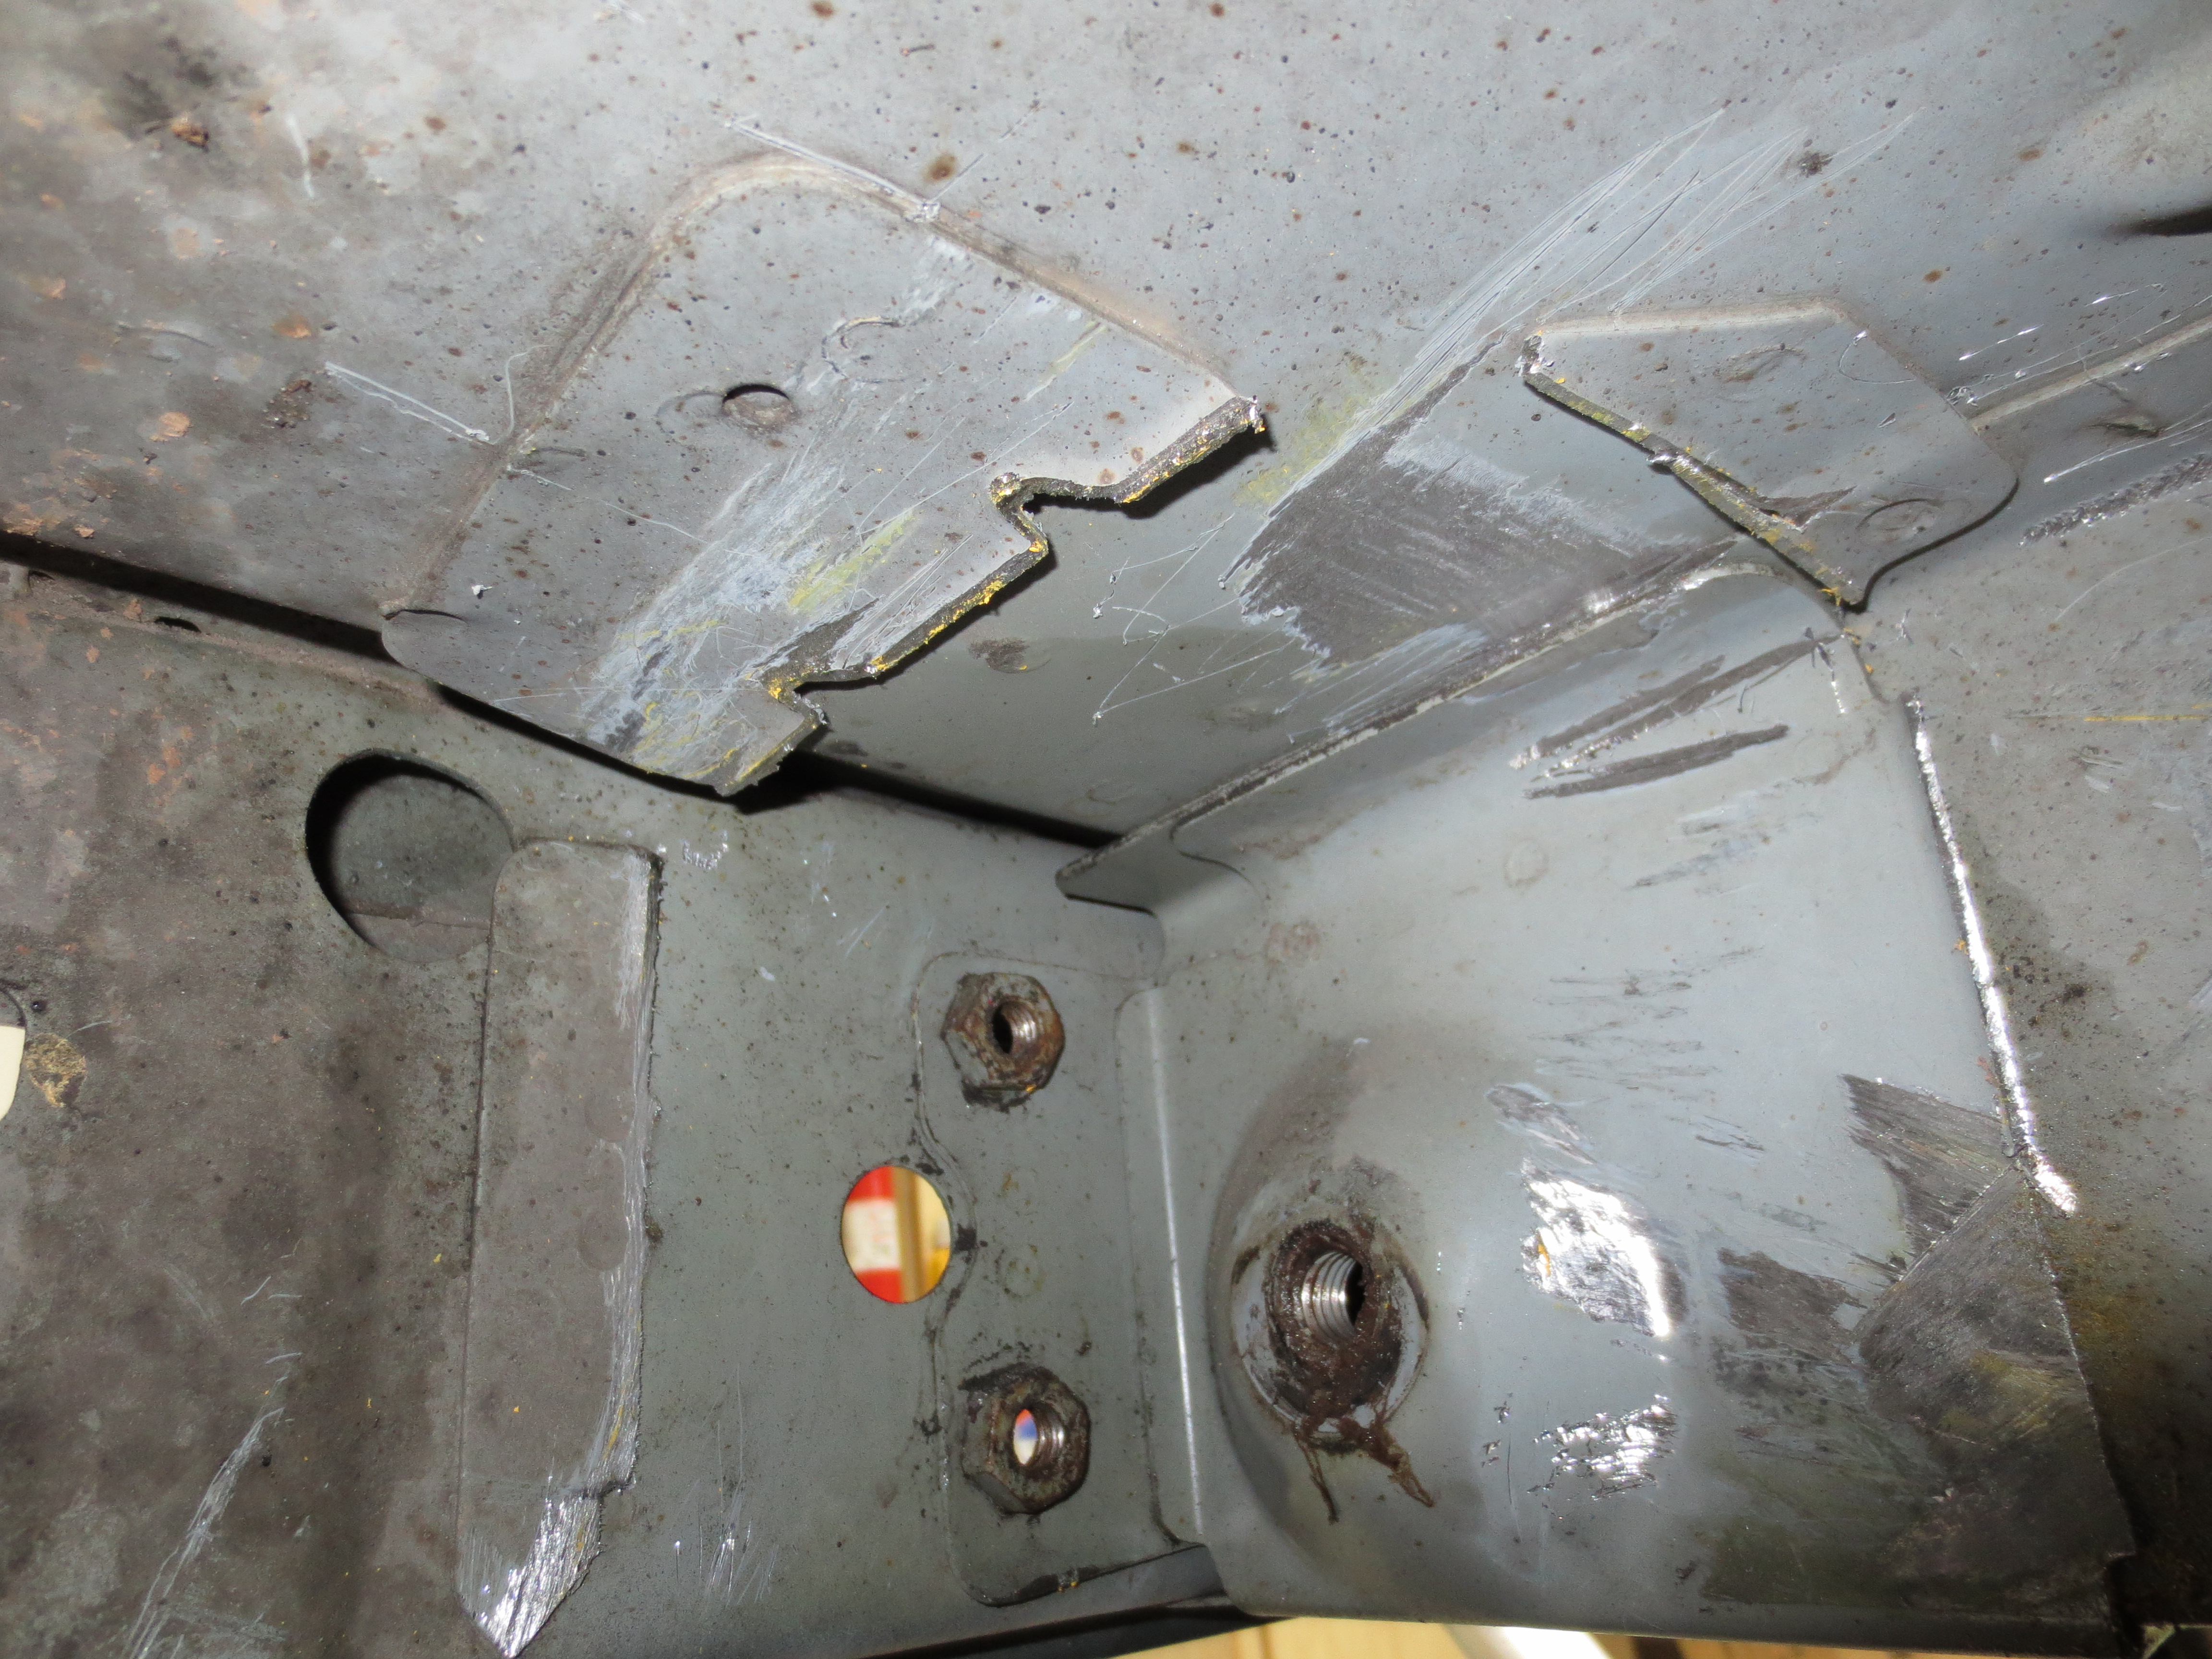
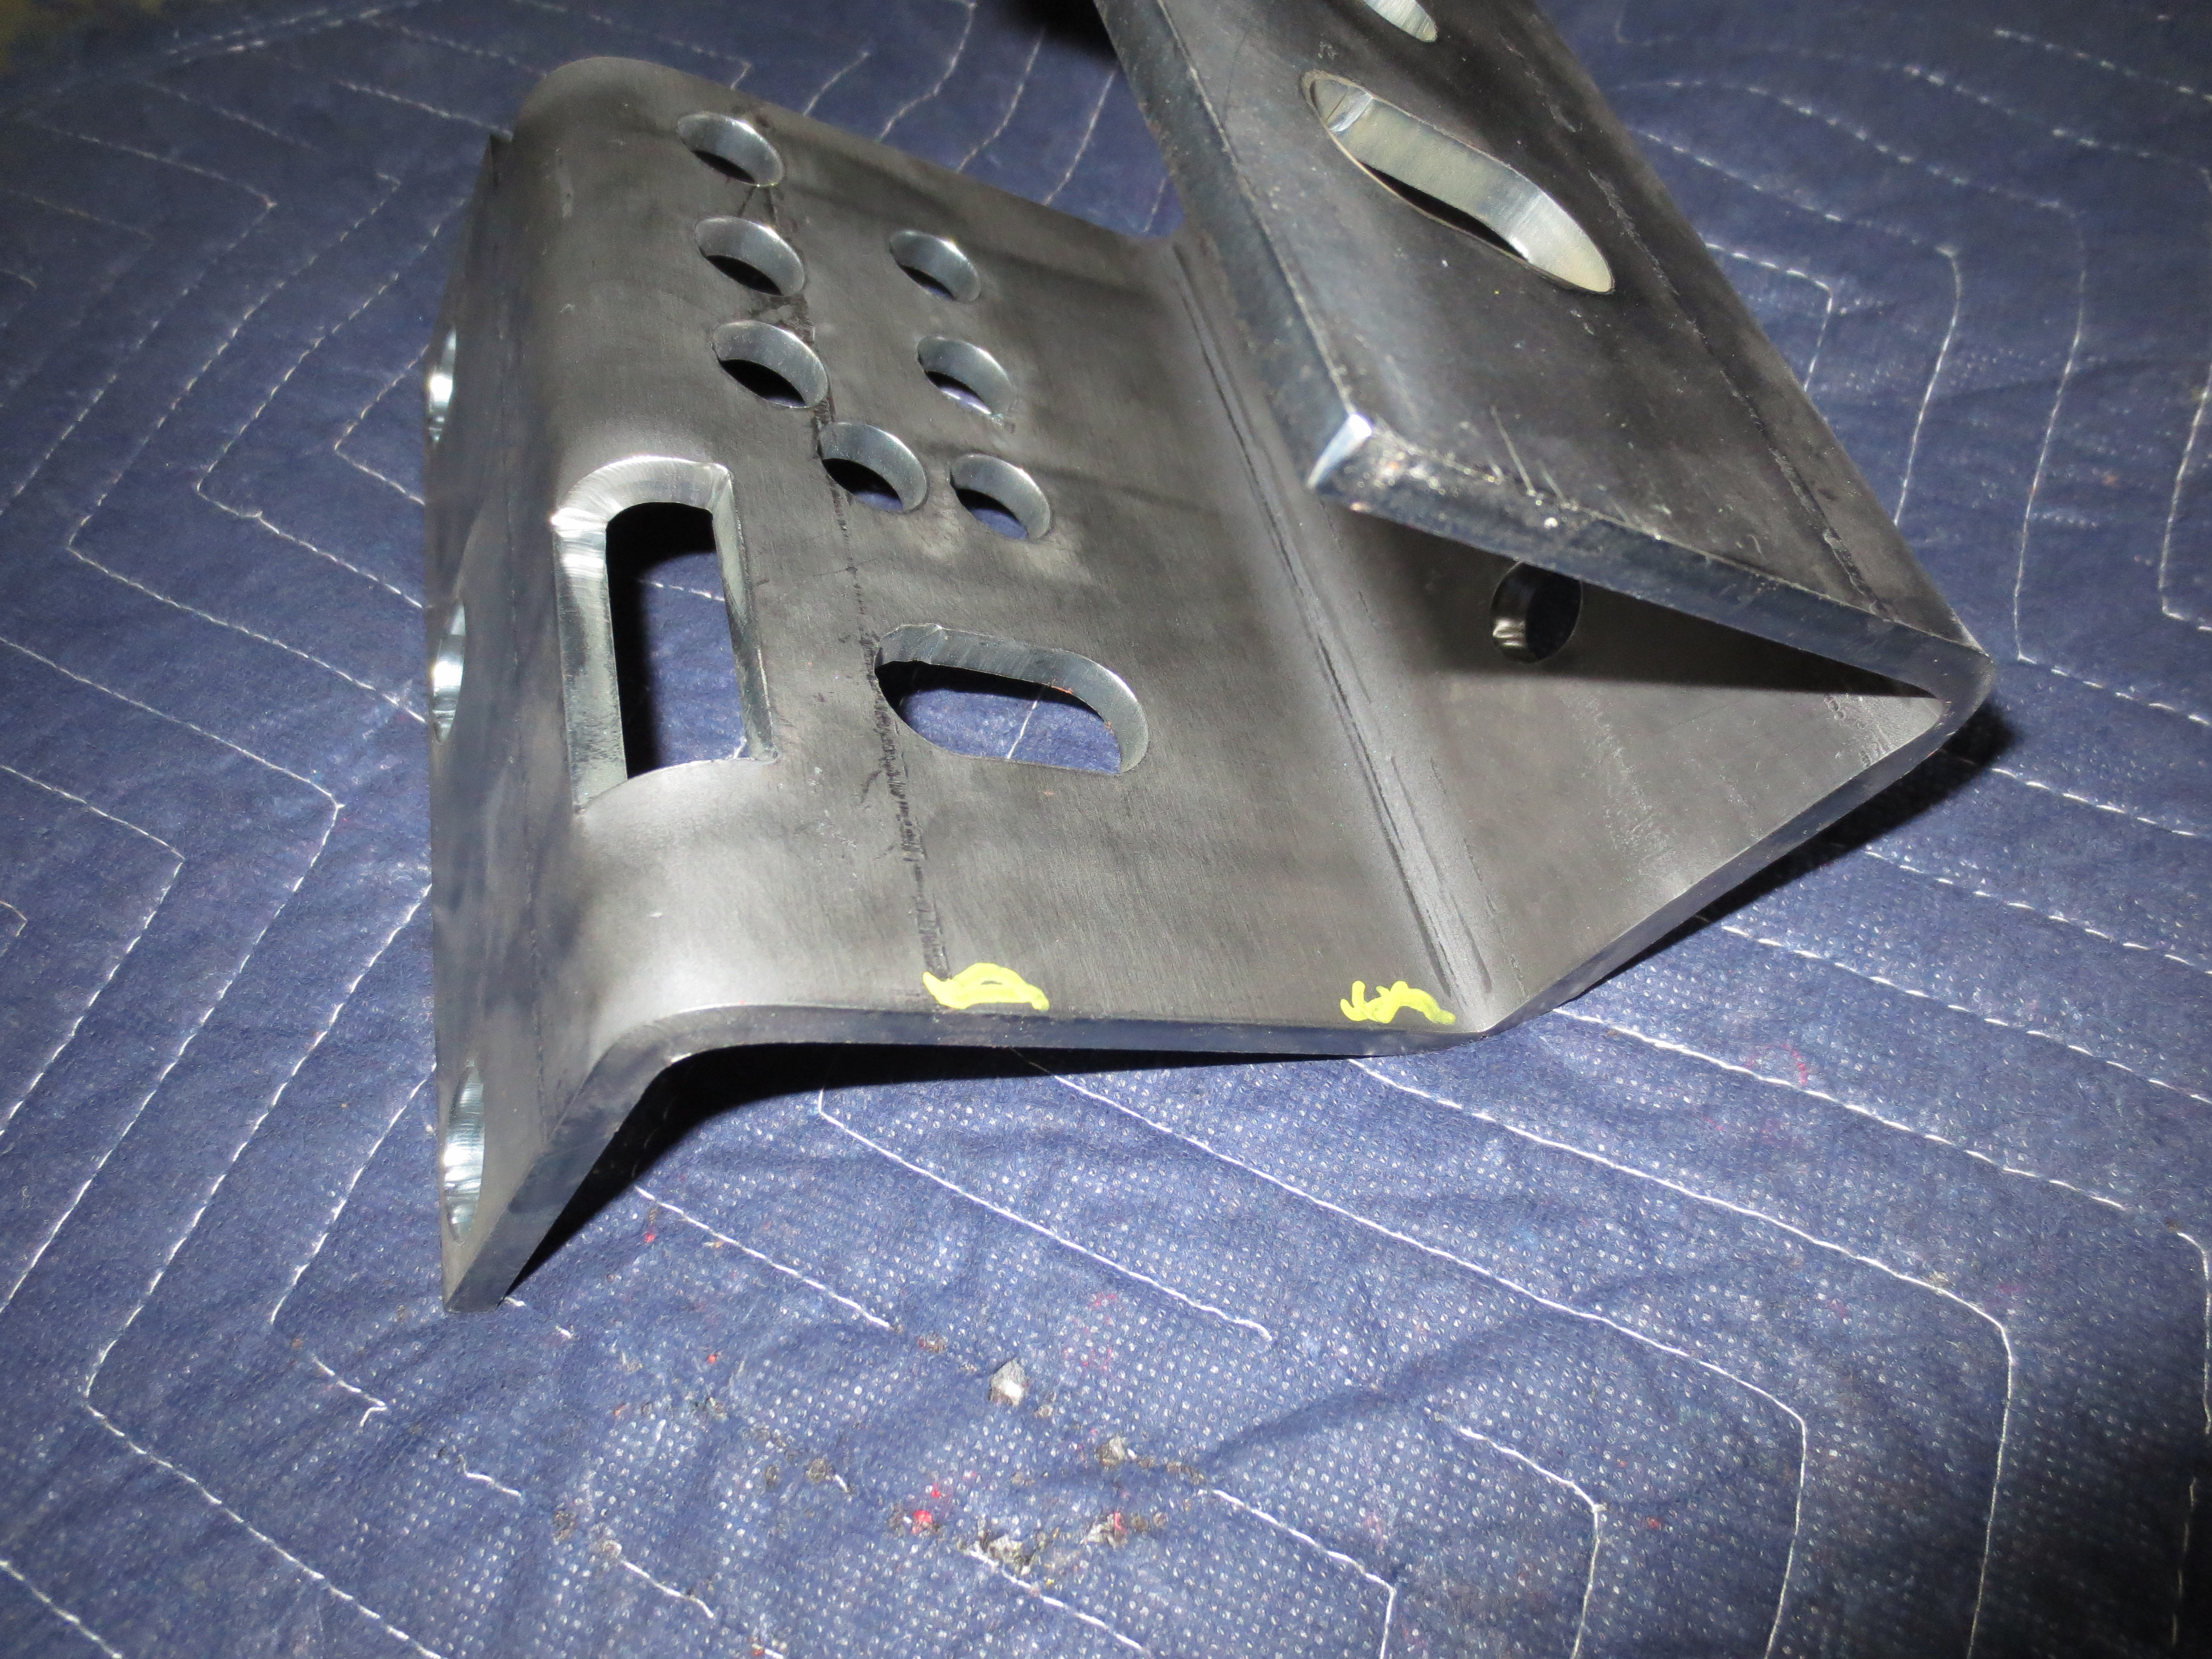
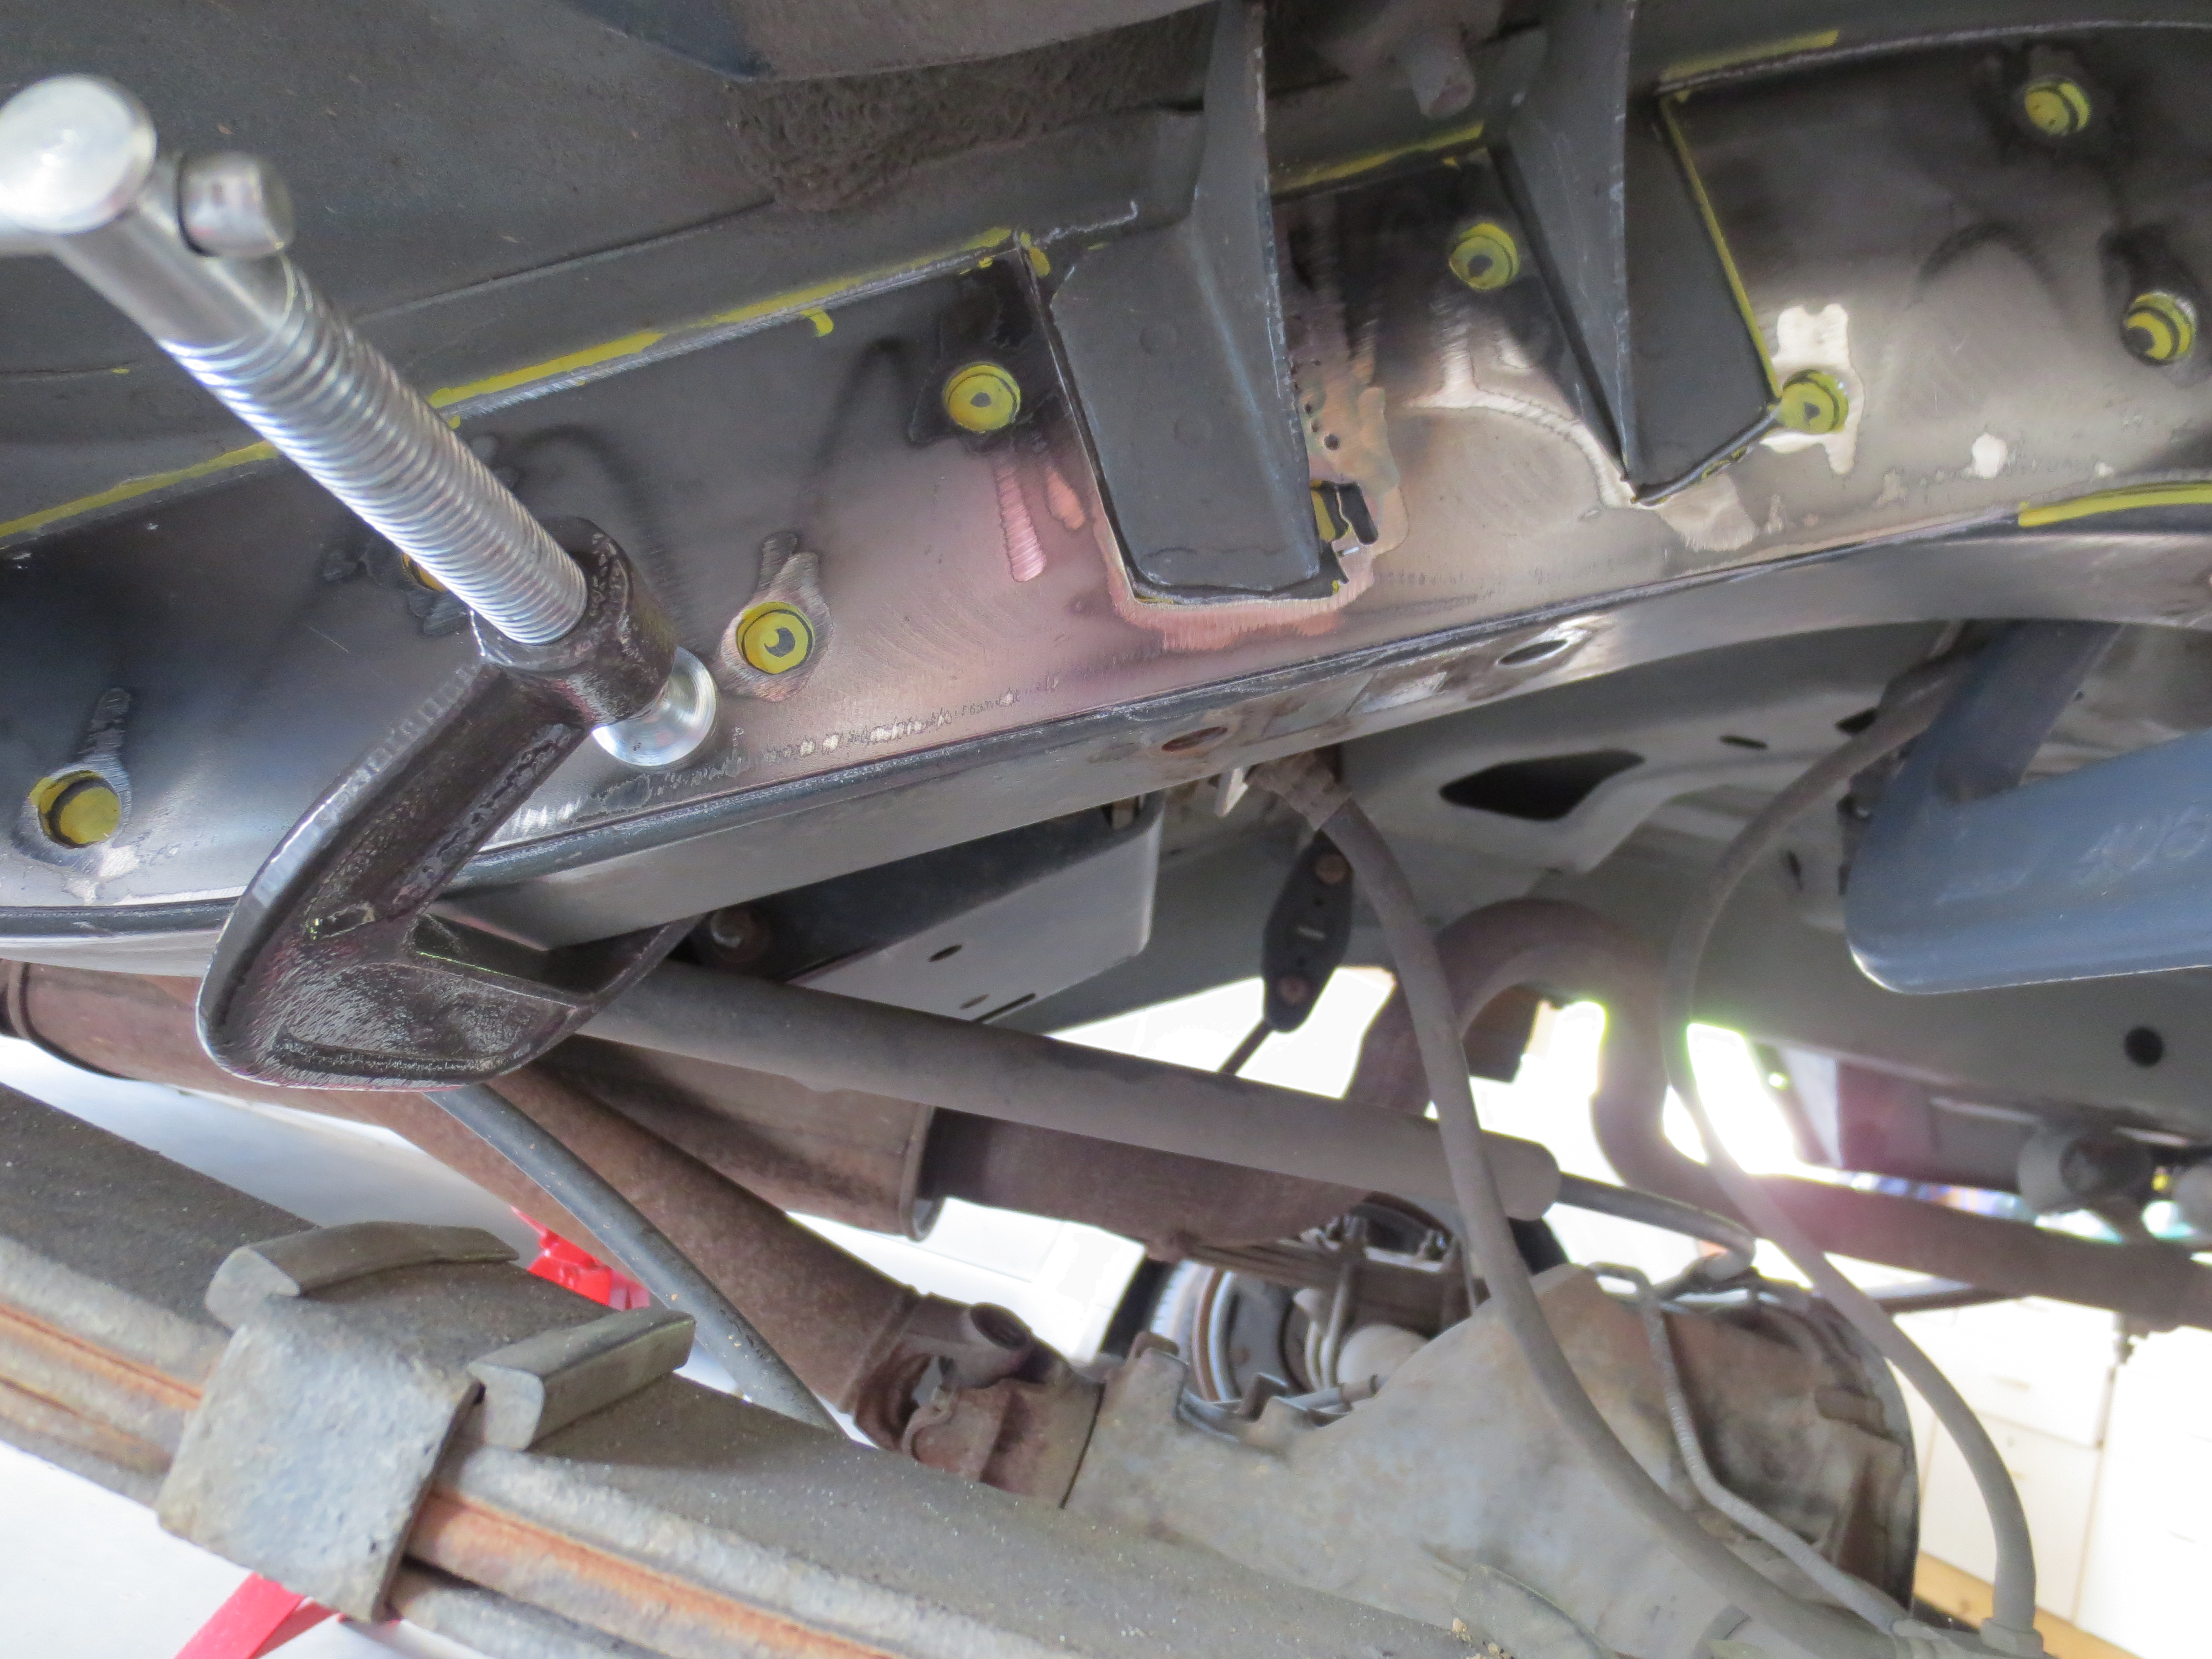
HD Offroad rear stiffeners
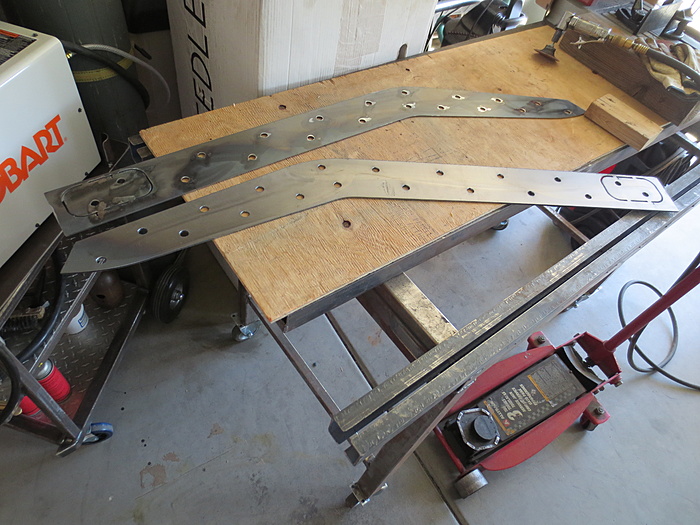
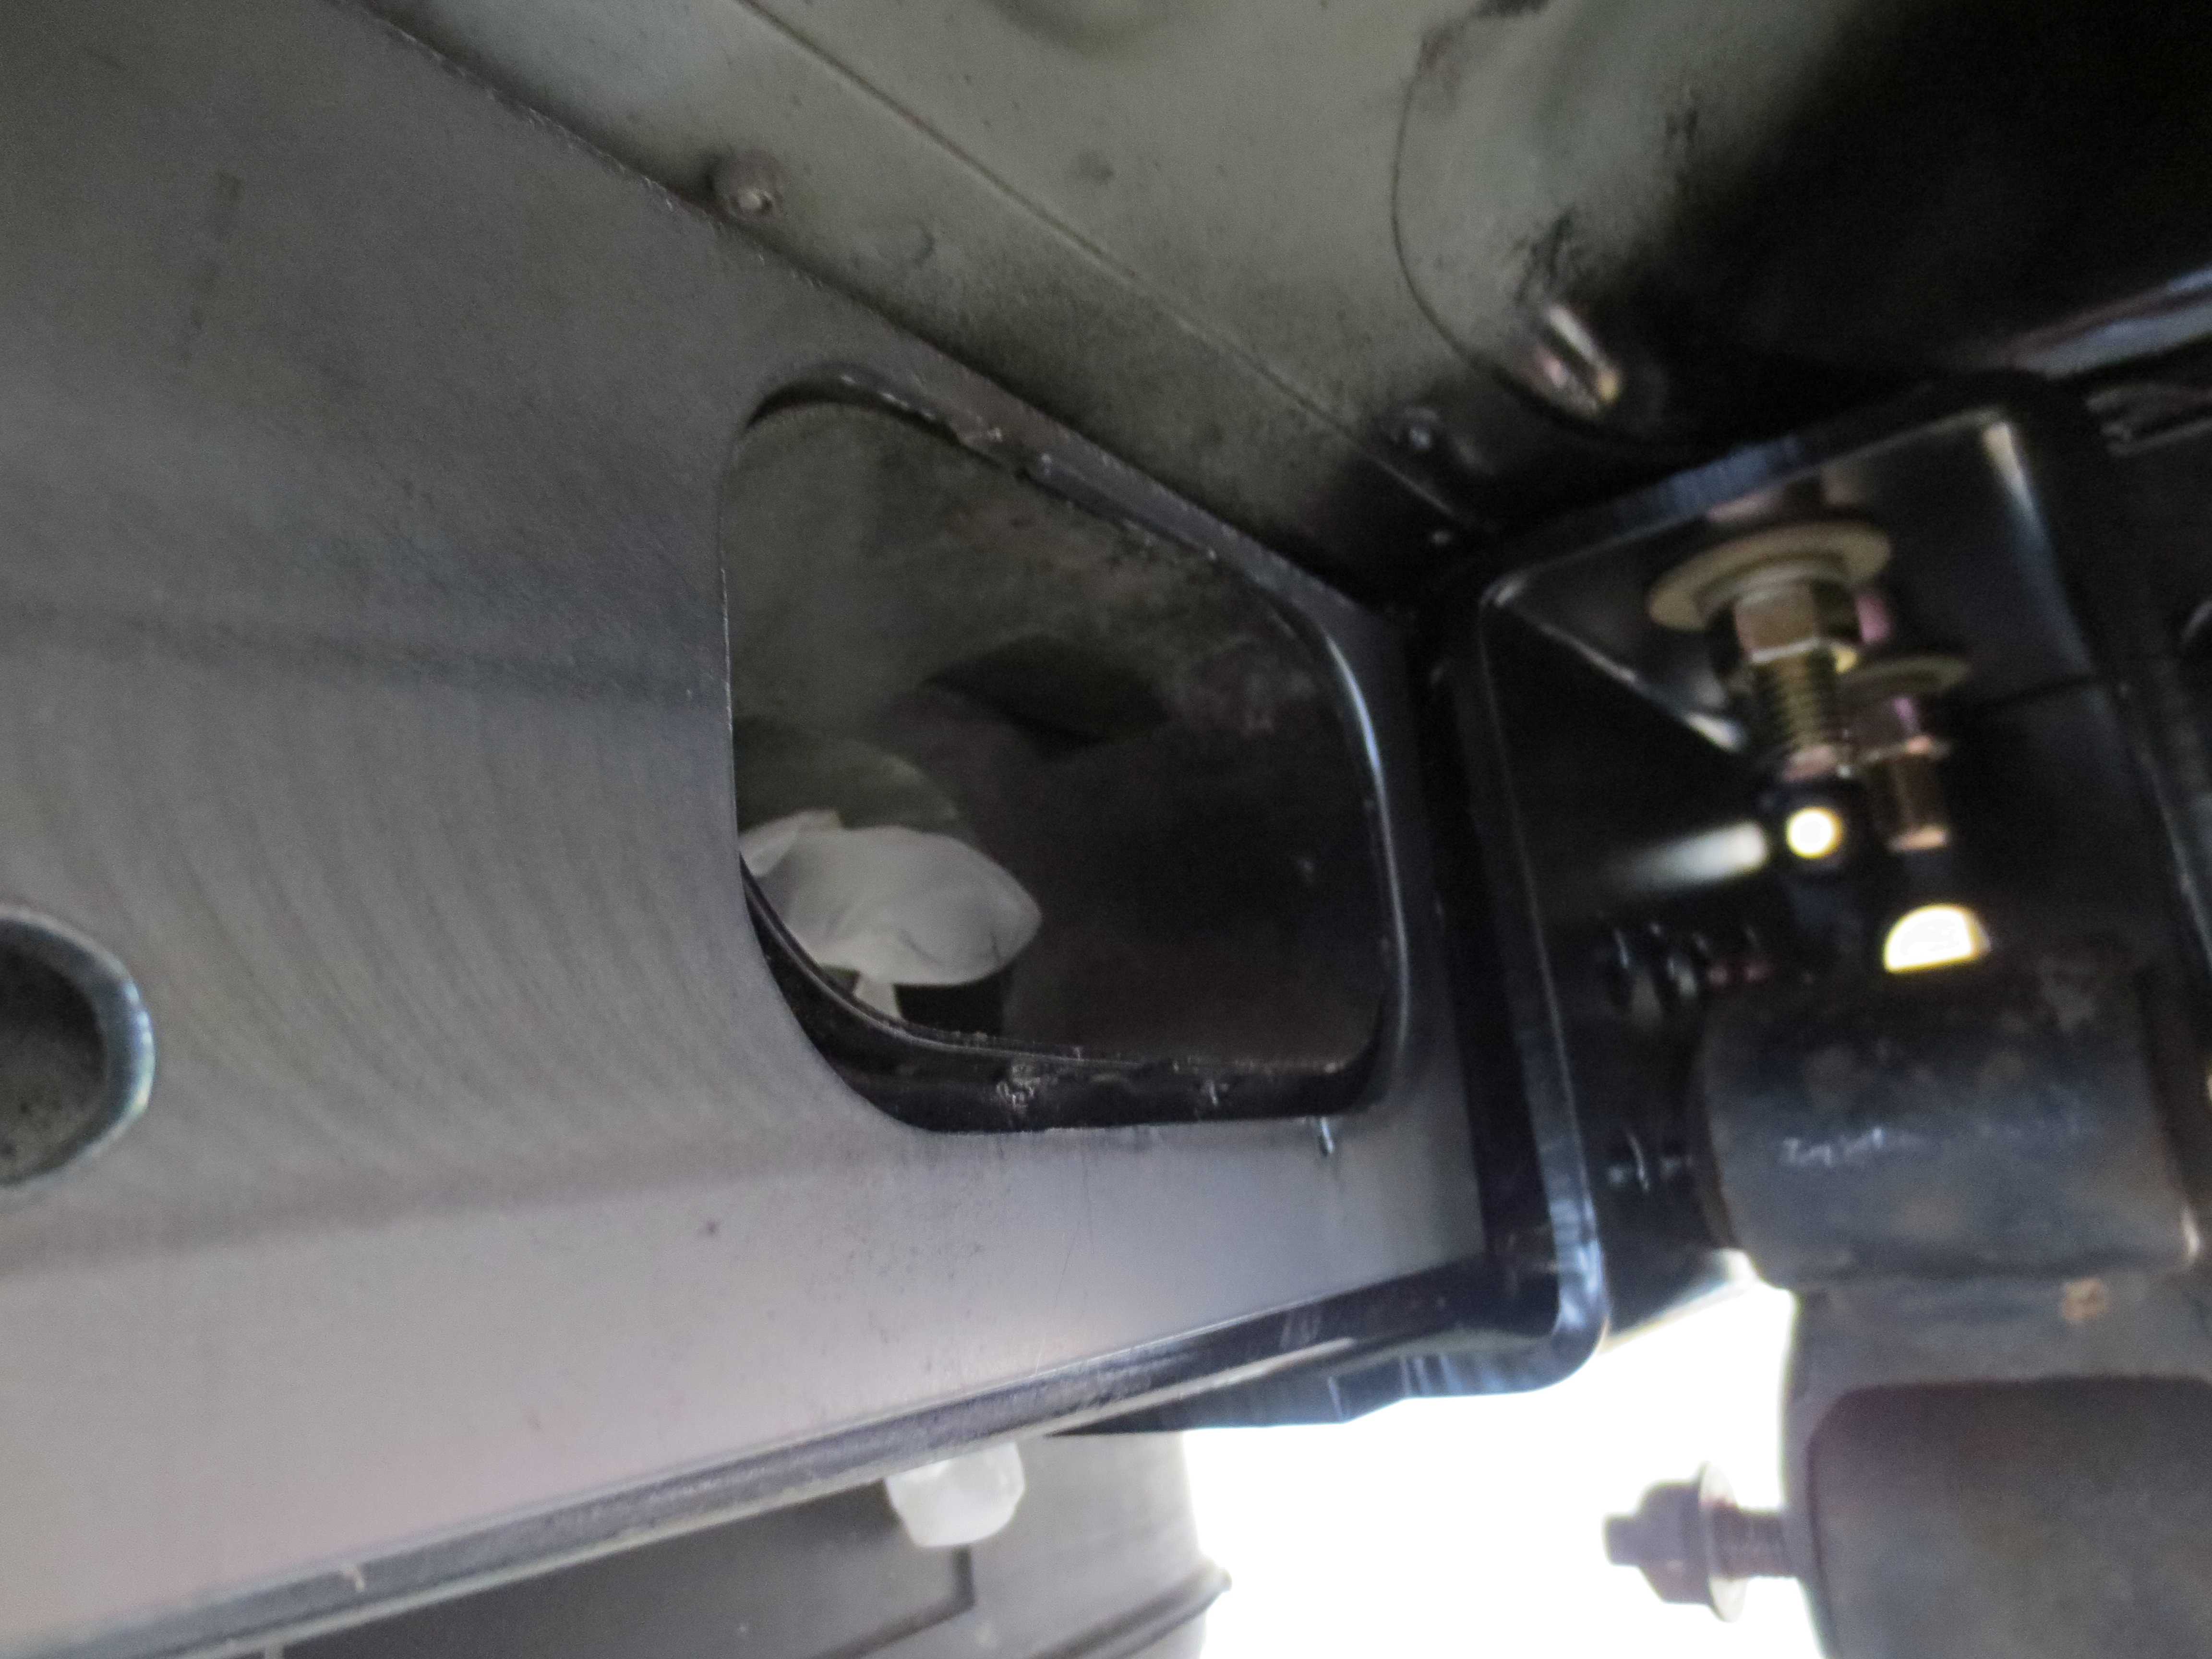
Have to cut this plate out for the fuel hoses
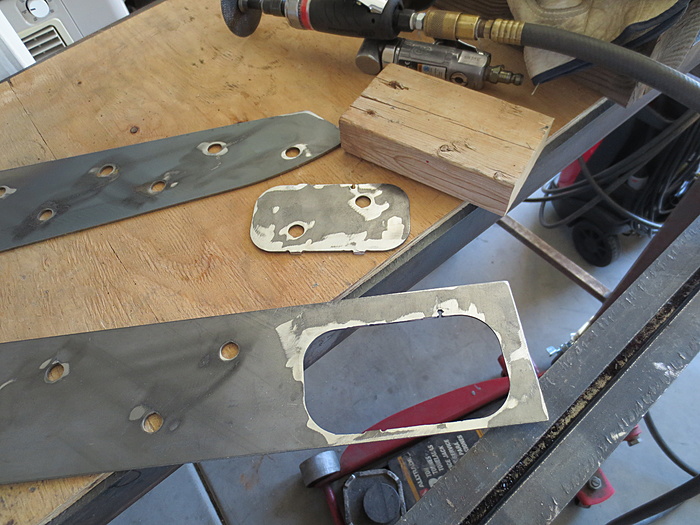

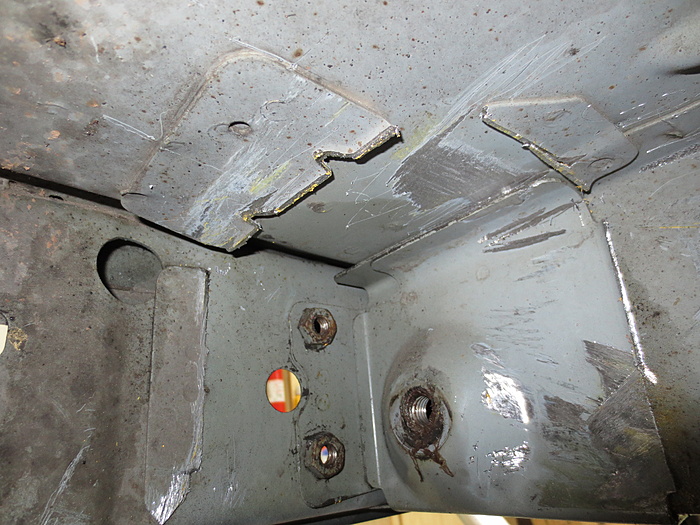
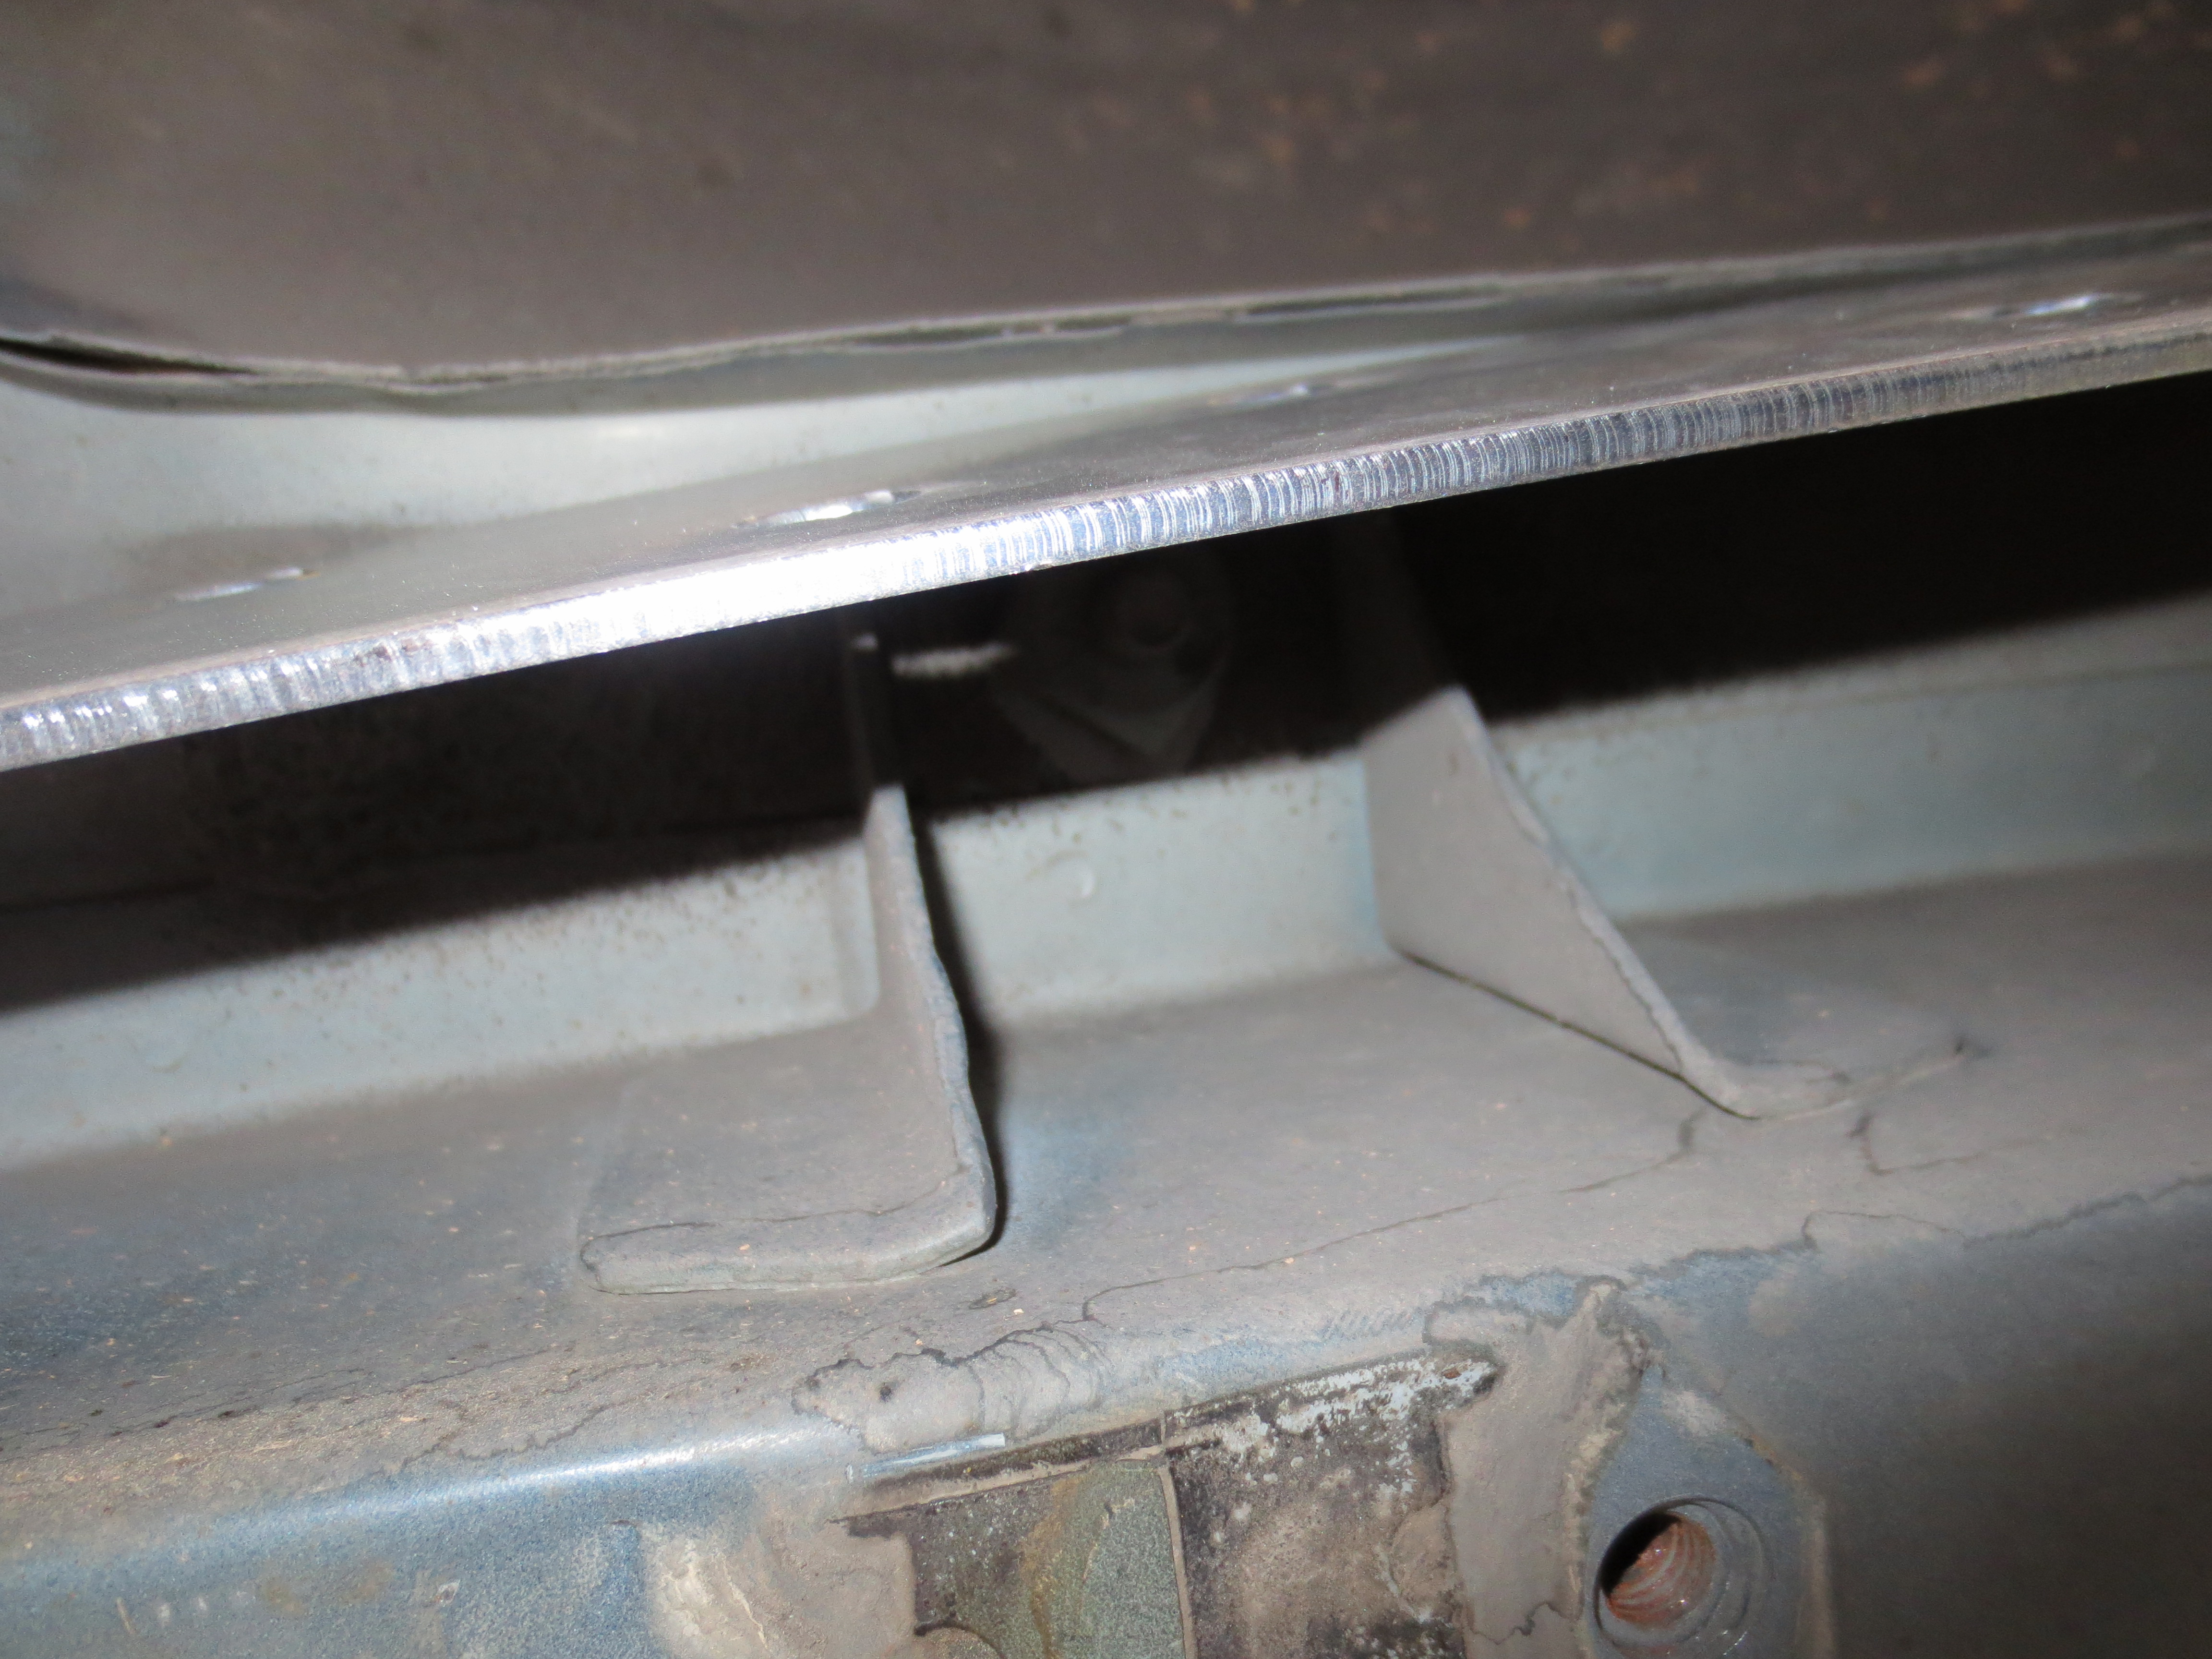
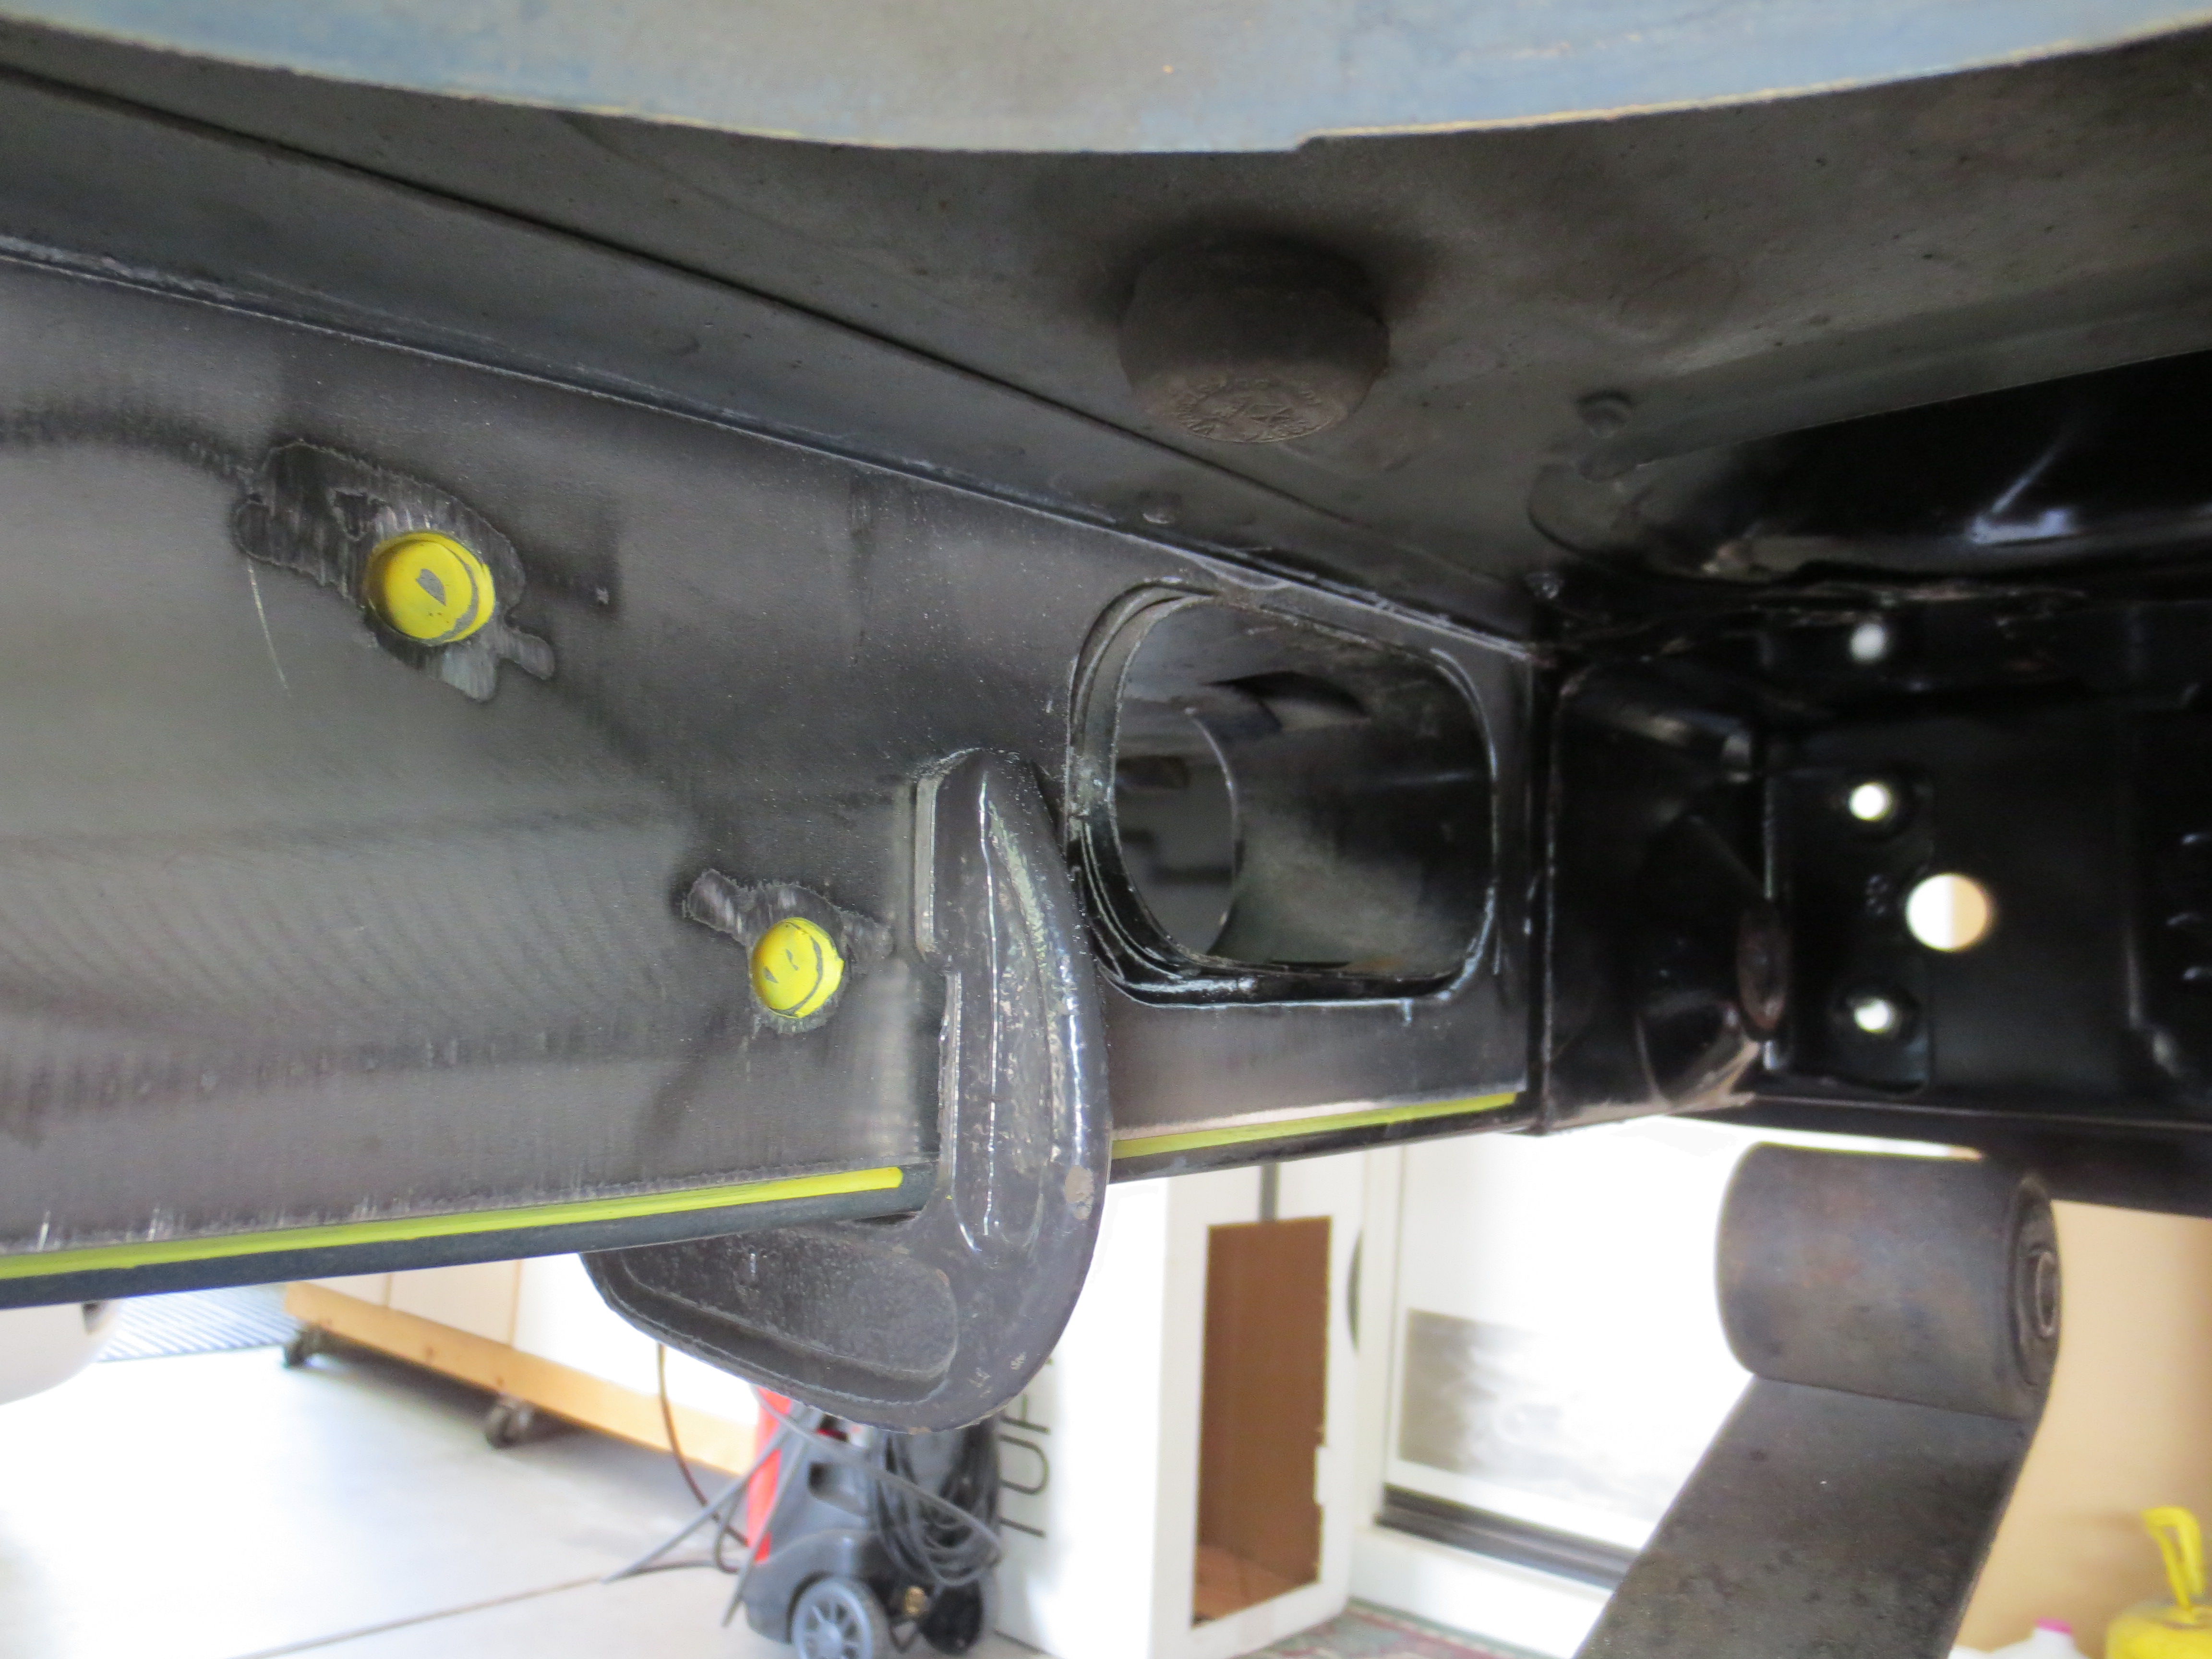
Too bad they don't give you a template for the seat belt mounts, it was a bit of trial and error to get these right

I decided to clearance for the whole mount rather than just slit it. I wanted the stiffener to sit flush and not raised up over the flange of the mounts. Also had to take some off the top edge for it to fit right
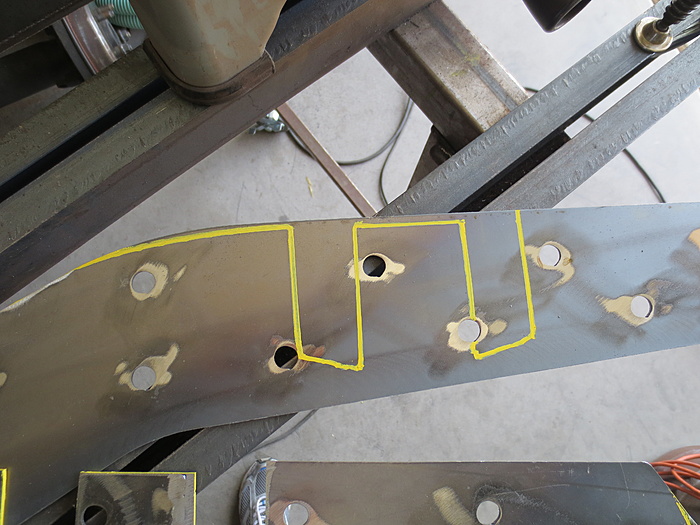
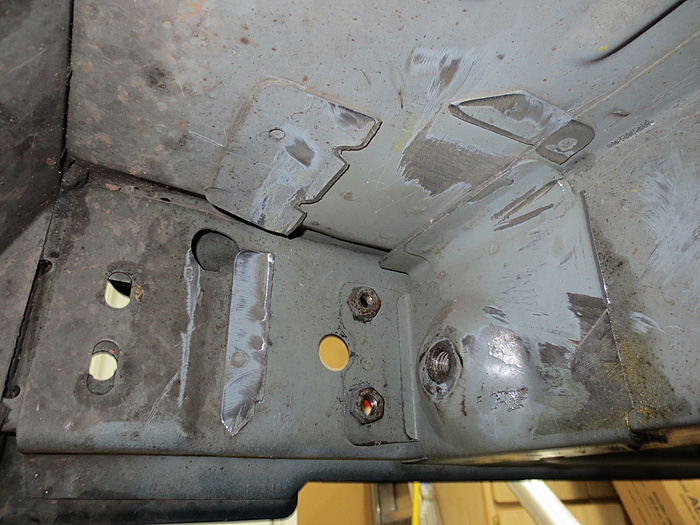
Mocked up and marked for grinding

Shackle relocation boxes had to be removed and I'd highly recommend removing the fuel hoses, I dropped the tank as I didn't want to weld anywhere near the hoses or fuel vapor. Honestly they needed to be changed anyways

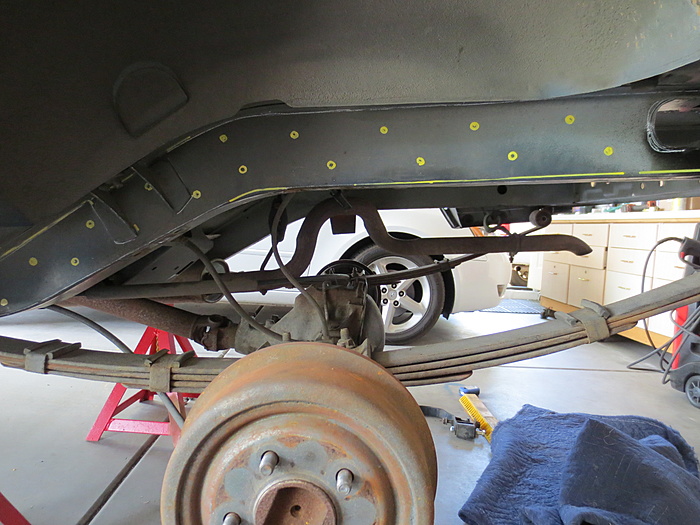
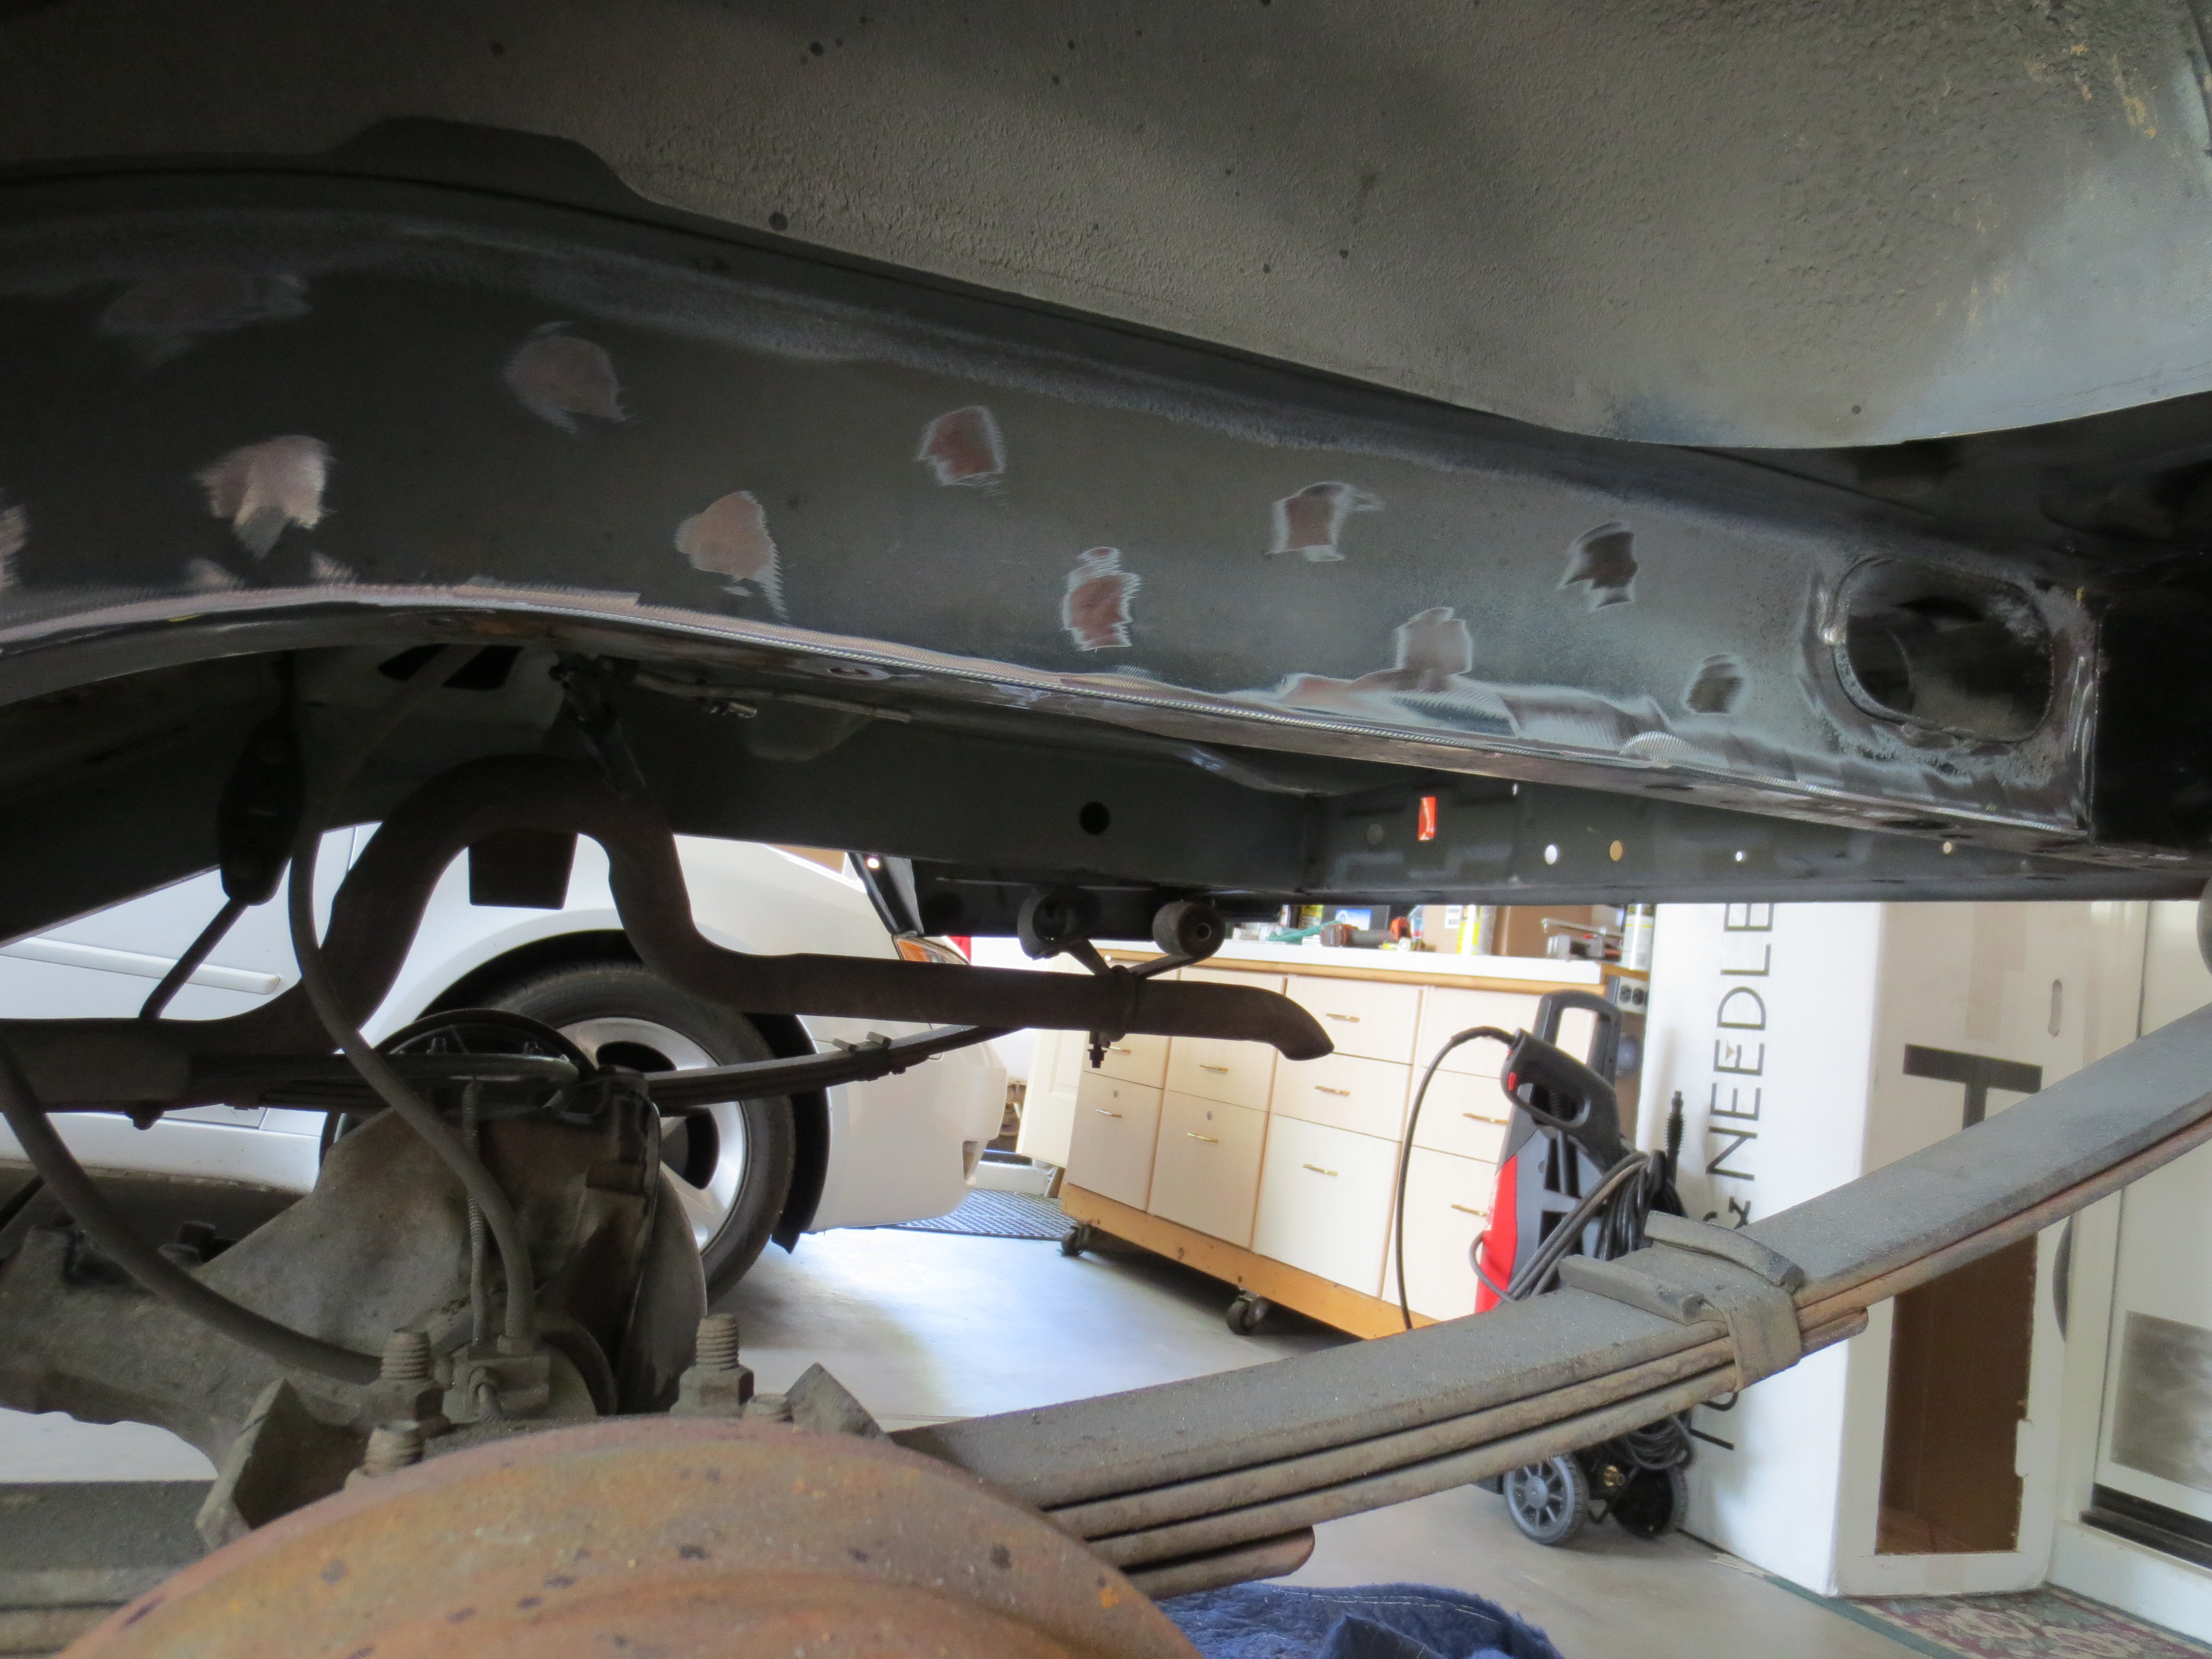
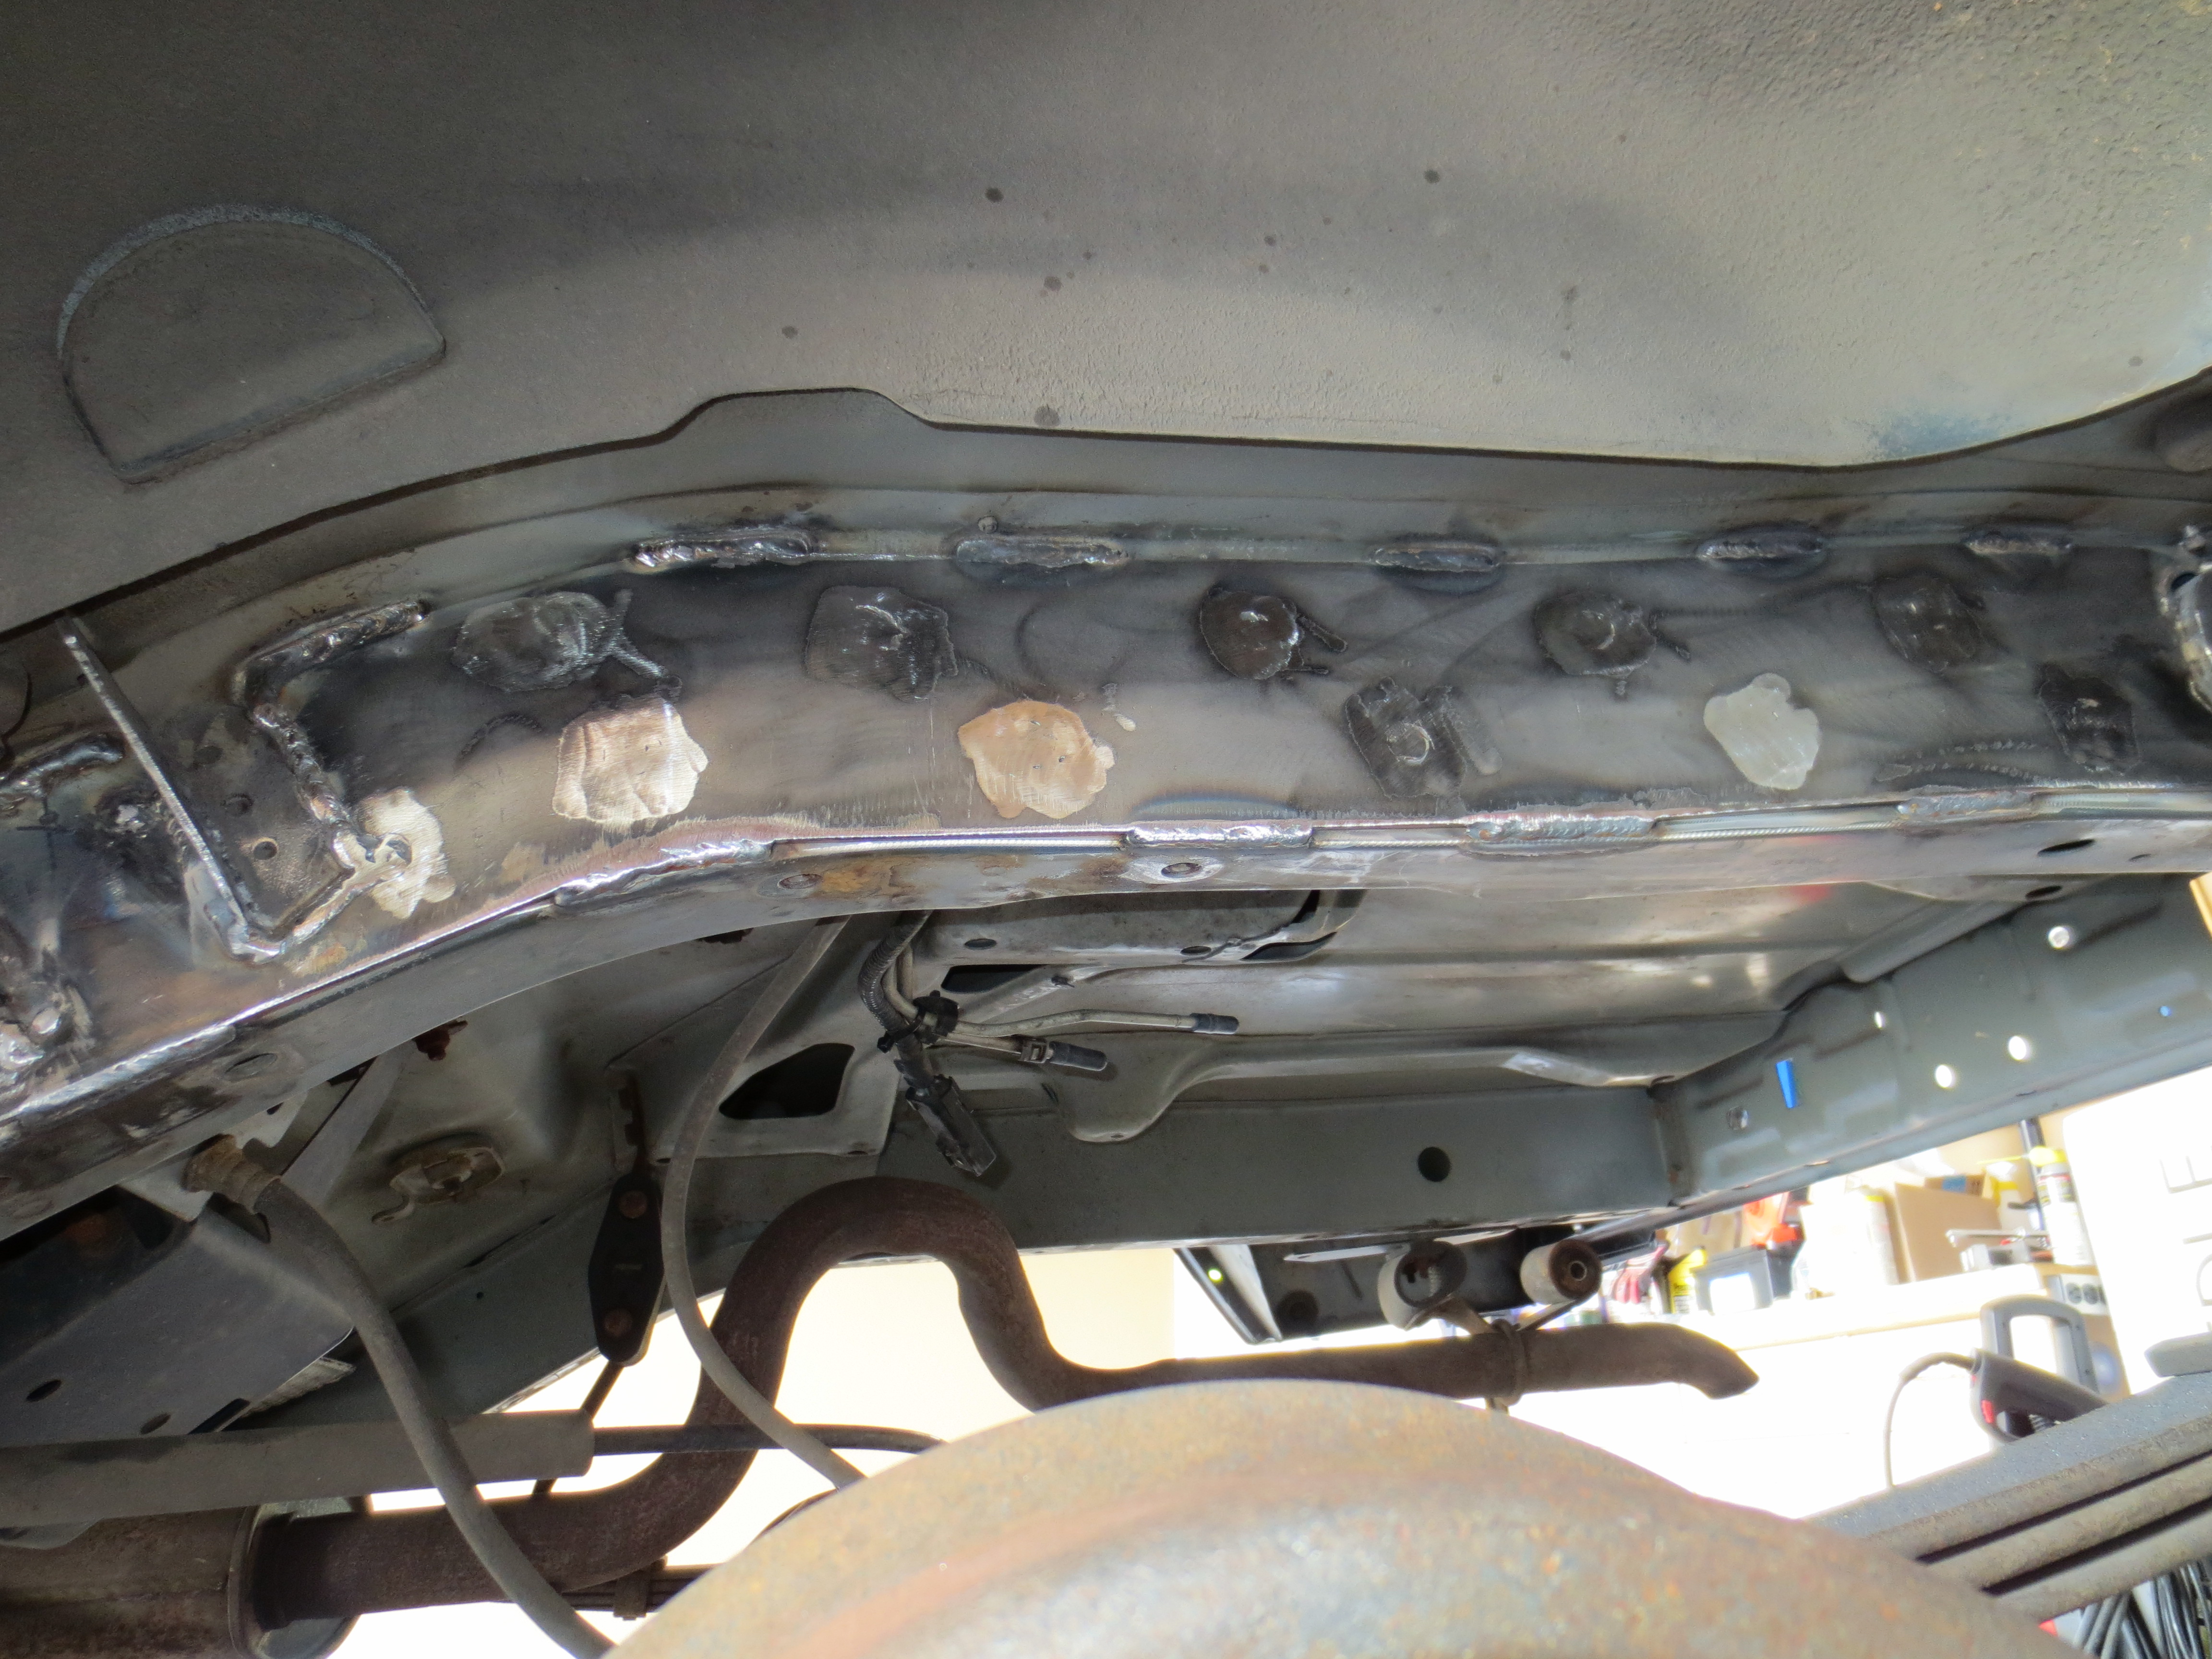
Cleaned up ready to weld

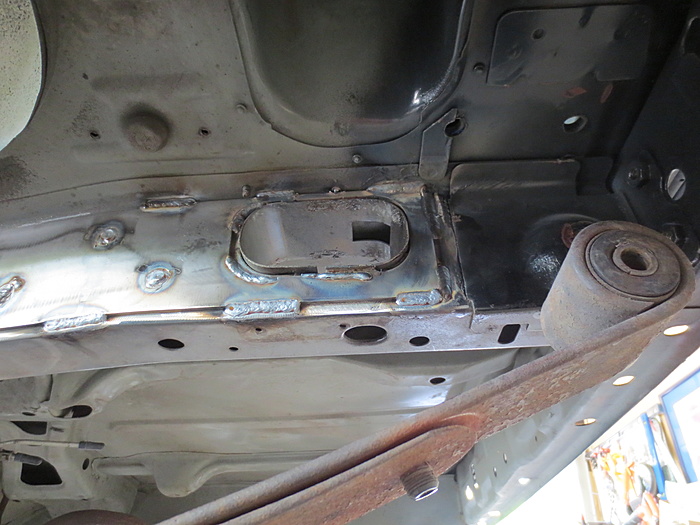
Almost done, I wasn't sure about removing the carpet, but I decided to move it at least. Drilled out the rivets for the cargo tie downs in the floor and lifted up the carpet. I checked it after welding the top edge of the stiffener and it was extremely hot on the cargo floor. Easily could've at least burned the insulation under the carpet or the carpet itself
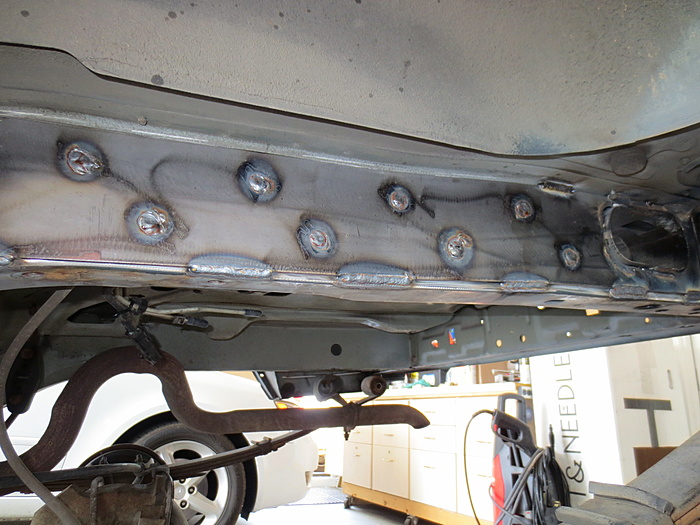
Done and ground the welds, ready for primer and undercoating
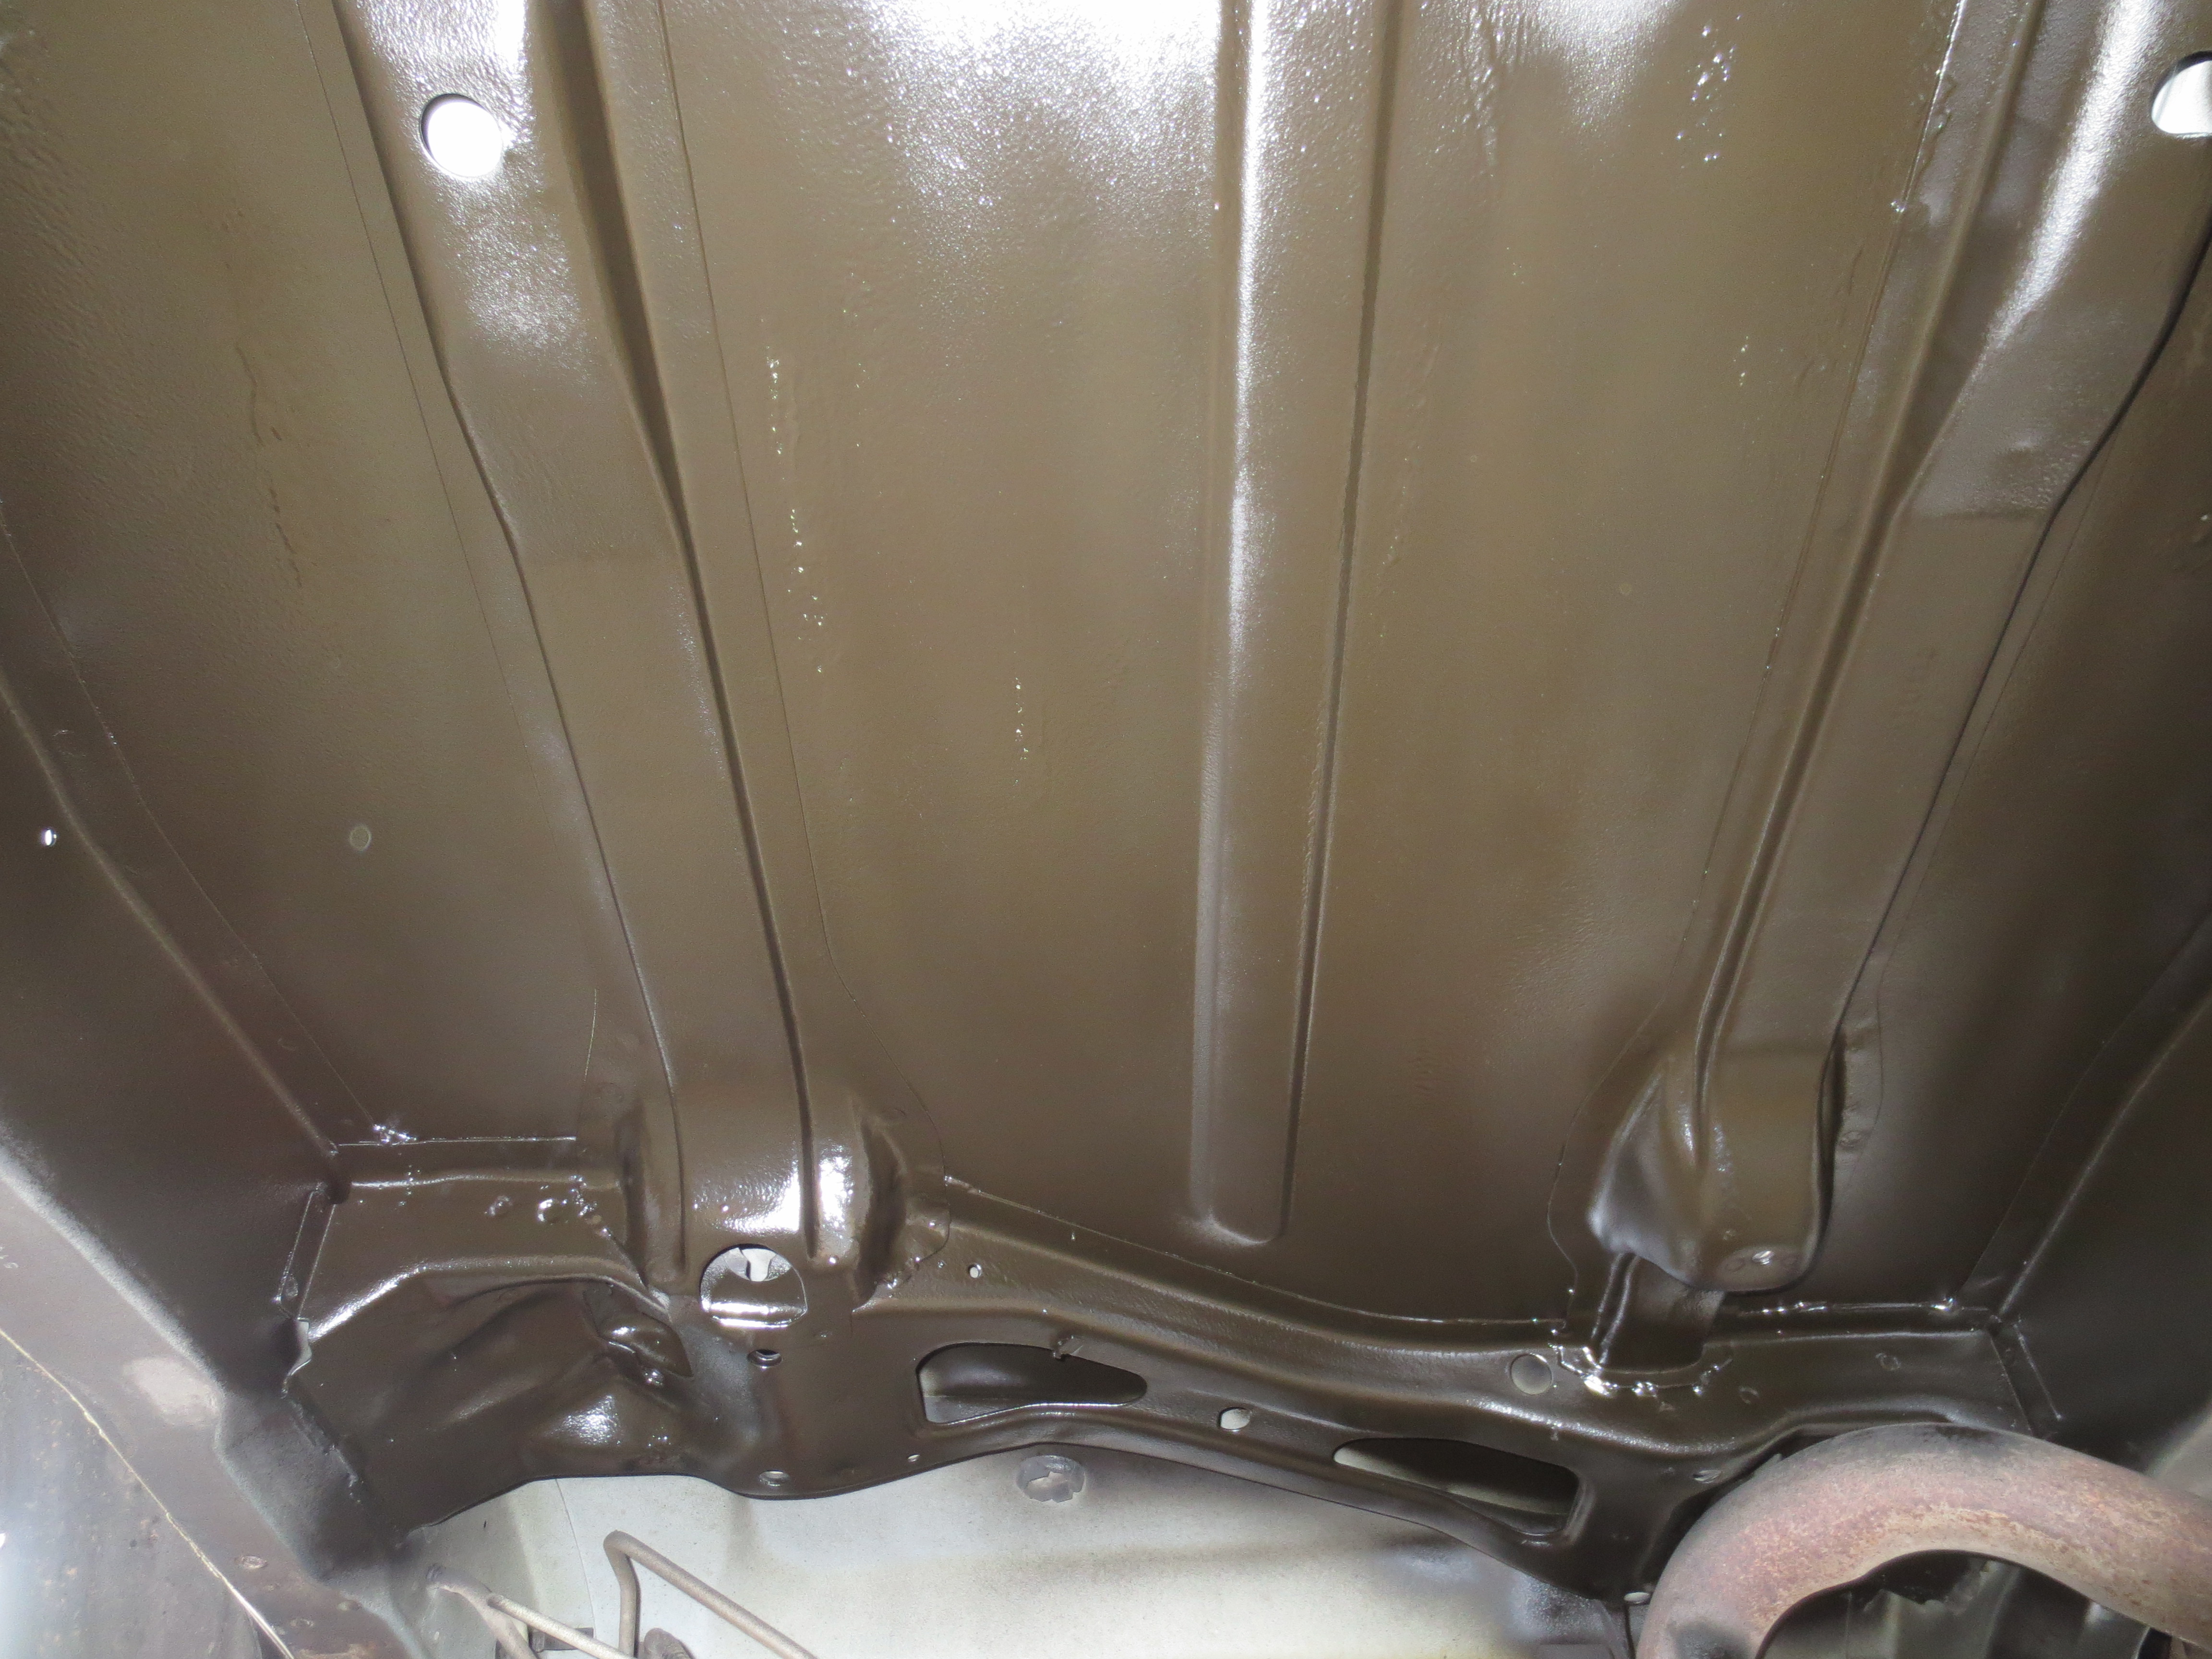
Undercoating done

Figured as long as the tank was out, I'd undercoat this area as well

Overall it took about half a day for the rear stiffeners, it's not too bad, but it's pretty hard getting the right angle at times, not a lot of fun without a lift. I'm not looking forward to the mids, I assume they'll be much more tedious!!
First welding project, rear frame stiffeners. I have to say, I really like this Hobart 210, huge upgrade from my old Lincoln 135, glad I finally upgraded!
On to some pics of the welding cart...


HD Offroad rear stiffeners

Have to cut this plate out for the fuel hoses

Too bad they don't give you a template for the seat belt mounts, it was a bit of trial and error to get these right
I decided to clearance for the whole mount rather than just slit it. I wanted the stiffener to sit flush and not raised up over the flange of the mounts. Also had to take some off the top edge for it to fit right
Mocked up and marked for grinding
Shackle relocation boxes had to be removed and I'd highly recommend removing the fuel hoses, I dropped the tank as I didn't want to weld anywhere near the hoses or fuel vapor. Honestly they needed to be changed anyways

Cleaned up ready to weld
Almost done, I wasn't sure about removing the carpet, but I decided to move it at least. Drilled out the rivets for the cargo tie downs in the floor and lifted up the carpet. I checked it after welding the top edge of the stiffener and it was extremely hot on the cargo floor. Easily could've at least burned the insulation under the carpet or the carpet itself


Done and ground the welds, ready for primer and undercoating
Undercoating done


Figured as long as the tank was out, I'd undercoat this area as well

Overall it took about half a day for the rear stiffeners, it's not too bad, but it's pretty hard getting the right angle at times, not a lot of fun without a lift. I'm not looking forward to the mids, I assume they'll be much more tedious!!
Trending Topics
CF Veteran
Joined: Apr 2014
Posts: 1,419
Likes: 1
From: Detroit, MI
Year: 1997
Model: Cherokee
Engine: I6 4.0L
Wow! That's gotta be the cleanest XJ I've ever seen. Great find! Really like the work you're doing. Definitely going about things the right way. I'll be watching.
Junior Member
Joined: Mar 2017
Posts: 46
Likes: 0
From: Ft Hood
Year: 2000 Sport
Model: Cherokee
Engine: 4.0
WOW! Thats one hell of a clean XJ. Its always better to start modding a virgin Xj that way you take whatever route you want at your own pace with your own taste. I really like how you are taking pics of all the steps. I too need to get more into welding I have a small lincoln wire fed welder collecting dust I dont know if I can get professional results out of it. Im looking forward to see your 8.8 swap.
Thread Starter
Member
Joined: Jan 2017
Posts: 125
Likes: 2
From: Anthem, AZ
Year: 2001
Model: Cherokee
WOW! Thats one hell of a clean XJ. Its always better to start modding a virgin Xj that way you take whatever route you want at your own pace with your own taste. I really like how you are taking pics of all the steps. I too need to get more into welding I have a small lincoln wire fed welder collecting dust I dont know if I can get professional results out of it. Im looking forward to see your 8.8 swap.
I had a Lincoln 135 for about 15 years and it served me well. I built a sand rail, a trailer from scratch and modified a few trailers plus countless little projects. I was good with it up to 3/16", maybe 1/4" for non critical welds. Easy to achieve professional welds with it as long as you know it's limitations. I was constantly switching between flux core and solid wire depending on what I was welding. I hate flux core, it's just so messy and requires too much clean up, but it's needed for thicker material as it burns hotter than solid wire. Just practice and research all you can. There are some you tube channels that give some good tips, one good one is welding tips and tricks, check it out and practice, practice, practice!!
I'm still researching which axles to use, trying to get the parts together to get the 8.8 under there, but I'm starting to consider 44/9 combo. I doubt I'll go that route, it will kill my "budget", we'll just have to see.
Not sure what I'm doing next, I'm thinking I want to get the rear mostly done besides the axle and bumper. I might trim the fenders and cut and fold the rear 1/4 next. I'm also doing some little things here and there, door speakers and deadening the doors a bit with some roofing underlayment. Not sure how it compares to actual automotive sound deadeners, but it's much, much cheaper!! I haven't taken any pictures of that stuff as it's not too exciting and pretty common.
I thinking I might start on the rear fenders next, I'm not doing the cut and fold, I think I'll cut along the body/fender trim line just above the pinch weld and see what happens. I can't find any good write ups on it, most are cut and fold. I know I'll have to weld the seam, so we'll see how comfortable I am welding sheetmetal, never really done it, oh well, what could go wrong?

Last edited by jbennett; Apr 19, 2017 at 07:47 AM.
Thread Starter
Member
Joined: Jan 2017
Posts: 125
Likes: 2
From: Anthem, AZ
Year: 2001
Model: Cherokee
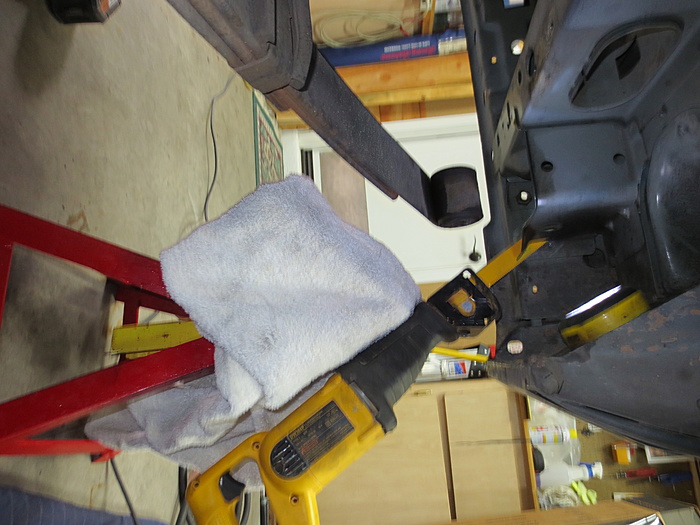
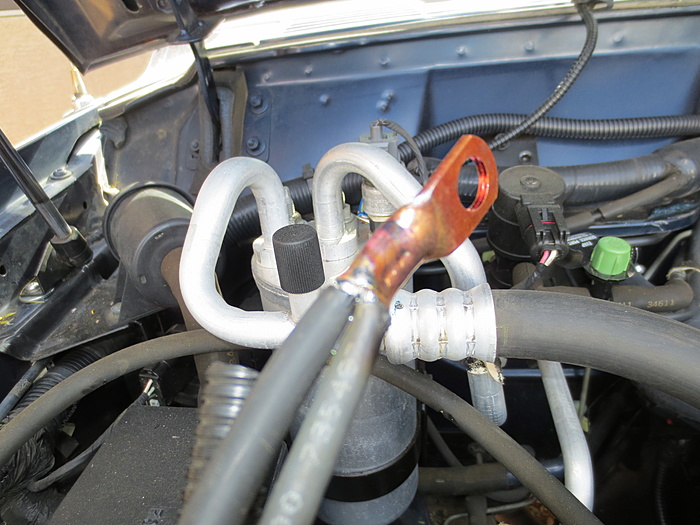
I had a little more fun today, I figured I'd try and remove the forward leaf spring bolts and get these stock springs out of the way. Should've done it before, but didn't want to deal with the hassle yet. I soaked the bolts when I got home today. Only waited a few minutes and figured I'd try and break them loose. Tried a long 1/2" ratchet, not a chance! Moved on to a 24" breaker bar and broke the drivers side loose. It sounded like something snapped and it didn't want to move anymore, so I sprayed some more PB on it and moved to the pass side. Same thing, barely budged and sprayed some more PB and left it alone and went inside to see if I could get any tips online while it soaked.
Most said to soak it every few days and wait a week, a lot broke the weld nut and some were seized on the inner bushing. I thought I may have broke the weld, but it was still tight, so figured I might be ok. I went back to the garage after maybe 15 minutes and worked on the drivers side. It was tight, but it started coming loose, made horrible noises for the first few turns, then started getting smoother and came out pretty easily. Got lucky this time and knew I couldn't be lucky enough to have the pass side be this easy!
Sure enough, pass side would move a little and lock up. I got it maybe a 1/4 turn loose, then tighten, then loosen, then tighten, spray more PB and repeat. It finally started turning a little easier, but still not like the drivers side. Turns out the bushing was frozen on the bolt and the shackle mount was spreading apart as the bolt loosened up. So what now? Don't really want to cut the bolt if I don't have to, so I figured I'd try and push the shackle mount and hopefully break the bushing loose on the bolt. Got a 1-1/16" socket to fit over the bolt head and push against the shackle. I beat on it with a little 4lb sledge, didn't work at first, then it started moving. I was able to loosen the bolt, but it's still stuck, tried prying on it while turning it, but it just won't let go. Sprayed some more PB, tried a few more times and gave up. Sprayed more PB and hope it will soak in overnight and be easier tomorrow.
I give up for now.
Sorry for no pictures, I'm not able to upload any at the moment, I'm getting this error message...
Your submission could not be processed because a security token was missing.
If this occurred unexpectedly, please inform the administrator and describe the action you performed before you received this error.
If this occurred unexpectedly, please inform the administrator and describe the action you performed before you received this error.
Thread Starter
Member
Joined: Jan 2017
Posts: 125
Likes: 2
From: Anthem, AZ
Year: 2001
Model: Cherokee
I gave in and cut the leaf spring bolt out, the sleeve just wouldn't let go.
Didn't do much on it lately, but I had today off work and was able to get a few things done.
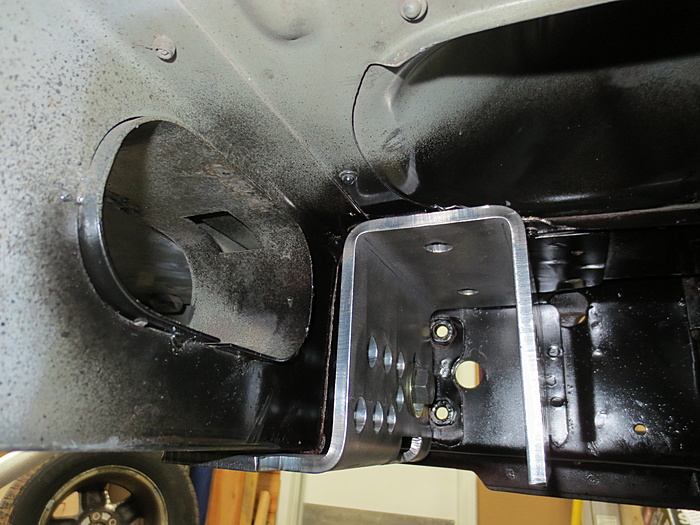
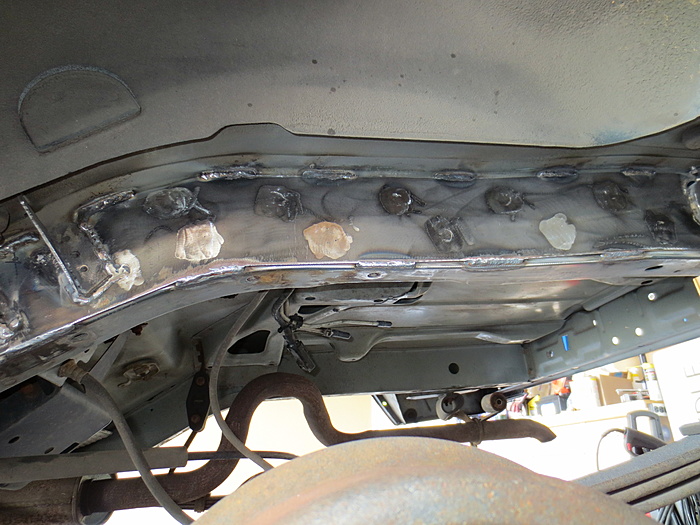
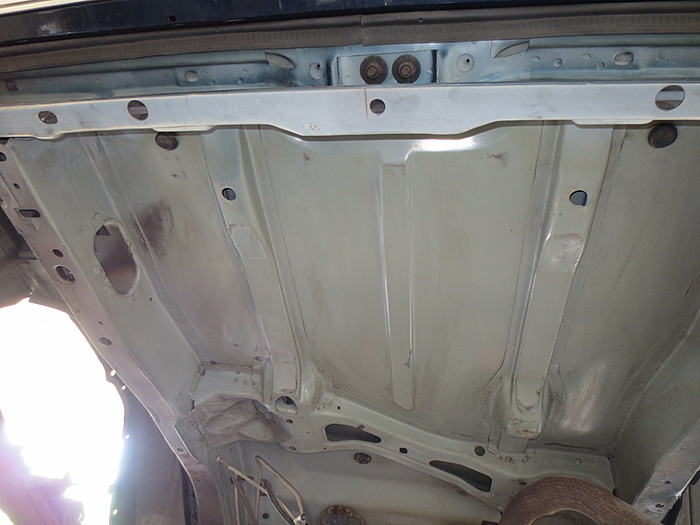
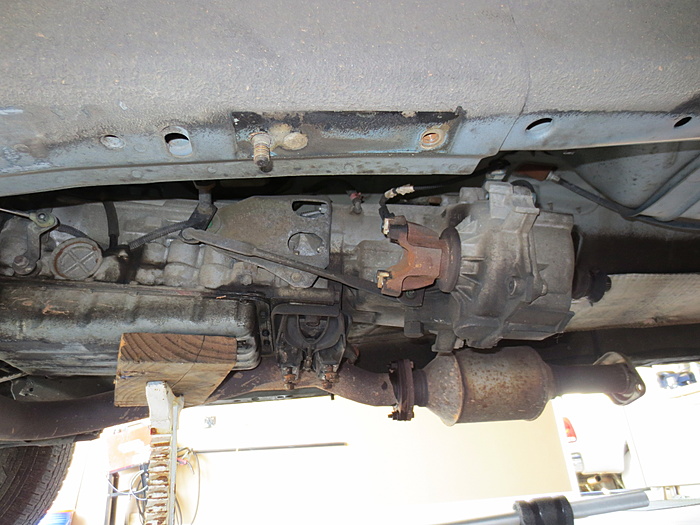
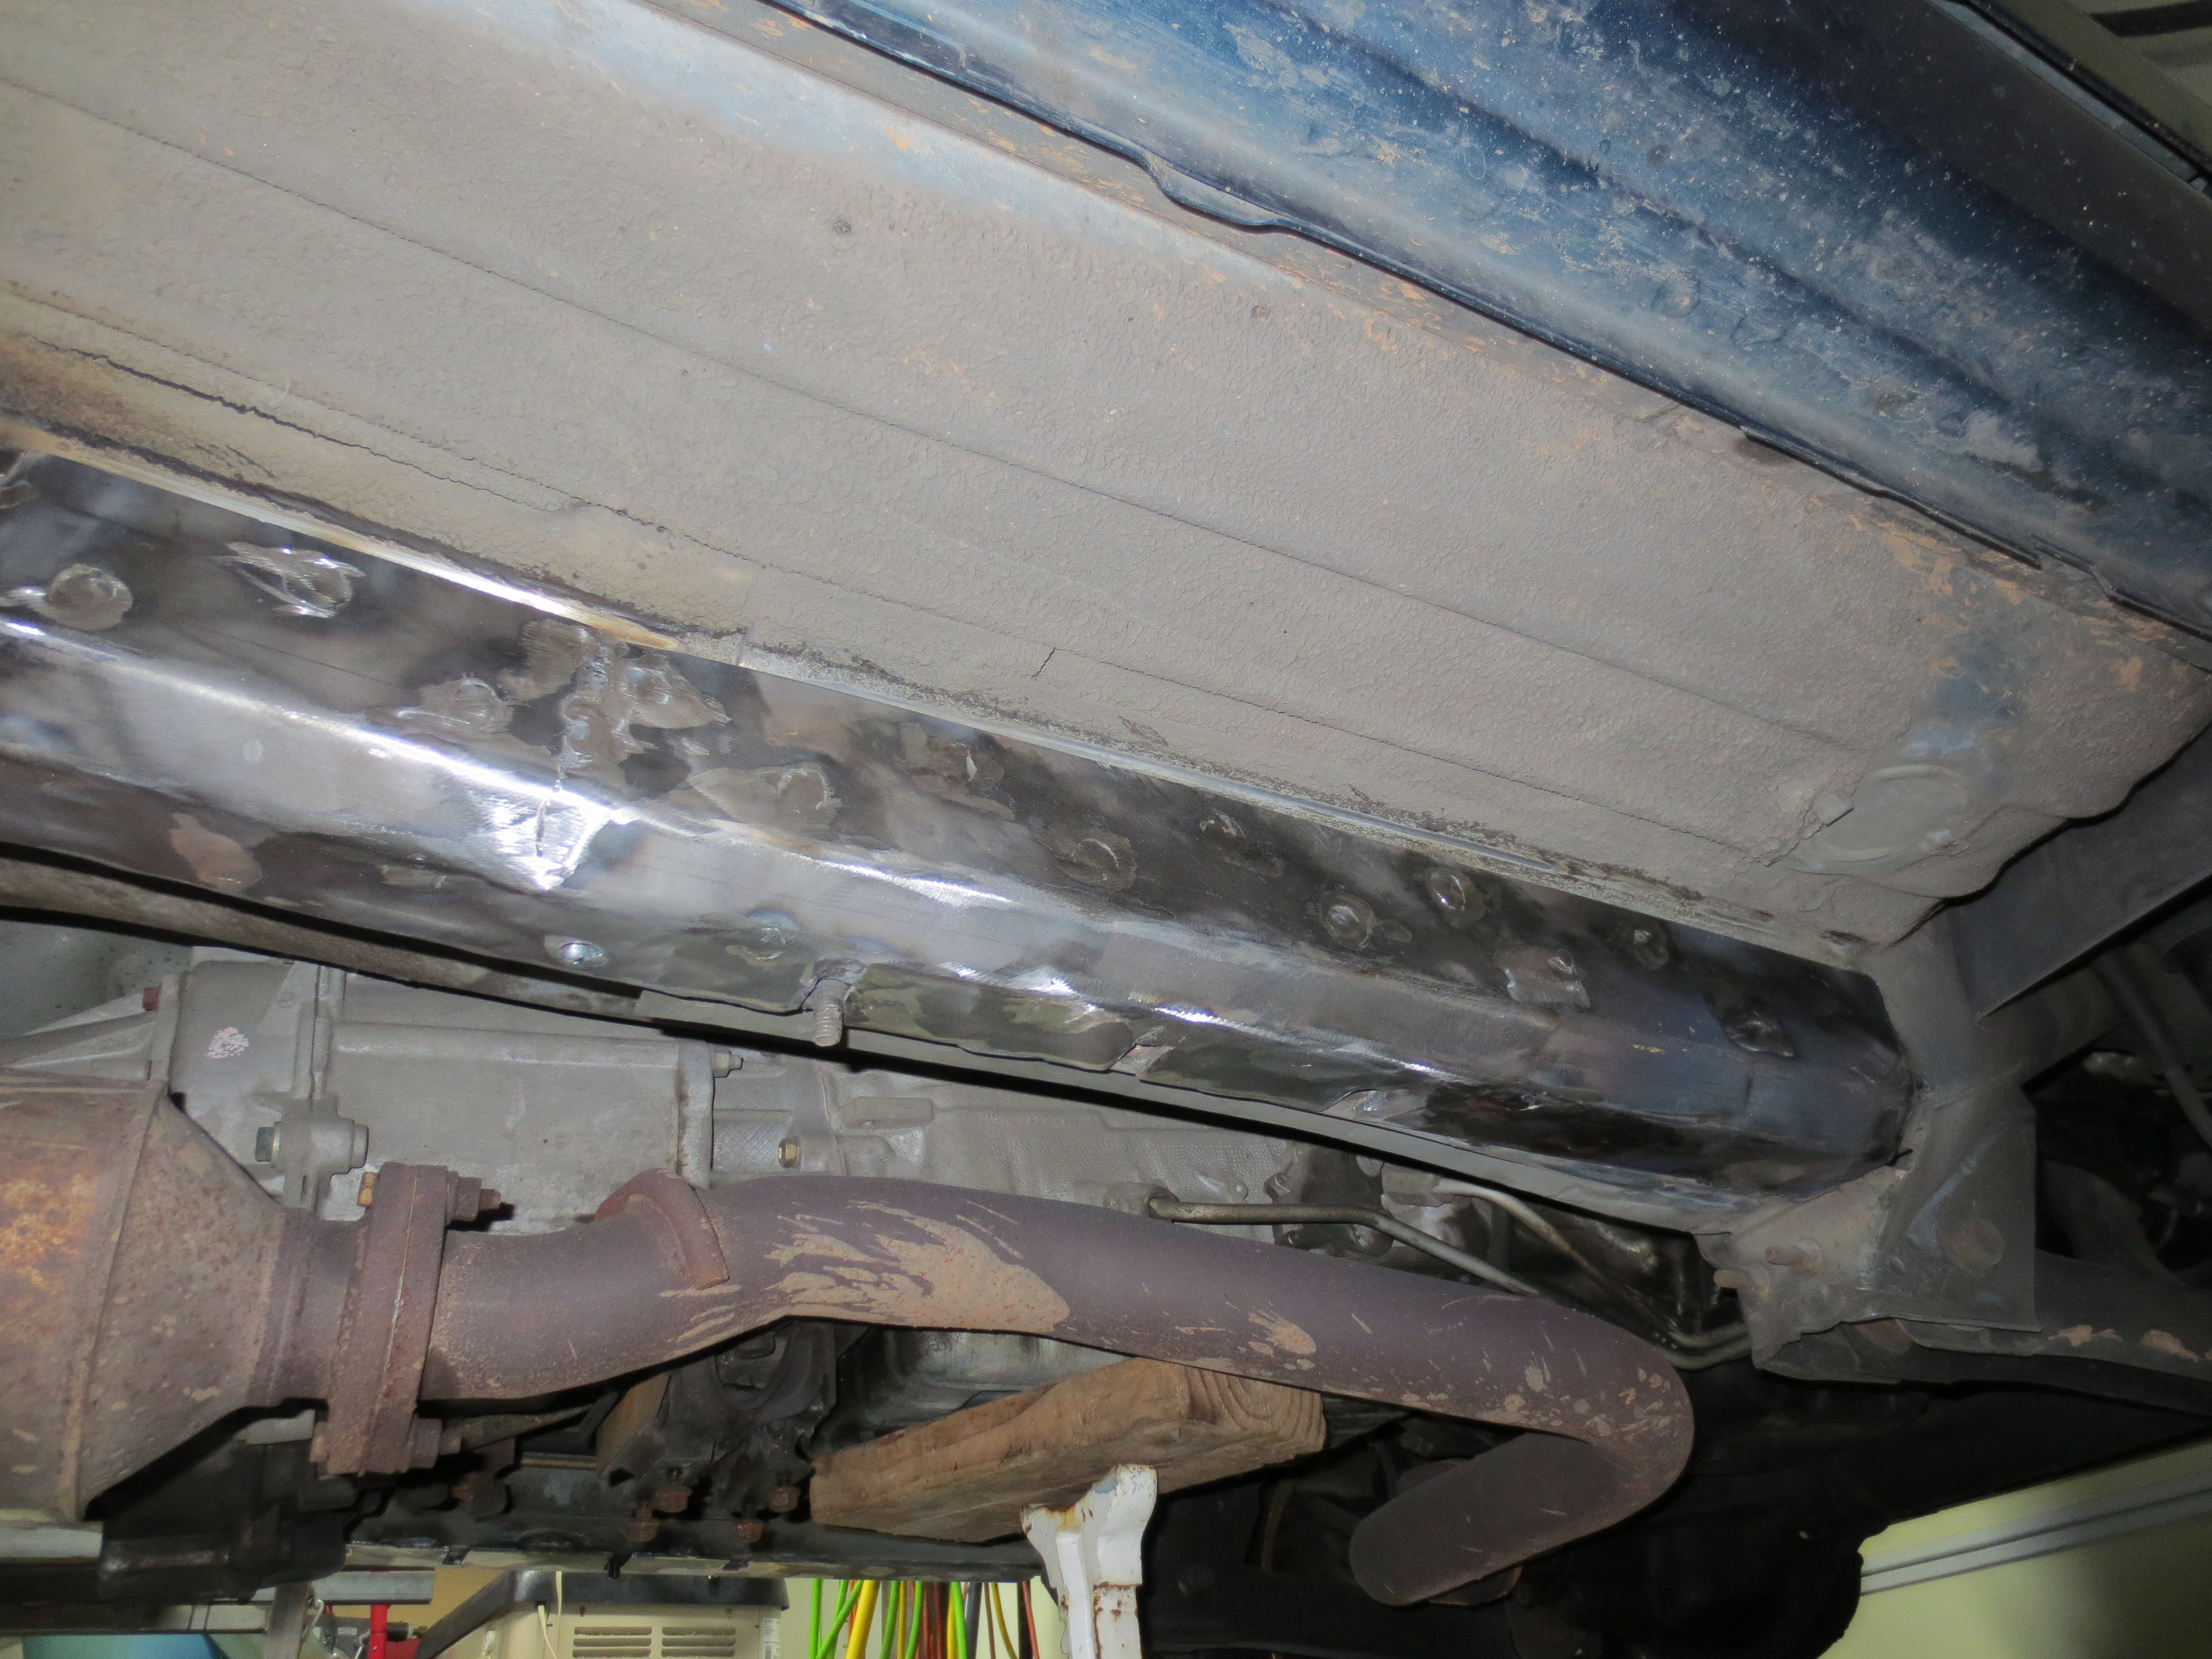
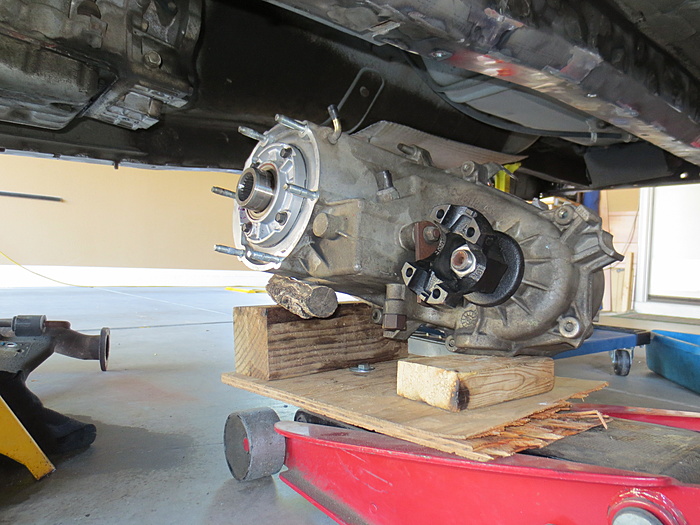
The rear axle is removed, both driveshafts out, some of the exhaust removed, got the trans cross member out so I could install the mid frame stiffeners and will be pulling the transfer case to install the SYE soon.
I got the drivers side mid stiffener done, that was not fun at all!!! It didn't really want to line up very well and welding upside down and at horrible angles sucks, could barely see what I was doing half the time! Turned out fine I think, I didn't weld the top edge at all, I didn't want to pull the seats and lift the carpet. Not sure if I'll do it later, but I really don't think it will make any difference.
Hopefully I can get the passenger side done this weekend and maybe start on the SYE.
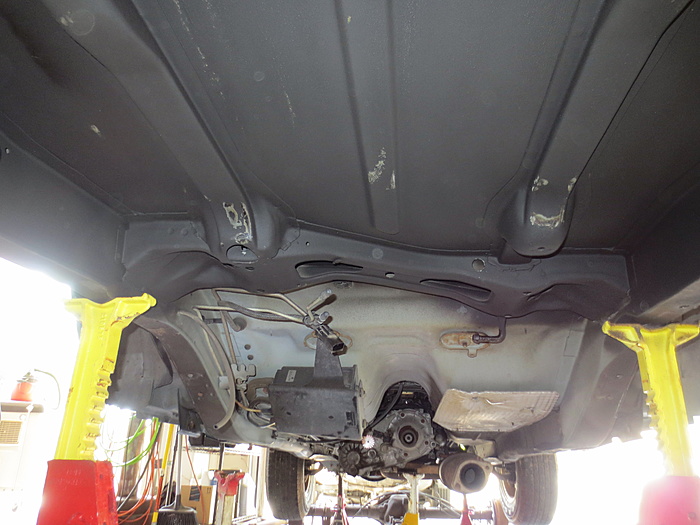
Rear axle removed, exhaust mostly removed. I guess the undercoating doesn't really hold up too well, you can see where the tank rubbed it off when I installed it
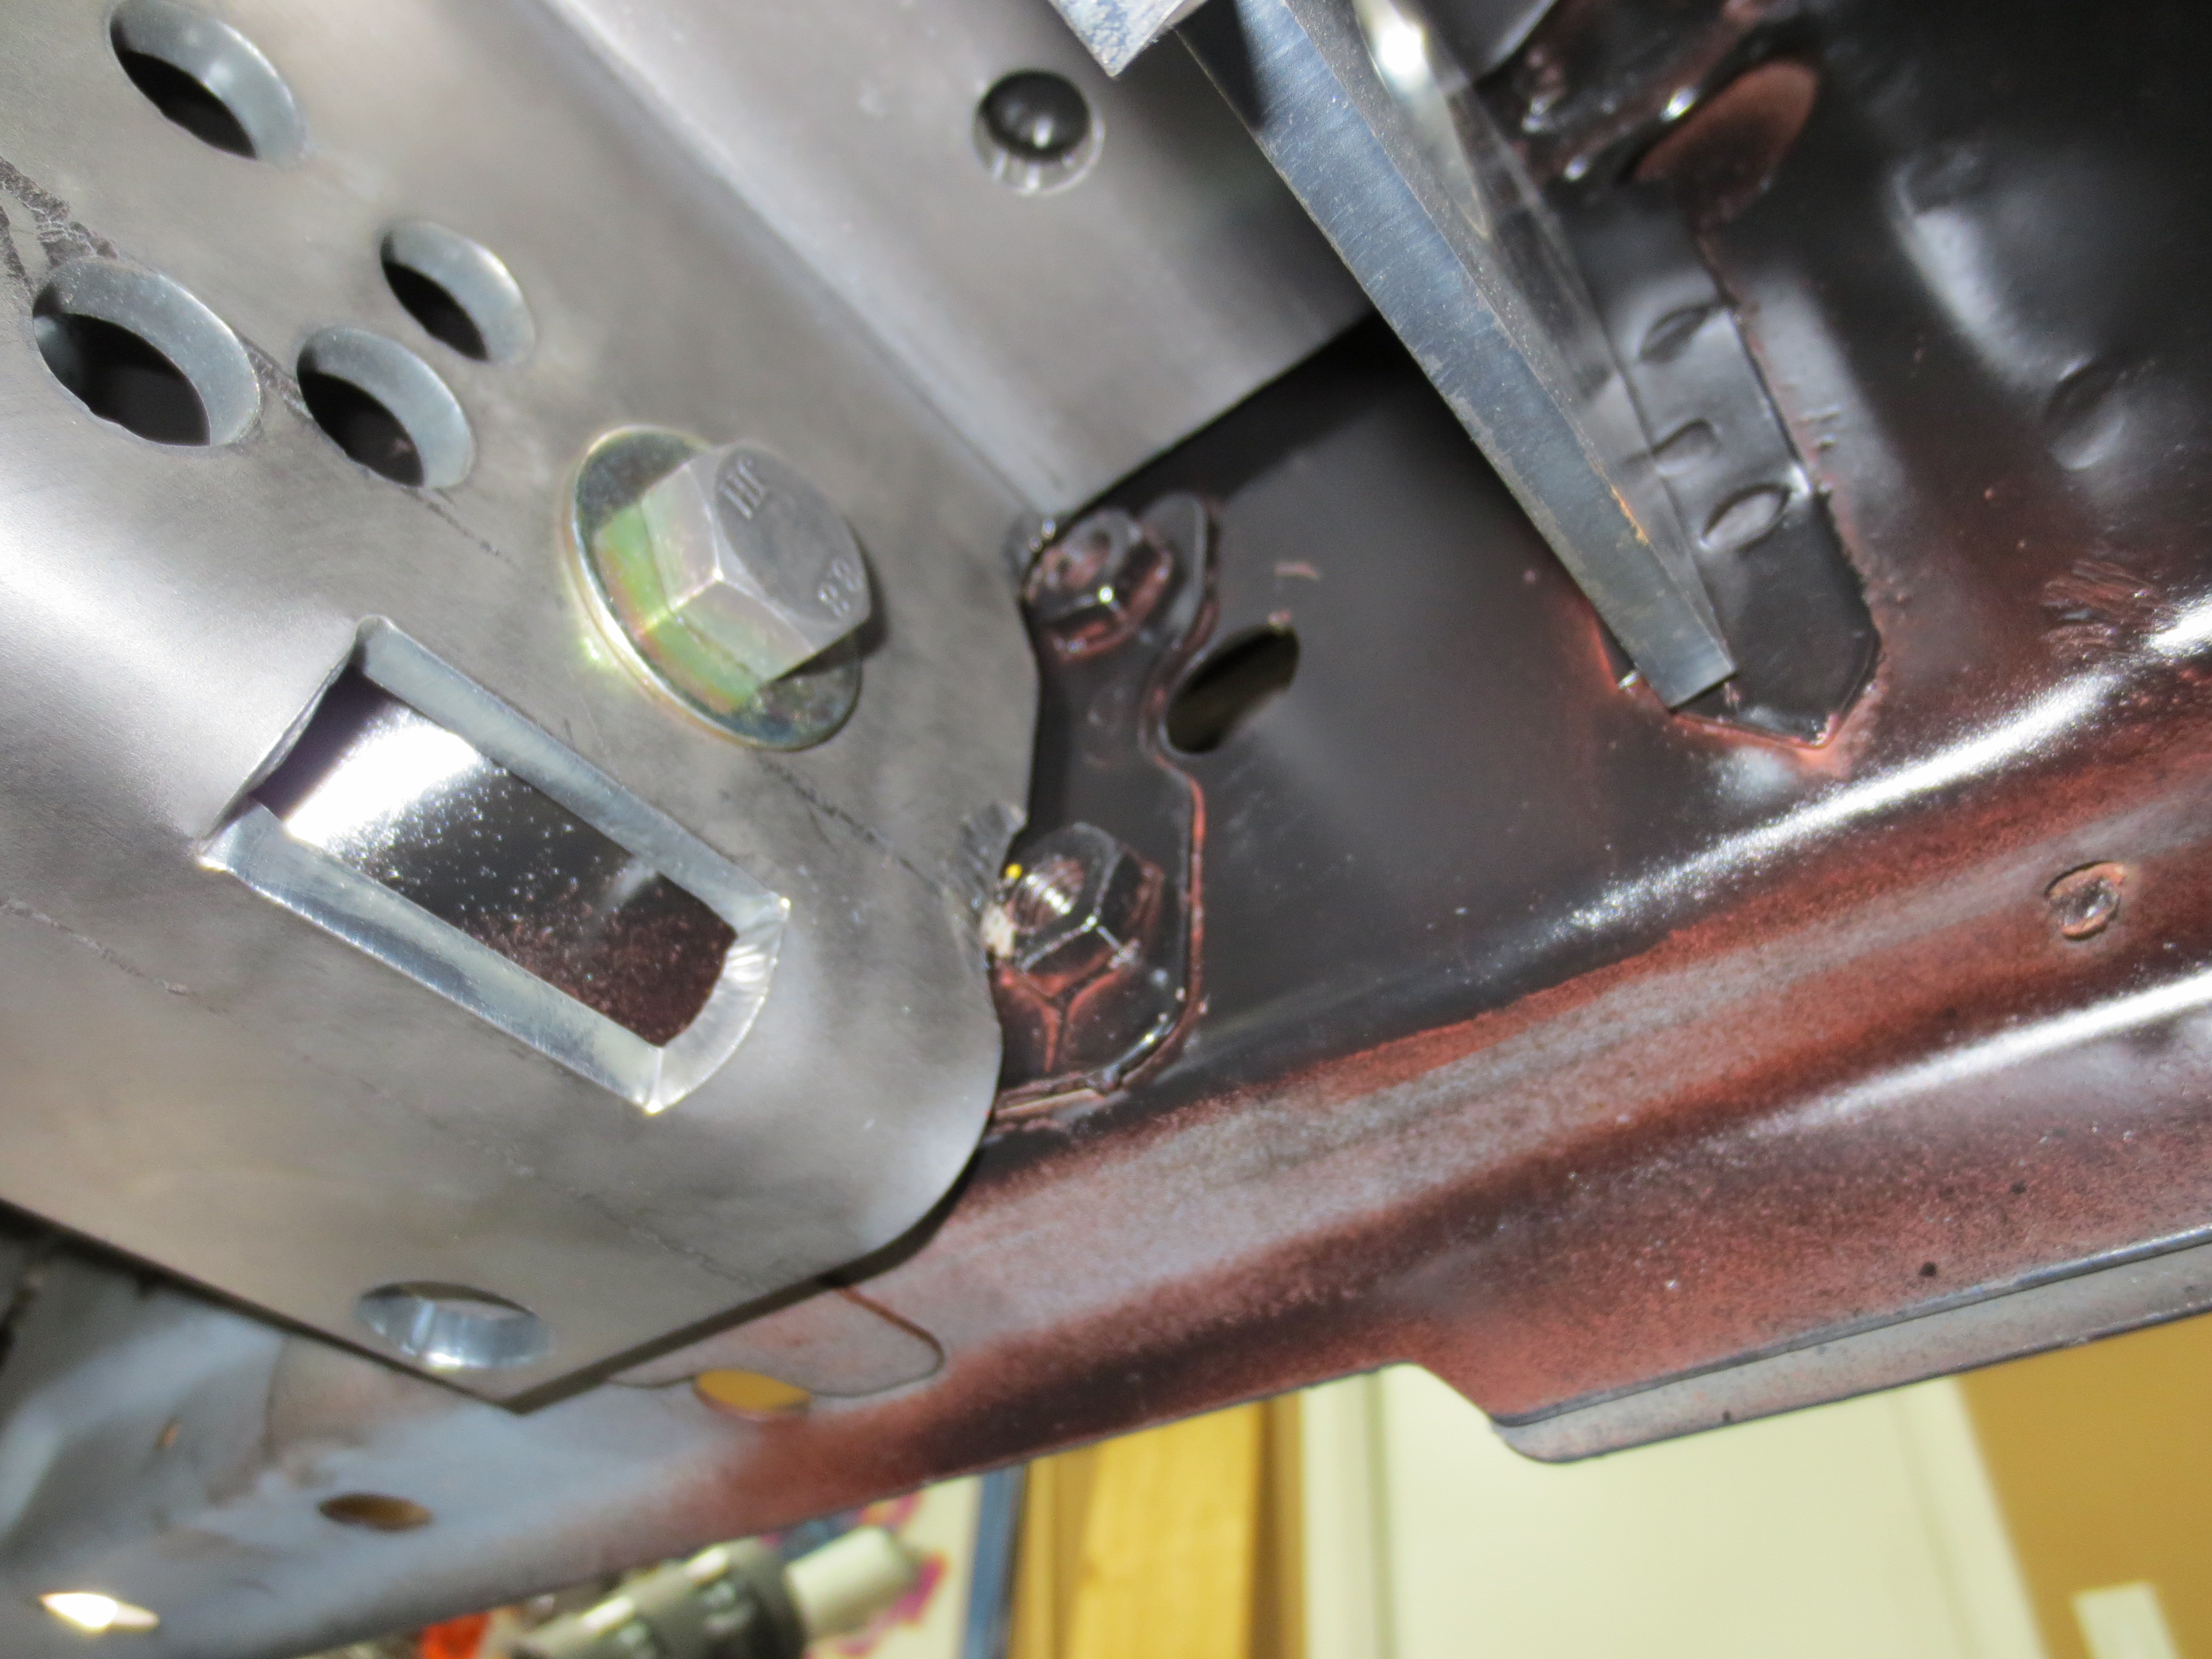
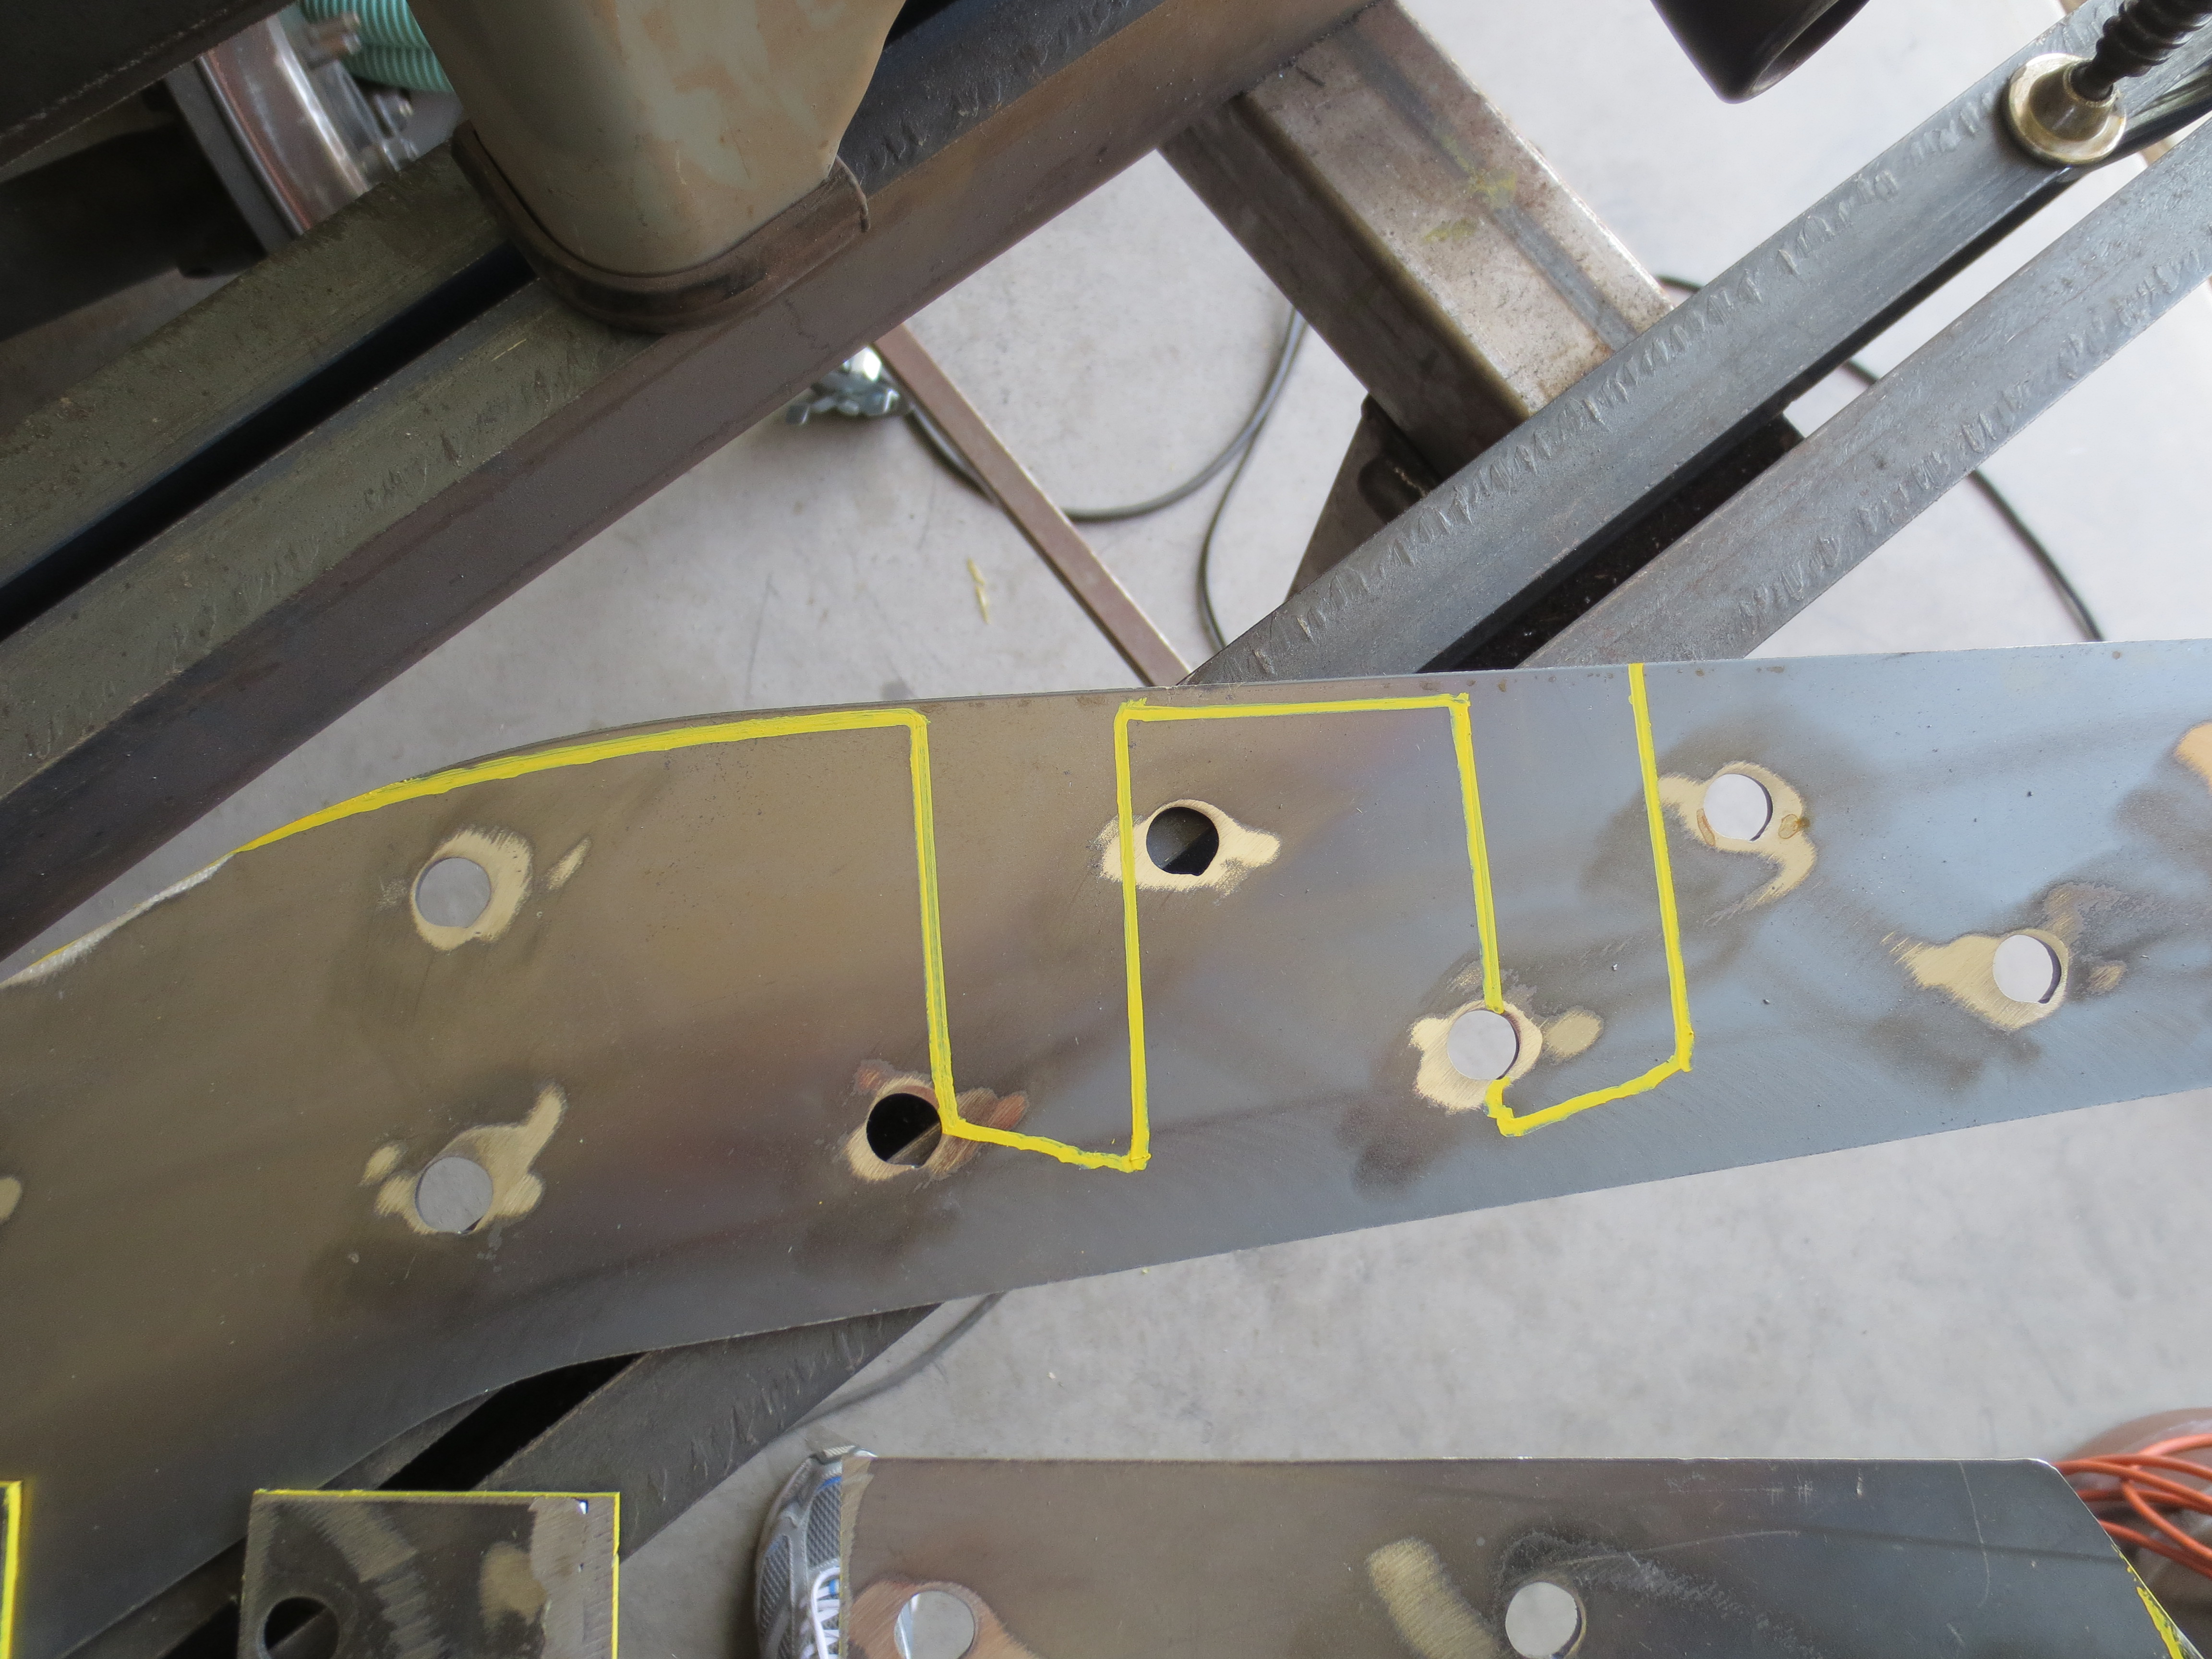
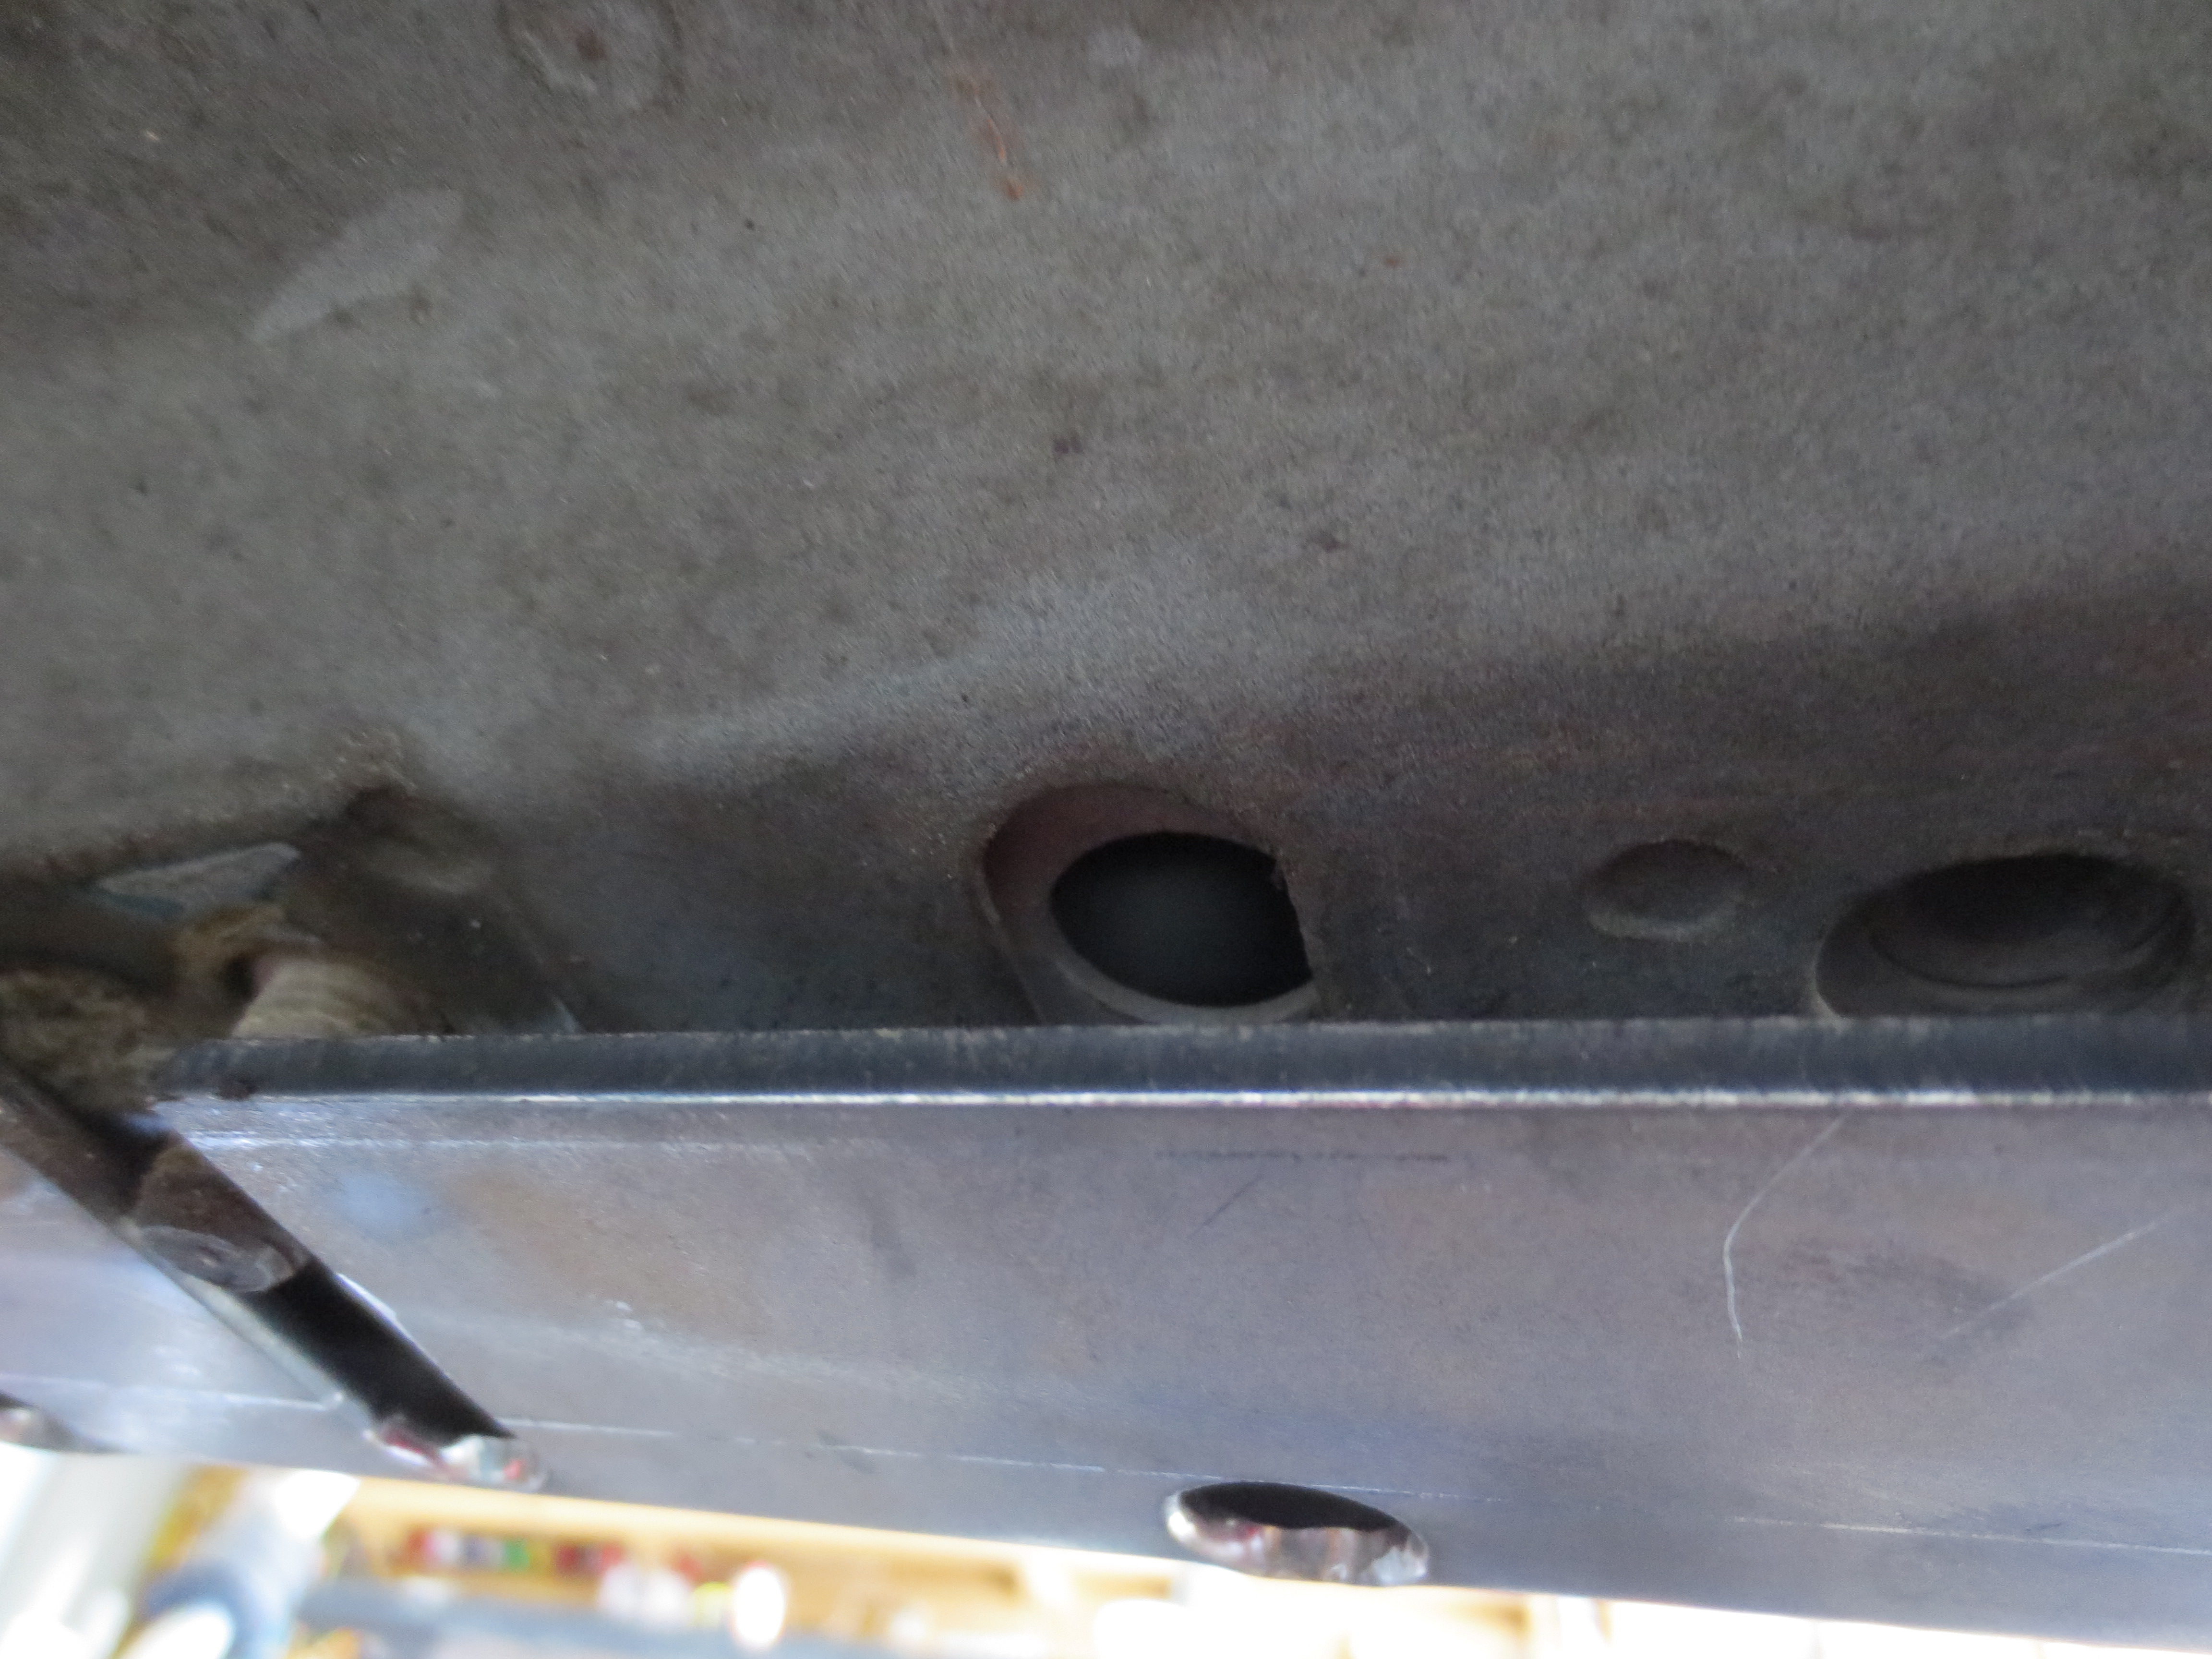
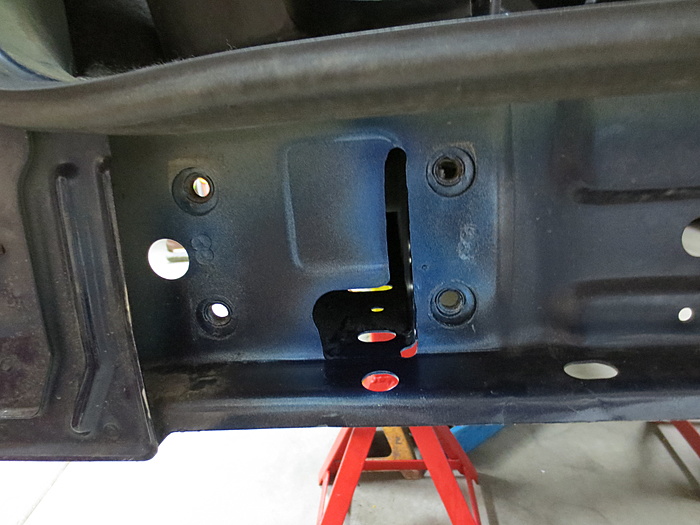
Three holes to mount the new crossmember, one unthreaded hole left of the stud needs 1/2-13 tap and the hole to the right is threaded. The stud will get removed and a bolt put in its place
The stiffeners are notched for the original mounting points, have to clearance it for the forward hole. You can see it at the far right of the pic

Marked, ready for grinding

Installed

Didn't do much on it lately, but I had today off work and was able to get a few things done.
The rear axle is removed, both driveshafts out, some of the exhaust removed, got the trans cross member out so I could install the mid frame stiffeners and will be pulling the transfer case to install the SYE soon.
I got the drivers side mid stiffener done, that was not fun at all!!! It didn't really want to line up very well and welding upside down and at horrible angles sucks, could barely see what I was doing half the time! Turned out fine I think, I didn't weld the top edge at all, I didn't want to pull the seats and lift the carpet. Not sure if I'll do it later, but I really don't think it will make any difference.
Hopefully I can get the passenger side done this weekend and maybe start on the SYE.
Rear axle removed, exhaust mostly removed. I guess the undercoating doesn't really hold up too well, you can see where the tank rubbed it off when I installed it

Three holes to mount the new crossmember, one unthreaded hole left of the stud needs 1/2-13 tap and the hole to the right is threaded. The stud will get removed and a bolt put in its place

The stiffeners are notched for the original mounting points, have to clearance it for the forward hole. You can see it at the far right of the pic
Marked, ready for grinding
Installed
Last edited by jbennett; Apr 29, 2017 at 09:10 AM.
Thread Starter
Member
Joined: Jan 2017
Posts: 125
Likes: 2
From: Anthem, AZ
Year: 2001
Model: Cherokee
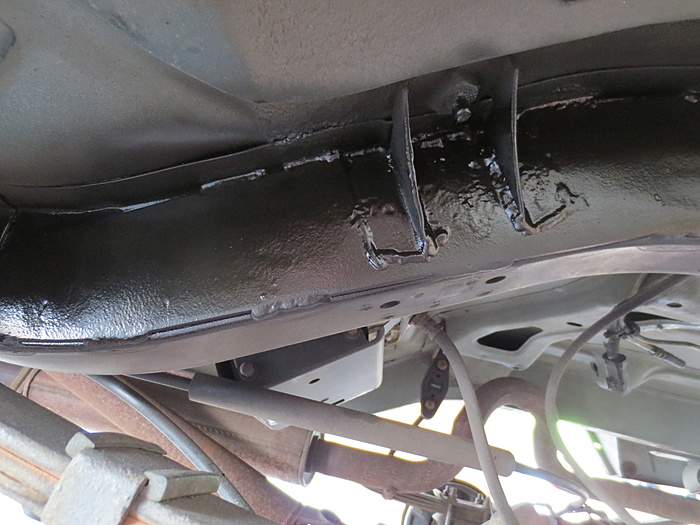
I really didn't want to do the passenger side stiffeners!! It was actually a lot easier than the drivers side though, maybe it was because I knew what problems to look for or maybe I just found some better positions to get in to weld upside down, either way, it was easier and faster than the drivers side. Still not fun, but at least they are done. Fronts are all that are needed now, but they will be a while, I'll do them when I have the front axle out.
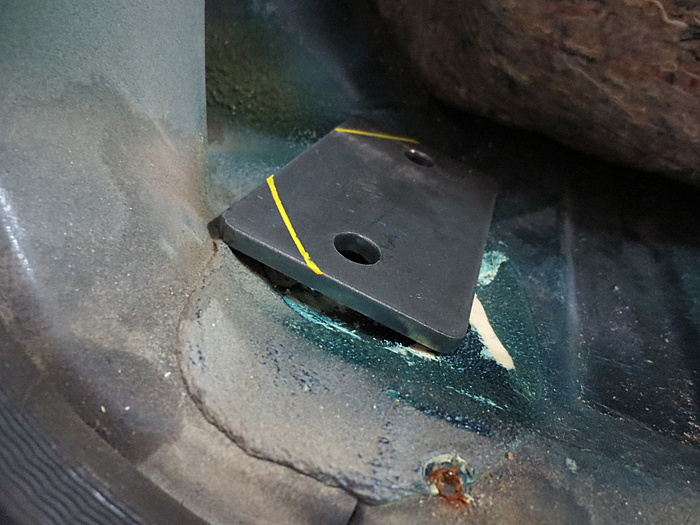
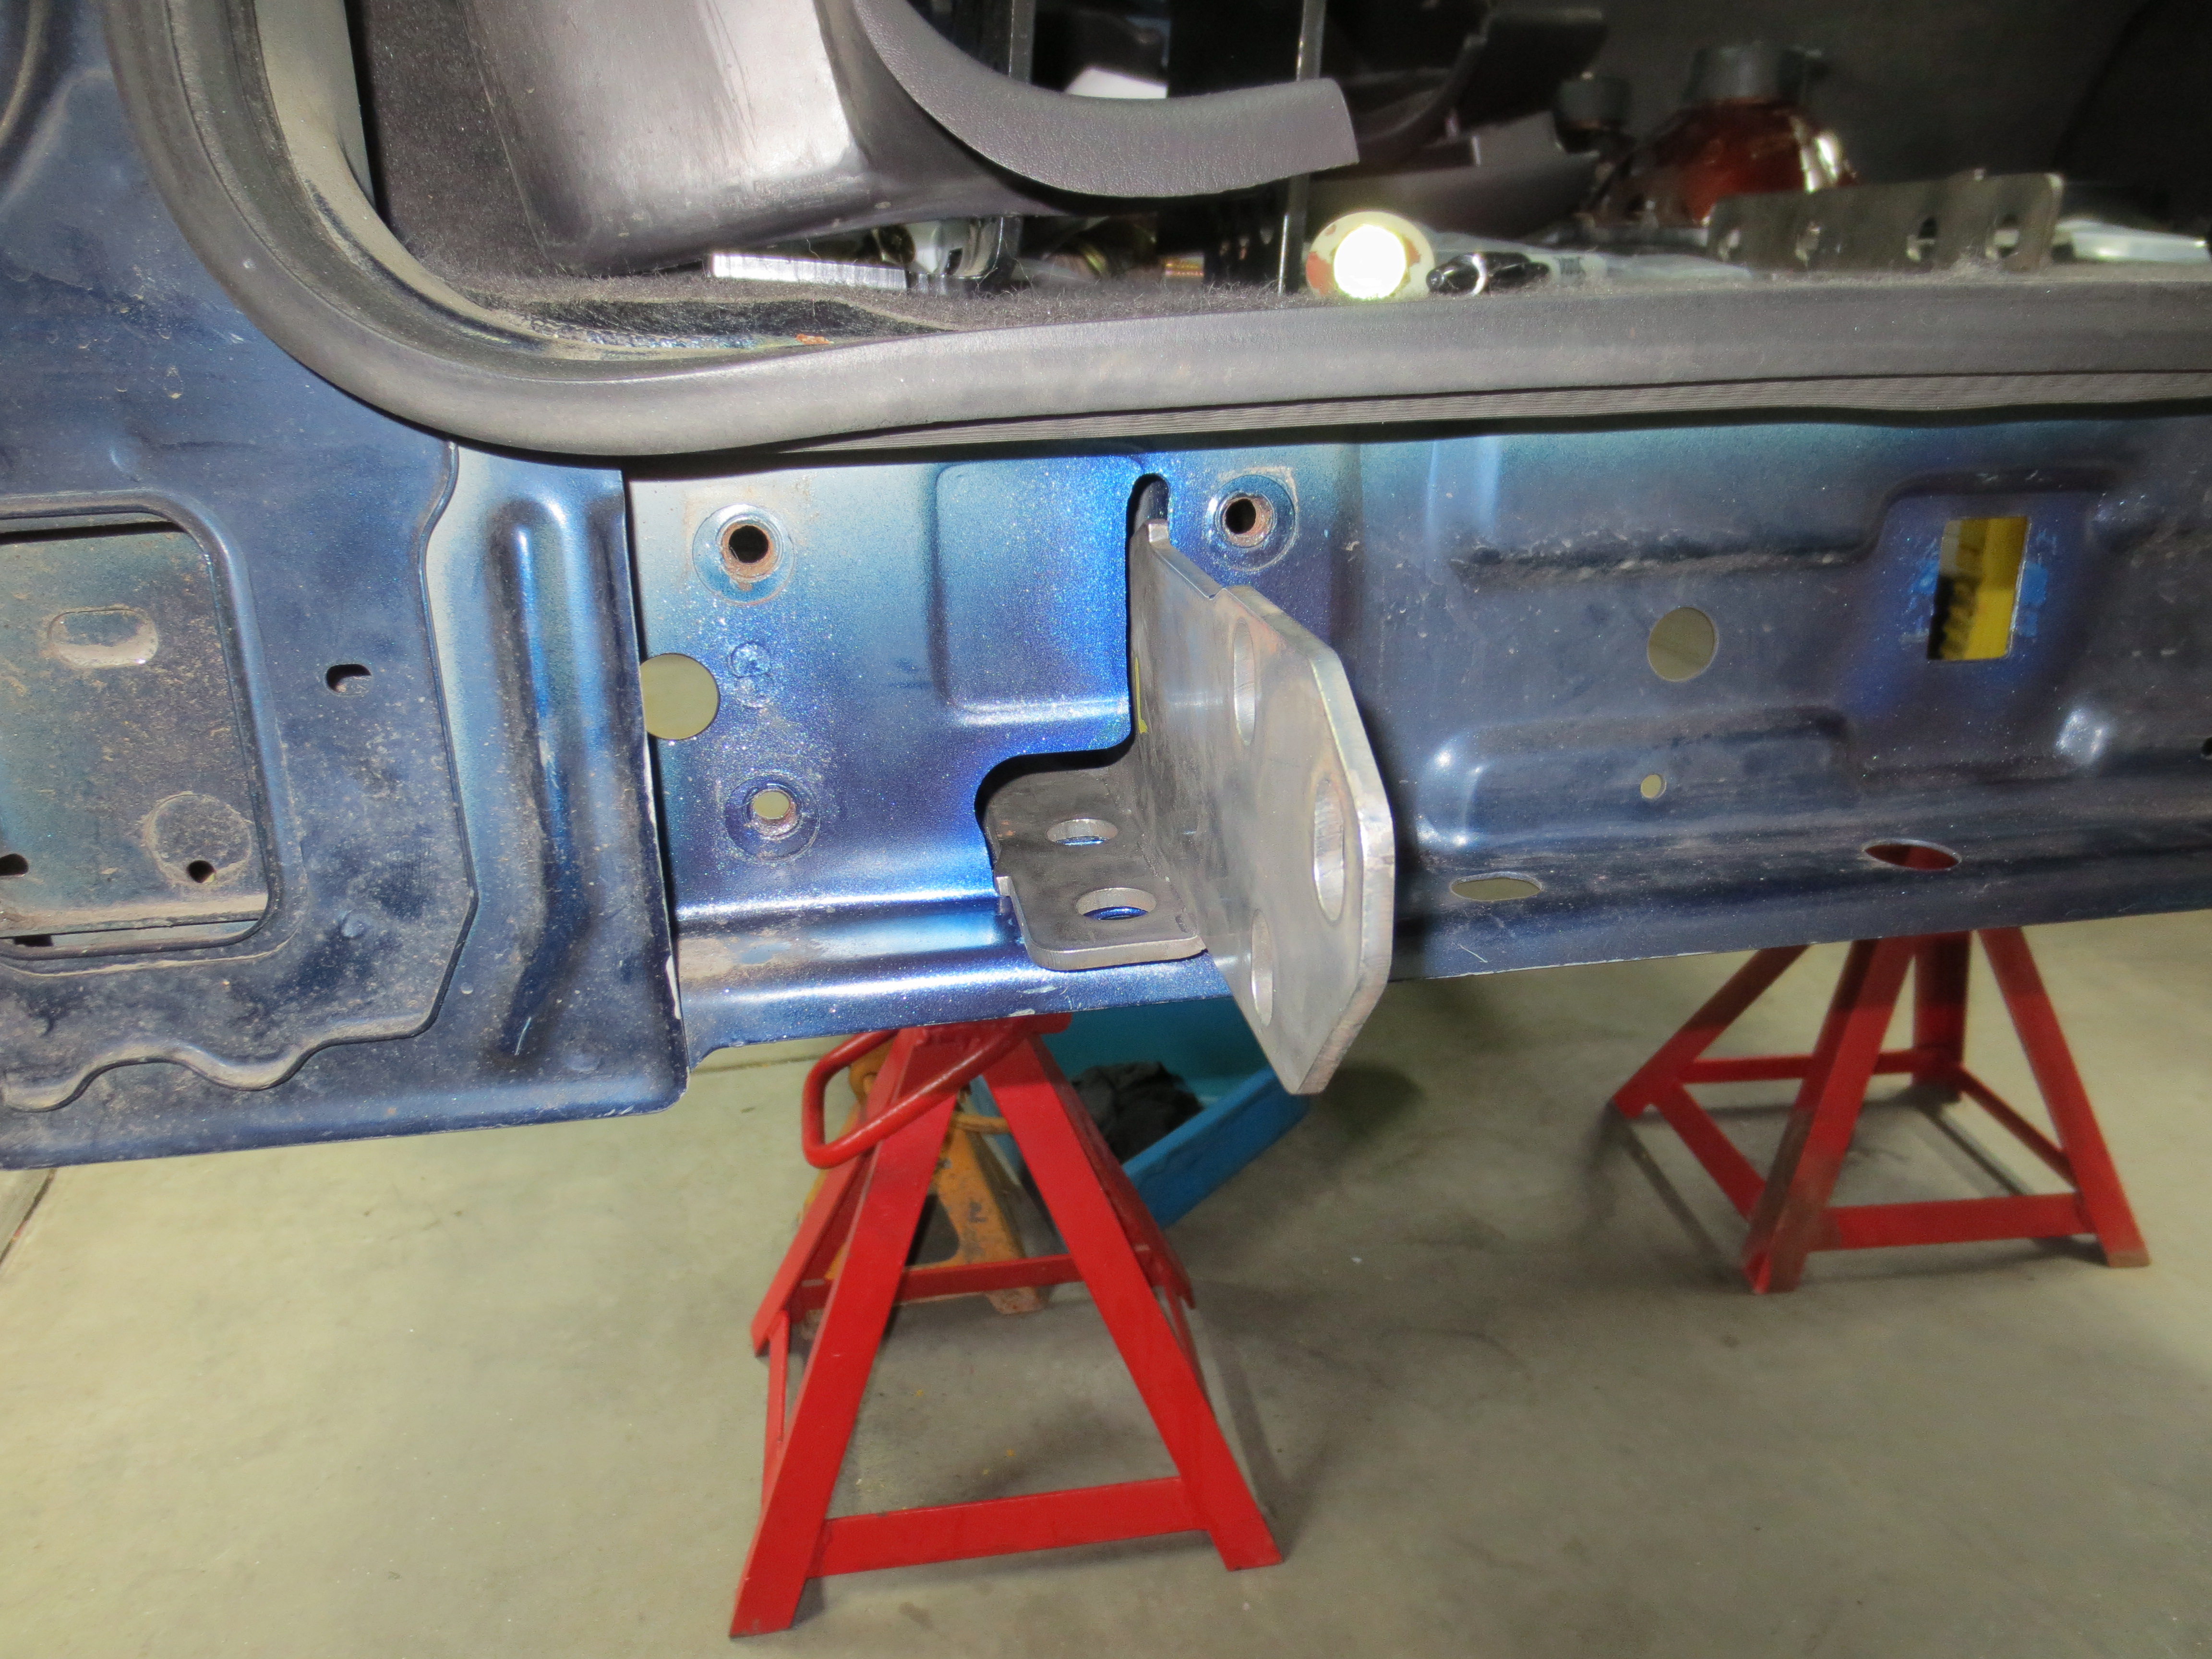
The only things I can think of that made the passenger side easier were that the fuel lines aren't on the inside of the frame rail and it's easier to get a clamp in the right position. Might be worth moving the fuel lines on the drivers side. Also, I used the stud and bolt hole from the crossmember to "clamp" the lower side on the front rather than a jack. I used the clamps closer to the spots I was welding, it really helps keep the stiffeners tighter to the frame. I just started in the front and moved my way back using two clamps and crossing them over as I went back. It takes time, but just to tack them near the clamp and move back keeps it all tight.
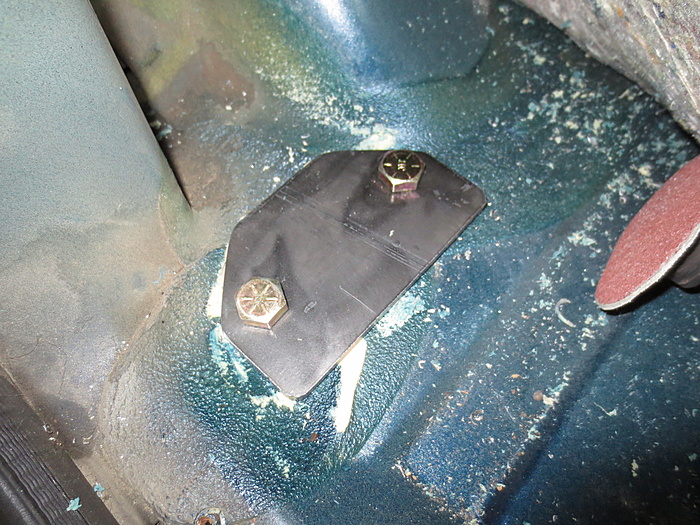
I also cut the holes for the Dirtbound rear bumper tie ins. Just drilled a couple holes where the corners of the hole will be and used a die grinder with cut off wheel. Then used a burr in the die grinder to clean up the edges.
Passenger side done


Hole for bumper tie in bracket
Bracket still needs nuts welded on it and the other tab welded to it to tie into the stock mounting holes

The only things I can think of that made the passenger side easier were that the fuel lines aren't on the inside of the frame rail and it's easier to get a clamp in the right position. Might be worth moving the fuel lines on the drivers side. Also, I used the stud and bolt hole from the crossmember to "clamp" the lower side on the front rather than a jack. I used the clamps closer to the spots I was welding, it really helps keep the stiffeners tighter to the frame. I just started in the front and moved my way back using two clamps and crossing them over as I went back. It takes time, but just to tack them near the clamp and move back keeps it all tight.
I also cut the holes for the Dirtbound rear bumper tie ins. Just drilled a couple holes where the corners of the hole will be and used a die grinder with cut off wheel. Then used a burr in the die grinder to clean up the edges.
Passenger side done
Hole for bumper tie in bracket

Bracket still needs nuts welded on it and the other tab welded to it to tie into the stock mounting holes
Thread Starter
Member
Joined: Jan 2017
Posts: 125
Likes: 2
From: Anthem, AZ
Year: 2001
Model: Cherokee
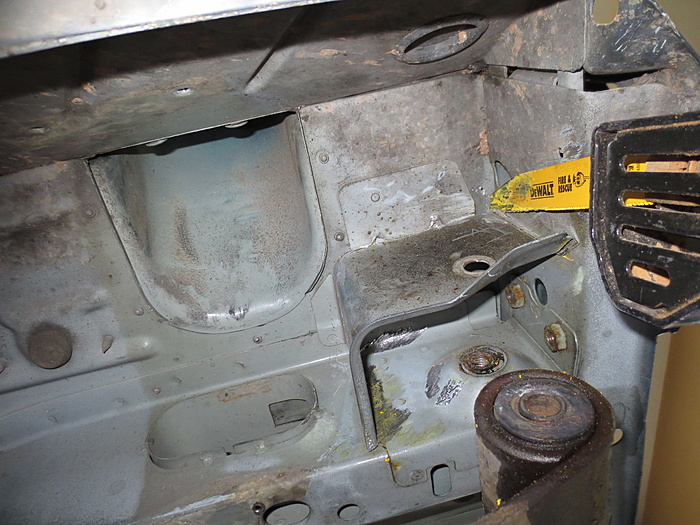
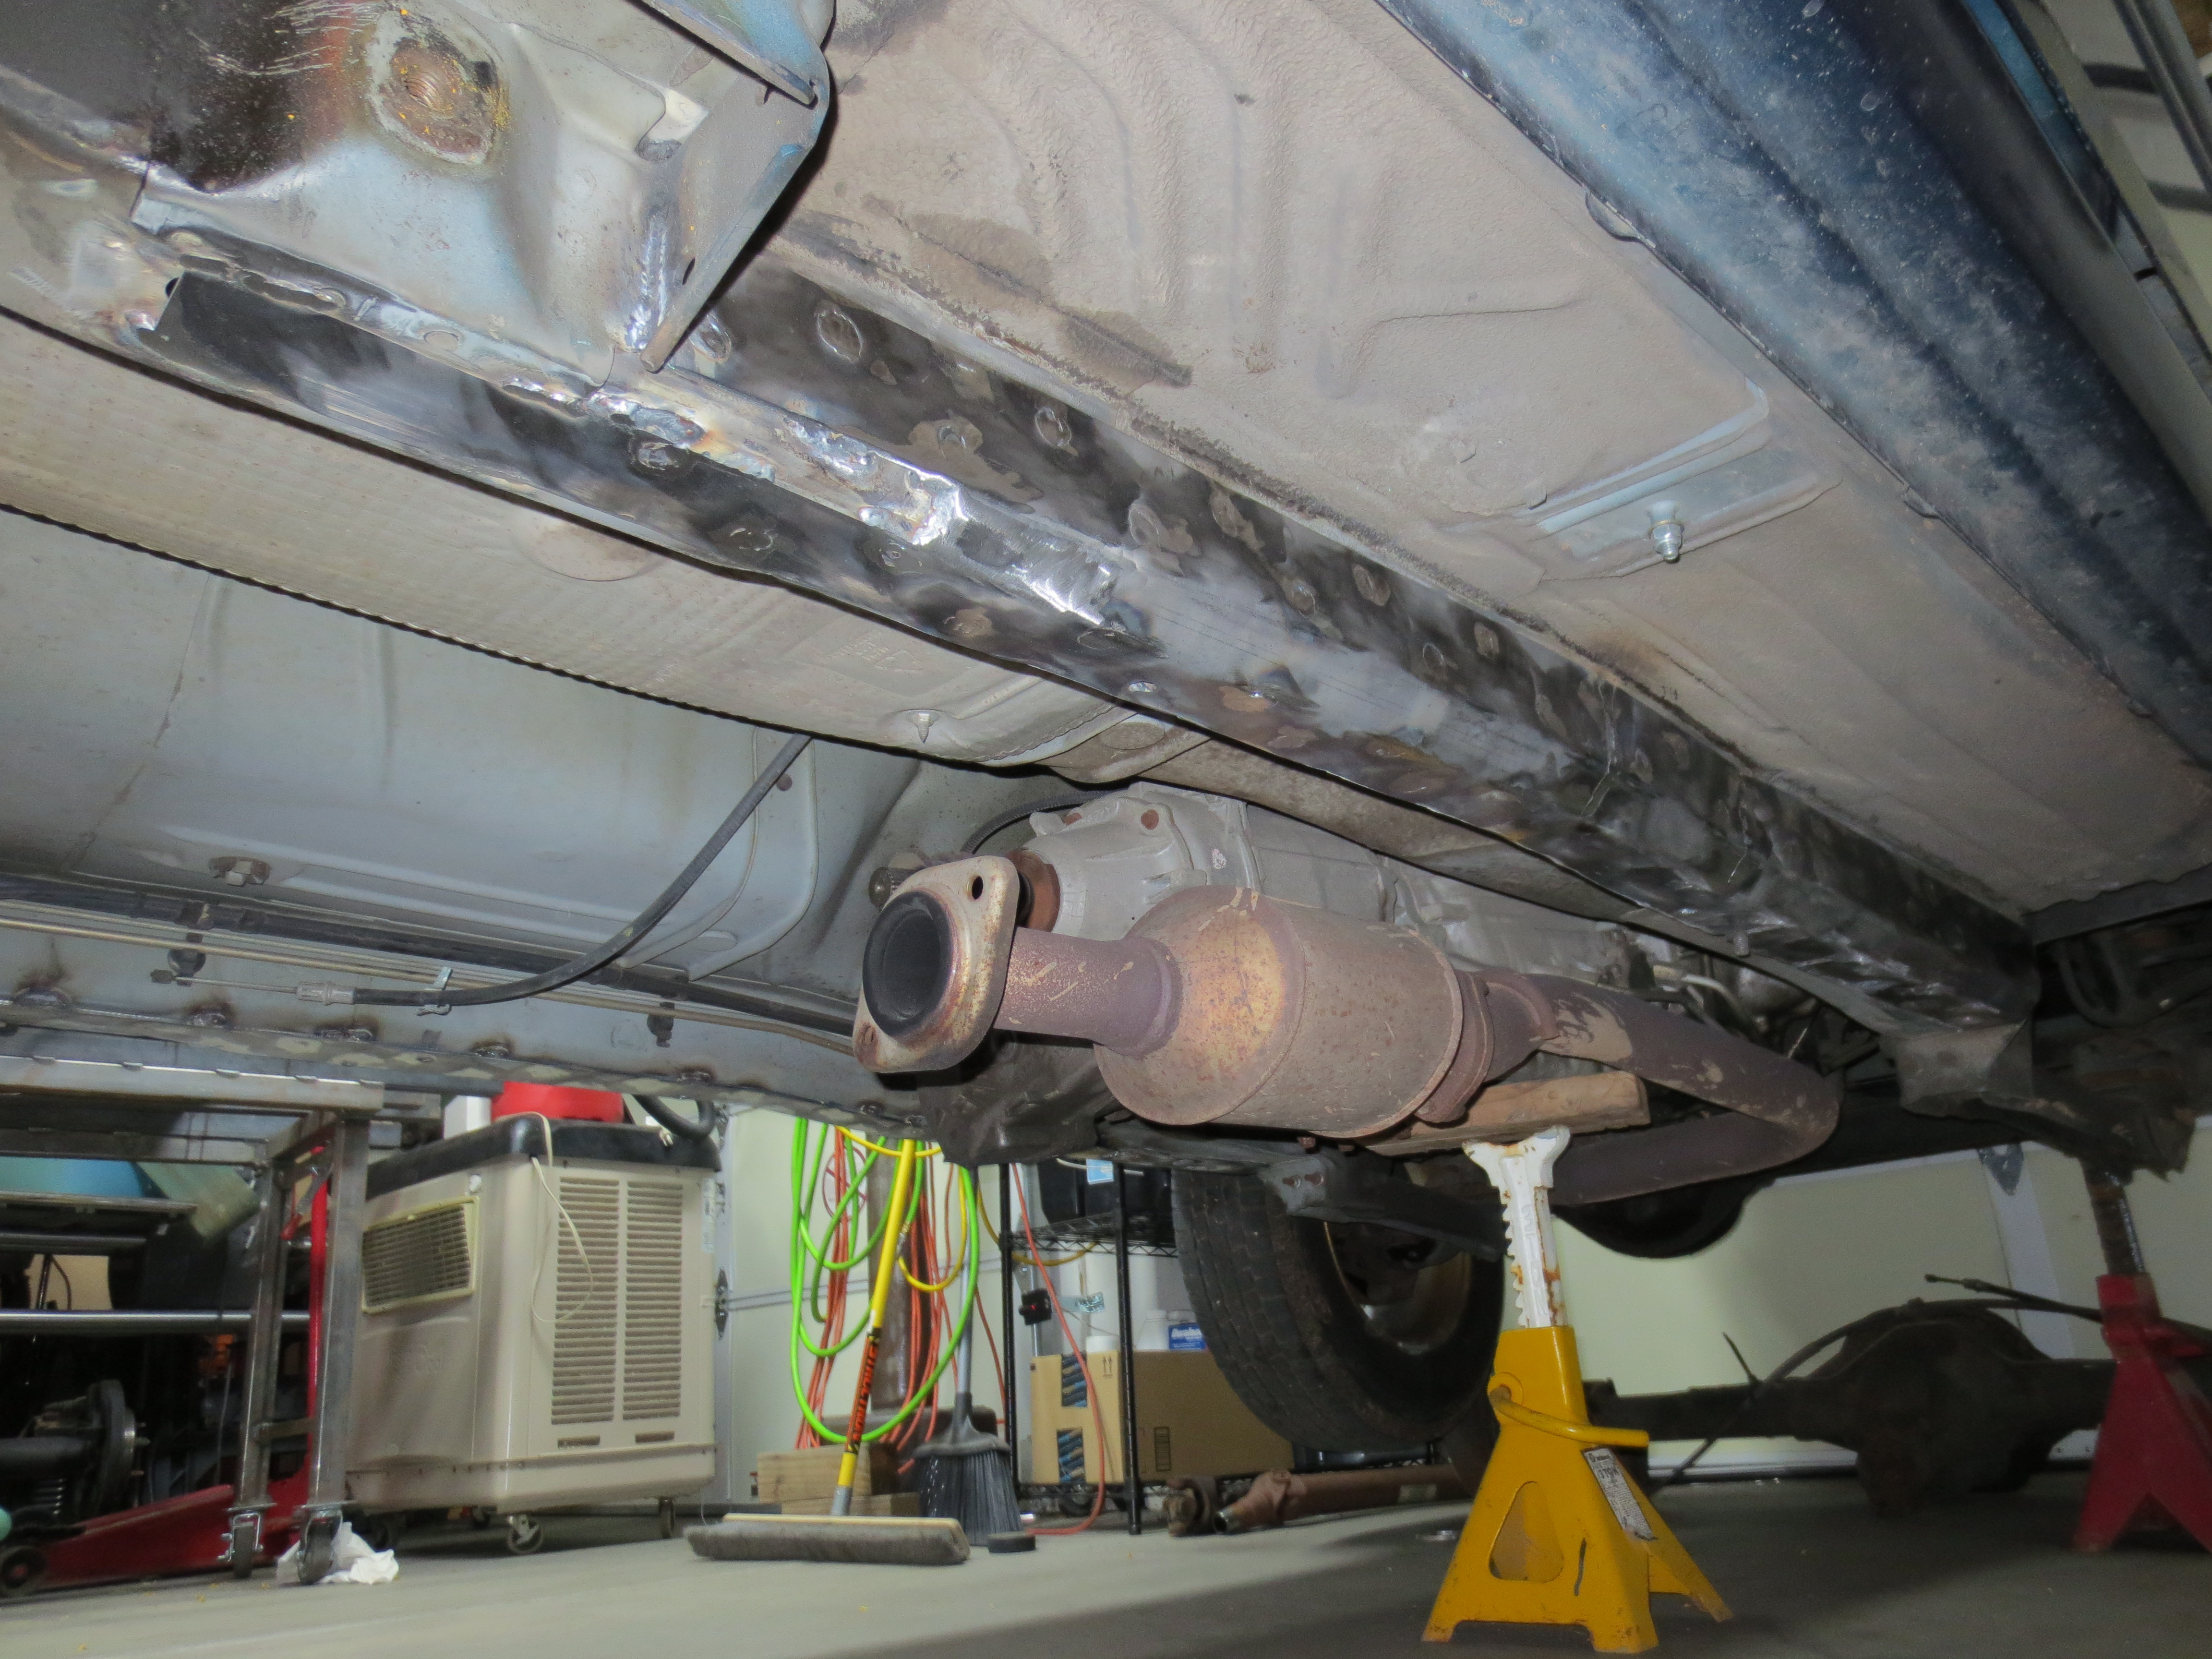
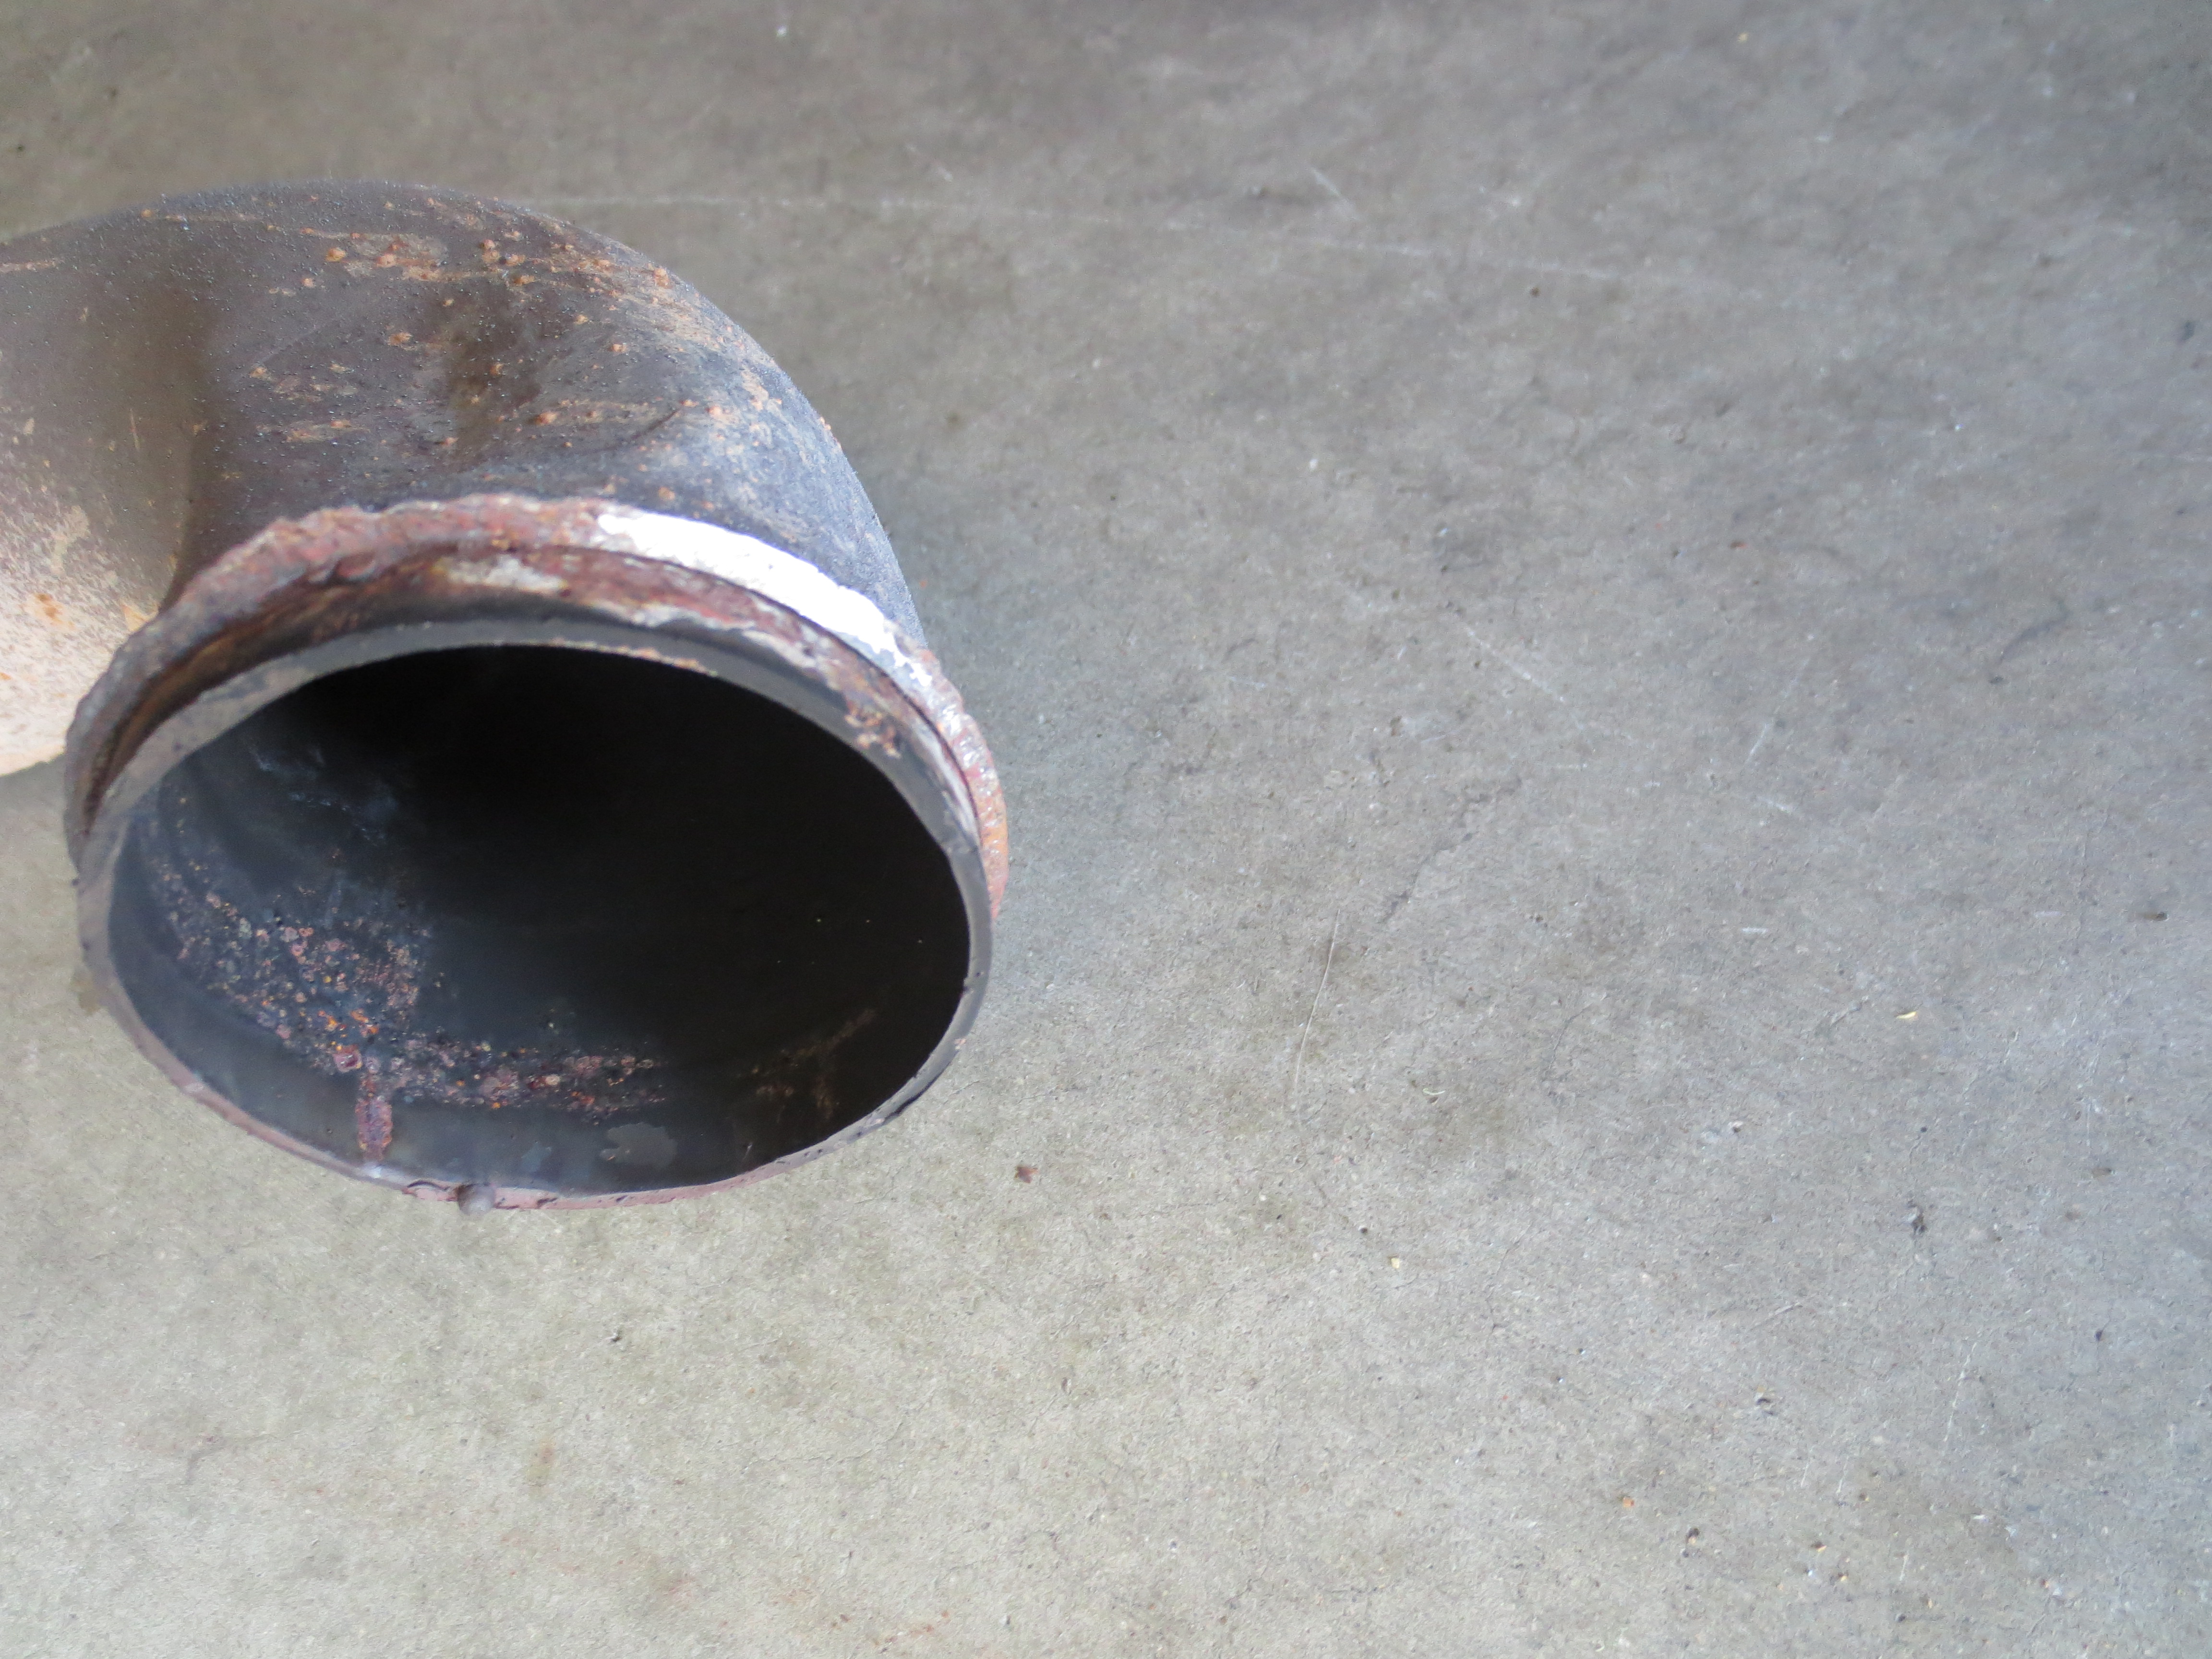
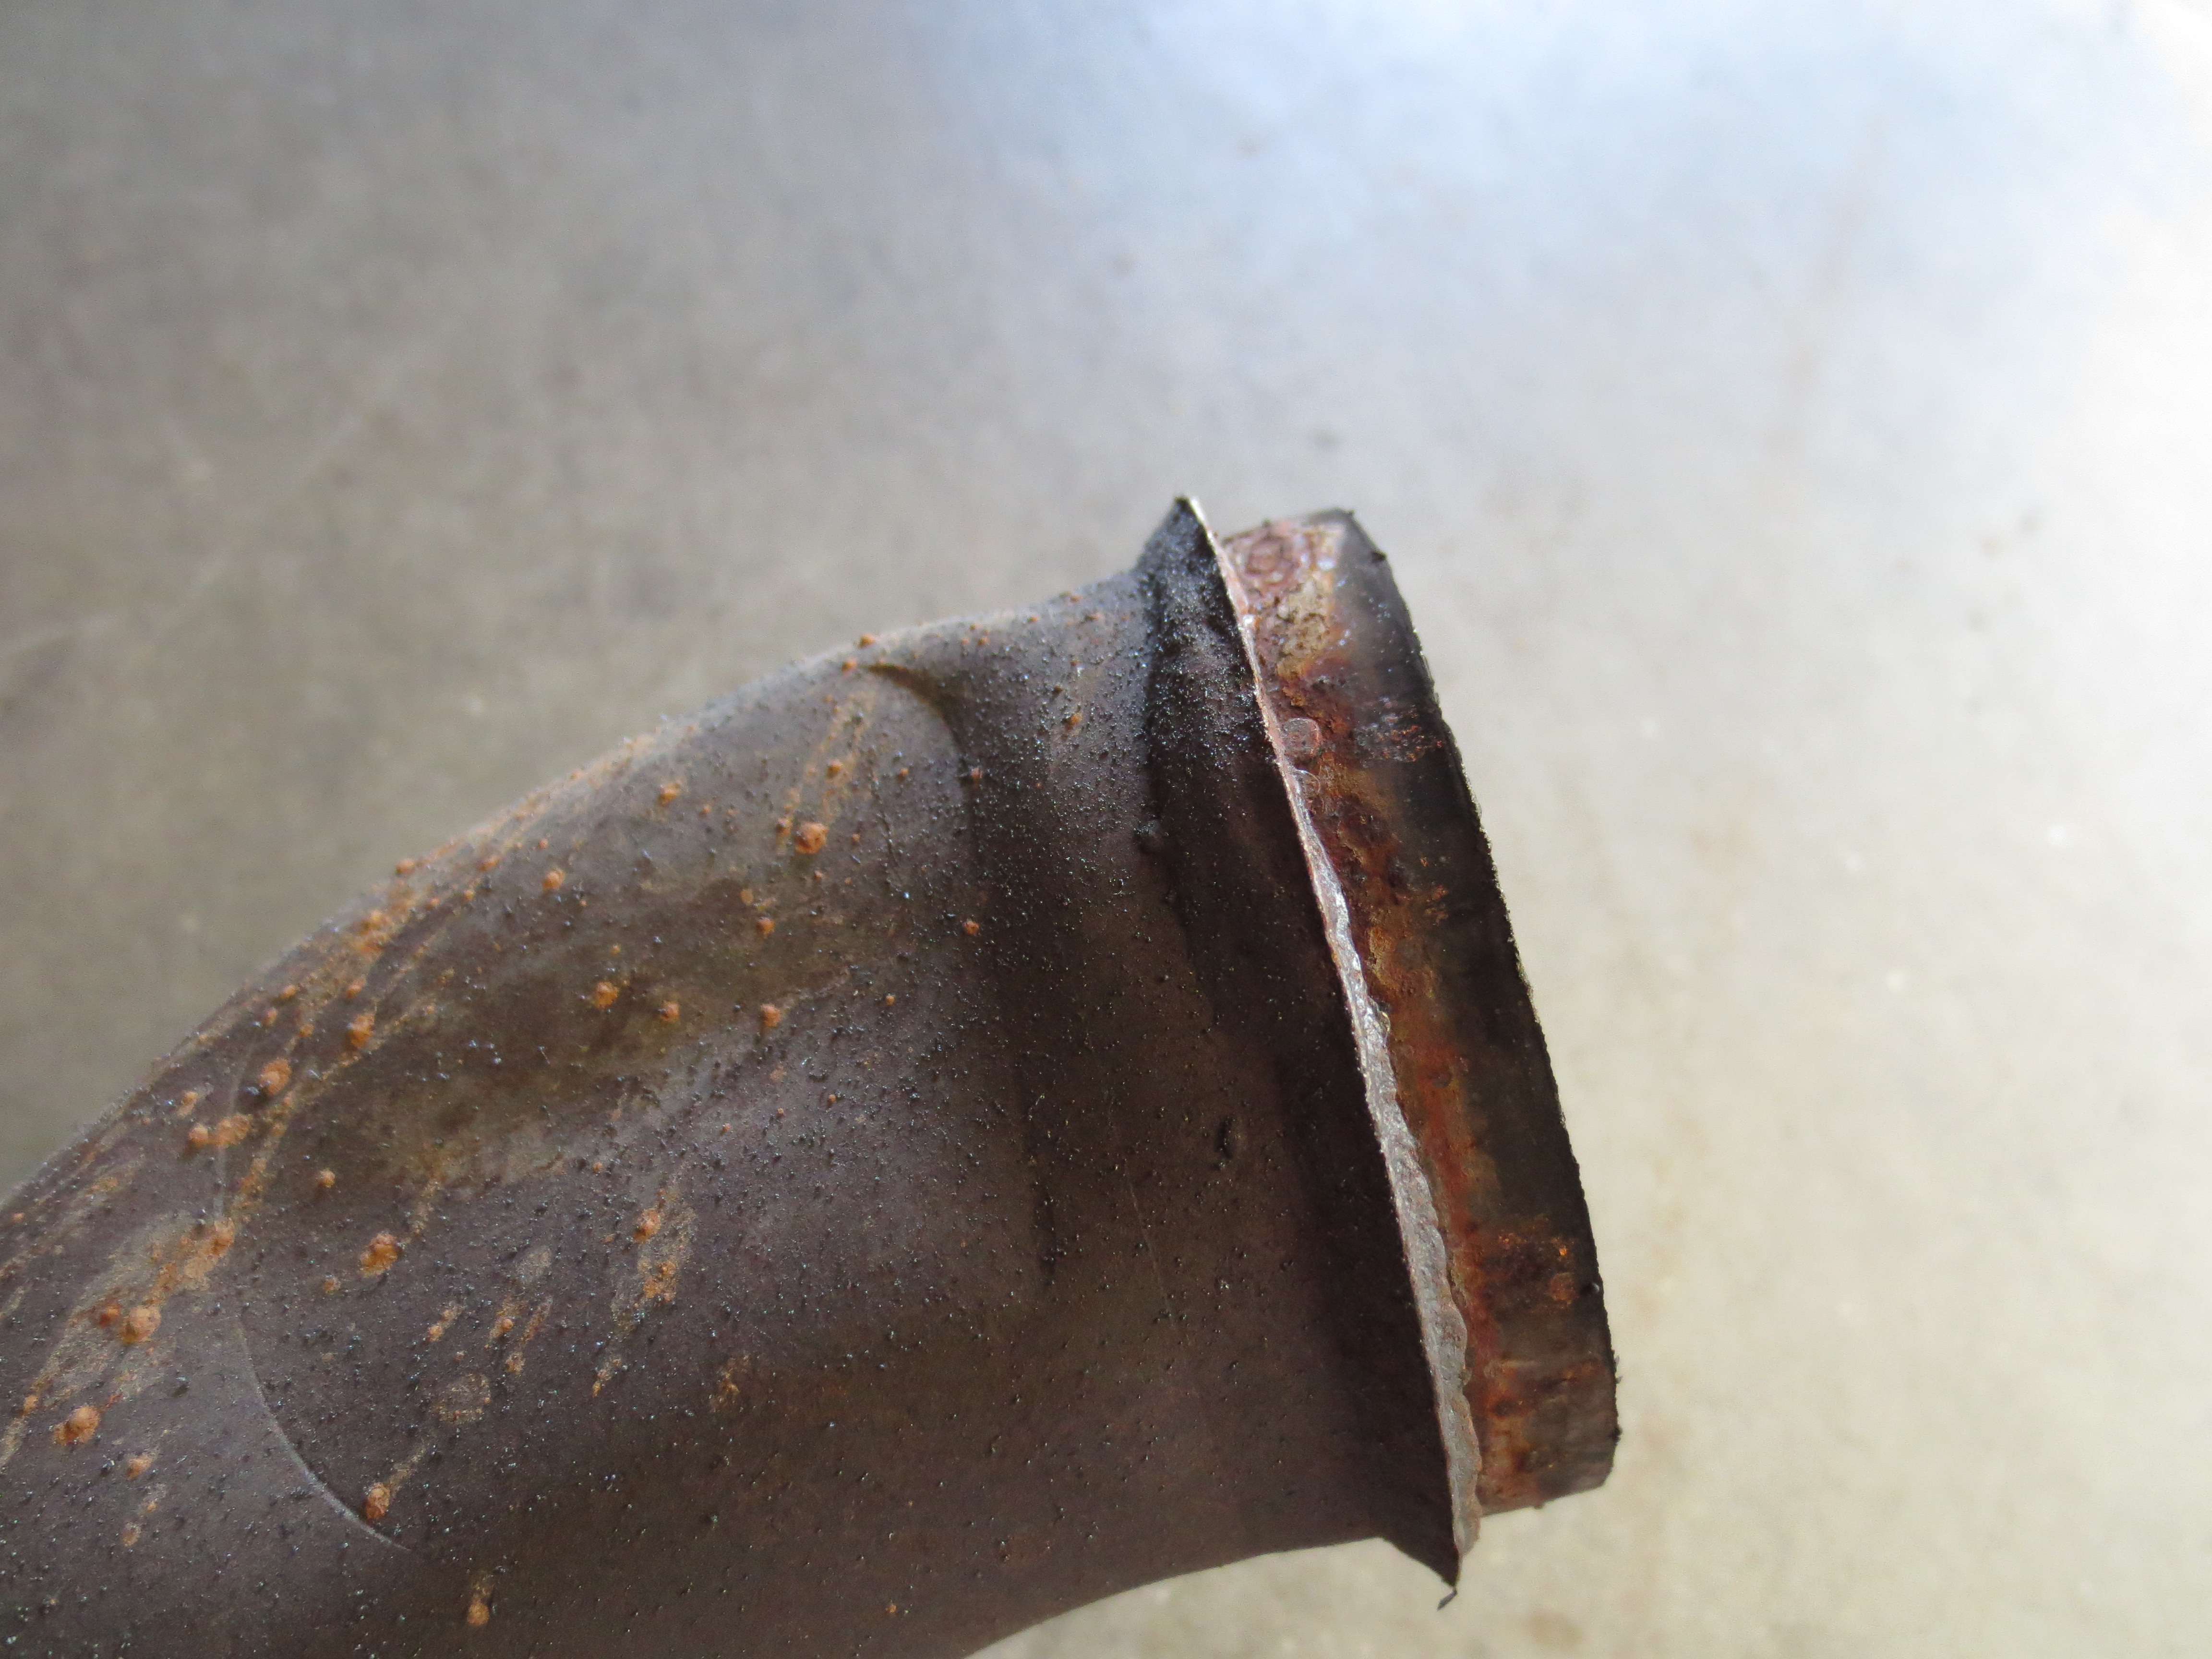
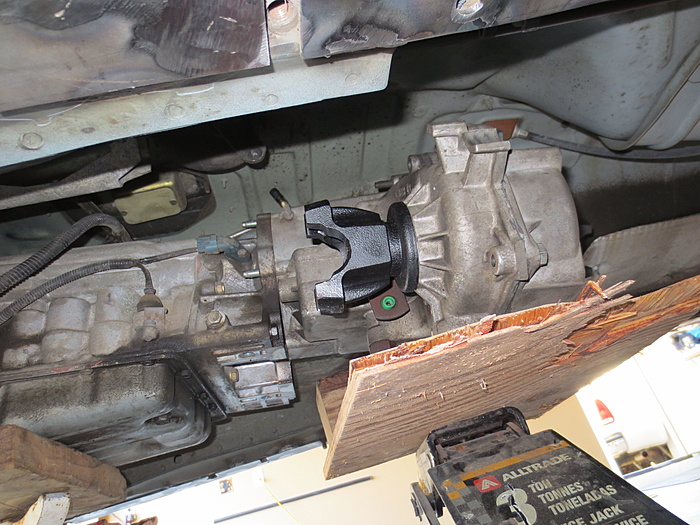
I didn't get much accomplished today, I was going to do the rear quarter cut and fold, but I just couldn't get motivated and didn't want to screw it up, so I decided to pull the transfer case and start on the SYE. As I was trying to get to the bolts on the pass side of transfer case, the cat and exhaust pipe were in the way. I kind of moved it to get clearance and it came right off at the flange where it mounts to the manifold. The weld must have been cracked for a while, there was only a small section still holding. Glad it came apart now rather than on the trail or highway!!
I was able to get the transfer case out and on the bench. Pulled a few things off it and decided I'd wait until I get my other snap ring pliers to finish the job, mine worked, but the flat tip style will be much easier to deal with.
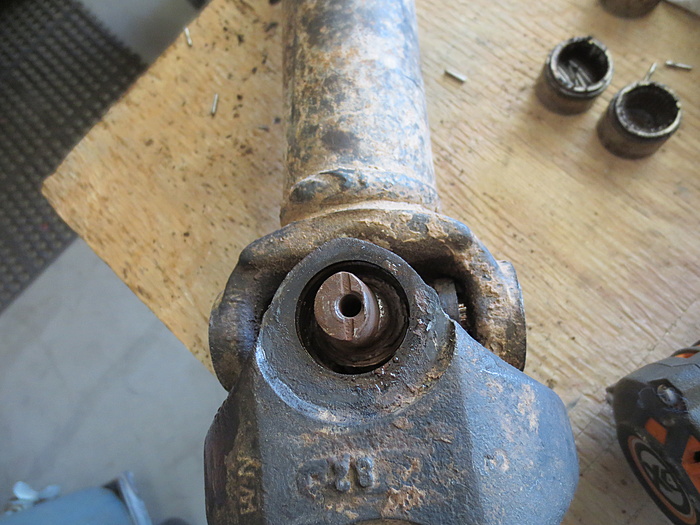
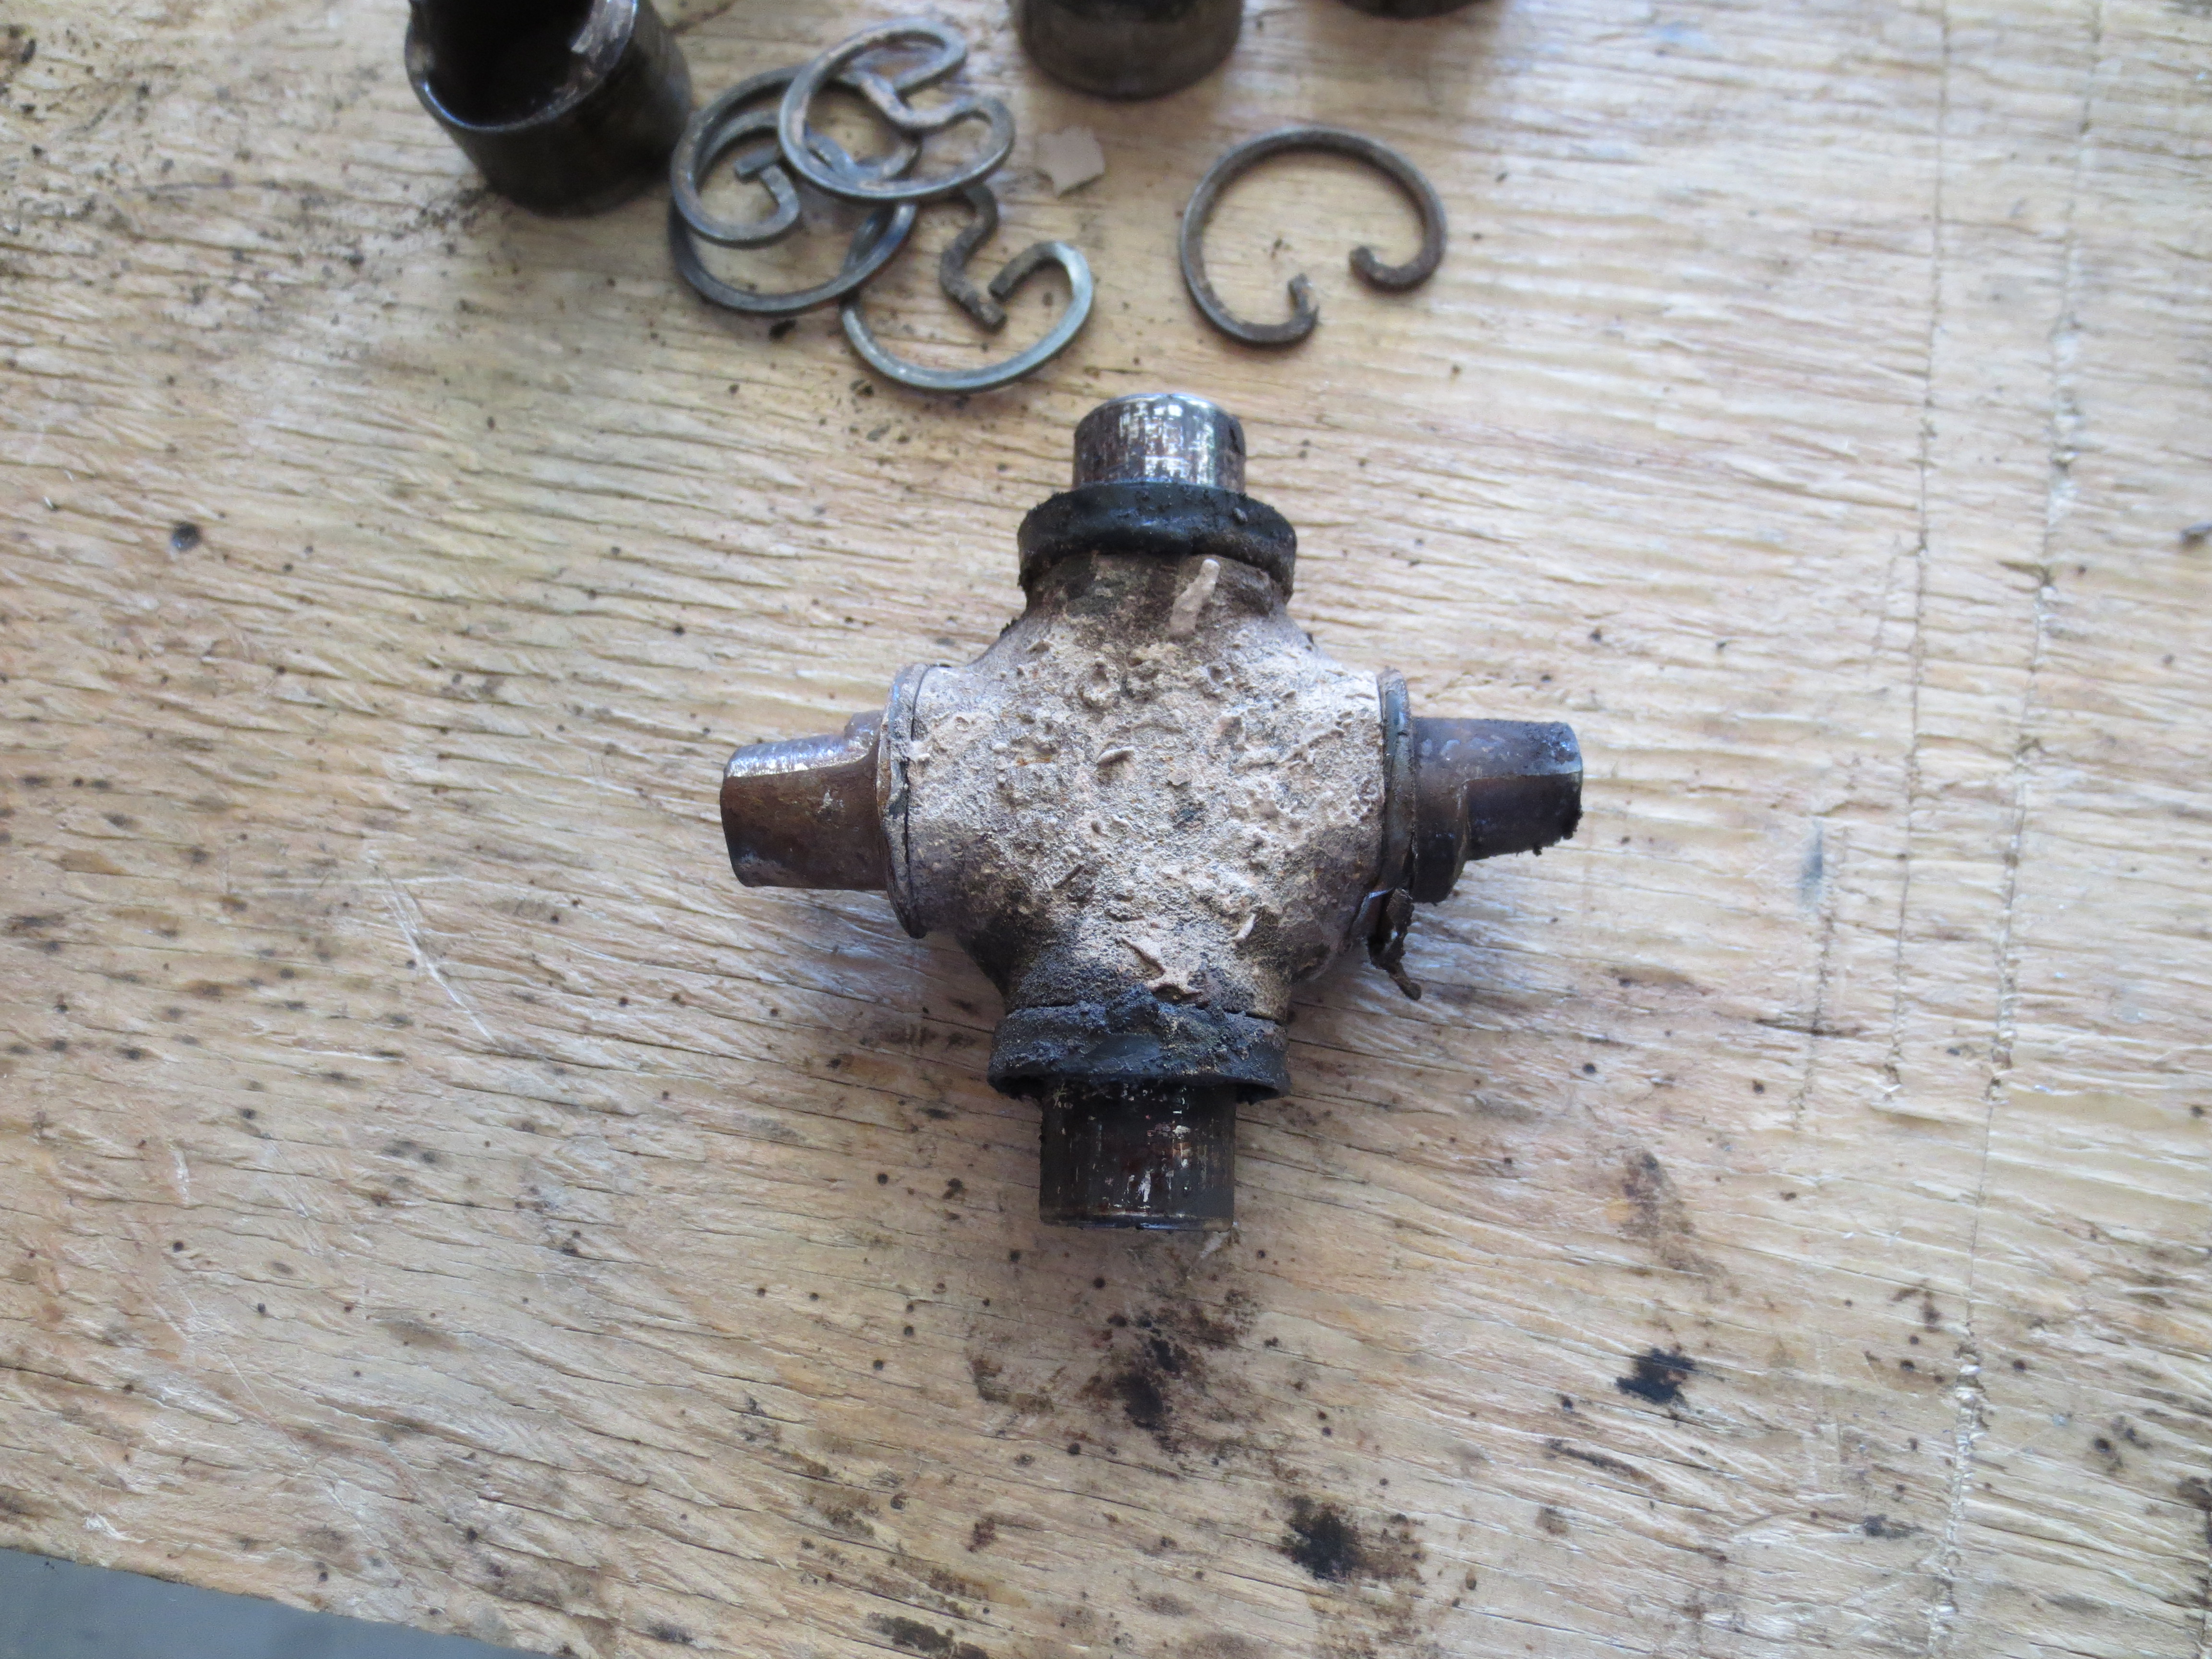
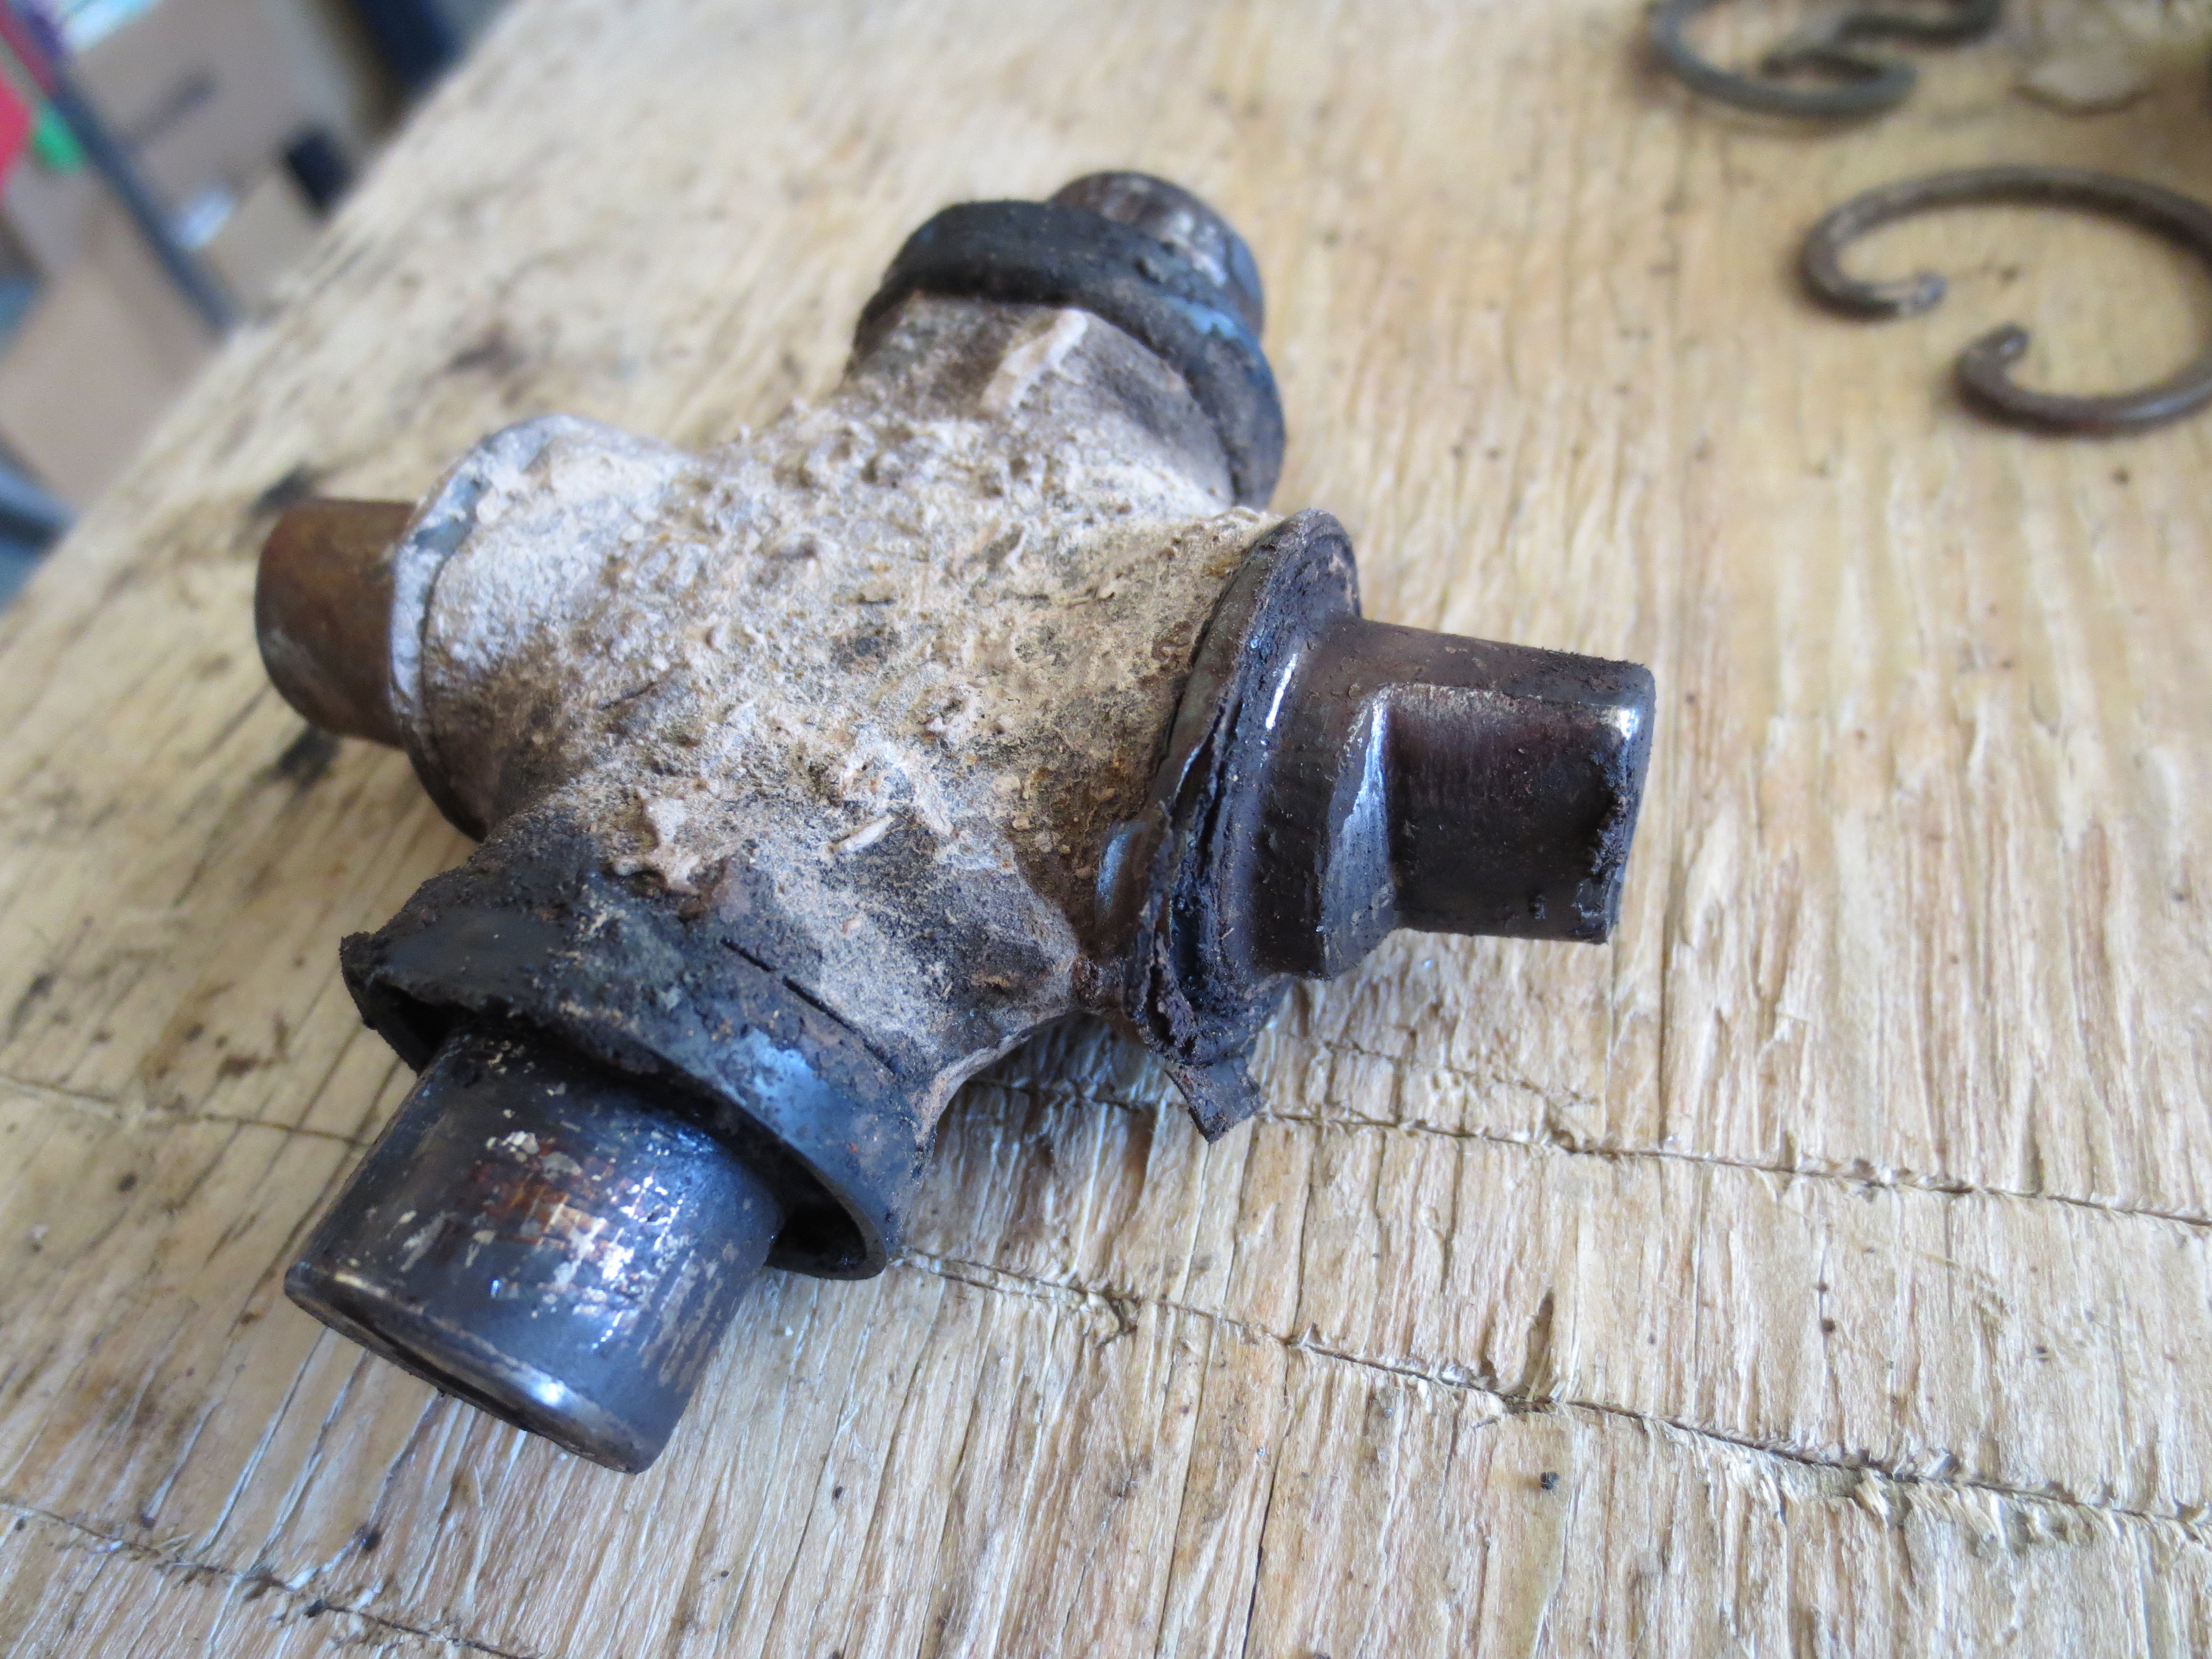
Moved on to work on the driveshaft. I picked up a front drive shaft from the junkyard a couple weeks ago and the ujoints felt pretty bad. I was going to change them out anyways, but I was surprised how bad they were when I pulled them apart. Still waiting on some parts to finish the repair and I'm going to clean and paint the shaft anyways, so called it a day.
I didn't take pics of the transfer case removal, there are some great videos online of the whole process.
Nice clean break
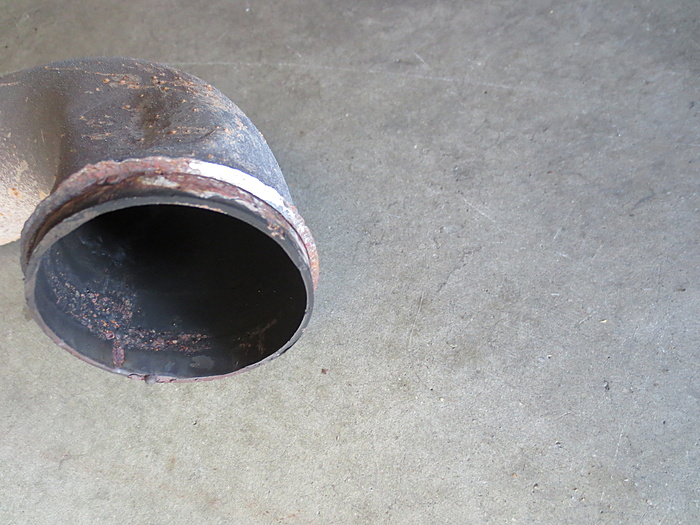

You can see the shiny part, the rest must've been cracked for a while
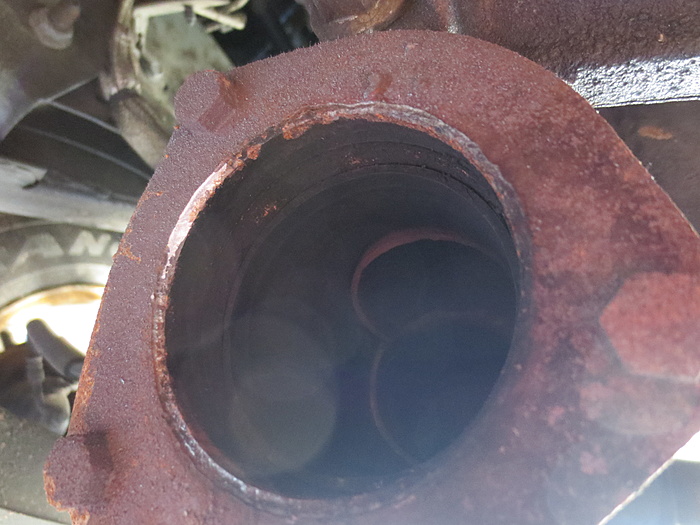
This looks pretty bad, way overdue for replacement!


I'll hopefully get some tools and parts and finish these two jobs this week. I need to get the fenders trimmed and rear quarter cut, maybe I'll feel up to starting that next weekend.
I was able to get the transfer case out and on the bench. Pulled a few things off it and decided I'd wait until I get my other snap ring pliers to finish the job, mine worked, but the flat tip style will be much easier to deal with.
Moved on to work on the driveshaft. I picked up a front drive shaft from the junkyard a couple weeks ago and the ujoints felt pretty bad. I was going to change them out anyways, but I was surprised how bad they were when I pulled them apart. Still waiting on some parts to finish the repair and I'm going to clean and paint the shaft anyways, so called it a day.
I didn't take pics of the transfer case removal, there are some great videos online of the whole process.
Nice clean break
You can see the shiny part, the rest must've been cracked for a while

This looks pretty bad, way overdue for replacement!

I'll hopefully get some tools and parts and finish these two jobs this week. I need to get the fenders trimmed and rear quarter cut, maybe I'll feel up to starting that next weekend.
Thread Starter
Member
Joined: Jan 2017
Posts: 125
Likes: 2
From: Anthem, AZ
Year: 2001
Model: Cherokee
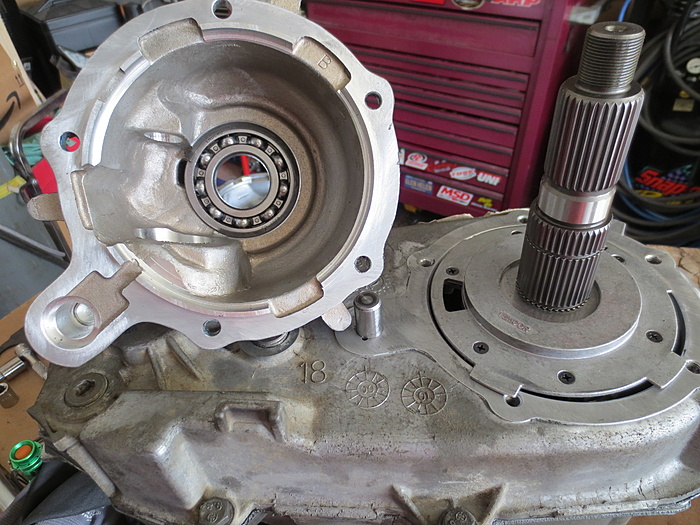
I made a little progress the past couple weeks, I did the SYE, it's pretty easy, but I'm an idiot and screwed up the oil pump, so had to order a new one. It's all back together and back in. I just need my CavFab tie in brackets now so I can fit the crossmember and weld the crush sleeves in. Hope to start building the 8.8 soon, it will be nice to get the rear done and start on the front end.
Here's a few pics of the SYE install, there are a couple videos on youtube that are great and show the whole process, watch both of them, they take you through everything. One is by Advanced Adapters and one is BleepinJeep.
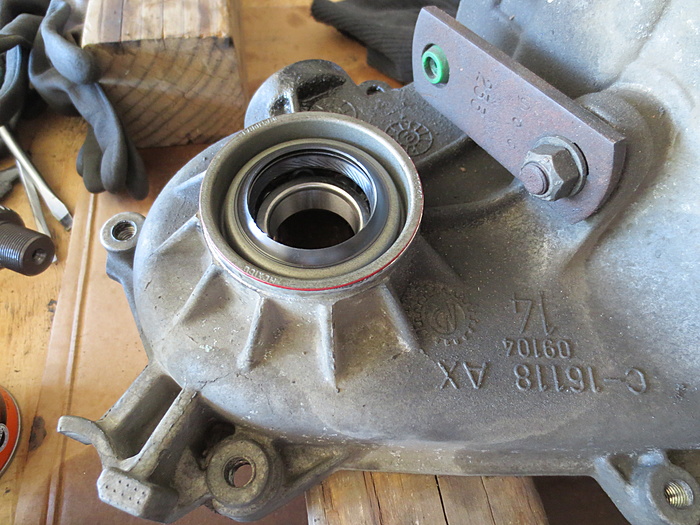
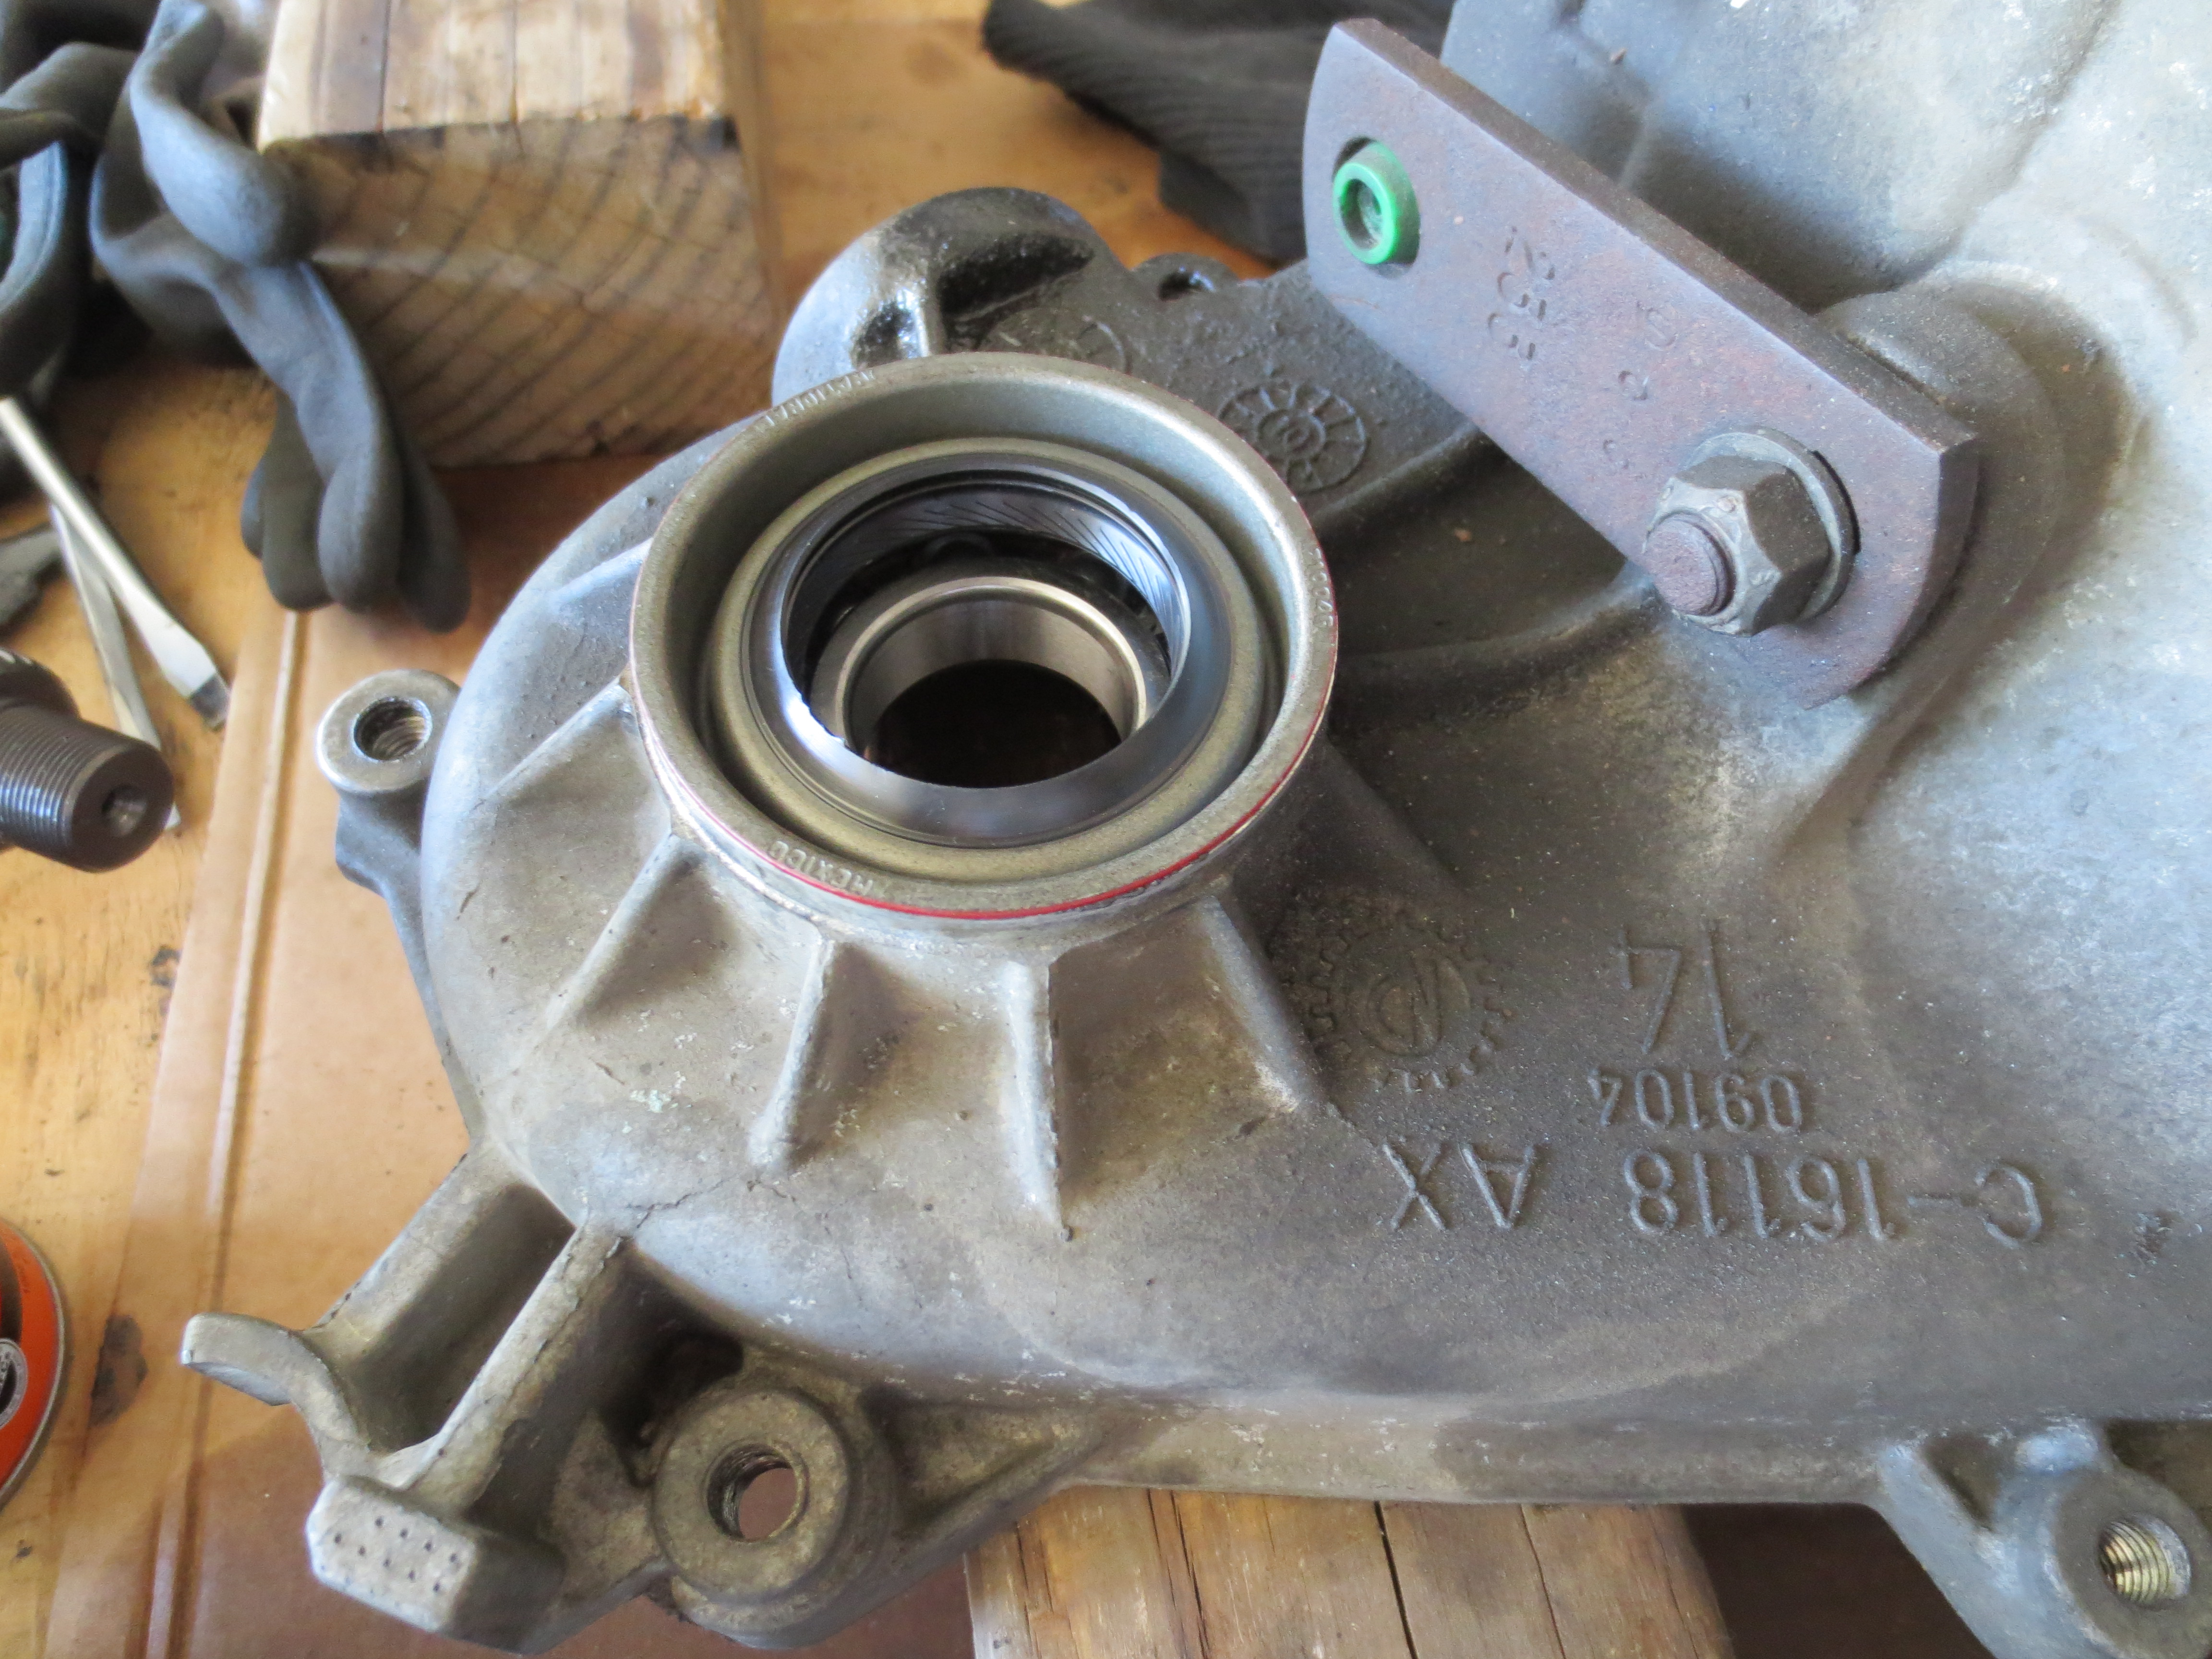
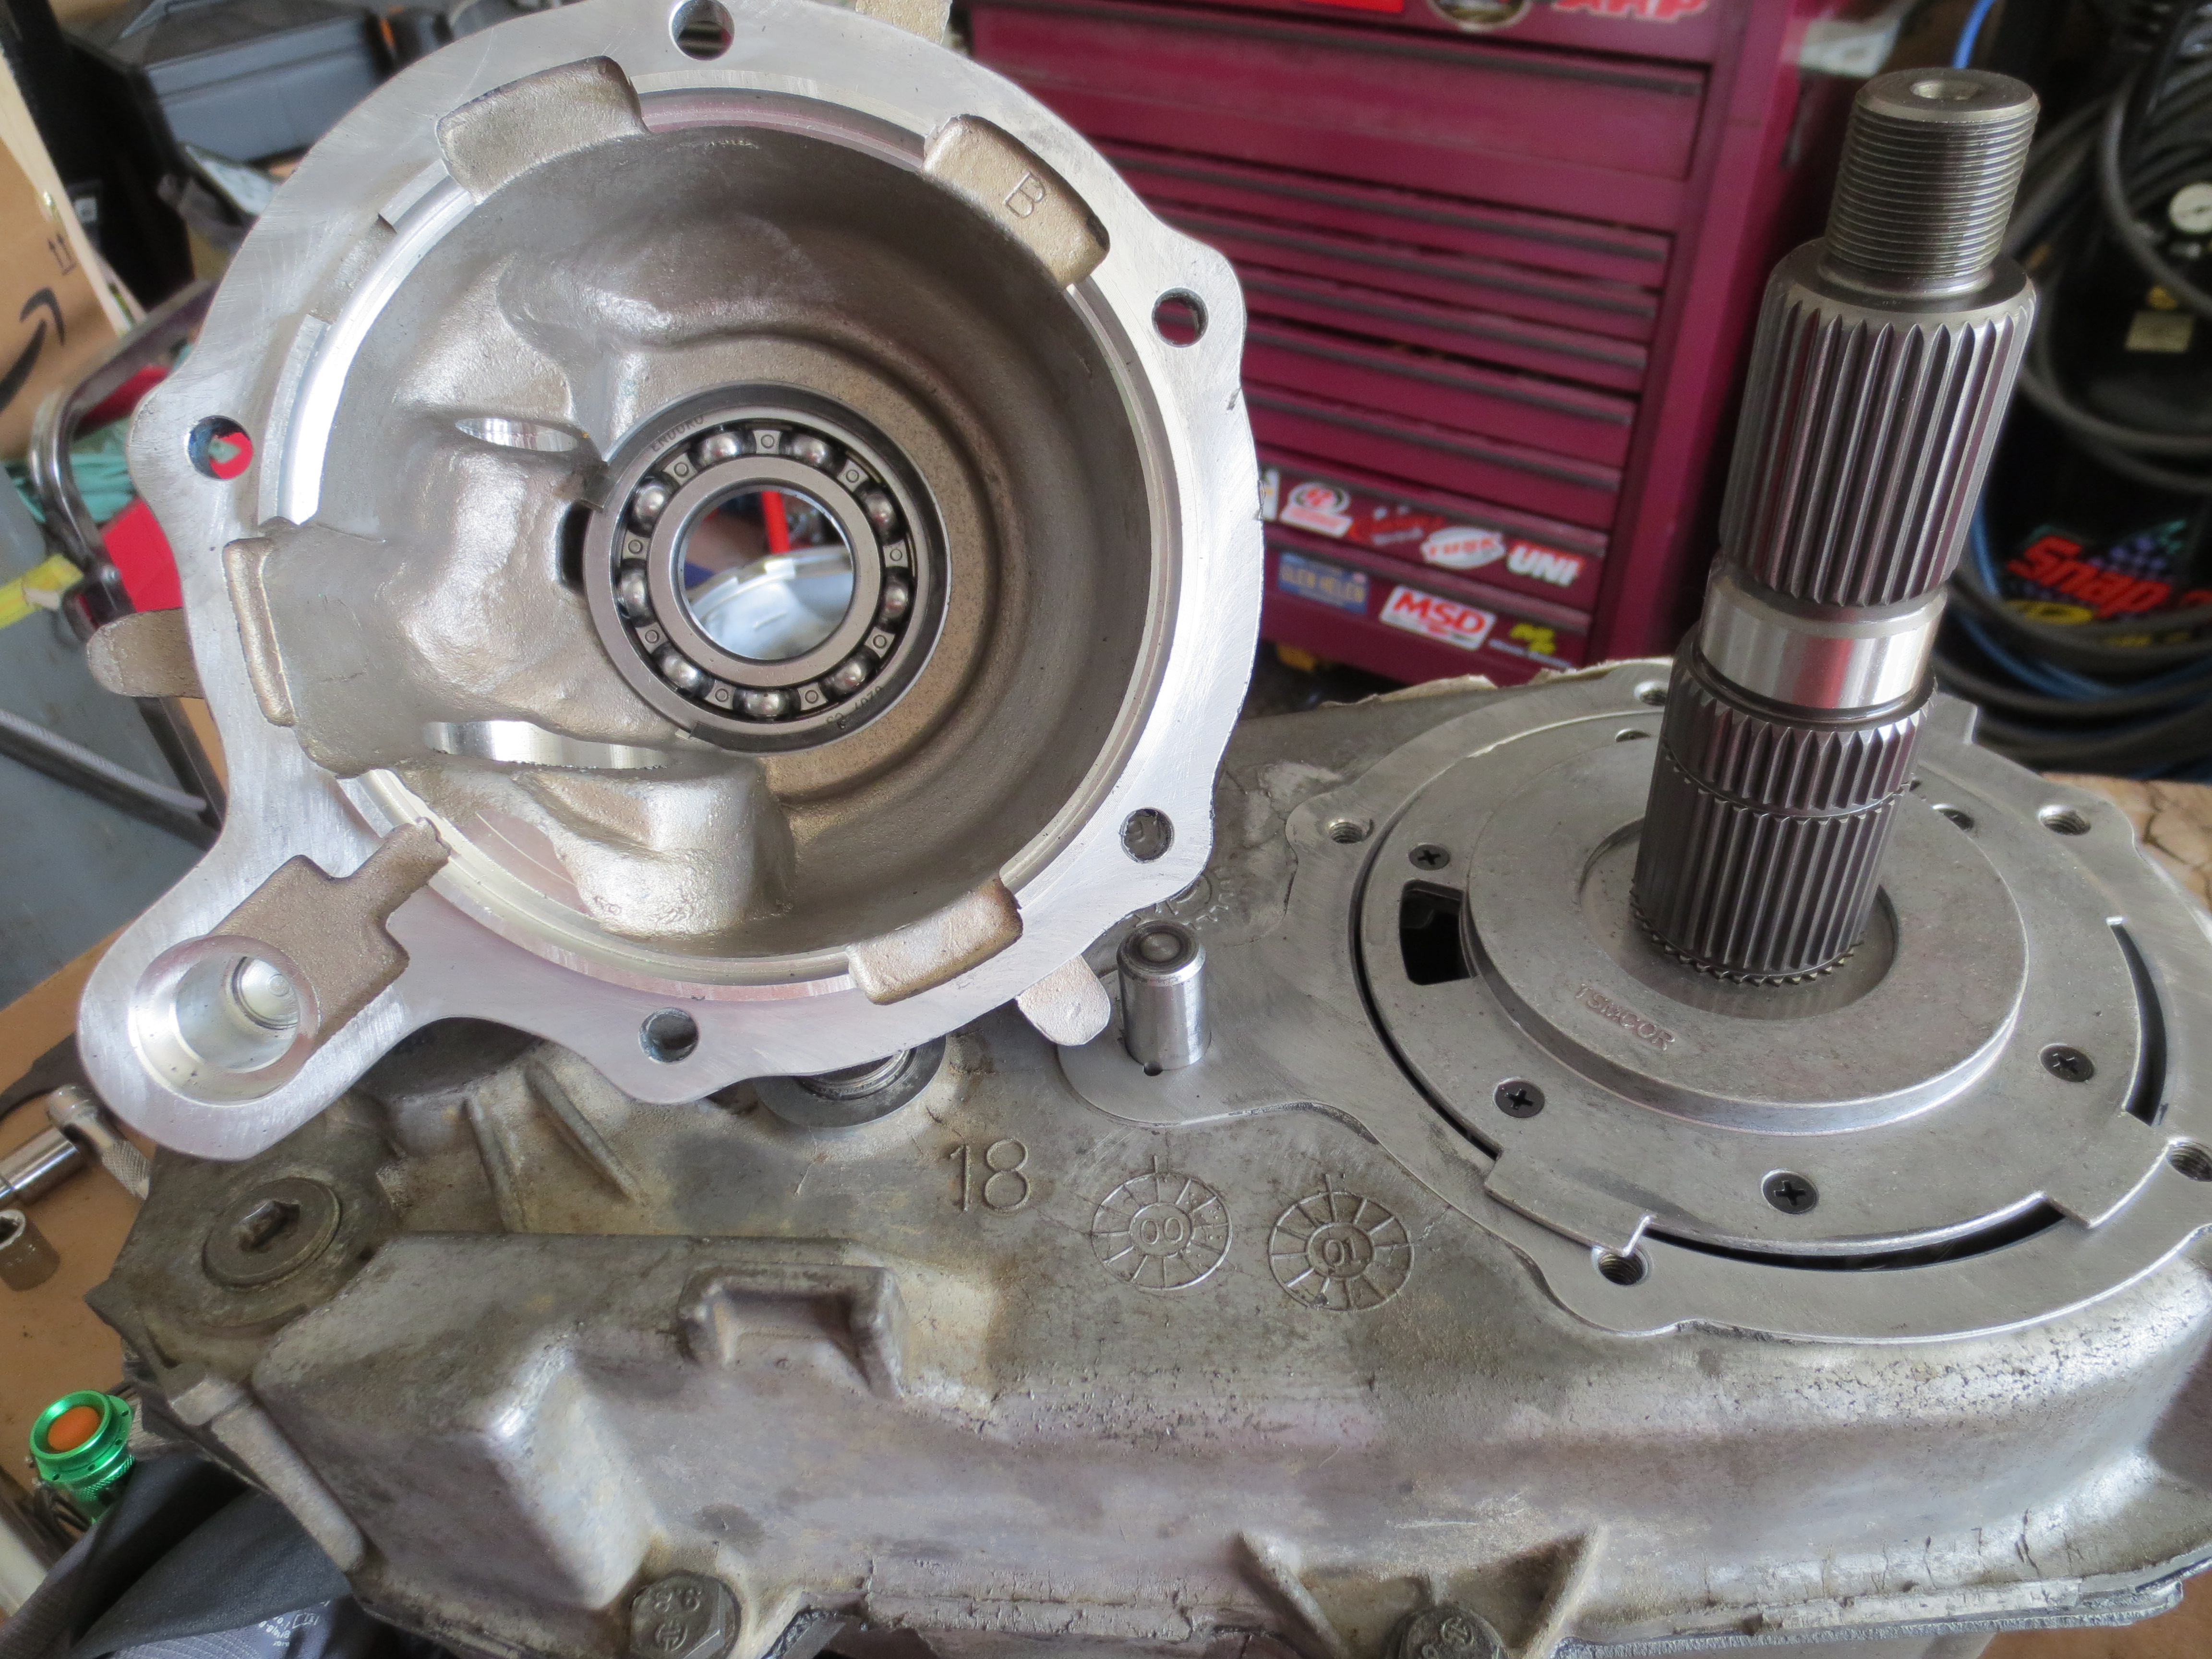
Front output bearing was a little gritty feeling, so decided to swap it, new bearing and seal
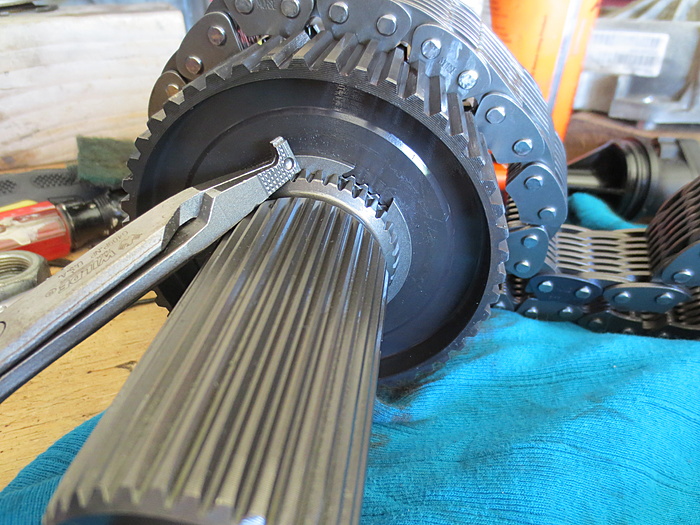
Highly recommend this type of flat nose snap ring plier, they work great
So, I'm an idiot, but if it saves someone making the same mistake, then I can admit it! I put the oil pump under the case half because in the manual it looks like its installed that way. Well, when I torqued the case halves together, a couple tabs broke off, had to buy a new pump
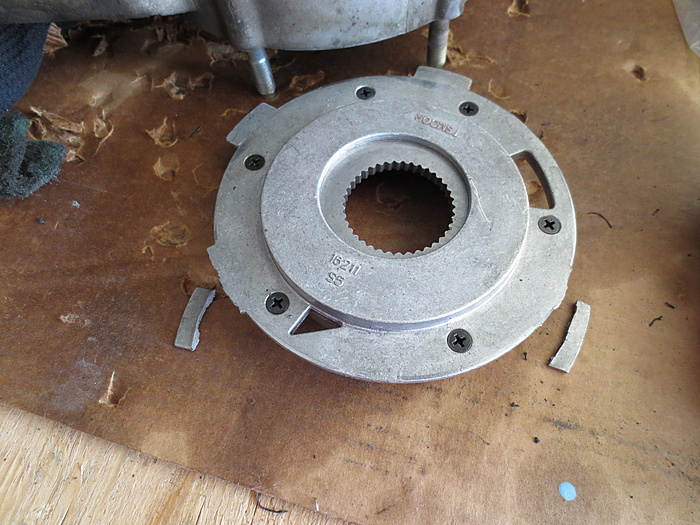
You can see this is how it's supposed to sit, the nose cone has slots for the tabs to go, don't make the same mistake I did!!
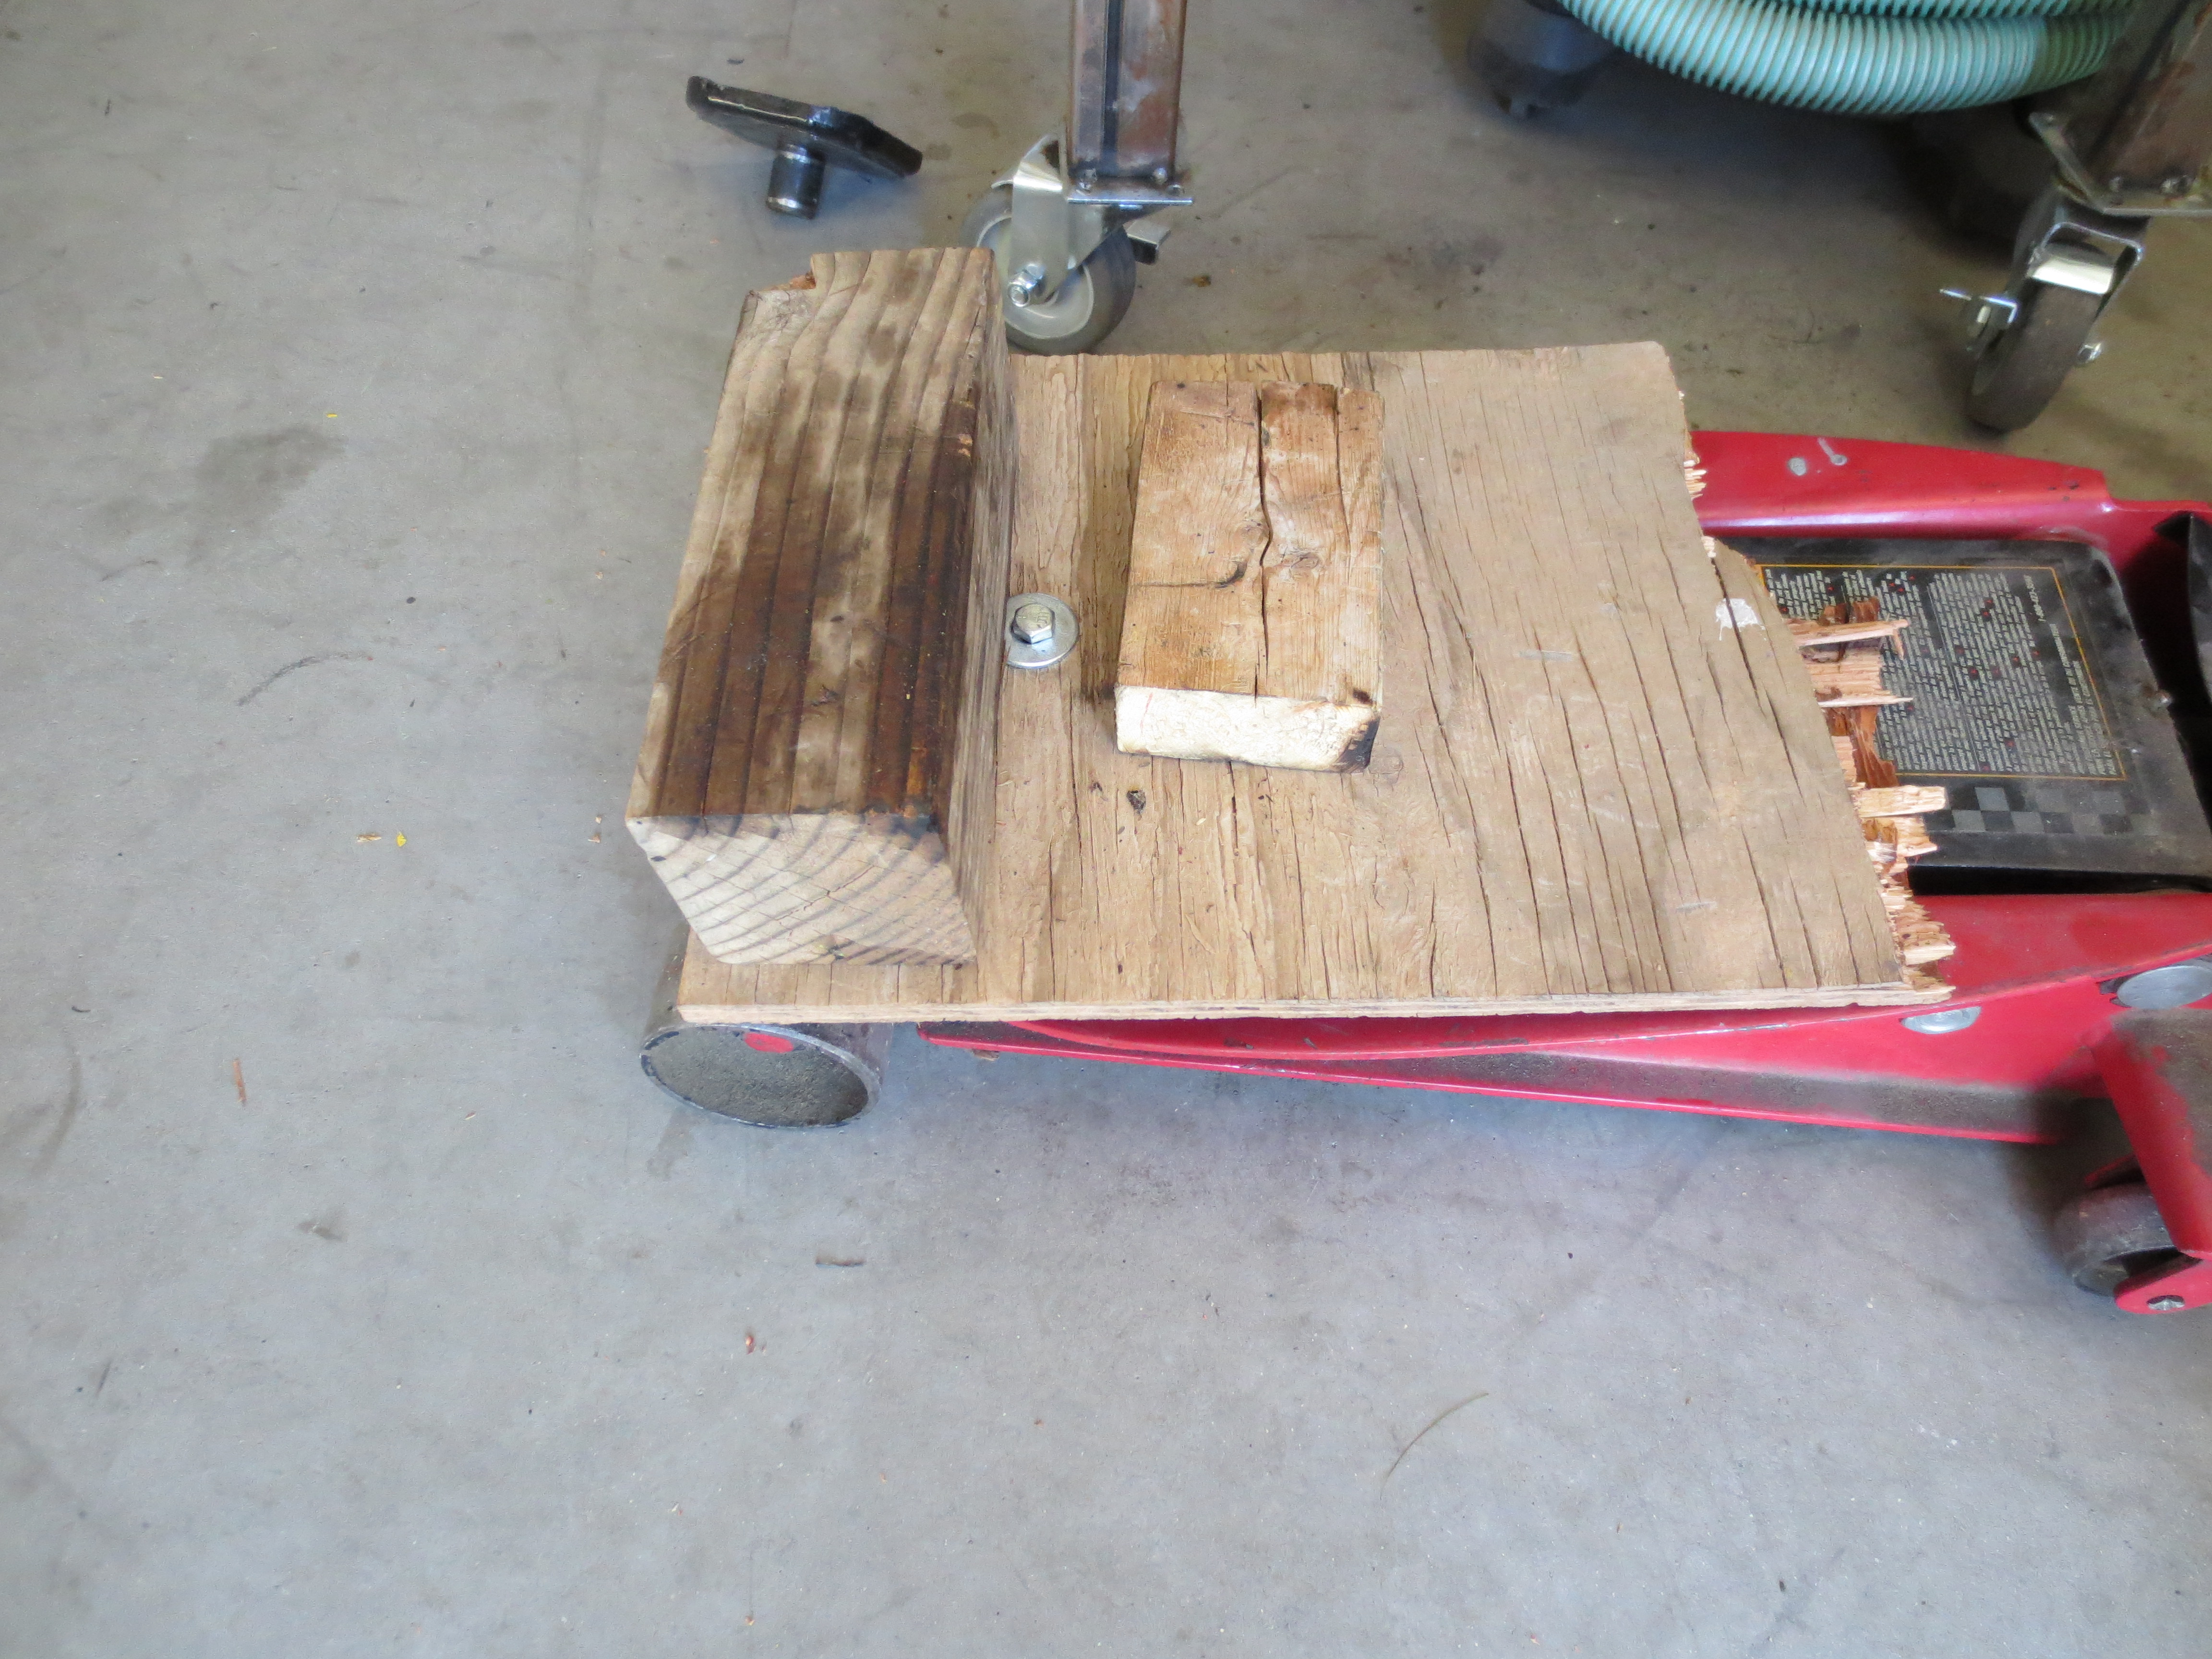
I tried just lifting it up to install it and just couldn't get it lined up and my arm was giving out. Tried balancing it on my jack and almost dropped it at it's highest point!! Plan C, make a tranny jack. Piece of plywood bolted to the jack saddle, 4x4 screwed to plywood, 2x4 to clock it in almost the perfect position and random piece of wood to tilt it at just the right angle. It worked amazingly well!!
The transfer case shift linkage bracket is gone, much easier to get to the nuts, I'm going with different linkage and don't need the bracket anymore.

Next up is rear quarter cut and weld.
Here's a few pics of the SYE install, there are a couple videos on youtube that are great and show the whole process, watch both of them, they take you through everything. One is by Advanced Adapters and one is BleepinJeep.
Front output bearing was a little gritty feeling, so decided to swap it, new bearing and seal
Highly recommend this type of flat nose snap ring plier, they work great

So, I'm an idiot, but if it saves someone making the same mistake, then I can admit it! I put the oil pump under the case half because in the manual it looks like its installed that way. Well, when I torqued the case halves together, a couple tabs broke off, had to buy a new pump

You can see this is how it's supposed to sit, the nose cone has slots for the tabs to go, don't make the same mistake I did!!
I tried just lifting it up to install it and just couldn't get it lined up and my arm was giving out. Tried balancing it on my jack and almost dropped it at it's highest point!! Plan C, make a tranny jack. Piece of plywood bolted to the jack saddle, 4x4 screwed to plywood, 2x4 to clock it in almost the perfect position and random piece of wood to tilt it at just the right angle. It worked amazingly well!!

The transfer case shift linkage bracket is gone, much easier to get to the nuts, I'm going with different linkage and don't need the bracket anymore.

Next up is rear quarter cut and weld.