
Rear washer inop... Pump is working.

Thread Starter
Member
Joined: Mar 2013
Posts: 115
Likes: 0
From: McMinnville Oregon
Year: 2000
Model: Cherokee
Engine: 4.0
So I have this new to me 2000 Classic. since I've owned it, the rear washer has not sprayed. The pump seems to work fine, I look under the jeep, nothing dripping. look inside the jeep, nothing (that I can see) there either. Anyone have any ideas? Common places to look? I've searched but the threads I've seen have always seemed to be pump issues, mine runs. Any help would be great.  <<-- wtf?! lol
<<-- wtf?! lol
CF Veteran
Joined: Feb 2012
Posts: 1,258
Likes: 0
From: Hamburg, NY
Year: 2001
Model: Cherokee
I've got the same problem (2001). I finally gave up on it other issues were more important. I couldn't believe that out of all problems, the rear squirts is what stumps me.
CF Veteran
Joined: Aug 2010
Posts: 8,357
Likes: 103
From: Canton, MI
Year: 1999
Model: Cherokee
Engine: 4.0
It may be the check valve is corroded shut. You may want to access the check valve and remove it for inspection.
From the 2000 FSM:
Located at the highest point of the supply hose routing, beneath the liftgate opening upper header garnish moulding, the hose connects to a check valve. The check valve prevents washer fluid drain-back or siphoning from occurring. From the check valve, another single hose is routed through a grommet to the liftgate, where it is connected to a nipple that protrudes from the inside of the rear wiper motor output shaft bezel.
Check Valve R&R:
CHECK VALVE
(1) Remove the four screws that secure the liftgate opening upper garnish moulding to the upper liftgate opening reinforcement.
(2) Using a trim stick or another suitable wide bladed flat tool, gently pry the liftgate opening upper garnish moulding away from the upper liftgate opening reinforcement to release the snap clip retainers.
(3) Remove the garnish moulding from the upper liftgate opening.
(4) Disconnect the liftgate half of the washer supply hose from the barbed nipple of the rear washer system check valve.
(5) Disconnect the body half of the washer supply hose from the other barbed nipple of the rear washer system check valve.
(6) Remove the check valve from the vehicle.
(7) When reinstalling the check valve, be certain the valve is properly oriented within the system flow
(8) Reverse the remaining removal procedures to complete the installation.
CF Veteran
Joined: Sep 2011
Posts: 4,172
Likes: 4
From: Riviera, Texas
Year: 1998 Sport
Model: Cherokee
Engine: 4.0
It may be the check valve is corroded shut. You may want to access the check valve and remove it for inspection.
From the 2000 FSM:
Located at the highest point of the supply hose routing, beneath the liftgate opening upper header garnish moulding, the hose connects to a check valve. The check valve prevents washer fluid drain-back or siphoning from occurring. From the check valve, another single hose is routed through a grommet to the liftgate, where it is connected to a nipple that protrudes from the inside of the rear wiper motor output shaft bezel.
Check Valve R&R:
CHECK VALVE
(1) Remove the four screws that secure the liftgate opening upper garnish moulding to the upper liftgate opening reinforcement.
(2) Using a trim stick or another suitable wide bladed flat tool, gently pry the liftgate opening upper garnish moulding away from the upper liftgate opening reinforcement to release the snap clip retainers.
(3) Remove the garnish moulding from the upper liftgate opening.
(4) Disconnect the liftgate half of the washer supply hose from the barbed nipple of the rear washer system check valve.
(5) Disconnect the body half of the washer supply hose from the other barbed nipple of the rear washer system check valve.
(6) Remove the check valve from the vehicle.
(7) When reinstalling the check valve, be certain the valve is properly oriented within the system flow
(8) Reverse the remaining removal procedures to complete the installation.
From the 2000 FSM:
Located at the highest point of the supply hose routing, beneath the liftgate opening upper header garnish moulding, the hose connects to a check valve. The check valve prevents washer fluid drain-back or siphoning from occurring. From the check valve, another single hose is routed through a grommet to the liftgate, where it is connected to a nipple that protrudes from the inside of the rear wiper motor output shaft bezel.
Check Valve R&R:
CHECK VALVE
(1) Remove the four screws that secure the liftgate opening upper garnish moulding to the upper liftgate opening reinforcement.
(2) Using a trim stick or another suitable wide bladed flat tool, gently pry the liftgate opening upper garnish moulding away from the upper liftgate opening reinforcement to release the snap clip retainers.
(3) Remove the garnish moulding from the upper liftgate opening.
(4) Disconnect the liftgate half of the washer supply hose from the barbed nipple of the rear washer system check valve.
(5) Disconnect the body half of the washer supply hose from the other barbed nipple of the rear washer system check valve.
(6) Remove the check valve from the vehicle.
(7) When reinstalling the check valve, be certain the valve is properly oriented within the system flow
(8) Reverse the remaining removal procedures to complete the installation.
CF Veteran
Joined: Aug 2010
Posts: 8,357
Likes: 103
From: Canton, MI
Year: 1999
Model: Cherokee
Engine: 4.0
Cutaway view of rear washer check valve:
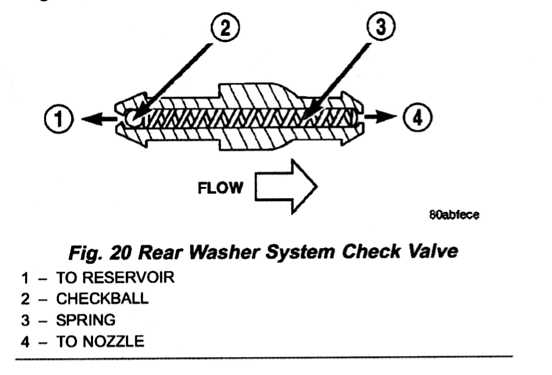
Before actually removing the check valve, unhook the supply hose from the valve and operate the pump to see if fluid comes out.
If you do find that the check ball is rusted in place you may want to place the check valve in a plastic container with enough "Evapo Rust" to cover it and let it sit for several hours and see if the rust desolves. I'm not sure you can buy new check valves (I haven't looked).
Evapo Rust works very well but it is slow acting. Available at O'reilly Auto Parts, and other auto parts stores.
Trending Topics


Member

Joined: Nov 2018
Posts: 200
Likes: 48
From: Fargo, ND
Model: Cherokee (XJ)

Thread
Thread Starter
Forum
Replies
Last Post
Robert Ottavio
Stock XJ Cherokee Tech. All XJ Non-modified/stock questions go here
18
Oct 23, 2020 02:01 PM
lucknuts
Stock XJ Cherokee Tech. All XJ Non-modified/stock questions go here
24
Jun 18, 2014 10:59 PM
Nothing-2-Deep-4-Cherokee
Stock XJ Cherokee Tech. All XJ Non-modified/stock questions go here
13
Feb 27, 2014 07:10 PM
Japawe
Stock XJ Cherokee Tech. All XJ Non-modified/stock questions go here
14
Apr 8, 2011 02:04 PM
simon
Stock Grand Cherokee Tech. All ZJ/WJ/WK Non-modified/stock questions go here!
6
Dec 14, 2009 06:49 AM
Currently Active Users Viewing This Thread: 1 (0 members and 1 guests)