Pic: worn Jeep 4.0 rocker pivot fulcrum
 02-28-2013, 08:47 AM
#16
CF Veteran
Join Date: Aug 2010
Location: Canton, MI
Posts: 8,357
Likes: 0
Received 82 Likes
on
67 Posts
Year: 1999
Model: Cherokee
Engine: 4.0
I was really skeptical about the idea that the bridges could get "twisted" so easily. But lo and behold the twisted junk-yard bridges my buddy pulled for me yesterday:
Skeptical! Man, if we tell you a chicken can haul a freight train,you better start hitching him up.

Far right: you can see the twist on the "new" junk-yard part (gap above the table).
Far left: my old pivot for comparison (sitting nice and flat, but not so shiny).
I still don't understand how this twist can happen so easily.
It can happen removing them as well as installing them. When removing them you are supposed to just break the torque a little then unscrew the bolts evenly. Same going on, tighten down alternately until seated. But - if a cam lobe has put a lift on a rocker even taking them down evenly will put a side load on the bridge.
The latest Harbor Freight flyer has coupon for a 3/8 drive 5 to 80 ft. lb. torque wrench for $9.99 (Reg. $34.99). Get one.
Perhaps this has something to do with my Belleville High education?
So humbled, I plan to rotate my crankshaft to get both rods "down" before I torque on each of these bridges...
Any easy way to knock off the "good" pivots to install on my old bridges?
They should should just pop off with a little persuasion.
Any advice on how to choose which rocker to install on which pivot (he gave me a bag of loose parts)? Are the diagonal oil grooves on the pivot supposed to criss-cross the grooves on the rocker, or mate them (I'm guessing "mate" for max flow).
All the tappet seats that I could easily see looked nice and shiny. I used a narrow shop-vac attachment on all of them before installing the head (to help get out old gasket shavings). All rods ends looked perfect; also no wobble rolling them on my wife's granite kitchen counter top (much to her joy).
I'll use the old valve-cover gasket for a very short while, till I'm sure every thing is put back right. Then I'll run this test. Should I expect oil to be launched all over my engine bay during this test?
Skeptical! Man, if we tell you a chicken can haul a freight train,you better start hitching him up.
Far right: you can see the twist on the "new" junk-yard part (gap above the table).
Far left: my old pivot for comparison (sitting nice and flat, but not so shiny).
I still don't understand how this twist can happen so easily.
It can happen removing them as well as installing them. When removing them you are supposed to just break the torque a little then unscrew the bolts evenly. Same going on, tighten down alternately until seated. But - if a cam lobe has put a lift on a rocker even taking them down evenly will put a side load on the bridge.
The latest Harbor Freight flyer has coupon for a 3/8 drive 5 to 80 ft. lb. torque wrench for $9.99 (Reg. $34.99). Get one.
Perhaps this has something to do with my Belleville High education?
So humbled, I plan to rotate my crankshaft to get both rods "down" before I torque on each of these bridges...
Any easy way to knock off the "good" pivots to install on my old bridges?
They should should just pop off with a little persuasion.
Any advice on how to choose which rocker to install on which pivot (he gave me a bag of loose parts)? Are the diagonal oil grooves on the pivot supposed to criss-cross the grooves on the rocker, or mate them (I'm guessing "mate" for max flow).
All the tappet seats that I could easily see looked nice and shiny. I used a narrow shop-vac attachment on all of them before installing the head (to help get out old gasket shavings). All rods ends looked perfect; also no wobble rolling them on my wife's granite kitchen counter top (much to her joy).
I'll use the old valve-cover gasket for a very short while, till I'm sure every thing is put back right. Then I'll run this test. Should I expect oil to be launched all over my engine bay during this test?
When you remove the VC to check the oil flow you will be removing the CCV tube at the intake manifold. This will cause a giant vacuum leak which will cause the engine to race up to around 1200-1500 RPM when you start it. Not to worry, you should be checking oil flow at this RPM anyway. You can throttle the RPM down as you watch the oil flow by sliding you thumb over the fitting on the intake manifold.
 03-01-2013, 07:10 PM
#18
Junior Member
Thread Starter
In this pic, you can see that no matter how you flip it, the bridge will "always be installed correctly" (the pivot towards the rear of the engine will always point the "wide grooves" to the intake/exhaust; the pivot towards the front of the engine will always point the "narrow grooves" to the intake/exhaust). I guess they were more worried about getting the bridged reversed on re-install, than they were about getting the rockers mixed up.
Upshot: given a loose bag of rocker parts, just make sure that the oil grooves on the rockers align with (NOT criss-cross) the oil grooves on the pivot during install.
Update: I am "re-bending" the junk-yard bridges back into position as best I can, b/c my ignorant attempts to remove the bad pivots from the old bridges bends them anyways. Went down to Harbor Freight today (before I read CCKen's post). Did not have the $10 coupon for the $20 "small" torque wrench (darn it). Got the medium one for $20 instead (20-150 ft-lbs). Also have my grandfathers old-school torque wrench (goes up to 300 inch-lbs). 21 ft-lbs = 252 inch-lbs, so its near the top of that scale.
03-01-2013, 08:33 PM
#19
::CF Moderator::
Join Date: Aug 2011
Location: Prescott, Az
Posts: 43,915
Received 1,530 Likes
on
1,241 Posts
Year: 1990
Model: Cherokee (XJ)
Engine: 4.0
03-01-2013, 11:34 PM
#20
Junior Member
Thread Starter
Yes I do... And yes that sucks... Much wrong on the 2000 Jeep Grand Cherokee model year... I upgraded to the newer OEM Brembro calipers after my non-Bermbro OEM calipers insisted on warping the rotors again and again (see Tech Serv Bulletin). However, given enough backwards and forwards compatibility, I might be able to swap out enough parts to make this thing reasonable.
03-02-2013, 06:28 AM
#21
::CF Moderator::
Join Date: Aug 2011
Location: Prescott, Az
Posts: 43,915
Received 1,530 Likes
on
1,241 Posts
Year: 1990
Model: Cherokee (XJ)
Engine: 4.0
Yes I do... And yes that sucks... Much wrong on the 2000 Jeep Grand Cherokee model year... I upgraded to the newer OEM Brembro calipers after my non-Bermbro OEM calipers insisted on warping the rotors again and again (see Tech Serv Bulletin). However, given enough backwards and forwards compatibility, I might be able to swap out enough parts to make this thing reasonable.
Good attitude.
03-02-2013, 08:48 AM
#22
CF Veteran
Join Date: Aug 2010
Location: Williamsport, Pa
Posts: 1,168
Likes: 0
Received 3 Likes
on
3 Posts
Year: 1997
Model: Cherokee
Engine: 4.0L
Technically you could probably test oil flow by turning the oil pump with an electic drill. You just need to remove the cam sensor and make a tool to chuck up in the drill, simular to a flat style screwdriver- except it should be really fat on the end so it doesn't flop around when you're spinning the oil pump. This will not require you to put the whole engine back together.
So what head did you put back on? Another 0331 or 0630? It would be worth you're time to pull the oil plan and check some bearings. It's rare that a cracked head problem doesn't take out the bottom end, especially with rocker arm pivots that look like that.
It's going to be a gamble at this point though. Put it back together and cross your fingers.
Last edited by Cherockee; 03-02-2013 at 08:56 AM.
03-02-2013, 11:03 AM
#23
Junior Member
Thread Starter
I put on a reman 0331 TUPY head. Here's my thought process: if it holds 19 psi at idle (like it did when I took it apart), then I'm not sure I really care what the bearings look like. Even if I "failed" the electric drill test... at this point, I just HAVE to put it back together. At the very least, I could drive it to the junkyard with pride. I do appreciate your suggestions though.
03-02-2013, 04:20 PM
#24
Junior Member
Thread Starter
Progress: I got the exhaust and intake manifold back on (mostly...). except for bolt #5, as shown here:

Bolt #5 seems to just spin and spin. It reaches one point where is seems to be tightening, then just breaks loose again. I fear the reman head is stripped there... Does anyone know if if the threads go much deeper than the bolts? (could I try a longer bolt?). I think I'll table this problem till I get the rest back together. If you have any advice, please let me know.
Bolt #5 seems to just spin and spin. It reaches one point where is seems to be tightening, then just breaks loose again. I fear the reman head is stripped there... Does anyone know if if the threads go much deeper than the bolts? (could I try a longer bolt?). I think I'll table this problem till I get the rest back together. If you have any advice, please let me know.
03-02-2013, 04:59 PM
#25
CF Veteran
Join Date: Aug 2010
Location: Canton, MI
Posts: 8,357
Likes: 0
Received 82 Likes
on
67 Posts
Year: 1999
Model: Cherokee
Engine: 4.0
Looks like you're snake bit at every turn.
Which bolt?
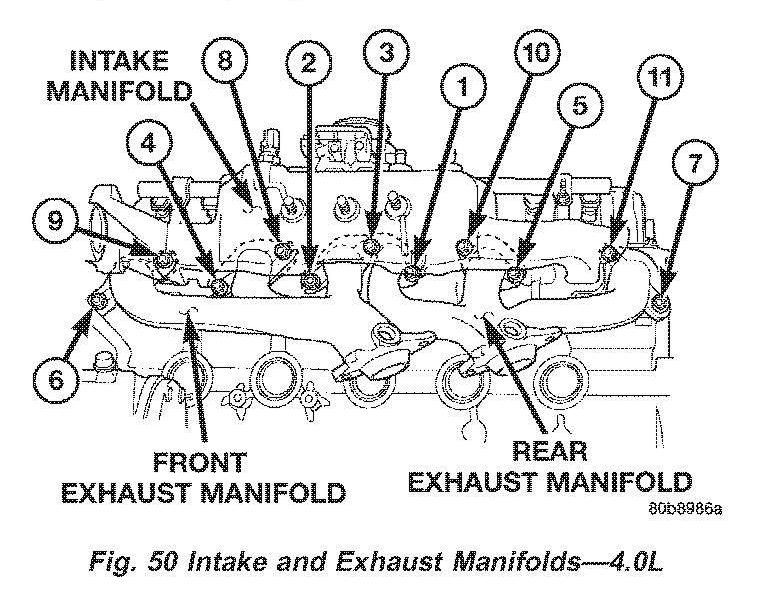
INT/EXH MANIFOLD INSTALLATION
If the manifold is being replaced, ensure all the fitting, etc. are transferred to the replacement manifold.
(1) Install a new engine exhaust/intake manifold gasket over the alignment dowels on the cylinder head.
(2) Position the engine exhaust manifolds to the cylinder head. Install fastener Number 3 and finger tighten at this time (Fig. 50).
(3) Install intake manifold on the cylinder head dowels.
(4) Install washer and fastener Numbers 1, 2, 4, 5, 8, 9, 10 and 11 (Fig. 50).
(5) Install washer and fastener Numbers 6 and 7 (Fig. 50).
(6) Tighten the fasteners in sequence and to the specified torque (Fig. 50).
The intake and engine exhaust manifolds on the 4.0L engine must be removed and installed together. The manifolds use a common gasket at the cylinder
head. Refer to Intake Manifold�4.0L Engine in this section for the proper removal and installation procedures.
Which bolt?
INT/EXH MANIFOLD INSTALLATION
If the manifold is being replaced, ensure all the fitting, etc. are transferred to the replacement manifold.
(1) Install a new engine exhaust/intake manifold gasket over the alignment dowels on the cylinder head.
(2) Position the engine exhaust manifolds to the cylinder head. Install fastener Number 3 and finger tighten at this time (Fig. 50).
(3) Install intake manifold on the cylinder head dowels.
(4) Install washer and fastener Numbers 1, 2, 4, 5, 8, 9, 10 and 11 (Fig. 50).
(5) Install washer and fastener Numbers 6 and 7 (Fig. 50).
(6) Tighten the fasteners in sequence and to the specified torque (Fig. 50).
- Fastener Numbers 1 through 5�Tighten to 33 N�m (24 ft. lbs.) torque.
- Fastener Numbers 6 and 7�Tighten to 31 N�m (23 ft. lbs.) torque.
- Fastener Numbers 8 through 11�Tighten to 33 N�m (24 ft. lbs.) torque.
The intake and engine exhaust manifolds on the 4.0L engine must be removed and installed together. The manifolds use a common gasket at the cylinder
head. Refer to Intake Manifold�4.0L Engine in this section for the proper removal and installation procedures.
03-02-2013, 07:01 PM
#26
Junior Member
Thread Starter
Your diagram above matches my vehicle exactly.
Based on this, the prob I have is with bolt #2. At this point, I've tightened down all the others, probably too much, b/c I could not get my torque wrench on any of them in a meaningful way, and I was also overcompensating for the fact that I could not get #2 to tighten. Got lots of other things installed as well now; hope I don't have to go back (of course, it always goes easier the 3rd time around).
Your thoughts appreciated.
03-02-2013, 08:54 PM
#27
Junior Member

Join Date: Oct 2012
Location: Campbell, CA
Posts: 39
Likes: 0
Received 0 Likes
on
0 Posts
Year: 1989
Model: Cherokee
Engine: 4.0L
Had the exact same problem with mine when I put a new head fro Clearwater cylinder heads in it at the end of last year.
You can use a mirror and flashlight to look at the alignment of the manifold and hole. If off a little the bolt will thread a bit but then break loose when you try and tighten it up.
We got into this situation by hand tightening the bolts to get them all started before forking in sequence. When we got the the offensive bolt it just spun free..
Lucky it is early in the group so we found out right away there was anproblem before the others got tightened.
We ended up loosening them all, not good on the gasket and it's ability to seal.
After they were all hand tight we needed to use a jack to raise the exhaust mani up a little, voila bolt went right in.
Then back to the torque pattern.
So far no leaks.
Good luck, missing a bolt should lead to an exhaust leak.
But that may be the least of your worries.
03-03-2013, 12:24 AM
#28
Junior Member
Thread Starter
Based on your experience, I remain hopeful.
I used the jack under my exhaust from the get-go to get proper alignment for the exhaust mainfold onto my new head. Had to relieve the jack down a bit to make it work well to mount those outer exhaust bolts/nuts/studs. Then, without thinking, during that moment of triumph, I snugged those outer exhaust bolts a bit against my new manifold gasket. Thinking better, I then loosened them up, to hopefully re-make gasket torque start from the middle.
Before I installed my intake manifold, I loosely installed all of my lower manifold bolts, and put 14mm sockets and extensions on each lower manifold bolt BEFORE I slipped on the intake manifold (I plan to eventually post a pic to show you exactly what I did).
I can't imagine that I am failing to get this one bolt to connect correctly, especially when all others went in gently, and are now locked-down in good alignment. I still have that socket and extension connected to that loose #2 manifold bolt-head right now. I have used all kinds of pressure and angles trying to make those threads connect... I have failed thus far.
Tomorrow, I shall try to reverse-drive this bolt, in case it is caught on the lip of the metal gasket, or anything else. If this fails, I will try to "see" the bolt, either directly from below, or from above using mirrors. Any other suggestions also appreciated.
03-04-2013, 06:49 PM
#29
Junior Member
Thread Starter
NICE AND SOLID... Whew! I over-torqued #2 (I'm sure), b/c I could not believe it was really working. Upshot: The mirror helped to realign the socket onto the bolt, but did not help (me) to determine the state of the bolt. I'm not sure the jack really did anything at this point (except lift my engine a bit), b/c all other manifold bolts were already torqued down.
I am now back to trying to un-twist my bridges to lay perfectly flat on a smooth surface with my assortment of locking pliers. Oh, what a joyful task! I did find a way to easily knock off the pivots; maybe I'll "install the pivots" onto the old bridges by the act of torquing them back onto the head?
03-08-2013, 10:32 PM
#30
Junior Member
Thread Starter
OK, bridges rebent back into shape, and gently/evenly torqued to 21 ft-lbs... double-checking everything before I start it.
Here is the pre-start pic, cardboard in-place...

Here is the pre-start pic, cardboard in-place...