Nasty Mileage, Need Help!
 09-24-2018, 08:08 PM
#1
Newbie
Thread Starter

Join Date: Apr 2018
Location: California
Posts: 4
Likes: 0
Received 0 Likes
on
0 Posts
Year: 1989
Model: Cherokee(XJ)
Engine: 4L IL6
Hey Everyone,
I own a 1989 Cherokee XJ with 169k miles. The past few months it has been getting anywhere between 11 to 13 MPG. I'm not only fed up with the expense this costs me, but also because of how bad it smells of exhaust even after just starting the thing. (It smells so bad I even get self conscious at stoplights with people around!) Anyway, I have replaced the O2 sensor recently and I think I have checked all of the grounds. What could be some possible fixes, and how would I do them? My jeep is 100% stock, so there are no big mods that could be responsible for my poor milage. Also, if grounds really could be the culprit, where would I find a list of all of them, or may one of you please supply me with one?
Thank you!!
 09-24-2018, 08:30 PM
#2
CF Veteran
When was the last time you did a tune up (distributor cap, rotor, wires, plugs) and inspected the existing spark plugs?
09-24-2018, 08:53 PM
#3
Member
Join Date: Aug 2014
Location: Phoenix, AZ
Posts: 132
Likes: 0
Received 2 Likes
on
1 Post
Year: 1996
Model: Cherokee
Engine: 4.0L
They�re picky, you need an oem O2 sensor, which the brand is NTK.
Could also have sticky fuel injectors, junk yard ones are trash and so are aftermarket. Send them out to www.hurstinjectorservice.com and have him rebuild them for you.
Another thing is the exhaust manifolds on the 4.0L crack all the time, which sucks in air and trips the O2 sensor into screwing up the air/fuel ratio.
Last thing is, Jeeps are gas hogs.
09-24-2018, 09:26 PM
#4
Newbie
Thread Starter
Join Date: Apr 2018
Location: California
Posts: 4
Likes: 0
Received 0 Likes
on
0 Posts
Year: 1989
Model: Cherokee(XJ)
Engine: 4L IL6
Last tune up was around 6 months ago, and about 900 miles. I just recently replaced the intake/exhaust manifold gasket and verified the exhaust manifold has no cracks. Would it help if I did a check up and re-torqued the manifold bolts/ nuts? Interesting idea with the injectors, too.
09-24-2018, 10:19 PM
#6
CF Veteran

Join Date: Dec 2015
Location: PA
Posts: 3,038
Likes: 0
Received 333 Likes
on
277 Posts
Year: 1997
Model: Cherokee
Engine: 4.0L
Check the fuel pressure. And how old is the o2 sensor? Running too rich or too lean affects the o2 sensor. The older it gets, the less reliable it becomes. This eventually takes its toll on the cat. Look for any vacuum leaks while youre at it. A dirty air and fuel filter can cause trouble as well. Even the cooling system.
09-24-2018, 11:11 PM
#7
Senior Member
During and after the manifold gasket replacement, did you do a check to ensure all the emission parts and vacuum hoses were not bypassed by the previous owner ...and hooked up correctly? A lot of guys butcher things then later complain about crappy performance.
Trending Topics
09-25-2018, 02:03 AM
#8
Member
Join Date: Aug 2014
Location: Phoenix, AZ
Posts: 132
Likes: 0
Received 2 Likes
on
1 Post
Year: 1996
Model: Cherokee
Engine: 4.0L
900 miles in 6 months, is this thing actually being driven? Or is just scooting around town to the grocery store and the post office kind of driving?
Because if so so as long as it isn't mid-single digit mpg, it's probably normal.
Because if so so as long as it isn't mid-single digit mpg, it's probably normal.
09-25-2018, 08:14 AM
#10
::CF Moderator::
Join Date: Aug 2011
Location: Prescott, Az
Posts: 43,876
Received 1,526 Likes
on
1,238 Posts
Year: 1990
Model: Cherokee (XJ)
Engine: 4.0
09-25-2018, 08:18 AM
#11
::CF Moderator::
Join Date: Aug 2011
Location: Prescott, Az
Posts: 43,876
Received 1,526 Likes
on
1,238 Posts
Year: 1990
Model: Cherokee (XJ)
Engine: 4.0
How do you "think" you "checked" the grounds?
If you do not remove, clean, scrape to bare metal the grounds, you might as well do a tribal dance hoping for improvement.
I'll bet $ the line from your throttle body to MAP sensor on the firewall got wonkied up during the intake gasket change.
If you do not remove, clean, scrape to bare metal the grounds, you might as well do a tribal dance hoping for improvement.
I'll bet $ the line from your throttle body to MAP sensor on the firewall got wonkied up during the intake gasket change.
09-25-2018, 08:23 AM
#12
::CF Moderator::
Join Date: Aug 2011
Location: Prescott, Az
Posts: 43,876
Received 1,526 Likes
on
1,238 Posts
Year: 1990
Model: Cherokee (XJ)
Engine: 4.0
Here';s how to do your grounds and fix the troublesome throttle body to MAP hose.
The Renix era XJs and MJs were built with an under-engineered grounding system for the engine/transmission electronics. One problem in particular involves the multiple ground connection at the engine dipstick tube stud. A poor ground here can cause a multitude of driveabililty issues, wasted time, failed emission tests, and wasted money replacing components unnecessarily.
All the components listed below ground at the dipstick tube stud:
Distributor Sync Sensor, TCU main ground, TCU “Shift Point Logic”, Ignition Control Module, Fuel Injectors, ECU main ground (which other engine sensors ground through, including the Oxygen sensor, Knock Sensor, Cruise Control and Transmission Sync signal. All extremely important stuff.
The factory was aware of the issues with this ground point and addressed it by suggesting the following:
Another area where the grounding system on Renix era Jeeps was lacking is the engine to chassis ground. There is a braided cable from the back of the cylinder head that also attaches to the driver’s side of the firewall. This cable is undersized for its intended use and subject to corrosion and poor connections at each end.
I prefer to add a #4 gauge cable from the firewall to a bolt on the rear of the intake manifold, either to a heat shield bolt or fuel rail bolt. A cable about 18″ long with a 3/8″ lug on each end works great and you can get one at any parts store already made up. NAPA has them as part number 781116.
A further improvement to the grounding system can be made using a #4 cable, about 10″ long with 3/8″ terminals at each end. Attach one end of this cable to the negative battery bolt and the other end under the closest 10mm headed bolt on the radiator support just forward of the battery. NAPA part number 781115.
For those of us with Comanches, it’s very important to remove the driver’s side tail lamp assembly to access the ground for the fuel pump. Remove the screw holding the black ground wire. Scrape the paint from the body and corrosion from the wire terminal. Add a 10 gauge wire, with an eyelet on each end, from that grounding point to a bolt on the frame. Better yet, on both Cherokees and Comanches, complete Tip 29 for the best fuel pump grounding. Be sure to scrape all mounting points to bare metal and apply OxGard also.
If you want to upgrade your ground and battery cables with custom made parts, contact Neal at www.meanlemons.com

The Renix throttle bodies have a strange and failure prone connector on the side where the MAP supply originates and then runs up to the MAP sensor located on the firewall. This hose/pipe assembly is no longer available for purchase.
The real kicker here is how critical this line is in supplying the correct vacuum signal to the MAP, the most relied upon sensor for the ECU to read regarding air/fuel ratio. Any cracks, melted spots, or loose rubber connectors can cause major starting and driveability issues.
There’s a simple fix though. All that’s required is a 1/8” NPT tap, a new throttle body gasket ( Napa FPG 60742 ), a vacuum fitting (Napa 05703-B102), two vacuum elbows (Napa2-670), and a length of new plastic piping (Napa 2-672).

Remove the throttle body and take it to the workbench.
Using an oiled tap along with a driver, carefully thread the lower of the 2 holes of the throttle body where the old fitting was plugged in. Don’t go too deep. These are pipe threads.
Flush the hole with carb cleaner and inspect for any left over cuttings.
This is an excellent time to do a complete throttle body and IAC cleaning. See Tip 11.
Take the vacuum fitting (05703-B102 ) and apply a LITTLE bit of thread sealer on the threads only. I prefer Permatex #2 but almost anything is fine.
.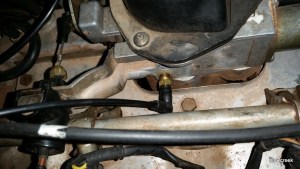
Carefully screw the fitting in until snug.
Install one of the vacuum elbows on the MAP sensor so it points toward the throttle body, and the other vacuum elbow on your new throttle body fitting so it points up to the MAP sensor.
Cut a length of the new plastic tubing (approximately 13 inches) to fit between the vacuum elbows and install it making sure there is enough slack for some engine movement. Route it according to the photo. We don’t want any rubbing or chafing with engine movement. Not a bad idea to use some contact cement or Gasga-Cinch sparingly on the tubing to elbow connectors.

Also, a tune up on a 4.0 is plugs, wires, cap and rotor every 30,000 miles. Throttle body cleaning at the same time.
Originally by TJWalker of CherokeeForum & JeepForum

The Idle Air Control (IAC) is mounted on the back of the throttle body (front for ’87-’90).
The valve controls the idle speed of the engine by controlling the amount of air flowing through the air control passage. It consists of a stepper motor that moves a pintle shaped plunger in and out of the air control passage. When the valve plunger is retracted, the air control passage flows more air which raises the idle speed. When the valve plunger is extended, the air control passage flows less air which lowers the idle speed.
Over time and miles, the IAC can get carboned up which can have an adverse affect on idle quality. Cleaning the IAC may restore proper function and is an easy procedure to perform and good preventive maintenance so it is never a bad idea. This should be part of a normal tune-up procedure and whenever idle/stalling issues are present.
CLEANING THE JEEP 4.0 IDLE AIR CONTROL


The Renix era XJs and MJs were built with an under-engineered grounding system for the engine/transmission electronics. One problem in particular involves the multiple ground connection at the engine dipstick tube stud. A poor ground here can cause a multitude of driveabililty issues, wasted time, failed emission tests, and wasted money replacing components unnecessarily.
All the components listed below ground at the dipstick tube stud:
Distributor Sync Sensor, TCU main ground, TCU “Shift Point Logic”, Ignition Control Module, Fuel Injectors, ECU main ground (which other engine sensors ground through, including the Oxygen sensor, Knock Sensor, Cruise Control and Transmission Sync signal. All extremely important stuff.
The factory was aware of the issues with this ground point and addressed it by suggesting the following:
- Remove the nut holding the wire terminals to the stud. Verify that the stud is indeed tightened securely into the block. If the whole stud turns, you can use a 7/32″ six point socket or wrench to hold it so the nut can be removed. Worst case, cut the wires and remove the stud and nut. Install new terminal eyelets on the wires when going back together. Scrape any and all paint from the stud’s mounting surface where the wires will attach. Surfaces must be clean, shiny and free of any oil, grease, or paint.
- Inspect the wire terminals. Check to see that none of the terminals are crimped over wire insulation instead of bare wire. Be sure the crimps are tight. It wouldn’t hurt to re-crimp them just as a matter of course. Sand and polish the wire terminals until clean and shiny on both sides. Apply a liberal coating of OxGard, which is available at Lowe’s and other stores. Reinstall all the wires to the stud and tighten th
 e nut down securely.

Another area where the grounding system on Renix era Jeeps was lacking is the engine to chassis ground. There is a braided cable from the back of the cylinder head that also attaches to the driver’s side of the firewall. This cable is undersized for its intended use and subject to corrosion and poor connections at each end.
- Remove the cable end from the firewall using a 15mm wrench or socket. Scrape the paint off down to bare metal and clean the wire terminal. Apply OxGard. Reattach securely.
- Remove the other end of the cable from the rear of the head using a 3’4″ socket. Clean all the oil, paint and crud from the stud. Clean the wire terminal of the cable and reattach securely with a liberal coating of OxGard.
I prefer to add a #4 gauge cable from the firewall to a bolt on the rear of the intake manifold, either to a heat shield bolt or fuel rail bolt. A cable about 18″ long with a 3/8″ lug on each end works great and you can get one at any parts store already made up. NAPA has them as part number 781116.
A further improvement to the grounding system can be made using a #4 cable, about 10″ long with 3/8″ terminals at each end. Attach one end of this cable to the negative battery bolt and the other end under the closest 10mm headed bolt on the radiator support just forward of the battery. NAPA part number 781115.
For those of us with Comanches, it’s very important to remove the driver’s side tail lamp assembly to access the ground for the fuel pump. Remove the screw holding the black ground wire. Scrape the paint from the body and corrosion from the wire terminal. Add a 10 gauge wire, with an eyelet on each end, from that grounding point to a bolt on the frame. Better yet, on both Cherokees and Comanches, complete Tip 29 for the best fuel pump grounding. Be sure to scrape all mounting points to bare metal and apply OxGard also.

If you want to upgrade your ground and battery cables with custom made parts, contact Neal at www.meanlemons.com
The Renix throttle bodies have a strange and failure prone connector on the side where the MAP supply originates and then runs up to the MAP sensor located on the firewall. This hose/pipe assembly is no longer available for purchase.
The real kicker here is how critical this line is in supplying the correct vacuum signal to the MAP, the most relied upon sensor for the ECU to read regarding air/fuel ratio. Any cracks, melted spots, or loose rubber connectors can cause major starting and driveability issues.
There’s a simple fix though. All that’s required is a 1/8” NPT tap, a new throttle body gasket ( Napa FPG 60742 ), a vacuum fitting (Napa 05703-B102), two vacuum elbows (Napa2-670), and a length of new plastic piping (Napa 2-672).

Remove the throttle body and take it to the workbench.
Using an oiled tap along with a driver, carefully thread the lower of the 2 holes of the throttle body where the old fitting was plugged in. Don’t go too deep. These are pipe threads.
Flush the hole with carb cleaner and inspect for any left over cuttings.
This is an excellent time to do a complete throttle body and IAC cleaning. See Tip 11.
Take the vacuum fitting (05703-B102 ) and apply a LITTLE bit of thread sealer on the threads only. I prefer Permatex #2 but almost anything is fine.
.

Carefully screw the fitting in until snug.
Install one of the vacuum elbows on the MAP sensor so it points toward the throttle body, and the other vacuum elbow on your new throttle body fitting so it points up to the MAP sensor.
Cut a length of the new plastic tubing (approximately 13 inches) to fit between the vacuum elbows and install it making sure there is enough slack for some engine movement. Route it according to the photo. We don’t want any rubbing or chafing with engine movement. Not a bad idea to use some contact cement or Gasga-Cinch sparingly on the tubing to elbow connectors.

Also, a tune up on a 4.0 is plugs, wires, cap and rotor every 30,000 miles. Throttle body cleaning at the same time.
Originally by TJWalker of CherokeeForum & JeepForum

The Idle Air Control (IAC) is mounted on the back of the throttle body (front for ’87-’90).
The valve controls the idle speed of the engine by controlling the amount of air flowing through the air control passage. It consists of a stepper motor that moves a pintle shaped plunger in and out of the air control passage. When the valve plunger is retracted, the air control passage flows more air which raises the idle speed. When the valve plunger is extended, the air control passage flows less air which lowers the idle speed.
Over time and miles, the IAC can get carboned up which can have an adverse affect on idle quality. Cleaning the IAC may restore proper function and is an easy procedure to perform and good preventive maintenance so it is never a bad idea. This should be part of a normal tune-up procedure and whenever idle/stalling issues are present.
CLEANING THE JEEP 4.0 IDLE AIR CONTROL

- Remove the air filter cover, associated hoses and the rubber boot that goes from the air filter cover to the throttle body. Remove the IAC with a Torx driver (2 bolts; one can be kind of hard to get to). On ’91 and later, it may be easier to just remove the whole throttle body. Be sure to use a new throttle body to manifold gasket when reinstalling.
- “Gently” wiggle out the IAC from the throttle body. Gasket/O-ring on the IAC can be re-used if it is not damaged
- Clean the IAC with a spray can of throttle body cleaner; inexpensive and available at any place that sells auto parts. Throttle body cleaner is recommended rather than carburetor cleaner as it is less harsh, safe for throttle body coatings and oxygen sensors. Use cleaner, a rag and a toothbrush and or Q-Tips. Be gentle; don’t twist or pull on the pintle that protrudes from the IAC as it is fragile and you could damage it.
- Thoroughly spray clean and flush where the IAC seats in the throttle body with the same spray cleaner.
- It is also a good idea to clean the entire throttle body bore itself, the butterfly valve inside of the throttle body and it’s edges, and all associated linkage as long as you have things disassembled.
 09-25-2018, 10:46 AM
#13
CF Veteran

Join Date: Nov 2017
Location: Groton, MA
Posts: 3,695
Received 234 Likes
on
207 Posts
Year: 1995
Model: Cherokee(XJ)
Engine: I6 4.0L
Also - O.P. - follow Cruiser's advice. You could not ask to be in better hands when it comes to your 89 XJ.
09-25-2018, 03:09 PM
#14
::CF Moderator::
Join Date: Aug 2011
Location: Prescott, Az
Posts: 43,876
Received 1,526 Likes
on
1,238 Posts
Year: 1990
Model: Cherokee (XJ)
Engine: 4.0
09-25-2018, 04:51 PM
#15
CF Veteran
Join Date: Nov 2017
Location: Groton, MA
Posts: 3,695
Received 234 Likes
on
207 Posts
Year: 1995
Model: Cherokee(XJ)
Engine: I6 4.0L
I tried that one and my Jeep drove exactly the same after (as far as I could tell because it was raining like a m'f'r).. I must have missed a step. 