
Is This My Alternator?

Thread Starter
Junior Member
Joined: May 2013
Posts: 37
Likes: 0
From: Northern Ontario, Canada
Year: 1990
Model: Cherokee
Engine: 4.0 I6
So this one has me stumped.
90 XJ, 4.0, Auto, 99,000 Miles.
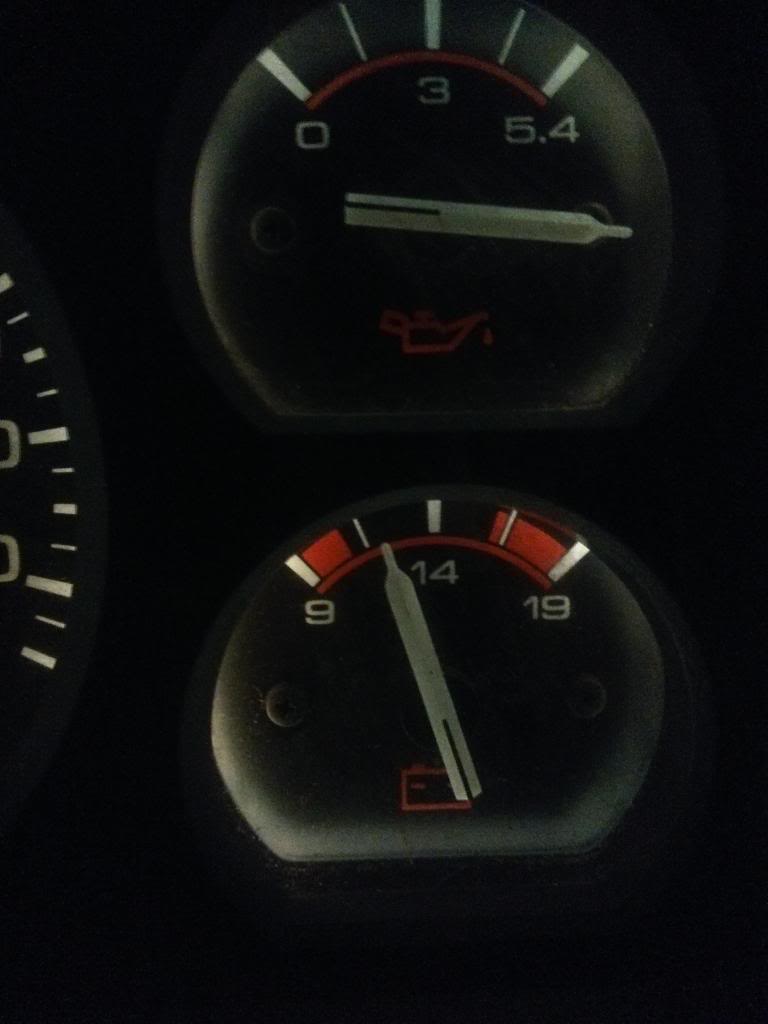
About a month ago I bought a new gator belt. Tightened it the best I could. I researched that XJ's need abnormally tight belts. Did that and it still squealed alot. Tried different tensions, same thing. Sometimes it would squeal right from start up, sometimes it would start quiet and get gradually worse. If I was out wheeling or driving for an extended period of time, the squeal was hellish. During this whole time, my volt gauge read this (disregard non-functioning oil press gauge):
I made a 100 mile trip to pick up a small utility trailer a few weeks ago and when I was driving, for a fraction of a second, my lights would blink/go out (hardly noticeable) and I would hear a relay-like click under my glove box and then the belt squeal would pick up big time. Then after about 10-20 mins, the belt would quiet down, then the click again and a major belt squeal.
A week ago I went to use my winch and when it started to spool in under load, my voltmeter plunged and the jeep almost died out.
Now a couple days ago, I was an idiot and left my aux lights on so it drained my battery. I boosted it and put a voltmeter on the battery and it read a little over 14 V. I drove it around to recharge it and it started the next day no problems. This time, no belt squeal at all. I drove it to work Monday and Tuesday (5 mile round trip) with no starting issues or belt squeal at all. I went to start it this morning and I heard my fuel pump kick on then when I went to turn the key, it may have turned over twice and was right dead.
Is there any correlation between any of these events? I know my battery is less than a year old. The alternator, I can't be sure as it was already installed when I bought the Jeep this summer.
Any ideas?
90 XJ, 4.0, Auto, 99,000 Miles.
About a month ago I bought a new gator belt. Tightened it the best I could. I researched that XJ's need abnormally tight belts. Did that and it still squealed alot. Tried different tensions, same thing. Sometimes it would squeal right from start up, sometimes it would start quiet and get gradually worse. If I was out wheeling or driving for an extended period of time, the squeal was hellish. During this whole time, my volt gauge read this (disregard non-functioning oil press gauge):

I made a 100 mile trip to pick up a small utility trailer a few weeks ago and when I was driving, for a fraction of a second, my lights would blink/go out (hardly noticeable) and I would hear a relay-like click under my glove box and then the belt squeal would pick up big time. Then after about 10-20 mins, the belt would quiet down, then the click again and a major belt squeal.
A week ago I went to use my winch and when it started to spool in under load, my voltmeter plunged and the jeep almost died out.
Now a couple days ago, I was an idiot and left my aux lights on so it drained my battery. I boosted it and put a voltmeter on the battery and it read a little over 14 V. I drove it around to recharge it and it started the next day no problems. This time, no belt squeal at all. I drove it to work Monday and Tuesday (5 mile round trip) with no starting issues or belt squeal at all. I went to start it this morning and I heard my fuel pump kick on then when I went to turn the key, it may have turned over twice and was right dead.
Is there any correlation between any of these events? I know my battery is less than a year old. The alternator, I can't be sure as it was already installed when I bought the Jeep this summer.
Any ideas?
Last edited by XJ1517; Nov 13, 2013 at 10:06 AM.

CF Veteran
Joined: Nov 2011
Posts: 2,433
Likes: 6
From: Northern MN
Year: 1990
Model: Cherokee (XJ)
Engine: Renix 4.0
^What he said. Also, welcome to Club Renix! The 87-90 XJs had poorly designed grounds, gauge cluster being on of them, and need to be upgraded. If you go into the tech write-up section and find Cruiser's Mostly Renix Tips you'll find ways to remedy these issues, which can cause all kinds of other issues too.
CF Veteran
Joined: May 2008
Posts: 3,018
Likes: 23
Year: 1988
Model: Cherokee
Engine: AMC242
Adding a chassis ground to RENIX usually does not go amiss.
Also, know that the IP voltmeter (especially on RENIX) is a notorious liar! ANY suspect reading there should be verified with a DMM before any other troubleshooting is undertaken. Full Stop.
(Mine's so whacked I just make a red grease pencil bracket on the gage window to give me a "relative state of charge" - if the needle falls outside of that bracket, I whip out the DMM to make sure it really did before I do anything else...)
CF Veteran
Joined: Aug 2011
Posts: 10,489
Likes: 24
From: Nor-Cal Coast
Year: 90,84
Model: Cherokee
Engine: 4.0,2.5
A long-shot, but worked for me;
Soaping The Belt
Tight, tighter, tightest the darn new belt would still chirp.
Finally in desperation I went out there with a bottle of Dawn dish soap and the garden hose. Idling, I got it wet, then squirt soap on both sides, rinsed some, and soaped a little more. Let it idle a minute all soapy. To end, I ran the hose slow on it running for a couple minutes. Bingo! That solved it. There was some sort of coating on the new belt? Idk.
I normally run my belt as loose as I can, and still have the alternator not slip with the blower on high, and lights on brights. Puts less strain on all the other bearings. Radi pointed out a cool tip. After it might have been slipping, (voltage has been low), see if the Alt. pulley is hot. I want to go back and loosen it a tad now.

CF Veteran
Joined: Oct 2011
Posts: 1,268
Likes: 1
From: Bakersfield CA
Year: 1990
Model: Cherokee (XJ)
Engine: 4.0
Like Dflintstone said soaping the belt works, and if that doesn't do it and the alt is not bad check your idler pully. The pully will sometimes glaze and needs to be cleaned and roughed up with some emery cloth, or so I have found.
Trending Topics
::CF Moderator::
Joined: Aug 2011
Posts: 43,971
Likes: 1,579
From: Prescott, Az
Year: 1990
Model: Cherokee (XJ)
Engine: 4.0
Since you mention some clicking etc, start with this:
Renix Ground Refreshing
The Renix era XJs and MJs were built with an under-engineered grounding system for the engine/transmission electronics. One problem in particular involves the multiple ground connection at the engine dipstick tube stud. A poor ground here can cause a multitude of driveabililty issues, wasted time, failed emission tests, and wasted money replacing components unnecessarily.
The components grounding at the dipstick tube stud are:
Distributor Sync Sensor, TCU main ground, TCU "Shift Point Logic", Ignition control Module, Injectors, ECU main ground which other engine sensors ground through, Oxygen sensor, Knock Sensor, Cruise Control, and Transmission Sync signal. All extremely important stuff.
The factory was aware of the issues with this ground point and addressed it by suggesting the following:
Remove the nut holding the wire terminals to the stud. Verify that the stud is indeed tightened securely into the block. Scrape any and all paint from the stud’s mounting surface where the wires will attach. Must be clean, shiny and free of any oil, grease, or paint.
Inspect the wire terminals. Check to see that none of the terminals are crimped over wire insulation instead of bare wire. Be sure the crimps are tight. It wouldn’t hurt to re-crimp them just as a matter of course. Sand and polish the wire terminals until clean and shiny on both sides. Reinstall all the wires to the stud and tighten the nut down securely.
While you’re in that general area, locate the battery negative cable which is fastened to the engine block just forward of the dipstick stud. Remove the bolt, scrape the block to bare metal, clean and polish the cable terminal, and reattach securely.
Another area where the grounding system on Renix era Jeeps was lacking is the engine to chassis ground. There is a braided cable from the back of the cylinder head that also attaches to the driver’s side of the firewall. This cable is undersized for it’s intended use and subject to corrosion and poor connections at each end.
First off, remove the cable end from the firewall using a 15mm wrench or socket. Scrape the paint off down to bare metal and clean the wire terminal. Reattach securely.
Remove the other end of the cable from the rear of the head using a 3’4" socket. Clean all the oil, paint and crud from the stud. Clean the wire terminal of the cable and reattach securely.
A suggestion regarding the braided cable:
I prefer to add a #4 Gauge cable from the firewall to a bolt on the rear of the intake manifold, either to a heat shield bolt or fuel rail bolt. A cable about 18" long with a 3/8" lug on each end works great and you can get one at any parts store already made up. Napa has them as part number 781116.
A further improvement to the grounding system can be made using a #4 cable, about 10" long with 3/8" terminals at each end. Attach one end of this cable to the negative battery bolt and the other end under the closest 10mm headed bolt on the radiator support just forward of the battery. Napa part number 781115.
For those of us with Comanches, it’s very important to remove the driver’s side taillamp assembly to access the ground for the fuel pump. Remove the screw holding the black ground wire. Scrape the paint from the body and corrosion from the wire terminal. Reattach securely.
If you want to upgrade your grounds and battery cables in general, contact Jon at www.kelleyswip.com. He makes an incredible cable upgrade for a very reasonable price.
Revised 03-04-2013
Then click on the pink link below and go to post 3.
Thread Starter
Junior Member
Joined: May 2013
Posts: 37
Likes: 0
From: Northern Ontario, Canada
Year: 1990
Model: Cherokee
Engine: 4.0 I6
Do you mean add one from the engine block to the chassis?
Been like that since I bought it from the PO. It worked for a day or two a week after I bought it, then never worked again. Should probably look into that...
A long-shot, but worked for me;
Soaping The Belt
Tight, tighter, tightest the darn new belt would still chirp.
Finally in desperation I went out there with a bottle of Dawn dish soap and the garden hose. Idling, I got it wet, then squirt soap on both sides, rinsed some, and soaped a little more. Let it idle a minute all soapy. To end, I ran the hose slow on it running for a couple minutes. Bingo! That solved it. There was some sort of coating on the new belt? Idk.
I normally run my belt as loose as I can, and still have the alternator not slip with the blower on high, and lights on brights. Puts less strain on all the other bearings. Radi pointed out a cool tip. After it might have been slipping, (voltage has been low), see if the Alt. pulley is hot. I want to go back and loosen it a tad now.
Soaping The Belt
Tight, tighter, tightest the darn new belt would still chirp.
Finally in desperation I went out there with a bottle of Dawn dish soap and the garden hose. Idling, I got it wet, then squirt soap on both sides, rinsed some, and soaped a little more. Let it idle a minute all soapy. To end, I ran the hose slow on it running for a couple minutes. Bingo! That solved it. There was some sort of coating on the new belt? Idk.
I normally run my belt as loose as I can, and still have the alternator not slip with the blower on high, and lights on brights. Puts less strain on all the other bearings. Radi pointed out a cool tip. After it might have been slipping, (voltage has been low), see if the Alt. pulley is hot. I want to go back and loosen it a tad now.
Since you mention some clicking etc, start with this:
Renix Ground Refreshing
The Renix era XJs and MJs were built with an under-engineered grounding system for the engine/transmission electronics. One problem in particular involves the multiple ground connection at the engine dipstick tube stud. A poor ground here can cause a multitude of driveabililty issues, wasted time, failed emission tests, and wasted money replacing components unnecessarily.
The components grounding at the dipstick tube stud are:
Distributor Sync Sensor, TCU main ground, TCU "Shift Point Logic", Ignition control Module, Injectors, ECU main ground which other engine sensors ground through, Oxygen sensor, Knock Sensor, Cruise Control, and Transmission Sync signal. All extremely important stuff.
The factory was aware of the issues with this ground point and addressed it by suggesting the following:
Remove the nut holding the wire terminals to the stud. Verify that the stud is indeed tightened securely into the block. Scrape any and all paint from the stud�s mounting surface where the wires will attach. Must be clean, shiny and free of any oil, grease, or paint.
Inspect the wire terminals. Check to see that none of the terminals are crimped over wire insulation instead of bare wire. Be sure the crimps are tight. It wouldn�t hurt to re-crimp them just as a matter of course. Sand and polish the wire terminals until clean and shiny on both sides. Reinstall all the wires to the stud and tighten the nut down securely.
While you�re in that general area, locate the battery negative cable which is fastened to the engine block just forward of the dipstick stud. Remove the bolt, scrape the block to bare metal, clean and polish the cable terminal, and reattach securely.
Another area where the grounding system on Renix era Jeeps was lacking is the engine to chassis ground. There is a braided cable from the back of the cylinder head that also attaches to the driver�s side of the firewall. This cable is undersized for it�s intended use and subject to corrosion and poor connections at each end.
First off, remove the cable end from the firewall using a 15mm wrench or socket. Scrape the paint off down to bare metal and clean the wire terminal. Reattach securely.
Remove the other end of the cable from the rear of the head using a 3�4" socket. Clean all the oil, paint and crud from the stud. Clean the wire terminal of the cable and reattach securely.
A suggestion regarding the braided cable:
I prefer to add a #4 Gauge cable from the firewall to a bolt on the rear of the intake manifold, either to a heat shield bolt or fuel rail bolt. A cable about 18" long with a 3/8" lug on each end works great and you can get one at any parts store already made up. Napa has them as part number 781116.
A further improvement to the grounding system can be made using a #4 cable, about 10" long with 3/8" terminals at each end. Attach one end of this cable to the negative battery bolt and the other end under the closest 10mm headed bolt on the radiator support just forward of the battery. Napa part number 781115.
For those of us with Comanches, it�s very important to remove the driver�s side taillamp assembly to access the ground for the fuel pump. Remove the screw holding the black ground wire. Scrape the paint from the body and corrosion from the wire terminal. Reattach securely.
Thanks everyone! Cheers.


Thread
Thread Starter
Forum
Replies
Last Post
cpnwrench
Stock XJ Cherokee Tech. All XJ Non-modified/stock questions go here
14
May 5, 2024 12:21 PM
SergeK
Stock XJ Cherokee Tech. All XJ Non-modified/stock questions go here
8
Feb 27, 2023 03:38 PM
soocom1
Modified XJ Cherokee Tech
27
Nov 30, 2015 05:56 AM
villamagna71
Stock XJ Cherokee Tech. All XJ Non-modified/stock questions go here
2
Sep 28, 2015 12:05 PM
Currently Active Users Viewing This Thread: 1 (0 members and 1 guests)