

 Sep 10, 2015, 05:47 PM
Last edit by: IB Advertising
See related guides and technical advice from our community experts:
Browse all: Steering & Suspension
- Jeep Grand Cherokee ZJ 1993-1998: How to Replace Upper and Lower Control Arms
Step by step instructions for do-it-yourself repairs.
Browse all: Steering & Suspension

How do you install the upper control arm axle bushing?
Thread Starter
Junior Member
Joined: Jun 2010
Posts: 53
Likes: 0
From: Auburn, CA.
Year: 96 2 Door Sport
Model: Cherokee
As the title says, how the heck do you get that sucker in? I've change out all the rest of the upper an lower control arms/bushings but the one going into the axle housing is giving me fits.
It's an oem bushing and sleeve.
Press? BFH?
And yes, I did try searching before posting this.
Thanks in advance for any assistance.
It's an oem bushing and sleeve.
Press? BFH?
And yes, I did try searching before posting this.
Thanks in advance for any assistance.
Honorary Moderator
Joined: Mar 2010
Posts: 8,135
Likes: 16
From: Gilbert AZ/Las Cruces NM
Year: 1996
Model: Cherokee
Engine: 4.0 upgraded
check out my write up. full with pictures and a step by step
http://www.cherokeetech.com/VBull/sh...ng-Replacement
http://www.cherokeetech.com/VBull/sh...ng-Replacement
Thread Starter
Junior Member
Joined: Jun 2010
Posts: 53
Likes: 0
From: Auburn, CA.
Year: 96 2 Door Sport
Model: Cherokee
check out my write up. full with pictures and a step by step

Thread Starter
Junior Member
Joined: Jun 2010
Posts: 53
Likes: 0
From: Auburn, CA.
Year: 96 2 Door Sport
Model: Cherokee
I recommend the ironman4x4fab bushing. Has a sleeve and a 2 piece bushing insert.
Honorary Moderator
Joined: Mar 2010
Posts: 8,135
Likes: 16
From: Gilbert AZ/Las Cruces NM
Year: 1996
Model: Cherokee
Engine: 4.0 upgraded
that is the upper control arm bushing on the axle.......
it is the passenger side (which is the same process as the drivers side.....)
the passenger side is the steel, drivers side is the cast into the pumpkin... Same process
Nominated
it is the passenger side (which is the same process as the drivers side.....)
the passenger side is the steel, drivers side is the cast into the pumpkin... Same process
Nominated
Last edited by 96_xj; Jun 15, 2011 at 12:19 AM.
Honorary Moderator
Joined: Mar 2010
Posts: 8,135
Likes: 16
From: Gilbert AZ/Las Cruces NM
Year: 1996
Model: Cherokee
Engine: 4.0 upgraded
btw off topic real quick. I grew up in Yuba City and we have 8 acres of property off of Bell road just past the 4 way with Joeger Rd.
Okay back on topic.
as pictured in my link.
just use a ball joint press and a 1 5/16" socket to help as well
Okay back on topic.
as pictured in my link.
just use a ball joint press and a 1 5/16" socket to help as well
Trending Topics
Thread Starter
Junior Member
Joined: Jun 2010
Posts: 53
Likes: 0
From: Auburn, CA.
Year: 96 2 Door Sport
Model: Cherokee
btw off topic real quick. I grew up in Yuba City and we have 8 acres of property off of Bell road just past the 4 way with Joeger Rd.
Nice area, that's only a few blocks from my house.
Got it on the uca, looks like I need to rent a press.
Thanks.
Member
Joined: Aug 2011
Posts: 242
Likes: 0
From: Vancouver, BC
Year: 1991
Model: Cherokee
Engine: 4.0
You'd be surprised how freakin difficult it is to find a press for this application in my area. I am pitifully ill-equipped to tackle this job but I'm forced to try. It took a good deal of elbow grease (and more than a good deal of profanity) to get the old bushing out and now I'm struggling with the task of getting that bushing in with nothing even closely resembling the proper tools.
I am very mechanically inclined but, as I said before, ill-equipped to tackle this. I am in the process of re-purposing a C-clamp and 1-1/2" sockets in lieu of a proper press. The biggest issue I have now is available space to work in...those damn springs are the biggest obstacle and I have but one spring compressor (ill-equipped rears it's ugly head again).
I'll repost if and when I conquer this problem.
Member
Joined: Aug 2011
Posts: 242
Likes: 0
From: Vancouver, BC
Year: 1991
Model: Cherokee
Engine: 4.0
Well I got the new bushing in. I broke down and got some coil spring compressors (I am such a cheapskate) and got the coil out of the way. I ruined the C-clamp...being too big for the space, it never could get at the bushing straight on and I ended up bending the spindle to an unusable degree.
I rummaged through my unnecessarily messy collection of tools and came out with a gear puller (2 arm).
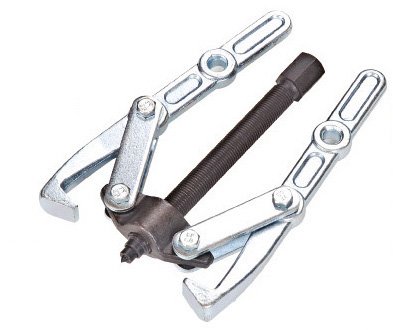
It wasn't quite what I wanted but with a socket on the end of the spindle and another larger one with a piece of metal to cover the full pushing surface of the bushing, I got the bushing in.

I guess perseverance payed off in spite of the fact that I'm low on funds at the moment. Better than paying a mechanic exorbitant shop rates later.
I rummaged through my unnecessarily messy collection of tools and came out with a gear puller (2 arm).
It wasn't quite what I wanted but with a socket on the end of the spindle and another larger one with a piece of metal to cover the full pushing surface of the bushing, I got the bushing in.
I guess perseverance payed off in spite of the fact that I'm low on funds at the moment. Better than paying a mechanic exorbitant shop rates later.

Newbie
Joined: Apr 2012
Posts: 3
Likes: 0
From: Arizona
Year: 1996
Model: Cherokee
Engine: 4.0
Bugsy,
Thanks for the pictures, I too am a novice mechanic and I was mortified to see what the shops were going to charge me to replace my same bushings, with your brilliant idea of using a gear puller to remove and install has inspired me to give it the o'l college try. I'll post pictures of my experience when I get started.
AZcherokeeXJ
Phoenix, AZ
Seasoned Member
Joined: Apr 2011
Posts: 328
Likes: 1
From: GSO NC
Model: Cherokee
Engine: 4.0L HO
I've only changed these once, someone recommended putting the bushings in the freezer overnight. I did, it was still a PITA, but I got it done with a BFH, BJ press, and a homebrew press (long screw, nuts, sockets, spacers, plate, washers)
CF Veteran
Joined: Jun 2011
Posts: 2,858
Likes: 1
From: Nor-Cal
Year: 1990
Model: Cherokee
Engine: The venerable 4.0
Originally Posted by RenegadeT
I've only changed these once, someone recommended putting the bushings in the freezer overnight. I did, it was still a PITA, but I got it done with a BFH, BJ press, and a homebrew press (long screw, nuts, sockets, spacers, plate, washers)
Newbie
Joined: Apr 2012
Posts: 3
Likes: 0
From: Arizona
Year: 1996
Model: Cherokee
Engine: 4.0
This was an excellent idea of how to install and remove upper control arm bushings but like someone said on this forum BE CAREFUL because the amount of foot pound pressure being placed on that gear puller will make it explode as is what happened to me. Luckily my son and I were not hurt, just scared s**tless but it was a cool explosion. I recommend to anyone using this method to improve their gear puller by fabricating some stronger, thicker plates (refer to picture) made from AMERICAN steel and you wont have this same outcome as I did.
Hmmm. never mind. Sorry I can't seem to upload my pictures for some reason. Give me some time and I will figure it out soon.
Hmmm. never mind. Sorry I can't seem to upload my pictures for some reason. Give me some time and I will figure it out soon.