
felpro valve cover gasket


Thread Starter
Member
Joined: Jan 2010
Posts: 118
Likes: 0
Year: 1993
Model: Cherokee
Engine: 4.0
Hello Everyone,
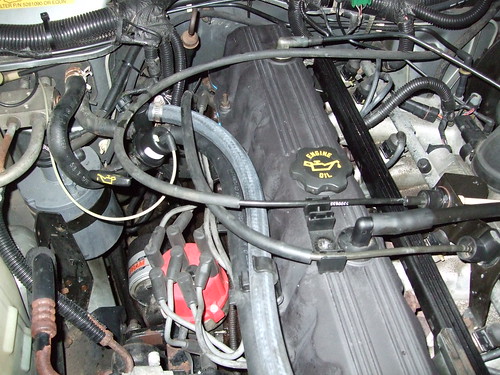
I am changing my valve cover gasket because I tried 2 cork ones and they always leaked. I went ahead and purchased a felpro valve cover gasket. I've never dealt with these metal kind. It appears to have a blue rubber silicone type cover around the metal gasket. Do I need to use RTV with this felpro gasket?
I am changing my valve cover gasket because I tried 2 cork ones and they always leaked. I went ahead and purchased a felpro valve cover gasket. I've never dealt with these metal kind. It appears to have a blue rubber silicone type cover around the metal gasket. Do I need to use RTV with this felpro gasket?


Thread Starter
Member
Joined: Jan 2010
Posts: 118
Likes: 0
Year: 1993
Model: Cherokee
Engine: 4.0
I got the cover off but I was being lazy and didn't move some cables. I ended up moving the cables and not paying attention and cracked off the elbow on the heater control valve.

In taking off the cover I also noticed a slight crack in the upper radiator hose so that will have to be replaced now.
Anyone have any suggestions on how plugging 5/8? So I don't have to hold up the hoses the whole time and to prevent poor out when trying to change the valve.
In taking off the cover I also noticed a slight crack in the upper radiator hose so that will have to be replaced now.
Anyone have any suggestions on how plugging 5/8? So I don't have to hold up the hoses the whole time and to prevent poor out when trying to change the valve.
Thread Starter
Member
Joined: Jan 2010
Posts: 118
Likes: 0
Year: 1993
Model: Cherokee
Engine: 4.0
I finished up putting the rocker cover on. I notice the manual is reading 55 in-lbs for the rubber gasket. I saw the cork was alot less. I also read that people broke bolts putting the rocker cover to 5 in-lbs. Any have an idea of what a feltpro rocker cover bolts should be?
I ended up going with 10 ft-lbs. It felt right. I drove it around and tested it out. Looks clean, I also painted the valve cover.
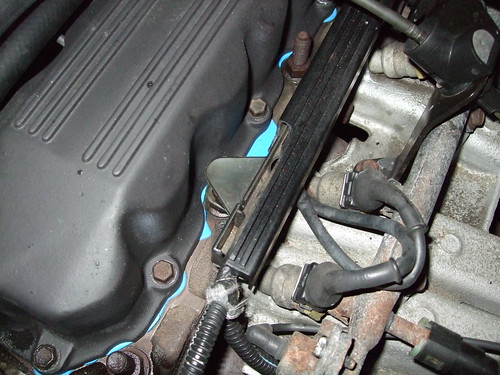
I ended up going with 10 ft-lbs. It felt right. I drove it around and tested it out. Looks clean, I also painted the valve cover.
Last edited by jstantherprsn; Jan 3, 2010 at 09:09 PM. Reason: update
Trending Topics

Junior Member
Joined: Apr 2009
Posts: 30
Likes: 0
Year: 1995
Model: Cherokee
Engine: 4.0
I tried to change mine out also but couldn't get the heater hose guides on the pass side off. Is it a simple pull up or twist?I didn't want to break it off like I did the elbow on top of the valve cover (front one was dry rotted). Thanks.
Thread Starter
Member
Joined: Jan 2010
Posts: 118
Likes: 0
Year: 1993
Model: Cherokee
Engine: 4.0
My experience this past weekend was just slightly annoying. If you follow the top piece of the heater control valve, (the top elbow) just below that hose their is another hose. This hose travels below the cover and connects to a metal tube near the upper radiator hose and near the thermostate (but not to the thermostat). Squeeze the tube and see how much overlap you have. I noticed I could get an inch there and still have enough hose. I then went back to the heater control valve, took my pliers and crushed the plastic nipple. Then I cut 1 inch off the end. I then pulled out a couple plastic pieces and noticed it was soupy plastic. I just pointed the hose down and let the remaining fluid flush the plastic pieces out. Then I losened the hose clamp and recaptured my 1". I checked to make sure there was no soup in the tubing and their was none. All the other pieces came off relatively easy. Just do the straight section first then the lower elbow, you won't spill that much then.
I'd also suggest just in case you get 6 ft of hose (just tell em the inner is 5/8" and they'll know what your talking about) and cut it to size. You can use pruning shears or a steak knife. Just put one hose end on first then feed the path you want then mark and cut. This way if you have give, you dont need to make it exactly the same as the original. Just make sure that on the heater control valve, that you feed the hoses all the way up. I dunno how new you are but you may want to rotate the spring hose hose clampss on the the heater hoses. Rotate them so the tabs face the battery before you you attempt to slide them back, so you can pull off the valve. Only do 1 hose at a time to reduce spillage.
I'd also suggest just in case you get 6 ft of hose (just tell em the inner is 5/8" and they'll know what your talking about) and cut it to size. You can use pruning shears or a steak knife. Just put one hose end on first then feed the path you want then mark and cut. This way if you have give, you dont need to make it exactly the same as the original. Just make sure that on the heater control valve, that you feed the hoses all the way up. I dunno how new you are but you may want to rotate the spring hose hose clampss on the the heater hoses. Rotate them so the tabs face the battery before you you attempt to slide them back, so you can pull off the valve. Only do 1 hose at a time to reduce spillage.
Junior Member
Joined: Jan 2010
Posts: 85
Likes: 0
From: Walton, Indiana
Year: 2000
Model: Cherokee
Engine: 4.0
Yeah, I just got my '00 about a week ago.. had a leaky VC gasket so I went w the Felpro. I hate cork gaskets & haven't touched one in probably 10 yrs! I installed the Felpro dry & after I spent an hour cleaning the surface very well w red scotch brite & brake clean. I went ahead & slammed a new T-stat in (since the T-stat housing was leaking) & installed new heater hoses since I had to drain the coolant to swap the T-stat. The local parts stores wanted $20 a piece for the heater hoses but like mentioned above, off the shelf heater hose works fine. For those of you doing this in the future I would like to add to the above post.... one line is 5/8" & the other is 3/4".

Thread Starter
Member
Joined: Jan 2010
Posts: 118
Likes: 0
Year: 1993
Model: Cherokee
Engine: 4.0
Don't use rtv just make sure the tab that says this side valve cover is pointing up. Then lay it in the valve cover to make sure it fits and if its not backwards it will. Lay it down on the engine then bolt it down starting from the center then work your way out along the diagonals.
The manual will show you, I tightened them to like 11ft-lbs. No leaks and its been like 3-4 weeks now and the jeep is my daily driver.
The manual will show you, I tightened them to like 11ft-lbs. No leaks and its been like 3-4 weeks now and the jeep is my daily driver.
Senior Member
Joined: Aug 2009
Posts: 958
Likes: 0
From: Effingham, N.H.
Year: 1989
Model: Cherokee
Engine: 4.0 I6
I think that cork has such a bad reputation because people tend to overtighten them, Cork splits if its overtightened. I have been running a cork gasket for a few years on mine cuz at the time the rubber was too much. No leaks at all.
Newbie
Joined: Jan 2010
Posts: 11
Likes: 0
From: Pasadena, CA
Year: 1998
Model: Grand Cherokee
Engine: 5.9 V8
Thread revival. Thanks for all that posted and contributed. I spent 13 hours working on my Jeep a few Saturdays ago. Got the good Felpro valve cover gasket, and thought I had the oil filter adapter O-rings, but found the set I bought didn't have one of the sizes. Had to make a run to Pep Boys. I was a lucky one and didn't have to use a T-60 Torx bit to get the adapter off.
So my adapter was leaking and the valve cover too. The CCV at the front of the valve cover was seeping, and was also sending oil into the air filter. The CCV at the back had been blocked off, as was the connector on the manifold where it was supposed to plug into. I decided to do it right and went to a NAPA center that had the new hoses in supply. Did some searches and found pics of where the hoses needed to plug into. Since I had the valve cover off, I sprayed it a bright silver.
I emptied about a quart of oil, added a quart of ATF fluid, ran it for 20 minutes at 1500 rpm, drained the oil, forgot to screw on the drain plug and emptied 3 quarts of Mobil 1 5000 mile dino oil. LOL Good thing I still had my drain pan underneath. Screwed on the drain plug with a new washer, and topped it off with full synthetic Mobil 1.
Weeks later and it's still running like a champ, dry as a bone, and damn near as clean as the day I did it.
Thanks to all!
Last edited by Hawkman; Mar 3, 2010 at 01:51 AM.
Newbie
Joined: Mar 2011
Posts: 10
Likes: 0
Model: Cherokee
Thread revival. Thanks for all that posted and contributed. I spent 13 hours working on my Jeep a few Saturdays ago. Got the good Felpro valve cover gasket, and thought I had the oil filter adapter O-rings, but found the set I bought didn't have one of the sizes. Had to make a run to Pep Boys. I was a lucky one and didn't have to use a T-60 Torx bit to get the adapter off.
So my adapter was leaking and the valve cover too. The CCV at the front of the valve cover was seeping, and was also sending oil into the air filter. The CCV at the back had been blocked off, as was the connector on the manifold where it was supposed to plug into. I decided to do it right and went to a NAPA center that had the new hoses in supply. Did some searches and found pics of where the hoses needed to plug into. Since I had the valve cover off, I sprayed it a bright silver.
I emptied about a quart of oil, added a quart of ATF fluid, ran it for 20 minutes at 1500 rpm, drained the oil, forgot to screw on the drain plug and emptied 3 quarts of Mobil 1 5000 mile dino oil. LOL Good thing I still had my drain pan underneath. Screwed on the drain plug with a new washer, and topped it off with full synthetic Mobil 1.
Weeks later and it's still running like a champ, dry as a bone, and damn near as clean as the day I did it.
Thanks to all!
I hate when that happens!