
Center A/C vent floppy

Thread Starter
CF Veteran
Joined: Apr 2009
Posts: 4,734
Likes: 12
Year: 2015, 2012
Model: Grand Cherokee (WK2)
Engine: 3.6L
Hi. Has anyone got a good fix for a floppy center A/C vent? It will not hold tension in the up/down direction. Thanks.


Junior Member
Joined: Jun 2009
Posts: 86
Likes: 0
Year: 96
Model: Cherokee
Engine: 6cyl
lol
I was kidding, I meant just stick it under it to keep it up.
Im sure if you take it out you could build up the area which is worn out to make hold again. A quick fix, you might be able to put some plyable material on each side of the vent to give it friction against the frame.
I was kidding, I meant just stick it under it to keep it up.
Im sure if you take it out you could build up the area which is worn out to make hold again. A quick fix, you might be able to put some plyable material on each side of the vent to give it friction against the frame.
Trending Topics
Thread Starter
CF Veteran
Joined: Apr 2009
Posts: 4,734
Likes: 12
Year: 2015, 2012
Model: Grand Cherokee (WK2)
Engine: 3.6L
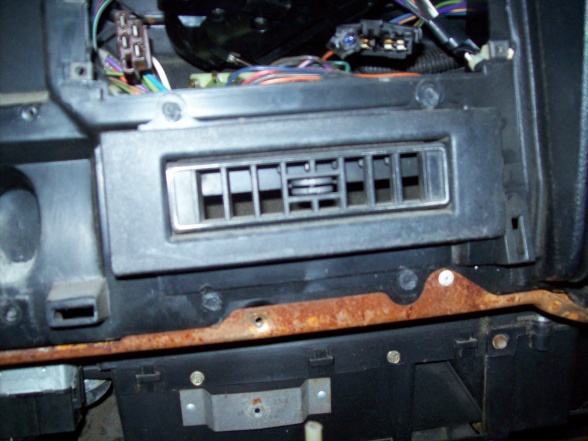
OK, thanks. It looks like the factory didn't use screws or pop rivits to attach the panel that holds the vent. They melted the plastic with a soldering-iron type thing to attach it to the metal frame of the dash.
To get it apart one would have to drill out the melted areas.
Then you could reattach it with screws or pop rivits perhaps.
Before I went that far, I thought I would check the immense body of knowledge on the forums.
My '87s center vent is still fairly tight. This one is as loose as a goose.
To get it apart one would have to drill out the melted areas.
Then you could reattach it with screws or pop rivits perhaps.
Before I went that far, I thought I would check the immense body of knowledge on the forums.
My '87s center vent is still fairly tight. This one is as loose as a goose.
CF Veteran
Joined: Feb 2009
Posts: 5,900
Likes: 10
Model: Cherokee
Alright, since you already know that the vent housing is held with the melted plastic rivet, this is how to remove the vent itself. (i know you have the dash partially disassembled but I will spell it out for everyone else.)
First remove the dash trim around the instrument cluster, 4 screws.
Second remove the cigarette lighter, 3 screws.
Third use a small phillps screwdriver the press in a small tab on the left side of the vent, the right side is inaccessable.
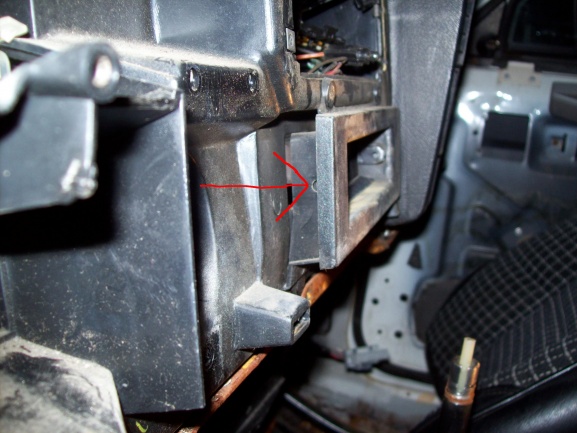
Pull the vent out from the left side while pushing the tab. It may be possible the apply heat to the tabs and bend them outward slightly to create more pressure against the vent housing.
First remove the dash trim around the instrument cluster, 4 screws.
Second remove the cigarette lighter, 3 screws.
Third use a small phillps screwdriver the press in a small tab on the left side of the vent, the right side is inaccessable.
Pull the vent out from the left side while pushing the tab. It may be possible the apply heat to the tabs and bend them outward slightly to create more pressure against the vent housing.
Thread Starter
CF Veteran
Joined: Apr 2009
Posts: 4,734
Likes: 12
Year: 2015, 2012
Model: Grand Cherokee (WK2)
Engine: 3.6L
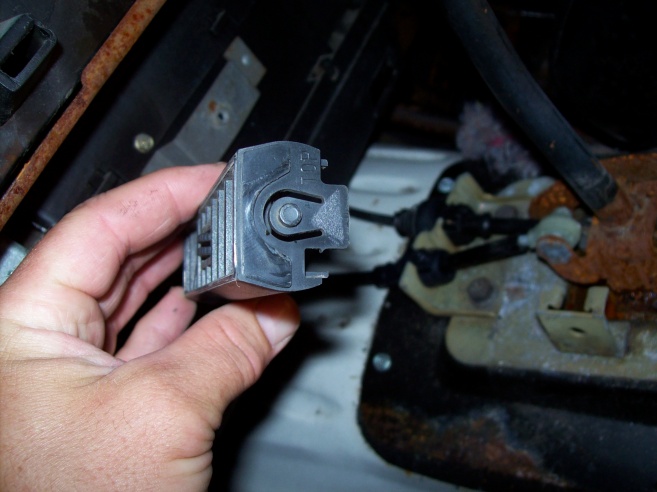
Seeing that small triangular piece of foam gave me an idea.
It might be possible to get some craft foam, cut it up some, and wedge between the air vent body and the housing.
That might hold it enough to keep it from sagging.
It might be possible to get some craft foam, cut it up some, and wedge between the air vent body and the housing.
That might hold it enough to keep it from sagging.
CF Veteran
Joined: Feb 2009
Posts: 5,900
Likes: 10
Model: Cherokee
Thats the great thing about having a junker in the driveway. I took pics of different parts as I took them off for the purpose of helping someone else. What few parts are left are unneeded and unimportant to me. So when someone has a question like this one, I go outside and either figure it out without fear of broken parts, or I just go ahead and break it then figure it out.
Thread Starter
CF Veteran
Joined: Apr 2009
Posts: 4,734
Likes: 12
Year: 2015, 2012
Model: Grand Cherokee (WK2)
Engine: 3.6L
I took it apart today (Thursday) based on your pictures. Someone had already been into it, as they had put it back in upside down.
Also, the small piece of foam on yours was missing on mine.
After some experimentation with various metal washers, I decided to put about 3 layers of black electrical tape where the foam should have been. I then reinstalled the vent in the proper direction. It was still a little loose, so I added a couple more layers of tape. It now stays in place.
A lot of the problem was that when it was installed upside down, it waas very loose. If they had put it back in properly, it would not have been so loose,
Thanks for your help and pictures.

Thread
Thread Starter
Forum
Replies
Last Post
jeepdewd
Stock Grand Cherokee Tech. All ZJ/WJ/WK Non-modified/stock questions go here!
20
Aug 2, 2016 01:29 AM
MightyMouse8
Stock XJ Cherokee Tech. All XJ Non-modified/stock questions go here
14
Oct 8, 2015 08:57 AM
TNXJsleeper
Stock XJ Cherokee Tech. All XJ Non-modified/stock questions go here
1
Oct 2, 2015 08:04 PM
Currently Active Users Viewing This Thread: 1 (0 members and 1 guests)