
The CavFab Alpha Series 3 Link

Junior Member
Joined: Dec 2013
Posts: 41
Likes: 0
From: Shallowater Texas
Year: 1992
Model: Cherokee
Engine: 4.0 Inline Six
I don't mind reading your experience at all, and I'm not looking to argue over it either. It's just at this point, there have been a lot of posts about it, and understandably so. However, it's getting a little old (not just you). I just think at this point it's best to just keep it between you (and whoever else) and CavFab. Then when you get everything, get it install, give us a good overall review.
Can't stop you from posting, and not trying to, because I do understand that frustration (been there, trust me). I don't know for sure, but I think you'll still be happy with it when it comes in and a lot of the waiting and frustration will be alleviated.
Can't stop you from posting, and not trying to, because I do understand that frustration (been there, trust me). I don't know for sure, but I think you'll still be happy with it when it comes in and a lot of the waiting and frustration will be alleviated.
Thread Starter
Sponsor

Joined: Apr 2016
Posts: 342
Likes: 6
From: Rising Fawn, Georgia
Hey Guys, this is Dave chiming in...this will probably turn into a long winded post so bear with me.
Ive been fairly vacant from here as we have been focusing primarily on mainstreaming our order/fullfillment/shipping processes...and thats what I manage personally on top of customer service and tech related questions. Every single product that we manufacture in house is built by Donovan. If you receive a CavFab product...donovan built it. Is this ideal? No...not anymore. We have bene very fortunate to have become as busy as we are and one person welding hundreds of products a week is clearly less than ideal. Could we hire a welder? Yes...we have and while it was helpful we found ourselves not completely satisfied with the overall craftsmanship of the finished products. Having a single guy building everything has allowed us to ensure that every single piece that leaves our shop is of the utmost quality...does it cause a delay and fairly excessive lead times? Yes clearly.
As we grow and develop more (this is our first full year in business) we will move past these growing pains. Im not going to give you guys any excuses...I wouldn't want to hear them as a consumer and as someone who sees what goes on behind the scenes I will never feed you BS. We do not rush products, if its not right..it doesn't get sent out. From the design phase of our products to the prototyping/R&D and final production fitment we take absolutely everything into account.
To shed some light on Dustin's situation about no tracking update (which some others may have seen). We recently moved towards a new shipping system that allows us to better manage shipments etc...along with this came a new label printing system. The first few dozen labels we printed off of it...were not printed properly..only the top half of the label was printed. When UPS Comes and picks up they normally pickup a few pallets of product and they do not scan the boxes...they take them back to the hub and they go out from there. When these new labels that were missing the bottom half of the label hit the hub...they had no way to scan them in so tracking never updated at all before the product arrived. This has been resolved now so our labels are now on point.
T-case Skids and an oil pan skid are in the works. We have a prototype design laid out and plan to have some physical prototypes in the upcoming weeks. We are working currently to get all of our orders fulfilled as prototyping new products does take away from production parts being fulfilled.
Hopefully this rambling posts sheds some light on who we are, what we do, how we do it, and the direction we are moving to become better.
Thank you,
Dave
CF Veteran
Joined: Oct 2016
Posts: 1,535
Likes: 10
From: CA
Year: 1994
Model: Cherokee (XJ)

Thread Starter
Sponsor
Joined: Apr 2016
Posts: 342
Likes: 6
From: Rising Fawn, Georgia
On another note.. Lets see those Alpha equipped rigs


Member
Joined: Jan 2017
Posts: 125
Likes: 2
From: Anthem, AZ
Year: 2001
Model: Cherokee
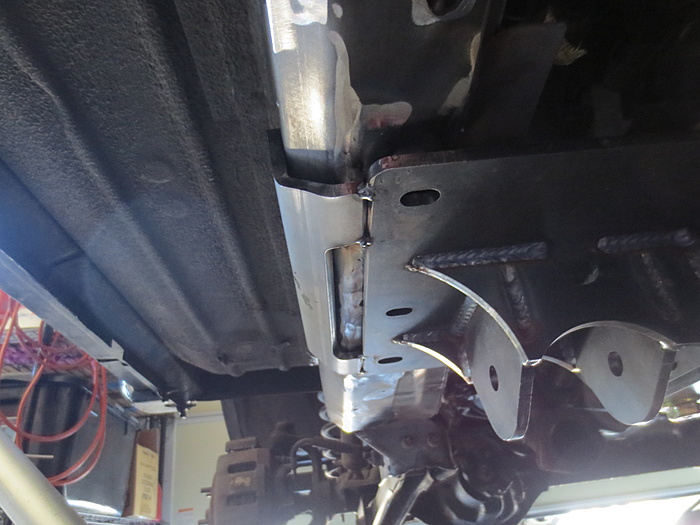
Installed my crossmember recently after finally getting my tie in brackets. Made a few modifications and ran into a couple problems as well. I have frame stiffeners so there is no hole for the flag nut, so I had to modify the tie ins a little. CavFab sent me some extra spacers to use instead of the flag nuts.
I didn't care for the way the tie ins mounted, so I cut the ends off and welded them to the crossmember brackets.

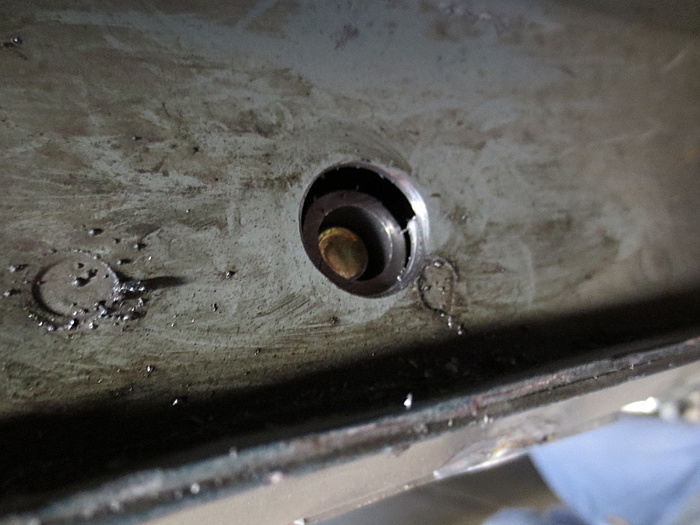
Here is the spacer in the front hole, it isn't quite long enough, but I was able to weld it to the frame and welded a nut as well to make installation easier.
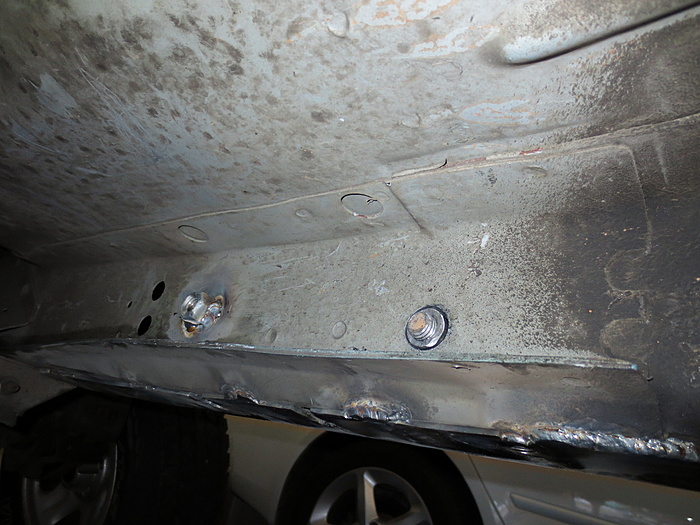
You can see the rear fits fine, the frame is narrower at that point than the front.
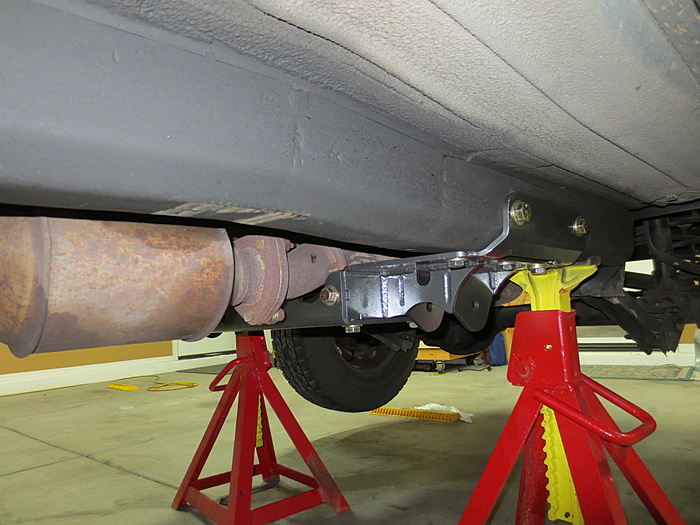
Here they are painted and mounted, nice and clean and should be more than strong enough.
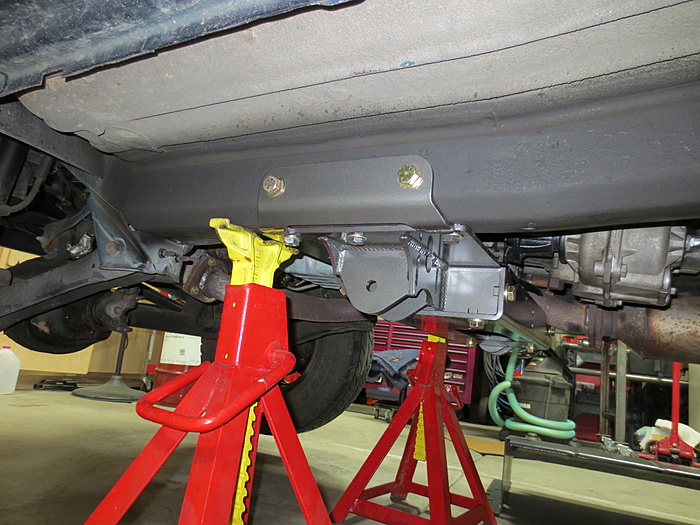
Other problem I ran into was the exhaust only has about 1/16" clearance here, I'll need to clearance it some more, wish I found this before I painted it. Not a big deal just extra work.
Overall, the kit is great so far, just way too much of a hassle and wait to get everything delivered.
Still a long way to go before I install everything and have this thing on the road. Hope this helps answer some questions and show a mounting option for the tie ins with frame stiffeners.
I didn't care for the way the tie ins mounted, so I cut the ends off and welded them to the crossmember brackets.


Here is the spacer in the front hole, it isn't quite long enough, but I was able to weld it to the frame and welded a nut as well to make installation easier.

You can see the rear fits fine, the frame is narrower at that point than the front.

Here they are painted and mounted, nice and clean and should be more than strong enough.


Other problem I ran into was the exhaust only has about 1/16" clearance here, I'll need to clearance it some more, wish I found this before I painted it. Not a big deal just extra work.

Overall, the kit is great so far, just way too much of a hassle and wait to get everything delivered.
Still a long way to go before I install everything and have this thing on the road. Hope this helps answer some questions and show a mounting option for the tie ins with frame stiffeners.
Junior Member
Joined: Apr 2016
Posts: 91
Likes: 1
From: Arizona
Year: 1995
Model: Cherokee
Engine: 4.0
Installed my crossmember recently after finally getting my tie in brackets. Made a few modifications and ran into a couple problems as well. I have frame stiffeners so there is no hole for the flag nut, so I had to modify the tie ins a little. CavFab sent me some extra spacers to use instead of the flag nuts.
I didn't care for the way the tie ins mounted, so I cut the ends off and welded them to the crossmember brackets.
Attachment 302858
Attachment 302864
Here is the spacer in the front hole, it isn't quite long enough, but I was able to weld it to the frame and welded a nut as well to make installation easier.
Attachment 302859
You can see the rear fits fine, the frame is narrower at that point than the front.
Attachment 302860
Here they are painted and mounted, nice and clean and should be more than strong enough.
Attachment 302861
Attachment 302862
Other problem I ran into was the exhaust only has about 1/16" clearance here, I'll need to clearance it some more, wish I found this before I painted it. Not a big deal just extra work.
Attachment 302863
Overall, the kit is great so far, just way too much of a hassle and wait to get everything delivered.
Still a long way to go before I install everything and have this thing on the road. Hope this helps answer some questions and show a mounting option for the tie ins with frame stiffeners.
Excellent work there, I really appreciate you showing us an alternative for mounting the tie in brackets. i too have frame stiffeners which makes the spacers too short and also makes the holes in which the spacers go through run right into the pinch seem on the inside of the frame. Another thing that I have not seen Cavfab address. I have had the kit installed now for a couple of months but have been reluctant to install the tie in brackets till now. Thanks again.
Senior Member
Joined: Mar 2016
Posts: 672
Likes: 7
Year: 1999
Model: Cherokee
Engine: 4.0
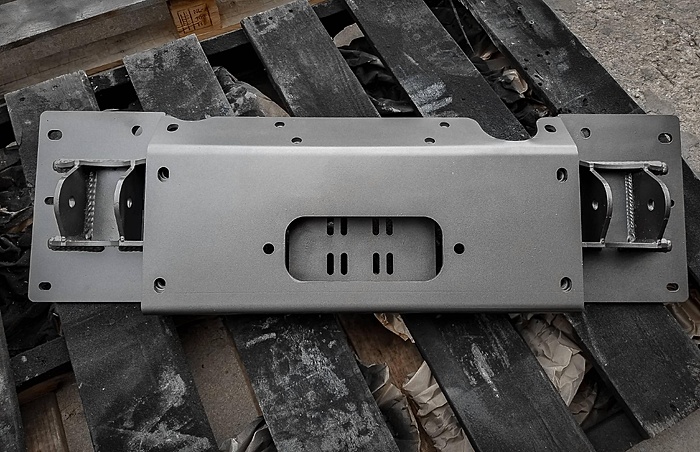
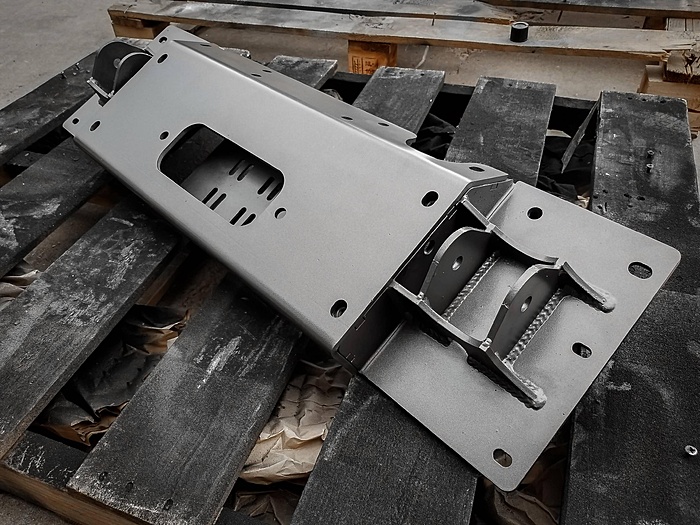
Cavfab Alpha crossmember arrived. Thing is a beast. Exceptional craftsmanship as expected. Favorite thing about it is how much higher the control arm mounts are tucked up compared to the OG 3 link. Also with the stiffener issue, I didn't have any issue with the OG 3 link and the side braces. Will update when I install the alpha


Member
Joined: Jan 2017
Posts: 125
Likes: 2
From: Anthem, AZ
Year: 2001
Model: Cherokee
Excellent work there, I really appreciate you showing us an alternative for mounting the tie in brackets. i too have frame stiffeners which makes the spacers too short and also makes the holes in which the spacers go through run right into the pinch seem on the inside of the frame. Another thing that I have not seen Cavfab address. I have had the kit installed now for a couple of months but have been reluctant to install the tie in brackets till now. Thanks again.
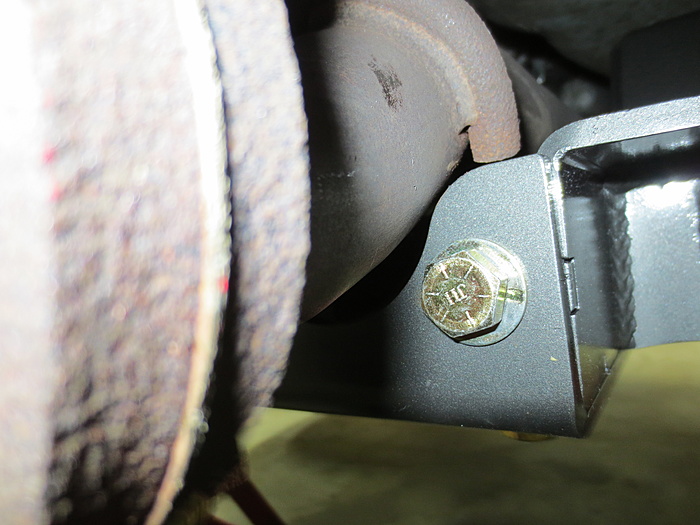
Couple extra pictures so you can see how close the fuel line is. Just tacked the nut so I wouldn't have to get a wrench in there and also figured it was more secure this way.

I didn't have a 3/4" drill bit, so I used a step bit. Drilled a smaller hole from the outside through the inside to locate the hole and enlarged it with the step drill bit. In the rear holes though, you can see there is some other brace or material on there that I had to enlarge since the step bit wouldn't reach that far. Used a burr bit on my die grinder. Just something to be prepared for if you don't have the right drill bit.

Another angle of how the exhaust isn't centered in the cutout.

Better angle showing the final product.

CF Veteran

Joined: Jan 2015
Posts: 1,364
Likes: 37
From: Dont Colorado Wyoming
Year: 1990
Model: Cherokee (XJ)
Engine: 4.0
Quick!
could anyone measure the 9/16's bolts for the JJ's for length, as well as the 1/2" bolts that go through the tie in brackets and crush sleeves? i did not get them in my shipment, so im just gonna go to home depot tonight and get the ones i need.
could anyone measure the 9/16's bolts for the JJ's for length, as well as the 1/2" bolts that go through the tie in brackets and crush sleeves? i did not get them in my shipment, so im just gonna go to home depot tonight and get the ones i need.
CF Veteran
Joined: Oct 2013
Posts: 5,924
Likes: 203
From: Greenville, SC
Year: 1999
Model: Cherokee(XJ)
Engine: 4.0
Originally Posted by WyoCherokee
Quick!
could anyone measure the 9/16's bolts for the JJ's for length, as well as the 1/2" bolts that go through the tie in brackets and crush sleeves? i did not get them in my shipment, so im just gonna go to home depot tonight and get the ones i need.
could anyone measure the 9/16's bolts for the JJ's for length, as well as the 1/2" bolts that go through the tie in brackets and crush sleeves? i did not get them in my shipment, so im just gonna go to home depot tonight and get the ones i need.
Member
Joined: Jan 2017
Posts: 125
Likes: 2
From: Anthem, AZ
Year: 2001
Model: Cherokee
I'm probably too late, but the 1/2" bolts are 5" long.