
1988 Jeep 4.0 No Start


Thread Starter
Newbie
Joined: Jan 2022
Posts: 9
Likes: 0
Model: Cherokee (XJ)
Hello all,
I have a 1988 Jeep comanche 4.0 liter engine that I have completley overhauled. I cannot get it started for the life of me.
I had no spark but I was able to figure out it was the coil connection.
It seems to have a ton of fuel in the intake and does hydrolock. Could it be that I have the distributor in wrong?
Only familiar with the wrangler 2.5 renix so any help will be greatly appreciated!
::CF Moderator::
Joined: Aug 2011
Posts: 43,971
Likes: 1,577
From: Prescott, Az
Year: 1990
Model: Cherokee (XJ)
Engine: 4.0
absolutely.CRUISER'S MOSTLY RENIX TIPS
With #1 spark plug removed, turn the engine over clockwise using the 3/4″ front crankshaft bolt.
You will see the degree marks on your front cover and you will see the timing mark on the balancer. Mark them with chalk or white-out.
While turning the engine over, put your finger/thumb over #1 spark plug hole. As the mark on the balancer approaches the marks on the front cover, if you are coming up on #1 TDC, pressure in the cylinder will push on your finger. If there’s no pressure, you’re at #6 TDC and need to crank the engine over until you see the marks coming together and you get pressure. Set the mark on the balancer to the 0 mark on the front cover.

SETTING YOUR 4.0 TO #1 TDC
OCTOBER 30, 2015 SALAD 18 COMMENTSWith #1 spark plug removed, turn the engine over clockwise using the 3/4″ front crankshaft bolt.
You will see the degree marks on your front cover and you will see the timing mark on the balancer. Mark them with chalk or white-out.
While turning the engine over, put your finger/thumb over #1 spark plug hole. As the mark on the balancer approaches the marks on the front cover, if you are coming up on #1 TDC, pressure in the cylinder will push on your finger. If there’s no pressure, you’re at #6 TDC and need to crank the engine over until you see the marks coming together and you get pressure. Set the mark on the balancer to the 0 mark on the front cover.

::CF Moderator::
Joined: Aug 2011
Posts: 43,971
Likes: 1,577
From: Prescott, Az
Year: 1990
Model: Cherokee (XJ)
Engine: 4.0
CRUISER'S MOSTLY RENIX TIPS

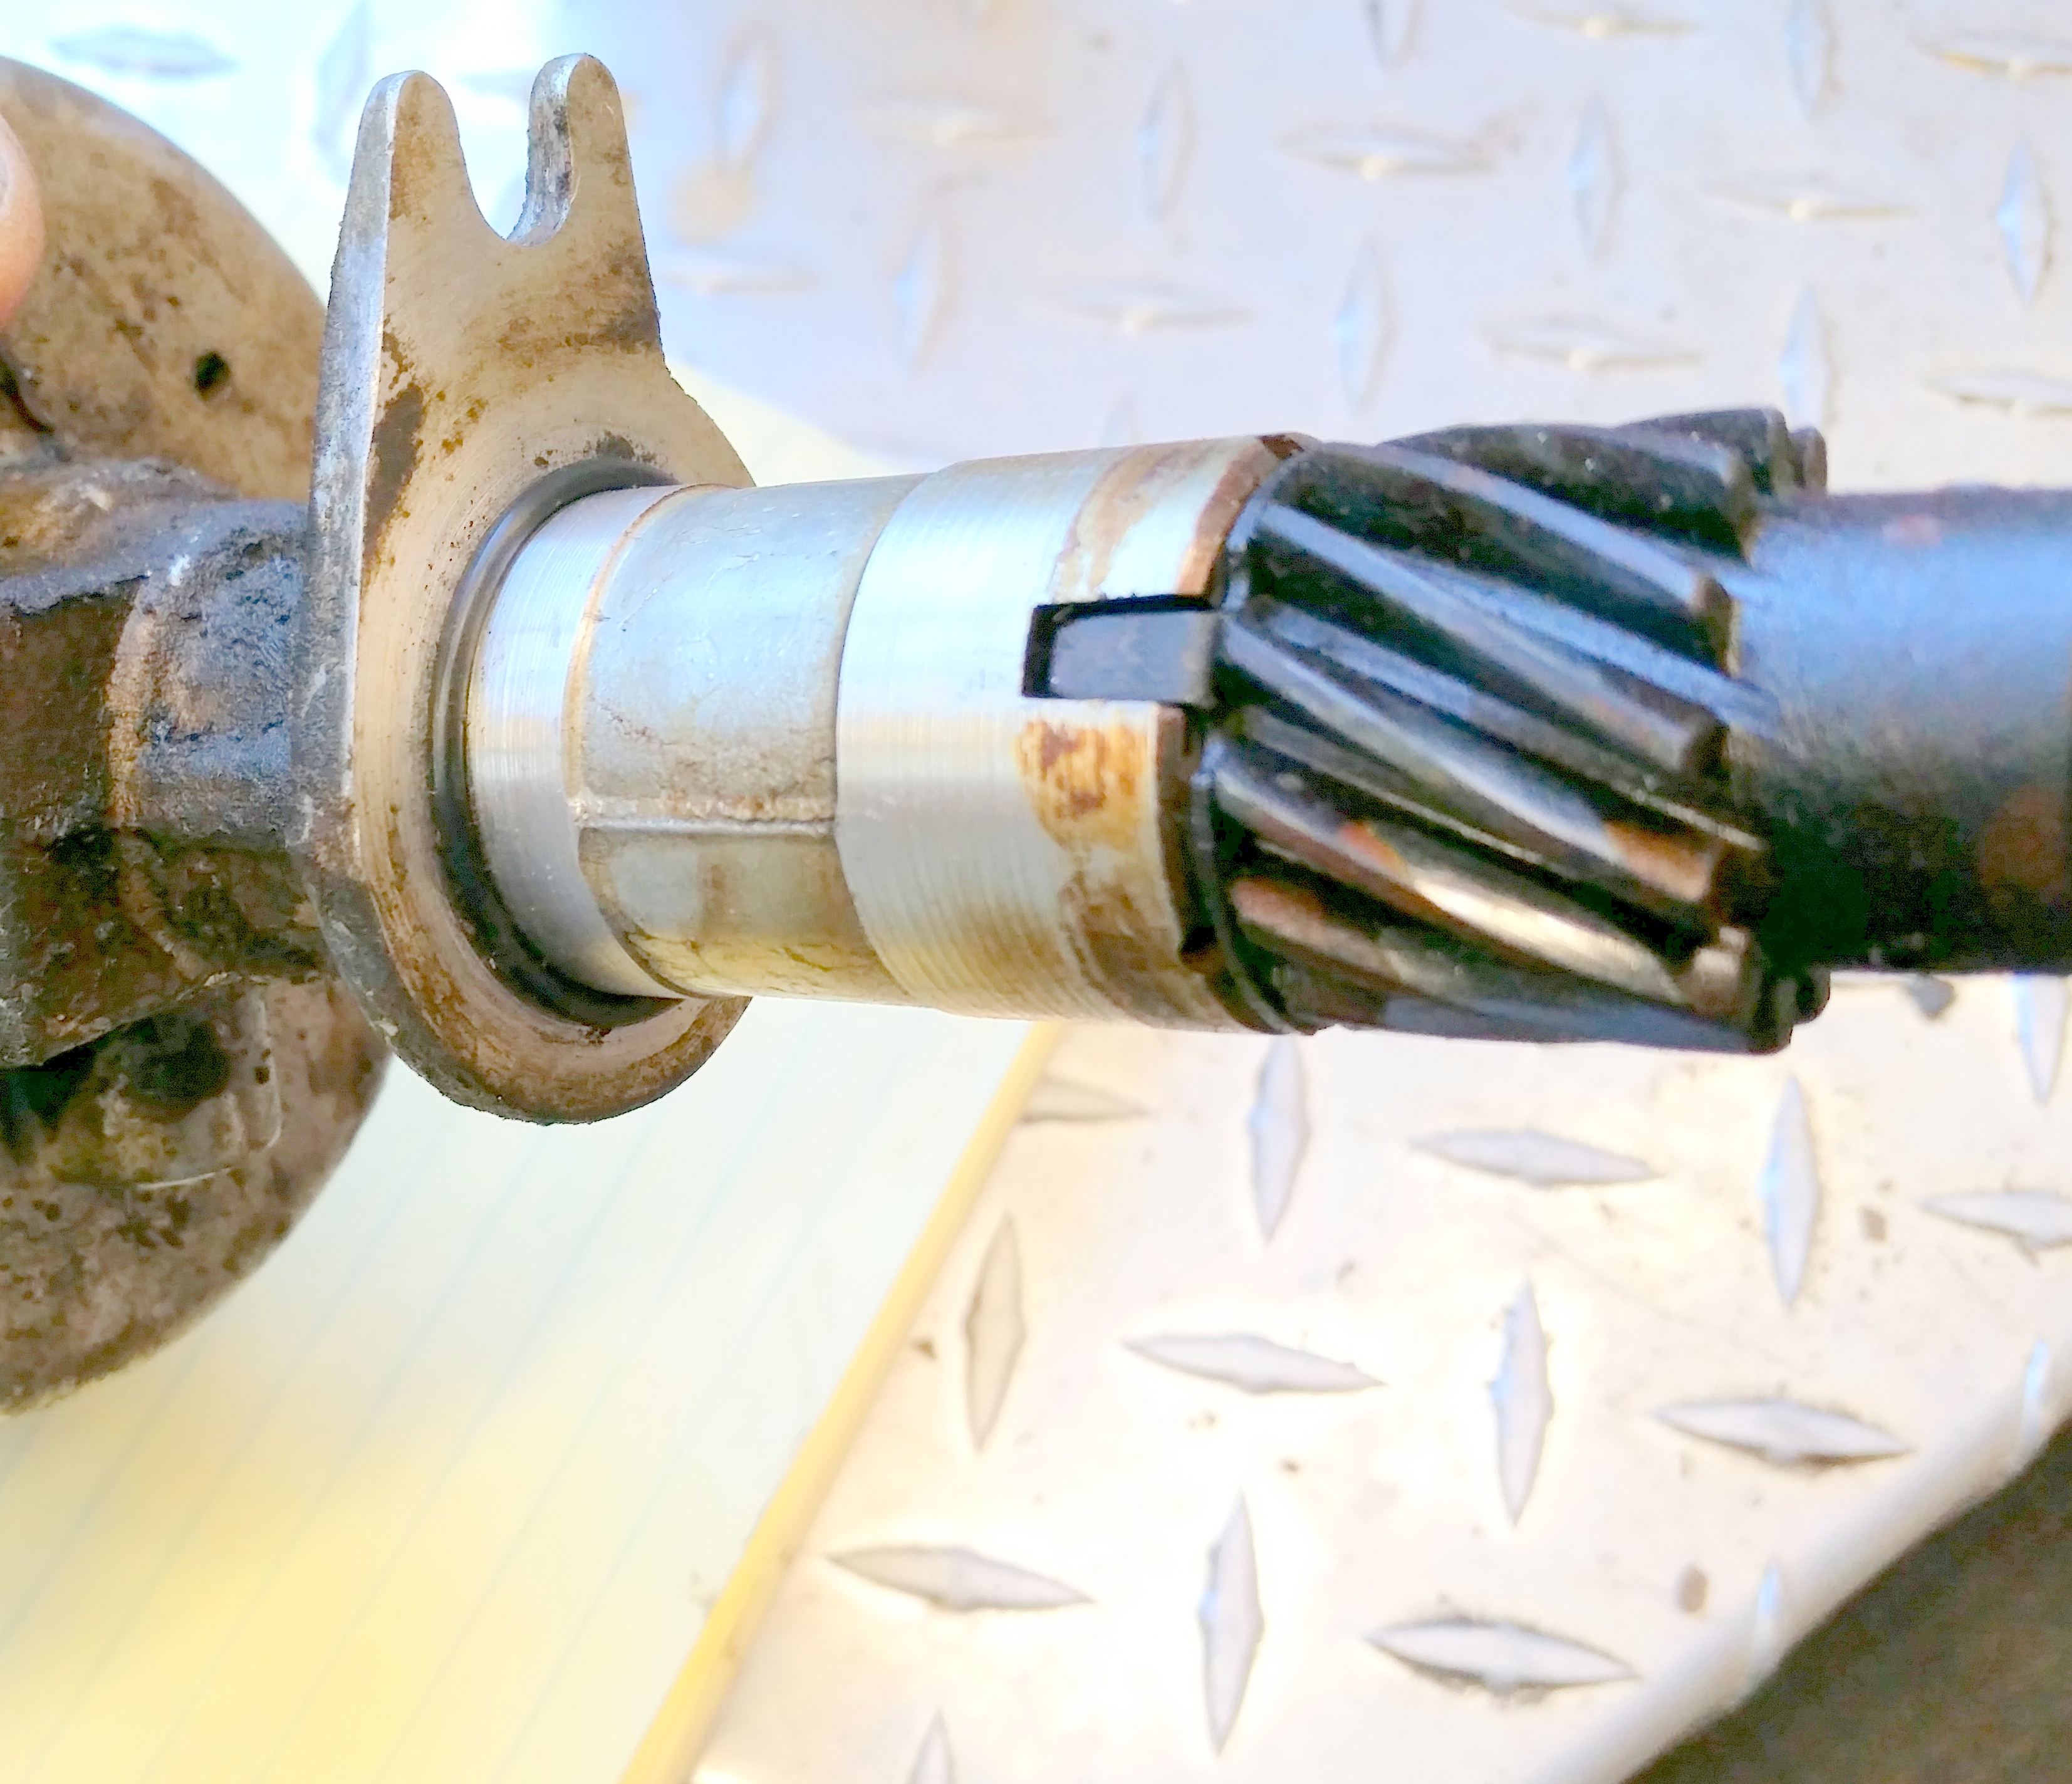
Distributor indexing explained:
For clarification though, that’s not a cam sensor inside the Renix dizzy. It’s there to fire the injectors sequentially with the firing order. You’ll never notice if it went bad because the ECU will try to “guess” where it is and does a heck of a job at it.
As for the “timing”, it is controlled by the ECU. Ever notice how wide the tip of the rotor is? Try and wrap your head around this:
When the ECU yells “Fire” to the ignition control module, where is the rotor in relationship to the dizzy terminal? Not to the terminal yet? Past the terminal too far?
What happens to the spark/secondary ignition strength when it has to jump the Grand Canyon in comparison to shooting from a rotor tip? Poor ignition performance, bucking, jerking, longer crank times.
The factory was aware of this and issued a Technical Service Bulletin on it. This Tip, #13, is a condensed version of that factory TSB. You wouldn’t believe how many we found out of whack when I worked at the dealership. Yours is probably messed up also. RARELY did we find one set accurately.
Use Tip 12 first to guarantee you’re on #1 TDC.
DISTRIBUTOR INDEXING
OCTOBER 30, 2015 SALAD 105 COMMENTS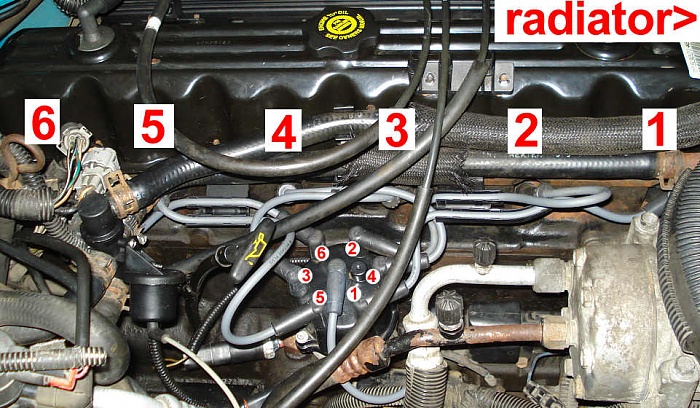

- Remove the distributor cap and cut a “window” into the side of the distributor cap at the #1 spark plug wire post . The “window” should be large enough to allow easy visual inspection of the position of the distributor rotor at the #1 spark plug wire post. Reinstall the distributor cap.
- Use Tip 12 first to guarantee you’re on #1 TDC.
- Install a �” wrench or socket onto the vibration damper retaining bolt. Rotate the engine in a clockwise direction until the #1 cylinder is at top dead center. Align the timing mark on the vibration damper with the “0” degree mark on the front cover timing scale. The tip of the distributor rotor should be near the #1 spark plug wire post.
- Disconnect the distributor electrical connection. Remove the distributor holddown clamp, holddown bolt
 and distributor. Remove the distributor cap and rotor.
 - Place the distributor housing upside down in a soft jaw vise. Scribe a line 1/2 inch from the end of the distributor locating tab. Cut the distributor locating tab at the scribed line with a saw.
- Remove any burrs and metal filings from the distributor. Reinstall rotor.
- If necessary, using a flat blade screwdriver, turn the oil pump gear drive shaft until the slot is slightly past the 11 o’clock position. The oil pump gear drive shaft is accessible through the distributor mounting bore in the engine block. A little tip here. Rather than use a dizzy gasket, use an o ring instead. NAPA #727-2024.

- Visually align the modified locating tab area of the distributor housing with the holddown clamp bolt hole.
- Turn the rotor to the 4 o’clock position.

- Lower the distributor into the engine block until it seats. The rotor should now be very close to the 5 o’clock position.
- Reinstall the distributor cap with the cutout “window”. Rotate the distributor housing until the trailing edge of the distributor rotor tip is just departing from the #1 spark plug wire post terminal .
- Reinstall the distributor holddown clamp and bolt.. Reinspect the position of the rotor to the #1 spark plug wire post to insure that it has not moved.
- Install the new distributor cap, reconnect the distributor electrical connections.


Distributor indexing explained:
For clarification though, that’s not a cam sensor inside the Renix dizzy. It’s there to fire the injectors sequentially with the firing order. You’ll never notice if it went bad because the ECU will try to “guess” where it is and does a heck of a job at it.
As for the “timing”, it is controlled by the ECU. Ever notice how wide the tip of the rotor is? Try and wrap your head around this:
When the ECU yells “Fire” to the ignition control module, where is the rotor in relationship to the dizzy terminal? Not to the terminal yet? Past the terminal too far?
What happens to the spark/secondary ignition strength when it has to jump the Grand Canyon in comparison to shooting from a rotor tip? Poor ignition performance, bucking, jerking, longer crank times.
The factory was aware of this and issued a Technical Service Bulletin on it. This Tip, #13, is a condensed version of that factory TSB. You wouldn’t believe how many we found out of whack when I worked at the dealership. Yours is probably messed up also. RARELY did we find one set accurately.
Use Tip 12 first to guarantee you’re on #1 TDC.
Thread Starter
Newbie
Joined: Jan 2022
Posts: 9
Likes: 0
Model: Cherokee (XJ)
Thanks this is very informative. I figured it'd be pretty forgiving but with it firing injectors that makes it pretty unforgiving. as it sits the mark is just past cylinder 1. I ran out of daylight to keep working on it but shall see if fine tuning it will help.
Spark seems to be kind of unreliable as it could be cutting out intermediately
Spark seems to be kind of unreliable as it could be cutting out intermediately

Thread
Thread Starter
Forum
Replies
Last Post
jaycibri
Stock XJ Cherokee Tech. All XJ Non-modified/stock questions go here
1
Mar 26, 2022 08:38 PM
matt0106
Stock XJ Cherokee Tech. All XJ Non-modified/stock questions go here
193
Feb 1, 2016 11:33 PM
Russell Waters
Stock XJ Cherokee Tech. All XJ Non-modified/stock questions go here
1
Mar 11, 2011 07:57 PM
always89
Stock XJ Cherokee Tech. All XJ Non-modified/stock questions go here
6
Mar 2, 2010 07:48 PM
Eds73Lemans
Stock XJ Cherokee Tech. All XJ Non-modified/stock questions go here
0
Jan 22, 2010 02:57 PM
Currently Active Users Viewing This Thread: 1 (0 members and 1 guests)