
My FX-r retrofit


Thread Starter
Junior Member
Joined: Apr 2013
Posts: 68
Likes: 0
From: Raleigh, NC
Year: 98
Model: Cherokee
Engine: 4.0
Hey guys I just thought I would post a few pics of my FX-r retro I just got done doing. This is gonna kind of be a pseudo build thread because I didn't really take step by step pics but just wanted to share.
I started by trying to bake open the housings but It didn't work well so I ended up busting out the glass and removing the pieces from the edge with pliers. You can soak them in gasoline to soften up the old adhesive but I did not. The glass came out and left the bead of adhesive so I just left it.
Anyway, first you want to make a template of the projector out of cardboard. I drew what I thought was the shape of the projector on to a piece of cardboard and cut it out. Trim it a little at a time until the projector fits in the hole. I would post a pic but I can't find the cardboard now. Use your imagination.
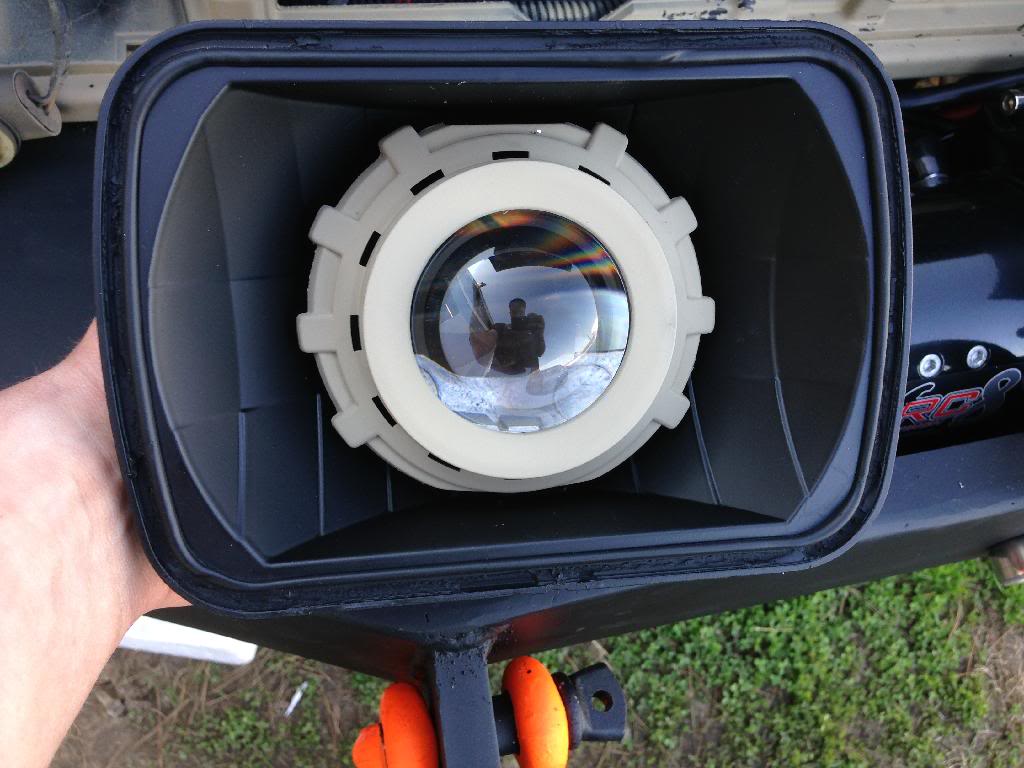
Then you want to place the cardboard on the back of the housing and use a sharpie to mark the outline. Next, use a Dremel and cut off wheel to cut out the shape. Test fit the projector until it fits snugly. You only want it to fit as to leave room for the lens to sit flush on the face of the housing. You should end up with something like this:
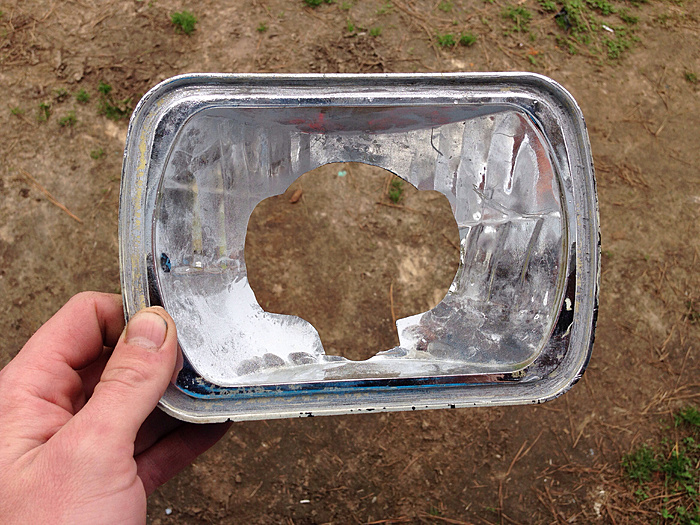
This is actually one I messed up on so I scrapped it and used a new housing. But you get the idea.
Once you get the projector sitting in there like you want it, you will need to put a bulb in it and hook up a ballast. I made a makeshift table out of some saw horses and a piece of Sheetrock, then leveled the table. Also you will need to mark a place on a wall exactly level as well. Fire up the light and move the projector until it is visually level, both in the housing and the cutoff.
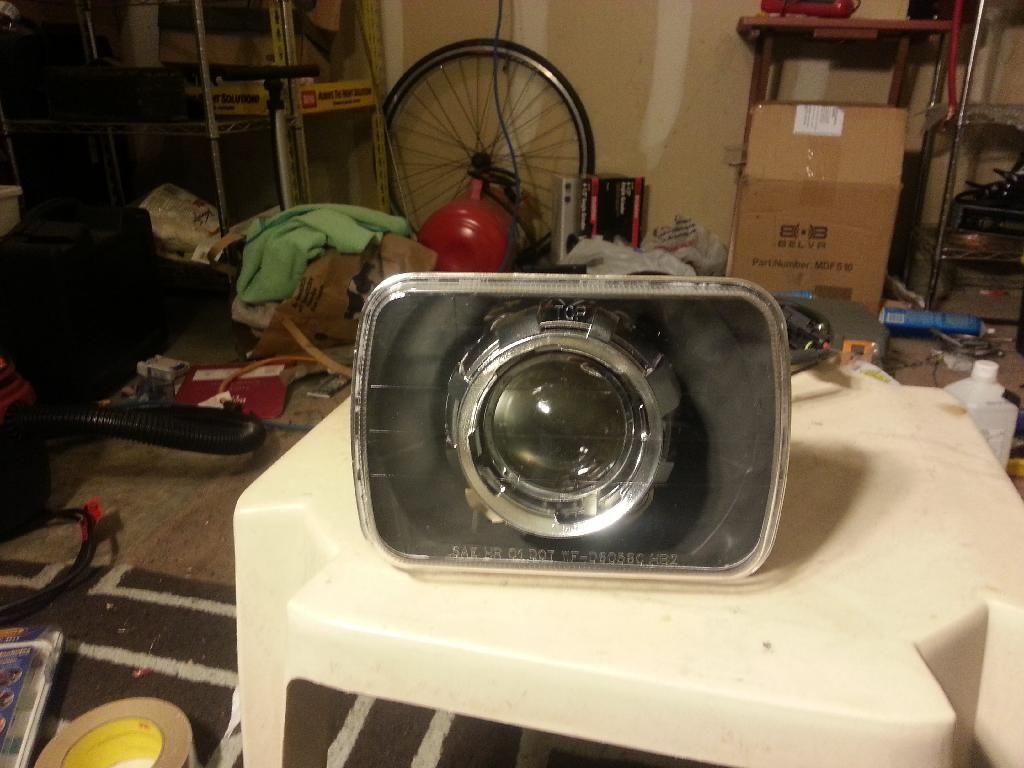
When you are happy with the cutoff being level it is time to epoxy the projectors into the housings. I bought two packages of JB Kwik and it was exactly enough. So if you have gaps or your cuts aren't perfect pick up a third pack.
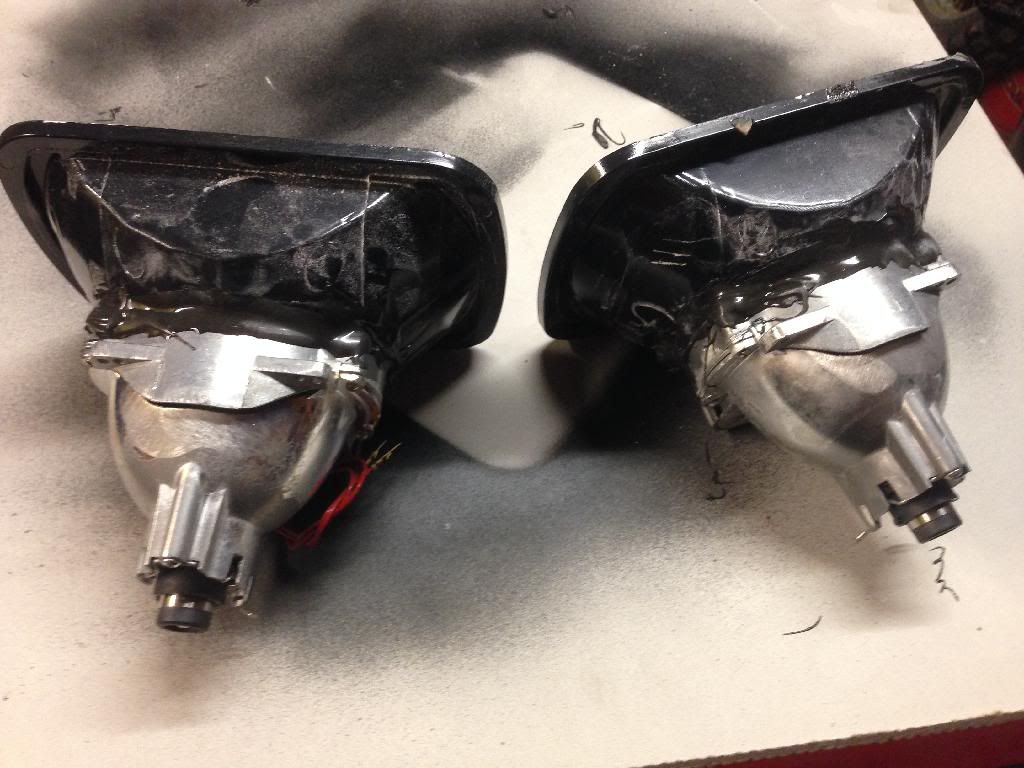
This is projectors epoxied into place. I used the jb kwik for it's fast set up time.
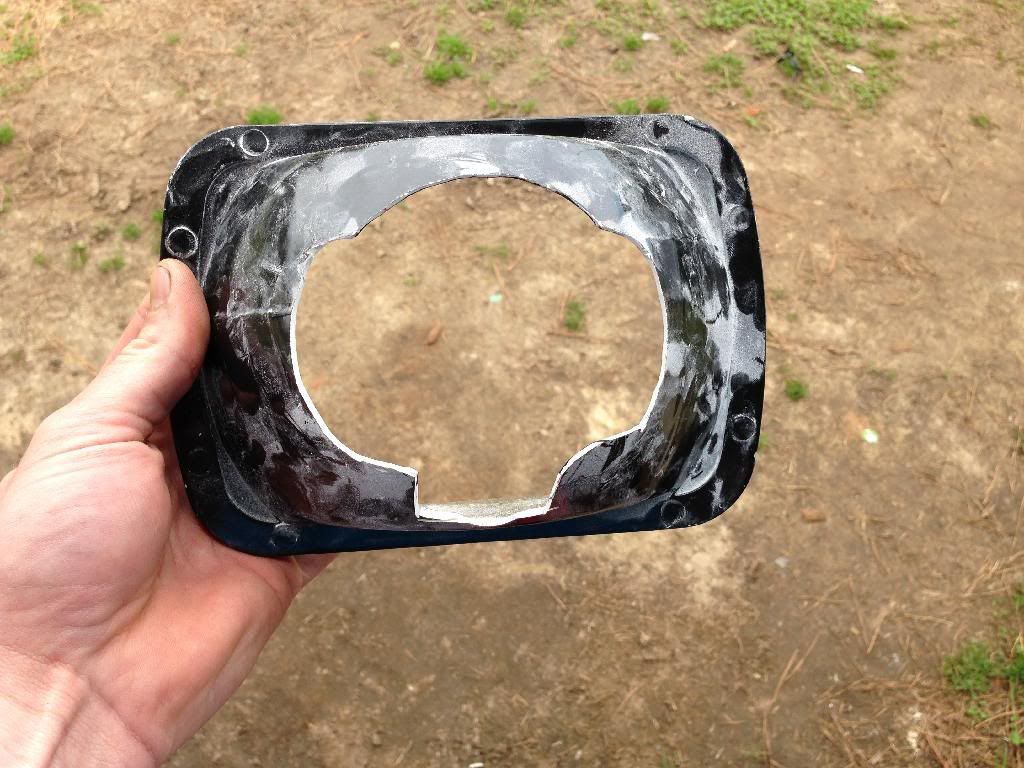
Now that the projectors are in place and solid, you need to cut your shrouds to fit. I ended up cutting quite a bit off them. I used a Dremel and cut off wheel. It's really just trial and error getting them to fit. Cut a little at a time until they fit flush on the projector and don't bottom out on the housing. You will end up with something like this
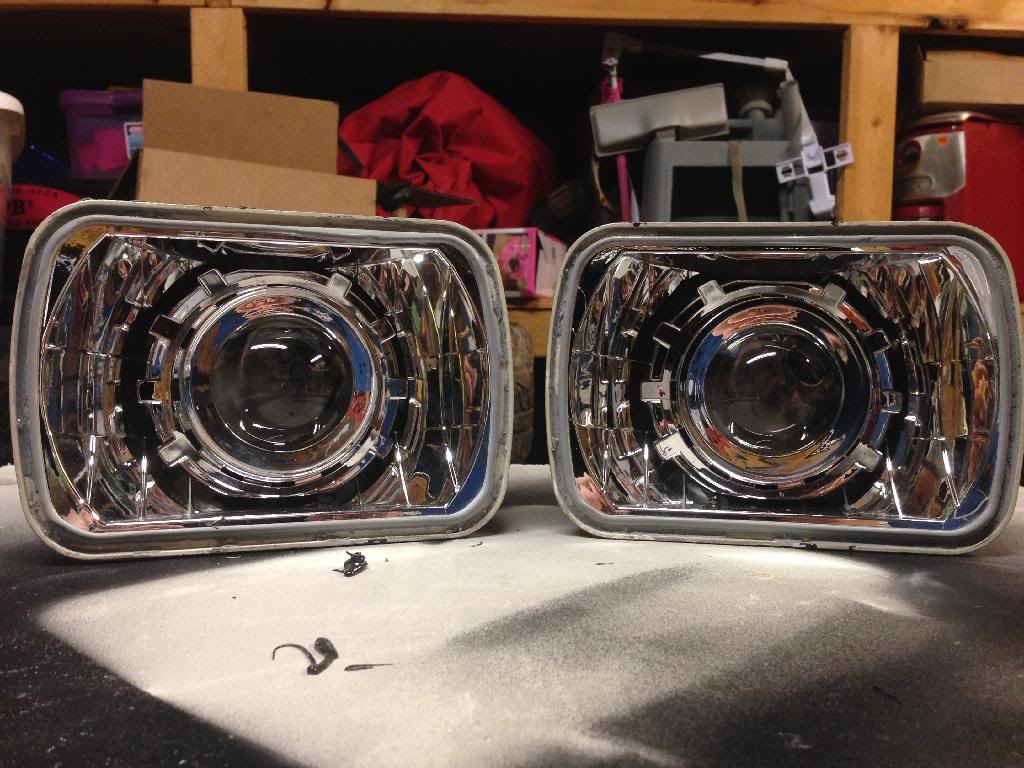
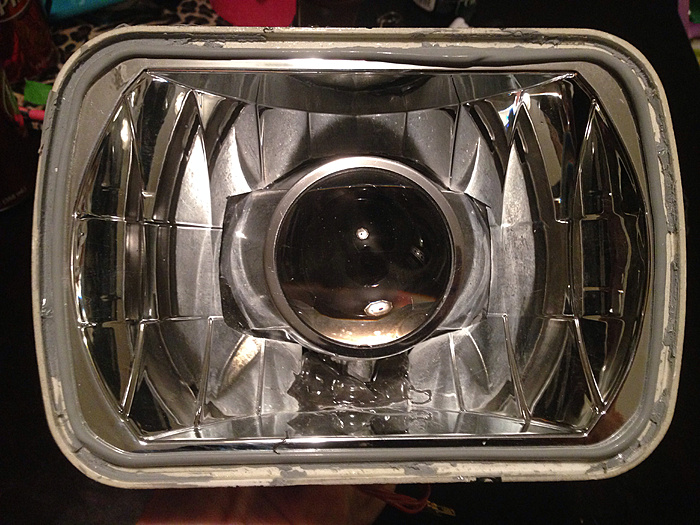
Still with me? Good. Now you need to find out what color scheme you want. If you want all chrome, you're done with this step. I chose to paint the housing flat black and the shrouds desert tan (matches my xj). Mask off the projector with some blue tape and give the housing a few coats. Hit the shrouds with a few coats of your color of choice as well.
This is how mine turned out
After you're all blinged up with the paint, you will need to cut some lenses out. I bought two pieces of lexan from Lowe's (8x10" or something) and used the headlight rings as a template. The best thing to use to cut them out is a jig saw with a very fine tooth blade. Trim them until they fit snug inside the headlight rings.
Your headlight buckets will need to be modified at this time. Take a pair of snips and make relief cuts all the way around the inside of the hole that is in the buckets. Then use your snips to cut away the excess material. There is a flat part on the back of the bucket that I used as a guide for my cutting.
Now you will want to seal the lenses to the housings. I used some 3m weatherstripping adhesive and laid a bead around the perimeter of the housings. Peel off the protective plastic from the lexan being careful not to touch it and leave fingerprints and/or dust on the inside portion. Place the lenses inside the rings and carefully place them onto the housings.
To attach the housings to the buckets I used 8-32x1.5 inch machine screws, washers, lock washers and nuts. You will need to drill out the screw holes in the bucket with a 5/32 or larger drill bit. Screw the housings to the bucket and you are completely done with the actual retrofit portion of the project.
To mount the headlights you will need to put a hole in the sheet metal behind the header panel. I used a 3.5" hole saw, marking the center of the hole before removing the header panel. Before you drill you will need to remove the hood latches on both sides. They will be in the way of the hole saw if not.
Next re install the hood latches and header panel, route your bixenon harness and before installing the headlights, hook up your wires for your high beam solenoid.
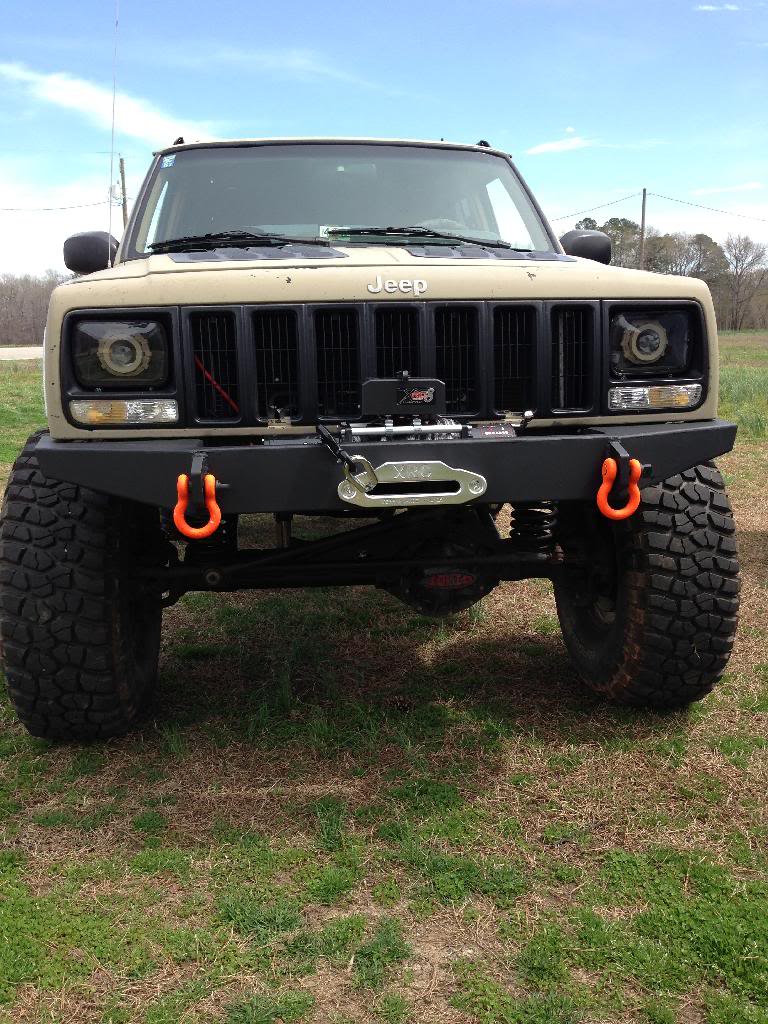
Once your headlights are installed, install the ballasts and connect your d2s connectors. Find a wall to aim them on and see what you've got. I didn't really take any measurements just took it down the road and determined if I needed to go higher or lower. Anyway, here is how mine turned out. The output is excellent and the cutoff is super sharp. I don't have any pics of the cutoff at the moment but I will post some as soon as I get a chance.
Sorry I didn't have more pics but I did most of this after work and I was more concerned with getting it done than making a diy at the time. If you have any questions let me know I will do my best to help you out.
I started by trying to bake open the housings but It didn't work well so I ended up busting out the glass and removing the pieces from the edge with pliers. You can soak them in gasoline to soften up the old adhesive but I did not. The glass came out and left the bead of adhesive so I just left it.
Anyway, first you want to make a template of the projector out of cardboard. I drew what I thought was the shape of the projector on to a piece of cardboard and cut it out. Trim it a little at a time until the projector fits in the hole. I would post a pic but I can't find the cardboard now. Use your imagination.
Then you want to place the cardboard on the back of the housing and use a sharpie to mark the outline. Next, use a Dremel and cut off wheel to cut out the shape. Test fit the projector until it fits snugly. You only want it to fit as to leave room for the lens to sit flush on the face of the housing. You should end up with something like this:

This is actually one I messed up on so I scrapped it and used a new housing. But you get the idea.
Once you get the projector sitting in there like you want it, you will need to put a bulb in it and hook up a ballast. I made a makeshift table out of some saw horses and a piece of Sheetrock, then leveled the table. Also you will need to mark a place on a wall exactly level as well. Fire up the light and move the projector until it is visually level, both in the housing and the cutoff.
When you are happy with the cutoff being level it is time to epoxy the projectors into the housings. I bought two packages of JB Kwik and it was exactly enough. So if you have gaps or your cuts aren't perfect pick up a third pack.
This is projectors epoxied into place. I used the jb kwik for it's fast set up time.

Now that the projectors are in place and solid, you need to cut your shrouds to fit. I ended up cutting quite a bit off them. I used a Dremel and cut off wheel. It's really just trial and error getting them to fit. Cut a little at a time until they fit flush on the projector and don't bottom out on the housing. You will end up with something like this
Still with me? Good. Now you need to find out what color scheme you want. If you want all chrome, you're done with this step. I chose to paint the housing flat black and the shrouds desert tan (matches my xj). Mask off the projector with some blue tape and give the housing a few coats. Hit the shrouds with a few coats of your color of choice as well.
This is how mine turned out
After you're all blinged up with the paint, you will need to cut some lenses out. I bought two pieces of lexan from Lowe's (8x10" or something) and used the headlight rings as a template. The best thing to use to cut them out is a jig saw with a very fine tooth blade. Trim them until they fit snug inside the headlight rings.
Your headlight buckets will need to be modified at this time. Take a pair of snips and make relief cuts all the way around the inside of the hole that is in the buckets. Then use your snips to cut away the excess material. There is a flat part on the back of the bucket that I used as a guide for my cutting.
Now you will want to seal the lenses to the housings. I used some 3m weatherstripping adhesive and laid a bead around the perimeter of the housings. Peel off the protective plastic from the lexan being careful not to touch it and leave fingerprints and/or dust on the inside portion. Place the lenses inside the rings and carefully place them onto the housings.
To attach the housings to the buckets I used 8-32x1.5 inch machine screws, washers, lock washers and nuts. You will need to drill out the screw holes in the bucket with a 5/32 or larger drill bit. Screw the housings to the bucket and you are completely done with the actual retrofit portion of the project.
To mount the headlights you will need to put a hole in the sheet metal behind the header panel. I used a 3.5" hole saw, marking the center of the hole before removing the header panel. Before you drill you will need to remove the hood latches on both sides. They will be in the way of the hole saw if not.
Next re install the hood latches and header panel, route your bixenon harness and before installing the headlights, hook up your wires for your high beam solenoid.
Once your headlights are installed, install the ballasts and connect your d2s connectors. Find a wall to aim them on and see what you've got. I didn't really take any measurements just took it down the road and determined if I needed to go higher or lower. Anyway, here is how mine turned out. The output is excellent and the cutoff is super sharp. I don't have any pics of the cutoff at the moment but I will post some as soon as I get a chance.
Sorry I didn't have more pics but I did most of this after work and I was more concerned with getting it done than making a diy at the time. If you have any questions let me know I will do my best to help you out.

Thread Starter
Junior Member
Joined: Apr 2013
Posts: 68
Likes: 0
From: Raleigh, NC
Year: 98
Model: Cherokee
Engine: 4.0
Yeah I love them. The cutoff is amazing. The only thing is I need to finish aiming them correctly. I aimed them as high as I thought would be ok without blinding people, but when I go downhill you can see the cutoff on the road. I am thinking it's because the jeep is so high off the ground you have to sacrifice range for not blinding folks
CF Veteran
Joined: Oct 2013
Posts: 2,097
Likes: 12
From: Tarpon Springs, FL / Denver, CO
Year: '98
Engine: 4.0 I6
Those came out great!!!
I did a set of these as well (with OEM Infinity FX projectors), but I jbwelded them from the opposite side (basically fit the projector from the front of the bucket instead of the rear).
I may need to cut mine apart and re-do them from the back as I had to cut too much of the housing to get the projector to fit under the front lens. You should make me a set of housings because I am TERRIBLE at this whole measure twice cut once thing
Trending Topics
CF Veteran
Joined: Oct 2013
Posts: 2,097
Likes: 12
From: Tarpon Springs, FL / Denver, CO
Year: '98
Engine: 4.0 I6
Yeah, I am just hoping that they will come back apart without too much hassle (I jbwelded the **** out of them).
Do you have any pics of the buckets and how the headlights sit in the header panel?
Do you have any pics of the buckets and how the headlights sit in the header panel?
Thread Starter
Junior Member
Joined: Apr 2013
Posts: 68
Likes: 0
From: Raleigh, NC
Year: 98
Model: Cherokee
Engine: 4.0
I don't have any pics of the buckets but if you look at the back of the bucket there is a place that is flat about 1/2 inch all the way around the hole. I cut the entire area out with snips and a little more at the bottom for the solenoid. The header panel I did not mod at all. They have a good size hole in them already. I just took a sharpie and marked the center of the hole in the header panel and used that as my mark to hole saw the sheet metal out. The hole saw I bought is beast and only took about 20 seconds per hole. Only thing is I didn't mark my hood latches and now the hood sits crooked. So now I have to pull the headlights and fix that ****

Thread Starter
Junior Member
Joined: Apr 2013
Posts: 68
Likes: 0
From: Raleigh, NC
Year: 98
Model: Cherokee
Engine: 4.0
Projectors and shrouds- 165
Housings- 25
Lexan & jbweld- 20
Vvme hid kit- 50
Paint and sealant- 10
Harness- 15
So about 285 in them. I probably will not sell these as they still require a bit of work to be done to install them, and I know how people are.
Housings- 25
Lexan & jbweld- 20
Vvme hid kit- 50
Paint and sealant- 10
Harness- 15
So about 285 in them. I probably will not sell these as they still require a bit of work to be done to install them, and I know how people are.

Thread
Thread Starter
Forum
Replies
Last Post
cartmann32
Stock Grand Cherokee Tech. All ZJ/WJ/WK Non-modified/stock questions go here!
1
Mar 19, 2014 06:29 PM
PAFirefighter11
Grand Cherokee Write-Ups
0
Nov 12, 2012 10:31 AM
Currently Active Users Viewing This Thread: 1 (0 members and 1 guests)