help on how to trim fender flares?
 04-08-2012, 08:09 PM
#31
Senior Member
Join Date: Feb 2012
Location: Kokomo,IN
Posts: 576
Likes: 0
Received 0 Likes
on
0 Posts
Year: 1999
Model: Cherokee
Engine: 4.0
Originally Posted by Erkmed XJ
That would be ALOT of cutting and i think thatd break through the pinch welds? Maybe? If so you have to get some plate amd weld them back together
 04-09-2012, 03:29 AM
#33
Seasoned Member
Join Date: Jan 2012
Location: Yuma, AZ....yes the 3:10 came here
Posts: 433
Likes: 0
Received 1 Like
on
1 Post
Year: 1998
Model: Cherokee
Engine: 4.0
I am but probably two months away. I don't think the build will be all that interesting. I think the only reason that BW has you cut the fender the way they do is because the top center hole also holds a bracket for fender stiffness. All i did was invert the brackets and bend a little and drill new holes for them. The bushwacker flares have you drill all new holes which is the most important part. I'm 98% sure I left enough fender for all the new holes...I'm only a little sketch on the lower rear but I think its good.
04-10-2012, 06:36 PM
#34
Seasoned Member
Thread Starter
Join Date: May 2011
Location: Placentia, CA
Posts: 311
Likes: 0
Received 0 Likes
on
0 Posts
Year: 1999
Model: Cherokee
Engine: 4.0 L
Either way I still wanna get all the details I can. Even just a before and after pic would help. Good luck with the install when you get them
05-01-2012, 06:00 PM
#36
CF Veteran
Join Date: Jul 2010
Location: 802
Posts: 4,930
Likes: 0
Received 3 Likes
on
3 Posts
Year: 99
Model: Cherokee
Engine: 4.0
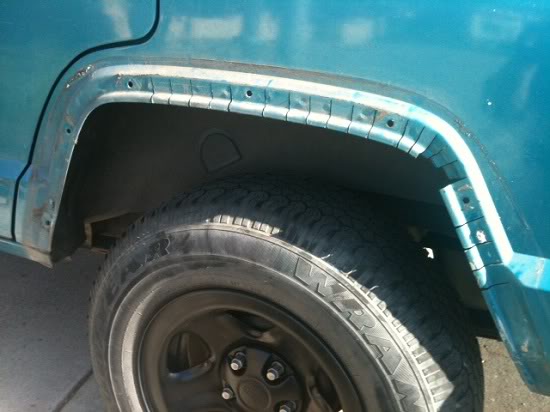
Haha, in luck: literally just did mine an hour ago:
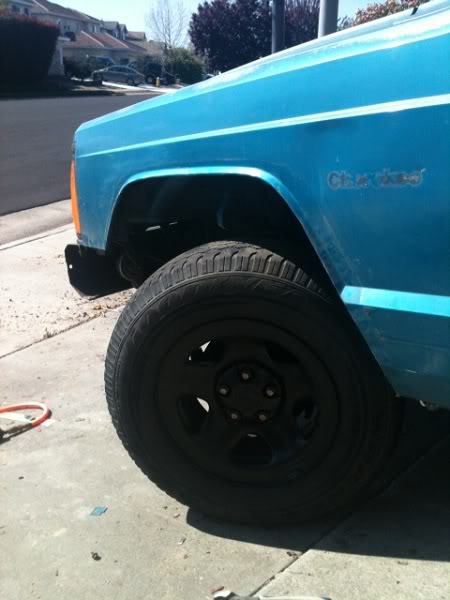
I only wanted to do a lil bit, so at the first bend I used vice grips (and pliers) to fold out the area I wanted to trim(1st pic). This sorta helped me get an idea for the look when done (2nd pic). Then grab the tin shears and make slow calculated cuts. A more legit way will be to tape off the area and use a cutting wheel.. I made small cuts, about a 1/2" or so apart to allow the pliers to grab the entire flap and bend it evenly. then crimp and hammer roughness if needed. Next step will be bed liner around the fenders or possibly the entire side of it..
On the rear if you cut the pinch weld you've got some work to do. So be cautious. The last two pics are just before and after for removing the fender bracket
Last edited by VTJeep; 05-01-2012 at 06:25 PM.
05-01-2012, 08:09 PM
#37
CF Veteran
Join Date: Aug 2011
Location: San Jose
Posts: 1,994
Likes: 0
Received 7 Likes
on
7 Posts
Year: 89
Model: Cherokee
Engine: 4.0 I6
Originally Posted by VTJeep
Haha, in luck: literally just did mine an hour ago:
I only wanted to do a lil bit, so at the first bend I used vice grips (and pliers) to fold out the area I wanted to trim(1st pic). This sorta helped me get an idea for the look when done (2nd pic). Then grab the tin shears and make slow calculated cuts. A more legit way will be to tape off the area and use a cutting wheel.. I made small cuts, about a 1/2" or so apart to allow the pliers to grab the entire flap and bend it evenly. then crimp and hammer roughness if needed. Next step will be bed liner around the fenders or possibly the entire side of it..
On the rear if you cut the pinch weld you've got some work to do. So be cautious. The last two pics are just before and after for removing the fender bracket
05-01-2012, 08:27 PM
#39
Seasoned Member
Join Date: Jul 2011
Location: Pulaski, IA
Posts: 259
Likes: 0
Received 1 Like
on
1 Post
Year: 1990
Model: Cherokee
Engine: Straight 6
okay so i was thinking of maybe trimming my fenders and didnt want to read through this whole thread, so could you maybe use a plasma cutter to do the trim?
05-01-2012, 08:35 PM
#40
CF Veteran
Join Date: Aug 2011
Location: San Jose
Posts: 1,994
Likes: 0
Received 7 Likes
on
7 Posts
Year: 89
Model: Cherokee
Engine: 4.0 I6
Originally Posted by VTJeep
Haha.......... 235/75r15 Wrangler DuraTrac's
05-01-2012, 08:39 PM
#41
CF Veteran
Join Date: Jan 2012
Location: New Hampshire
Posts: 1,117
Likes: 0
Received 1 Like
on
1 Post
Year: 1999
Model: Cherokee
Engine: 4.0L
Originally Posted by CherokeeXJ
okay so i was thinking of maybe trimming my fenders and didnt want to read through this whole thread, so could you maybe use a plasma cutter to do the trim?
05-01-2012, 08:39 PM
#42
CF Veteran
Join Date: Nov 2011
Location: City of Trees, CA
Posts: 7,387
Likes: 0
Received 10 Likes
on
9 Posts
Year: 93 2 door
Model: Cherokee
Engine: 4.0
seems like an old thread but I did mine recently as well. it was REALLY easy
just jumped right in there with a die grinder and a rubber hammer. took longer to do the front. rear is stiffer. dont cut past the pinch seem
tools needed: 10mm 12mm. die grinder. pliers to start bending them back. then I just gently hammered them back like teeth.
just jumped right in there with a die grinder and a rubber hammer. took longer to do the front. rear is stiffer. dont cut past the pinch seem
tools needed: 10mm 12mm. die grinder. pliers to start bending them back. then I just gently hammered them back like teeth.
Last edited by Atmos; 05-01-2012 at 08:42 PM.
05-01-2012, 08:50 PM
#43
CF Veteran
Join Date: Apr 2011
Location: Loveland CO
Posts: 7,842
Likes: 0
Received 2 Likes
on
2 Posts
Year: 1993
Model: Cherokee
Engine: l6
Angle grinder with a 4" to 4.5" metal disc. I'd put tape down for the front just so the paint doesn't get effed up. And for the rear ...... Ya you can waste the time to do the cut and fold method or just cut away. If there's a gap at the end.....I bought black calking and filled in the gap.... Looks pretty much the same as the other way and I think is easier. Plus then you know it's waterproof.
05-01-2012, 09:39 PM
#45
Senior Member
Join Date: Feb 2012
Location: Kokomo,IN
Posts: 576
Likes: 0
Received 0 Likes
on
0 Posts
Year: 1999
Model: Cherokee
Engine: 4.0
Originally Posted by Atmos
seems like an old thread but I did mine recently as well. it was REALLY easy
just jumped right in there with a die grinder and a rubber hammer. took longer to do the front. rear is stiffer. dont cut past the pinch seem
tools needed: 10mm 12mm. die grinder. pliers to start bending them back. then I just gently hammered them back like teeth.
just jumped right in there with a die grinder and a rubber hammer. took longer to do the front. rear is stiffer. dont cut past the pinch seem
tools needed: 10mm 12mm. die grinder. pliers to start bending them back. then I just gently hammered them back like teeth.