
703/784 injector swap write up

Senior Member
Joined: Jul 2011
Posts: 598
Likes: 1
From: Wilmington, NC
Year: 1997
Model: Cherokee
Engine: 4.0L
No need for a tool to do that. All it takes is a screw and a vice. Find a screw that fits snuggly into the injector basket. Put the screw in the vice, and then slowly screw the injector onto it. The screw will grab the basket, then pull off the injector, it will leave the old screen stuck on the screw.
I also found that you have to rock the injector back and forth to get it to come out and I didn't like those side-loads on the injector.
Something to pull the screen STRAIGHT out the top of the injector is the "right" way to pull them (ask anyone who actually services injectors for a living). Rocking it back and forth to "pry" it out is the "other" way to do it.
CF Veteran
Joined: Jun 2011
Posts: 2,460
Likes: 0
From: Dayton, Ohio
Year: 1992
Model: Comanche
Engine: 4.0
Senior Member
Joined: Mar 2011
Posts: 636
Likes: 0
From: Conowingo, MD
Year: 1999
Model: Cherokee
Engine: 4.0
Originally Posted by Zacks98
Theyre all the same, just "O-rings"
CF Veteran
Joined: Jan 2009
Posts: 1,964
Likes: 6
From: Baltimore, Maryland
Year: 1994 1993
Model: Cherokee
Engine: 4.0
I'm late jumping in here but ran across this thread searching for something else. As far as removing the micro filters from the tops of the injectors I also use the "screw" method but with one twist. I put a screw in the top with about 1/4" of thread still sticking out and then I grab on to that exposed thread with a cheap old pair of needle nosed vise grips locking them in place tightly. I then hold the injector upside down with the locked on vise grips sticking straight out to the side and holding the injector tightly I just give a quick strike down on the nose of the vise grips close to the injector with a steel rod (Or whatever you prefer) and the old micro filter comes out with no twisting or pulling. It's basically the vise and slide hammer idea just at it's most primative. 
CF Veteran
Joined: Jun 2011
Posts: 2,460
Likes: 0
From: Dayton, Ohio
Year: 1992
Model: Comanche
Engine: 4.0
Originally Posted by 99 XJ
I got the o rings got all the top ones on with ease trying to put the bottom ones on and can't get them over the cone on the 784s that center the injector
The cones come off
CF Veteran

Joined: Jan 2011
Posts: 1,653
Likes: 6
From: Converse, Texas
Year: 1999
Model: Cherokee
Engine: 4.0 I6
I know this is an old thread but I'd just like to say thanks for the write-up, took me about 4 hours (including a break to eat) to install them and no leaks, 784's work great. Although some gas did splash in my face... one injector popped right out and I wasn't ready for it, so it fell into the gas.

Junior Member
Joined: Feb 2011
Posts: 96
Likes: 0
Model: Cherokee
OK, ok, I have a question here.... The chart says I can put anything from a 19# injector in to a 22.8# injector in for an upgrade. So the XJ uses a speed density equation for a fuel map. So it is always going to think it has the same injector from factory. How can the injector size vary so much? It does not use a mass air flow sensor to measure the exact air input. It uses a preprogrammed fuel map with a preset injector input. So should I be looking for a 19# injector so I dont richen the fuel map?

Newbie
Joined: Mar 2010
Posts: 22
Likes: 0
From: Greencastle, Indiana
Year: 1999
Model: Cherokee
Engine: 4.0
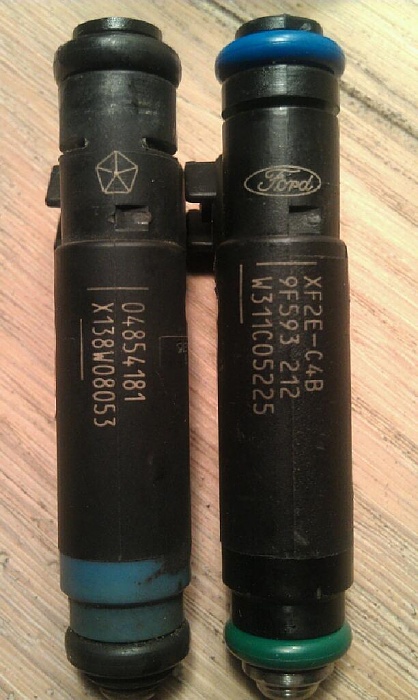
I'm ready to put in my new fuel injectors from fiveomotorsport.com, the Bosch XF2E, 4 pin hole injectors (Ford 19).
I noticed that the clips that held the old injectors to the fuel rail do not fit in the same location on the new injectors. So I'm worried about this
What do you suggest? I do not want to ship them back because I want to get the Jeep going again soon, but I also don't want to screw the thing up and burn it to the ground with fuel leak because I didn't use the clips.
So are the clips necessary in my case?

This is for all 703 and 784 injectors swaps. If you're using the Ford injectors, you'll need to get a set of the retaining clips and solder them in place.
Make sure the to drain the your fuel pressure first before starting the swap. Not doing this can result in a constant fuel spill from the rail.
1. Remove the air filter tube from the TB and the filter box, as well as the breather tube from the air filter box.
2. Disconnect the sensors from the TB.
3. Disconnect the vacuum line from the back of the TB.
4. Remove the 4 bolts that attach the TB to the intake manifold (for extra room to work)
5. remove the 2 bolts that attach the throttle cable bracket to the intake manifold
6. "Unclamp" the hoses from the top of the valve cover. Now move all the stuff you've unbolted
out of the way of the fuel rail.
7. Remove the bolts that attach the fuel rail to the engine.
8. Disconnect the electrical plugs from the injectors.
9. Gently pull the fuel rail away from the engine. Be careful to not break the connector to the fuel line that at the front of the rail. You should have a little play room to move the rail around, but it's not much.
10. Once the fuel rail is off, remove the small metal clips from the injectors. They are right where the injectors meet with the rail. You need to reuse these so don't lose/bend/break them. A small flat head screw driver works very well to pop them off.
11. Hold the rail over something to catch some fuel (a medium tupperware container works very well, especially the kind Hillshire Farms lunch meat comes in) and remove the "rear" injector. Some fuel should come out of the opening.
12. With the "back" of the rail (where you just pulled the injector from) still over the container, pull the "front" injector. This will allow any remaining fuel to pour out of the rail freely.
13. Once the fuel is done draining from the rail, remove the other 4 injectors.
14. Make sure that all the o-rings from the stock injectors are out of the rail and the engine. If there's any gunk buildup in the engine holes, use a toothpick and a damp rag to clean the holes. Be careful to not let any crud get into the engine.
15. Make sure the new injectors have the o-rings and caps on them. Lube all the o-rings with a small amount of vaseline. This will keep them from tearing.
16. Plug each injector into the rail, and refasten the metal clips to "lock" them in place.
17. Firmly press the rail and injectors into place on the engine and install the bolts.
18. Put a small amount of di-electric grease in each electrical plug and reconnect them to the injectors.
19. Put the TB cable bracket, the TB, all hoses, and sensors back in place.
20. Start the Jeep, and check for any fuel leaks coming from either end of all the injectors. If there's a leak, pull everything off again and make sure the injectors and rail are fitted properly, as well as making sure there isn't any evidence of a ripped/torn o-ring. Put it all back together and recheck for leaks. If there are no leaks, turn off the Jeep.
21. Disconnect your battery terminals and hold them together for 30 seconds. After those 30 seconds, reattach the terminals to the battery.
22. Turn your ignition to the "ON" position - DO NOT START YOUR JEEP.
23. Turn your headlights on, wait 10 seconds, then turn them off.
24. Turn the ignition to the "OFF" position.
25. Start your Jeep. Your ECU is now reset and will "relearn" the proper fuel trim levels for the new injectors over the next 50 warm up cycles.
CF Veteran
Joined: Aug 2011
Posts: 1,031
Likes: 4
From: Blue Springs, MO
Year: 1993
Model: Grand Cherokee
Engine: 4.0L Laredo
 Sorry, i said a quick tip, and it turned into a novelette.
CF Veteran
Joined: Jan 2009
Posts: 1,964
Likes: 6
From: Baltimore, Maryland
Year: 1994 1993
Model: Cherokee
Engine: 4.0
Just a quick tip.. I got a set of 703's from (drawing a blank on his handle, but thanks to him!) While i was inspecting and drooling over them, i noticed one of the pintles was cracked, and with a little fingernail scratchin' at it, i chipped a piece off.  Well, that's to be expected with old parts i guess, so i ran up to google some new ones. No joy. Buy 'em by the 50 pak or by the kit, but i donwanna spend the $$. Then, as I sat, dejected, staring at a very 'not helpful' google screen, an idea popped into my little noggin'.. Why not use the old ones? They looked fine the last time i had 'em out, and they're being replaced anyway. How DO i do it!? I don't know Sorry, i said a quick tip, and it turned into a novelette.
Sorry, i said a quick tip, and it turned into a novelette. Last edited by Programbo; Jan 8, 2012 at 01:25 PM.
Seasoned Member
Joined: Feb 2011
Posts: 300
Likes: 0
From: east mesa, AZ
Year: 1993
Model: Cherokee
Engine: rebuilt 4.0
I have a 93 cherokee sport.
Okay been reading up on this and still have a few questions. I know im doing the ford 19 (710s) and since I can get 777 injectores with 49psi I might as well do that right?
1.These are the right injectores for a 93 correct?
2. Since I have a 93 I DONT need to upgrade the fuel rail correct?
3.With the highter pressure rate does that mean im using more fuel or just a better mist?
Last edited by GRANDLICH; Jan 8, 2012 at 11:08 PM.
CF Veteran
Joined: Aug 2011
Posts: 1,031
Likes: 4
From: Blue Springs, MO
Year: 1993
Model: Grand Cherokee
Engine: 4.0L Laredo
Most likely you were upgrading your old injectors which means your old ones are EV-1 type pintles and the 703's use the newer EV-6 pintle (Even though the 703 uses an EV-1 electric plug. So you can't use your old tips. Is it cracked completely in half? All the plastic tip really does is hold the o-ring on and give the o-ring and injector a tad of protection for the heat and debrie of the combustion. In any event I usually pry my pintle caps off with an old flat fork which I spread the tins out to form a V. I've started looking all the ones I sell over with a magnifying glass as it's easy to miss those hairline cracks.
 i thought i was..
  I haven't switched them out yet; I want to wait til everything's ready to go. After reading an earlier post, i assumed they wouldn't fit and went ahead and ordered these..
http://www.bonanza.com/listings/BOSC...m_source=email
Now i'm wondering if i ordered the right set.. it says it's for EV-3 injectors, and includes two types of pintles(hoping one of 'em is right) drat! EV-1 or EV-6 and i end up with EV-3 I guess i'll find out in a few days
 (i'm replacing stock injectors on '93 GC Laredo) in case I didn't mention it