Updating an 86 and older MJ/XJ radiator support.
 06-09-2013, 02:27 PM
#1
CF Veteran
Thread Starter
Join Date: Jun 2009
Location: Michigan
Posts: 2,131
Received 288 Likes
on
238 Posts
Year: 1987 MJ, 1998 XJ, 1973 J2000, 89 waggy
Model: Comanche (MJ)
Engine: 4.0L H.O
So in order to run the newer style radiator setup (87 and newer), the radiator support has to be modified to accommodate for the larger radiator.
Dealing with this right now on my 86 MJ project and figured i'd shed some pics and info to potentially help others who may do this swap at some point.
 ,
,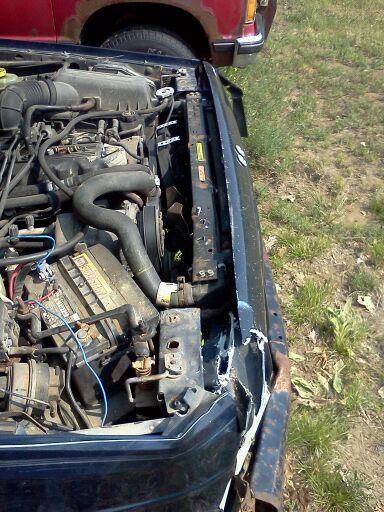
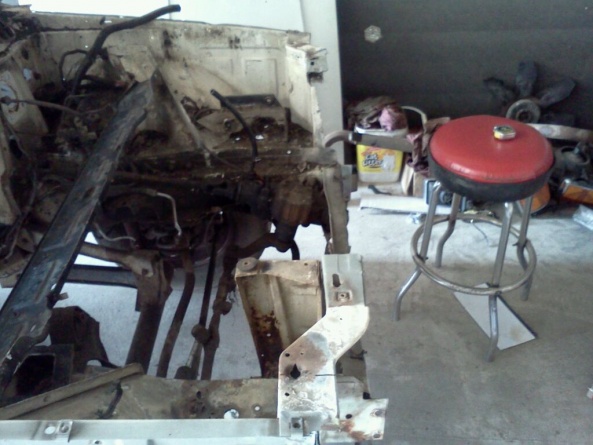
Old 86 setup on left, newer style 95 on right, don't mind the damage
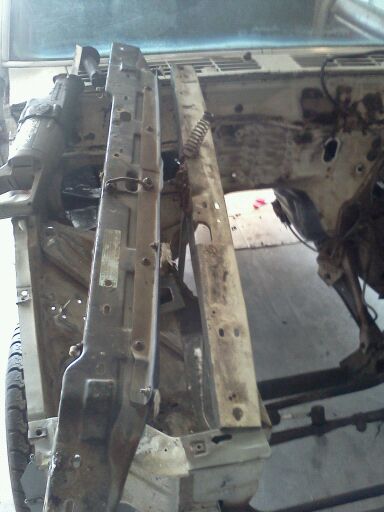
new style support on the left and old style support on the right
 ,
,
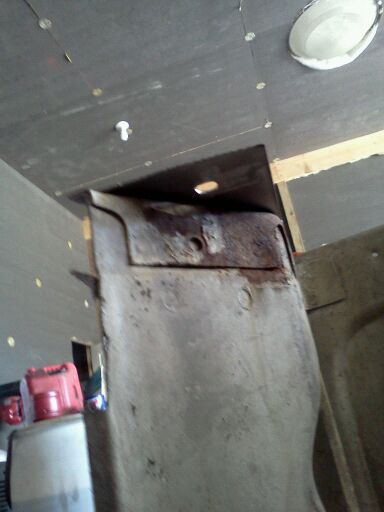
the old style support curves forward from the mounting holes while the new style is straight across. Just cut away the curve forward leaving it running straight across. In time i will cap the exposed cavity to also give it more strength.
Dealing with this right now on my 86 MJ project and figured i'd shed some pics and info to potentially help others who may do this swap at some point.
 ,
,Old 86 setup on left, newer style 95 on right, don't mind the damage
new style support on the left and old style support on the right
 ,
,
the old style support curves forward from the mounting holes while the new style is straight across. Just cut away the curve forward leaving it running straight across. In time i will cap the exposed cavity to also give it more strength.
 06-09-2013, 02:33 PM
#2
CF Veteran
Thread Starter
Join Date: Jun 2009
Location: Michigan
Posts: 2,131
Received 288 Likes
on
238 Posts
Year: 1987 MJ, 1998 XJ, 1973 J2000, 89 waggy
Model: Comanche (MJ)
Engine: 4.0L H.O
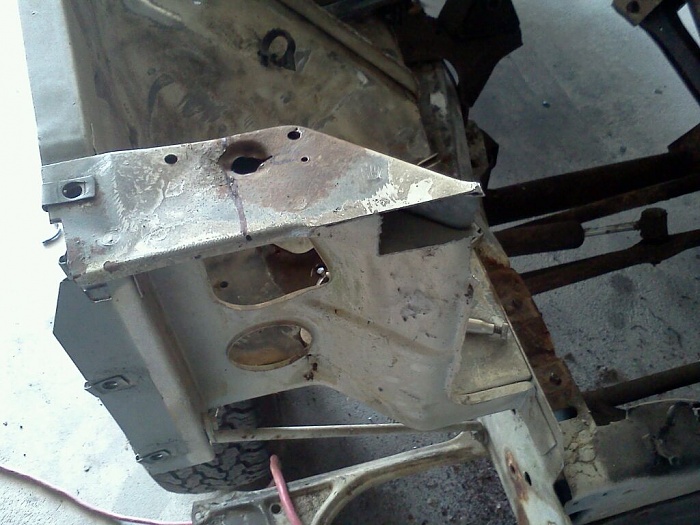
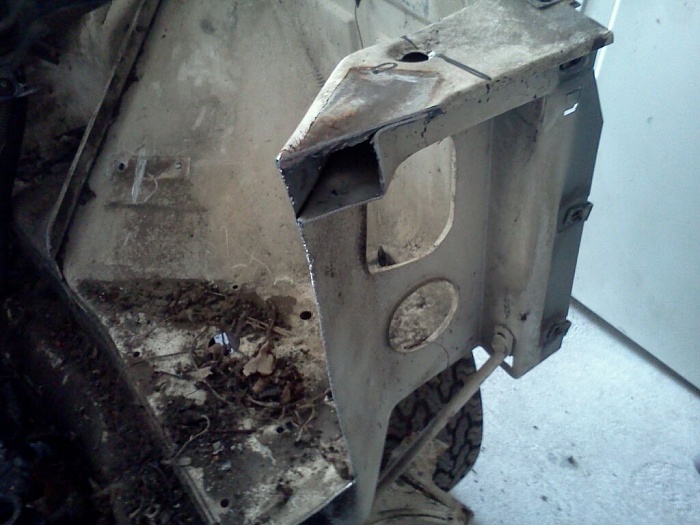
then cutout (2) 2.75" x 4" pieces of sheet metal (mine are 18 gauge) and drilled the mounting holes to match the newer style radiator support.
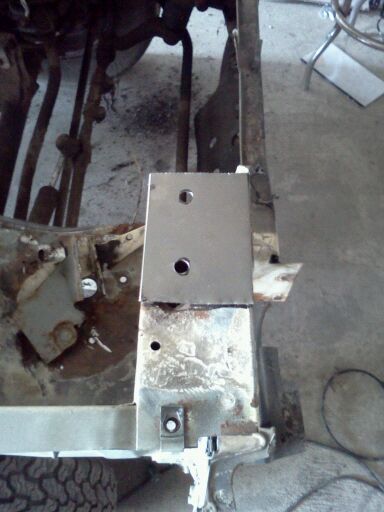
view from the inside of the engine bay at the underside of the "new bracket"
I'll get some hardware, probably some 1/4-20 bolts and weld a nut to the underside of the mounting bracket holes.
then its welding the brackets to the existing support. I'll update as i make more progress.
view from the inside of the engine bay at the underside of the "new bracket"
I'll get some hardware, probably some 1/4-20 bolts and weld a nut to the underside of the mounting bracket holes.
then its welding the brackets to the existing support. I'll update as i make more progress.


 01-08-2022, 02:23 PM
#4
Newbie

Join Date: Jan 2022
Posts: 4
Likes: 0
Received 0 Likes
on
0 Posts
Model: Cherokee (XJ)
Sorry to resurrect an old thread of yours but I am doing this same swap in my 86 Cherokee. After your made the necessary cuts and welds, what else was done before you were ready to drop in? My new radiator is not lining up at all was wonder if you have some pics of you dropping it in ??!
01-08-2022, 04:40 PM
#6
Newbie
Join Date: Jan 2022
Posts: 4
Likes: 0
Received 0 Likes
on
0 Posts
Model: Cherokee (XJ)
yes. It�s an aluminum radiator for 91 and up. Did you change anything with the lower support/crossmember?
I am currently doing a SBC350 swap in my 86. I made the mods for the upper support but can�t seem to get the radiator to sit in correctly.
I am currently doing a SBC350 swap in my 86. I made the mods for the upper support but can�t seem to get the radiator to sit in correctly.
Last edited by Badarosa07; 01-08-2022 at 04:42 PM.
01-08-2022, 04:45 PM
#7
CF Veteran
Yes, I put a flat piece of steel in and then drilled two holes for the lower bushings for the radiator mount. Fairly simple and can be done without welding if you need to. The hard part thouigh was the hood catch. I had to change over to the 4.0 cross member and catches
Trending Topics
01-08-2022, 06:40 PM
#8
Newbie
Join Date: Jan 2022
Posts: 4
Likes: 0
Received 0 Likes
on
0 Posts
Model: Cherokee (XJ)
I like that idea and sounds pretty simple. Do you want have any pics of that setup?
and for the hood latch, why did you have to change the lower crossmember to fit it? Did you use the old hood?
and for the hood latch, why did you have to change the lower crossmember to fit it? Did you use the old hood?
01-08-2022, 07:17 PM
#9
CF Veteran
I have some pics somewhere. It was because of the hood latch. The spike would have been in the radiator
01-30-2022, 08:52 PM
#11
CF Veteran
Thread Starter
Join Date: Jun 2009
Location: Michigan
Posts: 2,131
Received 288 Likes
on
238 Posts
Year: 1987 MJ, 1998 XJ, 1973 J2000, 89 waggy
Model: Comanche (MJ)
Engine: 4.0L H.O
Sorry for catching this soo late. What i didn't include in this setup was actually exactly what 4.3xj was mentioning. The A-member of the frame is also different! This can be remedied in multiple ways, ive seen it done a couple times where an A-member from the 87+ XJ/MJ was removed from a donor and then welded back into their 86 project. A bit entailed with drilling out plug welds and basically dissecting the front end of both donor and project to have that original finish. But by far the easiest solution would be to run a piece of flat stock steel from frame end-end and drill out 2 radiator bushing mounts for the posts that come off the bottom of the rad. As mentioned above you could zip-screw this metal in or weld it in place. I don't have a picture of my setup anymore but i went the flat metal strip route and welded the ends in. Also fwiw i defaulted to hood pins on the project i based this how-to on.
The overall build thread is still on here as well:
https://www.cherokeeforum.com/f46/19...167502/index2/
The overall build thread is still on here as well:
https://www.cherokeeforum.com/f46/19...167502/index2/

Thread
Thread Starter
Forum
Replies
Last Post
old_red_limited
Stock Grand Cherokee Tech. All ZJ/WJ/WK Non-modified/stock questions go here!
4
03-21-2011 12:09 AM
Currently Active Users Viewing This Thread: 1 (0 members and 1 guests)