
Rear Bumper & tire Carrier Spindle


Thread Starter
Newbie
Joined: Jun 2012
Posts: 18
Likes: 0
Model: Cherokee
Been working on a new bumper for the rear primarily since I need a spare tire carrier. I posted a question a bit back regarding installation of a A to Z spindle kit. Didn't get any responses so I am not sure if its a common product. Spindle kit seems really stout. Been sitting about 2 years in the toolbox before I got around to this project.
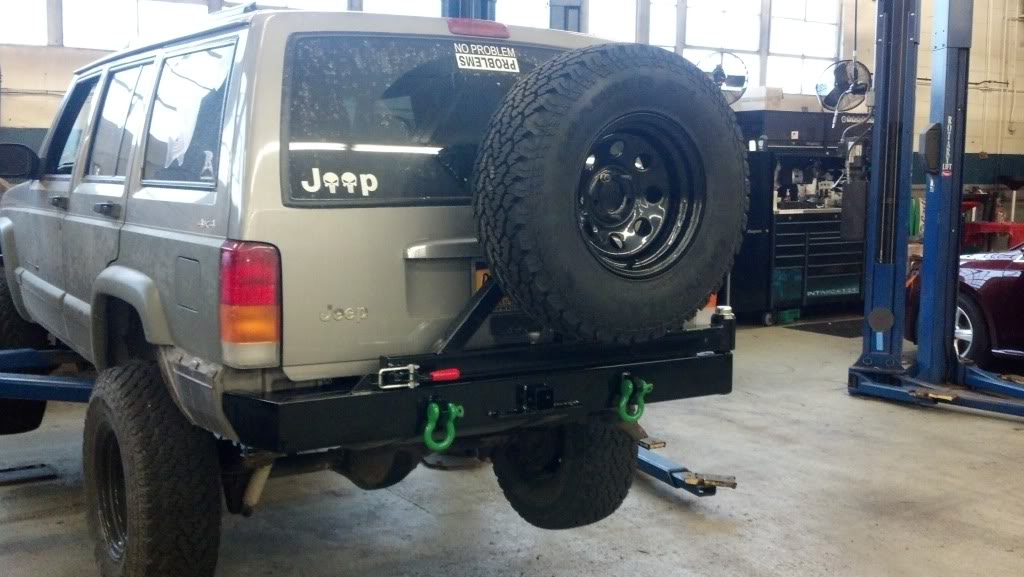
The following photo shows the relationship of the spindle to the bumper. I was worried I mounted the spindle too low yet once I got the bearings pressed into the sleeve, turns out it actually sits a bit higher than I wanted. There is a 1/2" clearance between the bottom of the sleeve and the top surface of the bumper. Thought it might be helpful for someone else to see a close-up of it installed. If you look closely, you'll see the bottom of the machined spindle (where the step is) is about 3/8" above the top of the bumper tube.
Plan to start work on the swing arm this week. Wnted to keep the cross bar low so I would clear the latch on the hatch. We'll see how it goes.
bth_xj_tirecarrierspindle.jpeg?t=1363053116
bth_xj_bumper.jpeg?t=1363053209

CF Veteran
Joined: Aug 2011
Posts: 1,994
Likes: 8
From: San Jose
Year: 89
Model: Cherokee
Engine: 4.0 I6
Hey good looking bumper you got there. Just a thought though, where your cut n fold armor is connected to the body of the bumper, looks like there's a good inch or two of metal hanging down. Have you thought of tapering it or adding something to make it flush? Just looks like it could get caught on something.
Cheers
Cheers
Thread Starter
Newbie
Joined: Jun 2012
Posts: 18
Likes: 0
Model: Cherokee
Spindle is an A to Z product, comes with spindle, bearings, and sleeve.
Yes, horizontal tube is 3x2 so there is a 1 inch step. Originally intended to set 3 inch measurement vertical yet looked better on the horizontal. Was thinking of plating the step to make transition but not sure I'll do it since I don't intend running rocks with the jeep and never got in a situation with the bumpers hanging up.
No original idea in the build as if you do a web search you can find a boatload of write ups on rear bumpers. Copied from a few different ones to get where I am at. Posted since could not find a close up of an installed spindle kit.
Thanks to all
Trending Topics
Thread Starter
Newbie
Joined: Jun 2012
Posts: 18
Likes: 0
Model: Cherokee

Thanks,
frame mounts were taken from another bumper build I found doing google search: HSS 4x2X1/8 tubing, notch to clear shackle bolt
drivers side shown, passenger side similar.
notch at top not yet done, you have to cope top to get it to fit around fuel tank fill pipe.
I had a hitch receiver that was used to tow a 22 foot boat so I did something similar, used the existing three bolt holes in the frame for the connection from 4x2 to frame, 3 1/2" grade 8 bolts.
locking pull toggle clamp arrived today from McMaster-Carr for the tire carrier swingarm. I took the size from another bumper build search but now its here it looks way too large for what it need it to do. Might be sending it back and getting soemthing smaller.

A to Z spindle is around 1 3/4" diameter so 1 1/2" hole saw worked well. cut HSS 6x3x3/16 main tube with 4 1/2" cut off wheel and plated with 3/16" flat bar. drilled hole through flat bar so I could weld up spindle base and tie it into bottom of tube bumper.

Thread Starter
Newbie
Joined: Jun 2012
Posts: 18
Likes: 0
Model: Cherokee
bth_3796faa8-fd73-4ff3-88d8-bac6e6640a9b.jpg?t=1363740476
Swing arm coming along. I have looked at a bunch of homemade bumpers through a google search but haven't come across any with a shortened swing arm. The horizontal swingarm tube is around 4'-6" and takes up a boatload of room when it opens. Since I plan to latch on the front surface of the bumper tube, I was wondering if I could loose the rest of the horizontal tube. Has anyone fabb'ed a tirecarrier with a short swing arm? If you have, please post some pics.
Thanks
Member
Joined: Dec 2012
Posts: 122
Likes: 0
I was wondering the same thing. If you have to open the hatch with limited space like in a parking lot, tailgating, backed in somewhere and now you have to pull up to open it.
What about offsetting the wheel to the side?
Will it look ok? Has a bonus that you can see out of the rear window a little better.
What about offsetting the wheel to the side?
Will it look ok? Has a bonus that you can see out of the rear window a little better.
Senior Member
Joined: Oct 2012
Posts: 857
Likes: 0
From: Parlin NJ/Staten Island NY
Year: 2000
Model: Cherokee
Engine: 4.0

Swing arm coming along. I have looked at a bunch of homemade bumpers through a google search but haven't come across any with a shortened swing arm. The horizontal swingarm tube is around 4'-6" and takes up a boatload of room when it opens. Since I plan to latch on the front surface of the bumper tube, I was wondering if I could loose the rest of the horizontal tube. Has anyone fabb'ed a tirecarrier with a short swing arm? If you have, please post some pics.
Thanks
Member
Joined: Dec 2012
Posts: 122
Likes: 0
Looks good but you may get some unwanted wobble with that setup. I have the Nates4X4 bumper/carrier. They build it with a short and beefier tube. The tire carrier is also offset to the right (closer to the pin) and it's built with supports. I get a little tire wobble but not much, it's the most solid carrier I've actually put my hands on so far.

Junior Member
Joined: Nov 2010
Posts: 87
Likes: 0
From: Carson City, NV
Year: 1989
Model: Cherokee
Engine: 4.0
Thread Starter
Newbie
Joined: Jun 2012
Posts: 18
Likes: 0
Model: Cherokee
Moving along a bit at a time when I can squeeze free time for work on the jeep.
The initial photo was only the mast so I could set the spare and see if it actually was where I wanted it so I intended to brace it once I had it where I wanted. I don't plan on running anything larger that the 32's I currently have installed so I wanted to shift the spare as far over to the drivers side as I could so it didn't block my view out the rear corner. I ended up cutting the mast off, moving it 3" over to the drivers side and also cutting the height down by about an inch. Ended up where you can't even tell the tire is there when you look over your right shoulder to make a lane change.
Added bracing and gussets. I can hang on the tire with the swing arm open and there is very little movement. So it worked out how I wanted. Latch was a bit more tricky than anticipated. I ended up installing an additional tube atop the swing arm to mount the latch in an upright position. Had to fabricate nut strips and weld then in place before capping the ends. Swing arm is still not 100% complete as I have an idea for a bump stop and a hopefully rattle proof mount.
You can't see it in the pics yet I welded a small tab on the far side of the spindle to act as a stop for the swing arm.
I still need to work on the filler plate below the hatch as well as the infill pieces below the taillights. Been slow going but hope to wrap up this weekend.
bth_2013_03_26Progress4.jpg?t=1364351039
bth_2013_03_26Progress3.jpg?t=1364351032
bth_2013_03_26Progress2.jpg?t=1364351002
bth_2013_03_26progress1.jpg?t=1364350989

Banned
Joined: May 2011
Posts: 163
Likes: 0
From: HIGHLAND CA.
Year: 1992
Model: Cherokee
Engine: 4.0
So the basis for this is 3x6? and 2x4 mounts of course..but the basis's of the bumper is 3x6? Any reason to no go smaller? Maybe 3x5 to avoid that extra inch lip for the cut & fold?
I'm also looking for a hitch, tire carrier, jerry can all in 1 package and am also going custom. JCR now has a BEEF spindle as well, so I'm shopping around. JCR is where I think I'll buy my spindle though.
I'm also looking for a hitch, tire carrier, jerry can all in 1 package and am also going custom. JCR now has a BEEF spindle as well, so I'm shopping around. JCR is where I think I'll buy my spindle though.