
Rear bumper and tire carrier

Thread Starter
CF Veteran
Joined: Mar 2012
Posts: 1,369
Likes: 0
From: Richmond, VA
Model: Cherokee
Long story short I got offered a good amount of steel for free so I decided to take advantage and pick up enough to do my bumpers and tire carrier. The front will be a while but started the rear last weekend and figured I'd share on here as well as JF. All the steel I'm using is A500. I'm not fabbing the hardware myself nor am I doing the cuts for the d ring tabs or hitch because I don't know a plasma cutter. Everything else I'm doing myself.
Tools I'm using:
14" DeWalt chop saw
4.5" DeWalt angle grinder
Lincoln ProMIG 135
Speed Square
Tape Measure
Soapstone
Material:
Rear bumper:
2x5x.25 rectangular square tube - free
2x2.x.25 square tube - free
AJ's Offroad rear bumper mounts and D-Ring shackle mounts $25/$40
Northern Tools weld in receiver hitch - $10
Total cost: $75
Tire carrier:
1.75x1.75x.120 square steel tube - free
AtoZ Fabrication Tire Carrier Builder's Kit - $92
Total: $92
Even after consumables and whatever I end up finishing the metal in I'll be under $200 for both the bumper and tire carrier.
Last edited by motorcharge; Jul 24, 2012 at 04:57 PM.
Thread Starter
CF Veteran
Joined: Mar 2012
Posts: 1,369
Likes: 0
From: Richmond, VA
Model: Cherokee
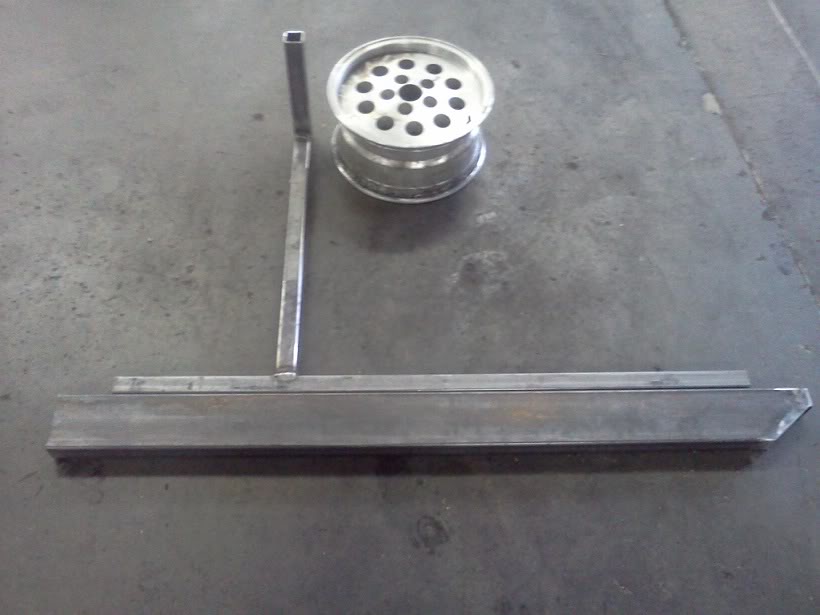
Only downside to this is it's going to be a few weeks til I can order the hardware/mounts due to $$$, or rather a lack thereof. Plus I only have access to the shop for personal use so the updates are going to only happen once a week. Here is what I've got so far (about 3 hours worth of work including taking measurements).
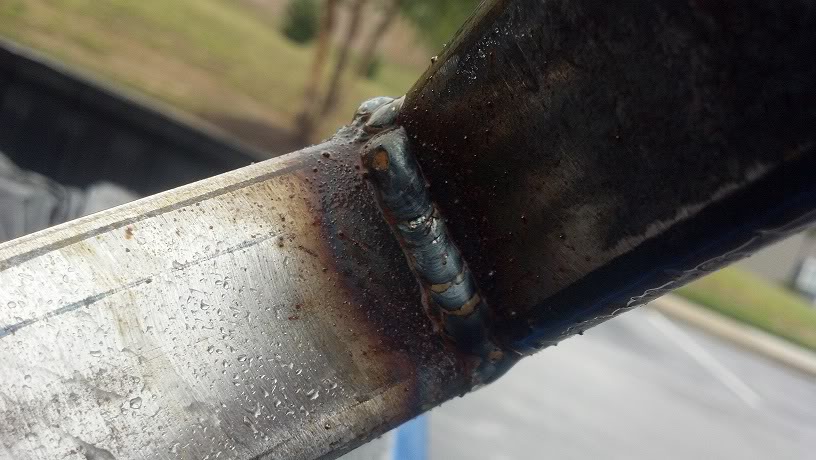
Took the steel when I got it up to the local truck wash and hosed it off with degreaser to get it nice and clean then hit it with a 60 grit flap disk prior to the welds. Sorry there aren't more pics but my phone died permanently the day before I got to work on it.
Tire mounting plate will mount on the end here.
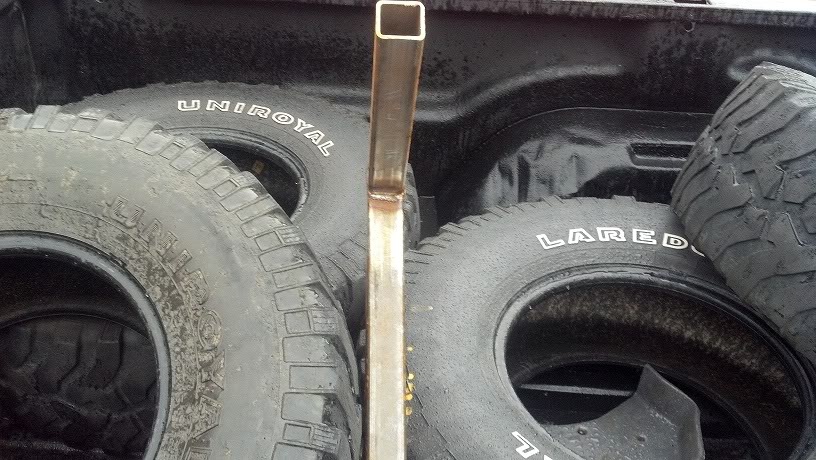
Obviously didn't get to the bracing.
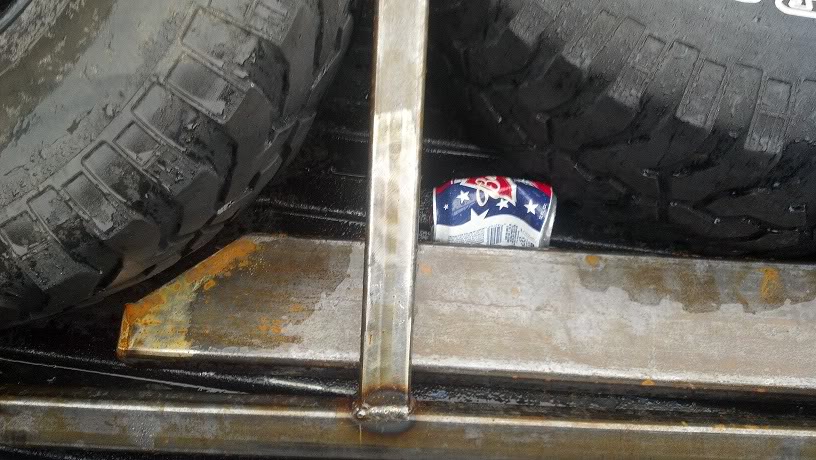
Ignore all the surface rust. It's been sitting in my truck bed since Saturday out in the rain. Ran outside in it when my new phone got here to get some more pics.
Unfortunately I only had one chop saw blade and by the time I made those few cuts it had gotten too small to go through even the 2" and it was too late in the day to go get another. I didn't get as far as I wanted but I'm pretty happy with it so far.
Total width of the bumper after capping the ends is 63.5", so a 1/4" wider than the tail lights and a bit smaller than the stock bumper with the caps on. I intentionally offset it so I wouldn't lose too much visibility and I wouldn't have to relocate the license plate.
Took the steel when I got it up to the local truck wash and hosed it off with degreaser to get it nice and clean then hit it with a 60 grit flap disk prior to the welds. Sorry there aren't more pics but my phone died permanently the day before I got to work on it.
Tire mounting plate will mount on the end here.
Obviously didn't get to the bracing.
Ignore all the surface rust. It's been sitting in my truck bed since Saturday out in the rain. Ran outside in it when my new phone got here to get some more pics.
Unfortunately I only had one chop saw blade and by the time I made those few cuts it had gotten too small to go through even the 2" and it was too late in the day to go get another. I didn't get as far as I wanted but I'm pretty happy with it so far.
Total width of the bumper after capping the ends is 63.5", so a 1/4" wider than the tail lights and a bit smaller than the stock bumper with the caps on. I intentionally offset it so I wouldn't lose too much visibility and I wouldn't have to relocate the license plate.
Last edited by motorcharge; Jul 24, 2012 at 04:49 PM.

Seasoned Member
Joined: Sep 2011
Posts: 280
Likes: 1
From: Arlington, TN (Memphis area)
Year: 2000
Model: Cherokee
Engine: 242 Power Tech I6 (4.0)
Great start on the bumper/tire carrier. I used the AtoZ Fabrication Tire Carrier Builder's Kit when I built my bumper/carrier (with free steel also!) and they make a good kit. Only difference with me is that I got the Mega-Duty Spindle when I ordered mine 'cause I wanted to be safe and I knew I was going to put other things on the swing other than a tire, plus at only $25 more, not too bad.
I will ask though, are you going to only use the AJ's Offroad rear bumper mounts or are you going to use frame tie-ins? The bumper will hold up better with tie-ins, especially if you are going to be putting D-rings and a Tire on the bumper.
If you need any ideas or what not, you can look at my bumper build in my signature.
Last edited by dcp1992; Jul 24, 2012 at 05:10 PM.
Thread Starter
CF Veteran
Joined: Mar 2012
Posts: 1,369
Likes: 0
From: Richmond, VA
Model: Cherokee
I was thinking about it but wasn't sure how necessary it was since I'd always used a frame mount hitch for rear recovery before. A guy over on JF cut out the space between each of the 4 bolt holes and fed his in that way to bolt through the frame rails. I figured if I ended up needing to I could go back and do that as well.
All it will ever be used for is recovery. The hitch will get used on rare occasions (maybe once a or twice a year) for a hitch mount storage rack I have and maybe a small utility trailer if I don't feel like driving the truck.
edit: Should have looked through your thread before typing all that haha
All it will ever be used for is recovery. The hitch will get used on rare occasions (maybe once a or twice a year) for a hitch mount storage rack I have and maybe a small utility trailer if I don't feel like driving the truck.
edit: Should have looked through your thread before typing all that haha
Trending Topics
Thread Starter
CF Veteran
Joined: Mar 2012
Posts: 1,369
Likes: 0
From: Richmond, VA
Model: Cherokee
Fixing my DD took all my time and money last weekend, but back to work on it this weekend.
I got the bracing cut out for it tonight. Still need to touch up the edges with a grinder tomorrow before I weld them in, but other than that they're good to go.
2012-08-03_19-30-14_893.jpg?t=1344044524
2012-08-03_19-30-22_557.jpg?t=1344044524
2012-08-03_19-30-47_717.jpg?t=1344044527
Also pay no attention to the gaps. That table is by no means level and I just set everything together real quick to get an idea of how it�s going to look.
Thread Starter
CF Veteran
Joined: Mar 2012
Posts: 1,369
Likes: 0
From: Richmond, VA
Model: Cherokee
Finished framing it this afternoon. I just couldn't get my *** in gear this morning and didn't get in til late so I've only had about an hour and a half to work so I didn't take very many pictures, though really there wasn't much to take pictures of without someone else there to take some while I was welding.
It's a little off, but I'm happy with it and it's going to be hidden anyway. Plus this is really the first thing I've actually built since I started welding other than some basic practice stuff. Speaking of practice I need to start practicing inside of 45s. This was the first time I'd done angles that weren't 90s and it shows, though they were getting much better by the time I got to the last couple. I'm also kind of debating taking some of the height out of it as I think it's going to sit up a few inches higher than I really need it to.
1.jpg?t=1344117906
2.jpg?t=1344117903
3.jpg?t=1344117906
4.jpg?t=1344117903
All I've got left now is to finish the bumper and order the hardware and it will be ready to be painted, powdercoated, or bedlined after I hit it and the outside welds with a grinder one more time. Haven't fully decided which to do yet.
Thread Starter
CF Veteran
Joined: Mar 2012
Posts: 1,369
Likes: 0
From: Richmond, VA
Model: Cherokee
Thanks guys. Unfortunately that last update will be the last for a couple more weeks. Finally got a new cylinder head ordered yesterday so I'll be broke for a bit meaning I can't order the hardware or the mounting plates to finish the bumper for a little bit.
Though I am debating taking some of the height out of it and centering it instead of having it offset. I wasn't really thinking when I measured and I measured 32" down forgetting that the wheel/tire will only come down ~ 16". I could actually take out almost all of the space between the bracing on the vertical bar where it would sit below the rear windshield enough that I wouldn't need to offset it.
Though I am debating taking some of the height out of it and centering it instead of having it offset. I wasn't really thinking when I measured and I measured 32" down forgetting that the wheel/tire will only come down ~ 16". I could actually take out almost all of the space between the bracing on the vertical bar where it would sit below the rear windshield enough that I wouldn't need to offset it.
Last edited by motorcharge; Aug 11, 2012 at 10:24 AM.

Seasoned Member
Joined: Jun 2011
Posts: 489
Likes: 0
From: San Antonio
Year: 1992
Model: Cherokee
Engine: 6 Cyl
If you can take some of the height out of it then do it. Mine sits too high, blocks some of the view and when traveling over a rough road it starts to bounce. Same for keeping it closer the rear hatch. The taller and farther out it sticks the more it wil bounce.