
expedition rig build out

Thread Starter
Senior Member
Joined: Mar 2013
Posts: 639
Likes: 3
From: lake stevens, wa
Year: 1996
Model: Cherokee
Engine: 4.0L
everything else back there is very solid tho. no rattles even on washboard trails (outside of the normal jeep rattles of course.. lol)
Thread Starter
Senior Member
Joined: Mar 2013
Posts: 639
Likes: 3
From: lake stevens, wa
Year: 1996
Model: Cherokee
Engine: 4.0L
havent posted in a while, but I got some more things done and figured I should get this thread caught up.
first, added some armor from ares fabrication. good guys to work with, and good communication.

had them add an extra rail on the driver side, which makes for a nice ladder to climb up to my roof deck.

then found some sweet led lights to mount.

decided that as long as I was improving some lighting, I may as well keep going. got these headlights from my buddy because he decided to sell his jeep. housings are from an extra set of a6 headlights he had sitting around. such a huge difference at night.. these should do the job til I do the commander headlights next year.

then i took care of a couple little things inside. first up, some rear USB charging ports. did one on each side so my kids can charge their kindles on the road.

and then I made myself a place to store my map/forest pass pouch. got tired of having to dig under the seat for it. gotta keep organized

first, added some armor from ares fabrication. good guys to work with, and good communication.
had them add an extra rail on the driver side, which makes for a nice ladder to climb up to my roof deck.
then found some sweet led lights to mount.
decided that as long as I was improving some lighting, I may as well keep going. got these headlights from my buddy because he decided to sell his jeep. housings are from an extra set of a6 headlights he had sitting around. such a huge difference at night.. these should do the job til I do the commander headlights next year.
then i took care of a couple little things inside. first up, some rear USB charging ports. did one on each side so my kids can charge their kindles on the road.
and then I made myself a place to store my map/forest pass pouch. got tired of having to dig under the seat for it. gotta keep organized
Last edited by uber; Oct 8, 2014 at 12:32 AM.

Thread Starter
Senior Member
Joined: Mar 2013
Posts: 639
Likes: 3
From: lake stevens, wa
Year: 1996
Model: Cherokee
Engine: 4.0L
and yesterday I decided to work on another idea I had been kicking around for my dashboard. first, yarding out the old setup..

then cleaned it up and sealed it off a bit more

and then got some of the new gear mounted up and wired in

and then a mount for my new source unit

and then the dash trimmed out, complete with a just-for-grins backlit panel under my magnetic phone mount. casts a pretty sweet glow in the front of the jeep at night.

i plan on making a short video showing how the new setup works, and I'll post a link here when I do.
then cleaned it up and sealed it off a bit more
and then got some of the new gear mounted up and wired in
and then a mount for my new source unit
and then the dash trimmed out, complete with a just-for-grins backlit panel under my magnetic phone mount. casts a pretty sweet glow in the front of the jeep at night.
i plan on making a short video showing how the new setup works, and I'll post a link here when I do.
Thread Starter
Senior Member
Joined: Mar 2013
Posts: 639
Likes: 3
From: lake stevens, wa
Year: 1996
Model: Cherokee
Engine: 4.0L

I found the lights while digging around on amazon. I liked them because they're not round like the ones that most people use. I figured nothing else on the xj is round, so why should the tails?
Thread Starter
Senior Member
Joined: Mar 2013
Posts: 639
Likes: 3
From: lake stevens, wa
Year: 1996
Model: Cherokee
Engine: 4.0L
thought about that, but worse case I can always toss another deck back in later if need be. for now I'm digging it. I also have a BT obd2 plug in my jeep that I can access via the torque plus app while music plays in the background. and backcountry navigator gives me live topo maps and breadcrumb trails off road. lots of cool toys, without having to have a separate arm hanging out somewhere

Junior Member
Joined: Apr 2014
Posts: 30
Likes: 0
From: Bismarck, ND
Year: 1986
Model: Cherokee
Engine: 3.4l, 5.0 TBI, Megasquirt III ECU
I've thought the exact same thing!!!! Great job on the build!
Junior Member
Joined: May 2008
Posts: 15,016
Likes: 11
From: +34� 25' 35.67", -81� 21' 12.04"
Year: 1993
Engine: 4.0
thought about that, but worse case I can always toss another deck back in later if need be. for now I'm digging it. I also have a BT obd2 plug in my jeep that I can access via the torque plus app while music plays in the background. and backcountry navigator gives me live topo maps and breadcrumb trails off road. lots of cool toys, without having to have a separate arm hanging out somewhere
I have a late model and the tablet installs I've seen in late models look pretty slick.
Thread Starter
Senior Member
Joined: Mar 2013
Posts: 639
Likes: 3
From: lake stevens, wa
Year: 1996
Model: Cherokee
Engine: 4.0L
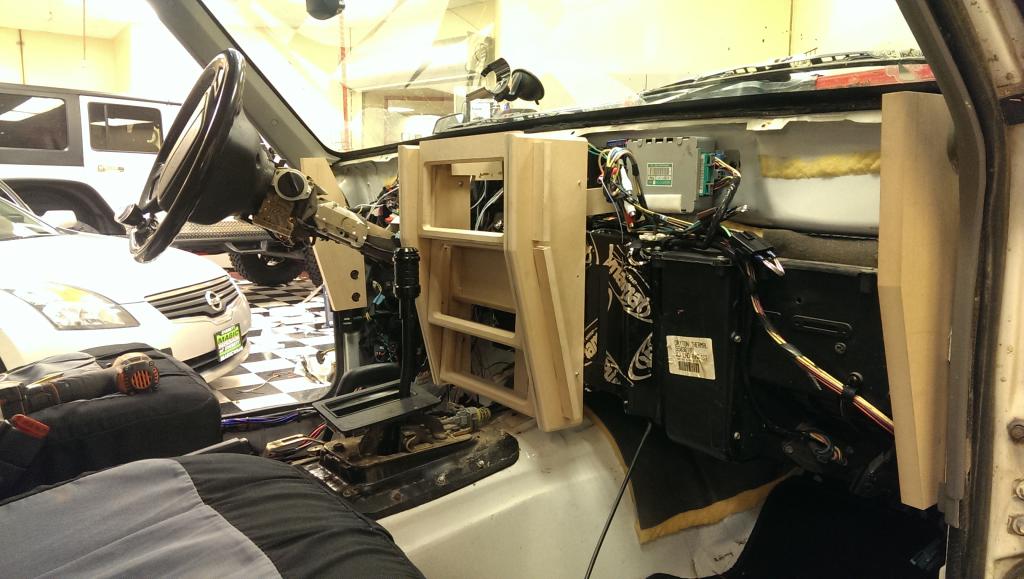
well, time to get back to it i guess.. in my neverending quest for different, i decided to go for something a bit more ambitious than normal. i've been working on it here and there after work for a while now, and i think i've made enough progress to share with the class.. LOL
step 1.. remove the dash


step 1.. remove the dash
Last edited by uber; Nov 9, 2014 at 12:15 AM.
Thread Starter
Senior Member
Joined: Mar 2013
Posts: 639
Likes: 3
From: lake stevens, wa
Year: 1996
Model: Cherokee
Engine: 4.0L
next, redesigning the instrument cluster..

then give it a home and make it pretty..

don't forget to make it work..

then make a new tablet holder..

then give it a place to live..

then fire it all up and bask in awesomeness..

then change it up a little, and make another spot for other things to come..

then give it a home and make it pretty..
don't forget to make it work..
then make a new tablet holder..
then give it a place to live..
then fire it all up and bask in awesomeness..
then change it up a little, and make another spot for other things to come..
Thread Starter
Senior Member
Joined: Mar 2013
Posts: 639
Likes: 3
From: lake stevens, wa
Year: 1996
Model: Cherokee
Engine: 4.0L
next up, trimming the fat..

then wall it off and seal the seams..

then build a new, better defrost vent..

then admire the new streamlined look and cleaned up wiring..

then wall it off and seal the seams..
then build a new, better defrost vent..
then admire the new streamlined look and cleaned up wiring..
Thread Starter
Senior Member
Joined: Mar 2013
Posts: 639
Likes: 3
From: lake stevens, wa
Year: 1996
Model: Cherokee
Engine: 4.0L
start on the framing, and make it pretty too..

then mount your end gaps and make some plumb lines..

then set up a contraption to get your frame positioned properly..

then make some temporary brackets to hold it there without the contraption..

then set your bezel on the frame for an idea of the end product..
and that's where i'm at so far. definitely a lot of fun to this point, and trying something i've never done before. stay tuned..
then mount your end gaps and make some plumb lines..
then set up a contraption to get your frame positioned properly..
then make some temporary brackets to hold it there without the contraption..
then set your bezel on the frame for an idea of the end product..
and that's where i'm at so far. definitely a lot of fun to this point, and trying something i've never done before. stay tuned..
