
The CF Neutral Safety Switch (N.S.S.) Refresh How-To


Thread Starter
CF Veteran
Joined: Oct 2009
Posts: 2,867
Likes: 16
From: Fauquier County, Virginia
Year: 1991
Model: Cherokee
Engine: I-6 4.0 HO
Hello everyone! I figured it would be nice for CherokeeForum to have its own N.S.S. clean/refresh how-to article on hand!
If you are here, then odds are that you have experienced some or all of these symptoms:
- Reverse lights do not work when in Reverse and you have verified the bulbs are ok.
- The Jeep will only start when the gear selector is in Neutral.
- The Jeep will do absolutely nothing when trying to start in Neutral or/and Park (no starter click, nothing; the water gauge will simply go all the way to the right with everything cutting off as it is supposed to but with no reaction from the starter)
- The Jeep will start in Park and/or Neutral only if you wiggle the shifter.
- Your transmission is shifting wonky (mainly OD).
Then congrats! Because I am willing to bet that your N.S.S. is giving you a hard time. "Oh No!" you my cry! "S%&^!" you may curse! A new N.S.S. is like $150-$200! That blows!
Fear not. The N.S.S. can be relatively easily cleaned and made operational once more! Want to find out how? Then read on!!
Thread Starter
CF Veteran
Joined: Oct 2009
Posts: 2,867
Likes: 16
From: Fauquier County, Virginia
Year: 1991
Model: Cherokee
Engine: I-6 4.0 HO
On a more serious note, the N.S.S. requires maybe 2 hours (3 if taking your careful and first time like I did) to get the job done. Have on hand these items:
- Zipties
- Brake Part Cleaner*
- Electrical Connector/Switch cleaner (sold next to brake part cleaner)
- A long flat-head screwdriver
- A 7/8" box end wrench
- A 13mm (IIRC) socket with socket wrench
- Scissors or (even better) long cutting pliers
- A toothbrush
- Dielectric grease (good quality!)
- Philips-head screwdriver
- PB Blaster
- Gloves help
- Possibly some black RTV (just a little!)
- Patience
Get your supplies together and park you Jeep. Block the wheels and pull the e-brake. I had ramps which made the job easier. Bare with me though; I missed a couple of snap shots due to awkward positions and busy/dirty hands. I have had to borrow a couple of pictures from the interwebz.
After getting the Jeep situated, get inside and put the key into the ignition to simply unlock the shifter. Don't turn it on all the way. Put the shifter in Neutral. Verify the Jeep is stable before you get underneath.
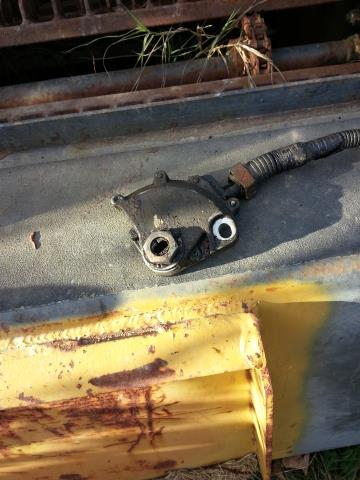
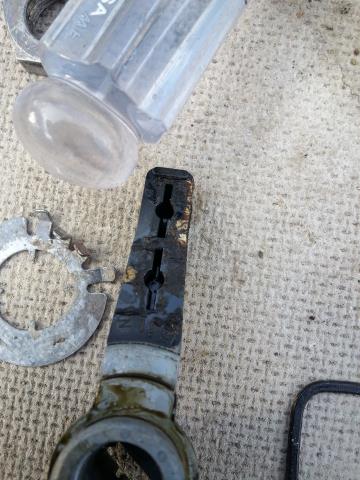
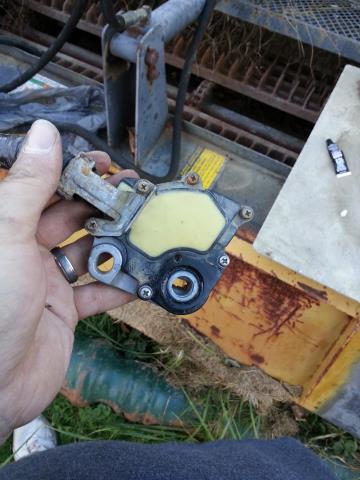
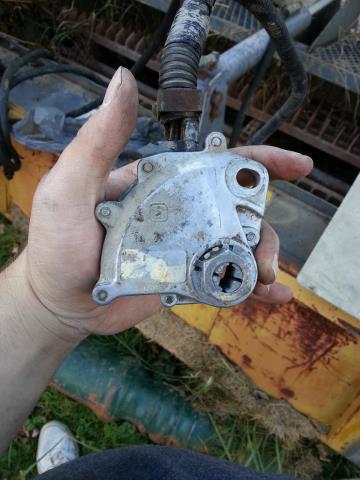
Climb under the passenger side and look up at the side of the transmission. You will see this:

(boyandjeep.com)
Yours will surely be messier. Next spray the back perimeter of the N.S.S. with PB Blaster as well as both the big center shaft nut and the mounting bolt. Some have also pointed out putting Dielectric grease on the exposed part of the shift sticking through the nut to assist in switch removal.
Next, examine the pic below:

(BC4X4.com)
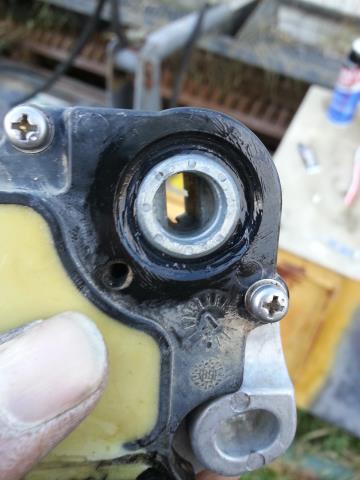
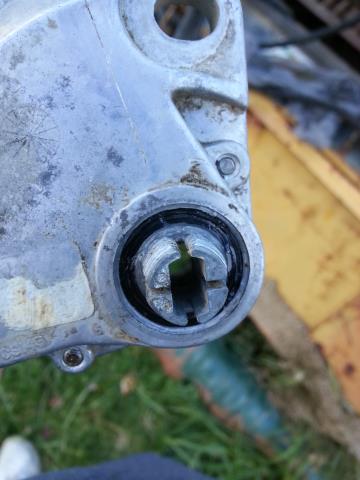
Remove the mounting bolt shown in the red square. Then loosen (but only a little!) the big 7/8" shaft nut. To do this, you must see the weird lock-washer under the big nut. It has little tabs bent to prevent the nut from spinning. Push down on these tabs with the screwdriver blade and the nut will be able to spin.
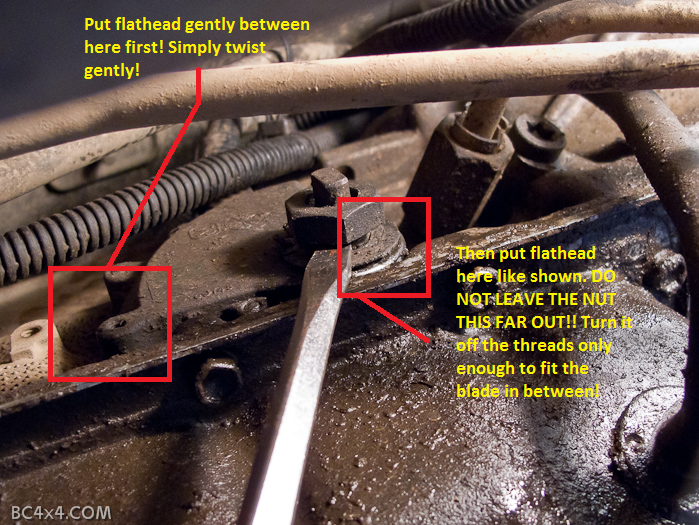
(BC4X4.com)
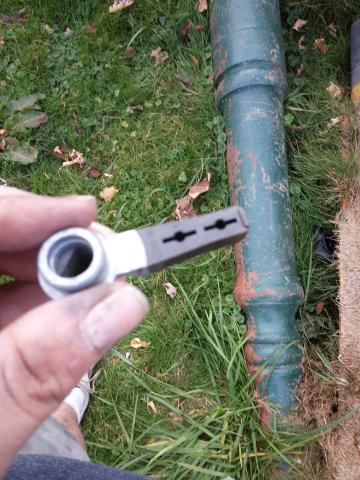
Next, use your flat-head to remove the unit from the side of the transmission. TAKE NOTES HERE AND READ ENTIRELY! The N.S.S. must be removed straight off of the shaft it is mounted on. It cannot be twisted off or forced off. Many people recommend various ways to do this as the plastic portion of the N.S.S. is fragile and can break. Some of these ways are probably better than what I and others have done. Use the flat-head as shown above the push against the shaft nut and therefore push the N.S.S. off the shaft. However, note my edits to the picture. I first finessed my hand and screwdriver along the left of the N.S.S. to wedge the head into that space and simply twist the screwdriver making the blade wedge a gap between the transmission and the N.S.S. Then go back to the shaft nut and just get it loose enough to get tension off the threaded collar and to get the blade of the screwdriver in between. Rock back and forth on all sides GENTLY and with patience. Make sure that mounting bolt is removed. Make sure the shaft nut is just loose enough. Make sure the Jeep is in Neutral. The N.S.S. WILL come off. My Jeep is 23 years old with the original N.S.S. and all that grime and rust. It came off with ease!
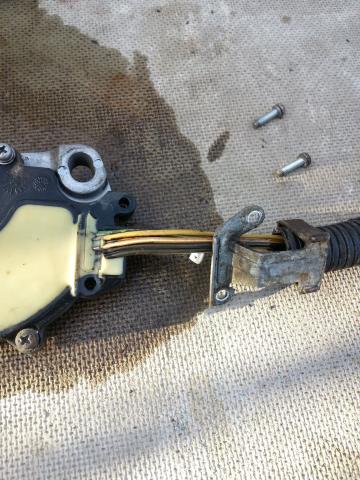
With your N.S.S. off and dangling, cut the 3 super-industrial-placed dumb as Hell-zipties that secure the N.S.S. harness. One is shown in the second pic above (in the green square). There is another one just up from the one pictured (just work it with your hand until it is in cutting distance). The last one is near the transmission dipstick in the engine bay.
While in the engine bay, unplug this connector:

(jeep-xj.info)
Be careful with the little tab! They like to break. Ignore the gray plug next to it. You will know you have the right plug if it has 6 terminals in use.
Before you let that plug drop, tie string to it. Makes it MUCH easier to pull that sucker back up through. After that, drop the plug and finesse it out until you have it in your hand!
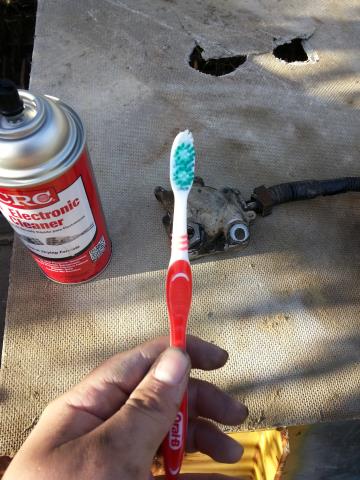
Go to your work area. Make sure it is somewhat clean. Bring your supplied. Begin surgery!!
Clean it off first! Handy-dandy toothbrush time! (Don't re-use this!!)
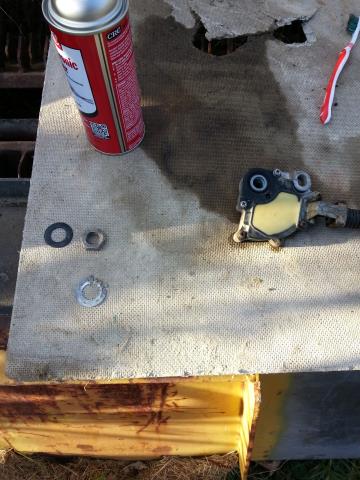
Remove the shaft nut. Under it is the weird lock-washer we talked about. Don't lose it! Under that is a rubber washer. Don't lose it either!!
Keep reading below!
- Zipties
- Brake Part Cleaner*
- Electrical Connector/Switch cleaner (sold next to brake part cleaner)
- A long flat-head screwdriver
- A 7/8" box end wrench
- A 13mm (IIRC) socket with socket wrench
- Scissors or (even better) long cutting pliers
- A toothbrush
- Dielectric grease (good quality!)
- Philips-head screwdriver
- PB Blaster
- Gloves help
- Possibly some black RTV (just a little!)
- Patience
Get your supplies together and park you Jeep. Block the wheels and pull the e-brake. I had ramps which made the job easier. Bare with me though; I missed a couple of snap shots due to awkward positions and busy/dirty hands. I have had to borrow a couple of pictures from the interwebz.
After getting the Jeep situated, get inside and put the key into the ignition to simply unlock the shifter. Don't turn it on all the way. Put the shifter in Neutral. Verify the Jeep is stable before you get underneath.
Climb under the passenger side and look up at the side of the transmission. You will see this:
(boyandjeep.com)
Yours will surely be messier. Next spray the back perimeter of the N.S.S. with PB Blaster as well as both the big center shaft nut and the mounting bolt. Some have also pointed out putting Dielectric grease on the exposed part of the shift sticking through the nut to assist in switch removal.
Next, examine the pic below:
(BC4X4.com)
Remove the mounting bolt shown in the red square. Then loosen (but only a little!) the big 7/8" shaft nut. To do this, you must see the weird lock-washer under the big nut. It has little tabs bent to prevent the nut from spinning. Push down on these tabs with the screwdriver blade and the nut will be able to spin.

(BC4X4.com)
Next, use your flat-head to remove the unit from the side of the transmission. TAKE NOTES HERE AND READ ENTIRELY! The N.S.S. must be removed straight off of the shaft it is mounted on. It cannot be twisted off or forced off. Many people recommend various ways to do this as the plastic portion of the N.S.S. is fragile and can break. Some of these ways are probably better than what I and others have done. Use the flat-head as shown above the push against the shaft nut and therefore push the N.S.S. off the shaft. However, note my edits to the picture. I first finessed my hand and screwdriver along the left of the N.S.S. to wedge the head into that space and simply twist the screwdriver making the blade wedge a gap between the transmission and the N.S.S. Then go back to the shaft nut and just get it loose enough to get tension off the threaded collar and to get the blade of the screwdriver in between. Rock back and forth on all sides GENTLY and with patience. Make sure that mounting bolt is removed. Make sure the shaft nut is just loose enough. Make sure the Jeep is in Neutral. The N.S.S. WILL come off. My Jeep is 23 years old with the original N.S.S. and all that grime and rust. It came off with ease!
With your N.S.S. off and dangling, cut the 3 super-industrial-placed dumb as Hell-zipties that secure the N.S.S. harness. One is shown in the second pic above (in the green square). There is another one just up from the one pictured (just work it with your hand until it is in cutting distance). The last one is near the transmission dipstick in the engine bay.
While in the engine bay, unplug this connector:
(jeep-xj.info)
Be careful with the little tab! They like to break. Ignore the gray plug next to it. You will know you have the right plug if it has 6 terminals in use.
Before you let that plug drop, tie string to it. Makes it MUCH easier to pull that sucker back up through. After that, drop the plug and finesse it out until you have it in your hand!
Go to your work area. Make sure it is somewhat clean. Bring your supplied. Begin surgery!!
Clean it off first! Handy-dandy toothbrush time! (Don't re-use this!!)
Remove the shaft nut. Under it is the weird lock-washer we talked about. Don't lose it! Under that is a rubber washer. Don't lose it either!!
Keep reading below!
Last edited by 1991Jeep_Man; Nov 19, 2013 at 07:58 PM.
Thread Starter
CF Veteran
Joined: Oct 2009
Posts: 2,867
Likes: 16
From: Fauquier County, Virginia
Year: 1991
Model: Cherokee
Engine: I-6 4.0 HO
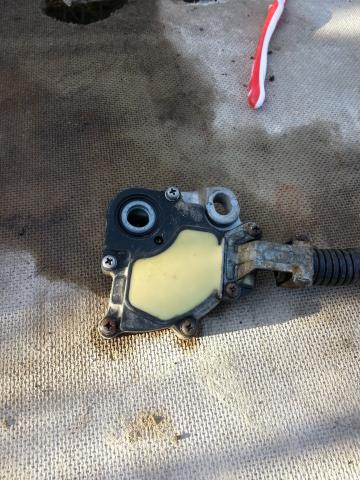
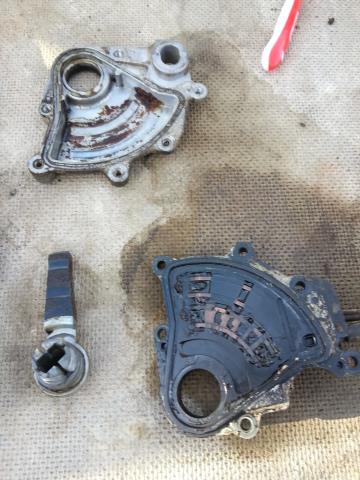
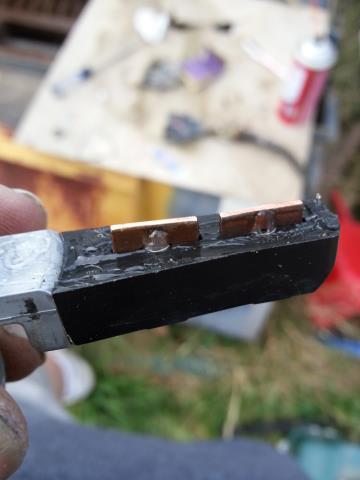
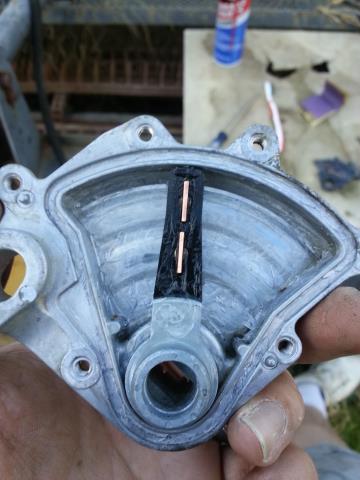
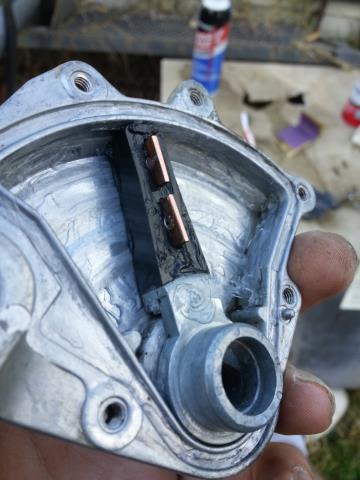
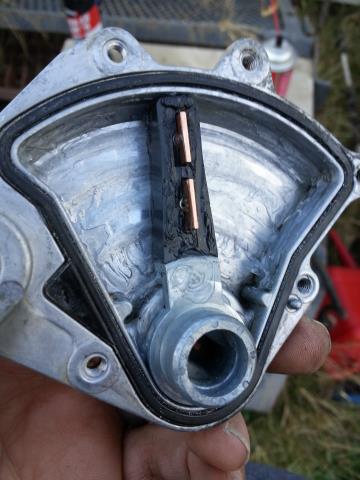
So with the outside of your N.S.S. nice and clean and with the shaft nut and junk removed, it's time to open it up. Not hard at all. Start with the little bolts at the wire harness. This is because those bolts hold a retainer that the flex tube stuff is part of to keep the N.S.S. breather tube covered and to keep the lower wires from becoming exposed.
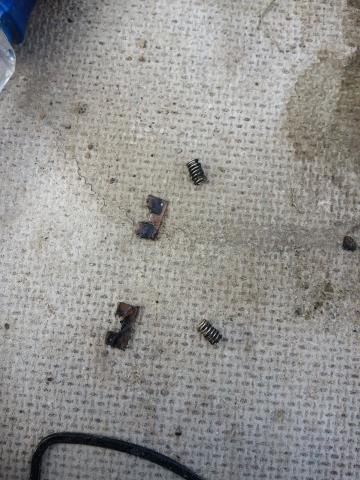
Remove the remainder of the little bolts. I went ahead and arranged them as to put them back in the same hole they were removed from. With the bolts out, gently pull apart the N.S.S. It should not take much effort. Watch for little springs or contacts to try and jump out! There are 2 springs and 2 contacts that sit the contact arm. Usually they are so gummed up though that they stay still.
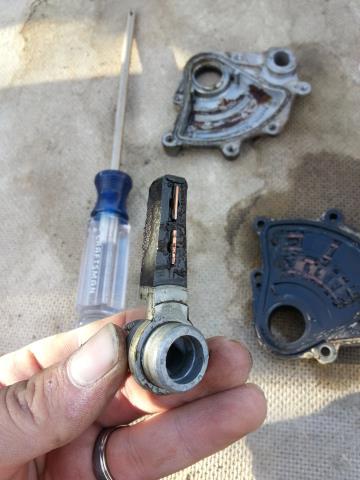
You'll see in the above pictures that I have also taken out the contact arm that pivots with the shaft going through the transmission. This shaft is 'free floating' and does not require any fastener/retainer removal to pull the arm from the openings in each side of the N.S.S. housing. Basically, if you look carefully at the contact arm (more on this below), those contacts are spring loaded and should move freely across the circuitry in the plastic part of the N.S.S. housing. This contact is what tells your Jeep if the vehicle is in a safe starting gear (Park or Neutral) or in a non-starting gear (R/D/3/1-2). This switch also says "Hey genius! We're in Reverse! Turn those lights on!!". This is (gasp) why the Reverse lights stop working when the N.S.S. gets gummed up. This switch is SUPER basic (and not worth $200 IMO) and doesn't really need replaced unless the harness gets trashed or the housing/circuitry is broken. What happens is the stock grease in the N.S.S. turns into a wax over-time and creates a barrier over the circuits and the contacts and springs that just screws everything up. Hence why we are here to clean it (and save $$$!).
Also, there is a gasket between the housing halves that you need to GENTLY get out (it is fragile):
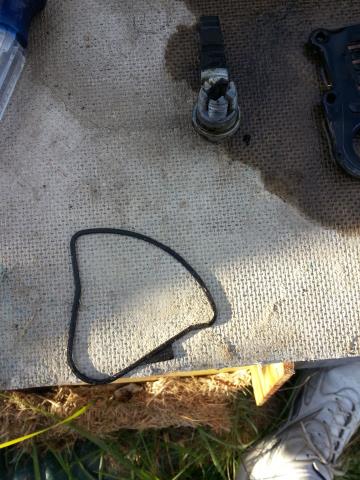
If you break a small section but the gasket is still intact then this is where a TINY dab of that RTV comes in handy. I suppose RTV could be used to replace the seal entirely, just make sure you DO NOT GOB it on! We don't need RTV smearing everywhere inside this switch.
Btw, here are those little contacts and springs you need to get out of the arm. DON'T DROP/LOSE THEM! Put them in a nice spot until you are ready to clean them:
Read On!
Remove the remainder of the little bolts. I went ahead and arranged them as to put them back in the same hole they were removed from. With the bolts out, gently pull apart the N.S.S. It should not take much effort. Watch for little springs or contacts to try and jump out! There are 2 springs and 2 contacts that sit the contact arm. Usually they are so gummed up though that they stay still.
You'll see in the above pictures that I have also taken out the contact arm that pivots with the shaft going through the transmission. This shaft is 'free floating' and does not require any fastener/retainer removal to pull the arm from the openings in each side of the N.S.S. housing. Basically, if you look carefully at the contact arm (more on this below), those contacts are spring loaded and should move freely across the circuitry in the plastic part of the N.S.S. housing. This contact is what tells your Jeep if the vehicle is in a safe starting gear (Park or Neutral) or in a non-starting gear (R/D/3/1-2). This switch also says "Hey genius! We're in Reverse! Turn those lights on!!". This is (gasp) why the Reverse lights stop working when the N.S.S. gets gummed up. This switch is SUPER basic (and not worth $200 IMO) and doesn't really need replaced unless the harness gets trashed or the housing/circuitry is broken. What happens is the stock grease in the N.S.S. turns into a wax over-time and creates a barrier over the circuits and the contacts and springs that just screws everything up. Hence why we are here to clean it (and save $$$!).
Also, there is a gasket between the housing halves that you need to GENTLY get out (it is fragile):
If you break a small section but the gasket is still intact then this is where a TINY dab of that RTV comes in handy. I suppose RTV could be used to replace the seal entirely, just make sure you DO NOT GOB it on! We don't need RTV smearing everywhere inside this switch.
Btw, here are those little contacts and springs you need to get out of the arm. DON'T DROP/LOSE THEM! Put them in a nice spot until you are ready to clean them:
Read On!
Last edited by 1991Jeep_Man; Nov 20, 2013 at 06:07 PM.
Thread Starter
CF Veteran
Joined: Oct 2009
Posts: 2,867
Likes: 16
From: Fauquier County, Virginia
Year: 1991
Model: Cherokee
Engine: I-6 4.0 HO
So now it's time to start cleaning. This is VERY self-explanatory. I used Brake Part cleaner for the metal half of the N.S.S. only and then the Switch/Electrical cleaner for everything else (plastic safe). This is entirely up to you as long as you use one or the other (I recommend the Switch cleaner).
First, the plastic half with the circuitry (before and after):
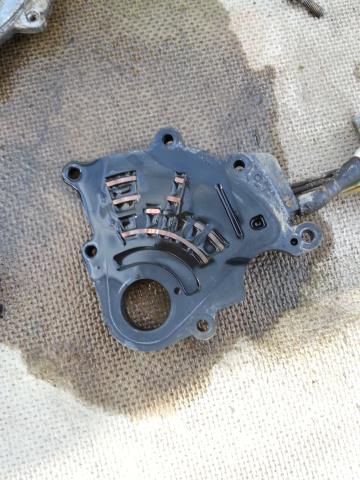
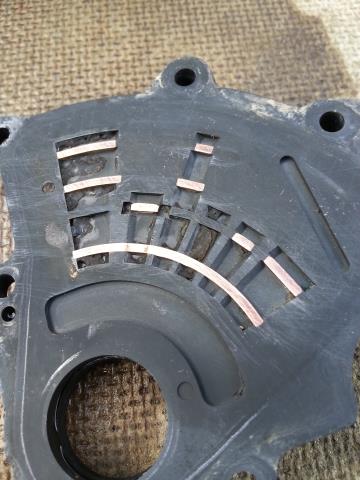
Get aggressive with the toothbrush but don't go all King Kong on it. Plenty of cleaner and the tooth brush will get all of that crap out/off. Spray the toothbrush clean occasionally. Also once the case half is clean, take some fine grit sandpaper or emery cloth and gently wipe down the circuit surfaces. When they shine, spray everything down once more with cleaner to get the tiny particles out (you'll see light scuffing in the plastic where I have done this).
Time to clean the arm (before and after). Make sure you clean those little holes that the springs and contacts sit in really well. A toothpick can make quick work of getting that done.
Carefully (as not to drop and lose them) clean the springs and contacts nice and clean. Before reinstalling them, pump some dielectric grease into those holes and smear a little over the contact arm. Also run that sandpaper or cloth over the tops of the contacts to get them nice and clean (spray again). Install the springs and then the contacts like so:
Make sure they 'free-float' in those holes and that the springs work nicely to move the contacts up and down.
Onward!
First, the plastic half with the circuitry (before and after):
Get aggressive with the toothbrush but don't go all King Kong on it. Plenty of cleaner and the tooth brush will get all of that crap out/off. Spray the toothbrush clean occasionally. Also once the case half is clean, take some fine grit sandpaper or emery cloth and gently wipe down the circuit surfaces. When they shine, spray everything down once more with cleaner to get the tiny particles out (you'll see light scuffing in the plastic where I have done this).
Time to clean the arm (before and after). Make sure you clean those little holes that the springs and contacts sit in really well. A toothpick can make quick work of getting that done.
Carefully (as not to drop and lose them) clean the springs and contacts nice and clean. Before reinstalling them, pump some dielectric grease into those holes and smear a little over the contact arm. Also run that sandpaper or cloth over the tops of the contacts to get them nice and clean (spray again). Install the springs and then the contacts like so:
Make sure they 'free-float' in those holes and that the springs work nicely to move the contacts up and down.
Onward!
Last edited by 1991Jeep_Man; Nov 20, 2013 at 06:16 PM.
Thread Starter
CF Veteran
Joined: Oct 2009
Posts: 2,867
Likes: 16
From: Fauquier County, Virginia
Year: 1991
Model: Cherokee
Engine: I-6 4.0 HO
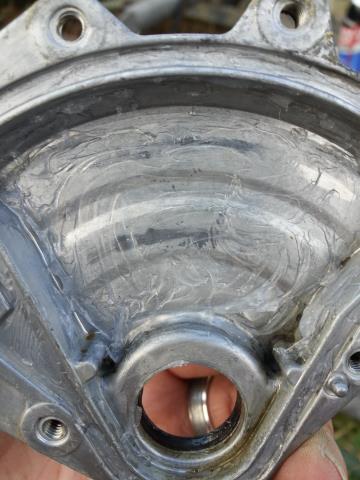
With the contacts in the arm, go ahead and carefully set the arm aside and clean the back metal portion of the N.S.S. This half conducts no signal and merely has grooves molded into it as a guide for the arm (the back of the arm matches the inside of the case half). With this all cleaned up, go ahead and smear some dielectric grease generously (but not gobbing!) inside the case half like so:
Take your contact arm and smear a thin layer of dielectric grease on the back and pivoting portions of the arm. Press it into the case half we just lubed up like so:
Take your gasket and gently place it inside its groove in the metal case half like shown below. Before I put the gasket in, I smeared a tiny amount of grease into each case half's groove. If you broke the gasket like I did but only in one spot and the gasket is otherwise still whole, then put a tiny tiny dab of RTV on the break spot:
Take the other case half with the circuits and smear a nice generously thin layer of dielectric grease over everything inside of that groove for the gasket to seat in. With that done, go ahead and press the case halves together being sure to keep the metal portion with the arm on its back as to not allow the contacts/springs to pop out:
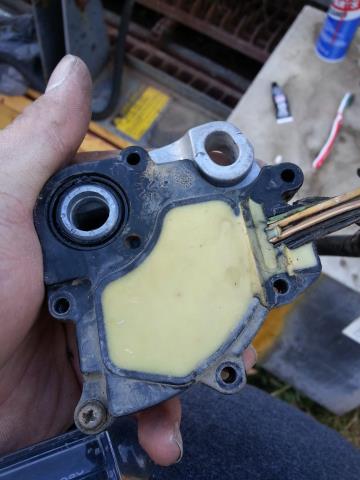
Install one bolt just barely a bit snug in the location shown to hold everything together.
Carry on (to the next part)!
Take your contact arm and smear a thin layer of dielectric grease on the back and pivoting portions of the arm. Press it into the case half we just lubed up like so:
Take your gasket and gently place it inside its groove in the metal case half like shown below. Before I put the gasket in, I smeared a tiny amount of grease into each case half's groove. If you broke the gasket like I did but only in one spot and the gasket is otherwise still whole, then put a tiny tiny dab of RTV on the break spot:
Take the other case half with the circuits and smear a nice generously thin layer of dielectric grease over everything inside of that groove for the gasket to seat in. With that done, go ahead and press the case halves together being sure to keep the metal portion with the arm on its back as to not allow the contacts/springs to pop out:
Install one bolt just barely a bit snug in the location shown to hold everything together.
Carry on (to the next part)!
Last edited by 1991Jeep_Man; Nov 20, 2013 at 06:54 PM.
Thread Starter
CF Veteran
Joined: Oct 2009
Posts: 2,867
Likes: 16
From: Fauquier County, Virginia
Year: 1991
Model: Cherokee
Engine: I-6 4.0 HO
Install the bolts in their respective holes starting with the two that hold the wire harness mount in place. Simply gently pull that mount back down over the holes and bolt it down making sure the little black/silver capped breather is inside the plastic conduit. Go ahead and install the remainder of the bolts making sure to tighten them in a crisscross pattern. These bolts DO NOT need to be "SUPER ERMAHGERD GET IT IN THAR!!!" tight. Just snug them up nice and tight and then you're good! You should be at this point:
I went ahead and smeared a little bit of dielectric grease around both sides of the N.S.S. where the contact arm mounts and the shaft goes through, like so:
Before you go any further, try and rotate the arm inside the housing. It should move with relative ease and little resistance. As long as it is able to swing nicely under the power of your fingers, you are good to go!
Go ahead and place the rubber washer back over the threaded collar (I smeared a little grease on each side), followed by the tabbed lock washer (don't bend the tabs yet!), and then finally screw on the mounting nut a few turns:

At this point, your N.S.S. is refreshed and ready to reinstall on your rig. I don't have pics of the installation (needed my dirty hands) but you merely need to reference to the first set of pics with the bolt locations, etc.
Make sure you have a tad bit of dielectric grease smeared on that shaft coming out of the transmission. It will assist when you push the N.S.S. back on the shaft. Next, note how the blocked portion of the shaft is oriented and rotate the contact arm so the threaded collar matches it (square peg in a square hole). Line the N.S.S. up on the shaft, and firmly press it straight onto the shaft. This is the only way to do this! Work with it and it will go on. It is one when the outer housing of the N.S.S. is almost flush with the outer rim of the transmission pan (use the first and second pics in this how-to as a reference). If you need to, take your screw driver and give a few gentle taps with the butt of it on various spots of the N.S.S. If need be, use the end of the screw driver on the mounting nut to gently give it a tap or two (last resort).
Once it is installed, the next part is fun! Remember that string I told you to tie to the connector? That string should still be hanging under the Jeep where you untied your connector and left it. Tie the string again around your connector, and go up top to gently work/finesse/cuss the plug through the maze of engine parts and up to its original location. If you feel extra bolt, work with the string to re-route that harness/plug on the outside of the dipstick and out to its original location. Why didn't they do this from the factory?
Anyways, once the plug is in its location, plug it in and use a zip tie or two to secure its harness to some stable location/other wire to give it some stability. I haven't done this yet but probably should.
Go back below to your N.S.S. and very lightly install that mounting bolt. Then very gently install the mounting nut onto the threaded collar/shaft. I say gently because there is some more guess work here. You will notice the hole in the housing that the mounting bolt goes through is elongated to allow for adjustment of the N.S.S. I put mine kind of in the center and then lightly tightened the mounting bolt down. Get the mounting nut on the shaft just a tiny tad over finger tight. Go in your Jeep and try shifting the transmission. If your shifter is suddenly more difficult to shift, then either the mounting bolt or the mounting nut is too tight and causing the N.S.S. to bind on that shaft which also (gasp) goes through the other side to your shift cable. At this point it is a game of Up-And-Down. Get everything nicely tightened and adjusted until the shifter is smooth like it was before. Then turn your key to 'ON' (not start) and put it in Reverse. If your Reverse lights work, one check. Put the Jeep in Park and try to start. If it starts no problem, another check. Turn it off, go in Neutral, and try to start. If it once again starts fine, then you are good to go and you have everything good to go! Make sure your mounting bolt is snug (doesn't need to be crazy) and your mounting nut hand tight. Then take your flat-head screwdriver and bend up the tabs on that lock washer to secure the mounting nut in place and prevent it from spinning.
You are done! If you are of drinking age, have a beer! If not... have a Root Beer! Pat yourself on the back, clean up yourself and your tools, and then be glad you just saved $150-200 in one part alone not counting labor.
If ya'll have any question, Please don't hesitate to PM me or leave me a message. Keep Jeepin'!
I went ahead and smeared a little bit of dielectric grease around both sides of the N.S.S. where the contact arm mounts and the shaft goes through, like so:
Before you go any further, try and rotate the arm inside the housing. It should move with relative ease and little resistance. As long as it is able to swing nicely under the power of your fingers, you are good to go!
Go ahead and place the rubber washer back over the threaded collar (I smeared a little grease on each side), followed by the tabbed lock washer (don't bend the tabs yet!), and then finally screw on the mounting nut a few turns:
At this point, your N.S.S. is refreshed and ready to reinstall on your rig. I don't have pics of the installation (needed my dirty hands) but you merely need to reference to the first set of pics with the bolt locations, etc.
Make sure you have a tad bit of dielectric grease smeared on that shaft coming out of the transmission. It will assist when you push the N.S.S. back on the shaft. Next, note how the blocked portion of the shaft is oriented and rotate the contact arm so the threaded collar matches it (square peg in a square hole). Line the N.S.S. up on the shaft, and firmly press it straight onto the shaft. This is the only way to do this! Work with it and it will go on. It is one when the outer housing of the N.S.S. is almost flush with the outer rim of the transmission pan (use the first and second pics in this how-to as a reference). If you need to, take your screw driver and give a few gentle taps with the butt of it on various spots of the N.S.S. If need be, use the end of the screw driver on the mounting nut to gently give it a tap or two (last resort).
Once it is installed, the next part is fun! Remember that string I told you to tie to the connector? That string should still be hanging under the Jeep where you untied your connector and left it. Tie the string again around your connector, and go up top to gently work/finesse/cuss the plug through the maze of engine parts and up to its original location. If you feel extra bolt, work with the string to re-route that harness/plug on the outside of the dipstick and out to its original location. Why didn't they do this from the factory?
Anyways, once the plug is in its location, plug it in and use a zip tie or two to secure its harness to some stable location/other wire to give it some stability. I haven't done this yet but probably should.
Go back below to your N.S.S. and very lightly install that mounting bolt. Then very gently install the mounting nut onto the threaded collar/shaft. I say gently because there is some more guess work here. You will notice the hole in the housing that the mounting bolt goes through is elongated to allow for adjustment of the N.S.S. I put mine kind of in the center and then lightly tightened the mounting bolt down. Get the mounting nut on the shaft just a tiny tad over finger tight. Go in your Jeep and try shifting the transmission. If your shifter is suddenly more difficult to shift, then either the mounting bolt or the mounting nut is too tight and causing the N.S.S. to bind on that shaft which also (gasp) goes through the other side to your shift cable. At this point it is a game of Up-And-Down. Get everything nicely tightened and adjusted until the shifter is smooth like it was before. Then turn your key to 'ON' (not start) and put it in Reverse. If your Reverse lights work, one check. Put the Jeep in Park and try to start. If it starts no problem, another check. Turn it off, go in Neutral, and try to start. If it once again starts fine, then you are good to go and you have everything good to go! Make sure your mounting bolt is snug (doesn't need to be crazy) and your mounting nut hand tight. Then take your flat-head screwdriver and bend up the tabs on that lock washer to secure the mounting nut in place and prevent it from spinning.
You are done! If you are of drinking age, have a beer! If not... have a Root Beer! Pat yourself on the back, clean up yourself and your tools, and then be glad you just saved $150-200 in one part alone not counting labor.
If ya'll have any question, Please don't hesitate to PM me or leave me a message. Keep Jeepin'!

Thread
Thread Starter
Forum
Replies
Last Post
extrashaky
Other Vehicles. Other Jeep models & cars and trucks of other makes
17
Jun 17, 2023 03:57 PM
Stabsthedrama
Stock XJ Cherokee Tech. All XJ Non-modified/stock questions go here
15
Oct 3, 2015 05:46 PM
csspencer
Stock XJ Cherokee Tech. All XJ Non-modified/stock questions go here
4
Sep 30, 2015 08:32 AM
Joshuapn
Other Vehicles. Other Jeep models & cars and trucks of other makes
1
Sep 25, 2015 08:16 PM
Currently Active Users Viewing This Thread: 1 (0 members and 1 guests)